7
Processing Route Data
Although we won’t be looking at the transition between route planning and route driving quite yet, in the big picture of where things stand, generating a route is an integral piece of the Space-Truckers gameplay. In this chapter, we’re going to stick with the previous practice of taking a brief detour into a tangential topic – in this case, that topic will be spiffing up the Sun rendering with some Particle Systems.
Following our detour into particle systems, we’ll dive straight into how to capture, crunch, and consolidate the data from route planning into a rich set of encounters based on location, which will then drive player challenges in the next phase.
What makes this all possible is a technique that has its roots in the earliest days of the RPG – when dark Dungeons filled with dangerous Dragons saw players rolling dice against encounter tables that would determine their fate. The encounter tables for Space-Truckers are categorized by zoneand play a similar part in determining a Space-Trucker's fate. Each zone has a list of potential encounters along with a base probability or chance of that encounter happening. Most encounters carry potential hazards the player must act upon to avoid or mitigate, while, more rarely, other encounters may have beneficial effects (if managed correctly).
In this chapter, we will cover the following topics:
- A Detour into Practical Systems
- Marking Out the Route
- Defining the Encounter Zone
- Selecting Encounters
- Adding Encounter Visuals
By the end of this chapter, we’ll have prettied up the route-planning environment a little, but for the most part, the areas of the application being covered won’t have as much tangible effect on the end user experience. That’s OK – it will end up having a huge effect later! For this to become the case, though, we must build up some logic to process and prepare the route for encounters.
Technical requirements
The technical prerequisites are not a whole lot different in this chapter, but there are some concepts and techniques that may have utility for the topics in this chapter.
Here are some topics to research if you’re feeling lost, overwhelmed by complexity, or having trouble with a particular area:
- Particle System: https://doc.babylonjs.com/divingDeeper/particles
- Torus Set Shape: https://doc.babylonjs.com/divingDeeper/mesh/creation/set/torus
- Torus (maths): https://www.mathsisfun.com/geometry/torus.html
- More torus maths: https://www.geeksforgeeks.org/calculate-volume-and-surface-area-of-torus/
The source code for this chapter is located at https://github.com/jelster/space-truckers/tree/ch7 and contains all the work in this chapter and previous ones. In addition to that, there are several improvements, bug fixes, and tweaks that have been introduced separately from what’s been covered previously in this book. While it would be great if we could include and discuss each of these in greater detail, that’s not possible in the space and time available! Where relevant, though, these changes will be called out. For the most part, however, the changes aren’t introducing any new concepts or techniques, but just refining, fixing, or enhancing what’s already present.
A Detour into Particle Systems
Particle systems are an area of graphics programming that, like the topic of input processing, can have entire books devoted to covering particle systems from basic theory to concrete implementation. We’re not going to get into that level of detail here, because we’ve got a lot of other things to do in addition to learning about particle systems! Here’s what you need to know about particle systems in general. In a moment, we’ll look at their relationship to Babylon.js and how we can use them for fun and profit.
Think back to the last video game you played. If it was a text-based game, then think of the last game you played that wasn’t text-based. Did the game have explosions? Are there magic fireballs exploding? What about fireworks or campfires? Each of these is an example of where a particle system might be employed by a game developer.
Let’s back up a bit. A particle is a single entity with a discrete life cycle of creation and death. It is usually represented not with a single mesh but with a texture, for most particles are 2D billboard textures or sprites. The texture or image has transparency properties blended into the rest of the scene in a varying number of ways. If “transparency properties” is confusing, it can be helpful to recall that transparency refers to the alpha channel, and the properties of this channel are the instructions to the engine on how to blend or mix that channel with overlapping colors. This means that often, a particle will always be oriented so that it is always directly facing the camera, and that it will have the ability to fade in and out of view.
A particle system is more than just an aggregation of particles. A particle system is what defines and controls the entire life cycle of its constituent particles. It does this through a few primary mechanisms:
- Emitter(s): The mesh or node where a particle begins its life. Different properties of the emitter allow granular control over parts of the mesh and the shape of the emission, as well as the number of particles emitted and the rate of emissions.
- Particle properties: Both visual and behavioral, these include size, scaling, rotation, color, and speed for the former, and lifetime for the latter.
- Animations, noise, and blending effects: Adding noise to the system enhances the realism of the particle system, while animations provide a dynamic look and feel to it.
If a particle system is comprised of particles, then what about a collection of particle systems? That is what’s called a Particle System Set, and that is also what we will be employing to give the Sun of Space-Truckers a bit of “flare!”
Important note
That last sentence may have been a pun too far.
The advantage of using a Particle System Set is that we can use a single consolidated piece of logic to load, start, and stop all the systems at once. Although we’ll be using the Particle System Set in our imminent future, there are a couple of other different but related means of generating and managing particles in Babylon.js.
The Disparate Particle Systems of Babylon.js
The family tree of BJS particle systems isn’t nearly as complex as the Greek pantheon, but what it does share with that fabled genealogy is a separation of generations.
The “Classic” CPU Particle System
This is what everyone knows, loves, and is familiar with. The vanilla flavor of the three, this offers the greatest amount of end developer (that is, you) programmatic control over every aspect of the particle’s behavior. Because it runs on the CPU every frame, it must share time in the frame budget with everything else the game needs to happen between frames. If the target framerate is 60 FPS, then the intra-frame budget is just 1/60s or just under 17 milliseconds. As any middle-child sibling knows, compromise is key!
The “New Wave” GPU Particle System
Since graphics accelerators have become pretty much ubiquitous in today’s computing environment (evidenced by a certain Web-GPU JavaScript framework…), so have the tools needed to program them to become more powerful. Later, in Chapter 11, Scratching the Surface of Shaders, we’ll take a closer look at how we can easily and effectively leverage this power for fun (and profit!), but for the present moment, the relevant fact is that the same particle systems that we used to run on the CPU are now executed and updated directly on the GPU. The biggest effect of this change is that the number of particles available to use has gone up drastically. Instead of worrying about the effect of a few hundred particles on performance, the same concerns only start to appear when particles number in the tens of thousands – quite a large improvement!
The “Hard Core” Solid Particle System
When the pedal hits the pavement and things get real, it’s time to pull out the big guns. A Solid Particle System (SPS) is constructed not from a point-like particle but from a three-dimensional mesh. Each particle instance must share the same material as the other SPS instances, but the other attributes such as position, scale, rotation, and others are all controlled by the developer. SPS particles can be physics-enabled, along with providing support for collisions. The downside of this level of control and detail is that each property must also be set and controlled individually – unlike a regular particle system that evolves according to the various attribute values associated with it. Hard-coding the individual values for a system is tedious, error-prone, and not very fun to maintain. It’s fine to do that for Playgrounds and prototypes, but for our application, we’re going to want to be able to represent our Particle Systems as data that we can manage separately from the behavior of the application.
Loading Particle Systems From Saved Data
When dealing with CPU or GPU Particle Systems, it can be extremely tedious and error-prone to type and tweak each specific property through code. The almighty Babylon.js Inspector (praise be its crazy good nature!) is probably the quickest way to iterate against different property values to see what they look like in real time, but how to effectively capture the current state of every property for every particle system in a Particle System Set may appear, at first, to be elusive. However, like many things in Babylon.js, there are multiple ways to accomplish the same goal. Fortunately, though, there are multiple ways to get the same result; each of them makes use of different methods of the ParticleHelper. All three are available to use in the Inspector (see Figure 7.2), which can be used to choose the most appropriate method for the requirements of the project.
ExportSet/Save to File (Inspector)
First up is the purely programmatic approach of calling ParticleHelper.ExportSet(setA, setB,…). The output of the function is a JSON string, which can then be saved to a file or stored somewhere else. It’s easiest to use this method in the Playground after putting together multiple systems. Using the Inspector, it’s possible to save a single system to JSON by selecting the desired system in the Scene Explorer, then clicking the Save… button under the FILE heading. This is useful for single-system setups, but for saving multiple systems to file, the ExportSet is the best option.
Saving a Snippet to the Snippet Server (Inspector)
With the Babylon.js Playground open in a browser – here’s one for reference: https://playground.babylonjs.com/#735KL4#15 – notice how the specific Playground is identified by a unique combination of a hash (the #735KL4 part) and a revision (#15). Well, the idea of making Playground resources referenceable in that fashion worked so well that the concept has been extended to many other areas of Babylon.js.
Want to load up a GUI setup in the GUI Editor? Use a snippet! How about that fancy procedural texture created in the Node Material Editor? Snippet’s got you! The Particle System Set JSON’s too big a drag to include? Snippet’s. Got. You. Like the Save to File option, but under the Snippet Server heading, click the Save to Snippet Server button to do what it says on the box. Loading can be done by clicking the Companion button manually or programmatically by calling ParticleHelper.CreateFromSnippetAsync. You can read more about the Snippet Server for Particle Systems in the official docs: https://doc.babylonjs.com/divingDeeper/particles/particle_system/particle_snippets.
Using a Built-In Particle System Set
Aristotle was an influential guy even during his time, and his idea that things are made of four “elements” – air, earth, fire, and water – was widely accepted as being true, mostly due to good marketing. In that spirit, Babylon.js provides a basic “elemental” catalog of particle system sets for you to use. Here are the available effects (see more about them in the docs at https://doc.babylonjs.com/divingDeeper/particles/particle_system/particleHelper#available-effects):
- Explosion: Good for blowing stuff up.
- Rain: For that extra bit of melancholy.
- Smoke: Useful to signal the selection of a new Pope, but also for a lot of other things. Just remember, where there’s smoke, there’s often…
- Fire: Whether it’s a campfire, a torch, or a good old-fashioned house fire, this is the place to start.
- Sun: Jackpot! This particle set includes flares, a dynamically evolving surface, and the hazy glare of a coronasphere. There’s just one problem…
Note
There was another theory floating around that things are made of these tiny, indivisible particles called (ἄτομος, or atomos), but its main proponent, Democritus, wasn’t as popular as Aristotle, so nobody listened to him. Who’s got the last laugh now, Aristotle?
What’s this problem mentioned? It’s not a big one. It’s kind of – no, it’s exactly the opposite of a big problem. It’s a small problem, one of scale. The Sun effect is perfect for our needs, but it’s way, way, way too small. We need to be able to scale it up to match our astronomical proportions, but it’s not going to be precise in how or where things are scaled – that will take some experimentation. The Playground at https://playground.babylonjs.com/#J9J6CG#9 shows the tweaks involved that were eventually incorporated into the JSON data committed to the Space-Truckers code repository.
Note
Though it would be ideal to include all the various game design aspects and decisions involved in this book, it isn’t possible to anticipate everything ahead of time. There are also pragmatic limits as to how large this book can get. Therefore, where applicable, links will be provided to GitHub Issues that provide details about the feature or part of the game. Issues in GitHub can be linked to other Issues and to Pull Requests (among other things), which makes it easy to quickly assess and evaluate the code associated with a given Issue or feature. Relevant to our current work, this issue – Star should have occasional flares and activity (https://github.com/jelster/space-truckers/issues/71) – aggregates links from the Babylon.js docs and from Playground snippets to provide insight into the desired outcome. Comments and linked Pull Requests show the history and evolution of the issue. This isn’t to say that we’re not going to cover the game design or details of it – far from it! Simply put, things in software evolve and change at a vastly disproportionate rate to that of other goods and industries, such as publishing. Those wishing to see how the game has evolved can do so by reading through the Issues documenting that change.
Before we can get into those changes, we must figure out how to load and start the Particle System Set from a JSON file. There is friction in attempting this. The ParticleHelper is designed and built with the focus on removing complexity for developers, certain aspects of which can be obstacles to our goals.
Parsing From a JSON File
One of those convenient features that ends up becoming a bit of an obstacle is that the CreateAsync method of PracticalHelper takes just a string representing the type of the system to create – that is, “rain,” “smoke,” “Sun,” and so on. This string is then used in conjunction with ParticleHelper.BaseAssetsUrl to construct the full URL for the JSON file. Unless explicitly overridden, BaseAssetsUrl has a value of https://github.com/BabylonJS/Assets/tree/master/particles/. The structure of the folders places the JSON files in a /systems subfolder and textures in the /textures subfolder – a nice consistent convention that works great for most use cases, save ours. The main conflicts with our setup are as follows:
- Our folder structure is different from what the convention assumes
- Multiple assets need to use the same textures
- We are using webpack to bundle and manage our assets and dependencies, so our design-time folder structures vary slightly from that of runtime
- Relying on external sources for core game assets and data complicates and prevents offline/native/PWA-type scenarios
The first and last items can be mitigated, to an extent, by using relative paths and by overriding BaseAssetsUrl and making it something like document.baseURI. The middle two, however, require a bit more thinking to resolve. Examining the ParticleHelper source code (see https://github.com/BabylonJS/Babylon.js/blob/master/packages/dev/core/src/Particles/particleHelper.ts) reveals that there’s no practical way to override the conventional logic that computes the URL of the JSON file. However, once past that step, parsing and hydrating the particle system set is very straightforward. The problem here isn’t that we can’t use the conventional approach, it’s that because of webpack, we don’t need to figure out how to load the JSON data – we already have it, while the ParticleHelper expects to have to retrieve the same. It’s time to start thinking like everyone’s favorite field engineer from the mid-1980s, MacGyver.
What would MacGyver do (WWMD)? MacGyver’s greatest strength wasn’t that he was big and brawny, or that he could kick bad-guy butt in a fistfight. It wasn’t even his luxurious mane of hair that would make an Olympian God (or Goddess!) jealous. No, MacGyver’s greatest strength was that he could build, hack, or otherwise science his way out of pretty much any situation he found himself stuck in. By paying attention to his surroundings and then applying his (extensive) knowledge of subjects far and wide, he proved that a sharp eye and a clever mind can overcome almost any obstacle. Let’s look at this problem through a MacGyver-tinted lens:
“We need to get a ParticleSystemSet before the bomb goes off! The JSON data is loaded, but the ParticleHelper needs the URL string, and there’s only one minute left until everything goes boom… What else do we have, let’s see… ah! Pass the object data to ParticleSystemSet.Parse and bypass the ParticleHelper entirely but do it quickly – we’re running out of time!”
So, according to MG up there, we don’t want to use the ParticleHelper at all and instead directly pass the loaded object data to ParticleSystemSet.Parse, since that’s what the ParticleHelper ends up doing anyway. How did he know to try this? He traced down the different ways the Babylon.js source code APIs allow a ParticleSystemSet to be created until he came across the Parse method (https://doc.babylonjs.com/typedoc/classes/babylon.particlesystemset#parse). Knowing that we were starting with a plain old JavaScript object deserialized from the correct definition file, he made the rather obvious (in hindsight, natch) conclusion that since the result (a ParticleSystemSet) was all that mattered, there was no need to involve the ParticleHelper since the only additional action it takes other than loading the data file is to specify the name property. Thanks to MG, we have the tools we need to be able to integrate the Sun particle system set with our application!
Adapting the Sun Particle System Set
The proof-of-concept Playground (https://playground.babylonjs.com/#J9J6CG#9) gave us a general idea of where to scale things in the game, but there’s more to be done to get the Sun system working the way we want it to. The Playground only has one of the three particle systems – the flare system – while there are two others; that is, the Sun and glare systems. These must also be properly scaled and configured. The best way to get it done is by following these steps:
- Go to the Babylon.js assets repository and save the needed JSON and texture files to the local repository. For example, the Sun set is located at https://github.com/BabylonJS/Assets/blob/master/particles/systems/sun.json.
- Open the sun.json file and change the texture paths to reflect the project’s folder structure. Use relative paths, but make sure to consider the relative path of the consuming script, not the path of the JSON file. In the Star class, add the necessary code to load and start the set (see https://github.com/jelster/space-truckers/blob/ch7/src/route-planning/star.js#L26).
- With the application running and on the appropriate screen, open the Inspector window by pressing the appropriate key combination (Shift + Alt + I by default). Modify the properties of the systems and wait for the changes to take effect.
- Update the properties of the various systems so that they match the desired values.
- GOTO (3).
The result will be whatever you think looks the coolest, but if you want to start with or just go with the existing definition, you can find it at https://github.com/jelster/space-truckers/blob/ch7/src/systems/sun.json:

Figure 7.1 – After the Sun particle system has been adapted to the scale of Space-Truckers. The Inspector window is crucial to being able to see the effect of different values in real time
In general, the particle counts may need to be increased for the Sun and glare particles, but whatever the change, make sure to wait a few seconds for it to propagate to newly spawned particles, since some may have lifetimes measured in the low 10s of seconds!
In this section, we’ve learned about the different types of particle systems available in Babylon.js, as well as some techniques to quickly iterate toward finding our desired look and feel. Hopefully, we’ve made ol’ Mac proud by channeling his clever knack for finding solutions to the problem of loading up and adapting the Sun ParticleSystemSet to the game. As we pull away from this detour, let’s turn our gaze to what’s coming up next – building the foundation for tracking our CargoUnit as it traverses the system in its flight.
Marking Out the Route
A key aspect of the gameplay of Space-Truckers is how the path taken by CargoUnit in the route planning phase affects the challenges – and the rewards – of the driving phase. We’ve already tackled the ballistic flight mechanics of the route planning, so now, we need to capture that route and data about the environments it traverses. The following diagram shows the primary properties of our route and how they might be represented:

Figure 7.2 – Various pieces of telemetry are captured during the in-flight part of route planning. The Position, rotation, velocity, and a timestamp are all collected for each sample
Here, the idea that CargoUnit is what is responsible for saving its path, which translates out to the CargoUnit class, thus gaining a new routePath[] property along with associated logic in the reset() and update() methods to clear and update the path, respectively. The data itself is simple, though we’ll get into the encounterZone field in a bit:
let node = new TransformNode("cargoNode", this.scene,
    true);
node.position = this.mesh.position.clone();
node.rotationQuaternion = this.mesh.rotationQuaternion?.
    clone() ??
    Quaternion.FromEulerVector(this.rotation.clone());
node.scaling = this.lastVelocity.clone();
node.velocity = this.lastVelocity.clone();
node.gravity = this.lastGravity.clone();
node.time = this.timeInTransit;
node.encounterZone = this.encounterManager.
    currentZone?.name;
A TransformNode is a non-rendered object in the Scene that is a superclass of the more-derived Mesh type. We’ll look at one way that storing this data as a TransformNode is useful in the Adding Encounter Visuals section. Because they implement everything needed to calculate and place the node’s position in the world of the Scene, TransformNodes are useful in a lot of different applications. This includes the ability to both be a parent and/or a child to other objects within the Scene. Some examples include a “camera dolly” made by parenting a camera to a node, a source for particles, and scaffolding to hold a PhysicsImpostor.
Since this code comes right after we’ve freshly calculated the velocity, gravity, and rotation properties, we’re ensuring that we have the latest and most up-to-date values. Why are we storing the rotation as a Quaternion rather than the Vector3 representation we already have? The reason is that we are going to want to perform some mathematical transformations against mesh vertices in a local space, rather than world space, and having the quaternion already computed makes for more simple calculations, as well as being more efficient.
Important note
Don’t forget that JavaScript reference types assign by reference, not by value – hence the need to clone the Vector3 property values.
Although that’s all there is to capturing the path telemetry data, there’s still more work to do before this will start to be useful in the game. One of those pieces of work is to implement the concept of an Encounter Table and its concomitant Encounter Zones. After that, we can start to put the two together into the SpaceTruckerEncounterManager. If you want to get more in-depth into the history and linkages between the different components we’ll be talking about and their high-level design, https://github.com/jelster/space-truckers/issues/70 is a good place to start.
Defining the Encounter Zone
An Encounter Table is what it says on the box: it’s a tabular format of probabilities for certain events to occur based on a random factor. In tabletop and RPG-style games, the random factor is provided by rolling one or more dice of various numbered sides. In computer-based games, the same thing applies, except that instead of tossing physical dice, we’ll generate encounters based on the output of a random number generator.
Like much of the rest of the game objects, the Encounter Zones (EZs) are updateable game components, while each Encounter serves as a container for data defining that encounter. This allows the EncounterManager to choose which EZ should be responsible for running encounter checks, simplifying the logic required in the EZ. Easy, right?
Encounters Overview
The structure of an Encounter table is simple. Down each row is a specific event or encounter that the game designer wants to make possible. A probability column in the table indicates the likelihood of that event occurring in the form of a number between 0 (no chance whatsoever) and 1 (guaranteed). This is a good start, but we need to be able to further group encounters by their spatial locations in the world; it wouldn’t make much sense to encounter a solar flare in the dark reaches of the Outer System, would it? That’s where the concept of an Encounter Zone comes in.
Encounter Zones and Encounter Tables
An Encounter Zone is an Encounter Table scoped to a specific spatial location in the game world, as alluded to previously. From the Inner System to the Outer Reaches, each Encounter Zone has a unique set of potential encounters for the player to deal with – or benefit from! The following is a table of encounters grouped by zone that was part of the Space-Truckers game design specifications. Incomplete and purposefully vague on specifics, it still provides a clear picture of how the feature should work and interoperate with other features:
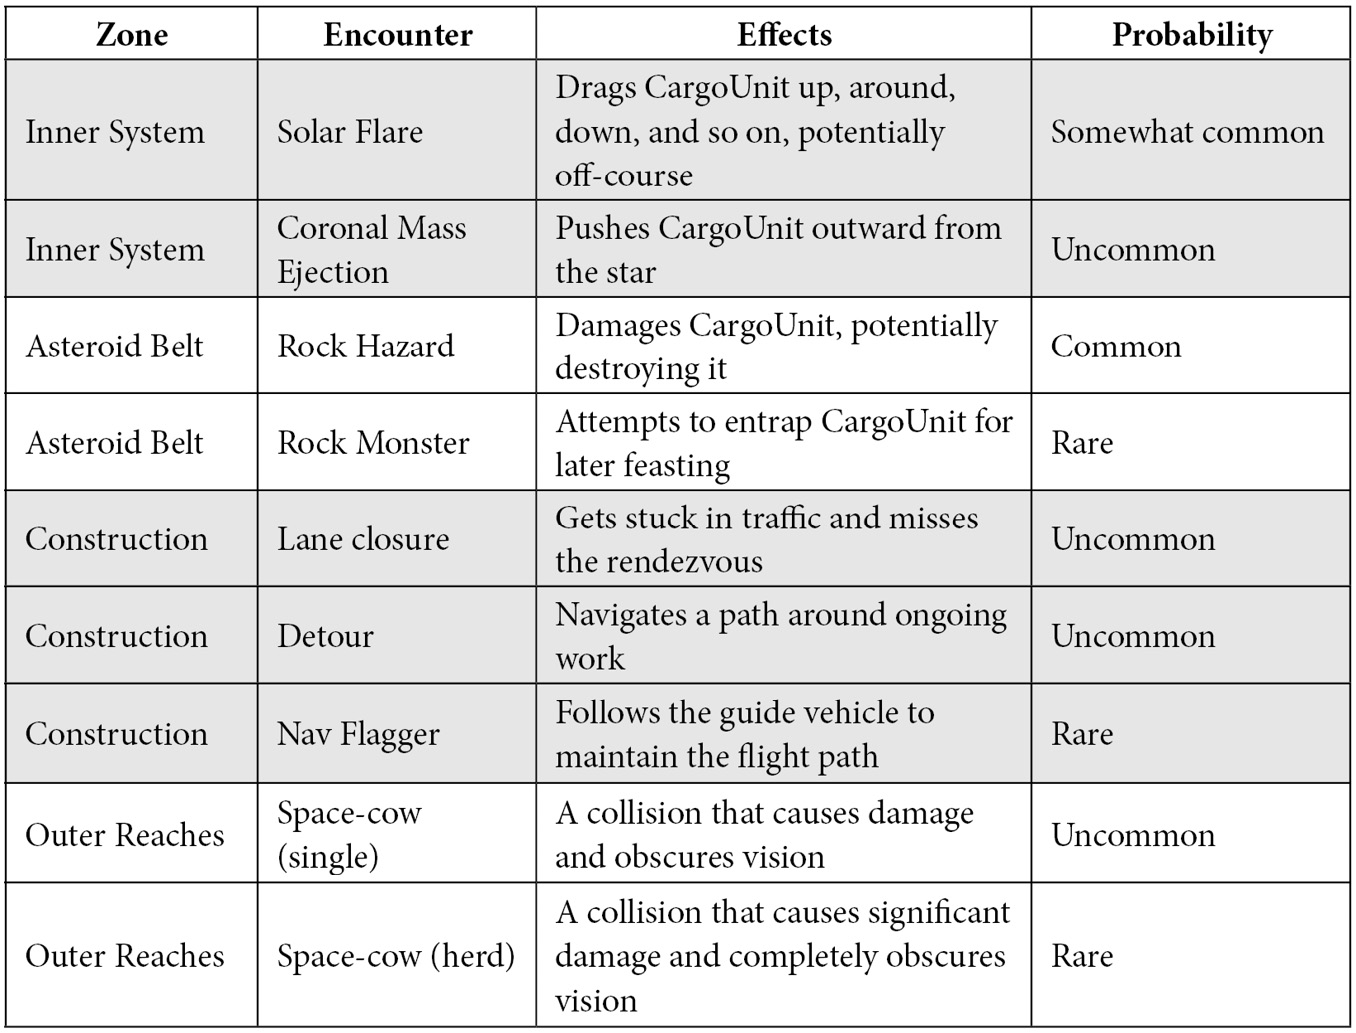
Figure 7.3 – Design for the Space-Truckers encounter. Source: https://github.com/jelster/space-truckers/issues/65
When implementing encounters, there will be different needs and thus differently structured solutions for each type of encounter. Fortunately, we don’t need to define those specifics quite yet, so we’ll park it for the moment and take a step back to look at how the Encounter Zone can track CargoUnit.
Tracking Intersections
Each EZ needs to register the intersection exit and enter triggers for the CargoUnit mesh’s Action Manager, but we don’t want to have to write code to do that for each Zone – what if we change the number of EncounterZones, or want to change the way intersections are used? Thankfully, this problem can be solved easily.
When the initialize method of SpaceTruckerEncounterManager is invoked, the list of encounterZones is iterated across in a forEach loop. Among other actions, each zone is passed by cargo.mesh as a parameter to its registerZoneIntersectionTrigger method. This function performs the intersection registration on meshToWatch.actionManager, which hooks up the corresponding OnIntersectionExitTrigger and OnIntersectionEnterTrigger to the EncounterZone’s onExitObservable and onEnterObservable, respectively.
Note
SpaceTruckerEncounterManager is a member of CargoUnit.
The primary purpose of SpaceTruckerEncounterManager is to (as the name implies) manage encounters in its constituent Zones but to be able to do that, it needs to know which EZ cargoUnit is currently transiting. You may initially surmise that because EncounterZone has a torus shape, nested (but not overlapping) zones should fire their intersection triggers only when the mesh is crossed, but that’s not the case in practice.
Performing intersection calculations against a complex mesh is a very computationally expensive process, making it not very suitable for real-time processing applications. Instead, what Babylon.js does is use the much less expensive and computationally efficient bounding box intersection calculations. Though fast, they do not mimic the actual geometries being tested very accurately, resulting in a problem wherein the cargo unit appears to the application as if it is within not just the zone at its location but all other zones that are nested around it!
To resolve this, SpaceTruckerEncounterManager keeps track of all triggered intersections with the inAndOut field. Incremented whenever a zone signals the entrance, and decremented for the converse, it is an integer that represents an index to currentZone that’s offset by the total number of encounter zones:
get currentZone() {
    let zidx = this.encounterZones.length - this.inAndOut;
    return this.encounterZones[zidx]?.zone;
}
This property is used in several areas, from CargoUnit to the Route Planning GUI, but the underlying zones in the encounter manager need to be populated ahead of time with data defining the boundaries and characteristics of each zone.
Encounter Zones and Game Data
An Encounter Zone (like most software components) is defined by its behaviors and data. The data comes from the encounter zone’s definition and looks something like this:
asteroidBelt: {
    id: "asteroid_belt",
    name: "Asteroid Belt",
    innerBoundary: 1000,
    outerBoundary: 1700,
    encounterRate: 0.2,
    colorCode: "#ff0000",
    encounters: [
        { id: 'rock_hazard', name: 'Rock Hazard', image
            hazard_icon, probability: 0.90 },
        { name: '', id: 'no_encounter', probability: 0.1,
            image: '' }
    ]
}
At construction time, SpaceTruckerEncounterZone uses this structure (passed as a parameter to the constructor) to initialize and configure the EZ. Some properties are self-explanatory, but innerBoundary and outerBoundary warrant explicit definitions, along with encounterRate. Once we’ve covered those, we’ll dive into the encounters array and how it works.
The innerBoundary field is the radius (remember that for later) of the innermost circle of a torus – a donut shape – making this value the radius of the donut hole, while outerBoundary is the radius of the outer circle described by the torus. Though this makes sense from a conceptual viewpoint, it is a bit different from how the Babylon.js TorusBuilder API approaches the subject. When calling the createTorus method, the primary “knobs and switches” available to control the size of the mesh are the diameter and thickness parameters. These two values sound like they would work well if we were to pass outerBoundary and (outerBoundary – innerBoundary), respectively, but closely reading the parameter descriptions tells us a different story.
The best way to picture how the various parameters all fit together is by taking a length of wire and forming it into a half-circle of some radius, r. The diameter is 2 * r. Now, picture taking a small paper coaster of the radius, R, and poking the wire through the center of it while joining the two ends of the wire to make a complete circle. So, the thickness of the torus described by the coaster around the wire is 2 * R. The outer boundary of the torus isn’t the same as the diameter parameter – it’s equal to the diameter plus one-half the thickness. The inner boundary is equal to half of the diameter minus half the thickness. That’s not the best way to picture this, but it is one way to describe it! Here’s something better than a description – a visualization for that analogy, available at the Playground link in the caption:

Figure 7.4 – The properties of a torus. The diameter is depicted by a solid circle with its thickness described by a second smaller circle. This Playground can be found at https://playground.babylonjs.com/#P2YP2E#1
Why are we going through these hoops? Because by structuring it in this way, we can quickly and easily compare and align encounter zones with planetary orbits, as defined in gameData.
Finally, getting back to the EZ data, the encounterRate field is a percentile (0 – 1) number indicating how often encounters happen in general for the zone. Each zone independently keeps its own encounter table, which it then uses to determine what, if any, encounter might occur. Since we’re on the topic of encounters and random numbers, we might as well try to gain an understanding of exactly how to go about implementing the logic of picking entries from the Encounter Table. For that, we need to talk about something called a Cumulative Distribution Mass Function.
Selecting Encounters
A developer implementing this kind of functionality for the first time might devise a simple function, getEncounter, that picks a random number to serve as a dice roll before searching through an array of encounters for the first one with a probability less than or equal to the dice roll. To that developer’s chagrin, this simple approach would also be incorrect! Though this approach works when rolling to determine the chance of a singular Encounter, it won’t work when there are multiple potential encounters. Here’s what the Asteroid Belt Encounter Table looks like in simplified form:
encounters: [
            { id: 'rock_hazard', name: 'Rock Hazard',
                 image: hazard_icon, probability: 0.90 },
            { name: '', id: 'no_encounter', probability:
                0.1, image: '' }
        ]
Each entry in the encounter table has an associated probability factor, the total of which will usually (but doesn’t have to due to some code we’ll write shortly) equal 1 (100%). When you want to pick a random entry from the table, it’s necessary to consider all the potential other events that might take place. The fancy-pants way of referring to the process of computing an event output in response to a random number input is a Cumulative (Mass) Distribution Function (CMDF). In the EncounterZone source (see https://github.com/jelster/space-truckers/blob/ch7/src/encounterZone.js#L44), the CMDF is implemented in the constructor as a two-step process.
Summing the Probabilities
In step one, we take the sum of all the individual encounters’ probabilities. This step is what will allow the application to handle scenarios where the individual probabilities don’t all add up to 1 and is used by step two. While we’re there, the encounter table gets populated from the definition:
var total = 0;
definition.encounters.forEach((e, i) => {
    total += e.probability;
    this.encounterTable.push(e);
});
The point of this step is that while we can’t necessarily guarantee that the total of the probabilities will come to one, we can normalize that sum in the next step so that each entry in the table is correctly and proportionally represented in the CMDF.
Populating CMDF Results
Step two involves looping through the list of encounters again (after pre-baking the first element of the cumulativeDistribution array) and populating entries into a second array – the aforementioned cumulativeDistribution array. This collection’s entries represent the CMDF over its entire space and can therefore be used as an index to look up values for arbitrary inputs:
this.cumulativeDistribution[0] = this.encounterTable[0].
    Probability / total;
for (var I = 1; i < definition.encounters.length; i++) {
    this.cumulativeDistribution[i] =
        this.cumulativeDistribution[i - 1] +
            definition.encounters[i].probability / total;
}
Note that because the loop looks backward, the first element is calculated outside of the loop, which then starts at the second element. Essentially, the current element of the loop’s value (this.cumulativeDistribution[i]) is equal to the previous element’s value added to the current encounter’s share of probability toward total. This only needs to happen once, upon initialization. Once in place, it is now possible to “roll the dice” and implement a more correct form of getEncounter.
Rolling an Encounter Check
Every time EncounterZone’s update method is called, the logic will evaluate whether an encounter happens before deciding which encounter is going to take place. It needs to consider how much time has elapsed since the last frame, as it would then tie encounters to a player’s frame rate – not what we want! Once that is considered, and if there is indeed an encounter indicated for the zone, the getEncounter method is called to retrieve a random entry from encounterTable. The encounter retrieved is then passed as the event parameter for onEncounterObservable, letting any subscriber know about encounter:
const encounterProbability = this.encounterRate * deltaTime;
if (Math.random() < encounterProbability) {
    let encounter = this.getEncounter();
    console.log('encounter ' + encounter?.name);
    this.onEncounterObservable.notifyObservers(encounter);
}
That’s the update loop in its entirety. If only life could always be as elegant and simple as these solutions, maybe people would get along better, because the getEncounter method boils down to a single line of correct, though slightly esoteric, JavaScript:
for (var i = 0; i < this.cumulativeDistribution.length && (diceRoll > this.cumulativeDistribution[i]); i++) {}; The reason this is a bit esoteric is that, as you might have noticed, the for loop has no body! There isn’t a body in the loop because, simply put, there isn’t a need for any. The purpose of the loop is to find the index (i) that conforms to the CMDF, given the input random diceRoll number. Once that condition has been fulfilled, the i value sticks around due to being declared with var rather than with let. The encounter itself is retrieved as an index and returned to the calling method for distribution.
Listening for Encounters
Once the EncounterZone has notified its subscribers of the onEncounterObservable’s new event, its role in the encounter journey has ended. It doesn’t need to know anything about who is listening to that event or what happens as a result of it, which allows our code to be more resistant to change (robust) and to be simpler and easier to understand (maintainable). This is one of the many strengths that can be leveraged from an event-driven system. The primary subscriber of these events is SpaceTruckerEncounterManager, which then acts as a broker and aggregator for distributing the news of Encounter throughout the application in its onEncounter observer method. The same observer is subscribed to all the zone’s onEncounterObservable, which is what gives us the aggregation of these events that we need, along with the CargoUnit’s lastFlightPoint telemetry package.
Both the encounter and cargoData are then bundled together and pushed into the encounterEvents array for future reference. The index of the newly added element is what is then propagated to observers of onNewEncounterObservable:
const cargoData = this.cargo.lastFlightPoint;
const idx = this.encounterEvents.push({ encounter,
    cargoData });
this.onNewEncounterObservable.notifyObservers(idx - 1);
The reason we are passing an index (or pointer) to the encounterEvents collection is that we want to ensure that we can dispose of those objects cleanly and at any time; if the object were passed in the event, it might not be possible for the system to determine whether memory can be freed up from disposed-of objects – a condition known as a memory leak.
At this point, we have finished inspecting and discussing the underlying infrastructure needed to define, locate, and generate encounters of different types. These encounters will be brought to life later in this book when we get into the driving phase game logic for each encounter. However, while our understanding of encounters is fresh, let’s look at how encounters might be used and presented within the context of the route planning screen.
Adding Encounter Visuals
This is where our previous work in the Marking Out the Route section comes into play. Recall that as our CargoUnit falls through its trajectory, it is constantly laying down a line of breadcrumbs to mark out its path. This is visualized by the CargoUnit.trailMesh component, which other than needing to be initialized and disposed of during scenario resets, takes care of itself without much need for us to intervene. We need an equivalently hands-off way to similarly render visualizations for encounters when and where they occur along the route, and that’s precisely what the work we just covered is meant to enable.
Important note:
While the following section is ultimately cut from the game, the technique demonstrated is helpful to have in your pocket.
Putting 2D Labels into 3D Space
Although there is a 3D GUI system in Babylon.js, our current needs don’t require the use of a full 3D UI. Still, one of the advantages of a 3D GUI is that it is easy to position elements within the World Space – for reasons that should hopefully be obvious.
Note
Unlike jokes, there’s no risk of ruining this with an explanation. The obvious reason is that positioning 2D elements concerning a 3D world-space point can get tricky because of the need to combine camera position, world position, and screen position transformations to get the correct coordinates as opposed to a 3D GUI system operating in the same coordinate space.
Much of the complexity inherent in coordinate transformations is, fortunately, hidden away from the developer by the BJS GUI framework – linkWithMesh and moveToVector both allow callers to place a GUI control somewhere in the World Space. That’s good for part of the way, but we still need to have someplace to hang the visuals as well as provide a base for future enhancements and behaviors.
If you’ve come back to this section after a break, you can thank your Past Self for putting all the pieces into place. If you’ve been binging through this chapter (don’t stop – won’t stop – can’t stop!) then take a moment to pat yourself on the back. It’s important to take the time to properly acknowledge yourself and the impact of previous actions on present situations – both good and bad! This is going to be easy, in other words.
Remember how we used a TransformNode to track our cargo’s flight path? This is where that decision is finally justified. Most Controls in the Babylon.js GUI system have the linkWithMesh function, whose name implies that you must only pass a Mesh. This would be a wrong, though understandable, conclusion to make that can be remedied by studying the method’s documentation and seeing that while the name of the parameter is mesh, the expected type of the parameter is our old friend Transform Node!
Note
The documentation isn’t wrong, strictly speaking, because Mesh extends the TransformNode type.
The PlanningScreenGui component already has access to the encounterManager property of the planningScreen field in its constructor, so we can subscribe to its onNewEncounterObservable to be notified when a new encounter happens. In the observer function, we get the image URL from the encounter itself and use it to create Babylon.js GUI elements that are then linked to the associated TransformNode of the flight path:
const encounter = evt.encounter;
let panel = new Rectangle("panel-" + encounter.name);
let image = new Image("image-" + encounter.name,
    encounter.image);
image.alpha = 0.68;
panel.addControl(image);
panel.thickness = 0;
this.gui.addControl(panel);
this.encounterPanels.push(panel);
panel.linkWithMesh(evt.cargoData);
That’s the visual placed in the correct spot and with the right image, so now, let’s think about what else is involved with displaying an encounter. First, we want there to be a sound effect that plays. This can be done by registering SpaceTruckerPlanningScreen to onNewEncounterObservable, as shown in the following code:
this.encounterManager.onNewEncounterObservable.add(enc =>
        this.soundManager.sound("encounter").play());
While we’re not currently using the actual encounter index now, this approach allows it to be easily extended in the future – to allow individual encounters to specify their own sound to play, for instance. When an encounter occurs, we don’t want an icon to simply appear, with no fanfare. We want to make sure the player’s attention is called to it, but only momentarily. One way to accomplish that is to initially render the panel so that it’s much larger than its eventual size and then animate the panel so that it’s shrinking to its final size and position.
Animating the Encounter Panel
In Chapter 4, Creating the Application, we saw how to statically define an Animation that was later targeted to a specific object as part of an AnimationGroup. We will use the same technique here to define the animations involved in shrinking the encounter panel.
Important note
Even though it may not seem like it, almost any object can be the target of an Animation – including GUI components! You just need to know the specific name(s) of the properties to animate. In our case, those are the scaleX and scaleY properties of the GUI.Image component.
Note that there are two separate animations involved – one each for the X and Y-axes – since an Animation can only target a single property. Though there are separate animations for each mentioned axis, they have the same set of keyframes. In our encounter observer function, we can create an AnimationGroup and use addTargetedAnimation along with the target panel and panelShrink Animation, after which the animation is started:
let animationGroup = new AnimationGroup("shrinkAnimationGroup-"+ encounter.name,
    this.scene);
animationGroup.addTargetedAnimation(panelShrinkX, panel);
animationGroup.addTargetedAnimation(panelShrinkY, panel);
animationGroup.start(false, 1.0, 0, 180, true);
This gives us a nice presentation for the encounters, leaving just one more use case that we have yet to cover – resetting the route planning screen.
Clearing Encounter Panels
The list that encounters the GUI elements that are collected in anticipation of just this scenario is the encounterPanels array. Since each GUI control implements a dispose function, we reset the encounters UI by simply looping through the array and calling dispose on each element in turn. To avoid the need to anticipate every single place we need to do this, we can add the logic to the place it makes the most sense – the onScreenStateChange observer function. Whenever it executes logic to transition to the ReadyToLaunch state, the encounter panel is cleared of any elements and all children are disposed of:
this.encounterPanels.forEach(panel => {
    panel.children.forEach(child => child.dispose());
    panel.dispose();
});
That’s all there is to it.
Important note
Of course, that’s not all there is to it! There is much, much more that can be done and is being done in the context of Encounter visuals, but by and large, all of this is based on the same concepts presented throughout this section and chapter. If you haven’t already, don’t forget to remind yourself: game development is hard and there are a lot of moving parts!
Although we have only covered how the encounter GUI panels are cleared, this pattern completes the circle of creation and destruction.
Registering to listen for EncounterManager.onNewEncounterObservable informs components of new encounters, while setting SpaceTruckerPlanningScreen.onStateChangeObservable to the ReadyToLaunch state clears any existing ones.
Summary
Let’s take a step back and review what we’ve covered in this chapter. First, we took another side route to visit the various Babylon.js particle systems, making use of and adapting the Sun Particle System Set for our purposes.
We can look at particle systems in three rough categories of distinction – the “Classic”, “New Wave”, and “Hard Core” monikers. Each references the always-available CPU-bound Particle System, the GPU-bound GPU Particle System, and the mixed Solid Particle System (SPS). While the first two systems are based around 2D billboards and sprites – characteristics that can animate via sprite sheets and the like – an SPS uses a source mesh to generate particles, which can, in turn, be assigned any type of Material desired (we’ll get more into Materials, the different types, their properties, and more in Chapter 10, Improving the Environment with Lighting and Materials).
Loading a custom Particle System Set involves capturing a serialized JSON file containing the specific parameters for each Particle System involved in the appropriate structure. This can be done by calling ParticleHelper.ExportSet(setA, setB,…). Loading saved JSON from a URL is easy but loading it from a local URL gets a bit more complicated. However, by falling back to the ParticleSystemSet.Parse function, we can load data for the ParticleSystemSet in any way we please!
Following our detour into Particles, we examined the telemetry data our CargoUnit captures during its flight, and how we can use TransformNodes to represent spatial locations. This proves to be crucial for making it easy to display visuals without writing a lot of code and provided a good on-ramp to get into how Encounter Zones work.
Each Encounter Zone can be thought of as a unique biome or environment in the world of Space-Truckers. From the toasty Inner System to the frosty Outer System, each Zone has its own set of potential Encounters players might face. Defined by an inner and outer Boundary, some light math is involved in converting those handy gameData figures into parameter values used to create a set of nested Torus meshes to represent the zones. Not rendered, these meshes’ ActionManagers are used to register IntersectionEnter and IntersectionExit triggers against the CargoUnit. As it traverses the system, the SpaceTruckerEncounterManager keeps track of which Zone the player’s CargoUnit is currently transiting.
While transiting a given zone, the Zone’s update method makes a weighted random check every frame to decide whether there should be an Encounter, selected from the Zone’s Encounter Table. The Encounter Zone’s constructor pre-computes the Cumulative Mass Distribution Function values for every entry in the Table, normalizing the probabilities so that the total adds up to 1. If an encounter is “rolled,” the value of the roll (a number between 0 and 1) is used as an input to the function, which returns an index to the indicated event. SpaceTruckerEncounterManager listens for these Encounter Zone events.
Responsible for aggregating Encounter data with CargoUnit data and informing subscribers of where to find the resulting encounter data, the onNewEncounterObservable is the primary means for components such as the PlanningScreenGui to update themselves without needing to pepper appropriate logic throughout the application’s components. Within the PlanningScreenGui, techniques first perfected during the construction of the Splash Screen come in handy. Here, we can define some Animations that target the Encounter’s Image panel to give it a shrinking effect as an entrance.
Within the onNewEncounter observer, targeted animations are generated from the Animations and put into an AnimationGroup associated with the new GUI display elements. Our previous planning in the Marking the Route section pays off here as well, as we can ensure that the UI element is correctly positioned by calling linkWithMesh and passing in the TransformNode captured from the flight telemetry.
As usual, the code discussed in this chapter is available at https://github.com/jelster/space-truckers/tree/ch7, and while the game is still incomplete at this point in its history, we can point to concrete and valuable progress through the course of this chapter – never forget to give yourself credit for progress made on a journey! The Discussions board at https://github.com/jelster/space-truckers/discussions is a good place to post questions about the code, book, or application. Want to contribute? Navigate to the Issues at https://github.com/jelster/space-truckers/issues and browse for open ones that catch your fancy, or create a new Issue to discuss your enhancement, bug, or new feature. In the next chapter, we’re going to make good use of the route and the encounters generated to build the driving mini-game. Along the way, we’ll learn how to shift camera perspectives to a first-person view, apply decals to meshes, and more!
Note
There’s an entire category of Issues aimed at first-time contributors and people lacking experience or familiarity with Babylon.js and/or Space-Truckers – it’s called Good First Issue. Want to make MacGyver proud and fix Issues that nobody else can fix? Check out the Help Wanted label!
Extended Topics
There is always more content and ideas than there are time and space to implement them, so here are some ways that you can push yourself further with the content from this chapter. Before moving on to the next chapter, or at any time later, think of these as launch pads for you to clarify and fold the lessons learned here in the forge of experience:
- Add a new particle system based on the Sparks particle sample that is triggered when the cargo collides with something during the route planning’s flight phase.
- The world of Space-Truckers is rich and varied, and the game could display more of that richness. Use an animated particle system to bring these areas to life:
- Orbital manufacturing might look like a series of flashing lights from maneuver thrusters and welding torches clustering around shadowed block structures
- Traffic in the Space-Construction and Space-Highway zones could similarly be approximated with clusters of flashing lights zipping around
- Add the capability to load encounter lists from external sources other than the gameData file. The source can be a relative or remote path, with CMDFs being recomputed for the new list for each zone.
- Make an enhanced random number generator that will weigh or re-roll random values to avoid returning the same value more than X times in Y rolls.
- Random numbers generated by computers tend to cluster and clump unrealistically – the Asteroids are a great demonstration of that. There are other ways to weigh and generate random series of numbers, though. Sneak to the ch10 branch of the Space-Truckers source code on GitHub to see how the randomGenerator module implements getGaussianRandom for one example.