Chapter 2: Creating Materials Fast with EEVEE
This chapter will cover the magic of materials in EEVEE. After modeling, materials can define the look of the scene and give the person who is viewing your art a feel for the texture of the world you're creating. Want to show that an abandoned mansion you're working on is old and falling down? Mix dirt into your materials. Want the nice shiny architectural render you're working on to look sleek and modern? Use reflectivity and shiny materials with little to no dust. There are so many ways to use materials to really bring life to your scene, and we'll cover a couple of them in depth in this chapter.
The focus of this chapter will be stylized materials in EEVEE, but much of this lesson can be applied to any other scene you care to make in Blender. I like to break materials up into two categories, image-based materials and procedural materials. Texture materials are ones that involve using images to create a shader. As an example, using this methodology, we'd download a picture of a lizard's scales and apply it as the diffuse in our shader, and as a result, create a lizard scale material.
Conversely, when working with procedural materials, we're working with Blender's mathematically computed images to create materials. So we can take the Noise Texture (an inbuilt texture in our material space) and play around with the values until it looks like a lizard's scales, and then apply it to our shader to create the same material. There are pros and cons to both approaches, but to distill the arguments, image-based materials are easy to create and faster to render but can be hard to scale or edit flexibly. Procedural materials are hard to create but easy to scale and edit flexibly.
In this chapter, we're going to be using both approaches to create two different materials, one being the wooden plank material for our house (an image-based material); the other, the smoke material for the smoke coming out of our chimney of the house (a procedural material). So, while we're working on both examples, feel free to experiment. Try playing with values and color so you feel comfortable making tweaks to your own shaders.
In this chapter, we're going to cover the following main topics:
- Materials in EEVEE
- Creating our first image-based material
- Creating our first procedural material
Technical requirements
Make sure Blender is up to date and download the packet from https://github.com/PacktPublishing/Shading-Lighting-and-Rendering-with-Blenders-EEVEE/tree/main/Chapter02 to start this chapter. I've provided both a .blend file, which should open directly in Blender if double-clicked.
We'll be attaching nodes to the material output of the node tree inside our material editor to create interesting and varied materials that depict our environment. As an intermediate user, I assume you're already aware of how to switch into the material editor and add different types of nodes and attach them. You should also have a basic understanding of texture coordinates and UVs. As long as you've worked with materials a little bit, it should be easy to follow along with me, but if you're feeling overwhelmed or don't understand something, I'll provide some external resources for each section that you can choose to watch or read to get you more up to speed.
Materials in EEVEE
Materials in EEVEE are not that different from materials in Cycles. Of course, there are many ways to get better materials in EEVEE that don't even exist in Cycles (and vice versa), but the main concept of materials is exactly the same as you are aware of with Cycles. The Blender developers have been really great at adding to the functionality of EEVEE so that materials that work with Cycles should mostly work with EEVEE (there are some exceptions, but for the most part this is true). If we look closely at the material output node in any material node tree, we can see that the default option is All, which means materials will work, regardless of whether you switch to Cycles or EEVEE in the render panel. We can focus our output by choosing a target engine. I find that to be extraneous, but it's good to know in case you want to hyper-focus your material development on one engine.
Figure 2.1: Material Output node
When creating art fast (which is one of the main reasons for using EEVEE – speed), it's often not worth spending hours or days tweaking values and images to create materials that are perfect. Sometimes, good is good enough to get our ideas across. Of course, feel free to spend as much or as little time on materials as you want, but in this chapter, we'll be creating a non-photorealistic scene that will only require simple shaders and rely more on stylization and embellishment.
Side Note
Non-photorealistic is a term we're going to use a lot in this chapter. It can most easily be described as "cartoon" style. Instead of trying to make a scene that involves creating a realistic or "photo-real" look, we're instead using stylized shaders and creating exaggerated geometry to make something less real and more representative of reality. Non-photorealistic rendering is often shortened to NPR.
Why materials are a little different in EEVEE
Materials are a little different in EEVEE due to the fact that we're approximating light bounces. There are a number of features that work instantly inside of Cycles that will have to be set up in order to work with EEVEE. Fortunately, these aspects are easy to configure and will give us results that we can see directly in the viewport. Be prepared to not immediately see the result you want from a material in EEVEE. Tweaking and experiment will become part of our workflow, so you're comfortable with working with the shader until it's tuned to perfection.
At this point, we're almost ready to jump headfirst into our image-based material, but first, we have to deal with the fact that we have no lighting set up. Let's fix that with a little tip for quickly previewing lighting so we can get on with the materials faster.
Quickly previewing lighting ideas for fast iteration
I want to get up and running on a project as fast as possible. Some people would advocate setting up your lighting and camera first in this situation, but I think it's a lot better to just throw yourself into materials and worry about lights later. But, as a practiced Blender user, you'll be screaming, How can I see my materials accurately without lighting?!
There's a simple fix here that I think allows us to get to the fun design work quickly. This little hack will use Blender's inbuilt HDRIs, so we don't have to source our own right now:
- First set our newly opened scene to the Shading scene configuration. The tabs at the top of the window have specific workflow steps on them that allow us to open the specific tools that are relevant quickly, instead of trying to flip between different context windows.
Figure 2.2: Solid viewport preview
- Next, we want to make sure we're set to work in EEVEE. The Render menu is on the right toolbar and looks like a little camera or TV. As we can see, the choice of render engine is given to us on a drop-down menu. Make sure that is set to EEVEE for now so we can see accurate results in our viewport.
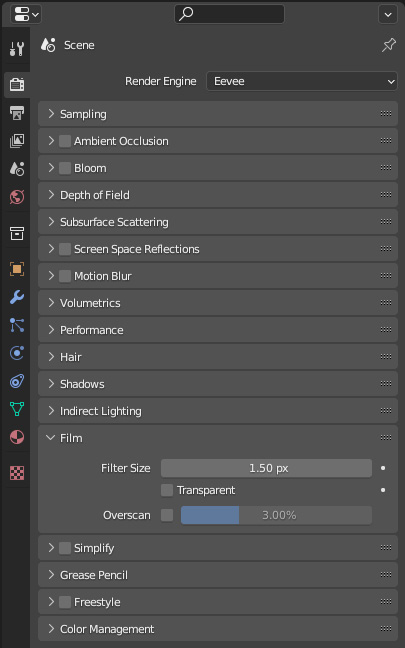
Figure 2.3: The Render panel
Blender comes complete with a few HDRIs we can use by default. Starting in Blender 2.8, it is possible to set our scene to be lit with a really simple click and start to conceptualize our materials without needing to spend time on lighting or rendering yet (those will come later).
Side Note
HDRIs are awesomely powerful when working in 3D to light a scene. We'll look at them in more detail in subsequent mini-projects, but right now, it is a great idea to go to https://polyhaven.com/ and check out some of their CC0 HDRIs. They're completely free and great quality, useful for any project.
- By clicking into the rendered viewport shading mode (or using the shortcut to the Pie menu – Z on the keyboard), we can see our scene as it will be rendered.

Figure 2.4: The render shading menu
- Then, click the down arrow next to the Viewport Shading menu. This will give us the Viewport Shading option.
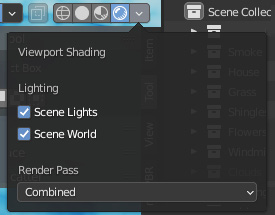
Figure 2.5: Viewport Shading options
- From here, if you turn off Scene Lights and Scene World by unchecking them, the menu will change to something a little more like this:
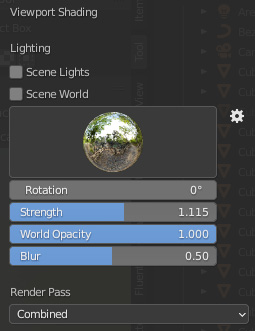
Figure 2.6: HDRI panel options
This menu gives us the ability to change the overall strength, rotation, and opacity of the HDRI that Blender has loaded automatically for us.
- It is even possible to change to another HDRI so you can preview some different looks by clicking directly on the silver ball and selecting another HDRI icon.
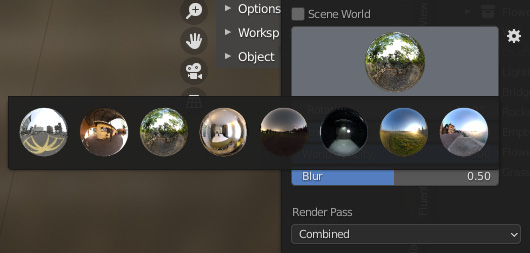
Figure 2.7: Options for different HDRIs
Side Note
Keyboard shortcuts are the backbone of any 3D artist's workflow – we all have different ones we've grown to like over time, so reading the documentation and even making your own keyboard shortcuts is encouraged. I'll be doing my best to call out some of the more useful keyboard shortcuts in these side notes. One of my favorite time-saving shortcuts is Z for opening the shading Pie menu.
Cool! Now we have an awesome, well-lit scene so that we can preview different lighting styles and colors without really doing much. We will have to tune our lighting eventually, but this is great to get right to something more useful like materials. This allows us to be flexible in how we create materials. If the director tells you to light something like it's night time then changes their mind later on, you may need to rework your materials completely. By using the default HDRIs in Blender, it's easy to switch between the eight options, see how light will affect the materials you're working on, and be open to iteration and change as the project progresses.
Next, we'll tackle the meat of this chapter and start adding some life to our mini-project by creating an image-based texture for the wooden exterior of our House-In-The-Sky.
Creating our first image-based material
Time to make our first texture for the project. I'm going to be working on the plank texture for the front and sides of the house, but feel free to select another object you want to add and follow along. The steps should be the same, and I've added some other textures to the GitHub repository that should do the trick, or feel free to find your own. This section of the texturing stage will be exceptionally simple but hopefully will give us a cool, stylized look as well as teaching you how to set up a really quick image-based texture. Here's the main gist of the process:
- Add two-click Principled Setup.
- Add the Shader to RGB shader for a stylized look.
- Tweak the values if needed.
Side Note
There are a lot of free CC0 (free to use with minimal copyright protections) sites that have popped up in the last couple of years that are really easy to grab textures from.
These are three highly recommended websites with a good array of materials, usually with the full range of diffuse to normal maps that can be plugged into a Principled shader:
https://ambientcg.com/, https://www.sharetextures.com/, and polyhaven.com
Two-click Principled Setup
This step abstracts away the tedious workflow of importing images, organizing them, and connecting them to sockets. With the Node Wrangler add-on, we can make materials so easily that it's almost too good to be true:
- Create a material and select the Principled shader node that comes by default with the material.
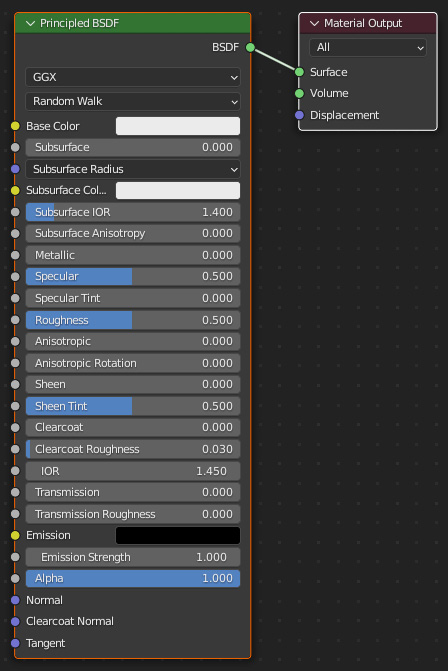
Figure 2.8: Principled node shader
- Use the keyboard shortcut Ctrl + Alt + T to open a file browser window.
- Select all the textures (the BaseColor, Metallic, Roughness, and Normal images provided in textures folder in the Chapter 2 folder on GitHub; I chose the Planks material in this example) that belong to the material. This shortcut relies on your textures being labeled correctly, so make sure the Normal map has Normal Map in the name, and so on.
- Confirm the selection. You should have a well-organized material to base our further tweaking on. You'll notice the Normal map that is required between the Normal map and Principled shader. This node takes the colors from the Normal image and translates them to displacement, so we need to make sure the Normal map node is added between the Normal image and the Principled shader.
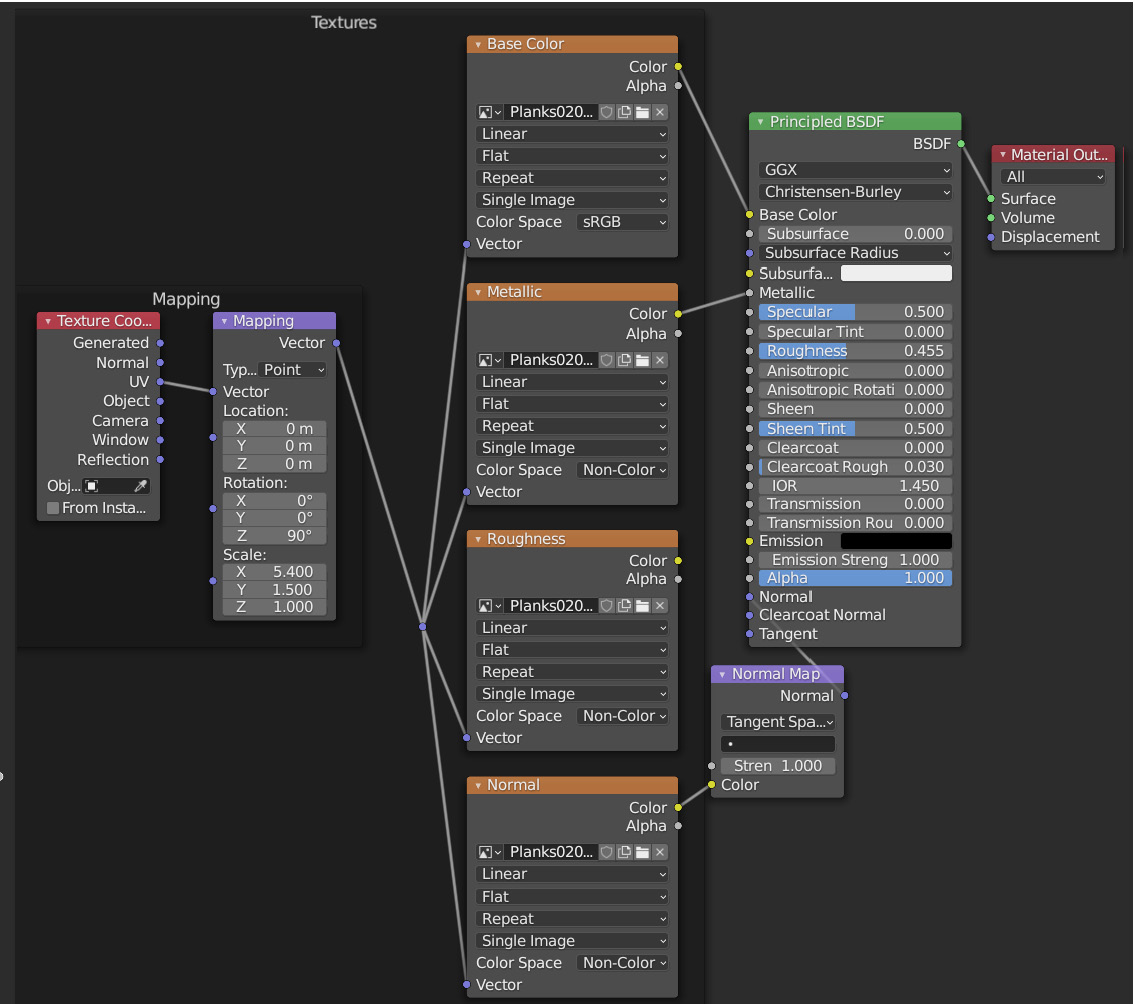
Figure 2.9: Full material setup
As you can see, this is an awesome way to set up a material really quickly. Try changing some of the values to see how they affect the material in the viewport. You should get lightning-fast updates to the scene – no having to wait for Cycles to recompile the viewport or noise in the image. Almost too good to be true, right?
I wanted the wood planks of my material to run up and down instead of side to side, so setting my rotation in the Mapping node easily fixed that. Then I increased the scale values, making the X Scale value equal to 5.4 and the Y Scale value equal to 1.5. The Z value isn't being used in this case – since we only have a 2D texture, we only need to tweak two dimensions. I also changed the Z Rotation to 90 degrees. The overall idea here is to tweak the values on the Mapping node to get the planks to have the right aspect ratio. I find it's easier to tweak these Mapping nodes rather than try to re-UV unwrap things to get them to fit properly. It's just a matter of texturing inside of one Blender workspace rather than jumping back and forth between the UV and the material workspaces.

Figure 2.10: Mapping nodes
Side Note
You may notice that the connectors between different nodes have different colors. This is an update in Blender 3.0 and allows us to visualize the type of information that is being transferred between nodes.
Shaders in EEVEE and Cycles are bright green.
Vectors are dark blue/purple.
Colors are yellow.
I ended up with something like this in the viewport.

Figure 2.11: Initial material
Of course, wood is not the only material we can create using a Principled shader. Refer to the Blender manual if you would like more information on using the Principled shader and how the shader works: https://docs.blender.org/manual/en/latest/render/shader_nodes/shader/principled.html.
Shader to RGB
The look that we just created with our Principled Setup isn't exactly stylized – it's more realistic than the overall feel we're going for here. Inside of EEVEE, we can use the Shader to RGB node to convert our realistic material into a flatter, shaded-cell material that can easily be tweaked for our needs:
- Connect the Shader to RGB node between the Principled shader output and the Material Output node.

Figure 2.12: Shader to RGB node
You won't see much of a change to your material at this point. The magic is in the next step.
- Add a ColorRamp in between the Shader to RGB node and Material Output.
- Set the ColorRamp interpolation to Constant, which means the colors will change at a constant rate, without mixing between colors at the markers.
- Add a few extra colors to the ColorRamp by clicking the plus icon on the left side of the node and add some arbitrary colors.
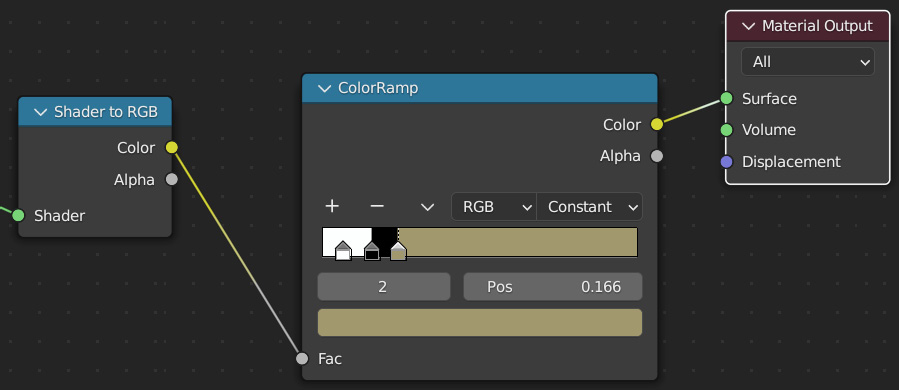
Figure 2.13: ColorRamp added to shader
I ended up with something like this:

Figure 2.14: Result of ColorRamp
The overall viewport looks like something out of a comic book now.
- To see the full effect, using the Viewport Shading drop-down menu that we discussed before, change the rotation of the HDRI and see how it affects the overall color of the material. The material will now react to light by changing the color of the texture.
x
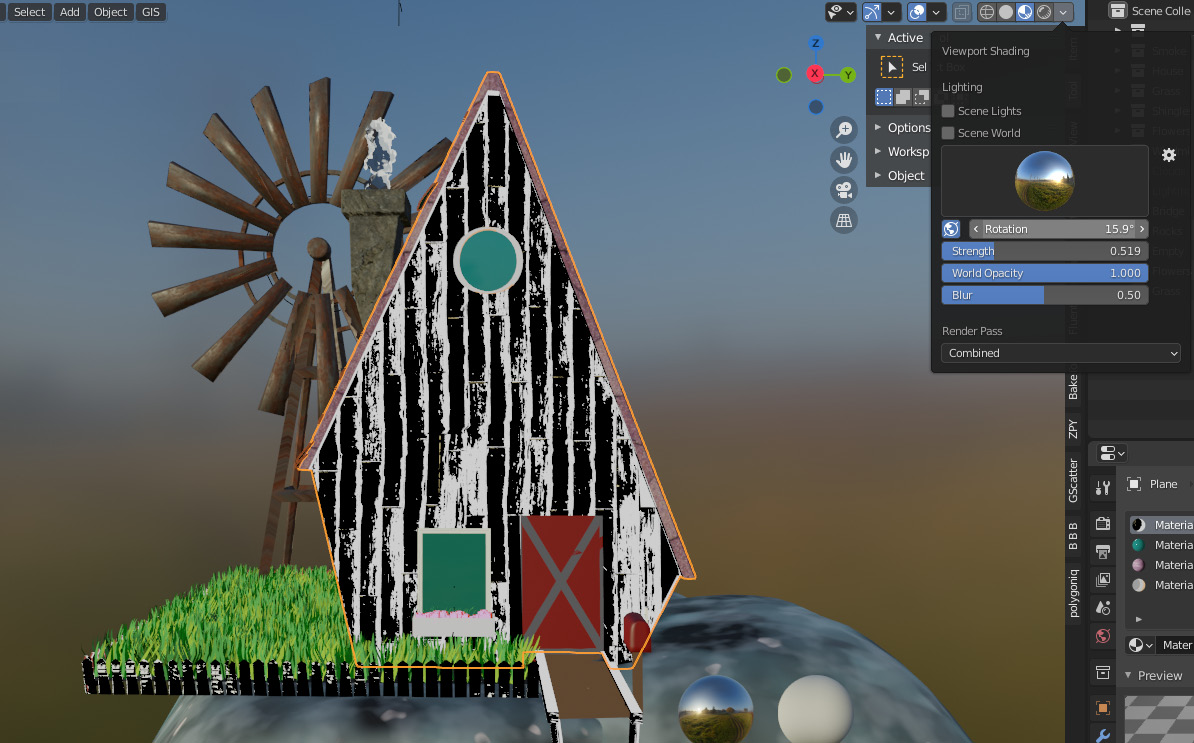
Figure 2.15: Changing light to affect the material
Places that are shadowed become black (as the leftmost color on my ColorRamp) and lit areas are yellow (as the rightmost color on my ColorRamp).
- The last node to add is a Math node between the ColorRamp and the Shader to RGB node. Set the drop-down Math method to Power and set that to somewhere around 0.5. This gives you more leverage with the ColorRamp to experiment with different values.
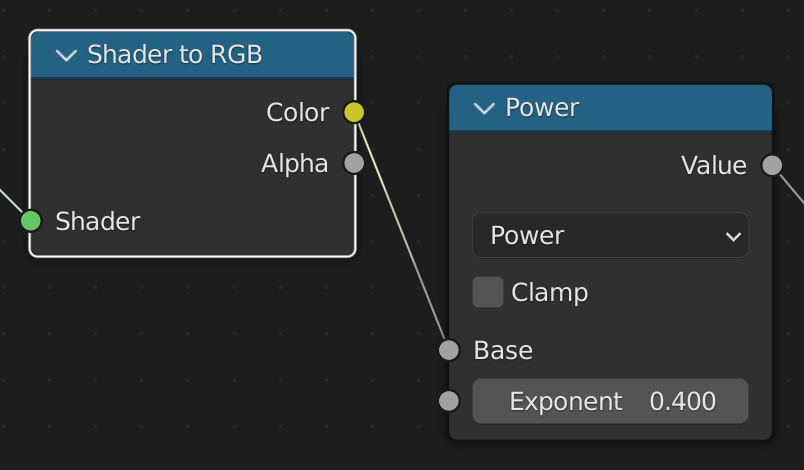
Figure 2.16: Power node added
Play around with the values. There's really no "right" number; it's what looks good to you.
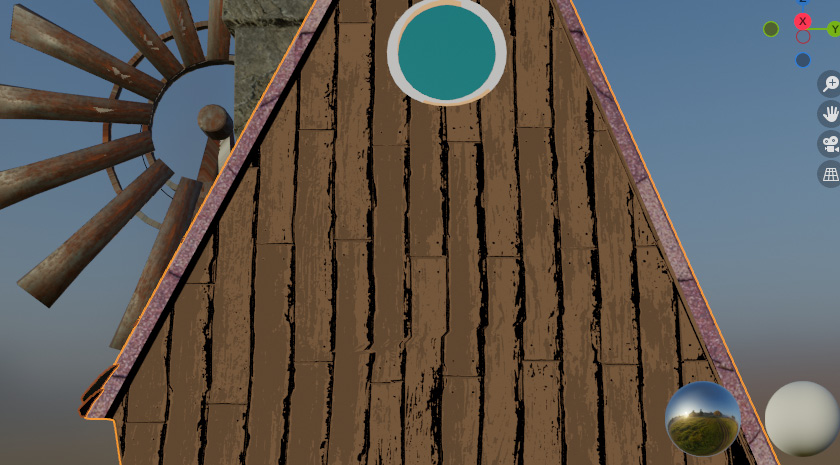
Figure 2.17: Material shader after adding the Power node
This is what I ended up with. I picked some colors from the original texture, to still give it a wooden look. From a close-up of the material, it's easy to see that we've maintained most of the detail from the original texture, but now we have a much more abstract, stylized version of it, with very little effort.

Figure 2.18: Close-up of the material
That concludes a little bit on how to manipulate and integrate principled textures into an EEVEE workflow. We'll be utilizing Node Wrangler in later chapters to create quick textures, but I won't really go over the process in detail beyond what we've already covered, so make sure you have that under control before moving on to the next section of this chapter.
Creating our first procedural texture
Procedural textures are textures that don't involve using images. Because we're using inputs into the shader that are scalable and manipulatable, we ultimately have more flexibility over what the final output of our shader looks like. We also don't need to go looking for textures online when we create them procedurally. The procedural texture that I want to create today is going to be a huge time saver for us. While sometimes it's appropriate to simulate smoke for your scene, it can also be very heavy on the computer and requires some knowledge of how physics works inside of Blender. But there is another way of creating smoke or other VFX in EEVEE so that we can continue to work in real time – by faking it with a procedural shader! Most video games also take this route, creating shaders that fake the look of smoke, fire, or plasma guns. Creating real-time effects is a great skill to have both in EEVEE and for game design, so let's jump into designing that shader for our stylized scene.
The base mesh
The first thing we want to do is create some geometry that will form the basis of our simulation. I started with a cube and extruded a couple of times, scaling to create a kind of zig-zag pattern, and came up with something like this. It's supposed to represent a really, really simple smoke column that tapers at the top. Stick to simplicity at this point, as we'll layer details on top of this base.
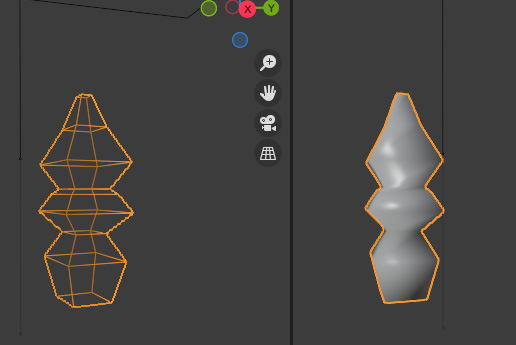
Figure 2.19: The smoke mesh
Next, let's add a couple of modifiers to our mesh:
- First, a Subdivision Surface modifier, set to the Simple subdivision style. Change the levels in the viewport and Render to 2.
- Then add a Displace modifier, set Coordinates to Object, and leave Direction as Normal. As you can see in our modifier, we still need an object for our coordinates to work with.
- Add an Empty object (Plain Axis is just fine) to the scene. Set the Displace modifier to work with the Empty object we just placed.
- We still have a little more work to do on our Displace modifier, namely adding a texture. If you click the icon on the far right in line with the texture name on the Displace modifier, you'll be taken to the Texture menu.
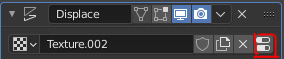
Figure 2.20: Go to the Texture menu
- Click the New button to create a new texture, then set the drop-down menu labeled Type to Clouds. You can play with the values of the Displace texture, but I left mine at the defaults for simplicity. My Displace texture looks something like this.

Figure 2.21: Cloud texture
And my modifier stack now looks like this. I decided to tone down the strength of my Displace modifier to get a more subtle look, but whatever looks good to you is the value you should choose.

Figure 2.22: Displace modifier
- If you try moving your Empty object on the Z axis, you should see it now causes your smoke object to displace randomly, kind of like smoke does.

Figure 2.23: Mesh result
Texture creation with procedural nodes
Next, we need to create a new material to set up our shader to add even more detail:
- After adding that new material, open up the material editor and we'll get into the shading of our smoke.
- First, let's add a Texture Coordinate node and a Mapping node, connecting the Object output on the Texture Coordinate node to the input on Vector on the Mapping node.
- Next, create a Normal node (not a Normal map) and connect the Mapping node to the Normal input on the Normal node.
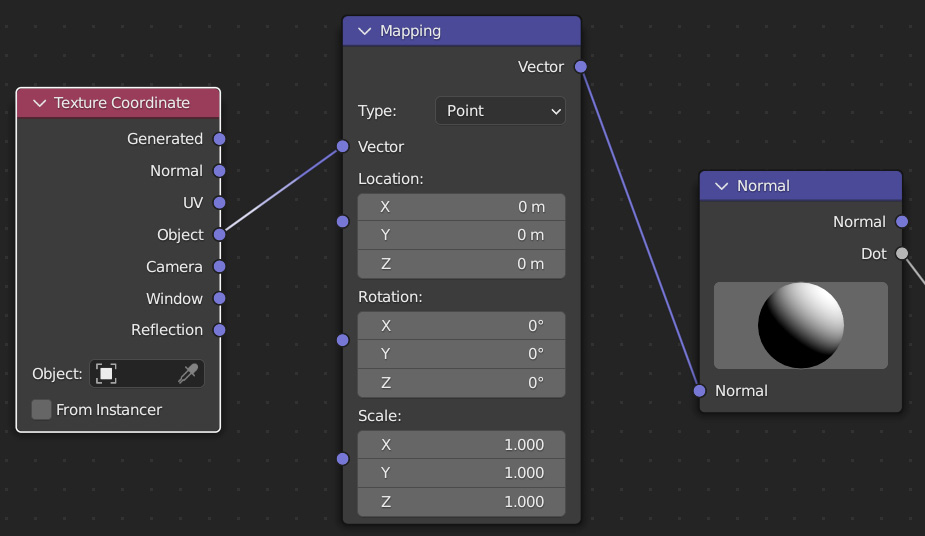
Figure 2.24: Normal and Mapping nodes
The Normal node manipulates the direction of the normals on the object shader level.
- If you click on the white dot in the Normal node and drag it, you can see how it affects the color of our smoke material. Try that out, but the overall effect this has on our material won't be apparent until later, so don't try to get it perfect right now.
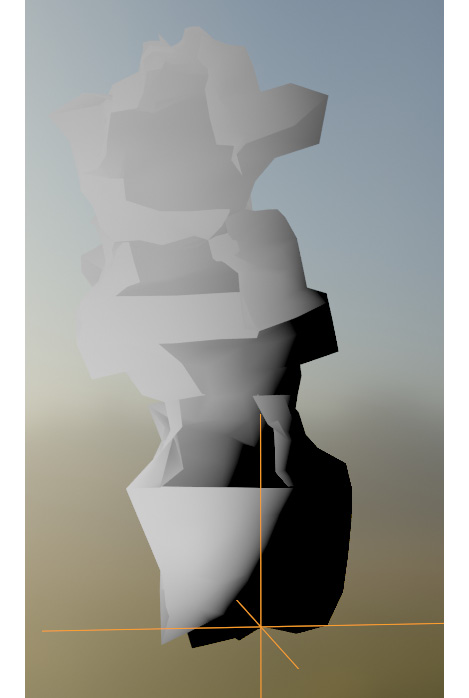
Figure 2.25: The smoke after playing with the Normal node
- Next, let's add a ColorRamp to the Dot output of Normal (Color Ramps are great utilities to control the output of a node – I use them liberally).
- Then, let's add a Mix color node and plug the output from the ColorRamp into the bottom socket of the Mix node. This Mix color is going to let us add some more noise into the shader so we get more detail on the smoke.
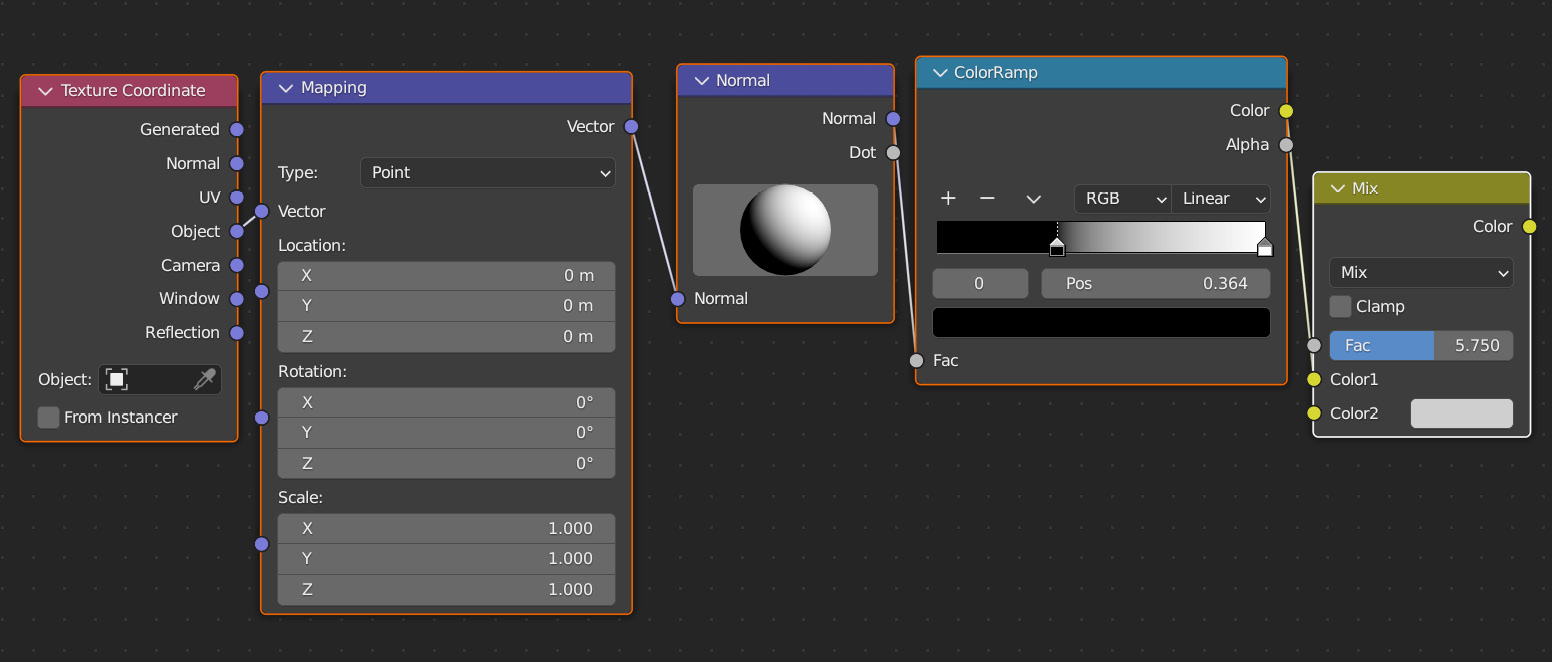
Figure 2.26: Adding the color Mix node
- Now let's add that noise, by adding – you guessed it – a Noise Texture node. We'll add a Mix color node and a Voronoi Texture node to round out this noise section of the texturing. Set the Voronoi Texture node to Smooth F1 with Smoothness of 1 and Scale of 7.5.
- Combine the Noise Texture node and the Voronoi Texture node together with the Mix node, and then attach that Mix color node to the top input of our other Mix color node, which I set to a factor of 0.575. This combines our Normal node and Noise Texture node together.
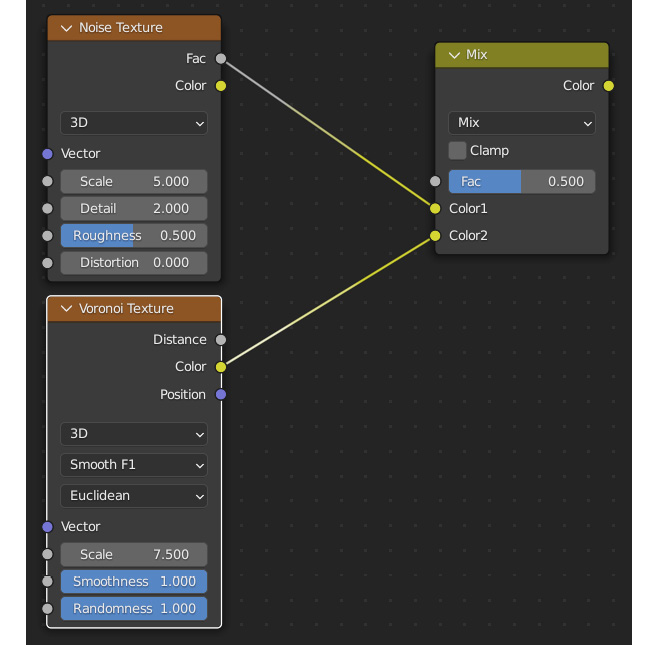
Figure 2.27: Mixing in the Noise Texture and Voronoi Texture
- It's also important we give the Voronoi Texture mapping coordinates. You can do this with Node Wrangler by selecting the Voronoi Texture and using the shortcut Ctrl + T.
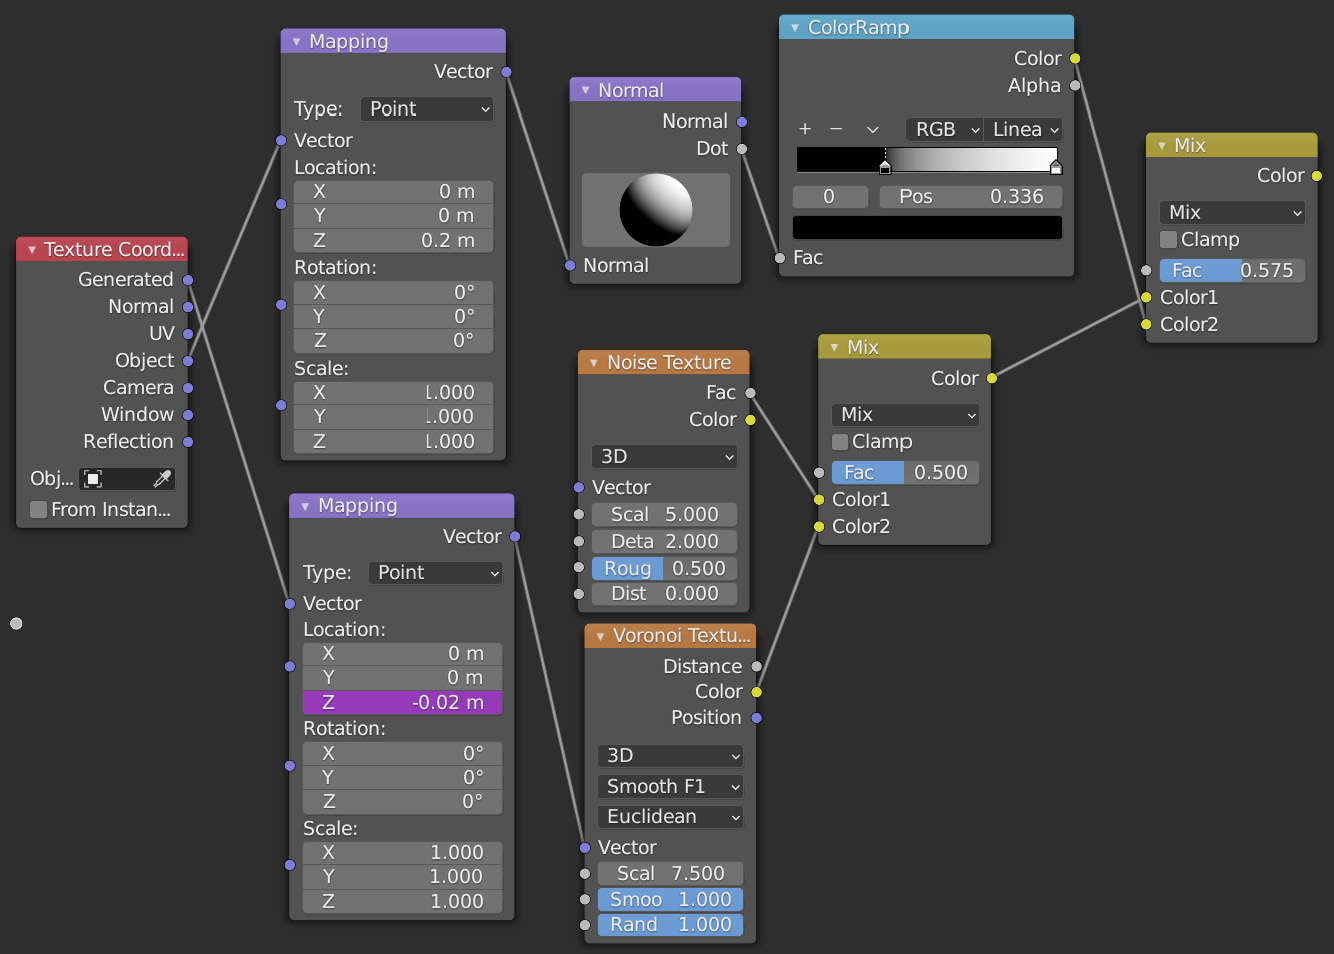
Figure 2.28: Adding it all together
Okay, our texture is looking interesting, but not necessarily smoke-like yet. So, let's add some Color Ramps to get the colors we're looking for.
- Add two Color Ramps, each set to Constant interpolation.
- Attach the result of the Mix color node to both Color Ramps. The top ramp is going to be our alpha, describing the transparency of our image. The second ramp is going to give the smoke its coloration. This is something you can play around with and reference some pictures or videos of smoke to refine the numbers you are using. Reference Figure 2.35 for a zoomed-out view of the shader if you are having problems assembling the nodes correctly.

Figure 2.29: The two Color Ramps
That's it for the texture creation process.
Figure 2.30: Result from the lower Color Ramp
Adding shading to the material
Now we're going to use the outputs from our two Color Ramps to add shading to the material:
- Add an Emission shader, Mix Shader, and a Transparent shader.
- Plug the top Color Ramp into the factor of the Mix Shader.
- Plug the bottom Color Ramp into the Emission shader.
- Then plug the Emission shader output into the bottom input of the Mix Shader, and stick the Transparent shader into the top input of the Mix Shader.

Figure 2.31: Adding Emission and Transparent shaders
If you've been following along with my exact values, you should have something like this:
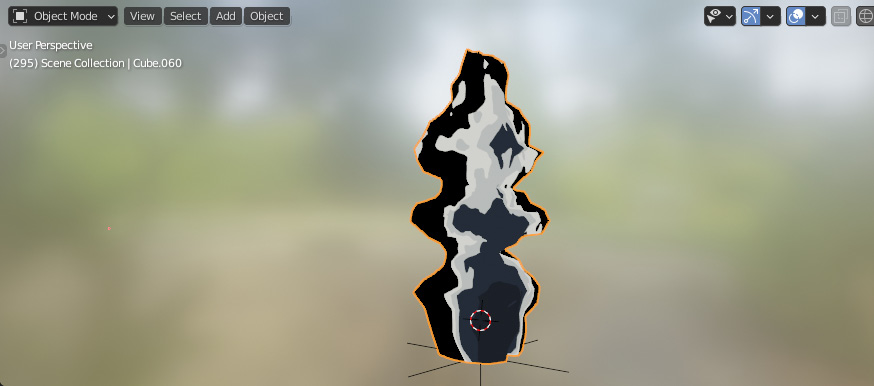
Figure 2.32: The material after adding shaders
We have a kind of cool smoke shader here – but we're not getting the transparency from our shader that we should be getting. This is because EEVEE defaults materials to be opaque regardless of what actual shaders you're using. Let's fix this.
- Select the material, scroll down to the material settings in the Properties panel and change Blend Mode from Opaque to Alpha Blend.

Figure 2.33: The Smoke material settings
So now our transparency is showing up and we get some wispy trails out from the main center of the shader that give us a smoky feeling:

Figure 2.34: The smoke
The last thing we need to do is give the "smoke" a little more translucency because smoke isn't entirely opaque.
- Add another Mix Shader, take the output from the previous Mix Shader, and plug it into the first socket of the new Mix Shader. Then add another Transparent shader and plug it into the second socket. I set my Mix factor to .35, but play around with what looks good to you.

Figure 2.35: Final node shader setup
The final node setup is inside Smoke_Shader.blend in the GitHub repository, in case you need to look it over in more detail. The very last step in this shader setup is only required if you want to animate the smoke. Of course, you can move the Empty object on the Z axis and the smoke will move based on that, but it's not very convincing. We can add an animation to the Z location of our Voronoi Texture that will give the smoke a little more of an upward movement.
- Right-click on the Voronoi Texture's node's Z Location value and select Add Driver.

Figure 2.36: The driver settings
Drivers are mathematical expressions that we can use to automatically animate something.
- In this instance, we'll take the negative frame number provided by Blender and divide it by 50, so the texture will move over time. That expression gets typed in as -frame/50 in the Expression box in the driver properties.

Figure 2.37: Expression creation
- You'll notice Blender shows that this expression is invalid. All you have to do to fix this is delete the var input variable that comes by default with every driver by clicking the X in the right corner of the variable box and then Update Dependencies.

Figure 2.38: Deleting the variable

Figure 2.39: NPR smoke shader
You can move the Empty object up and down and see how the warping from the Displace modifier causes the flickering effect of smoke (albeit in a stylized manner). This is a really simplified version of this effect, and you could spend a lot more time and energy working this into something with a huge amount of detail, but this is a good starting place to work through some of the processes of creating stylized real-time VFX.
Summary
In this chapter, we covered two really useful ways of creating materials, one that involved using textures and one that involved using the inbuilt tools that come with Blender. Both are useful processes to know so that we can create textures fast and with style and composition in mind.
In the next chapter, we'll work on setting up the cameras and lights in the scene to showcase the work we've already done.