Chapter 2: Kubernetes Architecture – From Docker Images to Running Pods
In the previous chapter, we laid the groundwork regarding what Kubernetes is from a functional point of view. You should now have a better idea of how Kubernetes can help you to manage clusters of machines running containerized microservices. Now, let's go a little deeper into the technical details. In this chapter, we will examine how Kubernetes enables you to manage containers that are distributed on different machines. Following this chapter, you should have a better understanding of the anatomy of a Kubernetes cluster; in particular, you will have a better understanding of Kubernetes components and know the responsibility of each of them in the execution of your containers.
Kubernetes is made up of several distributed components, each of which plays a specific role in the execution of Docker containers. To understand the role of each Kubernetes component, we will follow the life cycle of a Docker container as it is created and managed by Kubernetes: that is, from the moment you execute the command to create the container to the point when it is actually executed on a machine that is part of your Kubernetes cluster.
In this chapter, we're going to cover the following main topics:
- Understanding the difference between the master and worker nodes
- The kube-apiserver component
- The kubectl command-line tool and YAML syntax
- The Etcd datastore
- The kubelet and worker node components
- The kube-scheduler component
- The kube-controller-manager component
- How to make Kubernetes highly available
Understanding the difference between the master and worker nodes
To run Kubernetes, you will require Linux machines, which are called nodes in Kubernetes. A node could be a physical machine or a virtual machine on a cloud provider, such as an EC2 instance. There are two types of nodes in Kubernetes:
- Master nodes
- Worker nodes
Master nodes are responsible for maintaining the state of the Kubernetes cluster, whereas worker nodes are responsible for executing your Docker containers.
While using Linux, you will have probably used commands such as apt-get install or yum install to get a new, fully functional software preconfigured that just works out of the box. With Kubernetes, things are a slightly more complex.
The good news is that you can also use Windows-based nodes to launch Windows-based containers in your Kubernetes cluster. The thing to know is that you can mix Linux and Windows machines on your cluster and it will work the same, but you cannot launch a Windows container on a Linux worker node and vice versa.
By nature, Kubernetes is a distributed application. What we call Kubernetes is not a single monolithic app released as a single build that you would install on a dedicated machine. What we mean by Kubernetes is a collection of small projects. Each project is written in Go and forms part of the overall project that is Kubernetes.
To get a fully functional Kubernetes cluster, you need to set up each of these components by installing and configuring them separately and have them communicate with each other. When these two requirements are met, you can start running your containers using the Kubernetes orchestrator.
For development or local testing, it is fine to install all of the Kubernetes components on the same machine; however, in production, these components should be spread across different hosts. This will help you to make your Kubernetes cluster highly available. By spreading the different components across multiple machines, you gain two benefits:
- You make your cluster highly available and fault-tolerant.
- You make your cluster a lot more scalable. Components have their own lifecycle, they can be scaled without impacting others.
In this way, having one of your servers down will not break the entire cluster but just a small part of it, and adding more machines to your servers becomes easy.
Each Kubernetes component has its own clearly defined responsibility. It is important for you to understand each component's responsibility and how it articulates with the other components to understand how Kubernetes works overall.
Depending on its role, a component will have to be deployed on a master node or a worker node. While some components are responsible for maintaining the state of a whole cluster and operating the cluster itself, others are responsible for running our application containers by interacting with Docker daemons directly. Therefore, the components of Kubernetes can be grouped into two families:
- Components belonging to the Control Plane:
These components are responsible for maintaining the state of the cluster. They should be installed on a master node. These are the components that will keep the list of containers executed by your Kubernetes cluster or the number of machines that are part of the cluster. As an administrator, when you interact with Kubernetes, you actually interact with the control plane components.
- Components belonging to the Worker Nodes:
These components are responsible for interacting with the Docker daemon in order to launch containers according to the instructions they receive from the control plane components. Worker node components must be installed on a Linux machine running a Docker daemon. You are not supposed to interact with these components directly. It's possible to have hundreds or thousands of worker nodes in a Kubernetes cluster.
Clustering technologies use this architecture a lot. They define two types of nodes: masters and workers. The master(s) nodes are responsible for the management of the cluster and all operational tasks according to the instructions received from the administrator. The worker(s) nodes are responsible for the execution of the actual workload based on instructions received from the master(s).
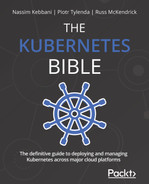
Kubernetes works in relatively the same way. You are not supposed to launch your Docker containers by yourself, and therefore, you do not interact directly with the worker nodes. Instead, you send your instructions to the control plane. Then, it will delegate the actual container creation and maintenance to the worker node on your behalf. You never run a docker command directly:

Figure 2.1 – A typical Kubernetes workflow. The client interacts with the master node/control plane components, which delegate container creation to a worker node. There is no communication between the client and the worker node
When using Kubernetes you'll notice here and there the concepts of control plane and the master node. They're almost the same: both expressions are meant to designate the Kubernetes components responsible of cluster administration, and by extension, the machines (or nodes) on which these components have been installed. In Kubernetes, we generally try to avoid talking about master nodes. Instead, we talk about the control plane.
The reason is because saying "master node" supposes the components allowing the management of the cluster are installed on the same machine and have a strong coupling with the machine that is running them. However, due to the distributed nature of Kubernetes, its master node components can actually be spread across multiple machines. This is quite tricky, but there are, in fact, two ways in which to set up the control plane components:
- You run all of them on the same machine, and you have a master node.
- You run them on different machines, and you no longer have a master node.
Master node terminology tends to imply that all control plane components are running on the same machine, but not the case. To achieve maximum fault tolerance, it's a good idea to spread them across different machines. Kubernetes is so distributed that even its master node can be broken into multiple machines, where each of them has the responsibility to execute a single component that allows the management of the cluster.
The idea is that control plane components must be able to communicate with each other, and this can be achieved by installing them onto different hosts. In fact, later, you'll discover that the control plane components can even be launched as Docker containers on worker node machines. This is a very advanced topic, but it's possible. That's why the master node terminology is not that accurate to Kubernetes, and we prefer the control plane terminology instead.
However, for the sake of simplicity, I'll consider, in this chapter, and also for a huge part of this book, that we are using dedicated master node machines to execute all of the control plane components in the same place. Throughout the different examples listed here, control plane components will be tightly coupled with the machine that is executing them. This will help you to understand the role of each component. Later, we will explore the advanced techniques related to the management of control plane components, such as launching them as Docker containers and more.
That being said, things are simpler when it comes to worker nodes: you start from a standard machine running Docker, and you install the worker node components next to the Docker runtime. These components will interface with the local container engine that is installed on the said machine and execute containers based on the instructions you send to the control plane components. You can control all the aspects of Docker from Kubernetes thanks to this worker nodes mechanics: container creation, network management, scaling containers, and so on. Adding more computing power to your cluster is easy; you just need to add more worker nodes and have them join the cluster to make room for more containers.
Important Note
By splitting the control plane and worker node components of different machines, you are making your cluster highly available and scalable. Kubernetes was built with all of the cloud-native concerns in mind; its components are stateless, easy to scale, and built to be distributed across different hosts. The whole idea is to avoid having a single point of failure by grouping all of the components onto the same host.
Here is a simplified diagram of a full-featured Kubernetes cluster with all the components listed. In this chapter, we're going to explain all of the components listed on this diagram, their roles, and their responsibilities. Here, all of the control plane components are installed on a single master node machine:
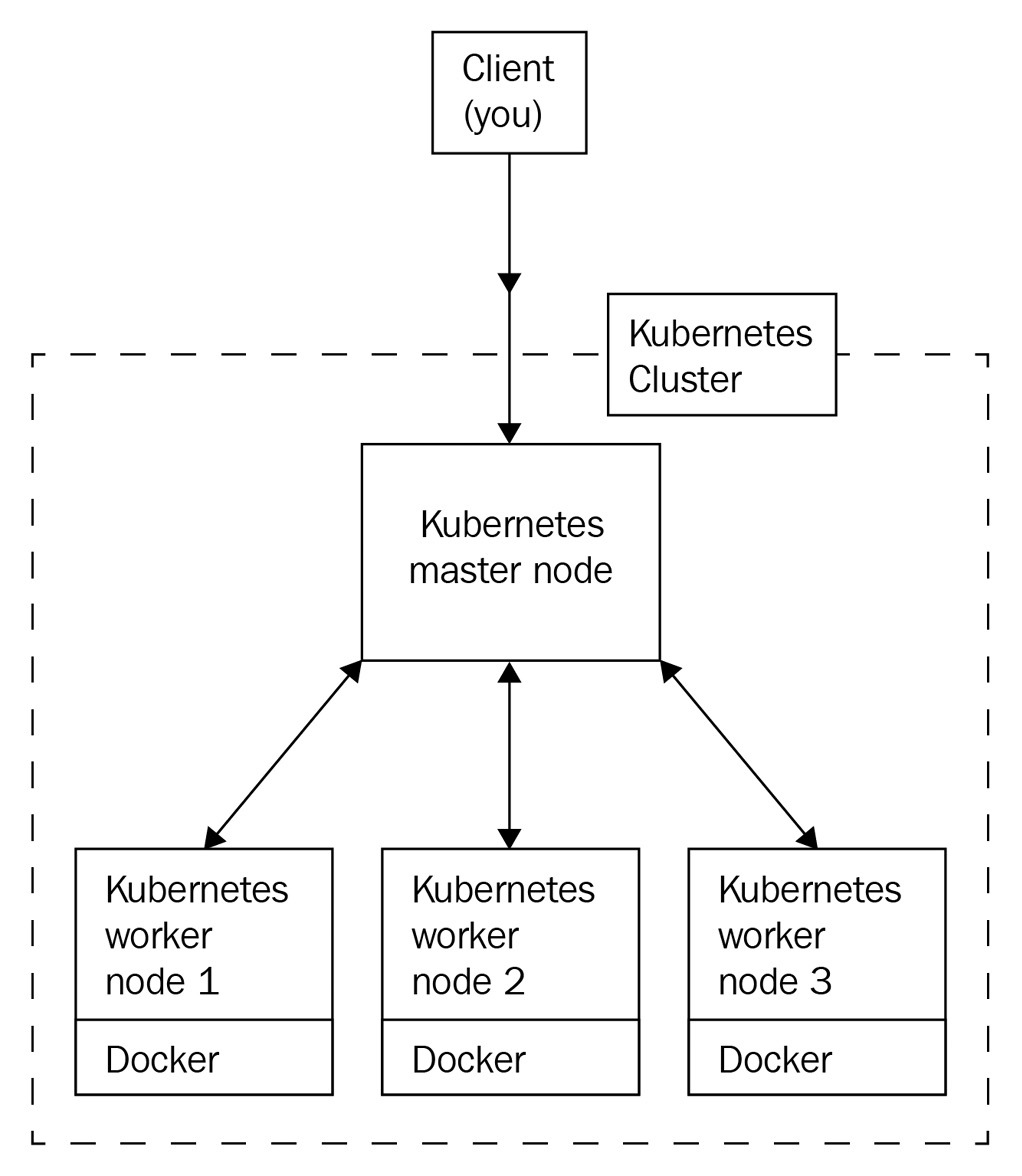
Figure 2.2 – A full-featured Kubernetes cluster with one master node and three worker nodes
The preceding diagram displays a 4-node Kubernetes cluster with all of the necessary components. As you can see, there are quite a few components.
The following is a table that lists all of the Kubernetes components that we will discuss in this chapter. In addition to all of these components, we will also examine the kubectl client that will allow you to interact with your Kubernetes clusters:

Bear in mind that Kubernetes is modified and, therefore, can be modified to fit a given environment. When Kubernetes is deployed and used as part of a distribution such as Amazon EKS or Red Hat Openshift, additional components could be present, or the behavior of the default ones might differ. In this book, for the most part, we will discuss bare Kubernetes. The components discussed in this chapter, and which are listed here, are the default ones. You will find them everywhere; they are the backbone of Kubernetes.
You might have noticed that the majority of these components have a name starting with Kube: these are the components that are part of the Kubernetes project. Additionally, you might have noticed that there are two components with a name that does not start with Kube. The other two (Etcd and Container Engine) components are two external dependencies that are not strictly part of the Kubernetes project, but which Kubernetes needs in order to work:
- Etcd is a third-party database used by the Kubernetes project. Don't worry; you won't have to master it in order to use Kubernetes.
- The container runtime is also a third-party engine. For us, it's going to be Docker because Kubernetes forcibly needs to manage something.
Rest assured, you will not have to install and configure these components all by yourself. Almost no one bothers with managing the components by themselves, and, in fact, it's super easy to get a working Kubernetes without having to install the components.
For development purposes, you can use Minikube, which will install all of the Kubernetes components on your local machine and run them as a single virtual machine. This is absolutely NOT recommended for production, but it is incredibly useful for development and tests.
For production purposes, you can use a cloud offering such as Amazon EKS or Google GKE. This will give you a production-grade Kubernetes cluster that is fully integrated with your preferred cloud provider along with all of the scaling mechanics that you are already familiar with. If you don't have access to such platforms, you can use Kubeadm. This is a Kubernetes installation utility that is capable of installing and configuring all Kubernetes components with just one command.
For educational purposes, you can install them, one by one, from scratch. A very famous tutorial, called Kubernetes the Hard Way, is available on the internet. It teaches you how to install and configure the components of Kubernetes from scratch. From public key infrastructure (PKI) management to networking and computing provisioning, this tutorial teaches you how to install Kubernetes on bare Linux machines in Google Cloud. Do not try to follow this tutorial if you are still new to Kubernetes as it's quite advanced.
You will observe many references to this tutorial on the internet because it's very famous. Bear in mind that installing, securing, configuring, and managing a production-grade Kubernetes cluster is time-consuming and not easy at all. You should avoid using the result of the Kubernetes the Hard Way tutorial in production.
The kube-apiserver component
Kubernetes' most important component is a REST API called kube-apiserver, Essentially, this is an API that exposes all Kubernetes features. You interact with Kubernetes by calling this REST API through the kubectl command-line tool.
The role of kube-apiserver
This is a component that is part of the control plane, meaning it's something to install and run on a master node. The kube-apiserver component is so important in Kubernetes that, sometimes, people believe it is Kubernetes itself. However, it's not. kube-apiserver is simply one component of the orchestrator. It's the most important, yes, but it's just one of them.
It's implemented in Go. Its code is open source, under the Apache 2.0 license, and you can find it hosted on GitHub.
When working with Kubernetes, the workflow is simple. When you want to give an instruction to Kubernetes, you will always have to send an HTTP request to kube-apiserver. When you want to tell Kubernetes to create, delete, or update a container, you should always do so by calling the correct kube-apiserver endpoint with the correct HTTP verb. This is how we will work all of the time with Kubernetes; kube-apiserver is the single entry point for all operations issued to the orchestrator. This best practice consists of never having to interact with one of the Docker daemons by yourself. You do run containers by sending instructions to the kube-apiserver component through the HTTP(S) protocol, and you let the Kubernetes components update the state of the Docker daemons for you.
Let's update the previous architecture diagram to make it a little more accurate with what happens in the real world:

Figure 2.3 – When interacting with Kubernetes, you are actually issuing HTTP requests to a kube-apiserver component running on a master node; that's the only component you will interact with directly
The kube-apiserver component is built according to the REST standard. REST is very effective at exposing features via HTTP endpoints that you can request through the various methods of the HTTP protocol (for example, GET, POST, PUT, PATCH, and DELETE). To illustrate this, consider a dummy API that is managing users. You would have a path called /users. By sending HTTP requests to this /users path, you can command different operations against the users resource:
- The following request will retrieve a list of all the users on an API running on localhost:
GET https://127.0.0.1/users
- This request would delete the users with an ID of 1 on an API running on my.api.com:
DELETE https://my.api.com/users/1
POST https://127.0.0.1:8080/users
As you might have gathered, the REST standard relies entirely on the HTTP protocol. By combining HTTP methods and paths, you can run different operations defined by the method, against resources defined by the path.
Additionally, the REST standard brings a lot of flexibility. Because adding new resources means adding new paths, any REST API can be extended. To bring things to life, REST APIs generally use a datastore to maintain the state of the objects or resources they are managing. With our dummy API, it could, for example, use a MySQL database and a users table to keep the users created by calling the API in the long term.
There are two ways in which such an API can enable data retention:
- The REST API keeps its data in its own memory:
This could work; however, in this case, the API is stateful and impossible to scale.
- By using a full-featured database engine such as MariaDB or PostgreSQL:
This is the go-to way; delegating the storage to a third-party engine on another host makes the API stateless. In this scenario, the API is scalable horizontally; you can add a lot of instances of your API as long as they can retrieve the state in the common database.
Any REST API can be easily upgraded or extended to do more than its initial intent. To sum up, here are the essential properties of a REST API:
- It relies on the HTTP protocol.
- It defines a set of resources identified by URL paths.
- It defines a set of actions identified by HTTP methods.
- It can run actions against resources based on a properly forged HTTP request.
- It keeps the state of their resources on a datastore.
Just like this dummy users API, kube-apiserver is nothing more than a REST API, which is at the heart of any Kubernetes cluster you will set up, no matter if it's local, on the cloud, or on-premises. It is also stateless; that is, it keeps the state of the resources by relying on a database engine called Etcd. This means you can horizontally scale the kube-apiserver component by deploying it onto multiple machines and load balance request issues to it using a layer 7 load balancer without losing data.
Important Note
By default, HTTP servers listen to port 80, whereas HTTPS services listen to port 443. This is not the case with kube-apiserver. By default, the port it listens to is port 6443. However, this configuration data can be overridden.
Because HTTP is supported almost everywhere, it is very easy to communicate with and issue instructions to a Kubernetes cluster. However, most of the time, we interact with Kubernetes thanks to a command-line utility named kubectl, which is the HTTP client that is officially supported as part of the Kubernetes project. This book will also focus on how to communicate with the API server through the use of the kubectl command-line tool. In this chapter, we will explore this tool, too.
When you download kube-apiserver, you'll end up with a Go-compiled binary that is ready to be executed on any Linux machine. The Kubernetes developers defined a set of resources for us that are directly bundled within the binary. These resources are the ones that Kubernetes manages. Unlike the dummy users API mentioned earlier, Kubernetes does not describe a Users resource. This is simply because Kubernetes was not meant to manage users but containers. So, do expect that all of the resources you will find in kube-apiserver are related to container management, networking, and computing in general.
Let's name a few of these resources, as follows:
- Pod
- ReplicaSet
- PersistentVolume
- NetworkPolicy
- Deployment
Of course, this list of resources is not exhaustive. If you want a full list of the Kubernetes components, you can access it from the official Kubernetes documentation API reference page at https://kubernetes.io/docs/reference/generated/kubernetes-api/v1.18/.
You might be wondering why there are no Containers resources here. As mentioned in Chapter 1, Kubernetes Fundamentals, Kubernetes makes use of a resource called a pod to manage the containers. For now, you can think of pods as though they were containers. We will learn a lot about them in the coming chapters. Each of these resources is associated with a dedicated URL path, and just as we witnessed earlier, changing the HTTP method when calling the URL path will have a different effect. All of these behaviors are defined in kube-apiserver; note that these behaviors are not something you have to develop, they are directly implemented as part of the kube-apiserver.
After the Kubernetes objects are stored on the Etcd database, other Kubernetes components will convert these objects into raw Docker instructions. This way, multiple Docker daemon can mirror the state of the cluster as it is stored in the Etcd datastore and described by kube-apiserver.
Another important point to bear in mind is that kube-apiserver is the single entry point and the single source of truth for the whole cluster. Everything in Kubernetes has been designed to revolve around kube-apiserver. You'll see that other Kubernetes components also have to read or change the state of the cluster: even they will do so by calling kube-apiserver through HTTP and never directly. As an administrator, aside from very rare occasions, you must never interact directly with the other components of the cluster. So, ensure you refrain from using SSH to sign in to a machine that is part of the cluster and start doing things manually.
The is because kube-apiserver does not just manage the state of the cluster, it also has tons of different mechanisms related to authentication, authorization, and HTTP response formatting. That's why doing things manually is really bad.
How do you install kube-apiserver?
In Chapter 3, Installing Your First Kubernetes Cluster, we will focus on how to install and configure a Kubernetes cluster locally. However, I would like you to know that all of the components of Kubernetes are available to download for free from Google's servers. You can download a specific version of kube-apiserver, along with any component of Kubernetes, using a simple wget command:
$ wget -q --show-progress --https-only –timestamping
https://storage.googleapis.com/kubernetes-release/release/v1.14.0/bin/linux/amd64/kube-apiserver
By calling this command, you will get the official build of kube-apiserver in version 1.14. However, running this binary won't be enough to have a fully working Kubernetes cluster. This is because, again, Kubernetes is not just the kube-apiserver component. You will require the other components of Kubernetes to make it work.
If you are wondering how to run kube-apiserver, essentially, there are two ways to proceed:
- From a Docker image on a worker node
- From a systemd unit file on a dedicated master node
Let's put aside the Docker method because it's a little bit more advanced. Instead, let's explain the simpler solution and run it as a systemd service. Essentially, systemd is a daemon management tool that is available by default on Linux and will be helpful to run kube-apiserver. I don't recommend you do that as it's going to be useless, but let me show you how easy it is to run a Kubernetes component on Linux thanks to systemd:
- We need to create a file at the following path: /etc/systemd/system/kube-apiserver.service.
- We need to put the following content inside the file. Essentially, this systemd unit file executes the kube-apiserver binary that was downloaded earlier with some arguments to configure it.
- Once the unit file has been created, reload the systemd daemon, enable the new service, and start it using the following commands:
$ systemctl daemon-reload
$ systemctl enable kube-apiserver
$ systemctl start kube-apiserver
Ensure that the following file exists in the directory with the following content. As you might have gathered, it's just a basic systemd unit file, /etc/systemd/system/kube-apiserver.service:
[Unit]
Description=Kubernetes API Server
Documentation=https://github.com/kubernetes/kubernetes
[Service]
ExecStart=/usr/local/bin/kube-apiserver
--advertise-address=${INTERNAL_IP}
--allow-privileged=true
--apiserver-count=3
--audit-log-path=/var/log/audit.log
--authorization-mode=Node,RBAC
--bind-address=0.0.0.0
--client-ca-file=/var/lib/kubernetes/ca.pem
--enable-admission-plugins=NamespaceLifecycle,NodeRestriction,LimitRanger,ServiceAccount,DefaultStorageClass,ResourceQuota
--etcd-cafile=/var/lib/kubernetes/ca.pem
--etcd-certfile=/var/lib/kubernetes/kubernetes.pem
--etcd-keyfile=/var/lib/kubernetes/kubernetes-key.pem
--etcd-servers=https://10.240.0.10:2379,https://10.240.0.11:2379,https://10.240.0.12:2379
--encryption-provider-config=/var/lib/kubernetes/encryption-config.yaml
--kubelet-certificate-authority=/var/lib/kubernetes/ca.pem
--kubelet-client-certificate=/var/lib/kubernetes/kubernetes.pem
--kubelet-client-key=/var/lib/kubernetes/kubernetes-key.pem
--kubelet-https=true \
--runtime-config=api/all \
--service-account-key-file=/var/lib/kubernetes/service-account.pem \
--service-cluster-ip-range=10.32.0.0/24
--service-node-port-range=30000-32767
--tls-cert-file=/var/lib/kubernetes/kubernetes.pem
--tls-private-key-file=/var/lib/kubernetes/kubernetes-key.pem
--v=2
Restart=on-failure
RestartSec=5
[Install]
WantedBy=multi-user.target
Don't attempt to run this example by yourself, as there are some missing parts for now. In the next chapter, we are going to set up a local Kubernetes, but at least now you know that it is easy to launch Kubernetes components as systemd: in the end, they are plain old Linux-compiled binaries.
Where do you install kube-apiserver?
Cloud services such as Amazon EKS or Google GKE, or other similar cloud offerings, will install and configure all the components of Kubernetes properly and expose you to a Kubernetes endpoint (or, if you prefer, the kube-apiserver endpoint) without giving you too much information regarding the underlying machines or load balancers provisioned. The following is a screenshot of a Kubernetes cluster that was created on the Amazon EKS service:

Figure 2.4 – The UI console showing details of a Kubernetes cluster provisioned on Amazon EKS
Note that the kube-apiserver component should be installed on a sufficiently powerful machine dedicated to its execution. Indeed, it is a very sensitive component. If your kube-apiserver component becomes inaccessible, your Docker containers will continue to run, but you won't be able to interact with them through Kubernetes. Instead, they become "orphan" containers running on isolated machines that are no longer managed by a Kubernetes cluster.
You want to avoid this situation; that's why you should pay special attention to your kube-apiserver instance(s).
In addition to this, be aware that the other Kubernetes components, as we'll discover a little later, constantly send HTTP requests to kube-apiserver in order to understand the state of the cluster or to update it. Because these components need to know the state of the cluster at any moment, they are running a lot of HTTP requests against the kube-apiserver component. And the more worker nodes you have, the more HTTP requests that will be issued against kube-apiserver. That's why kube-apiserver should be independently scaled as the cluster itself scales out.
As mentioned earlier, kube-apiserver is a stateless component that does not directly maintain the state of the Kubernetes cluster itself and relies on a third-party database to do so. You can scale it horizontally by hosting it on group of machines that are behind a load balancer such as an HTTP API. When using such a setup, you interact with kube-apiserver by calling your load balancer endpoint.
We have mentioned a lot of things about kube-apiserver. Now, let's take a look at the kubectl client. This is the official HTTP client that will allow you to interact with Kubernetes, or more exactly, with the kube-apiserver component of your Kubernetes cluster.
Exploring the kubectl command-line tool and YAML syntax
kubectl is the official command-line tool used by Kubernetes. You must install it on your local machine; we will learn how to install it properly in the next chapter. For now, we need to understand its role. This is an HTTP client that is fully optimized to interact with Kubernetes and allows you to issue commands to your Kubernetes cluster. You can install it right now since you are going to need it in the coming chapters:
- In Linux, use the following commands:
$ curl -LO https://storage.googleapis.com/kubernetes-release/release/v1.14.10/bin/linux/amd64/kubectl
$ chmod +x ./kubectl
$ sudo mv ./kubectl /usr/local/bin/kubectl
$ kubectl version # Should output kubectl version
- On macOS, use the following commands:
$ curl -LO https://storage.googleapis.com/kubernetes-release/release/v1.14.10/bin/darwin/amd64/kubectl
$ chmod +x ./kubectl
$ sudo mv ./kubectl /usr/local/bin/kubectl
$ kubectl version # Should output kubectl version
- In Windows, use the following commands
curl -LO https://storage.googleapis.com/kubernetes-release/release/v1.14.10/bin/windows/amd64/kubectl.exe
kubectl version # Should output kubectl version
This last example for Windows users requires you to add kubectl.exe to your PATH variable before being able to call kubectl.
The role of kubectl
Since kube-apiserver is nothing more than an HTTP API, any HTTP client will work to interact with a Kubernetes cluster. You can even use CURL to manage your Kubernetes cluster, but of course, there is a better way to do that.
The developers of Kubernetes have developed a client for the kube-apiserver component. This client comes in the form of a command-line tool called kubectl. So, why would you want to use such a client and not go directly with CURL calls? Well, the reason is simplicity. Indeed, kube-apiserver manages a lot of different resources and each of them has its own URL path.
Calling kube-apiserver constantly through CURL would be possible but extremely time-consuming. This is because remembering the path of each resource, and how to call it is not user-friendly. Essentially, CURL is not the way to go since kubectl also manages different aspects related to authentication against Kubernetes authentication layer, managing cluster contexts and more.
You would have to go to the documentation all of the time to remember which URL path, HTTP header, or query string. kubectl will do that for you by letting you call kube-apiserver through commands that are easy to remember, secure, and entirely dedicated to Kubernetes management.
When you call kubectl, it reads the parameters you pass to it, and based on them, will forge and issue HTTP requests to the kube-apiserver component of your Kubernetes cluster:

Figure 2.5 – The kubectl command line will call kube-apiserver with the HTTP protocol; you'll interact with your Kubernetes cluster through kubectl all of the time
This is the general workflow with Kubernetes: you will always interact with Kubernetes through kubectl. Once the kube-apiserver component receives a valid HTTP request coming from you, it will read or update the state of the cluster in Etcd based on the request you submitted. If it's a write operation, for example, to update the image of a running container, kube-apiserver will update the state of the cluster in Etcd. Then, the components running on the worker node where the said container is being hosted will issue the proper Docker commands in which to launch a new container based on the new image. This is so that the actual state of the Docker daemons always reflects what's in Etcd.
Given that you won't have to interact with Docker yourself, or with Etcd, we can say that the mastery of Kubernetes is largely based on your knowledge of the kubectl commands. To be effective with Kubernetes, you must master kubectl because it is the command that you will type constantly. You won't have to interact with any other components than kube-apiserver and the kubectl command-line tool that allows you to call it.
kubectl is available to download for free directly from Google's servers. This is an Apache 2.0 licensed project that is officially part of the Kubernetes project. Its source code is available on GitHub at https://github.com/kubernetes/kubectl.
Important Note
Since the kube-apiserver component is accessible through the HTTP(S) protocol, you could interact with any Kubernetes cluster with any HTTP-based library and even programmatically through your favorite programming language. Tons of kubectl alternatives exist. However, kubectl, being the official tool of the Kubernetes project, is the tool you'll systematically see in action in the documentation, and most of the examples you will find use kubectl.
How does kubectl work?
When you call the kubectl command, it will try to read a configuration file that must be created in $HOME/.kube/config. This configuration file is called kubeconfig.
All of the information, such as the kube-apiserver endpoint, its port, and the client certificate used to authenticate against kube-apiserver, must be written in this file. Its path can be overridden on your system by setting an environment variable, called KUBECONFIG, or by using the --kubeconfig parameter when calling kubectl:
$ export KUBECONFIG="/custom/path/.kube/config"
$ kubectl --kubeconfig="/custom/path/.kube/config"
Each time you run a kubectl command, the kubectl command-line tool will look for a kubeconfig file in which to load its configuration in the following order:
- First, it checks whether the --kubeconfig parameter has been passed and loads the config file.
- At that point, if no kubeconfig file is found, kubectl looks for the KUBECONFIG environment variable.
- Ultimately, it falls back to the default one in $HOME/.kube/config.
To view the config file currently used by your local kubectl installation, you can run this command:
$ kubectl config view
The kubeconfig file contains different information about the Kubernetes cluster it communicates with. That information includes the URL of kube-apiserver, the configured user for authenticating against the said kube-apiserver, and more. The role of the kubectl tool is to forge an HTTP request based on the arguments you pass to the kubectl command and to execute it against the cluster specified on its loaded kubeconfig file. Then, the HTTP request is actually sent to kube-apiserver, which produces an HTTP response that kubectl will reformat in a human-readable format and output to your Terminal.
The following command is probably one that you'll type almost every day when working with Kubernetes:
$ kubectl get pods
This command lists the Pods. Essentially, it will issue a GET request to kube-apiserver to retrieve the list of containers (pods) on your cluster. Internally, kubectl associates the pods parameter passed to the command to the /api/v1/pods URL path, which is the path that kube-apiserver uses to expose the pod resource.
Here is another command:
$ kubectl run nginx --restart Never --image nginx
This one is slightly trickier because run is not an HTTP method. In fact, this command will issue a POST request against the kube-apiserver component, which will result in the creation of a container called nginx, based on the nginx image hosted on Docker Hub.
Important Note
In fact, this command won't create a container but a Pod. We will discuss the pod resource extensively in Chapter 4, Running Your Docker Containers. Let's try not to talk about containers anymore; instead, let's move on to pods and familiarize ourselves with Kubernetes concepts and wordings. From now on, if you come across the word container, it means a real container from a Docker perspective. Additionally, pods refer to the Kubernetes resource.
The YAML syntax
kubectl supports two kinds of syntaxes:
- The imperative syntax
- The declarative syntax
Almost every instruction that you send to kube-apiserver through kubectl can be written using one of these two forms.
Essentially, the imperative form runs kubectl commands on a shell session. By passing in correct sub-commands and arguments, you can forge instructions for the kube-apiserver component. Let me give you a few examples of the imperative syntax. All of the following commands, once executed, issue HTTP requests against a given kube-apiserver endpoint:
- This command creates a pod, called my-pod, based on the busybox:latest Docker image:
$ kubectl run my-pod --restart Never --image busybox:latest
- This command lists all the ReplicaSet resources in the my-namespace namespace created on the Kubernetes cluster:
$ kubectl get rs -n my-namespace
- This command deletes a pod, called my-pod, in the default namespace:
$ kubectl delete pods my-pod
Imperative syntax has multiple benefits. If you already understand what kind of instructions to send to Kubernetes and the proper command to achieve this, you are going to be incredibly fast. The imperative syntax is easy to type, and you can do a lot with just a few commands. Some operations are only accessible with imperative syntax, too. For example, listing existing resources in the cluster is only possible with the imperative syntax.
However, the imperative syntax has a big problem. It is very complicated having to keep records of what you did previously in the cluster. If for some reason, you were to lose the state of your cluster and need to recreate it from scratch, it's going to be incredibly hard to remember all of the imperative commands that you typed in earlier to bring your cluster back to the state you want. You could read your .bash_history file but of course, there is a better way to do this.
So, let's move on to declarative syntax now. The declarative syntax is about writing a JSON or YAML file on disk first and then applying it against the cluster using the kubectl command line. Both JSON and YAML formats are supported; however, by convention, Kubernetes users prefer YAML syntax because of its simplicity. YAML is not a programming language. There is no real logic behind it. It's simply a kind of key:value configuration syntax that is used by a lot of projects nowadays, and Kubernetes is one of them.
Using kubectl in the declarative way requires you to create a file on your disk and to write some key:value pairs, in YAML format, inside of it. Each key:value pair represents the configuration data that you want to set to the Kubernetes resource you want to create.
The following is the imperative command that created the pod named my-pod using the busybox:latest Docker image we used earlier:
$ kubectl run my-pod --restart Never --image busybox:latest
We will now do the same but with the declarative syntax instead:
apiVersion: v1
kind: Pod
metadata:
name: my-pod
spec:
containers:
- name: busybox-container
image: busybox:latest
Let's say this file is saved on disk with the name of pod.yaml. To create the actual pod, you'll need to run the following command:
$ kubectl create -f pod.yaml
This result will be the equivalent of the previous command.
Each YAML file that is created for Kubernetes must contain four mandatory keys:
- apiVersion:
This field tells you in which API version the resource is declared. Each resource type has an apiVersion key that must be set in this field. The pod resource type is in API version v1.
- Kind:
This Kind field indicated the resource type the YAML file will create. Here, it is a pod that is going to be created.
- Metadata:
This field tells Kubernetes about the name of the actual resource. Here, the pod is named my-pod. This field describes the Kubernetes resource, not the Docker one. This metadata is for Kubernetes, not for Docker.
- Spec:
This field tells Kubernetes what the object is made of. In the preceding example, the pod is made of one container that will be named busybox-container based on the busybox:latest image. These are the containers that are going to be created on Docker.
Another important aspect of the declarative syntax is that it enables you to declare multiple resources in the same file using three dashes as a separator between the resources. Here is a revised version of the YAML file, which will create two pods:
apiVersion: v1
kind: Pod
metadata:
name: my-pod
spec:
containers:
- name: busybox-container
image: busybox:latest
---
apiVersion: v1
kind: Pod
metadata:
name: my-second-pod
spec:
containers:
- name: nginx-container
image: nginx:latest
You should be able to read this file by yourself and understand it; it just creates two pods. The first one uses the busybox image, and the second one uses the nginx image.
Of course, you don't have to memorize all of the syntaxes and what value to set for each key. It would be useless for you, so just use copy and paste from the documentation when needed.
The declarative syntax offers a lot of benefits, too. With it, you'll be slower because writing these YAML files is a lot more time-consuming than just issuing a command in the imperative way. However, it offers two major benefits:
- Infrastructure as Code (IaC) management:
You'll be able to keep the configuration stored somewhere and use Git to version your Kubernetes resources, just as you would do with IaC. If you were to lose the state of your cluster, keeping the YAML files versioned in Git will enable you to recreate it in a clean and effective manner.
- Create multiple resources at the same time:
Since you can declare multiple resources in the same YAML file, you can have entire applications and all of their dependencies in the same place. Additionally, you get to create and recreate complex applications with just one command. Later, you'll discover a tool called Helm that can achieve templating on top of the Kubernetes YAML files. Thanks to this tool, it's going to be easier to manage resources through YAML files.
There is no better way to use kubectl; these are just two ways to interact with it, and you need to master both. This is because some features are not available with the imperative syntax, while some others are not available with the declarative syntax. For example, you cannot create a multi-container pod from the imperative syntax, and you cannot list running pods from the declarative syntax. That's why you need to master both.
Remember that, in the end, both call the kube-apiserver component by using the HTTP protocol.
kubectl should be installed on any machine that needs to interact with the cluster
From a technical point of view, you must install and configure a kubectl runtime whenever and wherever you want to interact with a Kubernetes cluster.
Of course, it should be on your local machine, since this is where you are going to work with Kubernetes because you have to be able to communicate with your cluster from your own workstation. However, in larger projects, it's also a good idea to install kubectl in the agents/runner of your continuous integration platform.
Indeed, you will probably want to automate maintenance or deployment tasks to run against your Kubernetes cluster, and you will probably use a continuous integration (CI) platform such as GitLab CI or Jenkins to do that.
If you want to be able to run Kubernetes commands in a CI pipeline, you will need to install kubectl on your CI agents and have a properly configured kubeconfig file written on the CI agent filesystem. This way, your CI/CD pipelines will be able to issue commands against your Kubernetes cluster and update the state of your cluster, too.
Just to add, kubectl should not be seen as a Kubernetes client for human users only. It should be viewed as a generic tool to communicate with Kubernetes: install it wherever you want to communicate with your cluster.
Remember that the golden rule is very simple: you never do anything in Kubernetes without going through kubectl. It doesn't matter if it's made by you as a human administrator or as part of an automation script: make use of kubectl.
The Etcd datastore
We explained that kube-apiserver is a stateless API that can be scaled horizontally. However, it is necessary for kube-apiserver to store the state of the cluster somewhere, such as the number of containers created, on which machines, the names of the pods, which Docker images they use, and more. To achieve that, it uses the Etcd database.
The role of the Etcd datastore
Etcd is part of the control plane. The kube-apiserver component relies on a distributed NoSQL database called Etcd. Strictly speaking, Etcd is not a component of the Kubernetes project. As you might have gathered, Etcd is not named according to the same nomenclature as the other components (kube*). This is because Etcd is not actually a Kubernetes project but a project completely independent of Kubernetes.
Instead of using a full-featured relational database such as MySQL or PostgreSQL, Kubernetes relies on this NoSQL distributed datastore called Etcd to store its state persistently. Etcd can be used independently on any project, but Kubernetes cannot work without Etcd. This is something that you have to understand: Kubernetes has an external dependence. Instead of rewriting a database engine from scratch, Kubernetes developers decided to use Etcd. The good news is that Etcd is an open source project too, which is available on GitHub under license Apache 2.0, written in Go (just like Kubernetes). You can locate it at https://github.com/etcd-io/etcd. It's also a project incubated by the Cloud Native Computing Foundation (CNCF), which is the organization that maintains Kubernetes.
Important Note
Don't expect to be able to use another database engine with Kubernetes. It is not possible to replace Etcd with MySQL or another datastore. Kubernetes was really built to rely specifically on Etcd.
So, to sum up, Etcd is the database that Kubernetes uses to keep its state. When you call the kube-apiserver, each time you implement a read or write operation by calling the Kubernetes API, you will read or write data from or to Etcd. So, this is the main memory of your Kubernetes cluster, and the kube-apiserver can be seen as a proxy in front of Etcd.
Let's zoom into what is inside the master node:
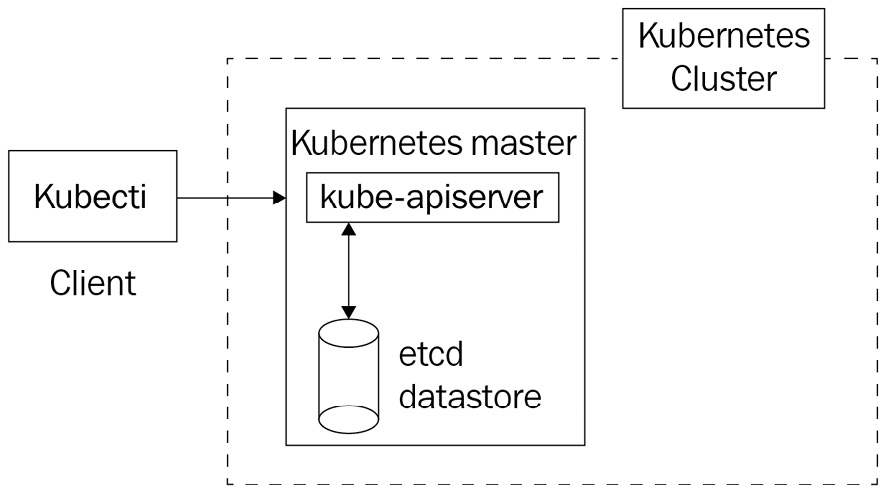
Figure 2.6 – The kube-apiserver component is in front of the Etcd datasore and acts as a proxy in front of it; kube-apiserver is the only component that can read or write from and to etcd
Etcd is the most sensitive point of your cluster. This is because if you were to lose the data inside it, your Kubernetes cluster would become completely unusable. It's even more sensitive than the kube-apiserver component. The reason is simple; after all, if kube-apiserver crashes, you can still relaunch it. However, if you lose the data in your Etcd datastore, or it somehow gets corrupted, and you don't have a backup to restore it, your Kubernetes cluster is dead.
Fortunately, you do not need to master Etcd in depth to use Kubernetes. It is even strongly recommended that you do not touch it at all if you do not know what you are doing. This is because a bad operation could corrupt the data stored in Etcd and, therefore, the state of your cluster.
Remember, the general rule in Kubernetes architecture says that every component has to go through the kube-apiserver to read or write in Etcd. This is because, from a technical point of view, the kubectl authenticates itself against the kube-apiserver through a TLS client certificate that only the kube-apiserver has. Therefore, it is the only component of Kubernetes that has the right to read or write in Etcd. This is a very important notion in the architecture of Kubernetes. All of the other components won't be able to read or write anything to or from Etcd without calling the kube-apiserver endpoints through HTTP.
Important Note
Please note that Etcd is also designed as a REST API. By default, it listens to port 2379.
Let's go back to the command that we mentioned earlier:
$ kubectl run nginx --restart Never --image nginx
When you execute the preceding command, the kubectl tool will forge an HTTP POST request that will be executed against the kube-apiserver specified in the kubeconfig file. The kube-apiserver will write a new entry in Etcd, which will be persistently stored on disk.
At that point, the state of the Kubernetes changes: it will then be the responsibility of the other Kubernetes component to reconcile the actual state of the cluster to the desired state of the cluster (that is, the one in Etcd).
Unlike Redis or Memcached, Etcd is not in-memory storage. If you reboot your machine, you do not lose the data because it is kept on disk.
Where do you install Etcd?
As with the kube-apiserver, cloud services such as Amazon EKS or Google GKE will install and configure a pool of servers running Etcd for you, without giving you much information about the machines. They offer you a working Kubernetes cluster without letting you know too much about the underlying resources.
If you were to run an Etcd datastore on-premises, or if you intend to manage it by yourself, you should know that Etcd is part of the Kubernetes control plane and should run on a master node.
It can be run as part of a systemd unit file, just as we saw with the kube-apiserver, but also as a Docker container, too. Etcd has the ability to natively include features, allowing you to deploy them in a distributed way. Therefore, it is also natively ready to be scaled horizontally since it's capable of spreading its dataset through multiple servers: Etcd is built as a clustering solution on its own.
In general, you can decide on the following:
- Install Etcd on a machine that is dedicated to it.
- Group Etcd on the same machines running other control plane components.
The first solution is better because you reduce the risk of the unavailability of your cluster in the event of an outage. Having a set of machines dedicated to running Etcd also reduces any security risks.
The problem is that it will always cost more than the first solution since it involves more machines, more planning, and also more maintenance. It's fine to run Etcd on the same machines as the kube-apiserver; however, if you can afford it, don't hesitate to use dedicated machines for Etcd.
The Kubelet and worker node components
So far, we have described key Kubernetes control plane components: the kube-apiserver component and the Etcd datastore. You also know that in order to communicate with the kube-apiserver component, you have to use the kubectl command-line utility to get data to and from the Etcd datastore through the help of kube-apiserver.
However, all of this is not telling us where and how these instructions result in running containers on worker nodes. We will dedicate this part of the chapter to explain the anatomy of a worker node by explaining the three components running on it:
- The container engine
The first component that should be installed on a worker node is the Docker daemon. Kubernetes is not limited to Docker; it can manage other container engines, such as rkt. However, in this book, we will be using Kubernetes with Docker, which is the most common setup.
Therefore, any Linux machine running Docker can be used as a base on which to build a Kubernetes worker node. Please note that a Kubernetes worker node can also run Docker containers that were not launched by Kubernetes. That is no problem.
The Docker daemon running on a Kubernetes worker node is a plain old Docker installation; it has nothing special compared to the one you might run on your local machine.
The Kubelet agent
As its name suggests (Kube*), the Kubelet is a component of Kubernetes, which is part of the worker node. In fact, it is the most important component of the worker node since it is the one that will interact with the local Docker daemon installed on the worker node.
The Kubelet is a daemon running on the system. It cannot run as a Docker container itself. Running it on the host system is mandatory; that's why we usually set up using systemd. The Kubelet differs from the other Kubernetes components because it is the only one that cannot run as a Docker container. The Kubelet strictly requires you to run on the host machine.
When the Kubelet gets started, by default, it reads a configuration file located at /etc/kubernetes/kubelet.conf.
This configuration specifies two values that are really important for the Kubelet to work:
- The endpoint of the kube-apiserver component
- The local Docker daemon UNIX socket
When the worker node launches, it will join the cluster by issuing an HTTP request against the kube-apiserver component to add a Node entry to the Etcd datastore. After that, running this kubectl command should list the new worker node:
$ kubectl get nodes
Note that kube-apiserver keeps a registry of all the worker nodes that are part of the Kubernetes cluster. You can retrieve a list of all your nodes by simply running this command.
Once the machine has joined the cluster, the Kubelet will act as a bridge between kube-apiserver and the local Docker daemon. Kubelet is constantly running HTTP requests against kube-apiserver to retrieve pods it has to launch. By default, every 20 seconds, the Kubelet runs a GET request against the kube-apiserver component to list the pods created on Etcd that are destined to it.
Once it receives a pod specification in the body of an HTTP response from kube-apiserver, it can convert this into Docker containers specification that will be executed against the specified UNIX socket. The result is the creation of your containers on your local Docker daemon.
Important note
Remember that Kubelet does not read directly from Etcd, rather it interacts with the kube-apiserver that exposes what is inside the Etcd data layer. Kubelet is not even aware that an Etcd server runs behind the kube-apiserver it polls.
These polling mechanisms, called watch mechanisms in Kubernetes terminology are precisely how Kubernetes proceeds to run and delete containers against your worker nodes at scale. Each Kubelet instance on each worker node is watching kube-apiserver to get noticed when a change occurs in the Etcd datastore. And once a change is noticed, Kubelet is capable of converting the changes into corresponding Docker instructions and communicating with the local Docker daemon using the Docker UNIX socket specified in the Kubelet configuration file. There are two things to pay attention to here:
- Kubelet and the kube-apiserver must be able to communicate with each other through HTTP. That's why HTTPS port 6443 must be opened between the worker and master nodes.
- Because they are both running on the same machine, Kubelet and the Docker daemon are interfaced through the usage of UNIX sockets.
Each worker node must have its own Kubelet, which means more HTTP polling against the kube-apiserver as you add more worker nodes to your cluster. If your Kubernetes cluster has hundreds of machines, it could result in a negative performance impact on the kube-apiserver. Ultimately, you can even DDoS your kube-apiserver by having too many worker nodes. That's why it's important to make the kube-apiserver and the other control plane component highly available by scaling them efficiently.
If you create Docker containers manually on a worker node, the Kubelet won't be able to manage it. You can completely bypass Kubernetes and create containers on your worker nodes without having to use the Kubelet. Running a plain old docker run command would work. Just bear in mind that the Kubelet is only capable of managing the Docker containers it created. The reason for this is that the containers won't be created as part of a pod in the Etcd datastore, and the sole job of Kubelet is that its local Docker daemon reflects the configuration that is stored in Ectd.
Important Note
Please note that the container engine running on the worker node has no clue that it is managed by Kubernetes through a local Kubelet agent. A worker node is nothing more than a Linux machine running a Docker daemon with a Kubelet agent installed next to it, executing raw Docker instructions. You can execute the same with the Docker client manually.
The kube-proxy component
This is the last of the three components running on a worker node. An important part of Kubernetes is networking. We will have to opportunity to dive into networking later; however, you need to understand that Kubernetes has tons of mechanics when it comes to exposing pods to the outside world or exposing pods to one another in the Kubernetes cluster.
These mechanics are implemented at the kube-proxy level; that is, each worker node requires an instance of a running kube-proxy so that the pods running on them are accessible. We will explore a Kubernetes feature called Service, which is implemented at the level of the kube-proxy component. Just like the Kubelet, the kube-proxy component also communicates with the kube-apiserver component.
There are also several other sub-components or extensions that are operating at the worker node level, such as cAdvisor or Container Network Interface (CNI). However, they are advanced topics that we will discuss later.
The kube-scheduler component
The kube-scheduler component is a control plane component. It should run on the master node.
This is a component that is responsible for electing a worker node out of those available to run a newly created pod.
The role of the kube-scheduler component
Similar to the Kubelet, kube-scheduler queries the kube-apiserver at regular intervals in order to list the pods that have not been scheduled. At creation, pods are not scheduled, which means that no worker node has been elected to run them. A pod that is not scheduled will be registered in Etcd but without any worker node assigned to it. Therefore, no running Kubelet will ever be aware that this pod needs to get launched, and ultimately, no container described in the pod specification will ever run.
Internally, the pod object, as it is stored in Etcd, has a property called nodeName. As the name suggests, this property should contain the name of the worker node that will host the pod. When this property is set, we say that the pod has been scheduled; otherwise, the pod is pending for schedule.
We need to find a way to fill this value, and that is the role of the kube-scheduler. To do this, the kube-scheduler poll continues the kube-apiserver at regular intervals. It searches for pod resources with an empty nodeName property. Once it finds such pods, it will execute an algorithm to elect a worker node. Then, it will update the nodeName property in the pod by issuing an HTTP request to the kube-apiserver component. While electing a worker node, the kube-scheduler component will take into account some configuration values that you can pass:

Figure 2.7 – The kube-scheduler component polls the kube-apiserver component to find unscheduled pods; it then schedules the pods by setting a nodeName property and updates the entry. Then, the pod gets launched on the proper worker node by the local Kubelet
The kube-scheduler component will take into account some configuration values that you can pass optionally. By using these configurations, you can precisely control how the kube-scheduler component will elect a worker node. Here are some of the features to bear in mind when scheduling pods on your preferred node:
- Node selector
- Node affinity and anti-affinity
- Taint and toleration
There are also advanced techniques for scheduling that will completely bypass the kube-scheduler component. We will examine these features later.
Important Note
The kube-scheduler component can be replaced by a custom one. You can implement your own kube-scheduler component with your own custom logic to select a node and use it on your cluster. It's one of the strengths of the distributed nature of the Kubernetes components.
Where do you install kube-scheduler?
Cloud providers such as Amazon EKS and Google GKE will create a highly available installation of the kube-scheduler component without exposing you to much information regarding the underlying machines that execute it.
Since the kube-scheduler component is part of the Kubernetes control plane, you should not install it on a worker node. Again, you can choose to install kube-scheduler on a dedicated machine or the same machine as kube-apiserver. It's a short process and won't consume many resources, but there are some things to pay attention to.
The kube-scheduler component should be highly available. That's why you should install it on at least two different machines. If your cluster does not have a working kube-scheduler component, new pods won't be scheduled, and the result will be a lot of pending pods. If no kube-scheduler component is present, it won't have an impact on the already scheduled pods. However, newly created pods won't result in new containers.
The kube-controller-manager component
This is the last Kubernetes component that we will review in this chapter. We will go through it very quickly because some notions might appear too abstract to you at that point.
The kube-controller-manager component is part of the Kubernetes control plane, too. It's a binary that runs what we call the reconciliation loop . It tries to maintain the actual state of the cluster with the one described in the Etcd so that there are no differences between the states.
The role of the kube-controller-manager component
Historically, the kube-controller-manager component is a big binary that implements a lot of things. Essentially, it embeds what is called a Controller. Kubernetes developers tend to break the different controllers being executed as part of the kube-controller-manager component into multiple smaller binaries. This is because, with time, kube-controller-manager holds multiple and diverse responsibilities that are not compliant with the microservice philosophy.
Sometimes, the actual state of the cluster differs from the desired state that is stored on Etcd. The reason for this could be because of a pod failure and more. Therefore, the role of the kube-controller-manager component is to reconcile the actual state with the desired state.
For example, let's take ReplicationController, which is one of the controllers running as part of the kube-controller-manager binary.
Later, you'll observe that it's possible to tell Kubernetes to create and maintain a specific number of pods across the different worker nodes. If for some reason, the actual number of pods differs from the number you asked for, ReplicationController will start running requests against the kube-apiserver component in order to recreate a new pod in Etcd so that the failed one is replaced on a worker node.
Here is a list of the few controllers that are part of it:
- NodeController
- NamespaceController
- EndpointsController
- ServiceaccountController
As you can gather, the kube-controller-manager component is quite big. But essentially, it's a binary that is responsible for reconciling the actual state of the cluster with the desired state of the cluster that is stored in etcd.
Where do you install kube-controller-manager?
The kube-controller-manager component is part of the Kubernetes control plane. Cloud providers such as Amazon EKS or Google GKE will create and configure a kube-controller-manager component for you.
Since it's a control plane component, it should run on a master node. The kube-controller-manager component can run as a Docker container or a systemd service similarly to kube-apiserver. Additionally, you can decide to install the kube-controller-manager component on a dedicated machine.
How to make Kubernetes highly available
As you've observed earlier, Kubernetes is a clustering solution. Its distributed nature allows it to run on multiple machines. By splitting the different components across different machines, you'll be able to make your Kubernetes cluster highly available. Next, we will have a brief discussion on the different Kubernetes setups.
The single-node cluster
Installing all Kubernetes components on the same machine is the worst possible idea if you want to deploy Kubernetes in production. However, it is perfectly fine for testing your development. The single-node way consists of grouping all of the different Kubernetes components on the same host or a virtual machine:
Figure 2.8 – All of the components are working on the same machine
In general, this setup is considered a good way to start your journey with Kubernetes using local testing. There is a project called Minikube that will help you set up a single-node Kubernetes on your local machine by running a virtual machine from a pre-built image with all of the components properly configured inside it. Minikube is good for testing locally, but of course, all of the features requiring multiple nodes won't be available with Minikube. Please note that it is, in fact, possible to run Minikube as a multi-node cluster but should absolutely not be used in production. However, still, it's a good way to start. Just remember to never deploy such clusters in production since it's a really terrible idea:

Overall, this setup is the best way to start experimenting with Kubernetes, although it prevents us from experimenting with multi-node scenarios. However, it's the worst process for production. We recommend that you do not ever deploy such a setup for a production workload.
The single-master cluster
This setup consists of having one node executing all of the control plane components with as many worker nodes as you want:

Figure 2.9 – A single master node rules all of the worker nodes (here, it is three)
This setup is quite good, and the fact that there are multiple worker nodes will enable high availability for your containerized application. However, there is still room for improvement.
There is a single point of failure since there is only one master node. If this single master node fails, you won't be able to manage your running Docker containers in a Kubernetes way anymore. Your containers will become orphans, and the only way to stop/update them would be to SSH on the worker node and run plain old Docker commands.
Also, there is a major problem here: by using a single Etcd instance, there is a huge risk that you lose your dataset if the master node gets corrupted. If this happens, your cluster will be impossible to recover.
Lastly, your cluster will encounter an issue if you start scaling your worker nodes. Each worker node brings its own Kubelet agent, and periodically, Kubelet polls the kube-apiserver every 20 seconds. If you start adding dozens of servers, you might DDoS your kube-apiserver, resulting in an outage of your control plane. Remember that your master node/control plane must be able to scale in parallel with your worker nodes:

Overall, this setup will always be better than a single-node Kubernetes; however, it's still not highly available.
The multi-master multi-node cluster
This is the best way to achieve a highly available Kubernetes cluster. Both your running containers and your control plane are replicated to avoid a single point of failure.

Figure 2.10 – This time, the cluster is highly available
By using such a cluster, you are eliminating all the risks because you are running multiple instances of your worker nodes and your master nodes. Both of the control plane components that are your running containers will be scalable, and since the kube-apiserver component is a stateless API, it's also ready to be scaled.
You will need a load balancer on top of your kube-apiserver instances in order to spread the load evenly between all of them, which will require a little bit more planning. Even though we don't have much information about this, it is almost certain that cloud providers such as Amazon EKS or Google GKE are provisioning Kubernetes clusters that are multi-master multi-worker clusters. If you wish to take it a step further, you can also split all of the different control plane components across a dedicated host. It's better but not mandatory, though. The cluster described in the preceding diagram is perfectly fine.
Before we end this chapter, I'd like to sum up all of the Kubernetes components. This table will help you to memorize all of their responsibilities:

These components are the default ones and are officially supported as part of the Kubernetes project. Remember that other Kubernetes distributions might bring additional components, or they might change the behavior of these ones.
These components are the strict minimum that you need to have a working Kubernetes cluster.
Summary
This was quite a big chapter, but at least, now, you have a list of all of the Kubernetes components. Everything we will do later on will be related to these components: they are the core of Kubernetes. This chapter was full of technical details too, but it was still relatively theoretical. Don't worry if things are still not very clear to you. You will gain a better understanding through practice.
The good news is that you are now completely ready to install your first Kubernetes cluster locally and things are going to be a lot more practical from now on. It is the next step, and that's what we will do in the next chapter. After the next chapter, you'll have a running Kubernetes cluster locally on your workstation, and you will be ready to run your first pods using Kubernetes!