In the last chapter, we upgraded our Content Management System to use a database, pretty much without any real thought to the overall application we want to end up with. We created a table for our content, which originally had no provisions for multiple pages. While we did add a column to the table when we figured out that we wanted multiple pages worth of content, we had to go back and add data for the new column for those records we had already created. It wasn't hard; we added the name Home to our first record in the PageName column. However, what if we already had 100, or 500, or even a million records in the table? It would have been a lot smarter to plan the columns in the table before we started filling them with data.
And that's what architecture is. Just like architecture for a building, program architecture is a plan for the development of the program. It includes a foundation for the program to rest on, supporting structures for the various parts of the program and individual rooms, or functions, of the program. They are all spelled out in vast detail, so that the builder, or programmer, can work from the architectural plan and create the program. But they are also only lines on paper, which can be changed as needed such as when the client wants a three-car garage instead of two, or an event calendar on every page.
One of the basic standards of good development is to separate content from presentation. This means we want the content, the actual words, pictures, and so on, to be present in the system without being attached to any presentation specifics such as fonts, background colors, layout, or anything else. The advantage to this is that we don't need to edit the content to change the way our site looks. We will also stay away from using HTML for formatting, and instead use cascading style sheets (CSS), wherever possible. This allows us to change a few lines in a single CSS file to change the look of all of our web pages.
In this chapter, we'll look at all of these, as well as plan our database structure and lay out our data relationships. We'll look at ways to access the data, apply some simple business logic to it, and then present that data on a web page. This separation of the data, data access, business logic, and presentation is often referred to as n-tier programming. Although we won't get heavily into programming separate tiers for our Content Management System, we will walk through the process.
By the end of this chapter, you will have a better understanding of:
Multi-tier architecture
Interacting with the data store
Creating sample articles to work with
The fundamentals of a data access layer
The fundamentals of a business logic layer
Using typed datasets
Creating your data access and business logic layer classes
The beginnings of your presentation layer
In larger programming environments, where the entire application is not created by a single developer, many of the programming tasks are broken into separate tiers. Separation of these tiers makes maintenance and expansion of an application easier, and allows for the development of each tier to fall to a programmer who is expert in that programming arena. There is no way a modern application developer can be an expert, or even relatively fluent, in all aspects of development, so teams of developers are essential. There are often database programmers, network programmers, and graphic designers involved in a project, each of whom may have little or no idea about the other's job.
Another reason why n-tier architecture is so prevalent is that modern applications have to adapt to changing conditions. A corporate merger may mean a change of database, new business rules, or a new design for the end-user interface. It is far easier to change these aspects if they are separated from each other than if a developer has to sift through thousands of lines of code to find the needed changes.
The solution for these issues is separation of the application into tiers, usually four tiers that are often referred to as three. These tiers are:
Data Layer: This tier represents the database itself and any programming within it. There may be specific programming involved such as stored SQL procedures to handle data retrieval or SQL triggers to update data when other data is changed.
Data Access Layer (DAL): This layer accesses the data and exposes the data to the Business Logic Layer. This layer often includes some validation of data, constraints on the type of data that can be entered, and possibly some data formatting.
Business Logic Layer (BLL): This layer is where business logic occurs. Business logic includes whatever might be specific to the business such as gross receipts always being reported before taxes, finances must be expressed in Euros and US dollars, or employees are always listed as last name, first name.
Presentation Layer: This layer determines the actual presentation that is viewed by the user, the styles, themes, layout of pages, and so on. It is at this layer that all typographic settings occur, including font size, color, and so on.
These tiers are often referred to as three-tier architecture because the data layer (the data store itself) is often combined with the data access layer. In fact, for small applications, it makes little sense to abstract these layers when there is very little for a layer to do. In the case of our Content Management System, we will not be using SQL stored procedures, as this is a learning application and there aren't enough pages in this book to teach SQL database programming. We'll also tend to blur the lines in these layers because our application is small, but we'll make sure the concept of the separate tiers is still adhered to. Just because our application is small doesn't mean we should toss aside good programming techniques.
Our architecture starts at the foundation with the data store, in our case, with the SQL Server 2005 Express database. We created the database and the Content table in Chapter 2, but we need more than just a single table for a full Content Management System. While we'll create other new tables as we move deeper into the application, let's create a Pages table now to hold information about our web site pages. In Chapter 2, we had a single table with the content assigned to a page name, but that structure is entirely inflexible as we couldn't easily move content from one page to another. In addition, we may need to store additional information about pages such as page hierarchy. However, database normalization principles tell us that data about a single entity such as a page should be kept in the same table, excluding data about another entity such as content.
As we're also going to be adding additional tables as we add features to the application, we want a consistent naming scheme that won't confuse us as to what data we're asking for and receiving. Our Chapter 2
Content table had a column, which also was named Content, making the use of the word Content ambiguous—do we want the Content field or the entire Content table? SQL uses a dotted notation for specifying the database, user, table, and field, so the specific Content field would be specified as SimpleCMS.sa.Content.Content. However, we really want a better scheme for identifying data quickly and uniquely.
Note
Specifying an SQL Server database
In Chapter 2, we referred to the Content field in the Content table as Content.Content, which is an acceptable notation. The full identification is actually {Database}.{DatabaseUser}. {TableName}.{FieldName}, which in this case would be SimpleCMS.sa.Content.Content. The database user in our case is also the database owner, so dbo can be substituted for sa. As we are connected to only a single database with a single user account, we can drop these specifications and still be specific because they cannot be misconstrued. We will never use a second database or username in our application. If we were working in a single table, we could drop the table name as well, but good practice is to always use the table name to avoid confusion for other developers. It also makes maintenance easier, as we might upgrade the application in the future to use two tables for the query, and as we could possibly have two tables with the same field names such as employee.address and customer.address, it's always safest to specify both. To provide further uniqueness, we could name the fields employee.employee_address and customer.customer_address if we think there may ever be an issue. Remember, it's harder to change a field or table name later than it is when planning the layout.
We're going to modify our application into three parts that will make up a page when combined. The first will be an article, which is the part that displays the content. The second is a pane, which holds modules on a page. And the third is the page itself, which holds panes containing articles. The reason for this is that we want the overall look and feel to be governed at the page level, making every additional page fit into the same theme as the first. We will also want to organize multiple panes on a page to define the layout, and we want to have multiple articles that can display in panes. Now, we'll have three entities—named Pages, Panes, and, Articles—each being a table.
Each page will have a number of attributes that we want to manage. We'll want a name, an ID, and we'll need to determine where a page is in relation to other pages. To do this, we'll use the parent/child relationship and identify a parent page for every page. This way, if a page has no parent, it will be in the root of our page menu. On the other hand, if it has a parent, it will fall under the parent page on the menu.
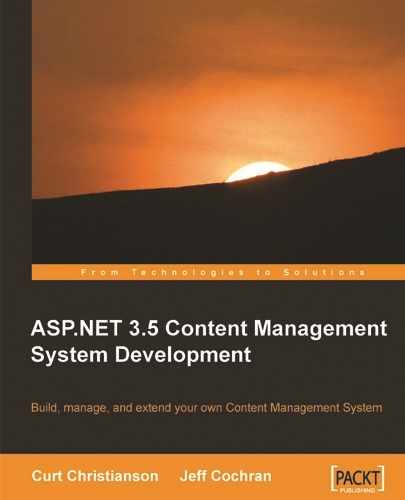
To create the Pages table, open SQL Server Management Studio and expand Tables under the SimpleCMS database. Leave the Content table alone for now, we won't use it in this chapter. However, we don't have a reason to get rid of it yet, especially if we already have data we want to store in it. Right-click in the Tables pane and choose New Table. Create a Pages table with three columns, PageID, PageName, and PageParentID, set to data types of int, nvarchar(50), and int respectively. Do not allow nulls in any field. In the Properties pane, set the name to Pages and the Identity Column to PageID. Your table should look something like this when you save it:
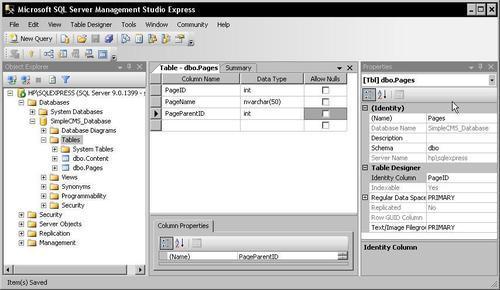
We need to create the Panes table in the same manner. Right-click on Tables in the Object Explorer pane and choose New Table. Create a Panes table, with columns of PaneID, PaneName, and PanePageID, set to the data types of int, nvarchar(50), and int respectively. Allow nulls for the PaneName and PanePageID fields. You guessed it, PaneID will be the Identity Column. The table should look like this:
In this table, we left the PageName and PageID as null because we don't actually need them when we create a pane. We will assign them individually. In the case of Pages, we don't want a page without a name, or the identification of its parent page, as we wouldn't be able to add it to a menu. In later chapters, we'll expand these tables to accommodate other data, but we just need these fields for now.
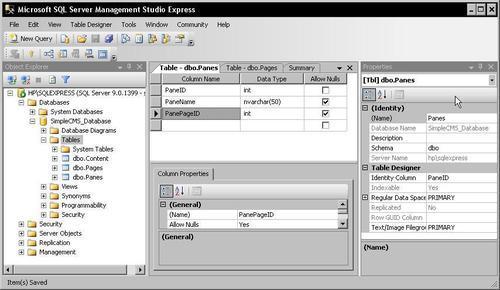
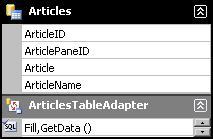
Articles are what our content will be displayed with, along with the permission to edit that content. This table is essentially the heart of the application, with other tables controlling the display and positioning of the articles and the structure of the web site. To begin this table, we need four columns—ArticleID, ArticleName, Article, and ArticlePaneID. We need the ArticlePaneID column to define which pane this particular article will appear in. We will eventually want to describe this article with many other pieces of data such as an author, date, and expiration date, but the available columns would suffice for now. Create the Articles table with the following settings:
|
Column name |
Data type |
Can be null |
|---|---|---|
|
|
|
No |
|
|
|
Yes |
|
|
|
Yes |
|
|
|
Yes |
Name this table Articles and use the ArticleID as the Identity Column. When you finish, it should look something like this:
We're going to use the Articles table, as we did the Content table in the previous chapter, and it helps to have some sample data in the table when we start working with it. In the previous chapter, we added data manually, by directly editing the table. However, that's not the most efficient way to add sample data to a table. Instead, we can use a simple SQL query to add the data.
Open SQL Server Management Studio Express if it's not already open, highlight the SimpleCMS database and click on the New Query button on the toolbar. This brings up the query window. Enter the following query into the window:
INSERT Into Articles
(ArticleName, Article, ArticlePaneID)
VALUES
('Article 1','<p>Lorem ipsum dolor sit amet, consectetuer adipiscing elit. Donec sodales luctus nisl. Duis fringilla felis
convallis magna. Nullam urna. Nulla ante. In eget tortor. Sed est nibh, consectetuer ut, aliquet nec, euismod sit amet, odio.
Nam nisl. Morbi sapien dolor, consectetuer sit amet, condimentum non, lobortis vitae, lorem. Sed consequat, erat vitae
feugiat rutrum, ligula ipsum pharetra dui, in dapibus nisi massa ut sem. Integer at nunc quis lectus facilisis molestie.
Vestibulum fermentum.</p>',1);
GO
Note
SQL Note:
You will note that we haven't included the ArticleID parameter in the INSERT statement, any guess as to why? If you remember, the ArticleID column is an Identity column with an auto-numbering. This means that the column will automatically generate a new ID, so we don't have to insert is manually.
Click on the Parse button on the toolbar (the green check mark) or press Ctrl+F5 to parse the query. If you have any errors, check the code and test with the Parse option until the code passes. Then click on the Execute button or press F5 to execute the query and populate one record. Do this several more times, each time changing the article title, so you add multiple records to the Articles table. The code download includes a simple SQL query you may run to populate the table without entering this query if you wish.
Note
Parsing SQL queries
When entering a query in the SQL Server Management Studio Express, it's always wise to parse the query before executing it. Parsing simply processes the query for SQL syntax errors without actually affecting the database, and is a safe way to ensure the code will work before it is executed. Remember that even code that is syntactically correct may be wrong, so double check any query before you execute it, to make sure it will do what you intend. Executed queries affect the data immediately, and the effect is irreversible. If in doubt, make sure you have a good backup before you start entering queries.
The purpose of the Data Access Layer (DAL) is to abstract the data source—in our case, to abstract the SimpleCMS database from the rest of the code. This allows us to change the data source (to maybe an Oracle or MySQL database) with minimum effort, which may be needed to move our application to a new client or company. The data access layer also allows us to handle database access more securely, as the actual page code doesn't touch the database and can't pass on security vulnerabilities.
We want to include anything related to accessing data in the DAL—the business logic layer and presentation layer should never access the data source directly. In addition, the DAL should use strongly typed datasets, which inherit from the ADO.NET DataSet class and provide all the methods and properties we will need to access the data source itself. In many cases, the DAL would also include SQL stored procedures to handle data manipulation, but we will not be using stored procedures for our application. There simply isn't enough space in the book to cover database programming in addition to our basic CMS application.
We'll start by creating a typed dataset using the Visual Web Developer wizard, which will also walk us through creating a table adapter to access the dataset. Open Visual Web Developer and open the SimpleCMS web site. In Solution Explorer, right-click the root of the site and choose Add New Item. Add a DataSet, using the default settings and name. When you are prompted, choose to save the dataset in the App_Code folder. After the dataset saves, you will be presented with the DataSet Designer.
Right-click in the designer pane and choose to Add a new TableAdapter. The TableAdapter wizard will open. Choose your existing SimpleCMS connection string and click Next, then choose SQL Statements and again click Next. You'll be presented with the SQL query window. We'll create this table adapter for use with the Articles table, and we'll start with a query that selects all the tables. Enter this in your query window:
SELECT ArticleID, ArticlePaneID, Article, ArticleName
FROM Articles
This selects all columns in our Articles table. We could simply use the code:
SELECT * FROM Articles
But this is a lazy programming method. In a query, we may not need every column and, even if we do, specifying the columns individually will let someone reading the code immediately know what we want.
Click the Advanced Options button, choose Generate Insert, Update and Delete Statements, and click OK. At this point, you may select Next until the TableAdapter is created, or simply choose Finish and the TableAdapter will be created, looking something like this:
At this point, you have created the DataSet attached to the Articles table, along with a corresponding ArticlesTableAdapter that includes a Fill method and a GetData() method. These can be used in an ASP.NET form with simple programming and no data coding. Let's create a simple test page for the data adapter we have created.
Right-click the root of your site in Solution Explorer and choose Add New Item. Add a new web form, and name it Test.aspx. We'll just delete it after we test, so we don't need anything fancy. In the Test.aspx form, we'll use a GridView control to display the data from our table. You can either drag one from the toolbox to the page or add the following lines in the default <div> created with the new form:
<asp:GridView ID="GridView1" runat="server">
</asp:GridView>
This is all we'll do with the Test.aspx page itself. Open the code behind file, Test.aspx.vb, and add the following Page_Load subroutine:
Protected Sub Page_Load(ByVal sender As Object,
ByVal e As System.EventArgs) Handles Me.Load
Dim articlesAdapter As New DataSet1TableAdapters.ArticlesTableAdapter
GridView1.DataSource = articlesAdapter.GetData()
GridView1.DataBind()
End Sub
As you add this code, you'll notice that Visual Web Developer's IntelliSense will pick up DataSet1 and the methods we created for it. This is because of the strongly typed dataset, which allows IntelliSense to work with it. The Test.aspx form will then look like the following:
Okay, it's ugly. But this isn't the presentation layer, so we don't care. All this page does is show that a few simple lines in the Page_Load event allow us to work with the data access layer we created.
The table adapter we created for our dataset has a Fill method and a GetData() method, both of which return the entire table. We will almost never want every article in the Articles table returned. We would want only the specific article we wanted to display. And we would normally want to retrieve our article by name, or maybe using the unique identifier, ArticleID. To make these retrievals possible, we simply set these methods up in our table adapter.
We know from the last chapter that we want a WHERE clause in our SQL query that specifies the data we want returned. The only thing we won't know until the user requests a specific article is the actual WHERE clause, so what we need to use is a parameterized query. This is simply a WHERE clause that uses a parameter in place of the specific WHERE details. Our current query that returns the entire table looks something like this:
SELECT ArticleID, ArticlePaneID, Article, ArticleName
FROM Articles
What we really want is something more like this:
SELECT ArticleID, ArticlePaneID, Article, ArticleName
FROM Articles
WHERE ArticleName = "Article 1"
But we don't know that we want Article 1 every time, so we have to substitute a parameter for the article name and then provide that parameter, when we call for the table adapter to do its work.
To configure the table adapter to handle the WHERE clause, open DataSet1.xsd from the App_Code folder in Visual Web Developer. Right-click on the ArticlesTableAdapter and choose Add Query. Choose Use SQL Statements and click Next. Now, choose SELECT, which returns rows, and finally click Next, bringing up the query window. The original query should be in the query window, which you can modify using the Query Builder. Otherwise, simply type in your new query. Modify the query by adding the WHERE clause at the end, so the query now looks like:
SELECT ArticleID, ArticlePaneID, Article, ArticleName
FROM Articles
WHERE (ArticleName = @ArticleName)
Click Next and rename the Fill and GetData methods to FillByArticleName and GetDataByArticleName. Finish the wizard and you'll see two new methods added to the ArticlesTableAdapter—FillByArticleName and GetDataByArticleName(@ArticleTitle).
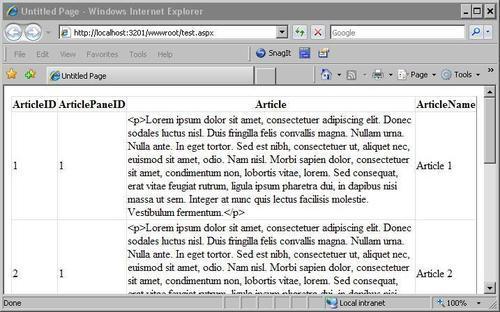
Once these methods have been added to the ArticlesTableAdapter, you can test them by modifying the code-behind file for Test.aspx—Test.aspx.vb. Change the Gridview1.DataSource line to read:
GridView1.DataSource = articlesAdapter.GetDataByArticleName _
("Article 1")
Now, when you view Test.aspx in your browser, you should see only a single record, something like shown in the following screenshot:

Add a second set of methods to the table adapter using the same process, this time to select by ArticleID, using this WHERE clause:
WHERE ArticleID = @ArticleID
As long as we pass the parameter required by the method to the table adapter, we no longer need to write SQL queries for this data. If you wish, you can modify the Test.aspx.vb file to display by ArticleID. Just remember that ArticleID is an integer, so the value doesn't need to be in quotes.
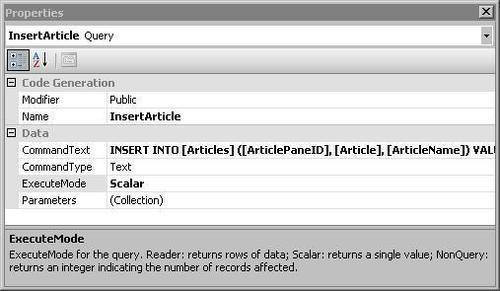
Now we can retrieve a record based on the ArticleName or ArticleID field. However, what if we want to add a new record—should we change an existing one or delete one altogether? For those functions, we'll create custom methods for our table adapter. In the designer screen, right-click on the TableAdapter and choose Add | Query. Choose Use SQL Statements and click Next, then choose Insert Query and Next. This will bring you to the query screen. Notice that the query is already created for you in a very basic manner. However, we need to modify it because when we insert a new article, we want to retrieve the automatically created ArticleID, so we can use it in our code. To do this, we will use the SELECT SCOPE_IDENTITY() function that returns the value of the last auto-generated Identity column in the scope of the query. This is actually a second query to the database, so we end the first query with a semicolon and then add this query to the code. Your query should look something like this:
INSERT INTO [Articles]
([ArticlePaneID], [Article], [ArticleName])
VALUES
(@ArticlePaneID, @Article, @ArticleName);
SELECT SCOPE_IDENTITY()
Name this function InsertArticle and save it. Insert methods normally return the number of rows affected, but we want to return the new ArticleID instead. To accomplish this, we have to change the ExecuteMode on our query. Click on the InsertArticle method we just created in the ArticlesTableAdapter and change the ExecuteMode to Scalar in the properties pane, as shown below:
To test this function, open the Test.aspx file and edit the Page_Load subroutine in the code behind to look like the following:
Protected Sub Page_Load(ByVal sender As Object, ByVal e _ As System.EventArgs) Handles Me.Load
Dim ArticlesAdapter As New _
DataSet1TableAdapters.ArticlesTableAdapter()
Dim NewArticleID As Integer = (ArticlesAdapter.InsertArticle( _
1, "This is a new article.", "New Article"))
GridView1.DataSource = ArticlesAdapter.GetData()
GridView1.DataBind()
End Sub
This test page will insert a new article on page load and then display the grid with all the articles. The newest article should be on the bottom, with an ArticleName of New Article and text reading: "This is a new article".
We also will need update and delete methods in our ArticlesTableAdapter. To create these, click on ArticlesTableAdapter to select it, and look at the Properties Pane for the DeleteCommand and UpdateCommand properties. Click the drop-down next to the UpdateCommand and select (New). This will create a new UpdateCommand listed as (UpdateCommand). In the CommandText property for the UpdateCommand, select the ellipses (...) to open the Query Builder. Here, we need to enter the query that will be executed when we update an article. Enter the following query:
UPDATE Articles
SET ArticleName = @ArticleName, Article = @Article,
ArticlePaneID = @ArticlePaneID
WHERE (ArticleID = @Original_ArticleID)
This query simply updates the ArticleName, Article, and ArticlePaneID fields with the parameters passed to the query, when the ArticleID is the same as the ArticleID passed to the query. Save this query and then modify the DeleteCommand in the same way, but with this query:
DELETE FROM Articles
WHERE (ArticleID = @Orginal_ArticleID)
This query simply deletes the article which has the ArticleID passed to the query. Once you have finished these changes, right-click on your web site root in the Solution Explorer pane and choose Build Web Site. The site must build with no errors before we can create the business logic layer.
The Business Logic Layer (BLL) is different from the data access layer in that it enforces business rules, those rules which are determined by business decisions and not by data restrictions or conditions. An example in our Content Management System would be if we had a mechanism to archive older articles, allowing retrieval but not editing. We might also want to restrict deletion of articles to a subset of users and not allow just anyone to delete an article. These would be business rules, as the only basis for the rule is how we wish to conduct our business.
For many rules, we could incorporate them into the table adapter code at the data access layer. We also might include them at the presentation layer. For example, we could disallow editing of archived articles in the data access layer code just as easily as anywhere else. We could also not allow archived articles to even get to the presentation layer for display by modifying code in the presentation layer. There are even some business rules that you will want to enforce at other layers such as corporate logos being displayed in the presentation layer, or the fact that dates and times are stored in the database as Date/Time fields so that we can perform calculations on them.
In our case, we won't have a lot of business logic, simply because this is a tutorial application. But if you were to extend this application for use in a business, good coding techniques mean we should plan for future code at this level now. So, let's create a business logic layer. To begin, let's clean up our project structure to make it easier to separate the DAL and BLL from each other, as we'll be creating BLL classes within the App_Code folder where our DataSet1.xsd file already is.
In Solution Explorer, right-click the App_Code folder and choose New Folder. Name this folder DAL. Create a second folder named BLL. You can now click and drag DataSet1.xsd into the DAL folder. One feature of the App_Code folder is that all files within that folder are compiled into the application at run-time (or during a command-line compile operation) without having to add code directories to the web.config file.
Our business logic layer will use classes, each of which handles a specific table adapter. In these classes, we'll handle basic business rules and validation, and pass requests between the presentation layer and the data access layer. In some ways, the BLL behaves as a proxy between the layers, especially for those functions where all we will do is pass information without working with the information within our BLL. For our BLL class, we will have methods for SELECT, INSERT, UPDATE, and DELETE operations on our DAL. We'll also have two separate SELECT methods—one to select by ArticleName and the other by ArticleID.
In Visual Web Developer 2008, right-click on the new BLL folder you created under the App_Data folder and choose New Item. Select the Class template and name it ArticlesBLL.vb. We will give this class five methods:
GetArticleByArticleID(ArticleID):Retrieves a specific article when given the ArticleIDAddArticle(ArticleID, ArticleName, Article, ArticlePaneID):Adds a new article to the databaseUpdateArticle(ArticleID, ArticleName, Article, ArticlePaneID): Updates an article already in the databaseDeleteArticle(ArticleID): Deletes a specific article when given the ArticleID
The first three functions merely pass a query on to the data access layer, passing either an ArticleID or ArticleName to retrieve a specific article, or nothing at all to retrieve all articles. The code that does this in our class looks similar to this code for the first function in our list, retrieving a list of all articles:
<System.ComponentModel.DataObjectMethodAttribute( _
System.ComponentModel.DataObjectMethodType.Select, True)> _
Public Function GetArticles() As DataSet1.ArticlesDataTable
Return Adapter.GetData()
End Function
We are simply passing the request to return all records to the GetData() method in our ArticlesTableAdapter and returning the data as a typed dataset. We can add validation logic or other business rules into this function, but for now we'll leave it as is. For example, in future, we might want to retrieve only those articles that haven't been archived, in which case we could modify the business rule to handle this.
The AddArticle and UpdateArticle functions are somewhat different from the GetArticle functions, as both AddArticle and UpdateArticle need to pass new data to the database access layer. We do this by creating a DataTable with the data to be added or updated, and passing it as a new DataRow to the data access layer. For example, the AddArticle function code looks like this:
<System.ComponentModel.DataObjectMethodAttribute _
(System.ComponentModel.DataObjectMethodType.Insert, True)> _
Public Function AddArticle(ByVal ArticleName As String, ByVal _
Article As String, ByVal ArticlePaneID As Nullable(Of Integer)) _

As Boolean
Dim Articles As New DataSet1.ArticlesDataTable()
Dim ArticleRow As DataSet1.ArticlesRow = Articles.NewArticlesRow()
If ArticleName Is Nothing Then ArticleRow.SetArticleNameNull() _
Else ArticleRow.ArticleName = ArticleName
If Article Is Nothing Then ArticleRow.SetArticleNull() _
Else ArticleRow.Article = Article
If Not ArticlePaneID.HasValue Then _
ArticleRow.SetArticlePaneIDNull() Else _
ArticleRow.ArticlePaneID = ArticlePaneID.Value
Articles.AddArticlesRow(ArticleRow)
Dim rowsAffected As Integer = Adapter.Update(Articles)
Return rowsAffected = 1
ArticlesBLL class, BLLmethodsEnd Function
We first create the ArticlesDataTable, and then the NewArticlesRow to add the new row to the database. We populate this row with the ArticleName, Article, and ArticlePaneID by setting each to the data we pass into the function from the presentation layer. In this process, as these columns in our database are null, we must also check to see if the data passed in is null and, if it is, we should set that data as null in our data row too.
Finally, we add the new row to the database and test the addition to ensure that only a single row was affected by the function. If no rows are affected, or more than one row is affected, we return False from our function, which we can process to present an error message to the user.
The last type of function we use is the DeleteArticle function which, as its name suggests, simply deletes the article matching the ArticleID we pass in. The code for this is simple.
<System.ComponentModel.DataObjectMethodAttribute _
(System.ComponentModel.DataObjectMethodType.Delete, True)> _
Public Function DeleteArticle(ByVal ArticleID As Integer) _
As Boolean
Dim rowsAffected As Integer = Adapter.Delete(ArticleID)
Return rowsAffected = 1
End Function
We simply delete the article matching the ArticleID and return a True/False, depending again on whether a single row was affected.
A quick test of the business logic layer can be made by modifying our Test.aspx application. Change the Page_Load subroutine in the code-behind file to the following:
Dim ArticlesLogic As New ArticlesBLL()
GridView1.DataSource = ArticlesLogic.GetArticles()
GridView1.DataBind()
This code uses the ArticlesBLL class that we created in our business logic layer to return all the articles in our database, through the GetArticles function in our business logic layer. It will actually look like the page we created to test the GetData() method from our ArticlesAdapter, and it should. While we are accessing that method through the intervening business logic layer, we aren't changing it in any way with our BLL. You'll see a more dramatic change, when we create the presentation layer.
The ASP.NET framework gives us some very useful tools for developing a presentation layer for our application. The major tool we'll use here is Master Pages, a template system for ASP.NET pages that provides for dynamic data to be inserted into the content panes. Using Master Pages cleanly separates the overall site design from the content, essentially creating a site-wide look and feel that is independent of the dynamically generated content displayed.
We'll start our presentation layer for the application by building a Master Page, which will hold our content and provide some basic site-wide formatting. To begin, add a new file to the SimpleCMS application, choose the Master Page template and name the file SimpleCMS.master. You will notice that the default code added to the SimpleCMS.master file includes a new control—the ContentPlaceHolder control. This is a special control that takes all code and text from a related Content control in a content page and displays it as is in the Master Page. By default, the new Master Page has two ContentPlaceHolder controls—one named Head and the other named ContentPlaceHolder1. There cannot be two ContentPlaceHolder controls on a Master Page with the same name, as this is what is used to determine which content page is loaded.
We are going to add some layout and some default design to our Master Page, which affects all pages that are built using this particular Master Page. To start, we'll do the layout for the Master Page with tables, an old HTML standby that still works. Tables have passed from favor, and CSS is the way you really want to handle this. However, for our first run-through, we'll stick with tables.
For our Master Page, we'll add a design table that has one column and three rows. The top row will be our site's logo, the middle row will be our ContentPlaceHolder, and the bottom row will be our copyright statement, so nobody tries to steal our brilliant design work. Open the SimpleCMS.master file and replace everything between the <form> tags with this code:
<table border="0" cellpadding="2" cellspacing="0">
<tr>
<td>
<img src="Images/SimpleCMSLogo.jpg" alt="SimpleCMS" />
</td>
</tr>
<tr>
<td>
<asp:ContentPlaceHolder id="ContentPlaceHolder1"
runat="server">
</asp:ContentPlaceHolder>
</td>
</tr>
<tr>
<td>
<p><strong>Website design Copyright 2009
by SimpleCMS</strong></p>
</td>
</tr>
</table>
You'll find the SimpleCMSLogo.jpg file in the file downloads for this chapter.
Our Master Page isn't much use to us without a standard web page that implements this new Master Page. Master Pages are never requested on their own. They are combined with an ASP.NET page at compile time and served as part of the request for the ASP.NET page. This ASP.NET page is called the content page, as it contains the content displayed in the ContentPlaceHolders on the Master Page. This is easily demonstrated by creating a quick content page.
Add a new file to the SimpleCMS application, this time choosing the Web Form template. Name it Default.aspx and make sure the Select Master Page option is checked. Click on Add and select the SimpleCMS.master—the Master Page we just created. This will create the Default.aspx content page. If you look at the default code created, you'll see something like this:
<%@ Page Language="VB" MasterPageFile="~/SimpleCMS.master"
AutoEventWireup="false" CodeFile="Default.aspx.vb"
Inherits="_Default" title="Untitled Page" %>
<asp:Content ID="Head" ContentPlaceHolderID="head" Runat="Server">
</asp:Content>
<asp:Content ID="Content1" ContentPlaceHolderID="ContentPlaceHolder1" Runat="Server">
</asp:Content>
You'll see first off that the @Page directive sets the MasterPageFile to the Master Page we selected. You'll also see that a title method has been added to the directive as well. Beyond that, the page is really just content controls with ContentPlaceHolderIDs that match those found in the SimpleCMS.master Master Page. Before we test it, let's add some static content to the Content1 Content control. Change this section of code to read:
<asp:Content ID="Content1" ContentPlaceHolderID="ContentPlaceHolder1" Runat="Server">
<h2>----] Content for ContentPlaceHolder1 goes here [----</h2>
</asp:Content>
This addition of a single line of content will provide some content for our Master Page to display in the matching ContentPlaceHolder control. If you view the Default.aspx page in a browser, it should look something like this:
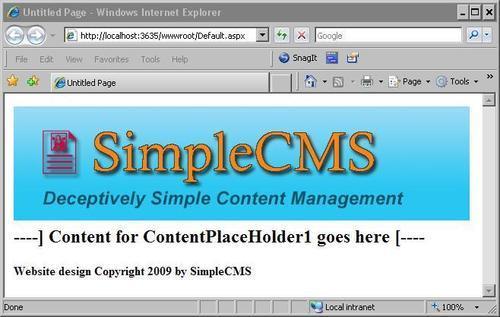
Notice that the logo and the copyright statement that show for the Default.aspx page are not part of the Default.aspx page code; they exist only in the SimpleCMS.master Master Page.
A Content Management System is pretty useless if you need to create a new page for every piece of content you might want to serve. Plus, we didn't go through the first two thirds of this chapter building application layers just to abandon them now. We need to add the dynamic content functions that we created to our content page, in order to retrieve the content from the database. To do this, we'll use some of the code we already created earlier in the chapter.
Edit the Content1 content control in Default.aspx to the following code:
<asp:Content ID="Content1" ContentPlaceHolderID="ContentPlaceHolder1" Runat="Server">
<asp:GridView ID="GridView1" runat="server">
</asp:GridView>
</asp:Content>
The GridView control is the same one we have been using while testing the rest of our code in this chapter. Add this Page_Load subroutine in the Default.aspx.vb code behind file:
Protected Sub Page_Load(ByVal sender As Object, ByVal e As
System.EventArgs) Handles Me.Load
Dim ArticlesLogic As New ArticlesBLL()
GridView1.DataSource = ArticlesLogic.GetDataByArticleID(1)
GridView1.DataBind()
End Sub
This calls our GetDataByArticleID function in our business logic layer and passes it the ArticleID of 1. The GridView is then bound to the results of this function, and displays the record matching the ArticleID parameter we passed. The end result is similar to past test pages, except that it now uses our Master Page because this is the Default.aspx page we created. If you choose to view Default.aspx in your browser, it should look something like this:

Okay, it's not pretty. We really don't want the entire row displayed, and we don't want it in a grid format either. The secret is to pull a trick from Chapter 2 and use a FormView control with an ItemTemplate that displays only what we want. To do this, first edit the Default.aspx.vb code behind, in order to change the GridView to a FormView using the following code:
FormView1.DataSource = ArticlesLogic.GetDataByArticleID(1)
FormView1.DataBind()
That's right, we're really changing only the GridView1 to FormView1—the rest is already handled by our BLL and DAL. Now, change the Default.aspx code to remove the GridView control and replace it with the FormView control, using this code:
<asp:FormView ID="FormView1" runat="server">
<ItemTemplate>
<h2><asp:Label ID="Label1" runat="server"
Text='<%# Bind("ArticleName") %>'></asp:Label></h2>
<asp:Label ID="Label2" runat="server"
Text='<%# Bind("Article") %>'></asp:Label>
<hr />
</ItemTemplate>
</asp:FormView>
This code uses a FormView control with an ItemTemplate to display two Label controls. The first is the ArticleName field retrieved through our DAL by the BLL, and bound to the FormView in the code-behind file. The second is the Article field. We also format the first label, the ArticleName, with a <h2> HTML tag, and we add a horizontal line with the <hr /> tag before we close the FormView control. When you view the Default.aspx file in a browser, it now looks more like a web page, with the logo, an article title, an article, and a copyright line at the bottom of the page. Something like shown in the next screenshot:

Finally, something that isn't truly lame. We have a lot more to add to our application, but by now you should be starting to understand the background concepts of our SimpleCMS application.
In this chapter, we built the database, a data access layer, a business logic layer, and a presentation layer for our Content Management System. We've only built a small part of the eventual application, and we'll need to add to all four of these architectural tiers as we continue the book. However, you should have a working knowledge of the basic architecture we are working with.
We first defined a table structure for our database, which we will expand upon in future chapters. A major reason for using a relational database management system such as Microsoft's SQL Server is the ability to grow the database as your application grows. We also created a data access layer to abstract access to the database. This allows us to write code to use other types of database engines without changing the rest of the application to match. It also allows us to access the database with minimal additional code from other layers in our architecture.
The business logic layer we created is extremely simple at this point. In fact, we have no business logic running in it at all. But it acts to further abstract the data storage from the presentation to the end user, and gives us a location to add future business rules. One reason to use a BLL for business logic is that these business rules are secure from being inadvertently changed by a designer working on the presentation layer. They can also be secured from prying eyes who might find ways to modify the request from the client to circumvent business logic in the presentation layer.
Finally, we built a rudimentary presentation layer based on Master Pages. The use of Master Pages, along with Themes, allows us to quickly change the look and feel of a site without affecting the underlying code; that is, it makes abstracting the layers from each other quite easier. We'll cover advanced use of Themes and Master Pages in Chapter 6.
The process we have used to build this architecture here is along the same lines as the tutorials at Microsoft's ASP.NET web site—http://www.asp.net. We have simplified much of the process in this chapter, but you are encouraged to continue learning through the tutorials and videos available online. This is also the first chapter, where full code has not been included in the book due to space. The code files are available from the project web site.
In the next chapter, we're going to add a security layer to our application, restricting functions to only certain accounts. After all, we don't want the general public changing the content of our web site at random, do we?