
A common system requirement is to dynamically schedule the future execution of a process or service relative to the occurrence of some event.
For example, we may have a customer satisfaction process, which we want to execute one month after the customer received delivery of ordered goods. Alternatively, we may want to schedule a repeating process for a specific period of time, for example, to track the status of a shipped item until it is delivered.
While this can be done using BPEL, it can cause issues when managing the dehydration store. Often, a better approach is to get the BPEL process to create a scheduled job to manage this separately.
You will need to download the Scheduler from the Rubicon Red website. It can be found at http://www.rubiconred.com/scheduler.
Once downloaded, follow the instructions to install the Scheduler on the WebLogic server running the Oracle SOA Suite.
To configure a scheduled job via the web service API, we will need the WSDL for the Scheduler. This can be found at http://localhost:7001/RXRScheduler_2.0/util.sch.evs.Job?WSDL.
For our purpose, we will be configuring the Scheduler to invoke our ParcelTracker process (as we use this in a later recipe). So, to follow the example, you will need to deploy the ParcelTracker composite contained within the example code for this chapter.
Once deployed, you will need the WSDL for the Parcel Tracker; this should be available at http://localhost:7001/soa-infra/services/default/ParcelTracker/parceltrackerservice_client?WSDL.
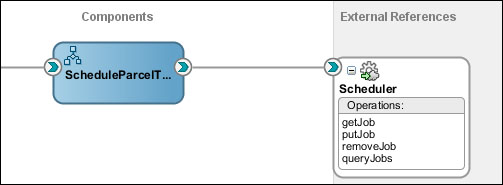
Create an SOA composite with a project containing a BPEL process (named ScheduleParcelTracker in the example detailed in this recipe).
The ScheduleParcelTracker process is designed to receive a request containing the orderNo for a parcel to be tracked and creating a scheduled job to invoke the ParcelTracker composite every 15 seconds to track the status of the specified order.
- Drag a web service from the SOA Component Palette onto the External References swimlane within our composite. This will launch the Create Web Service wizard. Specify
Scheduleras the name, and for the WSDL URL, enter the location of the Scheduler WSDL (see the Getting ready section).Ensure that Port Type is set to
util.sch.eve.Joband click on OK. JDeveloper will add a reference to the Scheduler to our composite. - Next, drag a wire from the BPEL process to the Scheduler external reference.
- Open the
ScheduleParcelTrackerBPEL process and rename the defaultinputVariablevariable toorderNo. - Next, drag an Invoke activity onto the BPEL process, double-click on it to open the Edit Invoke window. Give it the name
putJob. For Partner Link, selectSchedulerand select the operationputJob.For the input variable, click on the auto-create variable (plus icon) to launch the Create Variable window. Give the variable a meaningful name (for example,
putJobInput). Do the same for the output variable. - Drag an Assign activity onto our BPEL process just before the Invoke activity. Double-click on it to open the Edit Assign window. Give it the name
setPutJob. - First, we need to populate the job element with the unique identity of our job. This is a composite key defined by the elements
jobIdandjobGroup.Use the Assign activity to set
jobIdto contain theorderNoof the parcel being tracked andjobGrouptoParcelTracker(the name of our process).We have also set
jobDescriptionto hold details of the parcel being tracked. - Next, we need to specify the schedule for when the job will be run. For the purpose of this recipe, we will use a basic cron schedule to run our job every 15 seconds. Use the Assign activity to specify the following values for the job:
Job element
Source
ns9:startDatexp20:current-date()ns9:endDatexp20:add-dayTimeDuration-to-dateTime(xp20:current-date(), 'P14D')ns9:activetrue()ns9:jobDefinition/ns9:cronSchedule'0/15 * * * ?'We have specified that the job will only be active from the current date up to 14 days into the future (this is optional but will prevent the job from running forever, in case we forget to cancel it) and set the job to be active (otherwise it won't run).
- Next, we need to initialize the
jobdefinitionelement, which specifies the web service to be invoked and the content of the payload to be passed.Use the Assign activity to initialize the attributes of the job in the element
$putJob.payload/ns8:body/ns9:job/ns9:jobDefinition, as detailed within the following table:Element
Source
@jobClass'WebService'@responseInterface'One-Way'We also need to use the Assign activity to initialize the content of the element
ns9:jobDefinition/ns9:webServiceJobDefinition, as detailed in the following table:Element
Value
ns9:service/ns9:URI'http://rubiconred.com/ckbk/svc/ParcelTrackerService'ns9:service/ns9:localName'parceltrackerservice_client'ns9:port/ns9:URI'http://rubiconred.com/ckbk/svc/ParcelTrackerService'ns9:port/ns9:localName'ParcelTrackerService_pt'ns9:endpointAddress'http://localhost:7001/soa-infra/services/default/ParcelTracker/parceltrackerservice_client'We have now configured the Scheduler to send a correctly formed SOAP message to a web service endpoint; the next step is to provide the payload to put in the message.
- The
putJobelement contains an element calledsoapRequestBody, which is defined asxs:anyType. This is where we specify the request message to send toParcelTrackerwhen the Scheduler invokes it.To do this, we must create a variable of the same type as the message to be sent to
ParcelTracker. This is defined inParcelTrackerService_1.0.wsdl.Create a new global variable, named
syncParcelLocation. Select Message Type as the variable type, and click on Browse Message Types… to open the Type Chooser window. From here, select Import WSDL file and locate the Parcel Tracker Service WSDL file. Ensure copy to project is selected and click on OK.Within the Type Chooser window, expand
ParcelTrackerService_1.0.wsdland select the message typesyncParcelLocation.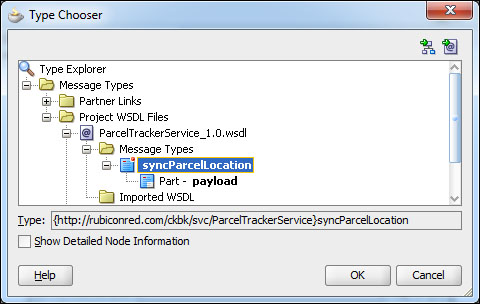
syncParcelLocationcontains the elementorderNo. Set this to be theorderNocontained within the variable used to invoke our BPEL process.Next, within the Assign activity, use an Append rule to copy the entire
syncParcelLocationmessage into thesoapRequestBodyelement.- When creating the mapping, you may have noticed a couple of choice elements, for example,
simpleScheduleorcronsSchedule, andednJobDefinitionorwebServiceDefinition.By default, BPEL will create empty elements for these alternative choices at runtime, so we need to remove them to produce a valid message.
- In the Assign activity, select the
simpleScheduleelement. Right-click and select Remove.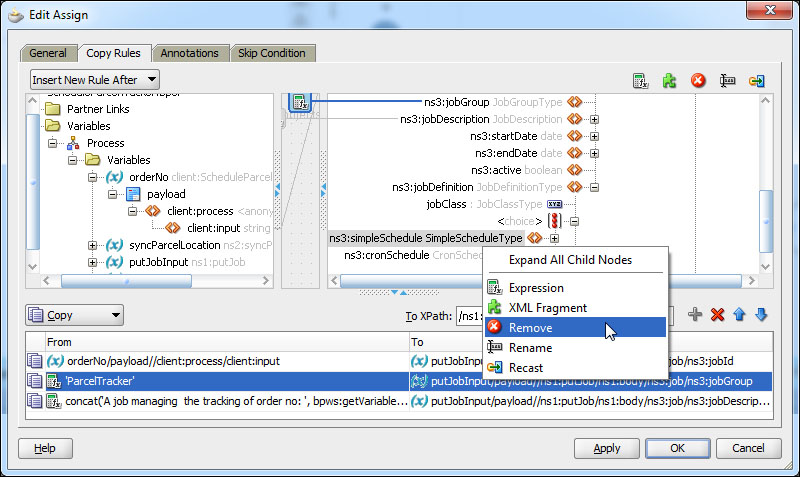
Repeat this step for the element
ednJobDefinition.Now that our process is complete, deploy it and run it to see the created job in action.
When our scheduleParcelTracker composite
is executed, it invokes the putJob operation against the Scheduler. The contents of the SOAP message should look somewhat like the following code snippet:
<job xmlns="http://rubiconred.com/ebo/util.sch.Job">
  <jobId xmlns:inp1="http://rubiconred.com/ckbk/xsd/order">120699</jobId>
  <jobGroup>ParcelTracker</jobGroup>
  <jobDescription>A job managing the tracking of parcel 120699</jobDescription>
  <startDate>2012-06-03</startDate>
  <endDate>2012-06-17</endDate>
  <active>true</active>
  <jobDefinition jobClass="WebService">
    <cronSchedule>0/15 * * * * ?</cronSchedule>
    <webServiceJobDefinition responseInterface="One-Way">
      <service>
        <URI>http://rubiconred.com/ckbk/svc/ParcelTrackerService</URI>
        <localName>parceltrackerservice_client</localName>
      </service>
      <port>
        <URI>http://rubiconred.com/ckbk/svc/ParcelTrackerService</URI>
        <localName>ParcelTrackerService_pt</localName>
      </port>
      <endpointAddress>http://localhost:7001/soa-infra/services/default/ParcelTracker/parceltrackerservice_client</endpointAddress>
      <soapRequestBody>
        <syncParcelLocation xmlns="http://rubiconred.com/ckbk/svc/ParcelTrackerService">
          <orderNo xmlns:inp1="http://rubiconred.com/ckbk/xsd/order">120699</orderNo>
        </syncParcelLocation>
      </soapRequestBody>
    </webServiceJobDefinition>
  </jobDefinition>
</job>
This will cause the Scheduler to invoke ParcelTracker every 15 seconds. If you log in to Enterprise Manager you should be able to see a list of instances of the ParcelTracker composite being started every 15 seconds.
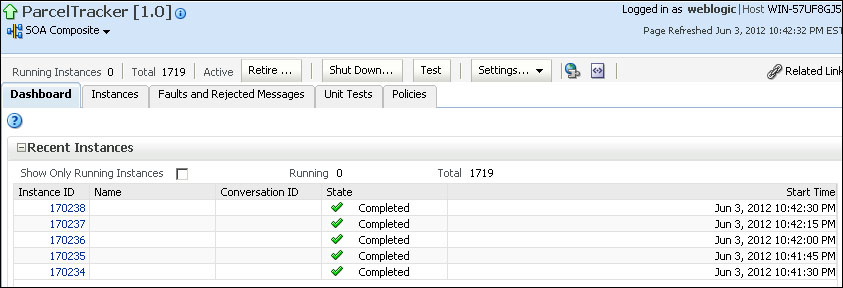
If we click on any of the ParcelTracker instances, we'll see the audit trail for a single instance of this repeatedly executed process.
Our Scheduler exposes operations that enable the creation and management of the scheduled jobs listed as follows:
putJob: Creates/updates a scheduled jobremoveJob: Removes a scheduled jobqueryJobs: Retrieves all jobs configured for a groupgetJob: Retrieves the configuration of a job
In this recipe we need to only use putJob
to create a new scheduled job. If we run putJob for an already defined job, the Scheduler will just update that job with the new details. We will use removeJob
to delete the job we just created, in the next recipe.
Depending on our process's requirements, we may need to use the queryJobs
operation to fetch a list of existing jobs from the Scheduler. We can filter this by specifying the job group groupId (ParcelTracker, in this example), and we can use getJob
to fetch the details of a specific job.
Not only is the Scheduler capable of triggering web services using an SOAP message, but we can also use it to publish an EDN event.