
Now that we are familiar with some of the most common ways to connect to a WebLogic Server, let's take a look at one of the features enabled by them, the Java Message Service (JMS) module.
JMS is a Java API that makes the sharing of information between systems or modules possible by sending and receiving messages in an asynchronous way.
WebLogic Server's JMS implementation is compliant with JMS 1.1, and its provider exposes both the message models that are defined by the specification, point-to-point and publish/subscribe, which translate to queue and topic components. The basic difference between them is that a message sent to a queue is consumed by only one listener, no matter how many of them are attached to the queue. By contrast, a topic delivers a message to all its subscribers (the clients attached to it) whether they are online or not, depending on their configuration.
When using WebLogic's JMS, you must first create the destination queue or topic you are planning to use. This may sound a little obvious, but there are tools that automate these procedures and make them transparent for you, hence the statement.
Also, WebLogic's JMS implementation demands you to create and configure several other components in a specific order so that you can create your queue or topic. The following is a diagram that represents the most common components an application uses:
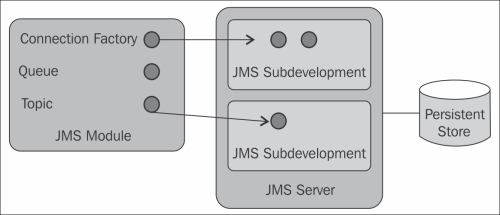
The components shown in the preceding diagram are discussed in the further sections. The following is a quick description of these components:
- A persistent store holds the messages waiting for delivery inside a file or database, instead of keeping all messages in memory.
- A JMS module is a logical container for components, such as queues, topics, and connection factories, which can be used by an application.
- A JMS server makes a bridge between JMS components and the underlying deployment structure, defining attributes such as which persistent store must be used by the components, if any, and logging parameters.
- A JMS subdeployment groups components from a JMS module into deployable units that can be targeted to a specific JMS server.
- A JMS queue will receive messages to be consumed by our application.
After checking the details of each component and how to create them, we will code the remote client project to post messages and the MDB that will consume the messages.
The business scenario that we will use to illustrate these functionalities is this: when our partner (the theater) needs to send new exhibition dates and times to our Theater module, it will do so using the remote client we're about to write. This client will receive information about the new exhibition as command-line arguments and post them to the queue that we're going to create in a later section. Finally, in the Theater module, a Message Driven Bean (MDB) will receive it and persist the new entity using the server's persistence layer.
WebLogic's persistent store is a service that provides physical storage to several other services and features such as JTA, the Timer EJB, and several components of the JMS system module.
A persistent store can be configured to use databases or files, having the same set of features for both options. Using files as persistence keeps things simple, as you don't need to configure and maintain an RDBMS and the access is local, but it may be harder to migrate the file store—to enable the store on another server—in case of failure. For this specific requirement, the database store is a lot easier to deal with, but you'll have extra processing and network traffic.
As a file store has less processing and network overhead when compared to a database store, it's generally the fastest option. Of course, this will depend on the hardware you have available—a SATA HDD is no match to a network attached storage (NAS) connected via a fiber channel, or to a high-performance system hosting your database.
So while defining one over the other, we have to consider all requirements and constraints of the project. Available hardware, expected network usage, databases, and disaster-recovery expectations are the basic items to be checked.
When you use WebLogic's JMS module, there are situations where a persistent store is mandatory, but this is not the case when you only need to enable a JMS queue—the behavior will be exactly the same, but instead of saving the messages to a file or database, they will be kept in memory. That said, there are a couple of things you need to know:
- Depending on the volume and size of your messages and the throughput of the consumers, you may get into a resource starvation scenario, that is, if the heap size of your JVMs isn't enough to hold all messages, the garbage collector starts to kick in frequently, leading to CPU peaks. Eventually, your system enters an overload condition, it can't recover itself, and you have to bounce it.
- Once you restart the server, as the messages exist solely in memory, they are gone for good. A sudden power outage also can make you lose them all.
The book's business scenario doesn't specify if we should tolerate loss of messages, so let's assume that we can't afford it. If a new exhibition entry is lost, the customer will not see it, and our partners aren't going to be happy with this, so better be safe than sorry, right?
The following steps are necessary to create a file-based persistent store:
- Open the administration console by going to
http://localhost:7001/console, then log in, and click on the Services entry in the navigation tree, and then on the subentry, click on Persistent Stores. - Click on the New button at the top of the list of persistent stores and then select Create FileStore from the menu.
- Set the value of Name to
FileStore-Tickets, leave the value of Target as it is—we don't have any other configured instances—and set the Directory field to./ticketFS.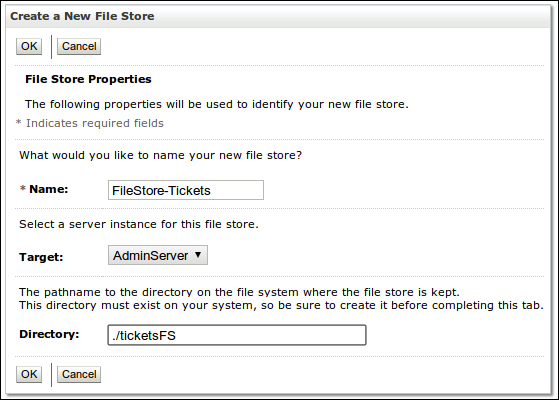
- Click on OK to finish the wizard and create the resource.
Tip
Starting with Version 12.1.2 of WebLogic, we can now target a persistent store to a cluster; that means that we don't need to create one persistent store for each server of a cluster, and associate one and only one JMS server to each store. When a persistent store is targeted to a cluster, WebLogic creates its file inside every managed server folder, making this procedure an easy task.
If you want to use a database store, there are a couple of things to remember:
- You must first create a data source that will be attached to the persistent store. This data source can't use an XA driver, and you can't enable the Supports Global Transactions flag of the non-XA data source you create.
- Just one table named
WLStoreis needed. If the system detects that the table doesn't exist upon startup, it tries to create it. If the user configured at the data source doesn't have the necessary permissions, the operation fails and the store will not be available.Note
If this is the case (the connection user doesn't have the permission to create objects), locate the
com.bea.core.store.jdbc_3.0.0.0.jarfile available in themodulessubfolder of your WebLogic installation. Open it, get the script that corresponds to your database server at path/weblogic/store/io/jdbc/ddl, adjust the name of the table toWLStore, and run it with the necessary credentials.Remember that you must give read and write permissions to the configured data source user on this table.
This component is a container for destination-related resources and acts as a link between them and the underlying environment; for example, the persistence store we just created must be linked to a JMS server, so when we send messages to our queue, it can use this configuration and persist the messages, if this is the case.
This component is also responsible for maintaining the state of durable subscribers, and is the unit used by the server migration feature to migrate data from a failed managed server to another one, avoiding loss of messages.
Tip
Until Version 12.1.1, a JMS server should be pinned to a specific managed server for increasing the administrative management. Since Version 12.1.2, JMS servers (and persistent stores, as already mentioned) can be targeted to a cluster, making the process of creating and starting new managed servers a breeze.
Let's create a JMS server to use with our code:
- In the administration console, click on the Services entry in the navigation tree, then expand the Messaging entry, and click on JMS Servers.
- Click on the New button just above the list of JMS Servers.
- Enter
JMSServer-Ticketsas Name, selectFileStore-Ticketsas Persistent Store, and click on Next. - Select the only entry available, AdminServer, as the target for the JMS Server, and then click on Finish.
A JMS module is a logical group of JMS components such as queues, topics, and connection factories. It's inside a module that these components are defined, but we must target the component to make it available and active—just existing inside a module doesn't mean it can be used.
There are two kinds of JMS modules:
- The system module: The modules created from the administration console or related technologies—by accessing MBeans through code or scripts, for instance—are named system modules. The components created inside them are visible to all applications targeted to the same WebLogic servers and can be shared by them.
- The application module: The declaration of such a module is done as a deployable package—all definitions go inside deployment descriptors, which are XML files—processed at deployment time. The package can be installed as a standalone module, which enables other applications to access the resources declared by it, or as a packaged module that exposes the components only to other modules deployed along with it—for instance, a EAR with a JMS module that declares a JMS queue and an EJB module with an MDB that consumes it. The components created by an application module aren't accessible via the administration console.
The general recommendation concerning which kind of module you should use is this: always choose the system module option. Although the appeal of flexibility given by the application module looks nice, it comes with a cost—no JMX management—that simply doesn't justify it.
If component isolation is a strong requirement, you can resort to the security model provided by WebLogic to accomplish this. We discuss this topic in Chapter 8, Adding Security.
We're going to create a system module to use in our projects:
- In the administration console, click on the Services entry in the navigation tree, then expand the Messaging entry, and click on JMS Modules.
- Click on the New button just above the list of JMS Modules.
- Enter
JMSModule-Ticketsas Name and click on Next, leaving the other fields empty. - Click on the checkbox beside the AdminServer entry to deploy the module to this server and click on Next.
- Leave the checkbox next to the question Would you like to add resources to this JMS system module? unchecked, and click on Finish.
Just one more resource must be created before we can finally declare our queue.
The JMS subdeployment component works as the link between the logical group where it exists (a JMS module) and one or more physical destinations (JMS servers). You can have several subdeployments inside a JMS module, each targeting one or more different JMS servers, which by its turn can be targeted to different WebLogic servers.
Note
Although using a subdeployment can be an optional step when dealing with JMS resources, doing so is a best practice that helps management by targeting groups of components at once. Also, there are resources that must be explicitly bound to a subdeployment, such as the queue that we're going to set up shortly.
So, before we create a queue, we must have a subdeployment to be its target. This is how we define one:
- In the administration console, click on the Services entry in the navigation tree, then expand the Messaging entry, and click on JMS Modules.
- Click on the name of the module we just created, JMSModule-Tickets.
- When the Settings page shows up, click on the Subdeployments tab at the top of the page.
- Click on the New button, type
PersistentSDin the Name field, and click on Next. - Bind the component to the JMSServer-Tickets JMS server and click on Finish.
Note
If you're wondering why you saw both WebLogic's AdminServer and JMSServer-Tickets JMS server on the target step, this is because there are JMS components that don't need to be explicitly bounded to a JMS server to be available, for instance the connection factories. Queues don't fall in this category. You can create a queue and target it to a subdeployment that points to a WebLogic Server, and no errors or warnings will be shown, but the resource will never be available.
So, as a best practice, always target your subdeployments to JMS Servers.
A JMS queue is the channel between a message producer and a consumer in a point-to-point model. A few things about its behavior and configuration:
- A message is delivered at the most to one consumer, even when multiple consumers are listening to the same queue.
- You can set the duration for which a message must be held waiting for consumption before it gets discarded. This is referred to as the time-to-live limit.
- If a queue receives a message but there are no consumer(s) listening to it, the message is held in the queue. It waits for a consumer to show up until the configured time-to-live limit expires.
- You can set the expiration policy value of a queue with one of the following:
- Redirect: The message is posted to another queue previously created and pointed by at the Error Destination parameter of the original one
- Log: The message is written to the JMS Server's log file. In order to be effective, you must also tick the Enable Message Logging checkbox inside the Logging tab of your queue
- Discard: The message is just dropped. This is the default behavior
Note
If you attach a message-driven bean to a queue, by default its
onMessagemethod is called by the container in the context of a transaction. So if something goes wrong and the method throws an exception, the message is kept in the queue, and its redelivery policies are processed, that is, the redelivery limit is checked, and if not reached, the message is made available to consumers after the redelivery delay interval.
To create the queue that will receive new exhibition instances, follow these steps:
- In the administration console, click on the Services entry on the navigation tree, then expand the Messaging entry, and click on JMS Modules.
- Click on the name of our module,
JMSModule-Tickets. - Click on the New button, select the Queue option on the next page, and click on Next.
- Enter
ExhibitionQueueas Name andjms.tickets.exhibitionas JNDI Name, then click on Next. - In the Subdeployments dropdown, select the PersistentSD entry and click on Finish.
You are now back on the JMS module's settings page, with the queue you just created listed in the Summary of Resources table. There are lots of other parameters and configurations that we can change, such as quotas and limits, security constraints, and logging, but the creation wizard only asks for the basic set of information it needs to do its job. If you want to, go ahead and click on the queue name to explore the available options.
We don't need to alter any of them, so at this point, we're all set to start posting messages to the queue.
Another kind of resource you can create inside a JMS module is the JMS connection factory. When you post a message to a queue, several aspects of the produced message are read from the connection, such as the message's priority, transactional behavior, and persistence configuration.
One of the most important flags of a connection factory dictates if the resource is able to participate in global transactions, or in other words, if it's an XA-enabled resource. If the posting or consumption of a queue or topic is one step inside a complex business function that must be committed or rolled back as a single unit, then you must use an XA connection factory. You do so by checking the XA Connection Factory Enabled option presented by its creation wizard.
When a WebLogic domain is configured, two default JMS connection factories are created, and they can be retrieved using these JNDI names:
weblogic.jms.ConnectionFactoryweblogic.jms.XAConnectionFactory
The configurations of both are basically the same, except for one pretty obvious detail: XAConnectionFactory is an XA-enabled resource. All other parameters have the same default values you get when you create your own JMS connection factory.
As the piece of code we're about to write has very basic demands, we don't need to create a specific JMS connection factory. Instead, we will use the non-XA default connection factory, weblogic.jms.ConnectionFactory. The only step in our business scenario is to post a single message, so support for distributed transactions isn't necessary.
Note
When developing a real project, always create your own JMS connection factories. This way, you can control your factories by changing its parameters, which is something you can't do when using WebLogic's default ones. Even if you could, as they're global resources, other applications may use them, so you would influence their behavior as well.