
First, let's define what a module is on the context at hand; apart from the usual Java EE modules deployed in WebLogic Server—our applications and shared libraries, for instance—there are modules that group server resources such as JDBC and JMS components.
When we create a data source using WebLogic's administration console, we're actually creating a module inside the domain's configuration folder. This structure is read at the server's startup procedure to configure it properly.
There are two kinds of such modules, classified according to the way they are defined: globally-scoped (also called system modules) and application-scoped. The first is the most commonly found and used module—resources are created using WebLogic's administration console or WebLogic Scripting Tool (WLST) scripts, and are available to any application deployed and targeted to the same servers of the module. The other module, application-scoped modules, refers to modules that are declared as part of a Java EE application. As you are packing everything together, there's no need to instruct WebLogic administrators or operators to create the resources before deploying the application.
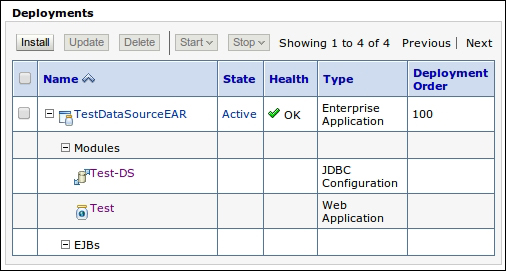
While looking up these application-scoped resources using WebLogic's administration console, you will not find them at the usual places—as they are part of a deployment, you will find them listed inside the deployment that defines it. The following screenshot shows the structure of an enterprise application that packages a data source and a web module:
To create this kind of module, the easiest way is to define everything you need using WebLogic's administration console, and then copy the generated XML files to your application, which must be an Enterprise Application (EAR). You can create a new folder inside it, and keep all module declarations inside it.
Then, you just need to add a reference to the module from within the weblogic-application.xml descriptor file, shown as follows:
<wls:module>
  <wls:name>StoreDS</wls:name>
  <wls:type>JDBC</wls:type>
  <wls:path>jdbc/StoreDS-jdbc.xml</wls:path>
</wls:module>
The previous sample shows that a folder jdbc has been created in the project's root, and the module descriptor StoreDS-jdbc.xml can be found there.
Even though we declare modules inside an application, it doesn't mean that the resources cannot be accessed by other applications. For JDBC data sources, for instance, the visibility depends on a parameter, scope, as shown in the following code snippet, which is taken from the configuration file and changed to reflect it:
<jdbc-data-source-params>
  <jndi-name>Ticket_DS</jndi-name>
  <scope>Application</scope>
</jdbc-data-source-params>You can use this setting to restrict external access to the resource, but there are a few collaterals that can make even the application defining the resource unable to use it.
- If you reference the app-scoped data source from a
persistence.xmlfile, the JNDI name resolution will fail, so it cannot be used when declaring JPA persistence units - References (either by lookup or the
@Resourceinjection) will only work when used inside enterprise beans, and the relationship between classes and resources must be explicitly declared using theejb-jar.xmlandweblogic-ejb-jar.xmldeployment descriptors
So, if you are considering this option to make access to a resource more secure (as there's no possibility of access from other applications) by setting the scope of the application, you may want to check the security features provided by WebLogic, leaving the scope with its default value.
Note
For more details on how to secure access to a resource, check Chapter 8, Adding Security.
The limitation involving web projects can be tackled with another feature, if all you need is to declare a data source; the annotations DataSourceDefinition and DataSourceDefinitions allow us to create a data source without resorting to the application-scoped module feature.
Here's how a web service declaring a data source pointing to our store database would look like:
import javax.annotation.Resource;
import javax.annotation.sql.DataSourceDefinition;

@DataSourceDefinition(
  name = "java:module/env/jdbc/tickets",
  className = "com.mysql.jdbc.Driver",
  portNumber = 3306,
  serverName = "localhost",
  databaseName = "store_db",
  user = "store_user",
  password = "store",
  properties={"create=false", "weblogic.TestTableName=SQL SELECT 1"})

@WebServlet(value="/hello")
public class SomeServlet extends HttpServlet {
  private static final long serialVersionUID = 1L;

  @Resource(lookup = "java:module/env/jdbc/tickets")
  DataSource ds;

  public void service(ServletRequest req, ServletResponse res) throws IOException, ServletException {
    Connection con;

    try {
      con = ds.getConnection();
      ...
      con.close();
    } catch (SQLException e) {
    e.printStackTrace();
    }
  }
}
Notice that we used the prefix module to declare the JNDI name. There are a few different prefixes we can use, each defining a different level of visibility for the resource.
As usual, you can declare the same object using deployment descriptors. As the previous sample is from a web project, this block could be added to the web.xml descriptor file:
<data-source>
  <name>java:module/env/jdbc/tickets</name>
  <class-name>com.mysql.jdbc.Driver</class-name>
  <server-name>localhost</server-name>
  <port-number>3306</port-number>
  <database-name>store_db</database-name>
  <user>store_user</user>
  <password>store</password>
  <property>
    <name>create</name>
    <value>false</value>
  </property>
  <property>
    <name>weblogic.TestTableName</name>
    <value>SQL SELECT 1</value>
  </property>
</data-source>
This feature cannot be used in pure named beans—only enterprise beans, servlets, and web services support it.