
Chapter 18 - Data Manipulation Language (DML)
“I tried to draw people more realistically, but the figure I neglected to update was myself.”
– Joe Sacco
INSERT Syntax # 1
The following syntax of the INSERT does not use the column names as part of the command. Therefore, it requires that the VALUES portion of the INSERT match each and every column in the table with a data value or a NULL.
INS[ERT] [ INTO ] <table-name> VALUES
( <literal-data-value> [ …,<literal-data-value> ] ;
Note: Using INS instead of
INSERT is not ANSI
compliant.
The INSERT statement is used to put a new row into a table. A status is the only returned value from the database; no rows are returned to the user. It must account for all the columns in a table using either a data value or a NULL. When executed, the INSERT places a single new row into a table. Although it can run as a single row insert, primarily it is used in utilities like BTEQ, FastLoad, MultiLoad, TPump or some other application that reads a data record and uses the data to build a new row in a table
INSERT Example with Syntax 1

After the execution of the above INSERT, there is a new row with the first character data value of ‘My character data’ going into Column1, the decimal value of 124.56 into Column2, the integer 102587 into Column3, NULL values into Column4 and Column5, and a date into Column6.
The NULL expressed in the VALUES list is the literal representation for no data. However, the two commas (,,) that follow the positional value for Column3 also represent missing data. The commas are placeholders or delimiters for the data values. When no data value is coded, the end result is a NULL.
INSERT Syntax # 2
The syntax of the second type of INSERT follows:
INS[ERT] [ INTO ] <table-name>
( <column-name> […,<column-name> ]
VALUES
( <literal-data-value> […,<literal-data-value> ] ;
Note: Using INS instead of
INSERT is not ANSI
compliant.
This is another form of the INSERT statement that can be used when some of the data is not available. It allows for the missing values (NULL) to be eliminated from the list in the VALUES clause. It is also the best format when the data is arranged in a different sequence than the CREATE TABLE, or when there are more nulls (unknown values) than available data values.
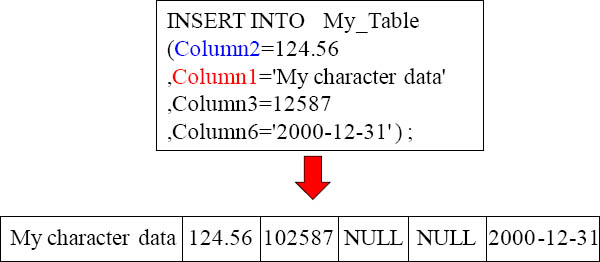
INSERT Example with Syntax 2

The above statement incorporates both of the reasons to use this syntax. First, notice that the column names Column2 and Column1 have been switched, to match the data values. Also, notice that Column4 and Column5 do not appear in the column list, therefore they are assumed to be NULL. This is a good format to use when the data is coming from a file and does not match the order of the table columns.
INSERT Example with Syntax 3
The third form of the INSERT statement can be used to insert the same row as the previous INSERT. It might look like the example above.
Using NULL for Default Values
Either of the next two INSERT statements may be used to build a row with no data values in My_Table
INSERT INTO My_Table VALUES (, , , , , ) ;

Teradata now has the ANSI DEFAULT VALUES functionality. Although an INSERT statement could easily put a null value into a table column, it requires it to use the NULL reserved word or by omitting a value for that column(s) between commas.
INSERT/SELECT Command
The syntax of the INSERT / SELECT is:
INS[ERT] [ INTO ] <table-name>
SELECT <column-name> […,<column-name> ]
FROM <table-name> ;
Although the INSERT is great for adding a single row not currently present in the system, an INSERT/SELECT is even better when the data already exists within Teradata. In this case, the INSERT is combined with a SELECT. However, no rows are returned to the user. Instead, they go into the table as new rows.
The SELECT reads the data values from the one or more columns in one or more tables and uses them as the values to INSERT into another table. Simply put, the SELECT takes the place of the VALUES portion of the INSERT.
This is a common technique for building data marts, interim tables and temporary tables. It is normally a better and much faster alternative than extracting the rows to a data file, then reading the data file and inserting the rows using a utility.
INSERT/SELECT Example using All Columns (*)
When all columns are desired to make an exact copy of the second table and both tables have the exact same number of columns in the exact same order with the exact same data types; an * may be used in the SELECT to read all columns without a WHERE clause, as in the example below:
INSERT INTO My_New_Table
SELECT *
FROM My_Original_Table;
Like all SELECT operations without a WHERE clause, a full table scan occurs and all the rows of the second table are inserted into My_New_Table, using only the data values from the columns listed.
INSERT/SELECT Example with Less Columns
When fewer than all the columns are desired, either of the following INSERT / SELECT statements will do the job:
INSERT INTO My_New_Table
SELECT ( Col1, Col2, Col3 , , , '2010-01-01' )
FROM My_Original_Table ;
INSERT INTO My_New_Table ( Col2, Col1, Col3, Col6)
SELECT Col2, Col1, Col3 , CURRENT_DATE
FROM My_Original_Table ;
In both of the above examples, only the first three and the last columns are receiving data. In the first INSERT, the data is a literal date. The second INSERT uses the CURRENT_DATE. Both are acceptable, depending on what is needed.
Working with the same concept of a normal INSERT, when using the column names the only data values needed are for these columns and they must be in the same sequence as the column list, not the CREATE TABLE. Therefore, omitted data values or column names become a NULL data value.
INSERT/SELECT to Build a Data Mart
As an example of a data mart, it might be desirable to build a summary table using something like the following:
INSERT INTO My_New_Data_Table
SELECT ( Column1, SUM(Column2), AVG(Column3),
COUNT(Column4), AVG(CHAR(Column5)),
AVG(CHAR(Column6)) )
FROM My_Original_Table
GROUP BY 1 ;
However used, the INSERT / SELECT is a powerful tool for creating rows from the rows already contained in one or more other tables.
Fast Path INSERT/SELECT
INSERT INTO My_Fast_Table SELECT * FROM My_Original_Table;
When the table being loaded is empty, the INSERT / SELECT is very fast. This is especially true when all columns and all rows are being copied. Remember, the table being loaded must be empty to attain the speed. If there is even one row already in the table, it negates the ability to take the Fast Path.
There are reasons behind this speed. There is no need to Transient Journal an identifier for each inserted row. Recovery, if needed, is to empty the table. No other type of recovery can be easier or faster.
When all columns and all rows are requested from the existing table and they exactly match the columns in the new table, there is no need to use spool. The rows go straight into the table being loaded. Additionally, when all rows are being selected Teradata does not bother to read the individual rows. Instead, each AMP literally copies the blocks of the original table to blocks for the new table.
These reasons are why it is called the Fast Path. To use this technique, the order of the columns in both tables must match exactly and so must the data types, otherwise spool must be used to rearrange the data values or translate from one data type to the other.
NOT quite the Fast Path INSERT/SELECT
What if it is necessary to retrieve the rows from multiple tables for the INSERT?
Multiple INSERT / SELECT operations could be performed as follows:
INSERT INTO My_Table SELECT * FROM My_Original_Table_1 ;
INSERT INTO My_Table SELECT * FROM My_Original_Table_2 ;
INSERT INTO My_Table SELECT * FROM My_Original_Table_3 ;
The first INSERT/SELECT into My_Table loads the empty table extremely fast, even with millions of rows. However, the table is no longer empty and the subsequent INSERT is much slower because it cannot use the fast path. All inserted rows must be identified in the Transient Journal. It can more than double the processing time.
The real question is: How to make all of the individual SELECT operations act as one so that the table stays empty until all rows are available for the INSERT?
UNION for the Fast Path INSERT/SELECT
One way get the Fast Path is to use the UNION command to perform all SELECT operations in parallel before the first row is inserted into the new table. Therefore all rows are read from the various tables, combined into a single answer set in spool and then loaded into the empty table. All of this is done at high speed.
For instance, if all the rows from three different tables are needed to populate the new table, the applicable statement might look like the following:
INSERT INTO My_Table
SELECT * FROM My_Original_Table_1
UNION
SELECT * FROM My_Original_Table_2
UNION
SELECT * FROM My_Original_Table_3 ;
Again, the above statement assumes that all four tables have exactly the same columns. Whether or not that would ever be the case in real life, this is used as an example. However, at this point we know the columns in the SELECT must match the columns in the table to be loaded, no matter how that is accomplished.
BTEQ for the Fast Path INSERT/SELECT
A second alternative method is available using BTEQ. The key here is that BTEQ can do multiple SQL statements as a single transaction for the SELECT and the INSERT operations. The only way to do that is to delay the actual INSERT, until all of the rows from all the select operations have completed. Then the INSERT is performed as a part of the same transaction into the empty table.
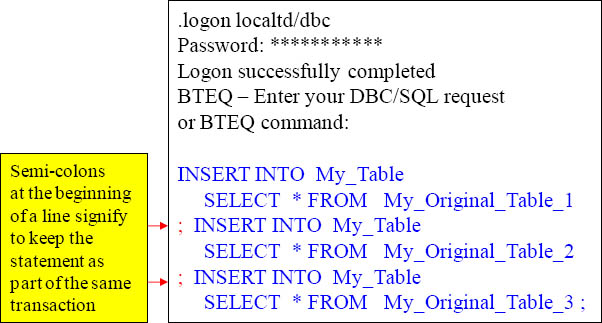
By having another SQL command on the same line as the semi-colon (;), in BTEQ, they all become part of the same multi-statement transaction. Therefore, all are inserting into an empty table and it is much faster than doing each INSERT individually.
The UPDATE Command Basic Syntax
UPD[ATE] <table-name>
[ FROM <table-name> [AS <alias-name> ] ]
SET <column-name> = { <expression-or-data-value> | <data-value> }
[…, <column-name> = <expression-or-data-value> | <data-value> ]
[ WHERE <condition-test> ]
[ AND <condition-test> … ] [ OR <condition-test> … ] [ALL] ;
The UPDATE statement is used to modify data values in one or more columns of one or more existing rows. A status is the only returned value from the database; no rows are returned to the user.
When business requirements call for a change to be made in the existing data, then the UPDATE is the SQL statement to use. In order for the UPDATE to work, it must know a few things about the data row(s) involved. Like all SQL, it must know which table to use for making the change, which column or columns to change and the change to make within the data.
Two UPDATE Examples
UPDATE My_Table
SET Column2 = 256
,Column4 = 'Mine'
,Column5 = 'Yours'
WHERE Column1 = 'My character data';
UPDATE My_Table
SET Column2 = Column2 + 256
WHERE Column1 = 'My character data'
AND Column4 = 'Mine'
AND Column5 = 'Yours' ;
The first UPDATE command modifies all rows that contain ‘My character data’ including the one that was inserted earlier in this chapter. It changes the values in three columns with new data values provided after the equal sign (=):
The next UPDATE uses the same table as the above statement. However, this time it modifies the value in a column based on its current value and adds 256 to it. The UPDATE determines which row(s) to modify with compound conditions written in the WHERE clause based on values stored in other columns:
Subquery UPDATE Command Syntax
UPD[ATE] <table-name>
[ FROM <table-name> [AS <alias-name> ] ]
SET <column-name> = { <expression-or-data-value> | <data-value> }
[…, <column-name> = <expression-or-data-value> | <data-value> ]
WHERE <column-name> […, <column-name> ]
IN ( SELECT <column-name> […,<column-name> ]
FROM <table-name> [ AS <alias-name> ]
[ WHERE <condition-test> … ] ) [ ALL ] ;
Sometimes it is necessary to update rows in a table when they match rows in another table. To accomplish this, the tables must have one or more columns in the same domain. The matching process then involves either a subquery or join processing. Notice in the above that creating an alias for the table being updated is not compatible with a FROM clause. This change was made in V2R4.
Example of Subquery UPDATE Command
To change rows in My_Table using another table called Ctl_Tbl, the following UPDATE uses a subquery operation to accomplish the operation:
UPDATE My_Table
SET Column3 = 20000000
WHERE Column2 IN
( SELECT Column2 FROM Ctl_Tbl
WHERE Column3 > 5000
AND ctl_tbl.Column4 IS NOT NULL ) ;
Sometimes it is necessary to update rows in a table when they match rows in another table. To accomplish this, the tables must have one or more columns in the same domain. The matching process then involves either a subquery or join processing.
Notice in the above that creating an alias for the table being updated is not compatible with a FROM clause. This change was made in V2R4.
Join UPDATE Command Syntax
UPD[ATE] <table-name>
[ FROM <table-name> [ AS <alias-name> ] ]
SET <column-name> = { <expression-or-data-value> | <data-value> }
[…, <column-name> = <expression-or-data-value> | <data-value> ]
WHERE [<table-name>.]<column-name> = [<table-name>.]<column-name>
[ AND <condition-test> ] [ OR <condition-test> ] [ ALL ] ;
When adding an alias to the UPDATE, the alias becomes the table name and MUST be used in the WHERE clause when qualifying columns.
Example of an UPDATE Join Command
To change rows in My_Table using another table called Ctl_Tbl the following UPDATE uses a join to accomplish the operation: Both examples are equivalent.
UPDATE My_Table
FROM Ctl_Tbl AS Ctbl
SET Column3 = 20000000
,Column5 = 'A'
WHERE My_Table.Column2 = Ctbl.Column2
AND My_Table.Column3 > 5000
AND Ctl_Tbl.Column4 IS NOT NULL ) ;
UPDATE My_Table
SET Column3 = 20000000
,Column5 = 'A'
WHERE mytable.Column2 = Ctl_tbl.Column2
AND mytable.Column3 > 5000
AND Ctl_tbl.Column4 IS NOT NULL ) ;
In reality, the FROM is optional. This is because Teradata can dynamically include a table by qualifying the join column with the table name. The FROM is only needed to make an alias for the join tables. The second UPDATE is the same as the above without the FROM for Ctl_Tbl.
Fast Path UPDATE
The following INSERT/SELECT “updates” the values in Column3 and Column5 in every row of My_Table, using My_Table_Copy:
INSERT INTO My_Table_Copy
SELECT Column1
,Column2
,Column3*1.05
,Column4
,'A'
,Column6
FROM My_Table ;
When the above command finishes, My_Table_Copy contains every row from My_Table with the needed update.
The DELETE Command Basic Syntax
DEL[ETE] [ FROM ] <table-name> [ AS <alias-name> ]
[ WHERE condition ] [ ALL ] ;
The DELETE statement has one function and that is to remove rows from a table. A status is the only returned value from the database; no rows are returned to the user. One of the fastest things that Teradata does is to remove ALL rows from a table.
The reason for its speed is that it simply moves all of the sectors allocated to the table onto the free sector list in the AMP’s Cylinder Index. It is the fast path and there is no OOPS command, unless the explicit transaction has not yet completed. In that case, a ROLLBACK statement can be issued to undo the delete operation before a COMMIT. Otherwise, the rows are gone and it will take either a backup tape or a BEFORE image in the Permanent Journal to perform a manual rollback. Be Very CAREFUL with DELETE. It can come back to bite you if your not careful.
Two DELETE Examples to DELETE ALL Rows in a Table
DELETE FROM My_Table ALL ;
DEL My_Table ;
Both examples will delete all the rows in the table. Since the FROM and the ALL are optional, and the DELETE can be abbreviated, the second example still removes all rows from a table and executes exactly the same as the above statement.
A DELETE Example Deleting only Some of the Rows
DELETE FROM My_Table
WHERE Column6 < 1001231 ;
The DELETE example above only removes the rows that contained a date value less than 1001231 (December 31, 2000) in Column6 (DATE, data type) and leaves all rows newer than or equal to the date.
Subquery and Join DELETE Command Syntax
The subquery syntax for the DELETE statement follows:
DEL[ETE] <table-name>
WHERE <column-name> […, <column-name> ]
IN ( SELECT <column-name> […,<column-name> ]
FROM <table-name> [ AS <alias-name> ]
[ WHERE condition … ] ) [ ALL ] ;
The join syntax for DELETE statement follows:
DEL[ETE] <table-name>
[ FROM <table-name> [ AS <alias-name> ] ]
WHERE <table-name>.<column-name>=<table-name>.<column-name>
[ AND <condition> ]
[ OR <condition> ] [ ALL ] ;
Sometimes it is desirable to delete rows from one table based on their existence in or by matching a value stored in another table. For example, you may be asked to give a raise to all people in the Awards Table. To access these rows from another table for comparison, a subquery or a join operation can be used.
Example of Subquery DELETE Command
To remove rows from My_Table using another table
called Control_Del_Tbl the next DELETE uses a
subquery operation to accomplish the operation:
DELETE FROM My_Table
WHERE Column2 IN
( SELECT Column2 FROM Control_Del_Tbl
WHERE Column3 > 5000 AND Column4 IS NULL ) ;
The above uses a Subquery and the DELETE command.
Example of Join DELETE Command
To remove the same rows from My_Table using a join with the table called Control_Del_Tbl, the following is another technique to accomplish the same DELETE operation as the subquery example on the previous page.
DELETE My_Table
FROM Control_Del_Tbl AS Ctl_Tbl
WHERE My_Table.Column2 = Ctl_Tbl.Column2
AND My_Table.Column1 = Ctl_Tbl.Column1
AND Ctl_Tbl.Column4 IS NULL ;
The previous example could also be written using the format below. However, an alias cannot be used with this format:
DELETE My_Table
WHERE My_Table.Column2 = Control_Del_Tbl.Column2
AND My_Table.Column1 = Control_Del_Tbl.Column1
AND Control_Del_Tbl.Column4 IS NULL ;
The above uses a Join and the DELETE and is equivalent to the previous subquery example we saw on the previous page.
Fast Path DELETE
Fast Path DELETE always occur when the WHERE clause is omitted.
However, most of the time, it is not desirable to delete all of the rows. Instead, it is more practical to remove older rows to make room for newer rows or periodically purge data rows beyond the scope of business requirements.
For instance, the table is supposed to contain twelve months worth of data and it is now month number thirteen. It is now time to get rid of rows that are older than twelve months.
As soon as a WHERE clause is used in a DELETE, it must take the slow path to delete the rows. This simply means that it must log or journal a copy of each deleted row. This is to allow for the potential that the command might fail. If that should happen, Teradata can automatically put the deleted rows back into the table using a ROLLBACK. As slow as this additional processing makes the command, it is necessary to insure data integrity.
To use the Fast Path, a technique is needed that eliminates the journal logging. The trick is again to use a Fast Path INSERT / SELECT. This means, we insert the rows that need to be kept into an empty table.
Fast Path DELETE Example # 1

There are three different methods for using Fast Path Processing in BTEQ for a DELETE. The first method uses an INSERT/SELECT. It will be fast, but it does require privileges for using the appropriate DDL. It also requires that additional PERM space be available for temporarily holding both the rows to be kept and all of the original rows at the same time.

The first example does NOT use the Fast Path Delete, but the second example does.
Fast Path DELETE Example # 2
Normal Path Processing for the DELETE (uses the Transient Journal):

This next method also uses an INSERT/SELECT and will be fast. It does not require privileges for using any DDL. It probably will not be faster than the first method, since the rows must all be put back into the original table. However, the table is empty and the Fast Path will be used:

The first example does NOT use the Fast Path Delete, but the second example does.
Fast Path DELETE Example # 3
This INSERT/SELECT uses a Global temporary table to prepare for the single transaction to copy My_Table in BTEQ:
INSERT INTO My_Global_Table_Copy
SELECT * FROM My_Table WHERE Column6 >= 1001230
; DELETE My_Table
; INSERT INTO My_Table
SELECT * FROM My_Global_Table_Copy ;
A Global Temporary Tables requires that TEMPORARY space be available for temporarily holding the rows to be kept and all of the original rows at the same time. A Volatile Temporary table could also be used. Its space comes from spool. However, it requires a CREATE statement to build the table, unlike Global Temporary tables. More information on Temporary tables is available in this book.
If you are not using BTEQ, these statements can be used in a macro. This works because macros always execute as a transaction.
MERGE INTO
Here are the V2R5 MERGE Rules:
1) The Source relation must be a single row.
2) The Primary Index of the target relation must use an equality condition to a numeric constant or a string literal in the ON Clause.
3) You cannot request an error log.
Here are the V12 and above MERGE Rules:
1) The Source relation can be a either a single row or multiple rows.
2) The Primary Index of the target relation must be bound by use of an equality condition to an explicit term or to a column set of the source relation.
3) The Primary Index of the target table cannot be updated.
4) The INSERT if the WHEN NOT MATCHED Clause is specified, must have the value specified in the ON clause with the target table primary index of the target table, which causes the INSERT to be on the local AMP.
MERGE merges a source row set into a target table based on whether there is a MATCH or whether there is a NOT MATCH condition. If there is a MATCH then Teradata will UPDATE the row, but if there is a NOT MATCH condition it will INSERT the row. Teradata Extension pre V12 and ANSI Version on Teradata V12.
MERGE INTO Example that Matches

SELECT * FROM Employee_Table
WHERE Employee_No = 2000000;

MERGE INTO Example that does NOT Match
I will now perform a MERGE that will have a
NOT MATCH situation because Employee_No
3000000 does not exist in the Employee_Table.
MERGE INTO Employee_Table
USING VALUES (3000000, 400, 'Coffing', 'TeraTom', 75000.00)
AS E (Emp, Dep, Las, Fir, Sal)
ON Employee_No = Emp
WHEN MATCHED THEN
UPDATE set salary = Sal
WHEN NOT MATCHED THEN
INSERT VALUES (Emp, Dep, Las, Fir, Sal);
SELECT * FROM Employee_Table
WHERE Employee_No = 3000000;

There is no employee 3000000 that exists before the MERGE INTO statement, but once the MERGE INTO statement runs (and doesn’t find a Match) it INSERTS employee 3000000 into the table.
OReplace
OReplace will replace characters or eliminate them
Just give the replace string as a zero length
string and it removes the character.
So if col1 contains '123*45*67*89*'
and you:
OReplace (col1,'*','')
the result is
123456789
The OReplace function is a UDF that will replace certain characters with others.
User Defined Functions (UDFs)
User Defined Functions (UDFs) are written in C or C++.
User Defined Functions (UDFs) are compiled and therefore they take up PERM space.
Teradata supports two types of user-defined functions (UDFs):
• SQL UDFs – Encapsulate regular SQL Expressions in functions
• External UDFs – Written in C, C++ or JAVA and then must be installed
UDFs can be of the following types:
•Scalar
•Aggregate
•Window Aggregate
•Table
User Defined Functions (UDFs) are functions that are written in C or C++ and they are always compiled. UDFs are invoked as expressions from within SQL statements. UDFs take up PERM space (compiled) and are invoked from expression within SQL. UDFs can be of the following types: Scalar, Aggregate, Window Aggregate or Table. A scalar UDF can appear almost anywhere a standard SQL scalar function can appear, and an aggregate UDF can appear almost anywhere a standard SQL aggregate function can appear. A table UDF can only appear in the FROM clause of an SQL SELECT statement. A window aggregate UDF is an aggregate UDF with a window specification applied to it.
User Defined Function Example

SELECT SQL01.firstUDF(tbl_1.Salary, t2.HlthCost, t3.Sales_Amt)
FROM tbl_1, tbl_2, tbl_3;
After compiling the UDF we can use it in our SQL.
The example above shows how to create a UDF and how to run a query that utilizes it.
User Defined Types (UDTs)
UDFs allow for the creation of custom data types that model the structure/behavior of data in a specific application(s). UDTs offer data types that have capabilities not offered by Teradata (built-in) data types. A UDT can only exist on the Teradata Database server.
Teradata Database supports two types of UDTs:
•distinct
•structured
A distinct UDT is based on a single predefined data type such as INTEGER or VARCHAR. It redefines an already-defined SQL data type. For example, Define 'Salary' as a Decimal (10,2), but with a function that prevents someone from entering a value of more than 2,500,000.
A structured UDT is a collection of fields termed attributes, each of which is defined as a predefined data type or other UDT. The purpose of this is to allow nesting. For example, If 'Phone' is defined as a UDT with subfields for Area Code and Number, Transform functions must be provided that convert input and output data into and from a 'Phone' object. Input and output data as a string with all the fields concatenated, using fixed field lengths or a delimiter such as a comma between them.
If the current build-in Teradata data types won't work for a specific column then you might consider creating a UDT.
User Defined Types Example
CREATE TYPE British_Pound
AS DECIMAL(8,2)
FINAL;
FINALis part of the ANSI/ISO standard SQL syntax. In Teradata, its purpose is to conform to the standard syntax for declaring distinct types.
In implementations that support type inheritance, it additionally signifies that the type cannot be used as a base type for defining a subtype. Teradata does NOT support any form of type inheritance.
If you specify a FORMAT phrase to define the format for UDT columns, it is required that the format is valid for the external type of the UDT. This must also be specified by the transform that defines how the UDT should be passed between the server and application.
Above is an example of creating a User Defined Function.
Formatting for Internationalizations
There is a file called Specification for Data Formatting (SDF) file
The SDF file defines the default display formats for the data types: Numeric, Date, Time and Timestamp
The SDF file defines strings that display in place of certain
formatting characters that appear in a FORMAT statement.
The SDF file will NOT work for INTERVAL Data Types

The Specification for Data Formatting file is called the SDF. It is used for formatting and display purposes.