Before we dive into Gulp, we need to cover some basic information to make sure we get started at the right pace. The most common reason why people end up avoiding build systems such as Gulp is because they have a preconceived idea that the command line is inherently hard and complicated. I know this because I've been there myself. Once I got over my initial hesitation and decided to dedicate some time to understanding the command line, I've been a much happier developer, and I'm sure you will be too.
In addition to learning how to use the command line, we are also going to understand the installation of Node.js and npm. These two tools allow us to run Gulp and manage the Gulp plugins that we will be using in our project.
Finally, we will cover the basics of using npm, and we will use it to install Gulp.
This will provide you with all of the necessary knowledge to get comfortable with using the command line to install packages.
Getting comfortable with the command line
Your computer's command line is one of the most powerful tools in your development toolset. If you've never used a command line or if you're still wondering what it even is, don't worry. We are going to take a look at some common commands and patterns that you will use to complete the rest of the book and set you up for future command line usage.
First, we need to discuss the differences between operating systems and their command-line interfaces that we will use. We are going to specifically cover two topics: Terminal on Mac/Linux and PowerShell on Windows.
Mac OS X Terminal: If you're using a Mac (or Linux), Terminal comes preinstalled as a system application. Simply search for it and run the application, and you're all set.
Windows PowerShell: Our Windows setup is a bit different in that we will use an additional application as our command-line interface. Windows PowerShell is a powerful application that will make your command-line experience much more enjoyable and consistent with the commands that we will run on Mac. Windows ships with a more basic command-line interface called Command Prompt; however, due to the differences in the syntax and added features, PowerShell is the clear choice when doing any command-line operations on Windows.
If you're running Windows 8, PowerShell comes preinstalled. However, if you're running anything below Windows 8, it will require an additional download.
Once you have your command-line interface installed and running, take a moment to understand what you see on the screen. When you first open your command line, you will most likely be greeted with something that appears completely alien to you if you haven't used one before. It should look something like this on Mac and Linux:

On Mac, the displayed text should look something like this:
travs-macbook:~ travis$
On Windows, it should look something like this:
PS C:UsersTravis>
This is a visual reference to our current location in our filesystem. The reason why these lines are different is because these operating systems have different filesystems. The good news is that you won't have to worry much about this. The important thing is to understand what you're seeing because this will soon change as we use commands and it will also help you visualize where you are within the filesystem.
At the end of these lines, you will notice a square cursor. This cursor verifies that our command line is ready to accept commands. Every command we will use shares a common syntax that is used to run our commands and specify what we would like each command to do. The common structure of a command is as follows:
application action --flag arguments
As you can see, each parameter we use in a command is separated by a single space to separate the application from its actions, flags, and arguments.
The application is the first thing listed in each command followed by the action we would like it to perform. In some cases, the only purpose of an application is to provide an action, so the additional action parameter doesn't apply in those situations.
Next, we include any flags we would like to use. Flags are optional and are preceded by a double dash like so: --flag. They are used to specify additional options for the action or application.
Finally, we list our arguments that are the custom input we provide to our application. Arguments will usually contain a name or set of names to either create or reference files depending on the application you are using.
In most cases, this order will remain consistent. As long as each parameter is separated by a single space, everything should work as expected. However, some applications require a specific order to execute the commands correctly. Be sure to check out the documentation of the application if you run into any problems.
Command reference
While learning how to use the command line, it is often easy to forget the basic commands that you will need to use, so I've created this simple reference. Go over each of the standard commands that we will be using throughout the book.
We'll start off with the basics, and then I'll show you some neat shortcuts that you can use while setting up your project structure. The commands we are going to cover are ls, cd, mkdir, touch, and ni.
Listing files and folders (ls)
The ls command will allow us to see what our current directory contains. You will use this a lot to see what is inside of your folders and ensure you are in the right location in your filesystem.
For listing files and folders, use the following command:
ls
A screenshot listing files and folders is as follows:

Changing directory/folder (cd)
The cd command stands for change directory. It allows you to navigate through your filesystem. It will accept both a path relative to the directory you are currently in and an absolute path to navigate directly to any directory in the filesystem.
The command for relative paths is as follows:
cd folder
cd folder/sub-folder
The command for an absolute path is as follows:
cd /users/travis/folder
The next screenshot demonstrates how to change directories:

To navigate out of a folder, you simply pass in cd .. in place of a path/folder. This will take you up one level in your tree.
To move up one tree level, use the following command:
cd ..
Making a directory/folder (mkdir)
The mkdir command stands for make directory. It allows you to create folders. Additionally, as a shortcut, you can pass in multiple folder names separated by a single space to create multiple folders at the same time.
To create a single folder, use the following command:
mkdir folder-name
To create multiple folders, use the following command:
mkdir folder-one folder-one/sub-folder folder-two
This will create two parent folders— folder-one and folder-two while additionally creating a sub-folder within folder-one with a name of sub-folder.
The next screenshot demonstrates how to make a new folder/directory:

Creating a file on Mac/Linux (touch)
The touch command is actually used to change a file's timestamps. However, if you pass it a filename that does not exist yet, it will create a blank new file for you on Mac/Linux systems. This is why you will see it often used as a way to create new files. Like mkdir, you can also pass in multiple filenames separated by a single space to create multiple files at once.
For creating a file on Mac/Linux, use the following command:
touch my-file.html
For creating multiple files on Mac/Linux, use the following command:
touch my-file.html styles.css
The following screenshot demonstrates how to create a new file:

Creating a file on Windows (ni)
The ni command stands for new item. It allows you to create a new file on Windows systems using PowerShell.
For creating a file on Windows, use the following command:
ni my-file.html -type file
Unlike other commands, we are required to specify a flag with the type of item that we wish to create. When using this command, we are required to specify the type of item because ni can be used to create folders as well.
If you do not provide the application with the flag, then it will prompt you to input the information before you can continue with the application.
Administrator permissions (sudo)
On Mac and Linux systems, you may run into permission issues as you run some of your commands, especially if the commands are used on protected areas of your filesystem. This is put in place to protect you from accidentally overwriting or deleting important files.
If you are running into these issues, it is a likely sign that you should move to an area of the filesystem where you have full ownership of the files and directories. It is suggested that you should try to avoid using sudo at all costs, unless you specifically understand the consequences of doing so. Understand that this section is more for informational purposes and not as a recommendation.
With that being said, in a case where you actually intend to create or modify files in protected areas, you will need to add the sudo keyword to the beginning of your commands.
For creating a folder with administrator permission, use the following command:
sudo mkdir folder-name
For creating a file with administrator permission, use the following command:
sudo touch my-file.html
By adding the sudo keyword to your commands, the system will prompt for your administrator password on the next line of your command-line application. If you enter your password correctly, the command will run with full administrator access and override any permission restrictions. Otherwise, you will receive permission errors and the command will halt.
By examining these commands, you can quickly notice the common pattern they all share. Having a familiarity with this shared pattern is great because all of the new commands we learn throughout the book will continue to follow it as well.
Creating your project structure
Having learned all of these great new commands, we're now going to use them to scaffold our project folder. First, let's make sure we're all in the same starting directory. For this, use the following command:
cd ~
Next, we're going to list out all of the files and folders in this directory to get a quick look at what it contains and ensure we are where we want to be. For listing files and folders, use the following command:
ls
Once you've run this command, your terminal window will respond with a listing of all your files and folders inside the current directory, which is shown as follows:

Next, we're going to create a new folder named gulp-book for our Gulp project to live in. If you would like to create this folder in another directory, now is the time to put your cd and ls commands to good use. Once you have navigated to a directory you are comfortable with, it's time to create your new project folder, which is done using the following command:
mkdir gulp-book
Once you run this command on your terminal window, a new folder named gulp-book will be created, which is shown as follows:

Next, we need to move into that directory so we can scaffold out the rest of our project structure. Instead of creating a single folder at a time, we will pass in the remaining folders we need to create all at once, which can be done using the following commands:
cd gulp-book
mkdir app app/js app/css app/img
The next screenshot shows the creation of multiple directories:

The preceding command created an app folder and three subfolders within it named css, img, and js, which we will use to store our images and source code. Next, we'll add some files. First, we'll create our index.html file.
Let's run the following command to jump back a directory so we're in the root of our project:
cd ../
To create a file using the Mac/Linux Terminal, use the following command:
touch index.html
To create a file using Windows PowerShell, use the following command:
ni index.html -type file
With the commands executed, you should now have an index.html file in the gulp-book directory. Now, let's create a gulpfile to accompany our newly created index.html file.
For creating a file on Mac/Linux Terminal, use the following command:
touch gulpfile.js
For creating a file using Windows PowerShell, use the following command:
ni gulpfile.js -type file
The following screenshot demonstrates the creation of the gulpfile:

A gulpfile is a set of instructions that Gulp uses to run your tasks. All the code that we will be writing for Gulp will be contained in this file. We will be coming back to this file very soon.
Hopefully, this is all starting to feel familiar. The more you use it, the more comfortable you'll be and the quicker you will be able to execute commands.
We've created some files in our base directory, but now we need to create some blank files in our app directories. Next, let's create a couple of blank CSS and JavaScript files for later use.
For Mac/Linux Terminal, use the following command:
touch app/css/main.css app/css/secondary.css app/js/main.js app/js/secondary.js
When using Terminal, we can create multiple files at once, much like our mkdir command from earlier.
For Windows PowerShell, use the following commands:
ni app/css/main.css -type file
ni app/css/secondary.css -type file
ni app/js/main.js -type file
ni app/js/secondary.js -type file
Take a look at the following screenshot:

If all went well, then you should be all set! Just to make sure, load your project folder into your favorite code editor or integrated development environment and examine the project tree. Your tree should look like this:
    gulp-book/
    - app/
      - css/
        - main.css
        - secondary.css
      - img/
      - js/
        - main.js
        - secondary.js
    - index.html
    - gulpfile.js
The next screenshot shows the tree structure in a text editor:
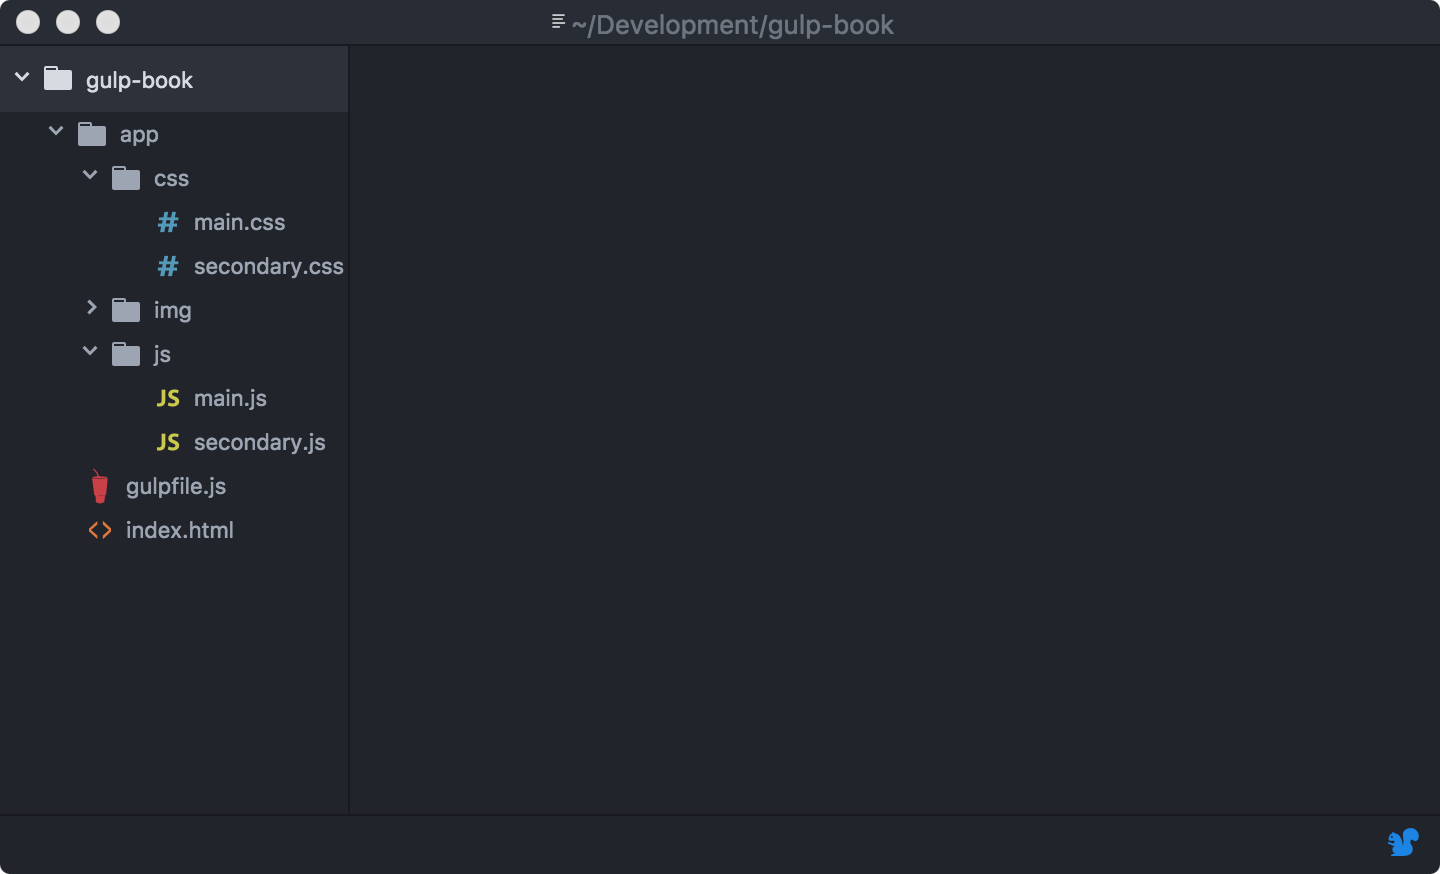
If your tree looks like this, then great! You've successfully learned how to use your command line to scaffold a basic project.
If your tree looks different, then you can take a moment to revisit the commands and try again, or you can patch up the missing files and folders in your code editor. It's up to you.
In the upcoming chapters, we will use this base project structure to build a small website in order to demonstrate Gulp's capabilities. But first, let's install the remaining software we will be using throughout the book.
Adding content to the project
After scaffolding our project folders and files, we must add code to our project. Our project is going to be a rather simple one-page HTML website. However, by setting this code up together, it will help us demonstrate the work that is taking place as we run our Gulp tasks in the upcoming chapters.
Keep in mind that these examples will be rather simple, only to reinforce those demonstrations. You are more than welcome to add in any additional code that you would like, but for the sake of simplicity and clarity, the code examples in this book are designed specifically to demonstrate the work our tasks will do to our code.
Preparing our HTML file
For our index.html file, we just need to provide a basic structure and link it up to the distributable files in our head. The code is as follows:
    <!DOCTYPE html>
    <html>
        <head>
            <meta charset="utf-8">
            <title>Gulp Book Project</title>
            <link rel="stylesheet" href="dist/all.css" />
        </head>
        <body>
            <div id="core">
                <div class="box">
                    <img src="dist/img/gulp.png" alt="Gulp Logo"        class="gulp-logo">
                    <h1>Gulp Book Example</h1>
                    <p>Lorem ipsum dolor sit amet, consectetur adipisicing elit. Fugiat atque unde doloremque illo, voluptatibus repellendus iusto, praesentium officia necessitatibus consectetur blanditiis neque eveniet accusamus dolorum labore iure vel, tempora odio.</p>
                    <p>Lorem ipsum dolor sit amet, consectetur adipisicing elit. Reiciendis dignissimos commodi minus sint animi itaque praesentium, natus vel eaque, molestias sequi modi quaerat aliquam in, quisquam quos, impedit maiores ratione!</p>
                    <p>Lorem ipsum dolor sit amet, consectetur adipisicing elit. Quos ut possimus, repellat vero modi, aliquam pariatur deserunt voluptas quam omnis maiores eveniet quo ipsam totam quasi recusandae, rem sit deleniti.</p>
                </div>
            </div>

            <script src="dist/all.js"></script>
        </body>
    </html>
Preparing our CSS
Once our HTML has been set up, we should begin writing our CSS. For the purposes of this example, we are going to keep the files rather small just to demonstrate the work that will be occurring when we run our tasks. However, if you feel comfortable up to this point, feel free to use your own code.
Let's open our main.css file that is located in our project's CSS directory. Inside this file, type or paste in the following code:
    /* Variables */
    :root {
        /* Colors */
        --red: #F05D5D;
        --green: #59C946;
        --blue: #6F7AF1;
        --white: #FFFFFF;
        --grey: #EEEEEE;
        --black: #000000;
    }

    body {font:300 16px sans-serif; background:var(--grey);}
This variable code may seem a bit unfamiliar to you, especially if you're used to another CSS preprocessor like Sass. However, the ideas are the same; only the syntax has changed. This code snippet uses new spec-compliant CSS variables to define a set of colors that we will use throughout our CSS. Because of this, we will introduce a tool in our gulpfile that will be able to translate these variables and further illustrate the work that Gulp will be doing.
Next, let's open our secondary.css file that is located in the same directory. In this file, we will add some additional styles that we will soon join together with our gulp-concat plugin. The code for the secondary.css file is as follows:
    #header {padding:2em; background: var(--blue);}
    #core {width:80%; max-width:900px; margin:0 auto;}
    #footer {padding:2em; background: var(--red);}
    .box {padding:2em; background:var(--white);}
    .gulp-logo {width:125px; margin:0 auto; display:block;}
We now have two separate CSS files that set preprocessor variables and then use those variables to output colors. The task we wrote in the preceding code will ensure that both of these files will be joined together. They will then be preprocessed so that all of these new variables we created will properly be assigned to the elements where we have assigned them in our CSS.
Preparing our JavaScript
Next, we need to add some code to our JavaScript files. Again, for the sake of succinctness and clarity, we will keep these examples quite small just to demonstrate what is happening to our files when Gulp runs.
First, let's open the main.js file inside the js directory in our main project folder. In this file, we are going to add a line of code to just fire off some basic logs to our browser console. The code is as follows:
console.log("I'm logging from the main.js file.");
Next, let's open up the secondary.js file and add in another log to our browser console, which is as follows:
console.log("I'm logging from the secondary.js file.");
Our project files have now been set up to demonstrate the processing that we will
be doing with gulp. We will be revisiting these files in the next chapter when we begin writing our tasks. Next, we will install the remaining software that we will use throughout the book.
Adding images
Our project will also contain some images. You are more than welcome to include any images you would like; however, if you would like to follow along with the book, I have provided some images for you in the project files for this chapter. You can download these files from Packt's website.
Summary
In this chapter, you learned about how to use a command-line application to navigate a filesystem and create new files and folders. With this newfound knowledge, we scaffolded our project directory that we will use throughout the remainder of the book. In the next chapter, we will dive into the basics of Gulp to better understand how it works in preparation for writing our own gulpfiles.