
In our use case, we are going to set up an authentication provider to integrate with an external OpenLDAP server. This will provide the key functionalities we need to secure our web application and illustrate with an example a common requirement of most enterprise applications.
Note
The setup of the OpenLDAP server and the initial load of users were performed in Chapter 2, Setting Up the Environment. You can check using some of the command-line utilities provided by OpenLDAP. For example, ldapsearch -H ldap://localhost:389 -D "cn=Manager,dc=example,dc=com" -W.
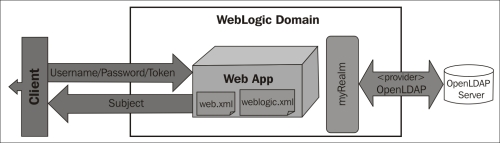
As the preceding diagram shows, our web application client will send username and password information, which will be processed by the WebLogic server against the active security realm; named myrealm by default. As we are using a standard Java EE web application, the web.xml deployment descriptor will be used to specify a few things:
- Security constraint: What should be protected and by which role
- Login configuration: Which authentication method will be utilized and (depending on the type) where the user will be redirected to authenticate in case of any errors
- Security roles: Declares the available roles for this application
But, as said, we still have to declare some security settings that are specific to the WebLogic implementation, and here is where a proprietary deployment descriptor comes in handy to connect the missing dots. We have to use the weblogic.xml file to specify the security roles assignments. It is a match between a security role declared in the web.xml file and the principals (users, groups, or other roles) available in the WebLogic Server security realm.
Besides the settings on the application, it's necessary to set up the authentication provider and adjust the proper connection settings to the OpenLDAP server. The configuration will be executed through the WebLogic console, but you can also use WLST scripts.
To configure a new authentication provider, follow these steps:
- Open the Security Realms page from the navigation tree and click on myrealm.
- In the Settings section for the myrealm page, click on the Providers tab. The page will list DefaultAuthenticator and DefaultIdentityAsserter, which are used by WebLogic natively in a standard installation.

- Click on New, and on the creation page use these values:
- Name:
StoreLDAP - Type:
OpenLDAPAuthenticator
- Name:
- Click on OK.
- You should see the Authentication Providers page again with the provider we've just created. Click on StoreLDAP.

- In the Settings section for the StoreLDAP page, change the control flag value to SUFFICIENT. Click on Save after this change.
- Still under the Configuration tab, select the Provider Specific tab.
- If you kept the default values specified in Chapter 2, Setting Up the Application, to set up an OpenLDAP server, apply the following settings. Otherwise, replace them with your specified values. Also, if a property is not specifically changed, you can keep the default value.
- Host:
localhost - Port:
389 - Principal:
cn=Manager,dc=example,dc=com - Credential:
welcome1 - Confirm Credential:
welcome1 - User Base DN:
ou=people, dc=example, dc=com - User From Name Filter:
(&(cn=%u)(objectclass=inetOrgPerson)) - User Object Class:
inetOrgPerson - Group Base DN:
ou=groups, dc=example, dc=com - Group From Name Filter:
(&(cn=%g)(objectclass=groupOfNames)) - Static Group Object Class:
groupOfNames - Static Member DN Attribute:
member - Static Group DN from Member DN Filter:
(&(member=%M)(objectclass=groupOfNames))
Click on Save after you finish.
- Host:
- After saving, WebLogic will warn you that a restart is required for the changes to take effect. So restart your server.
Tip
All security-related changes on WebLogic will have one of two possible characteristics: they're effective immediately, meaning you don't need to activate a change session, or may require a restart to take effect. Keep this in mind when doing any security changes, since this can help you troubleshoot your modifications. In general, the WebLogic console will mark items that require a restart with a yellow triangle and display a message after saving, indicating the need for a restart.
- Now browse back to the Providers list page (Security Realms | myrealm | Providers). Click on the Reorder button. The order presented on this page is the exact order that authentication providers will be executed in at runtime. Change the ordering so that StoreLDAP is the first on the list. Click on OK when done.

This concludes the OpenLDAP configuration on WebLogic. Now we have to do a few changes on the application's configuration in order to specify the security constraints, roles, and groups.
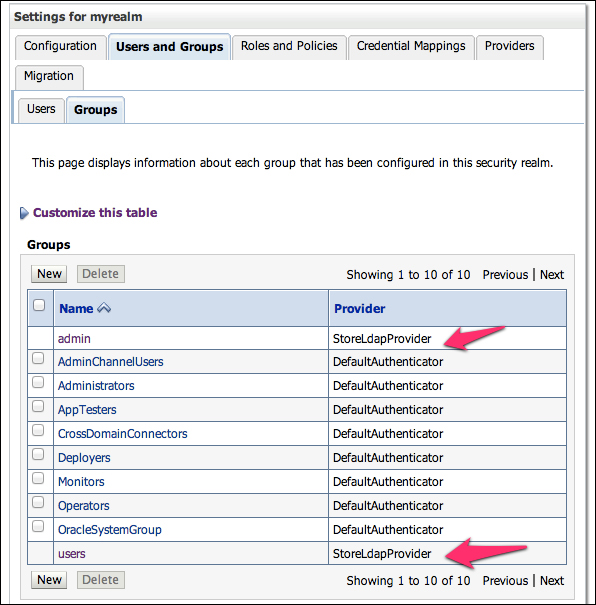
To double check if your configuration is correct, go to the myrealm page again and click on the Users & Groups tab. You should see a list of the available users on all providers, as well as a list of all groups. You can identify the source of each entry by checking the Provider column.
Tip
Consider using the Record feature of the WebLogic console in order to save the configuration steps in a WLST script. This can be re-used when setting up other environments and also save some time if you need to reinstall your own.
To start recording, click on the Record button on the WebLogic console toolbar at the top of the console.

Click on the button again to finish the recording, and WebLogic will display a message with the name and directory of the WLST script just recorded.