
The following diagram illustrates the overall security solution we're going to set up and use in this chapter:

Now let's walk through the actions involved.
- A visitor clicks on the Sign-up button and submits the form to create a new user.
- A JavaBean will interact with the JPA object and create the entry on the database.
- Concurrently, this JavaBean publishes a message on the JMS queue, possibly a protected WebLogic resource.
- Later, a Message Driven Bean (MDB) listening on the queue reads the message and submits the user information to the LDAP server, completing the user-provisioning process.
Due to the protected resource feature of the WebLogic server, this JMS queue can't be used by other systems, unless of course they match the security policy that will be created to protect the JMS queue.
Now that the solution is clear, let's do the implementation starting with the database step.
We are going to implement a sign-up process so new users can register themselves on the system.
- Add a Sign-up button to the login form we've just created in the previous section of this chapter. Right after the Login button in
login.xhtml, add the following:<p:commandButton id="signupBtn" value="Not a user? Sign-up" onclick="signupDlg.show()" immediate="true" /> - Then, after the
</center>tag, create a PrimeFacesdialogbox. This dialog will be displayed when a user clicks on the Sign-up button. Copy and paste the following code:<p:dialog id="dialog" header="User Sign-up" widgetVar="signupDlg"> <h:form> <h:panelGrid columns="2" cellpadding="5"> <h:outputLabel for="name" value="Name" /> <p:inputText id="name" required="true" value="#{login.customer.name}" label="name" /> <h:outputLabel for="email" value="E-mail" /> <p:inputText id="email" required="true" value="#{loginBean.customer.email}" label="email" /> <h:outputLabel for="password" value="Password:" /> <h:inputSecret id="password" required="true" value="#{loginBean.customer.password}" label="password" /> <f:facet name="footer"> <p:commandButton id="signup" value="Sign-up" oncomplete="handleSignup(xhr, status, args)" actionListener="#{loginBean.signup}" /> </f:facet> </h:panelGrid> </h:form> </p:dialog> - As you might have noticed, we're using some JavaScript calls in order to show or hide the dialog. In order to do that, copy and paste the following code right after the
</p:dialog>tag:<script type="text/javascript"> function handleSignup(xhr, status, args) { if (args.validationFailed) { jQuery('#dialog').effect("shake", { times : 2 }, 100); } else { signupDlg.hide(); jQuery('#signupBtn').fadeOut(); } } </script> - We need a service bean that will interact with the JPA and perform transaction handling. Create a new class named
CustomerBeanunder the packagecom.packt.store.customerand extend ourAbstractRepositoryclass in order to have standard CRUD operations.@Stateless public class CustomerBean extends AbstractRepository<Customer> { @PersistenceContext(unitName = "StoreBO") private EntityManager em; @Override protected EntityManager getEntityManager() { // TODO Auto-generated method stub return em; } } - Open the
LoginBean.javaclass and let's inject the EJB created earlier as a new class attribute.@EJB CustomerBean customerBean;
- Before creating the
signup()method, we need to hash the password we're going to store on the database and on the LDAP server later. So let's create ageneratePassword()method that will do just that usingSHA-1, a common hashing algorithm.private String generatePassword(String text) { MessageDigest md; try { md = MessageDigest.getInstance("SHA-1"); byte[] hash = new byte[40]; md.update(text.getBytes("iso-8859-1"), 0, text.length()); hash = md.digest(); return "{SHA}" + DatatypeConverter.printBase64Binary(hash)); } catch (NoSuchAlgorithmException e) { e.printStackTrace(); } catch (UnsupportedEncodingException e) { e.printStackTrace(); } return text; } - Still at
LoginBean, create asignup()method. Here we're going to save the new user to the database using the data received from the sign-up form.public void signup() { try { customer.setPassword(generatePassword(customer.getPassword())); customerBean.create(getCustomer()); addSuccessMessage("Thanks! Your user should be ready in a few seconds. Try to log in using the form below."); } catch (Exception ex) { ex.printStackTrace(); addErrorMessage("An unknown error occurred and your user was not created."); } } - Save all files and deploy.
- Access the URL
http://localhost:7001/store/login.jsf. Your Login form should look similar to the following screenshot. When you click on the Sign-up button, a dialog will be displayed and you can type your e-mail and password to create a new user on the system.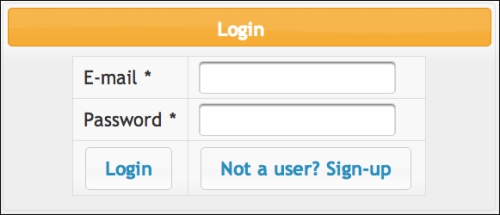
The system is inserting a new entry in the customer table of the store_db schema of MySQL. But there are still some flaws in this implementation that we're going to fix in the next sections. For example, this new entry in the customer table is not even being considered for authentication since we're using only the OpenLDAP authentication provider and the information is only at the database for now. Let's complete the solution by publishing the message to the JMS queue and getting the data into the LDAP server asynchronously.
In this section, we are going to publish a JMS message with a Customer object that will be used to create a new customer on the system.
- Create a JMS queue using the WebLogic console or WLST. This was already explained in Chapter 7, Remote Access with JMS. Name it
UserQueueand usejms.userQueueas the JNDI name. - Open the class
LoginBeanand add two Java EE resources as class properties; we're going to inject a JMS queue and a connection factory through the CDI mechanism.@Resource(mappedName = "jms.userQueue") private Queue queue; @Resource(mappedName = "weblogic.jms.XAConnectionFactory") private ConnectionFactory connectionFactory;
- Still at
LoginBean, create a new method calledpublish()as shown in the following code snippet:public void publish(Customer entity) throws JMSException { Connection con = null; Session session = null; MessageProducer sender = null; try { con = connectionFactory.createConnection(); session = con.createSession(true, Session.AUTO_ACKNOWLEDGE); sender = session.createProducer(queue); Message message = session.createObjectMessage(entity); sender.send(message); session.commit(); } catch (JMSException e) { // do something with exception e.printStackTrace();throw e; } finally { // Doesn't support try-with-resources yet... try { sender.close(); } catch (Exception e) { } try { session.close(); } catch (Exception e) { } try { con.close(); } catch (Exception e) { } } }
At this point, the method is ready to publish the ObjectMessage message containing a Customer object to the JMS queue. But we still need to protect the queue so that unauthorized users are unable to publish messages to it. This is a common requirement in enterprise environments where multiple applications share the same instance of the application server but have security concerns.
WebLogic provides security policies that are very useful for such situations, allowing a fine control of specific functions on a resource. For example, we're going to create a policy that allows only users from admin group to publish a message on a JMS queue.
- Open the WebLogic administration console, expand Services, then Messaging, and click on JMS Modules.
- Click on the JMSModule-Tickets module and select jms.userQueue.
- In Settings for jms.userQueue page, click on the Security tab and then Policies.
- Here you can compose conditions and the method you want to protect. The methods available are according to the resource. In this case, a JMS queue has three methods: browse, send, and receive.
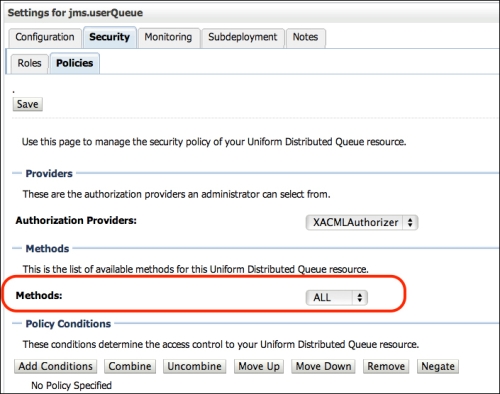
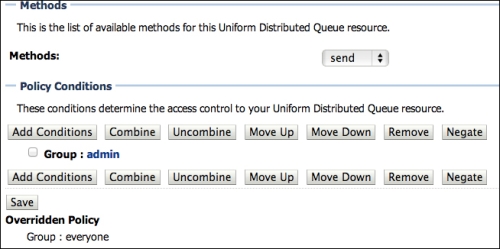
- For this example, select the method send on the Methods combobox. It's important to select the method before adding the conditions, since you can have different conditions for each method.
- Click on Add Conditions and select the predicate Group. Click on Next.
- Type
adminas group name, click on Add, and then Finish. - At this point, you should be redirected to the settings page for the queue and can double-check the changes. If everything looks good, click on Save. The following screenshot shows what the policy should look like:
Now update the LoginBean class to use our new method and publish the customer to the JMS queue. First, let's check if the security policy we've created really works.
- Open the
LoginBeanfile, comment the call to thecreate()method ofCustomerService, and add a call to thepublish()method we've created.public void signup() { //service.create(getCustomer()); publish(getCustomer()); addSuccessMessage("Thanks! Your user should be ready in a few seconds. Try to login in the form below."); - Save all files and deploy the application.
- Open
http://localhost:7001/store/login.jsfand click on Not a User? Sign-up, fill the form, and click on Sign-up to submit.
- Now take a look at the server logs from Eclipse or at the domain's log directory. Click on the Console tab if you're using Eclipse. You should see the following messages, confirming that the send action is denied to anonymous users:
...
Caused by: weblogic.jms.common.JMSSecurityException: Access denied to resource: type=<jms>, application=myModule, destinationType=queue, resource=jms/userQueue, action=send
  at weblogic.jms.dispatcher.Request.handleThrowable(Request.java:87)
  at weblogic.jms.dispatcher.Request.getResult(Request.java:52)
  at weblogic.jms.frontend.FEProducer.sendRetryDestination(FEProducer.java:1072)
  at weblogic.jms.frontend.FEProducer.send(FEProducer.java:1426)
  at weblogic.jms.frontend.FEProducer.invoke(FEProducer.java:1487)
  at weblogic.messaging.dispatcher.Request.wrappedFiniteStateMachine(Request.java:961)
  ...
- So let's configure the necessary resources to authenticate using the application administration user before publishing the message. Start by creating two new entries in the
web.xmldescriptor with the administrator user that is already in the preloaded users of our OpenLDAP configuration.<env-entry> <env-entry-name>signupUser</env-entry-name> <env-entry-type>java.lang.String</env-entry-type> <env-entry-value>[email protected]</env-entry-value> </env-entry> <env-entry> <env-entry-name>signupPassword</env-entry-name> <env-entry-type>java.lang.String</env-entry-type> <env-entry-value>welcome1</env-entry-value> </env-entry> - Now add these resources to the
LoginBeanclass attributes.@Resource(lookup = "signupUser") private String signupUser; @Resource(lookup = "signupPassword") private String signupPassword;
- Then add the authentication needed to publish the message. Replace the
signup()method body with the following code:public void signup() { try { getCustomer().setPassword(generatePassword(getCustomer().getPassword())); request.login(signupUser, signupPassword); publish(getCustomer()); customerBean.create(getCustomer()); addSuccessMessage("Thanks! Your user should be ready in a few seconds. Try to log in using the form below."); } catch (Exception ex) { ex.printStackTrace(); addErrorMessage("An unknown error occurred and your user was not created."); } finally { try { request.logout(); } catch (ServletException e) { e.printStackTrace(); } } } - Access the Login page and the Sign-Up form again. Try to create a new user, but this time no errors should occur since
[email protected]is a valid user that is a member of theadmingroup, which complies with the security policy. - To complete the test, check the messages on
jms.userQueuefrom the Monitoring tab, according to the instructions in the Queuing messages section in Chapter 7, Remote Access with JMS.Tip
Note that it's not possible to check the content of the message since it's an
ObjectMessagemessage, not a text message. In order words, there is a serializedCustomerobject in the message and the WebLogic console can't read this object from the Monitoring tab. Still, you can see the message size and count to confirm that there is a valid message in there.
Even though the first part of the sign-up process is done, we need to consume the message from the JMS queue and send it to the LDAP server. The consumption part is pretty straightforward, as already presented in the Consuming messages with an MDB section in Chapter 7, Remote Access with JMS.
To build the LDAP client, we're going to rely on a few APIs provided by the JDK used to access Java Naming and Directory Interface (JNDI) objects, since both models define the same mechanisms of having hierarchical namespaces and objects trees, which can also hold attributes and other related information.
Let's create the LDAP client using the JNDI APIs that will be used from the MDB we will create in the next section.
- Create a new class named
LDAPClient.@Named public class LDAPClient { - Create some properties in the class that we're going to need in order to connect to the LDAP server. This is the same information you have already used to set up the authentication provider in the WebLogic server.
final static String ldapServerName = "localhost"; final static String rootdn = "cn=Manager,dc=example,dc=com"; // This is not recommended for production code final static String rootpass = "welcome1"; final static String rootContext = "ou=people,dc=example,dc=com"; // create getters/setters for this property private DirContext ldapCtx; - Create a method named
connect()that consumes the properties we've defined.public DirContext connect() throws NamingException { Properties env = new Properties(); env.put(Context.INITIAL_CONTEXT_FACTORY, "com.sun.jndi.ldap.LdapCtxFactory"); // Consider SSL env.put(Context.PROVIDER_URL, "ldap://" + ldapServerName + "/" + rootContext); env.put(Context.SECURITY_AUTHENTICATION, "simple"); env.put(Context.SECURITY_PRINCIPAL, rootdn); env.put(Context.SECURITY_CREDENTIALS, rootpass); setLdapCtx(new InitialDirContext(env)); return getLdapCtx(); } - Now let's add more two methods:
createUser()andprepareUserObject(). These will create the object that will be sent to the LDAP server, extracting data from thecustomerentity.public void createUser(Customer customer) throws NamingException { Attributes attrs = prepareUserObject(customer); try { getLdapCtx().bind("cn=" + customer.getEmail(), null, attrs); log.info("User created in LDAP server"); } catch (NameAlreadyBoundException nae) { log.severe("User already exists on LDAP server.");throw nae; } catch (NamingException ex) { log.severe("Unknown error occurred with LDAP communication"); throw ex; } } private Attributes prepareUserObject(Customer customer) { Attributes attrs = new BasicAttributes(true); Attribute basicObjectClass = new BasicAttribute("objectclass"); basicObjectClass.add("inetOrgPerson"); basicObjectClass.add("organizationalPerson"); basicObjectClass.add("person"); basicObjectClass.add("top"); attrs.put(basicObjectClass); attrs.put("sn", customer.getEmail()); attrs.put("userPassword", customer.getPassword()); return attrs; }
This creates the LDAP client and exposes it to be injected on any other class through CDI, since it's using the @Named annotation. Also note that the createUser() method already connects to LDAP and creates the user.
The final part is to create a message bean (MDB) that will consume the message from the queue jms.userQueue and, through the LDAP client, send the customer to the LDAP server.
- Create a new Message Driven Bean (MDB) named
UserConsumerin thecom.packt.store.securitypackage with the following properties:... @MessageDriven(name = "UserConsumer", activationConfig = { @ActivationConfigProperty( propertyName = "destinationType", propertyValue = "javax.jms.Queue")}, mappedName = "jms.userQueue") public class UserConsumer implements MessageListener { Logger log = Logger.getLogger(UserConsumer.class.getCanonicalName()); ... - Inject the
LDAPClientandMessageDrivenContextclasses as follows:@Inject private LDAPClient client; @Resource private MessageDrivenContext mdc;
- In the
onMessage()method, we will use the LDAP client class to redirect the user to the LDAP server:public void onMessage(Message inMessage) { ObjectMessage msg = null; try { if (inMessage instanceof ObjectMessage) { msg = (ObjectMessage) inMessage; Customer customer = (Customer) msg.getObject(); client.createUser(customer); } else { log.severe("Message of wrong type: " + inMessage.getClass().getName()); } } catch (JMSException je) { mdc.setRollbackOnly(); je.printStackTrace(); } catch (NamingException e) { mdc.setRollbackOnly(); e.printStackTrace(); } } - Save all files and deploy the application.
Note
The usage of
MessageDrivenContextis important to avoid message loss. Through this context class, we can callsetRollbackOnly()and return the message to the queue and retry in case of errors. Through the WebLogic console, you can set a number of rules such as number of retries, delays, and even an error destination queue that the container will use to send messages that exceed the number of retries. All these settings are under the Delivery Failure tab of the queue.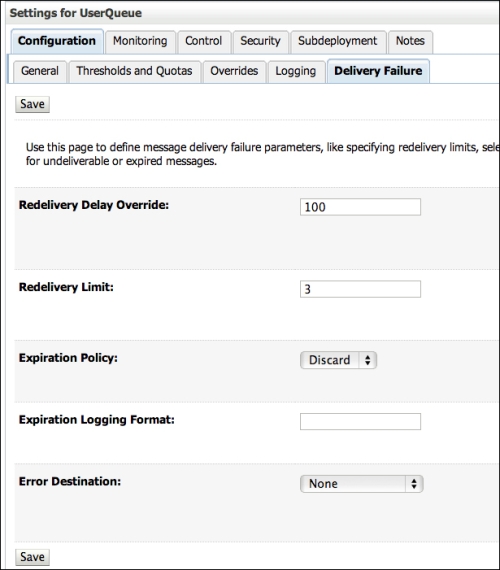
Now, to test the whole solution, perform the sign-up process again to submit a new message to the queue, but this time it will also be consumed and published to the LDAP server. So, right after the success message, you can try to log in to the application with you brand new user.
Remember that you are actually performing authentication against the LDAP server and have the same information duplicated into the database. This can lead to complex maintenance, but at the same time, you now also have a way to set up authentication on the database if needed or in a failure scenario, where your LDAP server might be down and you set up the database as a second option to authenticate using what you've learned so far in this chapter.
The application has a login form as part of the top.xhtml file in the templates folder, under WEB-INF. So use all you have learned in this chapter in order to make that form functional. It's just a matter of wiring up the components with the classes, as we have done in login.xhtml.