3. Building Kindle Fire Applications
Amazon built the Kindle Fire using the Android platform. Every platform technology uses different terminology to describe its application components. The three most important classes on the Android platform are Context, Activity, and Intent. Although there are other more advanced components that developers can implement, these three components form the building blocks for each and every Android application. In this chapter, we focus on understanding how Android applications are put together. We also take a look at some handy utility classes that can help developers debug applications.
Note
Some readers have assumed that they were to perform all the tasks discussed in this chapter on their own and build an app in one chapter without any help whatsoever. Not so! This chapter just gives you the 10,000-foot view of Android application development so that you have a good idea what you’ll begin implementing an application from the ground up. We do this so you get an idea of how another application might be built. So, get yourself a cup of coffee, tea, or your “brain fuel” of choice, sit back, relax, and let’s discuss the building blocks of Android apps.
Designing an Android Application
An Android application is a collection of tasks, each of which is called an activity. Each activity within an application has a unique purpose and user interface. To understand this more fully, imagine a theoretical game application called Chippy’s Revenge.
Designing Application Features
The design of the Chippy’s Revenge game is simple. It has five screens:
• Splash—This screen acts as a startup screen, with the game logo and version. It might also play some music.
• Menu—On this screen, a user can choose among several options, including playing the game, viewing the scores, and reading the help text.
• Play—This screen is where game play actually takes place.
• Scores—This screen displays the highest scores for the game (including high scores from other players), providing players with a challenge to do better.
• Help—This screen displays instructions for how to play the game, including controls, goals, scoring methods, tips, and tricks.
Starting to sound familiar? You may recognize this generic design from many a mobile application, game or otherwise, on any platform.
Determining Application Activity Requirements
You need to implement five activity classes, one for each feature of the game:
• SplashActivity—This activity serves as the default activity to launch. It simply displays a layout (maybe just a big graphic), plays music for several seconds, and then launches MenuActivity.
• MenuActivity—This activity is pretty straightforward. Its layout has several buttons, each corresponding to a feature of the application. The onClick() handlers for each button trigger cause the associated activity to launch.
• PlayActivity—The real application guts are implemented here. This activity needs to draw stuff onscreen, handle various types of user input, keep score, and generally follow whatever game dynamics the developer wants to support.
• ScoresActivity—This activity is about as simple as SplashActivity. It does little more than load a bunch of scoring information into a TextView control within its layout.
• HelpActivity—This activity is almost identical to ScoresActivity, except that instead of displaying scores, it displays help text. Its TextView control might possibly scroll.
Each activity class should have its own corresponding layout file stored in the application resources. You could use a single layout file for ScoresActivity and HelpActivity, but it’s not necessary. If you did, however, you would simply create a single layout for both and set the image in the background and the text in the TextView control at runtime, instead of within the layout file.
Figure 3.1 shows the resulting design for your game, Chippy’s Revenge Version 0.0.1 for Android.
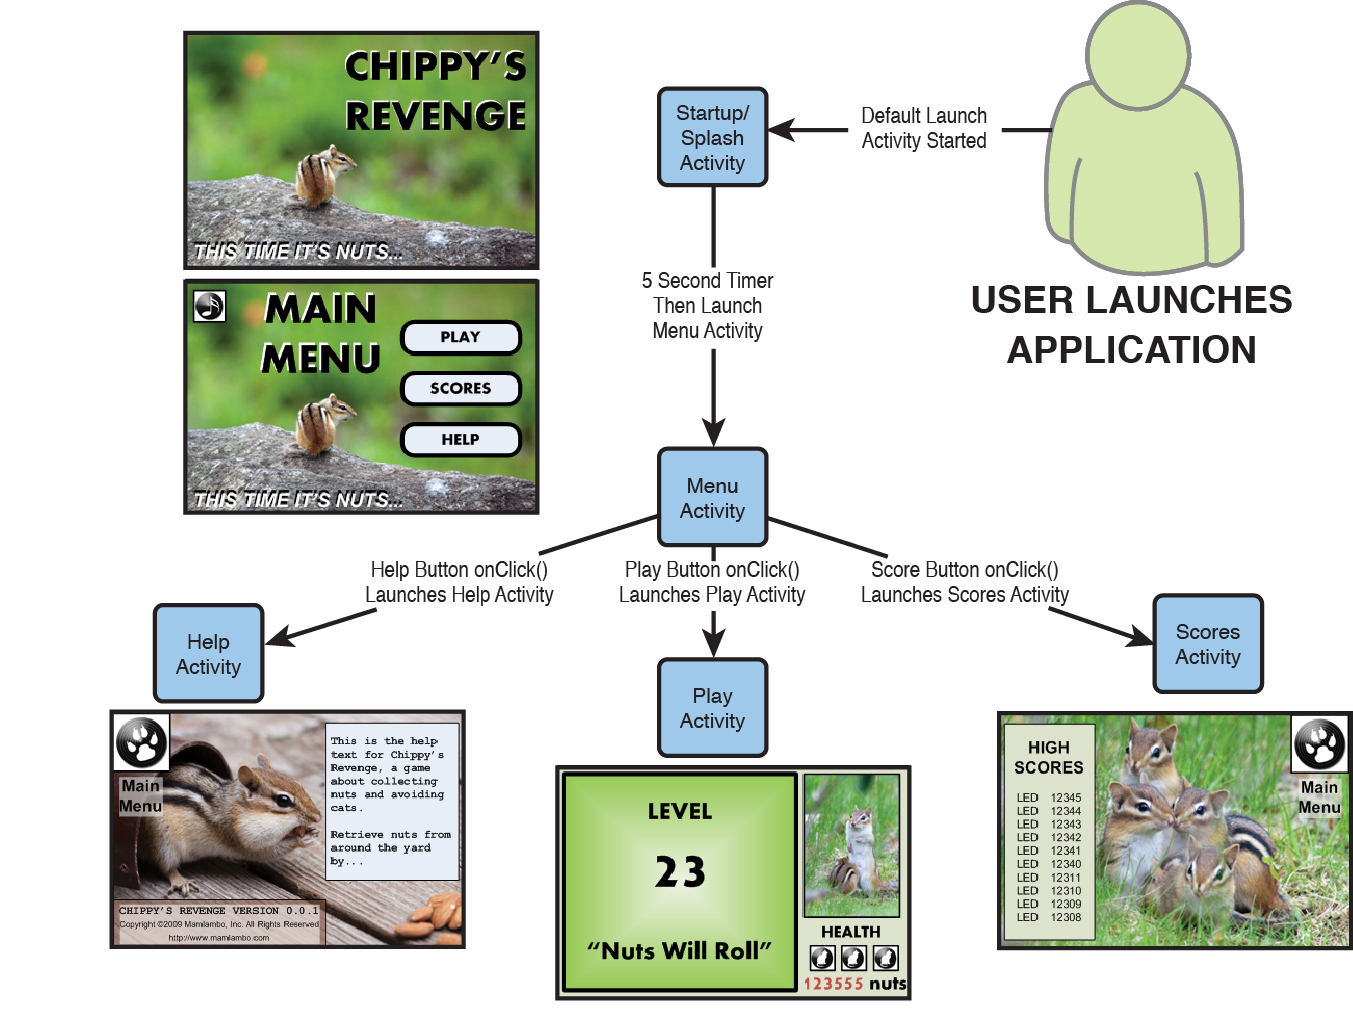
Figure 3.1. Chippy’s Revenge Application Design
Implementing Application Functionality
Now that you understand how a typical Android application might be designed, you’re probably wondering how to go about implementing that design.
We’ve talked about how each activity has its own user interface, defined within a separate layout resource file. You might be wondering about implementation hurdles such as the following:
• How do I control application state?
• How do I save settings?
• How do I launch a specific activity?
With our theoretical game application in mind, it is time to dive into the implementation details of developing an Android application. A good place to start is the application context.
Using the Application Context
The application context is the central location for all top-level application functionality. You use the application context to access settings and resources shared across multiple activity instances.
You can retrieve the application context for the current process by using the getApplicationContext() method, like this:
Context context = getApplicationContext();
Because the Activity class is derived from the Context class, you can use the this object instead of retrieving the application context explicitly when you’re writing code inside your Activity class.
Once you retrieve a valid application context, you can use it to access application-wide features and services.
Retrieving Application Resources
You can retrieve application resources by using the getResources() method of the application context. The most straightforward way to retrieve a resource is by using its unique resource identifier, as defined in the automatically generated R.java class. The following example retrieves a String instance from the application resources by its resource ID:
String greeting = getResources().getString(R.string.hello);
Accessing Application Preferences
You can retrieve shared application preferences by using the getSharedPreferences() method of the application context. You can use the SharedPreferences class to save simple application data, such as configuration settings. Each SharedPreferences object can be given a name, allowing you can organize preferences into categories or store preferences all together in one large set.
For example, you might want to keep track of each user’s name and some simple game state information, such as whether the user has credits left to play. The following code creates a set of shared preferences called GamePrefs and saves a few such preferences:
SharedPreferences settings = getSharedPreferences("GamePrefs", MODE_PRIVATE);
SharedPreferences.Editor prefEditor = settings.edit();
prefEditor.putString("UserName", "Spunky");
prefEditor.putBoolean("HasCredits", true);
prefEditor.commit();
To retrieve preference settings, you simply retrieve SharedPreferences and read the values back out:
SharedPreferences settings = getSharedPreferences("GamePrefs", MODE_PRIVATE);
String userName = settings.getString("UserName", "Chippy Jr. (Default)");
Accessing Other Application Functionality Using Contexts
The application context provides access to a number of top-level application features. Here are a few more things you can do with the application context:
• Launch Activity instances
• Retrieve assets packaged with the application
• Request a system-level service provider
• Manage private application files, directories, and databases
• Inspect and enforce application permissions
The first item on this list—launching Activity instances—is perhaps the most common reason you will use the application context.
Working with Activities
The Activity class is central to every Android application. Much of the time, you’ll define and implement an activity for each screen in your application.
In the Chippy’s Revenge game application, you have to implement five different Activity classes. In the course of playing the game, the user transitions from one activity to the next, interacting with the layout controls of each activity.
Launching Activities
There are a number of ways to launch an activity, including the following:
• Designating a launch activity in the manifest file
• Launching an activity using the application context
• Launching a child activity from a parent activity for a result
Designating a Launch Activity in the Manifest File
Each Android application must designate a default activity within the Android manifest file. If you inspect the manifest file of the HelloKindle project, you notice that HelloKindleActivity is designated as the default activity.
In Chippy’s Revenge, SplashActivity is the most logical activity to launch by default.
Launching Activities Using the Application Context
The most common way to launch an activity is to use the startActivity() method of the application context. This method takes one parameter, an Intent object. We talk more about the Intent class in a moment, but for now, let’s look at a simple startActivity() call.
The following code calls the startActivity() method with an explicit intent:
startActivity(new Intent(getApplicationContext(), MenuActivity. class));
This intent requests the launch of the target activity, named MenuActivity, by its class. This class must be implemented elsewhere within the package.
Because the MenuActivity class is defined within this application’s package, it must be registered as an activity within the Android manifest file. In fact, you could use this method to launch every activity in your theoretical game application; however, this is just one way to launch an activity.
Launching an Activity for a Result
Sometimes, you want to launch an activity, have it determine something (such as a user’s choice), and then return that information to the calling activity. When an activity needs a result, it can be launched using the Activity.startActivityForResult() method. The result will be returned in the Intent parameter of the calling activity’s onActivityResult() method. We talk more about how to pass data using an Intent parameter in a moment.
Managing Activity State
Applications can be interrupted when various higher priority events, such as alarms or certain types of notifications, take precedence. There can be only one active application at a time; specifically, a single application activity can be in the foreground at any given time. Although this is less common on a tablet, such as the Kindle Fire, you still need to be prepared for interruptions at any time based on user behavior, such as pressing the Home button and pausing the application.
Android applications are responsible for managing their state, as well as their memory, resources, and data. The Android operating system may terminate an activity that has been paused, stopped, or destroyed when memory is low. This means that any activity that is not in the foreground is subject to shutdown. In other words, an Android application must keep state and be ready to be interrupted and even shutdown at any time.
Using Activity Callbacks
The Activity class has many callbacks that provide an opportunity for an activity to respond to events, such as suspending and resuming. Table 3.1 lists the most important callback methods.
Table 3.1. Key Callback Methods of Android Activities

The main thread is often called the UI thread, because this is where the processing for drawing the UI takes place internally. An activity must perform any processing that takes place during a callback reasonably quickly, so that the main thread is not blocked. If the main UI thread is blocked for too long, the Android system shuts down the activity because of a lack of response. This is especially important to respond quickly during the onPause() callback, when a higher priority task is entering the foreground.
Figure 3.2 shows the order in which activity callbacks are called.

Figure 3.2. Important Activity Lifecycle Callbacks
Saving Activity State
An Activity can have private preferences—much like shared application preferences. You can access these preferences by using the getPreferences() method of the activity. This mechanism is useful for saving state information. For example, PlayActivity for your game might use these preferences to keep track of the current level and score, player health statistics, and game state.
Shutting Down Activities
To shut down an activity, you make a call to the finish() method. There are several different versions of this method to use, depending whether the activity is shutting itself down or shutting down another activity.
Within your game application, you might return from the Scores, Play, and Help screens to the Menu screen by finishing ScoresActivity, PlayActivity, or HelpActivity.
Working with Intents
An Intent object encapsulates a task request used by the Android operating system. When the startActivity() method is called with the Intent parameter, the Android system matches the Intent action with appropriate activity on the Android system. That activity is then launched.
The Android system handles all intent resolution. An Intent instance can be very specific, including a request for a specific activity to be launched, or somewhat vague, requesting that any activity matching certain criteria be launched. For the finer details on intent resolution, see the Android documentation.
Passing Information with Intents
Intents can be used to pass data between activities. You can use an Intent object in this way by including additional data, called extras, within the intent.
To package extra pieces of data along with an intent, use the putExtra() method with the appropriate type of object you want to include. The Android programming convention for intent extras is to name each one with the package prefix (for example, com.androidbook.chippy.NameOfExtra).
For example, the following intent includes an extra piece of information, the current game level, which is an integer:
Intent intent = new Intent(getApplicationContext(), HelpActivity.class);
intent.putExtra("com.androidbook.chippy.LEVEL", 23);
startActivity(intent);
When the HelpActivity class launches, the getIntent() method can be used to retrieve the intent. Then, the extra information can be extracted using the appropriate methods. Here’s an example:
Intent callingIntent = getIntent();
int helpLevel = callingIntent.getIntExtra("com.androidbook.chippy.LEVEL", 1);
This little piece of information can be used to give special hints, based on the level.
For the parent activity that launched a subactivity using the startActivityForResult() method, the result will be passed in as a parameter to the onActivityResult() method with an Intent parameter. The intent data can then be extracted and used by the parent activity.
Using Intents to Launch Other Applications
Initially, an application may only be launching activity classes defined within its own package. However, with the appropriate permissions, applications may also launch external activity classes in other applications.
There are well-defined intent actions for many common user tasks. For example, you can create intent actions to initiate applications such as the following:
• Launching the built-in web browser and supplying a URL address
• Launching the web browser and supplying a search string
• Launching the built-in email app and supplying a recipient, subject, and message body
• Launch third-party apps
Here is an example of how to create a simple intent with a predefined action (ACTION_VIEW) to launch the web browser with a specific URL:
Uri address = Uri.parse("http://www.perlgurl.org");
Intent surf = new Intent(Intent.ACTION_VIEW, address);
startActivity(surf);
This example shows an intent that has been created with an action and some data. The action, in this case, is to view something. The data is a uniform resource identifier (URI), which identifies the location of the resource to view.
For this example, the browser’s activity then starts and comes into foreground, causing the original calling activity to pause in the background. When the user finishes with the browser and clicks the Back button, the original activity resumes.
Applications may also create their own intent types and allow other applications to call them, allowing for tightly integrated application suites.
Working with Dialogs
The Kindle Fire screen has more display space available than many types of applications might need. Instead of creating a entirely new Activity to display a small amount of data, you may want to create a dialog instead. Dialogs can be helpful for creating simple user interfaces that do not necessitate an entirely new screen or activity to function. Instead, the calling activity dispatches a dialog, which can have its own layout and user interface, with buttons and input controls.
Table 3.2 lists the important methods for creating and managing activity dialog windows.
Table 3.2. Important Dialog Methods of the Activity Class

Activity classes can include more than one dialog, and each dialog can be created and then used multiple times.
There are quite a few types of ready-made dialog types available for use in addition to the basic dialog: AlertDialog, CharacterPickerDialog, DatePickerDialog, ProgressDialog, and TimePickerDialog.
You can also create an entirely custom dialog by designing an XML layout file and using the Dialog.setContentView() method. To retrieve controls from the dialog layout, simply use the Dialog.findViewById() method.
Dialogs or DialogFragments?
You may have seen in the Android SDK documentation that these Activity dialog-related methods are deprecated in favor of something called a Fragment. Fragments were introduced in API Level 11 (Android 3.0+). At the time of this writing, the Kindle Fire runs API Level 10 and, as such, does not have Fragment classes available. That being said, the Android Support package (a separate JAR file that can be linked to your project) can be used to gain access to some of these new SDK classes, including DialogFragment, in your Kindle Fire applications.
Working with Fragments
The concept of fragments is relatively new to Android. A fragment is simply a block of UI, with its own lifecycle, that can be reused within different activities. Fragments allow developers to create highly modular user interface components that can change dramatically based on screen sizes, orientation, and other aspects of the display that might be relevant to the design.
Table 3.3 shows some important lifecycle calls that are sent to the Fragment class.
Table 3.3. Key Fragment Lifecycle Callbacks

Although the lifecycle of a fragment is similar to that of an activity, a fragment only exists within an activity. A common example of fragment usage is to change the UI flow between portrait and landscape modes. If an interface has a list of items and a details view, the list and the details could both be fragments. In portrait orientation, the screen would show the list view followed by the details view, both full screen. But, in landscape mode, the view could show the list and details side-by-side.
The modular nature of fragments makes them a powerful user interface building block. The Fragment API is also available as a static support library for use with older versions of Android, as far back as Android 1.6; thus, its features can be leveraged by Kindle Fire applications.
Logging Application Information
Android provides a useful logging utility class called android.util.Log. Logging messages are categorized by severity (and verbosity), with errors being the most severe. Table 3.4 lists some commonly used logging methods of the Log class.
Table 3.4. Commonly Used Log Methods
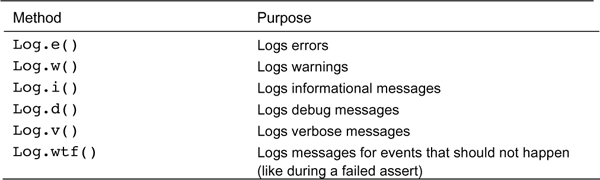
The first parameter of each Log method is a string called a tag. One common Android programming practice is to define a global static string to represent the overall application or the specific activity within the application such that log filters can be created to limit the log output to specific data.
For example, you could define a string called TAG, as follows:
private static final String TAG = "MyApp";
Now, anytime you use a Log method, you supply this tag. An informational logging message might look like this:
Log.i(TAG, "In onCreate() callback method");
You can use the LogCat utility from within Eclipse to filter your log messages to the tag string.
Note
Excessive use of the Log utility can result in decreased application performance. Debug and verbose logging should be used only for development purposes and removed before application publication.
Summary
In this chapter, you saw how different Android applications can be designed using three application components: Context, Activity, and Intent. Each Android application comprises one or more activities. Top-level application functionality is accessible through the application context. Each activity has a special function and (usually) its own layout, or user interface. An activity is launched when the Android system matches an intent object with the most appropriate application activity, based on the action and data information set in the intent. Intents can also be used to pass data from one activity to another.
In addition to learning the basics of how Android applications are put together, you also learned how to take advantage of useful Android utility classes, such as application logging, which can help streamline Android application development and debugging.
Exercises
1. Add a logging tag to the HelloKindleActivity class you created in the HelloKindle project in Chapter 1, “Getting Started with Kindle Fire.” Within the onCreate() callback method, add an informational logging message using the Log.i() method. Run the application and view the log output in the Eclipse DDMS or Debug perspectives within the LogCat tab.
2. Within the HelloKindleActivity class you created in the HelloKindle project in Chapter 1, add method stubs for the Activity callback methods in addition to onCreate(), such as onStart(), onRestart(), onResume(), onPause(), onStop(), and onDestroy(). To do this easily from within Eclipse, right-click the HelloKindleActivity.java class and choose Source, Override/Implement methods. Under the Activity class methods, select the methods suggested above and hit OK. You will see appropriate method stubs added for each of the methods you selected.
3. Add a log message to each Activity class callback method you created in Exercise 2. For example, add an informational log message such as, “In method onCreate()” to the onCreate() method. Run the application normally and view the log output to trace the application lifecycle. Next, try some other scenarios, such as pausing or suspending the application and then resuming. Simulate an incoming call using the Eclipse DDMS perspective while running your application and see what happens.