At first sight, the Bridge pattern looks much like the Adapter pattern in that a class is used to convert one kind of interface to another. However, the Adapter pattern is intended to make one or more classes' interfaces look the same as that of a particular class. By contrast, the Bridge pattern is designed to separate a class's interface from its implementation so that you can vary or replace the implementation without changing the client code.
The participants in the Bridge pattern are
the Abstraction, which defines the class's interface,
the Refined Abstraction, which extends and implements that interface,
the Implementor, which defines the interface for the implementation classes, and
the ConcreteImplementors, which are the implementation classes.
Suppose that you have a program that displays a list of products in a window. The simplest interface for that display is a JList box. But once a significant number of products have been sold, you might want to display the products in a table along with their sales figures.
Since we have just discussed the adapter pattern, you think immediately of the class-based adapter, where we adapt the fairly elaborate interface of the JList to our simpler needs in this display. In simple programs, this will work fine, but as we'll see, there are limits to that approach.
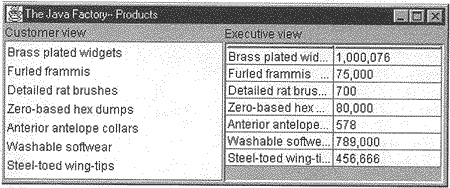
Further, let's suppose that we need to produce two kinds of displays from our product data, a customer view that is just the list of products we've mentioned and an executive view that also shows the number of units shipped. We'll display the product list in an ordinary JList box and the executive view in a JTable display. These two displays are the implementations of the display classes, as shown in Figure 10.1.
Now, we want to define a single, simple interface that remains the same regardless of the type and complexity of the actual implementation classes. We'll start by defining an abstract Bridger class.
public abstract class Bridger extends JPanel {
    public abstract void addData(Vector v);
}
This class is so simple that it receives only a Vector of data and passes it on to the display classes.
On the other side of the bridge are the implementation classes, which usually have a more elaborate and somewhat lower-level interface. Here we'll have them add the data lines to the display one at a time.
public interface visList {
    public void addLine(String s);
    public void removeLine(int num);
}
Implicit in the definition of these classes is some mechanism for determining which part of each string is the name of the product and which part is the quantity shipped. In this simple example, we separate the quantity from the name with two dashes and parse these apart within the list classes.
The Bridge between the interface on the left and the implementation on theright is the listBridge class, which instantiates one or the other of the list display classes. Note that it extends the Bridger class for the use of the application program.
public class listBridge extends Bridger {
    protected visList list;

    public listBridge(visList jlist) {
        setLayout(new BorderLayout());
        list = jlist;
        add("Center", (JComponent)list);
    }
    public void addData(Vector v) {
        for (int i = 0; i < v.size(); i++) {
             String s = (String)v.elementAt (i);
             list.addLine (s);
        }
    }
}
Then, at the top programming level, we just create instances of a table and a list using the listBridge class.
//add in customer view as list box
        listBridge lList = new listBridge(new productList());
        lList.add Data (prod);
        pleft.add("North", new JLabel("Customer view"));
        pleft.add("Center," lList);

        //add in executive view as table
        listBridge lTable = new listBridge(new productTable());
        lTable.addData (prod);
        pright.add("North", new JLabel("Executive view"));
        pright.add("Center", lTable);
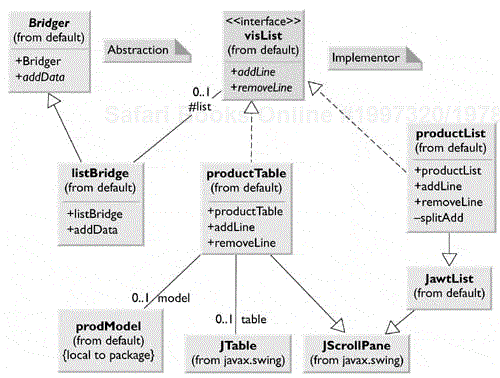
The UML diagram in Figure 10.2 for the Bridge pattern shows the separation of the interface and the implementation. The Bridger class on the left is the Abstraction, and the listBridge class is the implementation of that abstraction. The visList interface describes the public interface to the list classes productList and productTable. The visList interface defines the interface of the Implementor, and the Concrete Implementors are the productList and productTable classes.

Figure 10.2. The UML diagram for the Bridge pattern used in the two displays of product information.
Note that these two concrete implementors are quite different in their specifics even though they both support the visList interface.
Now suppose that we need to make some changes in the way these lists display the data. For example, you might want to have the products displayed in alphabetical order. You might think you'd need to either modify or subclass both the list and table classes. This can quickly get to be a maintenance nightmare, especially if more than two such displays eventually are needed. Instead, we simply make the changes in the extended interface class, creating a new sortBridge class from the parent listBridge class.
public class sortBridge extends listBridge {

    public sortBridge(visList jlist) {
        super(jlist);
        }
//--------------
    public void addData(Vector v) {
        Vector sv = sortData(v);

        for(int i = 0; i < sv.size(); i++) {
            String s = (String)sv.elementAt (i);
            list.addLine (s);
        }
    }
//--------------
    private Vector sortData(Vector v) {
        String s[] = new String[v.size()];
        for(int i = 0; i < v.size(); i++)
            s[i] = (String)v.elementAt (i);
        for(int i = 0; i < v.size(); i++) {
            for(int j = i; j < v.size(); j++) {
                if(s[i].compareTo (s[j]) > 0) {
                    String tmp = s[i];
                    s[i] = s[j];
                    s[j] = tmp;
                }
            }
        }
    Vector v1 = new Vector();
    for (int i = 0; i < v.size(); i++) {
        v1.addElement(s[i]);
        System.out.println(i+" "+s[i]);
    }
        return v1;
    }
}
This code shows that you can vary the interface without changing the implementation. The converse is also true. For example, you could create another type of list display and replace one of the current list displays without any other program changes, as long as the new list also implements the visList interface.
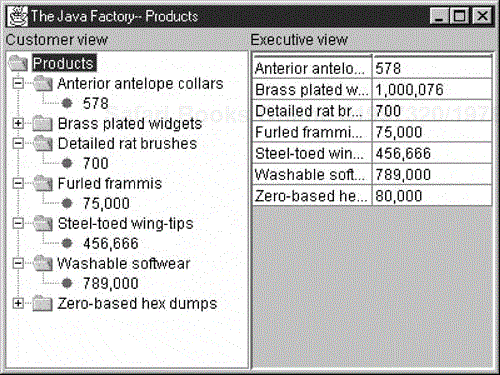
In the example in Figure 10.3, we have created a tree list component that inplements the visList interface. The ordinary list is replaced without any change in the public interface to the classes.
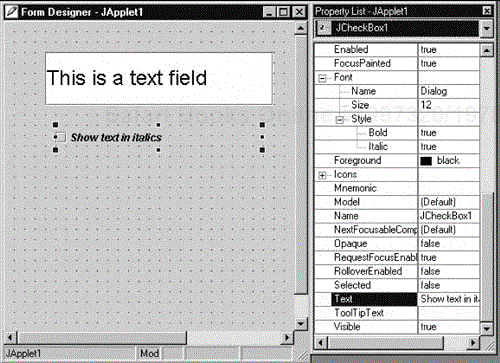
The Java Beans programming model is an ideal example of a Bridge pattern implementation. A Java Bean is a reusable software component that can be manipulated visually in a Builder tool. All of the JFC components are written as Beans, which means that they support a query interface (using the Introspector class) that enables builder programs to enumerate their properties and display them for easy modification. Figure 10.4 shows a screen from Symantec Visual Café, showing a panel with a text field and a check box. The builder panel to the right shows how you can modify the properties of either of those components by using a simple visual interface.

Figure 10.4. A screen from Symantec Visual Café showing a Java Bean interface. The property lists are implemented using a Bridge pattern.
In other words, all Java Beans have the same interface used by the builder program, and you can substitute any Bean for any other and still manipulate its properties using the same convenient interface. The actual program you construct uses these classes in a conventional way, each having its own rather different methods. However, from the builder's point of view, they all appear to be the same.
Using the Bridge pattern has the following consequences:
The Bridge pattern is intended to keep the interface to your client program constant while allowing you to change the actual kind of class that you display or use. This can help you to avoid recompiling a complicated set of user interface modules and require only that you recompile the bridge itself and the actual end display class.
You can extend the implementation class and the Bridge class separately and usually without their having much interaction with each other.
You can hide implementation details from the client program much more easily.
| Program | Description |
|---|---|
|
BridgeBasicBridgeProductDisplay.java | Displays a list box and a table of unsorted product names |
|
BridgeSortBridgeSproductDisplay.java | Displays a list box and a table of sorted product names. |
|
BridgeTreeBridgeTproductdisplay.java | Displays a tree list and a table of sorted product names and amounts. |


