
21. JavaServer Faces™ Web Applications
Objectives
In this chapter you’ll learn:
• Web application development using Java Technologies and Netbeans.
• To create JavaServer Pages with JavaServer Faces components.
• To create web applications consisting of multiple pages.
• To validate user input on a web page.
• To maintain user-specific state information throughout a web application with session tracking and cookies.
If any man will draw up his case, and put his name at the foot of the first page, I will give him an immediate reply. Where he compels me to turn over the sheet, he must wait my leisure.
—Lord Sandwich
Rule One: Our client is always right.
Rule Two: If you think our client is wrong, see Rule One.
—Anonymous
A fair question should be followed by a deed in silence.
—Dante Alighieri
You will come here and get books that will open your eyes, and your ears, and your curiosity, and turn you inside out or outside in.
—Ralph Waldo Emerson
Outline
21.1 Introduction
21.2 Simple HTTP Transactions
21.3 Multitier Application Architecture
21.4 Java Web Technologies
21.4.1 Servlets
21.4.2 JavaServer Pages
21.4.3 JavaServer Faces
21.4.4 Web Technologies in Netbeans
21.5 Creating and Running a Simple Application in Netbeans
21.5.1 Examining a JSP Document
21.5.2 Examining a Page Bean File
21.5.3 Event-Processing Life Cycle
21.5.4 Building a Web Application in Netbeans
21.6 JSF Components
21.6.1 Text and Graphics Components
21.6.2 Validation Using Validator Components and Custom Validators
21.7 Session Tracking
21.7.1 Cookies
21.7.2 Session Tracking with Session Beans
21.8 Wrap-Up
21.1 Introduction
In this chapter, we introduce web application development in Java. Web-based applications create content for web browser clients. This content includes Extensible HyperText Markup Language (XHTML), client-side scripting, images and binary data. If you are not familiar with XHTML, visit our XHTML Resource Center at www.deitel.com/XHTML/ for introductions, tutorials and other resources that will help you learn XHTML. For a complete list of our Resource Centers, visit www.deitel.com/ResourceCenters.html.
This chapter begins with an overview of multitier application architecture and Java’s web technologies for implementing multitier applications. We then present several web application examples. The first example introduces you to Java web development. In the second example, we build a web application that simply shows the look-and-feel of several web application GUI components. Next, we show how to use validation components and custom validation methods to ensure that user input is valid before it is submitted for processing on the server. The chapter finishes with two examples of maintaining user-specific information in a web application. Chapter 22 continues our discussion of Java web application development with more advanced concepts.
Throughout this chapter and Chapter 22, we use the Netbeans 6.1 IDE and the GlassFish v2 UR2 open source application server. To implement the examples presented in this chapter, you must install these software products. Netbeans is available from
www.netbeans.org/downloads/index.html
Download and execute the “Web and Java EE” or the “All” version of the installer. Both versions will install the Netbeans IDE and the GlassFish server. Once you’ve installed Netbeans, run it. Then, use the Help menu’s Check for Updates option to make sure you have the most up-to-date components.
Much of the code that we present in this chapter is generated by the Netbeans IDE. We’ve reformatted this code and deleted the Javadoc comments that the IDE generates to match our coding conventions used throughout this book and to save space. We sometimes show only a portion of the code. In such cases, we provide comments indicating where code was removed, and all line numbers match the complete example source code.
21.2 Simple HTTP Transactions
Let’s consider what occurs behind the scenes when a user requests a web page in a browser. In its simplest form, a web page is nothing more than an XHTML document that describes to a web browser how to display and format the document’s information. XHTML documents normally contain hyperlinks that link to different pages or to other parts of the same page. When the user clicks a hyperlink, the requested web page loads into the user’s web browser. Similarly, the user can type the address of a page into the browser’s address field.
URIs
The HTTP protocol allows clients and servers to interact and exchange information in a uniform and reliable manner. HTTP uses URIs (Uniform Resource Identifiers) to identify data on the Internet. URIs that specify document locations are called URLs (Uniform Resource Locators). Common URLs refer to files, directories or objects that perform complex tasks, such as database lookups and Internet searches. If you know the URL of a publicly available resource or file anywhere on the web, you can access it through HTTP.
Parts of a URL
A URL contains information that directs a browser to the resource that the user wishes to access. Computers that run web-server software make such resources available. Let’s examine the components of the URL
http://www.deitel.com/books/downloads.html
The http:// indicates that the resource is to be obtained using the HTTP protocol. The middle portion, www.deitel.com, is the server’s fully qualified hostname—the name of the server on which the resource resides. The computer that houses and maintains resources is usually is referred to as the host. The hostname www.deitel.com is translated into an IP address—a unique numerical value that identifies the server, much as a telephone number uniquely defines a particular phone line. This translation is performed by a domainname system (DNS) server—a computer that maintains a database of host-names and their corresponding IP addresses—and the process is called a DNS lookup. To test web applications, you’ll often use your computer as the host. This host is referred to using the reserved domain name localhost, which translates to the IP address 127.0.0.1. (See en.wikipedia.org/wiki/IP_address for more information on IP addresses.)
The remainder of the URL (i.e., /books/downloads.html) specifies both the name of the requested resource (the XHTML document downloads.html) and its path, or location (/books), on the web server. The path could specify the location of an actual directory on the web server’s file system. For security reasons, however, the path normally specifies the location of a virtual directory. The server translates the virtual directory into a real location on the server (or on another computer on the server’s network), thus hiding the true location of the resource. Some resources are created dynamically using other information stored on the server computer, such as a database. The hostname in the URL for such a resource specifies the correct server; the path and resource information identify the resource with which to interact to respond to the client’s request.
Making a Request and Receiving a Response
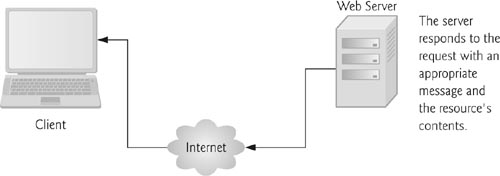
When given a URL, a web browser performs an HTTP transaction to retrieve and display the web page at that address. Figure 21.1 illustrates the transaction, showing the interaction between the web browser (the client) and the web server application (the server).
Fig. 21.1. Client interacting with web server. Step 1: The GET request.

In Fig. 21.1, the web browser sends an HTTP request to the server. The request (in its simplest form) is
GET /books/downloads.html HTTP/1.1
The word GET is an HTTP method indicating that the client wishes to obtain a resource from the server. The remainder of the request provides the path name of the resource (e.g., an XHTML document) and the protocol’s name and version number (HTTP/1.1). The client’s request also contains some required and optional headers, such as Host (which identifies the target computer) or UserAgent (which identifies the browser type and version).
Any server that understands HTTP (version 1.1) can translate this request and respond appropriately. Figure 21.2 depicts the server responding to a request. The server first responds by sending a line of text that indicates the HTTP version, followed by a numeric code and a phrase describing the status of the transaction. For example,
HTTP/1.1 200 OK
Fig. 21.2. Client interacting with web server. Step 2: The HTTP response.
indicates success, whereas
HTTP/1.1 404 Not found
informs the client that the web server could not locate the requested resource. On a successful request, the server appends the requested document to the HTTP response. A complete list of numeric codes indicating the status of an HTTP transaction can be found at www.w3.org/Protocols/rfc2616/rfc2616-sec10.html.
HTTP Headers
The server then sends one or more HTTP headers, which provide additional information about the data that will be sent. In this case, the server is sending an XHTML text document, so one HTTP header for this example would read:
Content-type: text/html
The information provided in this header specifies the Multipurpose Internet Mail Extensions (MIME) type of the content that the server is transmitting to the browser. MIME is an Internet standard that specifies data formats so that programs can interpret data correctly. For example, the MIME type text/plain indicates that the sent information is text that can be displayed directly, without any interpretation of the content as XHTML markup. Similarly, the MIME type image/jpeg indicates that the content is a JPEG image. When the browser receives this MIME type, it attempts to display the image. For a list of available MIME types, visit www.w3schools.com/media/media_mimeref.asp.
The header or set of headers is followed by a blank line, which indicates to the client browser that the server is finished sending HTTP headers. The server then sends the contents of the requested XHTML document (downloads.html). The client-side browser parses the XHTML markup it receives and renders (or displays) the results. The server normally keeps the connection open to process other requests from the client.
HTTP GET and POST Requests
The two most common HTTP request types (also known as request methods) are GET and POST. A GET request typically asks for a specific resource on a server. Common uses of GET requests are to retrieve an XHTML document or an image or to fetch search results based on a user-submitted search term. A POST request typically posts (or sends) data to a server. Common uses of POST requests are to send form data or documents to a server.
An HTTP request often posts data to a server-side form handler that processes the data. For example, when a user performs a search or participates in a web-based survey, the web server receives the information specified in the XHTML form as part of the request. GET requests and POST requests can both be used to send form data to a web server, yet each request type sends the information differently.
A GET request sends information to the server in the URL, e.g., www.google.com/search?q=deitel. In this case, search is the name of Google’s server-side form handler, q is the name of a variable in Google’s search form and deitel is the search term. A ? separates the query string from the rest of the URL in a request. A name/value pair is passed to the server with the name and the value separated by an equals sign (=). If more than one name/value pair is submitted, each pair is separated from the next by an ampersand (&). The server uses data passed in a query string to retrieve an appropriate resource from the server. The server then sends a response to the client. A GET request may be initiated by submitting an XHTML form whose method attribute is set to "get", by typing the URL (possibly containing a query string) directly into the browser’s address bar or through a normal hyperlink.
A POST request sends form data as part of the HTTP message, not as part of the URL. A GET request typically limits the query string (i.e., everything to the right of the ?) to a specific number of characters (2083 in Internet Explorer; more in other browsers), so it is often necessary to send large pieces of information using the POST method. The POST method is also sometimes preferred because it hides the submitted data from the user by embedding it in an HTTP message. If a form submits hidden input values along with usersubmitted data, the POST method might generate a URL like www.searchengine.com/search. The form data still reaches the server for processing, but the user does not see the exact information sent.
Software Engineering Observation 21.1
![]()
The data sent in a POST request is not part of the URL, and the user can’t see the data by default. However, there are tools available that expose this data, so you should not assume that the data is secure just because a POST request is used.
Client-Side Caching
Browsers often cache (save on disk) web pages for quick reloading. If there are no changes between the version stored in the cache and the current version on the web, this speeds up your browsing experience. An HTTP response can indicate the length of time for which the content remains “fresh.” If this amount of time has not been reached, the browser can avoid another request to the server. Otherwise, the browser requests the document from the server. Thus, the browser minimizes the amount of data that must be downloaded for you to view a web page. Browsers typically do not cache the server’s response to a POST request, because the next POST might not return the same result. For example, in a survey, many users could visit the same web page and answer a question. The survey results could then be displayed for the user. Each new answer changes the overall results of the survey.
When you use a web-based search engine, the browser normally supplies the information you specify in an XHTML form to the search engine with a GET request. The search engine performs the search, then returns the results to you as a web page. Such pages are sometimes cached by the browser in case you perform the same search again.
21.3 Multitier Application Architecture
Web-based applications are multitier applications (sometimes referred to as n-tier applications). Multitier applications divide functionality into separate tiers (i.e., logical groupings of functionality). Althoughtiers can be located on the same computer, the tiers of web-based applications typically reside on separate computers. Figure 21.3 presents the basic structure of a three-tier web-based application.
Fig. 21.3. Three-tier architecture.

The information tier (also called the data tier or the bottom tier) maintains data pertaining to the application. This tier typically stores data in a relational database management system (RDBMS). We discussed RDBMSs in Chapter 20. For example, a retail store might have a database for storing product information, such as descriptions, prices and quantities in stock. The same database also might contain customer information, such as user names, billing addresses and credit card numbers. This tier can contain multiple databases, which together comprise the data needed for our application.
The middle tier implements business logic, controller logic and presentation logic to control interactions between the application’s clients and the application’s data. The middle tier acts as an intermediary between data in the information tier and the application’s clients. The middle-tier controller logic processes client requests (such as requests to view a product catalog) and retrieves data from the database. The middle-tier presentation logic then processes data from the information tier and presents the content to the client. Web applications typically present data to clients as XHTML documents.
Business logic in the middle tier enforces business rules and ensures that data is reliable before the server application updates the database or presents the data to users. Business rules dictate how clients can and cannot access application data, and how applications process data. For example, a business rule in the middle tier of a retail store’s web-based application might ensure that all product quantities remain positive. A client request to set a negative quantity in the bottom tier’s product-information database would be rejected by the middle tier’s business logic.
The client tier, or top tier, is the application’s user interface, which gathers input and displays output. Users interact directly with the application through the user interface (typically viewed in a web browser), keyboard and mouse. In response to user actions (e.g., clicking a hyperlink), the client tier interacts with the middle tier to make requests and to retrieve data from the information tier. The client tier then displays the data retrieved from the middle tier to the user. The client tier never directly interacts with the information tier.
21.4 Java Web Technologies
Java web technologies continually evolve to provide developers with higher levels of abstraction and greater separation of the application’s tiers. This separation makes web applications more maintainable and extensible. It also allows for an effective division of labor. A graphic designer can build the application’s user interface without concern for the underlying page logic, which will be handled by a programmer. Meanwhile, you are free to focus on the application’s business logic, leaving the details of building an attractive and easy-to-use application to the designer. Netbeans allows you to develop a web application’s GUI in a drag-and-drop design tool, while handling the business logic in separate Java classes.
Java multitier applications are typically implemented using the features of Java Enterprise Edition (Java EE). The technologies we use to develop web applications in Chapters 21–22 are part of Java EE 5 (java.sun.com/javaee).
21.4.1 Servlets
Servlets are the lowest-level view of web development technologies in Java that we’ll discuss in this chapter. They use the HTTP request/response model of communication between client and server.
Servlets extend a server’s functionality by allowing it to generate dynamic content. For instance, servlets can dynamically generate custom XHTML documents, help provide secure access to a website, interact with databases on behalf of a client and maintain unique session information for each client. A web server component called the servlet container executes and interacts with servlets. Packages javax.servlet and javax.servlet.http provide the classes and interfaces to define servlets. The servlet container receives HTTP requests from a client and directs each request to the appropriate servlet. The servlet processes the request and returns an appropriate response to the client—usually in the form of an XHTML or XML (Extensible Markup Language) document to display in the browser. XML is a language used to exchange structured data on the web.
Architecturally, all servlets must implement the Servlet interface of package javax.servlet, which ensures that each servlet can execute in the framework provided by the servlet container. Interface Servlet declares methods used by the servlet container to manage the servlet’s life cycle. A servlet’s life cycle begins when the servlet container loads it into memory—usually in response to the first request for the servlet. Before the servlet can handle that request, the container invokes the servlet’s init method, which is called only once during a servlet’s life cycle to initialize the servlet. After init completes execution, the servlet is ready to respond to its first request. All requests are handled by a servlet’s service method, which is the key method in defining a servlet’s functionality. The service method receives the request, processes it and sends a response to the client. During a servlet’s life cycle, service is called once per request. Each new request is typically handled in a separate thread of execution (managed by the servlet container), so each servlet must be thread safe. When the servlet container terminates the servlet (e.g. when the servlet container needs more memory or when it is shut down), the servlet’s destroy method is called to release any resources held by the servlet.
21.4.2 JavaServer Pages
JavaServer Pages (JSP) technology is an extension of servlet technology. Each JSP is translated by the JSP container into a servlet. Unlike servlets, JSPs help you separate presentation from content. JavaServer Pages enable web application programmers to create dynamic content by reusing predefined components and by interacting with components using server-side scripting. JSP programmers can use special software components called JavaBeans and custom tag libraries that encapsulate complex, dynamic functionality. A JavaBean is a reusable component that follows certain conventions for class design and that can be manipulated visually in a builder tool such as Netbeans or Eclipse. JavaBeans classes that allow reading and writing of instance variables must provide appropriate get and set methods—together, these define properties of JavaBeans classes. The complete set of class design conventions is discussed in the JavaBeans specification (java.sun.com/javase/technologies/desktop/javabeans/glasgow/index.html).
Custom Tag Libraries
Custom tag libraries are a powerful feature of JSP that allows Java developers to hide code for database access and other complex operations in custom tags. To use such capabilities, you simply add the custom tags to the page. This simplicity enables web-page designers who are not familiar with Java to enhance web pages with powerful dynamic content and dynamic processing capabilities. The JSP classes and interfaces are located in the packages javax.servlet.jsp and javax.servlet.jsp.tagext.
JSP Components
There are four key components to JSPs—directives, actions, scripting elements and tag libraries. Directives are messages to the JSP container—the web server component that executes JSPs. Directives enable you to specify page settings, to include content from other resources and to specify custom tag libraries for use in JSPs. Actions encapsulate functionality in predefined tags that programmers can embed in JSPs. Actions often are performed based on the information sent to the server as part of a particular client request. They also can create Java objects for use in JSPs. Scripting elements enable you to insert Java code that interacts with components in a JSP (and possibly other web application components) to perform request processing. Tag libraries are part of the tag extension mechanism that enables programmers to create custom tags. Such tags enable web-page designers to manipulate JSP content without prior Java knowledge. The JavaServer Pages Standard Tag Library (JSTL) provides the functionality for many common web application tasks, such as iterating over a collection of objects and executing SQL statements.
Static Content
JSPs can contain other static content. For example, JSPs normally include XHTML or XML markup. Such markup is known as fixed-template data or fixed-template text. Any literal text or XHTML markup in a JSP is translated to a String literal in the servlet representation of the JSP.
Processing a JSP Request
When a JSP-enabled server receives the first request for a JSP, the JSP container translates the JSP into a servlet that handles the current request and future requests to the JSP. JSPs thus rely on the same request/response mechanism as servlets to process requests from and send responses to clients.
Performance Tip 21.1
![]()
Some JSP containers translate JSPs into servlets at the JSP’s deployment time (i.e., when the application is placed on a web server). This eliminates the translation overhead for the first client that requests each JSP, as the JSP will be translated before it is ever requested by a client.
21.4.3 JavaServer Faces
JavaServer Faces (JSF)—supported by Java Enterprise Edition 5 (Java EE 5) compliant servers, like GlassFish v2 UR2—is a web application framework that simplifies the design of an application’s user interface and further separates a web application’s presentation from its business logic. A framework provides libraries and sometimes software tools to help you organize and build your applications. Though the JSF framework can use many technologies to define the pages in web applications, this chapter focuses on JSF applications that use JavaServer Pages. JSF provides a set of user interface components, or JSF components, that simplify web-page design. These components are similar to the Swing components used to build GUI applications. JSF provides two JSP custom tag libraries for adding these components to a JSP page. JSF also includes APIs for handling component events (such as processing component state changes and validating user input), navigating between web application pages and more. You design the look-and-feel of a page with JSF by adding elements to a JSP document and manipulating their attributes. You define the page’s behavior separately in related Java source-code files.
Though the standard JSF components are sufficient for most basic web applications, you can also write custom component libraries. Additional component libraries are available through the Java BluePrints project—which shows best practices for developing Java applications. Many other vendors provide JSF component libraries. For example, Oracle provides almost 100 components in its ADF Faces library. [Note: There are many other popular web application frameworks, including Spring, Struts and Hibernate—each of which is also supported in Netbeans. We’ve chosen to demonstrate only JavaServer Faces.]
21.4.4 Web Technologies in Netbeans
Netbeans web applications that use the JavaServer Faces framework consist of one or more JSP web pages. These JSP files have the filename extension .jsp and contain the web pages’ GUI elements. The JSPs can also contain JavaScript to add functionality to the page. JSPs can be customized in Netbeans by adding JSF components, including labels, text fields, images, buttons and other GUI components. The IDE allows you to design pages visually by dragging and dropping these components onto a page; you can also customize a web page by editing the .jsp file manually.
Every JSP file created in Netbeans represents a web page and has a corresponding JavaBean class called the page bean. A JavaBean class must have a default (or no-argument) constructor, and get and set methods for all of the bean’s properties (i.e., instance variables). The page bean defines properties for each of the page’s elements that you wish to interact with programmatically. The page bean also contains event handlers and page life-cycle methods for managing tasks such as page initialization and rendering, and other supporting code for the web application.
Every Netbeans JSF web application defines three more JavaBeans. The RequestBean object is maintained in request scope—it exists only for an HTTP request’s duration. A SessionBean object has session scope—it exists throughout a user’s browsing session or until the session times out. There is a unique SessionBean object for each user. Finally, the ApplicationBean object has application scope—it is shared by all instances of an application and exists as long as the application remains deployed on a web server. This object is used for applicationwide data storage or processing; only one instance exists for the application, regardless of the number of open sessions.
21.5 Creating and Running a Simple Application in Netbeans
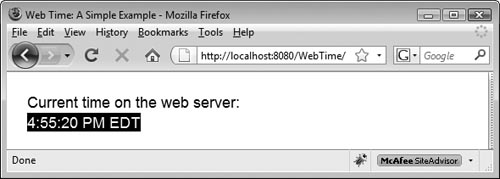
Our first example displays the web server’s time of day in a browser window. When run, this program displays the text "Current Time on the Web Server", followed by the web server’s time. The application contains a single web page and, as mentioned previously, consists of two related files—a JSP document (Fig. 21.4) and a supporting page bean file (Fig. 21.6). The application also has the three scoped data beans for request, session and application scopes that are not used in this example. We first discuss the markup in the JSP document, the application output and the code in the page bean file, then we provide step-by-step instructions for creating this web application. [Note: The markup in Fig. 21.4 and other JSP file listings in this chapter is the same as the markup that appears in Netbeans, but we’ve reformatted these listings for presentation purposes.]
Fig. 21.4. JSP document generated by Netbeans that displays the current time on the web server.

Netbeans generates most of the markup shown in Fig. 21.4 when you set the web page’s title, drag two Static Text components onto the page and set the properties of the Static Text components. Static Text components display text that cannot be edited by the user. We show these steps shortly.
21.5.1 Examining a JSP Document
The JSP documents in this and the following examples are generated almost entirely by Netbeans, which provides a visual editor that allows you to build a page’s GUI by dragging and dropping components onto a design area. The IDE generates a JSP file in response to your interactions. Line 1 of Fig. 21.4 is the XML declaration, indicating the fact that the JSP is expressed in XML syntax and the version of XML that is used. Lines 3–5 are comments that we added to the JSP to indicate its figure number, filename and purpose.
Line 6 begins the JSP’s root element. All JSPs must have this jsp:root element, which has a version attribute to indicate the JSP version being used (line 6) and one or more xmlns attributes (lines 6–9). Each xmlns attribute specifies a prefix and a URL for a tag library, allowing the page to use elements from that library. For example, line 8 allows the page to use the standard JSP elements, but each element’s tag must be preceded by the jsp prefix. All JSPs generated by Netbeans include the tag libraries specified in lines 6–9 (the JSF core components library, the JSF HTML components library, the JSP standard components library and the JSF user interface components library).
Lines 10–11 are the jsp:directive.page element. Its contentType attribute specifies the MIME type (text/html) and the character set (UTF-8) the page uses. The pageEncoding attribute specifies the character encoding used by the page source. These attributes help the client (typically a web browser) determine how to render the content.
All pages containing JSF components are represented in a component tree (similar to the one shown in Fig. 21.5) with the root JSF element f:view, which is of type UIViewRoot. This component tree structure is represented in a JSP by nesting all JSF component tags inside the f:view element (lines 12–33 in this example).
Fig. 21.5. Sample JSF component tree within a JSP document.

Lines 13–18 begin the JSP’s definition with the webuijsf:page, webuijsf:html and webuijsf::head elements, all from the webuijsf (JSF user interface components) tag library. The webuijsf:head element (lines 15–18) has a title attribute that specifies the page’s title. This element also contains a webuijsf:link element (line 16) that specifies the CSS stylesheet used by the page, and a webuijsf:meta element (line 17) that causes the page to refresh every 60 seconds. The webuijsf:body element (lines 19–30) contains a webuijsf:form element (lines 20–29), which contains two webuijsf:staticText components (lines 21–24 and 25–28) that display the page’s text. The timeHeader component (lines 21–24) has a text attribute (line 24) that specifies the text to display (i.e., "Current time on the web server"). The clockText component (lines 25–28) does not specify a text attribute because this component’s text will be set programmatically.
The webuijsf:staticText element at lines 25–28 has the attribute binding = "#{Time.clockText}" (line 25). This attribute uses JSF Expression Language notation (i.e., #{Time.clockText}) to reference the clockText property in the Time class that represents the page bean (you’ll see this class in Fig. 21.6). You can bind an attribute of a JSP element to the value of a property in any of the web application’s JavaBeans. For instance, the text attribute of a webuijsf:staticText component can be bound to an int property in the application’s SessionBean (as you’ll see in Section 21.7.2).
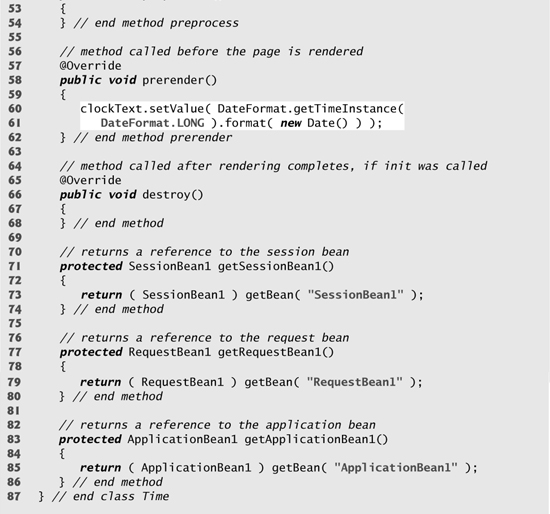
Fig. 21.6. Page bean file that sets clockText to the time on the web server.


All the JSP’s elements are mapped by the application server to a combination of XHTML elements and JavaScript code that enables the browser to render the page. JavaScript is a scripting language that is interpreted in all of today’s popular web browsers. It can be used to perform tasks that manipulate web-page elements in a web browser and provide interactivity with the user. You can learn more about JavaScript in our JavaScript Resource Center at www.deitel.com/JavaScript/.
The same web component can map to different XHTML elements and JavaScript code, depending on the client browser and the component’s property settings. The webuijsf:staticText components (lines 21–24, 25–28) typically map to XHTML span elements. A span element contains text that is displayed on a web page and is typically used to control the formatting of the text. The style attributes of a JSP’s webuijsf:staticText element are mapped to the corresponding span element’s style attribute, which the browser then uses to control the element’s appearance.
21.5.2 Examining a Page Bean File
Figure 21.6 presents the autogenerated page bean file. Line 3 indicates that this class belongs to package webtime. This line specifies the project’s name as the package name. Line 11 begins class Time’s declaration and indicates that it inherits from class AbstractPageBean (from package com.sun.rave.web.ui.appbase). All page bean classes that support JSP documents with JSF components must inherit from the abstract class AbstractPageBean, which provides page life-cycle methods. Note that the IDE makes the class name match the page name. Package com.sun.webui.jsf.component provides classes for many of the basic JSF user interface components, including the StaticText component (imported at line 6).
This page bean file defines a variable (line 17) for programmatically interacting with the clockText element of the JSP document of Fig. 21.4. The IDE also autogenerates get and set methods (lines 19–27) for this variable, as you’ll see in Section 21.5.4, Step 9. The clockText variable is of type StaticText.
The only logic required in this page is to set the clockText component’s text to the current time on the server. We do this in the prerender method (lines 58–62). The meaning of this and other page bean methods is discussed in Section 21.5.3. Lines 60–61 fetch and format the time on the server and set the value of clockText to that time.
21.5.3 Event-Processing Life Cycle
Several methods in the page bean tie into the JSF event-processing life cycle’s four major stages—initialization, preprocessing, prerendering and destruction. Each corresponds to a method in the page bean class—init, preprocess, prerender and destroy, respectively. Netbeans creates these overridden methods, so you can customize them to handle life-cycle processing tasks, such as rendering an element on a page only if a user clicks a button.
The init method (Fig. 21.6, lines 34–48) is called by the JSP container the first time the page is requested and on postbacks. A postback occurs when form data is submitted, and the page and its contents are sent to the server to be processed. Method init invokes its superclass version (line 36) then tries to call the method _init (declared in lines 13–15). The _init method is also automatically generated and handles component initialization tasks (if there are any), such as setting the options for a group of radio buttons.
The preprocess method (lines 52–54) is called after init, but only if the page is processing a postback. The prerender method (lines 58–62) is called just before a page is rendered (i.e., displayed) by the browser. This method should be used to set component properties; properties that are set sooner (such as in method init) may be overwritten before the page is actually rendered by the browser. For this reason, we set the value of clockText in the prerender method.
Finally, the destroy method (lines 66–68) is called after the page has been rendered, but only if the init method was called. This method handles tasks such as freeing resources used to render the page.
21.5.4 Building a Web Application in Netbeans
Now that we have presented the JSP file, the page bean file and the resulting XHTML web page sent to the web browser, we discuss the steps to create this application. To build the WebTime application, perform the following steps in Netbeans:
Step 1: Creating the Web Application Project
Select File > New Project... to display the New Project dialog. In this dialog, select Web in the Categories pane, Web Application in the Projects pane and click Next >. Change the project name to WebTime. In the Project Location field, specify where you’d like to store the project. These settings will create a WebTime directory to store the project’s files in the parent directory you specified. Keep the other default settings and click Next >. Keep the default options for Server and Settings and click Next >. Select Visual Web JavaServer Faces as the framework to use in this web application, then click Finish to create the web application project.
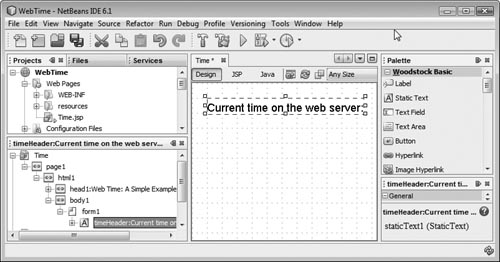
Step 2: Examining the Visual Editor Window of the New Project
The next several figures describe important Netbeans features, beginning with the visual editor window (Fig. 21.7). Netbeans creates a single web page named Page1 for each new project. This page is open by default in the visual editor in Design mode when the project first loads. As you drag and drop new components onto the page, Design mode allows you to see how the browser will render your page. The JSP file for this page, named Page1.jsp, can be viewed by clicking the JSP button at the top of the visual editor or by right clicking anywhere in the visual editor and selecting Edit JSP Source. As mentioned previously, each web page is supported by a page bean file. Netbeans creates a file named Page1.java when a new project is created. To open it, click the Java button at the top of the visual editor or right click anywhere in the visual editor and select Edit Java Source.
Fig. 21.7. Visual editor window in Design mode.

The Preview in Browser button at the top of the visual editor window allows you to view your pages in a browser without having to build and run the application. The Refresh button redraws the page in the visual editor. The Show Virtual Forms button allows you to see which form elements participate in virtual forms (discussed in Chapter 22). The Target Browser Size drop-down list lets you specify the optimal browser resolution for viewing the page and lets you see what the page will look like in different screen resolutions.
Step 3: Examining the Palette in Netbeans
Figure 21.8 shows the Palette displayed in the IDE when the project loads. Part (a) displays the Woodstock Basic list of web components, and part (b) displays the Woodstock Layout components. Woodstock is a set of user interface components for JavaServer Faces applications. You can learn more about these components at woodstock.dev.java.net. We discuss specific components in Fig. 21.8 as they are used throughout the chapter.
Fig. 21.8. Palette in Netbeans.


Step 4: Examining the Projects Window
Figure 21.9 displays the Projects window, which appears in the upper-left corner of the IDE. This window displays the hierarchy of all files included in the project. The JSP files for each page are listed under the Web Pages node. This node also includes the resources folder, which contains the CSS stylesheet for the project and any other files the pages may need to display properly, such as image files. The Java source code, including the page bean file for each web page and the application, session and request scope beans, can be found under the Source Packages node.
Fig. 21.9. Projects window for the WebTime project.

Step 5: Examining the JSP and Java Files in the IDE
Figure 21.10 displays Page1.jsp—the JSP document generated by Netbeans for Page1. [Note: We reformatted the code to match our coding conventions.] Click the JSP button at the top of the visual editor to view this file. When this file is first created, it contains elements for setting up the page, including linking to the page’s style sheet and declaring the JSF libraries that will be used. By default, Netbeans does not show line numbers in the source-code editor. To view the line numbers, select View > Show Line Numbers.
Fig. 21.10. JSP document generated for Page1 by Netbeans.

Figure 21.11 displays part of Page1.java—the page bean file generated by Netbeans for Page1. Click the Java button at the top of the visual editor to open the page bean file. This file contains a Java class with the same name as the page (i.e., Page1), which extends the AbstractPageBean class. As previously mentioned, AbstractPageBean has several methods that manage the page’s life cycle. Four of these methods—init, preprocess, prerender and destroy—are overridden by Page1.java. Other than method init, these methods are initially empty. They serve as placeholders for you to customize the behavior of your web application.
Fig. 21.11. Page bean file for Page1.jsp generated by Netbeans.

Step 6: Renaming the JSP and Java Files
Typically, you’ll want to rename the JSP and Java files, so that their names are relevant to your application. Right click Page1.jsp in the Projects window and select Refactor > Rename... to display the Rename Page1 dialog. Enter the new name, Time, and check the Apply Rename on Comments checkbox. To make the changes immediately, click the Refactor button. If you wish to preview the changes before they’re applied, click the Preview button to display the Refactoring window at the bottom of the IDE. Refactoring is the process of modifying source code to improve its readability and reusability without changing its behavior—for example, by renaming methods or variables, or breaking long methods into shorter ones. Netbeans has built-in refactoring tools that automate some refactoring tasks. Using these tools to rename the project files updates the name of the JSP file to Time.jsp and its corresponding page bean file to Time.java. The refactoring tool also changes the class name in the page bean file and all of the attribute bindings in the JSP document to reflect the new class name. If you choose to preview the refactoring changes, none of the changes will be made until you click the Do Refactoring button in the Refactoring window.
Step 7: Changing the Title of the Page
Before designing the content of the web page, we give it the title "Web Time: A Simple Example". By default, the page does not have a title when it is generated by the IDE. To add a title, open the JSP file in Design mode. In the Properties window, enter the new title next to the Title property and press Enter. View the JSP to see that the attribute title="Web Time: A Simple Example" was automatically added to the webuijsf:head tag. The page’s title will appear in the browser’s title bar when the page is rendered.
Step 8: Designing the Page
Designing a web page is simple in Netbeans. To add components to the page in Design mode, drag and drop them from the Palette onto the page. Each component is an object that has properties, methods and events. You can set these properties and events visually using the Properties window or programmatically in the page bean file.
The IDE generates the JSP tags for the components you drag and drop using a grid layout, as specified in the webuijsf:body tag. The components are rendered using absolute positioning—they appear exactly where they are dropped on the page. As you add components, the style attribute in each component’s JSP element will include the number of pixels from the top and left margins of the page at which the component is positioned.
This example uses two Static Text components. To add the first one, drag and drop it from the Palette’s Woodstock Basic components list to the page. Edit the component’s text by typing "Current time on the web server:" directly into the component. The text can also be edited by changing the component’s text property in the Properties window. Netbeans is a WYSIWYG (What You See Is What You Get) editor—when you make a change to a page in Design mode, the IDE creates the markup (visible in JSP mode) necessary to achieve the desired visual effects seen in Design mode. After adding the text to the web page, switch to JSP mode. You should see that the IDE nested a webuijsf:staticText element (with the text attribute that contains the text you just entered) in the webuijsf:form element inside the webuijsf:body element. The Static Text component is bound to the object staticText1 in the page bean file. Back in Design mode, click the Static Text component to select it. In the Properties window, click the ellipsis button (![]() ) next to the
) next to the style property to open a dialog box to edit the text’s style. Select 18 px for the font size and click OK. Again in the Properties window, change the id property to timeHeader. Setting the id property also changes the name of the component’s corresponding variable name in the page bean and updates its binding attribute in the JSP accordingly. The IDE should now appear as in Fig. 21.12. You can view the JSP file to see that font-size: 18 px has been added to the style attribute and the id attribute has been changed to timeHeader in the component’s tag.
Fig. 21.12. Time.jsp after inserting the first Static Text component.
Drop a second Static Text component onto the page and set its id to clockText. Edit its style property so that the font size is 18 px, the text color is yellow, and the background color is black. Do not edit the component’s text, as this will be set programmatically in the page bean file. The component will display with the text Static Text in the IDE, but will not display any text at runtime unless the text is set programmatically. Figure 21.13 shows the IDE after the second component is added.
Fig. 21.13. Time.jsp after adding the second StaticText component.

Step 9: Adding Page Logic
After designing the user interface, you can modify the page bean file to set the text of the clockText element. To interact with a JSF component programmatically, you must first right click the control in Design mode and select Add Binding Attribute. In the page bean file, this creates a variable that you can use to interact with the component as well as set and get methods for accessing the component.
In this example, we add a statement to method prerender (lines 58–62 of Fig. 21.6). Recall that we use method prerender to ensure that clockText will be updated each time the page is refreshed. Lines 60–61 of Fig. 21.6 programmatically set the text of clockText to the current time on the server. For this statement to work, you’ll also need the two imports shown in lines 8–9 of Fig. 21.6. The IDE can insert these import statements for you. Simply right click in the code editor window and select Fix Imports from the pop-up menu that appears
We’d like this page to refresh once per minute to display an up-to-date time. To accomplish this, add <webuijsf:meta content = "60" httpEquiv = "refresh" /> to the JSP document, as the last element nested in the webuijsf:head element. This element tells the browser to reload the page automatically every 60 seconds. You can also add this tag by dragging a Meta component from the Advanced section of the Palette to your page, then setting the component’s content attribute to 60 and its httpEquiv attribute to refresh. If you do this, the Meta component will show up in the Outline window.
Step 10: Examining the Navigator Window
Figure 21.14 displays the Netbeans Navigator window. We expanded the Time node, which represents the page bean file and shows the contents of the component tree. The request, session and application scope beans are collapsed, as we have not added any properties to these beans in this example. Clicking an item in the page’s component tree selects the item in the visual editor.
Fig. 21.14. Outline window in Netbeans.

Step 11: Running the Application
After creating the web page, you can view it several ways. First, you can select Run > Build Project, and after the build completes, select Run > Run Project, to run the application in a browser window. You can also run a project that has already been built by pressing the Run Project icon (![]() ) in the toolbar at the top of the IDE or by pressing F6. Note that if changes are made to a project, the project must be rebuilt before they’ll be reflected when the application is viewed in a browser. Because this application was built on the local file system, the URL displayed in the address bar of the browser when the application is run will be
) in the toolbar at the top of the IDE or by pressing F6. Note that if changes are made to a project, the project must be rebuilt before they’ll be reflected when the application is viewed in a browser. Because this application was built on the local file system, the URL displayed in the address bar of the browser when the application is run will be http://localhost:8080/WebTime/ (Fig. 21.6), where 8080 is the port number on which the test server—GlassFish v2 UR2—runs by default.
Alternatively, you can press Ctrl + F5 to build the application, then run it in debug mode—the Netbeans built-in debugger can help you troubleshoot applications. If you press F6, the program executes without debugging enabled.
Error-Prevention Tip 21.1
![]()
If you have trouble building your project due to errors in the Netbeans-generated XML files used for building, try cleaning the project and building again. You can do this by selecting Run > Clean and Build Project or by pressing Shift + F11.
Error-Prevention Tip 21.2
![]()
If you attempt to clean and rebuild your project and receive an error message indicating that one or more files could not be deleted, stop the GlassFish server, then attempt the clean and rebuild process again. To stop the server, click the Services tab in Netbeans, expand the Servers node, right click GlassFish v2 and select Stop. Once the server has stopped running, select Run > Clean and Build Project or press Shift + F11 to clean and rebuild the project.
Finally, you can run your built application by opening a browser window and typing the web page’s URL in the Address field. Since your application resides on the local file system, you must first start the GlassFish application server. If you have previously run the application using one of the methods above, the server will already be started. Otherwise, you can start the server from the IDE by opening the Services tab (located in the same panel as the Projects), expanding the Servers node, right clicking GlassFish v2 and selecting Start. Then you can type the URL (including the port number for the application server, 8080) in the browser to execute the application. For this example it is not necessary to type the entire URL, http://localhost:8080/WebTime/faces/Time.jsp. The path to the file Time.jsp (i.e., faces/Time.jsp) can be omitted, because this file was set by default as the project’s start page. For projects with multiple pages, you can change the start page by right clicking the desired page in the Projects window and selecting Set As Start Page. The start page is indicated by an icon with a green play button symbol (![]() ) next to the page’s name in the Projects window.
) next to the page’s name in the Projects window.
21.6 JSF Components
This section introduces some of the JSF components featured in the Palette (Fig. 21.8). Figure 21.15 summarizes some of the JSF components used in the chapter examples.
Fig. 21.15. Commonly used JSF components.

21.6.1 Text and Graphics Components
Figure 21.16 displays a simple form for gathering user input. This example uses most of the components in Fig. 21.15. All the code in Fig. 21.16 was generated by Netbeans in response to actions performed in Design mode. To create this application from scratch, review the steps in Section 21.5.4. This example does not perform a task when the user clicks Register. Later, we demonstrate how to add functionality to many of these components.
Fig. 21.16. Registration form that demonstrates JSF components.


Recall that Netbeans uses absolute positioning by default, so components are rendered wherever they were dropped in the visual editor. In this example, in addition to absolute positioning, we use a Grid Panel component (lines 30–45) from the Palette’s Woodstock Layout component group. The h: prefix indicates that it can be found in the JSF HTML tag library. This component—an object of class HtmlPanelGrid in package javax.faces.component.html—controls the positioning of the components it contains. The Grid Panel component allows the designer to specify the number of columns the grid should contain. Components may then be dropped inside the panel, and they will automatically be repositioned into evenly spaced columns in the order in which they are dropped. When the number of components exceeds the number of columns, the panel moves the additional components to a new row. The Grid Panel behaves like an XHTML table and is in fact rendered as an XHTML table in the browser. In this example, we use the Grid Panel to control the positions of the Image and Text Field components in the user information section of the page.
Adding a Formatting Component to a Web Page
To create the layout for the User Information section of the form shown in Fig. 21.16, drag a Grid Panel component onto the page. In the Properties window, change the component’s id to gridPanel and set the component’s columns property to 4. The component also has properties to control the cell padding, cell spacing and other elements of the component’s appearance. In this case, accept the defaults for these properties. Now you can simply drag the Images and Text Fields for user information into the Grid Panel. The Grid Panel will manage their spacing and their organization into rows and columns.
Examining Web Components on a Sample Registration Form
Here we focus on the new user interface elements in the example. Lines 27–29 of Fig. 21.16 define an Image, an object of class ImageComponent which inserts an image into a web page. The images in this example are located in the ch21images directory. Images to be displayed on a web page must be placed in the project’s resources folder. To add images to the project, drop an Image component onto the page and click the ellipsis button (![]() ) next to the url property in the Properties window. This opens a dialog in which you can select the image to display. Since no images have been added to the
) next to the url property in the Properties window. This opens a dialog in which you can select the image to display. Since no images have been added to the resources folder yet, click the Add File button, locate the image ch21images directory and click the Add File button to copy the file you selected into the project’s resources folder in the Web Pages folder. Now you can select the image and click OK to insert it into the page.
Lines 30–45 contain an h:panelGrid element representing the Grid Panel component. Within this element, there are eight Image and Text Field components. Text Fields allow you to obtain text input from the user. For example, line 35 defines a Text Field control used to obtain the first name. You can label a Text Field by setting its label property, which places text directly above the Text Field. Alternatively, you can label a Text Field by dragging and dropping a Label component onto the page, which allows you to customize the Label’s position and style. In this example, we’re using images to indicate the purpose of each Text Field.
The order in which Text Fields are dragged to the page is the order in which their JSP elements are added to the JSP document. By default, when a user presses the Tab key to navigate between input fields, the focus shifts from component to component in the order the JSP elements occur in the JSP document. To specify the navigation order, you can drag components onto the page in the appropriate order, or you can set each input field’s tabIndex property in the Properties window to explicitly set the tab order. A component with a tab index of 1 will be the first in the tab sequence.
Lines 52–55 define a Drop Down List. When a user clicks the drop-down list, it expands and displays a list from which the user can make a selection. This component is an object of class DropDown and is bound to the object booksDropDownDefaultOptions, a SingleSelectOptionsList object that manages the list of options. This object can be configured automatically by right clicking the drop-down list in Design mode and selecting Configure Default Options..., which opens the Options Customizer dialog box so you can add options to the list. Each option consists of a display String that the user will see in the browser and a value String that is returned when you programmatically retrieve the user’s selection from the drop-down list. Netbeans constructs the SingleSelectOptionsList object in the page bean file based on the display-value pairs entered in the Options Customizer dialog box. To view the code that constructs the object, close the dialog box by clicking OK, open the page bean file, and expand the Managed Component Definition node that follows the class definition’s opening curly brace. The object is constructed in the _init method, which is called by method init the first time the page loads.
The Hyperlink component (lines 56–59) of class Hyperlink adds a hyperlink to a web page. The url property of this component specifies the resource (http://www.deitel.com in this case) that is requested when a user clicks the hyperlink. By default, Hyperlink components cause pages to open in the same browser window, but you can set the component’s target property to change this behavior.
Lines 63–66 define a Radio Button Group component of class RadioButtonGroup, which provides a series of radio buttons from which the user can select only one. Like a Drop Down List, a Radio Button Group is bound to a SingleSelectOptionList object. The options can be edited by right clicking the component and selecting Configure Default Options.... Also like the drop-down list, the SingleSelectOptionsList is automatically generated by the IDE and placed in the _init method of the page bean class.
Lines 67–69 define a Button component of class Button that triggers an action when clicked. A Button component typically maps to an input XHTML element with attribute type set to submit. As stated earlier, clicking the Register button in this example does not do anything.
21.6.2 Validation Using Validator Components and Custom Validators
Validating user input is an important step in collecting information from users. Form validation helps prevent processing errors due to incomplete or improperly formatted user input. For example, you may perform validation to ensure that all required fields contain data or that a zip-code field has the correct number of digits. Netbeans provides three validator components. A Length Validator determines whether a field contains an acceptable number of characters. Double Range Validators and Long Range Validators determine whether numeric input falls within acceptable ranges. Package javax.faces.validators contains the classes for these validators. Netbeans also allows custom validation with validator methods in the page bean file. The following example demonstrates validation using both a validator component and custom validation.
Validating Form Data in a Web Application
The example in this section prompts the user to enter a name, e-mail address and phone number. After the user enters any data, but before the data is sent to the web server, validation ensures that the user entered a value in each field, that the entered name does not exceed 30 characters, and that the e-mail address and phone-number values are in an acceptable format. If the client does not have JavaScript enabled, then the validation is performed on the server. In this example, (555) 123-4567, 555-123-4567 and 123-4567 are all considered valid phone numbers. Once the data is submitted, the web server responds by displaying an appropriate message and a Grid Panel component repeating the submitted information. Note that a real business application would typically store the submitted data in a database or in a file on the server. We simply send the data back to the page to demonstrate that the server received the data.
Building the Web Page
[Note: To create this application from scratch, review the steps in Section 21.5.4.] This web application introduces the Label and Message JSF components from the Woodstock Basic section of the Palette. Each of the page’s three text fields should have its own label and message. Label components describe other components and can be associated with user input fields by setting their for property. Message components display error messages when validation fails. This page requires three Text Fields, three Labels and three Messages, as well as a submit Button. To associate the Label components and Message components with their corresponding Text Field components, hold the Ctrl and Shift keys, then drag the label or message to the appropriate Text Field. In the Properties window, notice that each Label and Message component’s for property is set to the appropriate Text Field.
You should also add a Static Text component to display a validation success message at the bottom of the page. Set the text to "Thank you for your submission. <br/>We received the following information:" and change the component’s id to resultText. In the Properties window, unset the component’s rendered and escaped properties. The rendered property controls whether the component will be displayed the first time the page loads. Setting escape to false (i.e., unchecked) enables the browser to recognize the <br/> tag so it can start a new line of text rather than display the characters "<br/>" in the web page.
Look-and-Feel Observation 21.1
![]()
When you set a component’s rendered property to false (unchecked), the component no longer appears in the visual editor. To select such a control so you can manipulate its properties, use the Navigator window in Design mode (as shown in Fig. 21.12).
Add a Grid Panel component below the resultText component. The panel should have two columns, one for displaying Static Text components that label the user’s validated data (named nameText, emailText and phoneText, respectively), and one for displaying Static Text components that display that data (named nameValueText, emailValueText and phoneValueText, respectively). The panel’s rendered property should be set to false so that it is not initially displayed.
Adding Binding Attributes for Programmatically Interacting with Components
Recall that for each control you plan to interact with programmatically, you must right click the control in Design mode and select Add Binding Attribute to add a property for the control to the page bean file. In this example, you should do this for each of the Text Field components (so you can obtain their values), for the resultText Static Text component (so you can display it), for the Grid Panel component (so you can display it) and for the Static Text components nameValueText, emailValueText and phoneValueText in the Grid Panel (so you can set their text).
Reviewing the JSP Document
The JSP file for this page is displayed in Fig. 21.17. Lines 31–35, 42–46 and 54–58 define webuijsf:textFields for retrieving the user’s name, e-mail address and phone number, respectively. Lines 28–30, 39–41 and 51–53 define webuijsf:labels for each of these text fields. Lines 36–38, 47–50 and 59–62 define the text fields’ webuijsf:message elements. Lines 63–66 define a Submit webuijsf:button. Lines 67–71 create a webuijsf:staticText named resultText that displays text when the user successfully submits the form, and lines 72–91 define a webuijsf:panelGrid that contains components for displaying the validated user input in the browser.
Fig. 21.17. JSP that demonstrates validation of user input.


(a) Submitting the form before entering any information.

(b) Error messages displayed after submitting the empty form.

(c) Error messages displayed after submitting invalid information.

(d) Successfully sumbitted form.

Setting the Required Property of an Input Component
Ensuring that the user has made a selection or entered some text in a required input element is a basic type of validation. This is accomplished by checking the required box in the element’s Properties window. If you add a validator component or custom validator method to an input field, the field’s required property must be set to true (checked) for validation to occur. Each of the three input webuijsf:textFields in this example has its required property set to true. Also note in the visual editor that the label for a required field is automatically marked by a red asterisk. If a user submits this form with empty text fields, the default error message for a required field will be displayed in the empty field’s associated webuijsf:message component. To customize the error message, you must provide a custom validator.
Using the LengthValidator Component
In this example, we use the Length Validator component (found in the Validators section of the Palette) to ensure that the length of the user’s name does not exceed 30 characters. This might be useful to ensure that a value will fit in a particular database field.
To add a Length Validator to a component, simply drag the validator from the Palette and drop it onto the field to validate. A lengthValidator1 node will appear in the Outline window. To edit the validation component’s properties, click this node and set the maximum and minimum properties to the desired number of characters in the Properties window. Here, we set only the maximum property to 30. We also changed the component’s id to nameLengthValidator. Notice that the nameTextField’s validatorExpression property has been bound to the nameLengthValidator’s validate method in the page bean file (lines 34–35). Remember that most client-side validation can be circumvented, so important validation should always be performed on the server.
This validator allows users to type as much text in the field as they wish, and if they exceed the limit, the default length validation error message will be displayed in the field’s webuijsf:message component after the user clicks the Submit button. It is possible to limit the length of user input without using validation. By setting a Text Field’s maxLength property, the Text Field’s cursor will not advance beyond the maximum allowable number of characters, so the user cannot submit data that exceeds the length limit.
Using Regular Expressions to Perform Custom Validation
Some of the most common validation tasks involve validating user input. For instance, it may be necessary to check user-entered e-mail addresses and telephone numbers to ensure that they conform to the standard formatting for valid e-mail addresses and phone numbers. Matching user input against a regular expression is an effective way to ensure that the input is properly formatted. This is frequently done on the client side before data is submitted to the server so the user is notified immediately if they supply invalid input. Servers typically revalidate the data as well for security purposes. Netbeans does not provide components for validation using regular expressions, so we’ll add our own custom validator methods to the page bean file. To add a custom validator to an input component, right click the component and select Edit Event Handler > validate. This creates a validation method for the component with an empty body in the page bean file. We’ll add code to this method shortly. Note that both emailTextField and phoneTextField’s validatorExpression attributes are bound to their respective custom validation methods in the page bean file (lines 45–46 and 57–58).
Examining the Page Bean File for a Form That Receives User Input
Figure 21.18 contains the page bean file for the JSP file in Fig. 21.17. Line 21 sets the maximum length for the nameLengthValidator, which is a property of this page bean. Recall that the name text field was bound to this property in the JSP document. Methods emailTextField_validate (lines 189–200) and phoneTextField_validate (lines 204–216) are the custom validator methods that verify the user-entered e-mail address and phone number, respectively. The submitButton_action method (lines 219–230) echoes the data back to the user if validation succeeds. The validator methods are called before the event handler, so if validation fails, submitButton_action will not be called and the user input will not be echoed.
Fig. 21.18. Page bean for validating user input and redisplaying that input if valid.


The two custom validator methods in this page bean file validate a text field’s contents against a regular expression using the String method match, which takes a regular expression as an argument and returns true if the String conforms to the specified format.
For the emailTextField_validate method, we use the validation expression
w+([-+.']w+)*@w+([-.]w+)*.w+([-.]w+)*
Note that each backslash in the regular expression String (line 196) must be escaped with another backslash (as in \), because the backslash character normally represents the beginning of an escape sequence in Java. This regular expression indicates that an e-mail address is valid if the part before the @ symbol contains one or more word characters (i.e., alphanumeric characters or underscores), followed by zero or more Strings comprised of a hyphen, plus sign, period or apostrophe and additional word characters. After the @ symbol, a valid e-mail address must contain one or more groups of word characters potentially separated by hyphens or periods, followed by a required period and another group of one or more word characters potentially separated by hyphens or periods. For example, the e-mail addresses bob’[email protected], [email protected] and [email protected] are all valid. If the user enters text in emailTextField that does not have the correct format and attempts to submit the form, lines 197–198 throw a ValidatorException. The Message component catches this exception and displays the message in red.
The regular expression in phoneTextField_validate ensures that the phoneTextBox contains a valid phone number before the form is submitted. The user input is matched against the regular expression
(((d{3}) ?)|(d{3}-))?d{3}-d{4}
(Again, each backslash is escaped in the regular expression String in line 211.) This expression indicates that a phone number can contain a three-digit area code either in parentheses and followed by an optional space or without parentheses and followed by a required hyphen. After an optional area code, a phone number must contain three digits, a hyphen and another four digits. For example, (555) 123-4567, 555-123-4567 and 123-4567 are all valid phone numbers. If a user enters an invalid phone number, lines 213–214 throw a ValidatorException The Message component catches this exception and displays the error message in red.
If all six validators are successful (i.e., each TextField contains data, the name is less than 30 characters and the e-mail address and phone number are valid), clicking the Submit button sends the form’s data to the server. As shown in Fig. 21.17(d), the submitButton_action method displays the submitted data in a gridPanel (lines 221–227) and displays the resultsText Static Text component (line 228).
21.7 Session Tracking
In the early days of the Internet, e-businesses could not provide the kind of customized service typically experienced in “brick-and-mortar” stores. To address this problem, e-businesses began to establish mechanisms by which they could personalize users’ browsing experiences, tailoring content to individual users while enabling them to bypass irrelevant information. Businesses achieve this level of service by tracking each customer’s movement through their websites and combining the collected data with information provided by the consumer, including billing information, personal preferences, interests and hobbies.
Personalization
Personalization makes it possible for e-businesses to communicate effectively with their customers and also improves the user’s ability to locate desired products and services. Companies that provide content of particular interest to users can establish relationships with customers and build on those relationships over time. Furthermore, by targeting consumers with personal offers, recommendations, advertisements, promotions and services, e-businesses create customer loyalty. Websites can use sophisticated technology to allow visitors to customize home pages to suit their individual needs and preferences. Similarly, online shopping sites often store personal information for customers, tailoring notifications and special offers to their interests. Such services encourage customers to visit sites and make purchases more frequently.
Privacy
A trade-off exists, however, between personalized e-business service and protection of privacy. Some consumers embrace the idea of tailored content, but others fear the possible adverse consequences if the info they provide to e-businesses is released or collected by tracking technologies. Consumers and privacy advocates ask: What if the e-business to which we give personal data sells or gives that information to another organization without our knowledge? What if we do not want our actions on the Internet—a supposedly anonymous medium—to be tracked and recorded by unknown parties? What if unauthorized parties gain access to sensitive private data, such as credit card numbers or medical history? All of these are questions that must be debated and addressed by programmers, consumers, e-businesses and lawmakers alike.
Recognizing Clients
To provide personalized services to consumers, e-businesses must be able to recognize clients when they request information from a site. As we have discussed, the request/response system on which the web operates is facilitated by HTTP. Unfortunately, HTTP is a stateless protocol—it does not support persistent connections that would enable web servers to maintain state information regarding particular clients. So, web servers cannot determine whether a request comes from a particular client or whether a series of requests comes from one or several clients. To circumvent this problem, sites can provide mechanisms to identify individual clients. A session represents a unique client on a website. If the client leaves a site and then returns later, the client will still be recognized as the same user. To help the server distinguish among clients, each client must identify itself to the server.
Tracking individual clients, known as session tracking, can be achieved in a number of ways in JSPs. One popular technique uses cookies (Section 21.7.1); another uses the SessionBean object (Section 21.7.2). Additional session-tracking techniques include using input form elements of type "hidden" and URL rewriting. With "hidden" form elements, a Web Form can write session-tracking data into a form in the web page that it returns to the client in response to a prior request. When the user submits the form in the new web page, all the form data, including the "hidden" fields, is sent to the form handler on the web server. With URL rewriting, the web server embeds session-tracking information directly in the URLs of hyperlinks that the user clicks to send subsequent requests to the web server.
21.7.1 Cookies
Cookies provide web developers with a tool for personalizing web pages. A cookie is a piece of data typically stored in a text file on the user’s computer. A cookie maintains information about the client during and between browser sessions. The first time a user visits the website, the user’s computer might receive a cookie; this cookie is then reactivated each time the user revisits that site. The aim is to create an anonymous record containing data that is used to personalize the user’s future visits to the site. For example, cookies in a shopping application might store unique identifiers for users. When a user adds items to an online shopping cart or performs another task resulting in a request to the web server, the server receives a cookie from the client containing the user’s unique identifier. The server then uses the unique identifier to locate the shopping cart and perform any necessary processing.
In addition to identifying users, cookies also can indicate clients’ shopping preferences. When a web server receives a request from a client, the server can examine the cookie(s) it sent to the client during previous communications, identify the client’s preferences and immediately display products of interest to the client.
Every HTTP-based interaction between a client and a server includes a header containing information either about the request (when the communication is from the client to the server) or about the response (when the communication is from the server to the client). When a page receives a request, the header includes information such as the request type (e.g., GET or POST) and any cookies that have been sent previously from the server to be stored on the client machine. When the server formulates its response, the header information contains any cookies the server wants to store on the client computer and other information, such as the MIME type of the response.
The expiration date of a cookie determines how long the cookie remains on the client’s computer. If you do not set an expiration date for a cookie, the web browser maintains the cookie for the duration of the browsing session. Otherwise, the web browser maintains the cookie until the expiration date occurs. When the browser requests a resource from a web server, cookies previously sent to the client by that web server are returned to the web server as part of the request formulated by the browser. Cookies are deleted when they expire.
Portability Tip 21.1
![]()
Clients may disable cookies in their web browsers for more privacy. When such clients use web applications that depend on cookies to maintain state information, the applications will not execute correctly.
Using Cookies to Provide Book Recommendations
The next web application shows how to use cookies. The example contains two pages. In the Options.jsp page (Figs. 21.19 and 21.21), users select a favorite programming language from a group of radio buttons and submit the form to the web server for processing. The web server responds by creating a cookie that stores the selected language and the ISBN number for a recommended book on that topic. The server then renders different components in the browser that allow the user either to view the options and select another favorite programming language or to view the Recommendations.jsp page in our application (Figs. 21.22–21.23), which lists recommended books pertaining to the programming language(s) that the user selected. Because we’ll be programmatically hiding and showing the components in the Options.jsp file, each component in the page requires a binding attribute. When the user clicks the hyperlink to view the recommended books, the cookies previously stored on the client are sent to the server, read by the application and used to form the recommended books list.
Fig. 21.19. JSP file that allows the user to select a programming language.


(a) User selects a programming language and clicks Submit to rerequest Options.jsp.
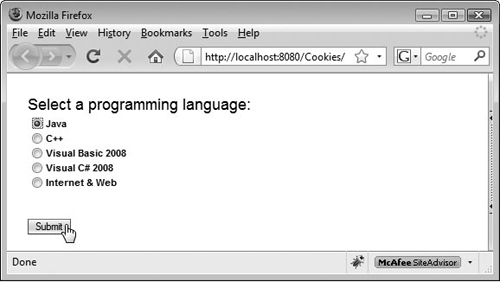
(b) Options.jsp displays a welcome message and provides links allowing the user to select another language or view book recommendations. User chooses to select another language, which rerequests Options.jsp.

(c) User selects a programming language and clicks Submit to rerequest Options.jsp.

(d) Options.jsp displays a welcome message and provides links allowing the user to select another language or view book recommendations. User chooses to view book recommendations.

The Options.jsp file in Fig. 21.19 contains a Radio Button Group (lines 24–28) with the options Java, C++, Visual Basic 2008, Visual C# 2008 and Internet & Web. Recall that you can set the display and value Strings of radio buttons by right clicking the Radio Button Group and selecting Configure Default Options.... The code for these options is shown in lines 22–34 of Fig. 21.21. The user selects a programming language by clicking a radio button, then pressing Submit to send the selection to the server. This makes an HTTP POST request to the web application on the server, which obtains the user’s selection, creates a cookie containing the selection and adds it to the HTTP response header that is sent to the client as part of the response. The browser then stores the cookie on the client computer.
When the user clicks Submit, the webuijsf:staticText, webuijsf:radioButtonGroup and webuijsf:button elements used to select a language are hidden, and a webuijsf:staticText and two webuijsf:hyperlink elements are displayed. One webuijsf:staticText and both webuijsf:hyperlinks initially have their rendered properties set to false (lines 35, 41, and 46). This indicates that these components are not visible when the page loads, as we want the user’s first view of the page to include only the components for selecting a programming language and submitting the selection.
The first hyperlink (lines 38–43) requests this page, and the second (lines 44–49) requests Recommendations.jsp. The url property is not set for the first link; we discuss this momentarily. The second link’s url property is set to /faces/Recommendations.jsp. Recall that earlier in the chapter, we set a url property to a remote website (http://www.deitel.com). To set this property to a page within the current application, you can click the ellipsis button (![]() ) next to the
) next to the url property in the Properties window to open a dialog containing a list of the application’s pages, then select an existing page as the link’s destination.
Adding and Linking to a New Web Page
To set the url property to a destination page (i.e., Recommendations.jsp) in the current application, the destination page must already exist. To create Recommendations.jsp, right click the Web Pages node in the Projects window and select New > Visual Web JSF Page... from the menu that appears. In the New Visual Web JSF Page dialog, change the name of the page to Recommendations and click Finish to create the files Recommendations.jsp and Recommendations.java. (We discuss the contents of these files shortly.) You can now select Recommendations.jsp as the url value for recommendationsLink. You can see the url’s value in line 49.
Hiding and Showing Elements of a Page and Rerequesting the Page
When the user clicks the languagesLink, we’d like to rerequest Options.jsp and display the list of options so the user can make another choice. Rather than setting the languagesLink’s url property, we’ll add an action handler for this component to the page bean. You can do this by right clicking languagesLink in the Navigator window (while in Design mode) and selecting Edit action Event Handler. The action handler will enable us to show and hide components of the page without redirecting the user to another page. Specifying a destination url would override the component’s action handler and redirect the user to the specified page. So it is important that we do not set the url property in this case, because we want to hide some elements of the page and show others. Since we use the languagesLink to reload the current page, we simply return null from its action handler, which causes Options.jsp to reload.
Adding an Action Handler to a Hyperlink and Redirecting to Another Page
If you need to add an action handler to a hyperlink that should also direct the user to another page, you must add a rule to the Page Navigation file (Fig. 21.20). [Note: This is not required for the current example.] To edit this file, right click anywhere in the visual designer and select Page Navigation. Click the plus (![]() ) icon for
) icon for Options.jsp in the navigation designer to display its components that might cause the page to request another page. Locate the link whose navigation rule you would like to set (e.g., recommendationsLink) and drag it to the destination page (e.g., Recommendations.jsp). Now the link can direct the user to a new page (Recommendations.jsp) and you can also place code in the Hyperlink component’s action handler that will execute when the user clicks the link. Editing the Page Navigation file is also useful when you would like action elements that cannot specify a url property, such as buttons, to direct users to another page.
Fig. 21.20. Editing the Page Navigation file.

Page Bean File for Options.jsp
Figure 21.21 contains the code that writes a cookie to the client machine when the user selects a programming language. The file also determines which components appear on the page, displaying either the components for choosing a language or the hyperlinks for navigating through the application, depending on the user’s actions.
Fig. 21.21. Page bean that stores the user’s language selection in a client cookie.


As mentioned previously, the _init method handles component initialization. Since this page contains a RadioButtonGroup object that requires initialization, method _init (lines 20–35) constructs an array of Option objects to be displayed by the buttons.
Lines 129–133 in the constructor initialize a HashMap object (defined at line 122)—a data structure that stores key/value pairs. In this case, the keys and values are Strings. The application uses the key to store and retrieve the associated value in the HashMap object. In this example, the keys contain the programming language names, and the values contain the ISBN numbers for the recommended books. Class HashMap provides method put, which takes as arguments a key and a value. A value that is added via method put is placed in the HashMap at a location determined by the key. The value for a specific HashMap entry can be determined by invoking the method get on the HashMap object with that value’s key as an argument.
Note that Netbeans can automatically import any missing packages your Java file needs. For example, after adding the HashMap object to Options.java, you can right click in the Java editor window and select Fix Imports to import java.util.HashMap. This option can also remove unused import declarations.
Clicking Submit invokes the event handler submitButton_action (lines 189–224), which displays a message indicating the selected language in the responseText element and adds a new cookie to the response. If a language was selected (line 194), the selected item is retrieved (line 197). Line 198 adds the selected language to the message string.
Line 201 retrieves the ISBN for the selected language from the books HashMap object. Then line 204 creates a new Cookie object (in package javax.servlet.http), using the selected language as the cookie’s name and a corresponding ISBN as the cookie’s value. This cookie is added to the HTTP response header in lines 207–209. An object of class HttpServletResponse (from package javax.servlet.http) represents the response. This object can be accessed by invoking the inherited method getExternalContext on the page bean, then invoking getResponse on the resulting object. If a language was not selected, line 213 sets the results message to indicate that no selection was made. [Note: Cookie names cannot contain whitespace. For this reason, we hyphenated the multiword names that represent the cookie names (i.e., the programming language names in this example) in lines 27, 28, 31 and 131–133. We use String method replace to replace the hyphens with spaces when we display the language name in the book recommendations page.]
Lines 216–222 control the appearance of the page after the user clicks Submit. Line 216 sets the responseText to display the String msg. Since the user has just submitted a language selection, the components used to collect the selection are hidden (lines 217–219), and responseText and the links used to navigate the application are displayed (lines 220–222). The action handler returns null at line 223, which reloads Options.jsp.
Lines 227–236 contain the languagesLink’s event handler. When the user clicks this link, responseText and the two links are hidden (lines 229–231), and the components that allow the user to select a language are redisplayed (lines 232–234). The method returns null at line 235, causing Options.jsp to reload.
Displaying Book Recommendations Based on Cookie Values
After clicking Submit, the user may request a book recommendation. The book recommendations hyperlink forwards the user to Recommendations.jsp (Fig. 21.22) to display recommendations based on the user’s language selections.
Fig. 21.22. JSP file that displays book recommendations based on cookies.


Recommendations.jsp contains a Label (lines 19–22), a Text Area (lines 23–26) and a Hyperlink (lines 27–30). The Label displays the text Recommendations at the top of the page. A Text Area component can display multiple lines of text. The Text Area in this example displays the recommendations created by the Recommendations.java page bean (Fig. 21.23), or the text "No Recommendations. Please select a language." The Hyperlink allows the user to return to Options.jsp (specified by the link’s url) to select additional languages.
Fig. 21.23. Page bean that displays book recommendations based on cookies storing user’s selected languages.
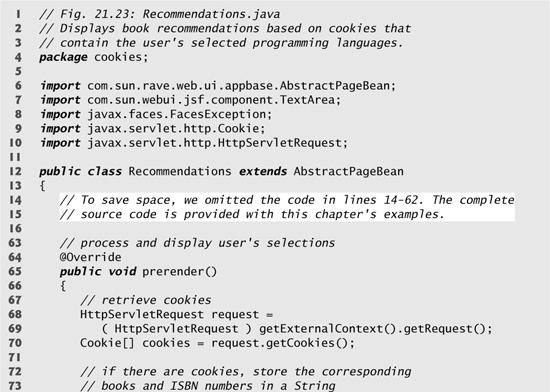

Page Bean That Creates Book Recommendations from Cookies
In Recommendations.java (Fig. 21.23), method prerender (lines 65–96) retrieves the cookies from the client, using the request object’s getCookies method (lines 68–70). An object of class HttpServletRequest (from package javax.servlet.http) represents the request. This object can be obtained by invoking method getExternalContext on the page bean, then invoking getRequest on the resulting object. The call to getCookies returns an array of the cookies previously written to the client. Cookies can be read by an application only if they were created by a server in the domain in which the application is running—for security reasons, a web server cannot access cookies created by servers in other domains. For example, a cookie created by a web server in the deitel.com domain cannot be read by a web server in any other domain.
Line 76 determines whether at least one cookie exists. Lines 78–87 add the information in the cookie(s) to the string recommendations, provided that the cookie’s name is not "/Recommendations.jsp"—a cookie by this name is added when the user returns from Recommendations.jsp to Options.jsp. The loop retrieves the name and value of each cookie, using the control variable to determine the current value in the cookie array. If no language was selected, lines 91–92 assign recommendations a message instructing the user to select a language. Line 95 sets recommendationsTextArea to display the resulting recommendations string. We summarize commonly used Cookie methods in Fig. 21.24.
Fig. 21.24. javax.servlet.http.Cookie methods.

21.7.2 Session Tracking with Session Beans
You can also perform session tracking with the subclass of AbstractSessionBean that is provided in each web application you create with Netbeans. By default, the subclass is named SessionBean1. When a user requests a page in the web application, a SessionBean1 object is created on the server. Properties of this object can be accessed throughout a browser session by invoking the method getSessionBean1 on the page bean. To demonstrate session-tracking techniques using the SessionBean1, we modified the page bean files in Figs. 21.21 and 21.23 so that they use the SessionBean1 object to store the user’s language selections. We begin with the updated Options.jsp file (Fig. 21.25). Figure 21.27 presents the SessionBean1.java file, and Fig. 21.28 presents the modified page bean file for Options.jsp.
Fig. 21.25. JSP file that allows the user to select a programming language.


(a) User selects a programming language and clicks Submit to rerequest Options.jsp.

(b) Options.jsp displays a welcome message and provides links allowing the user to select another language or view book recommendations. User chooses to select another language, which rerequests Options.jsp.

(c) User selects a programming language and clicks Submit to rerequest Options.jsp.

(d) Options.jsp displays a welcome message and provides links allowing the user to select another language or view book recommendations. User chooses to view book recommendations.

The Options.jsp file in Fig. 21.25 is similar to the one from the cookies example (Fig. 21.19). Lines 38–47 define two webuijsf:staticText elements that were not present in the cookies example. The first element displays the text "Number of selections so far:". The second element’s text attribute is bound to property numberOfSelections in the SessionBean1 object (line 47). We discuss how to bind the text attribute to a session bean property momentarily.
Adding Properties to the SessionBean
This example uses session tracking to store the user’s selected languages and the number of selections the user makes. To store session information, we add properties to the SessionBean1 class.
Begin by double clicking the SessionBean1 node in the Navigator window to open SessionBean1.java in the editor. Declare a numberOfSelections instance variable of type int to store the number of selections the user makes. Next, right click the variable in the editor and select Refactor > Encapsulate Fields.... In the dialog that appears, keep the default options and click the Refactor button. This creates get and set methods for instance variable numberOfSelections at the bottom of the source-code file. Together, the instance variable and its get and set methods represent the bean’s numberOfSelections property.
As you’ll see, we manipulate property numberOfSelections in the page bean file to keep track of the number of languages the user selects. You can see in Fig. 21.25(b) and (d) that we display this value in the page each time the user makes another selection. To display the value in the selectionsValueText element, change to Design mode, right click the element in the Navigator window or the visual editor and select Bind to Data.... In the Bind to Data dialog (Fig. 21.26), click the Bind to an Object tab, select property numberOfSelections in the SessionBean1 node and click OK. The selectionsValueText element is now bound to the value of SessionBean1’s numberOfSelections property. When the property’s value changes, the text in the page changes accordingly—you need not programmatically set the text in the page bean file.
Fig. 21.26. Bind to Data dialog.

Now that we’ve added a property to class SessionBean1 to store the number of selections, let’s add another property to store the selections themselves. We’d like to store selections as key/value pairs of the selected language and the ISBN number of a related book, similar to the way selections were stored using cookies. To do this, add a HashMap instance variable named selections to class SessionBean1, then refactor the code to create the get and set methods as you did for numberOfSelections. The two properties we added are shown in the SessionBean1.java file (Fig. 21.27).
Fig. 21.27. SessionBean file for storing language selections.
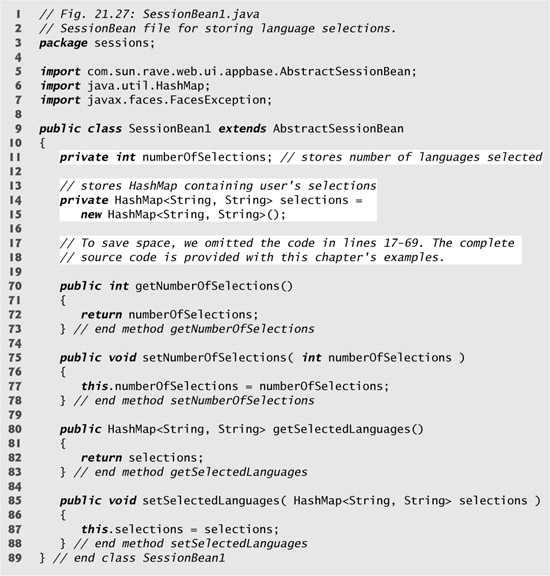
Line 11 declares the numberOfSelections instance variable, and lines 70–73 and 75–78 define its get and set methods, respectively, to complete the numberOfSelections property. Lines 14–15 define the HashMap object selections that will store user selections. Lines 80–83 and 85–88 are the get and set methods for this property. Recall that the IDE generated the get and set methods when we right clicked each instance variable, selected Refactor > Encapsulate Fields... and clicked the Refactor button.
Manipulating Session Bean Properties in a Page Bean File
The page bean file for the Options.jsp page is displayed in Fig. 21.28. Because much of this example is identical to the preceding one, we discuss only the new features. Since we are not using cookies in this example, we don’t need to hyphenate the programming language names that were previously used as cookie names (lines 24, 26, 28 and 151–153).
Fig. 21.28. Page bean that stores language selections in a SessionBean property.


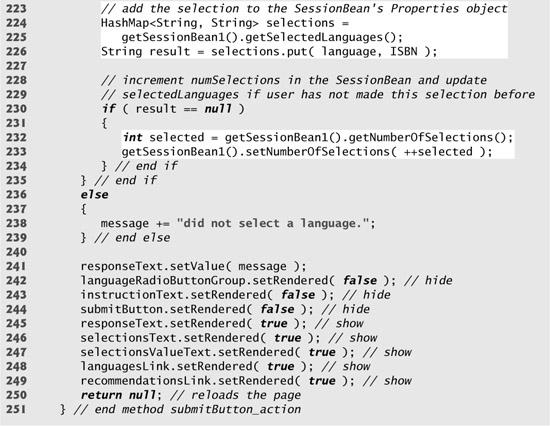
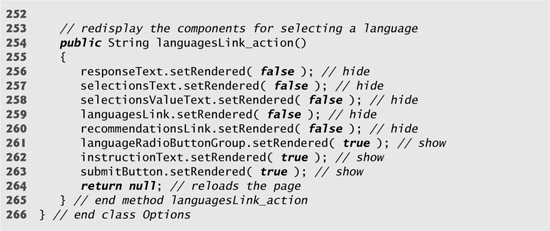
The submitButton’s action handler (lines 209–251) stores the user’s selections in SessionBean1 and increments the number of selections made, if necessary. Lines 224–225 retrieve from SessionBean1 the HashMap object that contains the user’s selections. Line 226 adds the current selection to the HashMap. Method put returns the value previously associated with the new key, or null if this key was not already stored in the HashMap object. If adding the new property returns null, then the user has made a new selection. In this case, lines 232–233 increment SessionBean1’s numberOfSelections property. Lines 242–249 and the languaguesLink action handler (lines 254–265) control the components that are displayed, just as in the cookies examples.
Software Engineering Observation 21.2
![]()
A benefit of using session bean properties (rather than cookies) is that they can store any type of object (not just Strings) as attribute values. This provides you with increased flexibility and power in maintaining client-state information.
Displaying Recommendations Based on Session Values
As in the cookies example, this application provides a link to Recommendations.jsp, which displays a list of book recommendations based on the user’s language selections. Since this JSP is identical to the version in Fig. 21.22, we show only the sample output of this page in Fig. 21.29.
Fig. 21.29. JSP file that displays book recommendations based on language selections stored in session scope.

Page Bean That Creates Book Recommendations from a SessionBean Property
Figure 21.30 presents the page bean for Recommendations.jsp. Again, much of it is similar to the page bean used in the cookies example. We discuss only the new features.
Lines 67–68 retrieve the HashMap object containing the user’s selections from the session bean, and line 69 retrieves the number of selections made. If any selections were made, lines 78–82 append book recommendations to the string recommendations. Line 78 uses the HashMap’s keySet method to obtain a Set of the keys in the HashMap, and line 81 uses each key to obtain the ISBN of the corresponding book.
Fig. 21.30. Displays book recommendations based on a SessionBean property.


21.8 Wrap-Up
In this chapter, we introduced web application development using JavaServer Pages and JavaServer Faces in Netbeans. We began by discussing the simple HTTP transactions that take place when you request and receive a web page through a web browser. We then discussed the three tiers (i.e., the client or top tier, the business logic or middle tier and the information or bottom tier) that comprise most web applications.
You learned the role of JSP files and page bean files, and the relationship between them. You learned how to use Netbeans to visually build web applications using Netbeans’s drag-and-drop capabilities, then you compiled and executed them.
We demonstrated several common JSF components used for displaying text and images on web pages. We also discussed validation components and custom validator methods, which allow you to ensure that user input satisfies the requirements of your application.
We discussed the benefits of maintaining user information across multiple pages of a website. We then demonstrated how you can include such functionality in a web application using either cookies or properties of the session bean class that is included in each web application.
In Chapter 22, we continue our discussion of Java web application development with more advanced concepts. You’ll learn how to access a database from a JSF web application, how to use AJAX-enabled JSF components and how to use virtual forms. AJAX helps web-based applications provide the interactivity and responsiveness that users typically expect of desktop applications.