
Chapter 7
Building a Branded Website, App, and Email Account
IN THIS CHAPTER
![]() Registering a domain name that promotes your brand
Registering a domain name that promotes your brand
![]() Building your own website or outsourcing that job
Building your own website or outsourcing that job
![]() Using website analytics to monitor traffic on your site
Using website analytics to monitor traffic on your site
![]() Getting an email address that matches your domain name
Getting an email address that matches your domain name
![]() Building a branded app or hiring a developer
Building a branded app or hiring a developer
For any brand to be successful in today’s world, it must have a strong online presence. When you tell people about your brand, the first question they typically ask is, “Do you have a website?” And my answer is always, “Yeah, GirlGangTheLabel.com. You should check it out.” Then, of course, I hand them my business card, which has my website and email addresses on it.
Even if you do most of your business at a physical location, having a website is useful for keeping customers informed and attracting new customers. If you have a physical store, an e-commerce-enabled website enables you to sell products and services to people in remote locations and to those who are unable (or unwilling) to visit your physical location. A website significantly extends your reach.
In this chapter, I explain how to begin the process of establishing an online presence by building a branded website, online store, or blog (or a combination of the three); creating a branded email address (such as [email protected]); and, if you’re truly ambitious (and it makes sense to do so), launching your very own branded mobile app.
 Don’t feel intimidated by the technology. In this chapter, I provide the guidance you need and introduce numerous tools and services that simplify these projects.
Going It Alone or Hiring a Developer
After you decide to build a website, online store, or blog, the next question is whether you’re going to do the work yourself or hire a designer/developer to do it for you. The answer usually comes down to time and money:
- If you have time but not enough money to hire a pro, do it yourself. If you’ve never created a website before, you can find plenty of tools and resources to do the job (many of which are free), but getting through that learning curve will take more of your time than hiring someone to do it for you.
- If you have the money, hire a pro, regardless of whether you have the time to do it yourself. A professional designer/developer can probably build a better site faster than you can. You still need to provide the developer guidance and most (or all) of the content, but a professional delivers the expertise and does most of the heavy lifting.
In the following sections, I take a deeper dive into the question of whether to build your own website or hire a pro.
Doing it yourself
You can build a decent-looking website, blog, or online store yourself quickly and easily. Readily available and often free or inexpensive themes, graphics, and tools are available to facilitate the process. Here’s a list of what you need to build your own branded website, blog, or online store:
- Website host: A website host is where all the files and functionality that make your website work will be stored on the Internet. See “Claiming Your Domain Name and Choosing a Hosting Service,” later in this chapter, for more about hosting services.
- Content management system: A content management service (CMS), such as WordPress, is software that enables you (or your developer) to build a website, blog, or online store and that presents your site to visitors. Think of a CMS as being a desktop publishing program, such as Microsoft Publisher, specifically for creating and publishing websites.
-
Theme: A theme (template) controls the layout and appearance of a site’s contents, making it as easy to change the appearance of your site as it is to change your clothes. Thousands of custom themes are available for popular CMSes, such as WordPress.
Choose a mobile-friendly theme — one that automatically adjusts your site’s layout and formatting to make it look and function properly regardless of the device on which it’s being viewed. More than half of users now browse the web on mobile devices, so your site needs to adapt to their needs and preferences. - Plug-ins or apps: Third-party providers develop plug-ins or apps for popular CMSes that you can use, typically for free or a small fee, to add functionality to your site, such as enabling e-commerce for online shopping, securing and backing up your site, or adding a discussion forum.
- Content: Content is everything you bring to the table — text, logo, graphics, audio, video, product catalog, and anything else you want to include on your site.
Some platforms contain nearly everything you need to get started. Just add content. Here are a few of my favorite all-in-one solutions:
-
Shopify (
https://www.shopify.com/domains) is great for building an online (e-commerce) store. A Basic account starts at $29 per month and includes a selection of free themes, an overview dashboard, financial reporting, customer profiles, product and order management, email carts, gift cards, discount codes, and more. Shopify also has more than 6,000 apps that integrate with and add features and functionality to your business.Shopify Lite ($9 per month) is a plan for merchants who sell in person or simply want to add a Buy button to their existing site. Using Lite, you can turn any website into an online store, accept credit card payments anywhere from an iOS or Android device, and prepare and send invoices. You can’t build an online store with the Lite version.
- Squarespace (
https://www.squarespace.com) is a combination website hosting service and CMS. It features attractive themes for building a professional-looking website, online store, blog, or portfolio (to let freelancers o showcase their creativity). It also features search engine optimization (SEO) tools that improve your site’s search engine rank and analytics that show out where your website traffic is coming from, what your visitors are looking for, and how they’re navigating and interacting with your site. Plans range from Personal ($12 per month) to Business ($18 per month), Basic Commerce ($26 per month), and Advanced Commerce ($40 per month). -
WordPress (
https://wordpress.com) is a combination hosting service and CMS. Like Shopify and Squarespace, it provides the tools you need to build and manage a website, blog, or online store. It offers several plans ranging from Free or Personal ($4 per month) to Premium ($8 per month), Business ($25 per month), and e-commerce ($45 per month). Popular e-commerce platforms such as Shopify integrate easily with WordPress sites. With a few clicks, you can generate a special code on Spotify and paste it into a page on your WordPress site to feature a product you sell on Spotify along with a Buy button customers can click to order the product.
See “Claiming Your Domain Name and Choosing a Hosting Service” and “Walking Through the Basics of Building a Website,” later in this chapter, for more about building a website, blog, or online store.
Hiring a developer
If designing and building a website is a project you prefer to outsource, you’ll need to find a qualified website developer. Start by creating a list of everything you want your site to have and to do. Your list should contain the following items:
- Your business’s or brand’s background: Include customer demographics, a description of your industry, and names of any competitors.
- Your site’s primary and secondary goals: You may have a primary goal of building a strong brand identity and a secondary goal of selling lots of merchandise, for example. If you’re a service provider, your primary goal may be to spread the word about your business, with a secondary goal of building trust.
- A sitemap: A sitemap is an outline of your site, listing all pages you want and how they’ll be organized.
- A few examples of existing sites you really like: List their addresses, along with what you like and dislike about each one.
-
Project scope, functionality, and deliverables: Create a list of everything you expect the site to have, such as the following:
- Static content on 10 to 12 pages
- Blogging functionality
- E-commerce functionality
- Ability for customers to choose a preferred store location
- Content development (will you supply text and graphics, or are you depending on the developer to do that?)
- Ability to collect information from forms
- SEO
- Content migration
 You can save yourself and your developer time, money, and aggravation by nailing down exactly what you need before you start. Otherwise, you’re susceptible to scope creep — the phenomenon in which a project continues to change and grow far beyond what was planned.
 - Deadline and milestones: Specify when you’d like to launch your site, and create a realistic timeline for completing different stages of the project.
- Budget: Be up-front about how much you’re willing to spend. As you start your search for a qualified developer, you can adjust your budget or the scope of the project according to what you find out about the going rates for developers.
When you have a fairly clear vision of your site, you’ll be well prepared to start looking for and contacting prospective developers. If you don’t have anyone in mind, consider the following resources:
- Search a freelancer marketplace such as
99designs(https://99designs.com) or Toptal (https://www.toptal.com). - Check the platform you want to use to build and host your site for developers who are familiar with the platform. Squarespace Marketplace can match you with a developer based on your needs and preferences, or you can browse its developer directory. Likewise, the Shopify Experts Marketplace can connect you with a trusted freelancer or agency.
- Reach out to your personal network by asking for recommendations from your contacts on social media platforms such as LinkedIn, Instagram, and Facebook.
Examine potential developers’ portfolios closely to determine whether they have the skills necessary to develop the site you want. Have they created any online stores? How effective are the sites they’ve developed at projecting brand identity? Check references to see what their clients have to say about their work.
Don’t expect the developer to do all the work. You’ll need to provide raw content for the site (info, images, and video), write some copy, supply your product database (for an online store), and offer guidance and feedback.
Claiming Your Domain Name and Choosing a Hosting Service
Choosing a domain name and hosting service is like buying a lot on which to build a home. The domain name is your site’s unique address, and the hosting service is the computer server on which your site will be built. The domain name for my Girl Gang brand, for example, is GirlGangTheLabel.com, and the site is hosted on servers maintained by Shopify. My domain name is also part of my email address ([email protected]), which strengthens my brand identity.
In this section, I explain how to choose and register a domain name, and how to find a reputable and reliable hosting service that meets your branding needs.
Choosing and registering a domain name
When your goal is to build brand recognition, you want to choose a domain that matches or reflects your brand name. You also want a name that’s short, easy to remember, easy to type, and difficult to mistype. Having .com at the end is a plus but not necessarily a deal-breaker if you can’t get it.
To find and register a suitable domain name, use a domain-name registrar. I use GoDaddy (https://www.godaddy.com) to register and mange my domains, but you can choose among dozens of reputable registrars, including the following:
- Squarespace (
https://www.squarespace.com/domain-name-search) - Shopify (
https://www.shopify.com/domains) - WordPress.com (
https://wordpress.com/domains) - Bluehost (
https://www.bluehost.com/domains) - HostGator (
https://www.hostgator.com/domains) - Google Domains (
https://domains.google)
When you arrive at any of these sites, you’re greeted by a search form. Type the domain name you want (including .com, .org, or whatever), and click the Search button (or its equivalent). The search results indicate whether the domain is available and provide alternatives if that domain is already taken. You may have to search several times until you find a suitable domain name.
Be flexible and creative. If the domain name you want is already taken, search for something similar. If winecircle.com is taken, consider winecircle.net or winecircle.store. Finding an available domain name may even be a good opportunity to rethink your brand name and come up with something entirely different, such as Wine Sprites at WineSprites.com.
Choosing a hosting service and plan
A web hosting service provides the Internet servers on which your website lives. Whenever someone visits your site, these servers deliver the content and coding that enable the visitor’s web browser to display the contents of your site as you designed it to be viewed.
Most hosting services are similar and offer comparable plans, but they can vary a little or a lot in terms of speed, reliability, security, features, and cost. Here’s a checklist you can use to be sure you’re getting a hosting provider and plan that meets your needs and can handle your brand’s growth:
- Reputable: Search the web and your social media accounts for ratings, customer reviews, and testimonials. If anyone has anything bad to say about a hosting service, it’s likely to pop up in a general search.
- Reliable: Whenever your site goes down, you lose opportunities and customers. Find out what the hosting service’s uptime percentage is, and remove from your list any candidate with less than 99.9 percent uptime. Uptimes may be posted in articles on the web or on the hosting provider’s website.
- Fast: Several factors determine how fast your site loads on a device, including how it’s built, the size of the files being transferred, the speed of your hosting provider’s servers, the connection speed between the server that delivers the site and the client that receives it, and the speed of the client’s device. You don’t want your hosting service to be the speed bump in that chain of delivery. Compare average speeds of all hosting services on your list. You can usually find a hosting provider’s average speed, typically measured in milliseconds (ms), through a simple web search.
-
Scalable: Hosting providers must be prepared to scale to meet not only your needs, but also the needs of their growing customer base. There’s no easy way to check scalability, but if a hosting provider isn’t scaling effectively, customers will start to complain online about its reliability and speed.
 Beware of hosting providers that limit bandwidth (the amount of data your site transfers) and restrict access to your site or slow the flow of data if your site exceeds a certain bandwidth limit. Look for hosting providers that offer unlimited bandwidth.
 - Secure: You can take steps to protect your own site, your data, and your customers from nefarious hackers and malware, but hosting providers can help. Choose a provider that stresses security and offers features such as free malware scanning, automated software updates, site backups, free Secure Sockets Layer (SSL) certificates, and distributed denial of service (DDoS) attack mitigation. You don’t need to know what these things are; just make that sure your hosting provider stresses security in its marketing.
- E-commerce-enabled: Most hosting providers feature tools for building online stores, but some are more geared to e-commerce than others. Shopify and Squarespace, for example, cater specifically to customers who sell products and services.
- Easy to use: All hosting providers have a control panel or some other interface that simplifies access to what it offers. You can usually find information or tutorials in the provider’s help system that demonstrate how to navigate and use popular tools and features. Check out these guides to get a taste of a provider before subscribing.
- Feature-rich: Before choosing a hosting provider, make sure that it offers everything you need, such as domain name registration and management, email accounts, sufficient storage, ability to migrate your site easily (if you have an existing site with a different hosting provider), and support for the CMS you want to use (such as WordPress).
- Quality technical support: When your site goes down or you’re having trouble getting a tool or feature to work as it’s supposed to, you need quick and easy access to technical support. When you’re screening different hosting providers, investigate how much they emphasize technical support, and see what their customers (or former customers) have posted about it online.
-
Affordable: Most hosting providers offer different plans at different prices, so when you’re comparing providers, look at comparable plans. Plans typically vary based on the number of websites you have; the amount of storage and bandwidth you need; and whether you want any special features, such as automated backups and site analytics.
All web hosting services offer promotions in the form of credits and free services, providing an affordable way to compare options. However, compare what you’ll be paying after the promotional period expires, and be sure you can easily transfer the site you’re developing to another service if this one doesn’t work out.
A key consideration in choosing a plan is which server type you want or need:
- Shared server: On a shared server, your site shares storage and computing resources with multiple other sites, so if any of those sites is hogging resources, it could negatively affect your site’s performance.
- Virtual private server: A virtual private server (VPS) dedicates a portion of a shared server’s resources to your website to help reduce competition for resources. The server is shared, but it acts more like a server that’s dedicated to your site.
- Dedicated server: With a dedicated server, your websites don’t share resources with other sites. This option is the best one, but it’s also the most expensive.
- Cloud server: Some hosting services run on giant public cloud servers, such as Amazon Web Services and Microsoft Azure, which have virtually unlimited storage and computing resources and can scale up and down automatically to meet changes in demand.
Walking Through the Basics of Building a Website
When you have a domain name and a hosting provider, you’re ready to start building your website, blog, online store, or combination of the three. I can’t possibly cover the process in detail for two reasons:
- It would require an entire book.
- It varies considerably according to the hosting service, the site you decide to build, and the tools you use. Building a website on Shopify is different from building a site on WordPress.com, for example.
What I can do is walk you through the basics so you have a general idea of what’s involved before you get your hands dirty.
Choosing the right site type and elements to include on your site
Websites vary considerably according to form, function, and content. An artist or architect may build a site that serves as a digital portfolio, whereas a retailer builds an online store to sell merchandise, and a consultant builds a blog to establish themself as a thought leader in their industry. These sites would look and function very differently from one another, even though they can all be used to build brand identity.
When you have a general idea of what you want your site to be and do, start thinking about its purpose and the components it needs to fulfill that purpose, such as the following:
- Web pages for presenting information
- A blog to publish posts regularly and allow visitors to comment on them
- A product catalog and shopping cart to enable visitors to shop for, order, and pay for merchandise
- A portfolio to showcase your creativity and expertise
- A contact form so visitors can get in touch with you via email
- A calendar for scheduling appointments
- Forms (registration, application, appointment request, request for additional information, and so on)
- A discussion forum to build a community where members can interact
Think about why customers and prospects will be visiting your site. If you created one product and are offering a preorder, you’ll want a minimalistic design with only a few pages. If you sell a variety of products, you’ll want a template that makes it easy to create a catalog. For a service-based business, you may be able to get by with a landing page to describe the services you offer, a testimonials page, and a contact form. Check out some websites for brands like yours to get ideas about what to include on your site.
Installing a CMS (or not)
Depending on what your hosting provider offers and how it’s set up, you may not need to install a CMS on your hosting provider’s server to start building your site. (With some hosting providers, the CMS is fully integrated, and you just choose an option to build a site.) If you need to install a CMS, the process can be complicated, but nearly all hosting providers offer installation wizards that make the process as simple as installing new software on a computer. On Bluehost, for example, you log in, click Advanced, click WordPress Manager by Softaculous, click Install, and complete an installation form (see Figure 7-1).

FIGURE 7-1: Installing WordPress on Bluehost.
The form prompts you to enter your preferences, such as the site’s URL (address), name, and description; your username, password, and email address; any plug-ins you want to install to add extra features; and the theme you want to start with (which you can easily change later, as explained in the next section, “Choosing a theme”).
At the bottom of the form is an Install button; click it to commence the installation.
After installation, you can log into your site’s dashboard (see Figure 7-2), to create pages and posts, modify the site’s appearance, install plug-ins, monitor comments posted by visitors, and more. Use the navigation bar on the left side of the screen to choose what you want to work on.

FIGURE 7-2: The WordPress dashboard.
Choosing a theme
A theme is a template that controls the layout and appearance of your site — its colors, fonts, number and sizes of columns, line spacing, margins, you name it. Some themes add features and functionality to your site as well, such as an email form, share buttons, survey forms, and drag-and-drop page builders. (To add an image, text, or other content to a page, you drag it from your computer and drop it in place.) WordPress provides access to thousands of free themes, and thousands more are available for purchase.
To change themes in WordPress, click Appearance (in the navigation bar on the left), click Themes, and choose the theme you want to use. To view more themes or install a theme, click Add New. A collection of featured themes appears, as shown in Figure 7-3. Use the navigation bar above the collection to view Popular or Latest themes, filter themes by desired features, or search for themes. (You can search for e-commerce themes, for example, or themes for consultants or musicians.)

FIGURE 7-3: A collection of featured themes in WordPress.
Integrating your logo and other brand assets
One major consideration in choosing a theme is how easy the theme makes it to brand your site — to change colors and fonts and add your logo (typically to the site’s header, which is the block at the top of every page on your site). With some themes, you may need to edit code to get everything to look right. The purpose of all themes is to keep all this complicated stuff in the background, so you don’t have to be a programmer or developer to control the look and feel of your site, but some themes do a better job than others. Also, some themes require more knowledge of coding than others.
Divi, a WordPress theme from Elegant Themes, does an excellent job of keeping the coding behind the scenes. In WordPress, when you choose to customize the appearance of the Divi theme, your site appears as shown in Figure 7-4, with a navigation bar on the left that enables you to control everything from the header and footer to the color scheme, menus, and more. As you enter your preferences, your site’s appearance changes, so you can preview the effects of changes before accepting them. When everything looks just right, click the Publish button (above the navigation bar) to save your changes.

FIGURE 7-4: You can easily customize the Divi theme.
Be sure to add your logo to the header and change the color scheme to comply with your brand’s style guidelines (see Chapter 6).
Note that at the bottom of the navigation bar in Figure 7-4 is Additional CSS. If you know Cascading Style Sheets (CSS) and want to fine-tune your site beyond what Divi’s menu-driven options offer, you can click this link to enter your own custom CSS.
Posting content
When you have your site roughed out, you can start posting content — pages, blog entries, images, audio, video, and so on. A CMS makes posting content as easy as working with a word processing or desktop publishing application. You simply enter the content and then format it by using the formatting tools in the CMS. In the following sections, I show you what to expect.
Creating web pages
The CMS and theme you choose determine what tools you have for creating, formatting, and publishing web pages, but the overall process is fairly standard. In WordPress, you mouse over Pages and click Add New. A blank page appears, prompting you to add a title for the page and start typing content (see Figure 7-5).
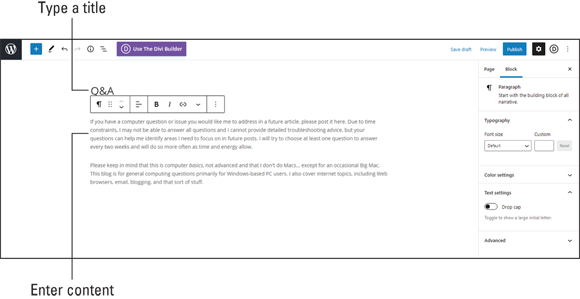
FIGURE 7-5: Creating a new web page in WordPress.
Your theme’s settings control the format of your page title, so you can’t change the title’s format when creating or editing a page. But when you start typing in the content area and select text, a toolbar appears just above the content area, providing options for formatting text, creating links, and adding media. Another toolbar appears on the right side of the screen, with additional options for controlling specific attributes of the page or the block of text you’re working on.
When you’re done creating the page, you can click the Preview button (top right) to see how it’ll look when published or the Publish button to add the page to your site.
You can edit a page at any time by returning to the WordPress dashboard, selecting Pages, and clicking the page you want to edit.
Posting blog entries
In WordPress, the process for posting blog entries is nearly identical to that for publishing pages. The main difference is how you start the process. To create a new post, go to the WordPress dashboard, mouse over Posts, and click Add New. Follow the steps in the previous section, “Creating web pages,” to add a title and to add and format text.
You may see some different options in the toolbar on the right side of the screen. On a blog’s Page tab, for example, is a Categories option that enables you to assign the post to specific categories you create. Categories help visitors find posts on specific topics of interest and help search engines properly index the content you post.
Adding images
To add an image to a page or post, position the insertion point where you want the image to appear and then click the Add Media button (in the toolbar above where you’re entering your content). The Add Media window appears, with the Media Library tab selected. Click the Upload Files tab and use the options on this tab to drag and drop image files or select them from a folder.
Click the Media Library tab (see Figure 7-6) and select the image you want to insert. Enter additional information about the image in the form on the right side of the tab, including alt text (for people who can’t view the image); an image title, caption, and description; and how you want text to wrap around the image. Then click the button for selecting or inserting the image.
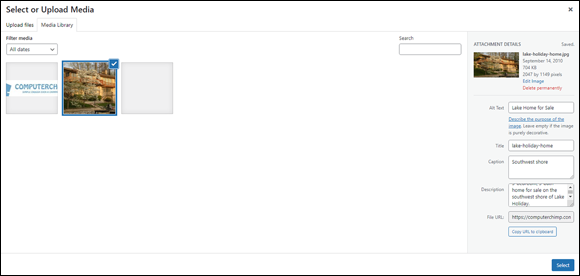
FIGURE 7-6: Add an image to a page or post.
Adding videos
To add a video to a page or post, first upload the video to YouTube, Vimeo, TikTok, or a similar site dedicated to playing video (see Chapter 12). Then access the video on that site, and look for the embed-code option. An embed code is text pasted into a web page or blog post that brings in content from another site. (If you can’t find the embed-code option, check the video sharing site’s help system.)
To add the video to a page or post on your site, copy the embed code, as shown in Figure 7-7. Then return to the page or post you’re creating and choose the option to edit the page or post in Hypertext Markup Language (HTML) mode, which displays all the complex formatting tags you usually want to keep hidden. Position the insertion point where you want your video to appear, and paste the embed code there. Then change back to Edit Visually mode to hide the HTML codes.

FIGURE 7-7: Copy an embed code for a YouTube video.
Making your site easy to navigate
As soon as you have some content posted, you can create one or more menus to enable visitors to navigate your site. Your CMS or theme contains a feature for creating and editing menus (see Figure 7-8). You can use this feature to create a menu from the names of pages you created, rename menu items, rearrange items, and even create submenus.
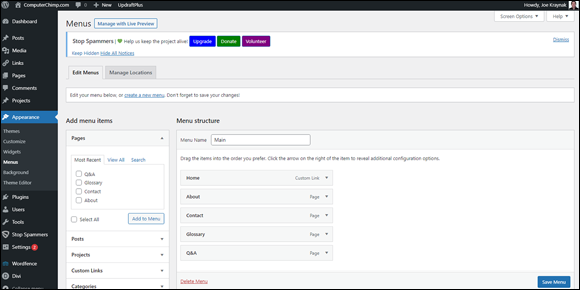
FIGURE 7-8: You can create menus from the names of existing pages.
When creating a menu, follow these guidelines to make your site easy to navigate:
- Limit your top-level menu to seven items visitors will click to access the most important content on your site — such as Home, Blog, Testimonials, Shop, Support, Contact, and Locations.
- Use clear, concise names for menu items.
- Follow the three-click rule: Visitors should be able to get to what they want on your site with the fewest clicks possible, preferably no more than three.
- In your site’s footer, include links to all the most popular pages on your site. If necessary, group the links by category, such as About, News, and Support.
Driving Traffic to Your Site
When your site is as close to perfect as you can make it, start promoting it. The situation isn’t like that Kevin Costner movie Field of Dreams, in which the voice from beyond says, “If you build it, he will come.” You can build a fantastic site, but if you don’t help people (and search engines) find it, nobody’s going to come.
In this section, I offer a few suggestions on how to start driving traffic to your site.
Making your site attractive to search engines
Prospective customers are most likely to find your site through one of the big search engines, such as Google, Bing, Yahoo!, and DuckDuckGo. Think of a search engine as being part phone book and part referral agency. If you want people to find you, the major search engines need to index your site and give it a high rank among similar sites for the content, products, and services you offer.
Every developer is in search of the secret sauce for improving their search engine rank, but the most effective techniques are the most basic:
- Embrace mobile-first web design. I can’t stress enough the importance of designing a mobile-friendly site — one that adjusts automatically to look and function properly on any device used to access it. A mobile-friendly design makes your site accessible not only to more users, but also to search engines: If your site’s not mobile-friendly, search engines may not include it in their search results for mobile users.
- Post relevant, quality content. On the web, the sites with the best content win. Search engines look at how long users spend on your site and how frequently they return to it. If few users visit your site and spend only a few minutes (or seconds) there, search engines take that fact as a sign that your site doesn’t offer anything of value. You want to get people’s attention and keep it.
- Keep it fresh. Update your site regularly by posting fresh content. One of the best ways to keep your site populated with fresh content is to add a blog to it and post something interesting and relevant to your brand at least a couple times a week. If people comment on your posts, all the better; they’re keeping your content fresh without your having to lift a finger. But you should engage with commenters by posting responses to show that you’re listening and are interested in what they have to say.
-
Use SEO, but don’t overdo it. Use relevant search terms throughout your text, especially in the titles and headings of web pages and blog posts. Use meta text to describe every page and post. Meta text is descriptive text that visitors don’t see but search engines check to help identify the nature of content. Your CMS or theme provide meta-text fields to fill out whenever you create a page or post.
Don’t overdo SEO. Unnaturally packing a page or post and its metadata with keywords to trick search engines into giving content a higher search rank than it deserves (a technique called keyword stuffing) can backfire. Search engines penalize sites suspected of using this technique. Don’t do it. (See Chapter 8 for more about SEO.) - Label content with headings. When composing web pages and blog posts, break up the text with plenty of headings that describe the content accurately. Generally, the higher the heading level (heading 1, heading 2, and so on), the greater its importance in the eyes of search engines.
- Use alt text for images, audio, and video. People with impaired vision or hearing may be unable to experience certain media, such as graphics, audio, and video, so they rely on your verbal descriptions of such content: alternative text (alt text for short). Whenever you add media to a page or post, be sure to complete the alt-text fields. Also helpful are transcripts for any audio or video content. Search engines rely heavily on text to determine the contents of nontext media.
Building incoming links
Search engines often determine a site’s status by the company it keeps — specifically, by the status of other sites that link to it. Here are a few ways to start creating incoming links:
- Post awesome content. When your site is established as a thought leader in a specific field or industry, people will start to refer to it via their own blogs and social media accounts.
- Add your site to your social media profiles and pages. Most social media sites allow members to provide the address of their website or blog. Check your profiles and any pages or other properties you own to make sure that you’ve included your site address.
- Link your blog to your website, and vice versa. If you have a separate blog and website or store, link the two.
- Add your site address to any business listings. If you have a business listing on Yelp, for example, be sure to include your site’s address.
- Link to your site any content you contribute to another site. If you write articles or posts for other online publications, request (or demand as a condition) that the content include a link to your site.
- Trade links. If you know other people with sites that contain content relevant to yours, ask whether they’d be willing to include a link on their site in exchange for your linking your site to theirs.
See Chapter 22 for more suggestions.
Promoting your site
When your site is ready for prime time, stage a grand opening by letting everyone know about it. Here are a few ways to start promoting your site:
- Link to your site in your email signature. Every email client allows you to create a signature that’s inserted automatically at the bottom of every outgoing message. Include a link to your site in your signature. (Search your email client’s help system for “signature” to find out how to create a signature.)
- Let everyone know about your site. Send an email blast to all your contacts, blog about your new site, and post about your site on all your social media accounts. When people ask what you do, be sure to include your site address in your elevator pitch — a statement about your brand that’s brief enough to deliver in full during a brief elevator ride.
- Add your site address to all your marketing materials. Your site address should be on your business card, all press releases and press packets, on every package you ship, on any company vehicles, in all your advertisements online or off, and anywhere else you can think to put it.
- Start an online ad campaign. Create a paid ad on Google or Facebook (or other online advertiser) offering a discount or other promotion to people who visit your site. Start with Google Ads at
https://ads.google.com.
Using Web Analytics to Improve Your Online Branding Activities
Web analytics involves the collection, reporting, and analysis of traffic in and around a site to gain insight into user behavior, the effectiveness of a site’s contents, the effectiveness of ad campaigns, and other metrics. Measuring and analyzing these metrics provide the insight you need to increase the number of visitors to your site and keep them engaged. Using web analytics, you can discover the following:
- The number of people who visit your site daily
- Which pages on your site draw the most traffic and engage visitors longest
- Where visitors to your site are coming from and where they go when they leave your site
- Your site’s bounce rate — the percentage of visitors who land on a page and then leave without doing anything else
- The effectiveness of your ad campaigns
Most hosting services provide one or more web analytics tools. The tools may be integrated into the platform, or you may need to access them via the provider’s control panel after logging in. Your CMS or theme or available plug-ins may also provide the means to easily add web analytics to your site and access data and reports.
One of the most popular web analytics tools is Google Analytics. In the following sections, I explain how to add it to your site and use it to gain insight into your site’s performance and other metrics you can use to improve what you’re doing online to strengthen and grow your brand.
Before you go through the trouble of adding Google Analytics to your site, check your hosting provider, CMS, theme, and available plug-ins for easier methods.
Setting up Google Analytics
With Google Analytics, you copy and paste a unique code into the header or footer of your site so that the code is added automatically to every page. Google Analytics uses this code to measure, collect, and analyze the traffic into, around, and out of your site.
The procedure for adding the code varies depending on how your hosting provider is set up or which CMS you’re using. The steps for obtaining a tracking code and adding it to a WordPress site go like this:
-
Go to
https://analytics.google.com, set up a Google Analytics account, and enter details about the site you want to track.For guidance on how to create an account and add your site, click the question-mark icon in the top-right corner of the Google Analytics screen.
- Log into your account, and choose Admin.
- Select the property (site) you want to track.
-
Select < > Tracking Info and then Tracking Code.
Google displays a tracking code to place on your site.
- Copy the tracking code (see Figure 7-9).
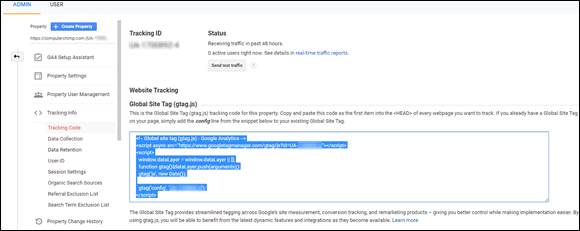
FIGURE 7-9: Copy the code in the Global Site Tag box.
- Log in to your site as an administrator.
-
Paste the global site tag you copied as the first item after the opening
<head>tag on every page and post of your site.How you do this varies depending on how your site is set up. The Divi theme, for example, has an Integration tab with a special field for adding codes to the head of your site (see Figure 7-10). You can also find Google Analytics plug-ins for WordPress and other CMSes that simplify the process.
- Save your site to save your changes.

FIGURE 7-10: Add the Google Analytics global site tag to your site's <head>.
Checking out your site’s Google Analytics
As soon as you add your Google Analytics tracking code to your site, Google starts to monitor your site and gather visitor and traffic data. You can access this data by logging into your Google Analytics account:
- Go to
https://analytics.google.com, and log in if you’re not already logged in. -
Open the menu to the right of Analytics (in the top-left corner of the page), and select the account, property (site), and view you want to see, as shown in Figure 7-11.
You can have multiple Google Analytics accounts with multiple properties (sites) in each. You can create different views for each property to filter data.
-
Use the menu bar on the left side of the screen to view reports on a variety of metrics and to access other Google Analytics features (see Figure 7-12).
Be prepared to spend some time on Google Analytics exploring its many reports, features, add-ons, and customizations. Consult the help system for details. To access the help system, click the question-mark icon near the top-right corner of the dashboard.

FIGURE 7-11: Select your analytics account, property, and view.
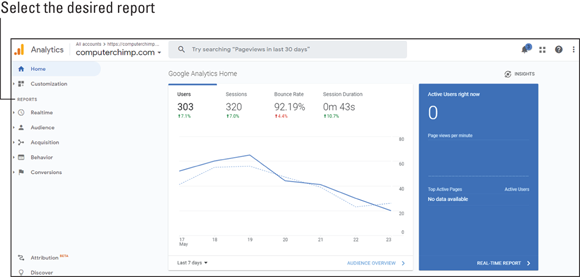
FIGURE 7-12: Google Analytics displays site metrics.
Establishing a Branded Email Account
I often encounter people who have a branded site address but continue to use their Gmail address for correspondence — a big mistake, and a common one too. After you go through all the trouble of finding and registering a domain name for your brand, you should use it in your email address as well. My Girl Gang the Label site address is GirlGangTheLabel.com, for example, and my email address is [email protected].
Every hosting provider I’m aware of allows users to set up multiple email accounts for every domain it hosts. The process for setting up new email addresses varies among hosting providers. In Bluehost, for example, you select Email in the control panel, click Create New, and use the form shown in Figure 7-13 to specify an email address and password.

FIGURE 7-13: Create a branded email account.
Check your hosting provider’s help system for instructions on creating email accounts and on sending and receiving email messages from those accounts.
Launching a Branded App
Launching an app can be a great way to stand out from competitors, deliver a unique experience to your customers, and significantly increase engagement with your brand. In addition, an app provides an easy way for you to contact your customers (via notifications) and collect more detailed behavioral analytics.
My company, Girl Gang, created a directory of female-owned businesses. Now I’m developing an app that makes it easy for users to find female-owned businesses near them — businesses in our directory. To experience the full effect, users must opt in to share their locations, which enables us to collect location data about them. We’ll be monetizing the app by partnering with businesses to offer discounts and other incentives, which can be sent via real-time notifications.
Several online tools are available for developing and distributing custom apps, including the following:
- Appery.io (
https://appery.io) is a cloud app development builder for creating cross-platform apps that run on iOS, Android, and other devices. It’s billed as a low-code app development platform with visual drag-and-drop creation and editing. - Mobile Roadie (
https://mobileroadie.com) is a custom app development service. You present your idea, and the development team works closely with you to develop your app for use on iOS and Android devices. - GoodBarber (
https://www.goodbarber.com) is a low-code, drag-and-drop development tool for creating e-commerce apps. You can make your app available in Apple’s App Store and Google Play or create a progressive web app (PWA) that’s designed to work on any device — smartphone, tablet, or desktop. You subscribe to the surface (starting at $25 per month), which provides you access to the builder and support. - Appy Pie (
https://www.appypie.com) bills itself as the number-one no-code development platform. It prides itself on simplicity, providing a development platform that enables you to drag and drop your way to mobile apps, websites, automated tasks, chatbots, and live chat applications. You can even transform an existing website into an app.
If you prefer to outsource your app development, you can find plenty of skilled, affordable development professionals who are eager to take on the project. Some app development platforms can refer you to developers, or you can search for freelancers on websites such as DevTeam.Space (https://www.devteam.space) and Toptal (https://www.toptal.com).