
In the previous chapter, we discussed the basic properties of the session task.
The Session task is used to execute a mapping. It is the most widely used task among all the tasks of Workflow Manager. As you must have seen earlier, there are lots of properties that we can define in the session task. In the previous chapter, we discussed some of these properties, for example, the Mapping tab of the Session task. We learned how to provide the source, target, and lookup transformation details required to move the data. We will discuss the remaining properties in this chapter.
Double-click on the session task to see the various tabs, as shown in the following screenshot:

The various tabs of the session task are as follows:
- General: As discussed in the preceding section, you can define the session name, rename the session name, and mention the description and other tasks related properties, as shown in the preceding section. We have discussed the General tab properties in the preceding section.
- Properties: You can define the session log's filename, commit interval, test load setting, recovery settings, and other performance-related properties. The following screenshot shows you the General Options properties that can be defined under the Properties tab:

The description of the property shown in the preceding screenshot is as follows:
|
Property |
Description |
|---|---|
|
Write Backward Compatible Session Log File |
You can select this option if you wish to write the generated session logs to a file. If you select this option, Informatica PowerCenter creates a log file, else it generates a normal session log file. |
|
Session Log File Name |
With this, you can define the session log filename. The default session log filename is |
|
Session Log File Directory |
With this, you can define the session log file directory. You can also define the parameters in this option. When you define the parameter, pass the value from the parameter file. |
|
Parameter Filename |
If you use the parameters and variables in your code, you need to pass the values from the parameter file. You can define the parameters' filename and path here. |
|
Enable Test Load |
You can select this option to allow only a few records to pass through the mapping. This option is useful when you are in the testing phase of your project. |
|
Number of rows to test |
When you select the Enable Test Load option, you can define the number of records you wish to flow from Mapping. Suppose you have 10,000 records to process. You can check the Enable Test Load option and mention the number of records you wish to test. So, if you define 100 records, Informatica will only process 100 records out of the 10,000 records. |
|
$Source connection value |
You can define the Database Connection value here. Consider that your database connection's name is |
|
$Target connection value |
You can define the Database Connection value here. Consider that your database connection's name is |
|
Treat source rows as |
This property allows you to treat records as The DATA DRIVEN property is selected when you use the update strategy transformation in Mapping. We will talk about the update strategy transformation in Chapter 7, The Lifeline of Informatica – Transformations. |
|
Commit Type |
You can select either a source-based or a target-based commit type. The default property is the target-based commit type. If you select a source-based commit type, Informatica commits the data into the target-based commit type for commit interval and flush latency intervals. Flush latency is the time interval for which you wish to commit the data. If you define the flush latency as 5 seconds and the commit interval as 10,000, Informatica will commit the data to the target-based commit type for whichever interval it reached first. Flush latency is a property defined by the Informatica PowerCenter administrator. So, you need not be worried about how to set up this property. In most cases, data is committed based on the commit interval, so we don't use the flush latency property frequently. If you select the target-based commit type, Informatica commits the data based on the commit interval. |
|
Commit On End Of File |
This option is selected by default. This property indicates that the records will be committed to the target. If the file contains a smaller number of records, then the commit interval is defined. |
|
Rollback Transactions on Errors |
When you select this option, Informatica will roll back the records at the next commit interval. This only happens if there is a nonfatal error. |
|
Recovery Strategy |
Using this property, you can recover the session task if the session happens to fail. Various options are available in this property, which you can select based on your requirement:
|
|
Java Classpath |
Use this option if you wish to use different types of Java packages in a Java transformation. |
The following screenshot shows you the Performance properties that can be defined under the Properties tab:

The description of the properties shown in the preceding screenshot is as follows:
In the Config Object tab, you can select the Advanced setting, Log Options, the Error handling properties, and Partitioning Options.
The advanced settings under the Config Object tab are shown in the following screenshot:

The description of the properties shown in the preceding screenshot is as follows:
The Log Options setting under the Config Object tab is shown in the following screenshot:

The description of the property shown in the preceding screenshot is as follows:
The Error handling properties under the Config Object tab is shown in the following screenshot:

The description of the property shown in the preceding screenshot is as follows:
The Partitioning Options property under the Config Object tab is shown in the following screenshot:
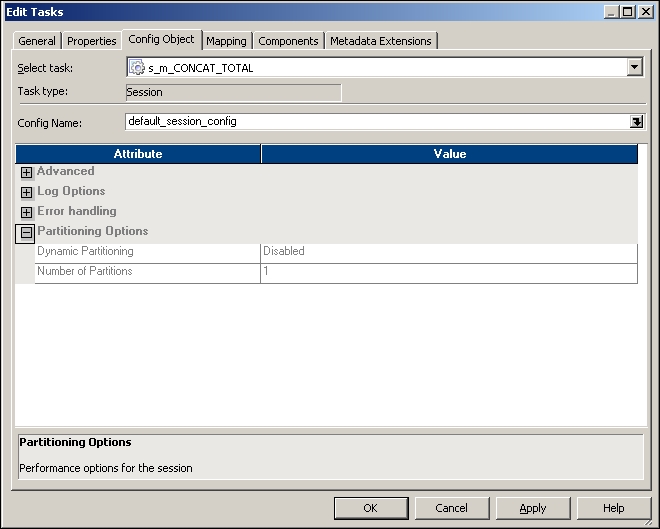
The description of the property shown in the preceding screenshot is as follows:
Edit Tasks also has the following tabs:
- Mapping: With this you can define the session, target, and lookup transformation path or connection. We discussed this tab in the previous chapter.
- Components: With this, you can define pre- or post- Command and Email tasks. This acts as a replacement for the Command and Email tasks.
The Components tab is shown in the following screenshot:

The description of the property shown in the preceding screenshot is as follows:
The Metadata Extensions tab helps define metadata-extension-related properties. Usually, we do not use this tab. It is used to define general information related to the workflow or to define the project-level information that can be used in future for reference purposes.
To create a session task in Workflow Manager or Task Developer, perform the following steps:
- In Workflow Manager or Task Developer, navigate to Tasks | Create.
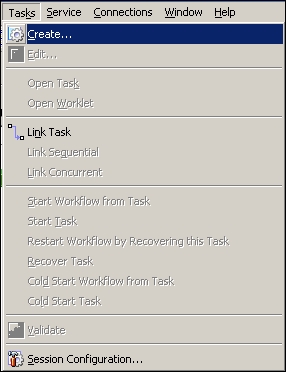
- From the list of tasks, select the Session task and specify the name of the session task as
s_TASK_NAME. For our reference, we are using the session task name ass_CONCAT_TOTALors_m_CONCAT_TOTAL, wherem_CONCAT_TOTALis the mapping name for which we are creating the session. Click on Create.
- In the next window, select the mapping you wish to associate in the session. When you run the session, it makes the data flow from the source to the target in the mapping you selected. Note that once you associate a mapping to a session, you cannot change the mapping. Click on OK, and then click on Done.

The session task appears in Workflow Manager or Task Developer. Use the Link task to connect the start task to the session task:
