
Within the Slide Master view, you can work with font formats and bullet list styles, insert text or text boxes, add graphics, or rearrange elements of any slide layout. You make these changes much as you do in the Normal view of PowerPoint. However, any changes you make in the Master view will be reflected on every slide to which the changed layout is applied. If you want to apply changes to all slides except the Slide Title layout, make those changes to the Master Layout at the top of the layout thumbnails.
 Click the View tab and choose Slide Master from the Presentation Views group.
 Click and drag the vertical scrollbar on the left pane to view more layouts in the master.
 Click and drag the divider between panes if you want to see more or less of either pane.
 To exit Slide Master, click the Normal or Slide Sorter view button.

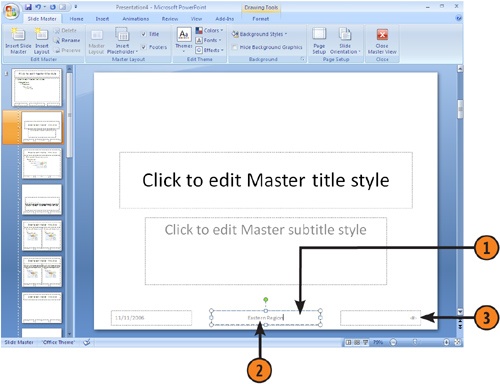
- With Slide Master displayed, click a footer placeholder to select it. Note one placeholder contains the current date by default.
- Enter whatever text you want in the placeholder; if you wish to move the footer placeholder, drag it wherever you wish on the slide and drop it.
- A slide number element is included. If you don’t want to use it, select it and press Delete on your keyboard to get rid of it, or drag the element to another location on the slide and drop it.
Tip
If you delete placeholders in a layout and want to put it back the way it was, in Slide Master click the layout to select it, click the Slide Master tab, and then click the Footers checkbox, and all original footer placeholders are reinstated.
Tip
The date footer is set to update automatically to reflect the date when you run the presentation. If you don’t want the current date, delete the current date and type in a specific fixed date for each slide layout where you want it to appear. If you prefer this footer to reflect the date and time, or simply the time, use the Date and Time button on the Insert menu to do so.
- With the Slide Master displayed, select the layout you want to place the graphic on (for example the title slide or a content slide), and click the Insert tab. If you want to insert the graphic on every layout except the Slide Title layout, click the top-level Slide Master.
- Use the controls in the Illustrations group to insert a master graphic in your presentation:
Click to insert a picture.
Click to insert clip art.
Click to insert a chart.
- When you have inserted a graphic on the Slide Master, you can resize it or drag it to wherever you want it to be positioned and drop it.

See Also
See Chapter 8, for more about inserting pictures, clip art, and charts in your presentation; see "Resizing Objects" for more about changing the size of objects.
Caution
When you place a master graphic, you typically put it in a corner of a slide so it doesn’t overlap placeholder text or elements such as large tables. Still, if you use a graphic on every slide, the odds are it will overlap some object on a few slides in the presentation. Be sure to check for this and use the procedure in the task Omit Master Graphics on Individual Slides to move or remove the graphic on those individual slides.
- With Slide Master view displayed, click the Slide Master tab and choose Insert Layout.
- On the new Custom Layout slide that appears, make any changes you like to the layout, such as:
Click to insert a new placeholder for any type of content.
Click an existing placeholder and press Delete.
Drag a placeholder to a new position on the slide.

