
2. Safely Surf the Internet

The focus of this chapter is on using your favorite web browser to achieve the most secure, efficient, and enjoyable web surfing experience possible. Topics include:
![]() Choosing a web browser for your computer and customizing its privacy settings
Choosing a web browser for your computer and customizing its privacy settings
![]() Understanding how “cookies” work
Understanding how “cookies” work
![]() Managing your web browser’s History folder
Managing your web browser’s History folder
![]() Taking advantage of your web browser’s other features and functions without compromising security
Taking advantage of your web browser’s other features and functions without compromising security
![]() Using web browser plug-ins/extensions
Using web browser plug-ins/extensions
![]() Increasing security using a virtual private network or two-factor authentication
Increasing security using a virtual private network or two-factor authentication
Most of what you use the Internet for, including web surfing, is handled by your computer’s web browser. As mentioned in Chapter 1, certain browsers come bundled with certain devices. Windows 10 PCs come bundled with the Microsoft Edge web browser. Apple Macs, iPhones, and iPads include the Safari web browser, and Android-based mobile devices typically include a mobile version of the Google Chrome or Samsung Internet web browser.
However, you can download other web browsers and use them for free on your computer and mobile device. The web browser you ultimately use is a matter of personal preference.
Using Your Favorite Web Browser
Each web browser has a variety of customizable settings and options that allow you to control what information it automatically collects, stores, and/or shares with third parties, including website operators and the online services you visit. You also can, and should, control what information online advertisers are able to learn about you, based on your web surfing and social media activities.
After adjusting these web browser-related settings and options to a security level you’re personally comfortable with, you can download and install optional web browser plug-ins/extensions that can provide your web browser with additional (often free) functionality.
Most computer users and mobile device users are accustomed to simply typing a specific website address (also known as a URL) into the search/address field of their web browser to visit a specific website.

The website address www.aarp.org was typed into the search/address field of Safari to access AARP’s website directly.
Alternatively, people use an Internet search engine (such as Google or Yahoo!) via their web browser, type in a search word or phrase, and then seek out websites that are relevant to exactly what they’re currently looking for.

The search phrase “yorkshire terrier” was typed into the Search field of Google Chrome, and the relevant search results are listed.
Search Engines Are in Cahoots with Online Advertisers
Most Internet search engines are free to use and make their money by selling ads and information about their users’ activities. This is one of the main reasons why immediately after you perform almost any type of search using a search engine, ads related to that subject will follow you around online, and for the next few weeks be displayed on many websites and online services you visit.
You may pay little or no attention to what information pertaining to your online activities is being collected, monitored, stored, shared, and used by third parties.
For example, what you do when surfing the Internet often impacts what advertising you see online. The operators of websites you visit and online services you use can easily track your activities and learn more about you, and then customize your experience based on your actions and preferences when you visit their website.
By default, most web browsers also maintain a detailed history file that contains information about every webpage you visit (along with when you visited it). Plus, you’re able to compile and store a personalized list of bookmarks so you can quickly return to your favorite webpages anytime and potentially have the web browser automatically remember your username and password for most websites you visit.
Your Web Browser Purposely Won’t Store Certain Passwords
If you have turned on the web browser feature that automatically stores all your website- and online-related usernames and passwords, you’ll notice that for banking websites, your web browser will remember your username but not necessarily your password. This is done intentionally for security reasons. Thus, depending on the web browser you’re using, you may need to remember those passwords on your own or use a separate password manager application to help you keep track of them.
Unless you adjust the default settings related to your favorite web browser, it’s typically set up to collect, monitor, store, and potentially share a wide range of information about you, your online activities, and your location. If you’re active on social media and have created a detailed profile, the information in that profile will also be shared with third parties and online advertisers—unless you manually lock down your account to prevent this.
Choosing a Web Browser for Your Computer or Mobile Device
In addition to the functionality each offers, the web browser you choose to surf the web can impact your surfing speed, how much of your computer’s internal resources the web browser uses to function, and the privacy level of your online activities. Virtually all web browsers offer useful features, including:
A wide range of customization options
The ability to sync stored content (such as bookmarks) between all your computers and mobile devices
A built-in password manager
A private browsing feature
Optional plug-ins (extensions)
As mentioned, your computer or mobile device’s operating system comes bundled with a web browser. However, you do have other options. Some computer and mobile device users prefer one web browser over another, based on its layout, user interface, or the assortment of features and functions that set it apart from others.

Shown here is the Microsoft Edge web browser running on a Windows 10 PC with the Google search engine home page displayed.

The same Windows 10 PC is shown here with the Google Chrome web browser displaying the home page for the Google search engine.
Acquiring a Web Browser
On the surface, most web browsers provide the same basic web surfing experience, but the appearance of on-screen icons and the layout of the user interface varies. The collection of features and functions, particularly those used to customize your web surfing experience, also vary, which is why you should consider trying out two or three web browsers and then choose which you like the best.
Table 2.1 The Most Popular Web Browsers and How to Acquire Them
Web Browser Name |
Where to Download It From |
Also Available for Mobile Devices |
|---|---|---|
Apple Safari |
Comes preinstalled on all Macs |
Yes, but only for the iPhone, iPad, and Macs |
Google Chrome |
Yes |
|
Microsoft Edge (Explorer) |
Comes preinstalled with Windows 10 PCs |
Yes, but only for PCs |
Mozilla Firefox |
Yes |
|
Opera |
Yes |
|
Samsung Internet |
Although Google Chrome tends to be the most popular among Android-based smartphone and tablet users, another option is the Samsung Internet browser. It comes bundled with all Samsung mobile devices but is available optionally for other Android smartphones and tablets. https://www.samsung.com/global/galaxy/apps/samsung-internet/ |
Yes, but only for Android-based smartphones and tablets |
What About Mobile Devices?
Many of the popular web browsers can also be used on mobile devices, with an Android version available from the Google Play Store and an iPhone/iPad version available from the Apple App Store.
The web browsers for mobile devices are designed specifically to use the smaller-sized touchscreen built into smartphones and tablets, yet still be fully compatible with their computer counterparts. Content (such as bookmarks) can then easily be synced and shared among all your computers and mobile devices.
Consider a Specialty Web Browser Built for Privacy
The popular web browsers offer optional plug-ins that allow you to manually add and manage privacy and security features. It just takes additional steps on your part to set up this added functionality. (See the section “Expanding Your Web Browser’s Functionality Using Optional Plug-Ins” later in this chapter for more information.)
Knowing that many web surfers are fed up with having their online activities recorded, analyzed, and tracked, several independent companies have released web browsers with built-in anti-tracking, ad blocking, anti-phishing, and encryption.
These specialty web browsers do not store any information about the user or their online activities, nor do they allow websites to use cookie-related information that may have already been collected while you surfed the Internet using another web browser.
Specialty web browsers designed for privacy are available for Windows PCs and Macs, as well as the iPhone/iPad and Android-based mobile devices.
Cliqz is one such web browser. You can download the Windows/Mac version by visiting https://cliqz.com/en/desktop, and the mobile version is available from the Apple App Store and Google Play Store.
The Opera web browser (www.opera.com) includes a built-in ad blocker, a “do not track” feature, and virtual private network (VPN) functionality. Another, lesser known web browser that was built specifically for privacy and security is called Epic (www.epicbrowser.com). It, too, offers a built-in ad blocker, prevents tracking, and does not store any cookies, for example.
Looking at Cookies
One key way websites and online services collect and use information about you, the web surfer, is by using cookies. A cookie is a tiny file that’s transferred to your computer from a website you visit. The file contains specific information about you, your activities, and your preferences, for example, so the website operator or online service can customize the experience you have when visiting.
Quickly See If Cookies Are Being Accepted
To quickly determine whether the web browser you’re using is set up to allow cookies, visit www.whatarecookies.com/cookietest.asp.
Information collected by cookies can be analyzed and used for a wide range of purposes, including determining what advertising will most likely appeal to you based on your online activities and search requests.
Your web browser allows you to turn on or off the ability for it to collect or accept cookies from websites. As you’ll discover, this can become a somewhat convoluted process, because some cookies enhance, personalize, and streamline your web surfing experience, whereas others are used to collect and track your actions and information about you. Determining “good” cookies from “bad” cookies is often extremely difficult, so you wind up having to take an accept all or accept none approach.

Cookie Checker allows you to see what cookies a website or online service has stored on your computer or mobile device and what each is being used for. In the Search field, type in any website address.

Cookie Checker will scan the desired website and quickly provide information about all cookies that are associated with that site.
Unlike viruses or malware, cookies are very rarely harmful to your computer, mobile device, data, documents, or files. They simply impact what information is collected and used whenever you visit a specific website or online service that uses cookies.
Today’s Internet (and the websites and online services that populate it) rely heavily on cookies. Blocking them altogether is not necessarily a good idea. Instead, you might want to manage what cookies your web browser accepts and have the option to reject or manually block cookies that’ll be used for information-gathering purposes you don’t agree with.
Each web browser has a different process for turning on/off or adjusting its cookie-related features. Turning off or blocking cookies is just one way to prevent websites and online services you visit, as well as online advertisers, from tracking your online activities.
Manage Microsoft Edge’s Cookie-Related Features
To adjust the cookie-related features associated with the Microsoft Edge web browser (used by Windows 10 PCs), follow these steps:
![]() Click the Windows icon and click Microsoft Edge to launch the Microsoft Edge web browser. Click the Settings and More menu icon (the three dots) in the upper-right corner of the browser window.
Click the Windows icon and click Microsoft Edge to launch the Microsoft Edge web browser. Click the Settings and More menu icon (the three dots) in the upper-right corner of the browser window.
![]() Scroll down, if necessary, and click the Settings option.
Scroll down, if necessary, and click the Settings option.

![]() Scroll down and click the View Advanced Settings button.
Scroll down and click the View Advanced Settings button.

![]() Scroll down, and below the Cookies heading, use the dropdown menu to select from among three options: Block All Cookies, Block Only Third-Party Cookies, or Don’t Block Cookies. Consider activating the Block Only Third-Party option, because this will often (but not always) prevent online advertisers from tracking your activities and behaviors.
Scroll down, and below the Cookies heading, use the dropdown menu to select from among three options: Block All Cookies, Block Only Third-Party Cookies, or Don’t Block Cookies. Consider activating the Block Only Third-Party option, because this will often (but not always) prevent online advertisers from tracking your activities and behaviors.
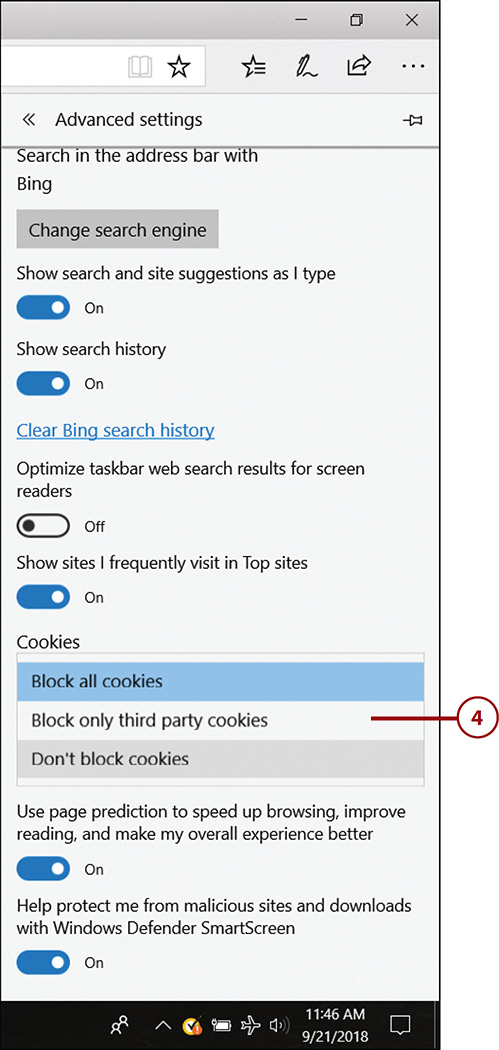
![]() While accessing the Advanced Settings menu, you can enhance your online privacy by clicking the Send Do Not Track Requests option to turn it on.
While accessing the Advanced Settings menu, you can enhance your online privacy by clicking the Send Do Not Track Requests option to turn it on.

Side Effects of Blocking Cookies
Deleting or blocking all cookies related to certain websites or online services may prevent behavior and ad-related tracking, but it might also alter the appearance or functionality of the website or service that has been customized for you. If you stay signed in to the website, you may be logged out automatically, and your username and password may be forgotten by the web browser. In other words, expect subtle changes to your web surfing or online experience after you delete or block cookies.
Manage Safari’s Cookie-Related Feature(s)
To adjust the cookie-related features associated with the Apple Safari web browser, follow these steps:
![]() Open the Safari web browser. (Not shown.)
Open the Safari web browser. (Not shown.)
![]() Click the Safari dropdown menu located in the upper-left corner of the screen.
Click the Safari dropdown menu located in the upper-left corner of the screen.
![]() Click the Preferences option.
Click the Preferences option.

![]() Click the Privacy option.
Click the Privacy option.
![]() Click the Prevent Cross-Site Tracking checkbox.
Click the Prevent Cross-Site Tracking checkbox.
![]() Click the Ask Websites Not to Track Me checkbox.
Click the Ask Websites Not to Track Me checkbox.
![]() Click the Block All Cookies option if you want to prevent any cookies from being accepted by your web browser while you’re surfing. Alternatively, click the Manage Website Data button to view a list of all cookies currently stored on your computer.
Click the Block All Cookies option if you want to prevent any cookies from being accepted by your web browser while you’re surfing. Alternatively, click the Manage Website Data button to view a list of all cookies currently stored on your computer.

![]() As you’re scrolling down the list of cookies, click to select and highlight any one from the list, and then click the Remove button to delete it. To delete all cookies currently stored by Safari, click the Remove All button.
As you’re scrolling down the list of cookies, click to select and highlight any one from the list, and then click the Remove button to delete it. To delete all cookies currently stored by Safari, click the Remove All button.

Manage Chrome’s Cookie-Related Features
To adjust the cookie-related features associated with the Google Chrome web browser (which is available to PC and Mac users), follow these steps:
![]() Open the Google Chrome web browser. On a PC, click the Windows icon and then click Google Chrome. On a Mac, click the Chrome icon that’s displayed on the Dock, or access the Applications menu and click the Chrome icon. (Not shown.)
Open the Google Chrome web browser. On a PC, click the Windows icon and then click Google Chrome. On a Mac, click the Chrome icon that’s displayed on the Dock, or access the Applications menu and click the Chrome icon. (Not shown.)
![]() Click the Customize and Control Google Chrome icon (three vertical dots) located in the upper-right corner of the web browser window.
Click the Customize and Control Google Chrome icon (three vertical dots) located in the upper-right corner of the web browser window.
![]() Click the Settings option.
Click the Settings option.

![]() Scroll to the bottom of the Settings menu and click the Advanced option.
Scroll to the bottom of the Settings menu and click the Advanced option.

![]() From the Privacy and Security menu, make sure the Safe Browsing feature is turned on (the “slider” will be blue).
From the Privacy and Security menu, make sure the Safe Browsing feature is turned on (the “slider” will be blue).
![]() Click to turn on the feature associated with the Send a “Do Not Track” Request with Your Browsing Traffic option.
Click to turn on the feature associated with the Send a “Do Not Track” Request with Your Browsing Traffic option.
![]() Click the Content Settings option.
Click the Content Settings option.

![]() Click the Cookies option.
Click the Cookies option.
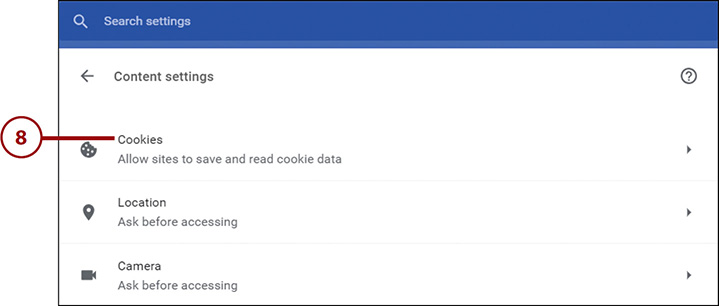
![]() Based on your personal preferences, turn on or off the Allow Sites to Save and Read Cookie Data option. Also decide whether you want to turn on or off the Block Third-Party Cookies option. Blocking third-party cookies will help keep online advertisers under control.
Based on your personal preferences, turn on or off the Allow Sites to Save and Read Cookie Data option. Also decide whether you want to turn on or off the Block Third-Party Cookies option. Blocking third-party cookies will help keep online advertisers under control.

![]() Click the See All Cookies and Site Data option. As you’re viewing the list of cookies already stored on your computer, click the Remove All option to delete them all, or click the Trash icon associated with a specific listing to delete specific cookies one at a time.
Click the See All Cookies and Site Data option. As you’re viewing the list of cookies already stored on your computer, click the Remove All option to delete them all, or click the Trash icon associated with a specific listing to delete specific cookies one at a time.

Some Cookies Are Clearly Related to Ads
As you’re reviewing a list of cookies already stored on your computer, some will obviously be related to advertising (such as adaptv.advertising.com), while others will relate directly to websites or online services you use often and may want to keep.
Some cookie names are deliberately confusing. To determine what those are associated with or used for, use a search engine and type in the filename to search for what it does. However, you can typically delete these with no negative repercussions.
In the rare instance when a cookie contains malware or a virus, your antivirus/ malware prevention software typically would detect it before damage could be done.
What Is an Ad Blocker?
An ad blocker is a plug-in you can download and install so it becomes part of your favorite web browser. When active, it will scan the websites you visit and automatically remove all advertising from those sites.
AdBlock Plus is just one example of an ad blocker that can be added to most popular web browsers: Chrome, Firefox, Opera, and Safari. AdBlocker Ultimate works with Chrome, Firefox, Opera, and Safari.
Ghostery (www.ghostery.com) helps manage trackers and cookies, plus blocks ads. A Ghostery web browser extension is available for all the popular web browsers.
You can find these and other ad blocker plug-ins in the plug-in directory that’s associated with your web browser. Each browser has an online-based plug-in directory that allows you to browse available plug-ins, and then download and install the ones you want. See “Expanding Your Web Browser’s Functionality Using Optional Plug-Ins” later in this chapter for information on how to access the plug-in directory for your favorite web browser.
Turning on Your Web Browser’s Privacy or Incognito Mode
In addition to the customizable options available from the Settings or Preferences menu on your favorite web browser, most allow you to use a private browsing feature (which Google calls Incognito mode). To do this with most web browsers, however, you must turn on the feature each time you launch your web browser or open a new browser window.
When you turn on this feature, the web browser automatically deletes your surfing history as soon as you close it, and retains no information about your online activities during that web surfing session. No cookies or related information is typically stored.
With this privacy feature, the next time you return to a website, it will not remember anything about you, including your username, password, or any preferences. Each time you revisit a website or online service using a web browser’s privacy mode, it’ll be like the first time you’re visiting that site. Some people find this frustrating.
Keep in mind that this mode does not necessarily prevent the website you visit, your Internet service provider, or the organization that owns the computer you’re using if you’re at a business or school, for example, to track and retain certain information related to your web surfing activities.
Any time you want to open a web browser window and surf the web using the web browser’s privacy or Incognito mode, follow these steps.
Turn On Privacy (InPrivate) Mode Using Microsoft Edge
![]() Launch the Microsoft Edge web browser by clicking the Windows icon and then Microsoft Edge (not shown).
Launch the Microsoft Edge web browser by clicking the Windows icon and then Microsoft Edge (not shown).
![]() Click the Settings and More icon (three dots) located in the upper-right corner of the browser window.
Click the Settings and More icon (three dots) located in the upper-right corner of the browser window.
![]() Click the New InPrivate Window option.
Click the New InPrivate Window option.

![]() When the new browser window opens, use the web browser like you normally would to access an Internet search engine to perform a search or to visit any website. Notice that an InPrivate icon now appears in the upper-left corner of the browser window.
When the new browser window opens, use the web browser like you normally would to access an Internet search engine to perform a search or to visit any website. Notice that an InPrivate icon now appears in the upper-left corner of the browser window.

![]() If you close your web browser and then re-launch it, you must repeat these steps, or Edge will revert to using regular browser windows with the InPrivate option turned off. (Not shown.)
If you close your web browser and then re-launch it, you must repeat these steps, or Edge will revert to using regular browser windows with the InPrivate option turned off. (Not shown.)
Turn On Private Mode Using Safari
![]() Launch the Safari web browser. Click on the Safari app icon located on the Dock, or access the Applications folder and click on the Safari icon or application listing.
Launch the Safari web browser. Click on the Safari app icon located on the Dock, or access the Applications folder and click on the Safari icon or application listing.
![]() Click the File dropdown menu located near the upper-left corner of the screen.
Click the File dropdown menu located near the upper-left corner of the screen.
![]() Click the New Private Window option. A new web browser window appears and the private surfing mode will be active.
Click the New Private Window option. A new web browser window appears and the private surfing mode will be active.

![]() Surf the web as you normally would. Keep in mind that all other previously open web browser windows will automatically be closed. You’ll know you’re in Private mode, because the Search/Website Address field in the upper center of the screen appears in gray.
Surf the web as you normally would. Keep in mind that all other previously open web browser windows will automatically be closed. You’ll know you’re in Private mode, because the Search/Website Address field in the upper center of the screen appears in gray.

Go Incognito Mode Using Chrome
![]() Launch the Chrome web browser. On a PC, click the Windows icon and then Google Chrome. On a Mac, click on the Chrome app icon located on the Dock, or access the Applications folder and click on the Chrome icon or application listing.
Launch the Chrome web browser. On a PC, click the Windows icon and then Google Chrome. On a Mac, click on the Chrome app icon located on the Dock, or access the Applications folder and click on the Chrome icon or application listing.
![]() Click the Customize and Control Google Chrome icon (three vertical dots) located in the upper-right corner of the screen.
Click the Customize and Control Google Chrome icon (three vertical dots) located in the upper-right corner of the screen.
![]() Click the New Incognito Window option.
Click the New Incognito Window option.

![]() The background of the web browser window becomes dark, and a message appears indicating that Incognito mode is turned on.
The background of the web browser window becomes dark, and a message appears indicating that Incognito mode is turned on.

![]() As you surf the web, notice that the top portion of the web browser is now dark (to show you’re in Incognito mode), and the Incognito logo appears near the upper-right corner of the screen (to the right of the Search/Website Address field). The web browser will not automatically store your browsing history, collect or save cookie or site data, or retain information you type into online forms.
As you surf the web, notice that the top portion of the web browser is now dark (to show you’re in Incognito mode), and the Incognito logo appears near the upper-right corner of the screen (to the right of the Search/Website Address field). The web browser will not automatically store your browsing history, collect or save cookie or site data, or retain information you type into online forms.

Turn on Privacy Mode on Your iPhone’s Safari Web Browser
To turn on the Private mode in Safari on an iPhone, follow these steps:
![]() Tap the Safari icon to launch Safari, and then tap the Browser Window icon displayed in the lower-right corner of the screen.
Tap the Safari icon to launch Safari, and then tap the Browser Window icon displayed in the lower-right corner of the screen.
![]() Tap the Private option located in the lower-left corner of the screen. Private browsing mode will immediately be turned on. Safari will not save details about the webpages you visit, save your search history, or allow you to use the web browser’s AutoFill option to complete online forms.
Tap the Private option located in the lower-left corner of the screen. Private browsing mode will immediately be turned on. Safari will not save details about the webpages you visit, save your search history, or allow you to use the web browser’s AutoFill option to complete online forms.
![]() Tap the “+” icon to open a new browser window.
Tap the “+” icon to open a new browser window.
![]() Start surfing the web as you normally would, while continuing to be in Private mode. Notice that the Search/Address field at the top of the web browser window is darker to indicate you’re in Private mode.
Start surfing the web as you normally would, while continuing to be in Private mode. Notice that the Search/Address field at the top of the web browser window is darker to indicate you’re in Private mode.

Turn on Privacy Mode on Your iPad’s Safari Web Browser
To turn on the Private mode in Safari on an iPad, follow these steps:
![]() Tap the Safari icon to launch Safari. (Not shown.)
Tap the Safari icon to launch Safari. (Not shown.)
![]() Tap the Browser Window icon displayed near the upper-right corner of the screen to open a new web browser window.
Tap the Browser Window icon displayed near the upper-right corner of the screen to open a new web browser window.

![]() Tap the Private option located near the upper-right corner of the screen. After Private mode is activated, tap the “+” icon to open a new web browser window.
Tap the Private option located near the upper-right corner of the screen. After Private mode is activated, tap the “+” icon to open a new web browser window.

![]() Surf the Internet as you normally would. Notice that the Search/Website Address field is now darker, indicating the web browser is in Private mode.
Surf the Internet as you normally would. Notice that the Search/Website Address field is now darker, indicating the web browser is in Private mode.

Turn on Privacy Mode on Your Android’s Chrome Web Browser
To turn on the Private mode in Chrome on an Android-based mobile device, follow these steps:
![]() Tap the Chrome icon to launch the Chrome web browser.
Tap the Chrome icon to launch the Chrome web browser.
![]() Tap the menu icon (three vertical dots) located in the upper-right corner of the screen.
Tap the menu icon (three vertical dots) located in the upper-right corner of the screen.

![]() From the menu, tap the New Incognito Tab option.
From the menu, tap the New Incognito Tab option.

![]() You see the You’ve Gone Incognito information screen. Continue browsing.
You see the You’ve Gone Incognito information screen. Continue browsing.

![]() For this search, type in a phrase or website address in the Search/Website Address field located in the upper center of the screen. Notice that the Search/Website Address field is now darker, indicating the web browser is in Private mode.
For this search, type in a phrase or website address in the Search/Website Address field located in the upper center of the screen. Notice that the Search/Website Address field is now darker, indicating the web browser is in Private mode.

Relaunch Privacy Mode Each Time You Use Your Web Browser
For most web browsers, you need to relaunch their privacy mode each time you launch them. This is not something that remains active after you close the web browser and then reopen it.
Managing Your Web Browser’s History Folder
One of the features that’s built into almost all web browsers, including Chrome, Edge, Firefox, and Safari, is the History folder. As you jump around from website to website, the web browser automatically keeps track of every webpage you visit, as well as the date and time you visit it. This is in addition to any information the web browser automatically collects, such as your location.
You can access the History folder, click a listing, and instantly reopen that webpage. The feature was designed to make it easier to retrace your online steps and quickly find a website you previously visited, but didn’t create a bookmark for.
Unfortunately, you’re not the only one who can access your web browser’s History folder. Anyone who has access to your computer or mobile device and can log in to it as you can open your web browser’s History folder, discover exactly what you’ve been doing online, and see which websites or online services you’ve been active on. (This is a popular way to determine if your children or grandchildren are surfing for inappropriate websites.)
Third parties and online advertisers can also sometimes access information stored in your web browser’s History folder to track your activities and better target you with specialized advertising.
By surfing the web while in private mode, you can prevent the web browser from collecting information to store in the History folder. At any time, however, you can manually delete the contents of the History folder. Erasing your History folder does not prevent some information from still being collected by the web browser, but it does help to cover your web surfing tracks.
If you want to access, review, and refer to your web browser’s History folder to help you relocate and visit a website you’ve already been to, or if you want to delete the contents of your web browser’s History folder altogether (something you’ll want to do periodically), follow the steps outlined in this section, based on which web browser you’re using.
Work with Microsoft Edge’s History Folder
To view and manage Edge’s History folder, follow these steps:
![]() Click the Windows icon and Microsoft Edge to launch the Edge web browser.
Click the Windows icon and Microsoft Edge to launch the Edge web browser.
![]() Click the star-shaped Hub icon located near the upper-right corner of the browser window.
Click the star-shaped Hub icon located near the upper-right corner of the browser window.

![]() At the top of the menu that opens, click the clock-shaped History icon. The History folder’s contents appear.
At the top of the menu that opens, click the clock-shaped History icon. The History folder’s contents appear.
![]() To clear the entire History folder, click the Clear History option.
To clear the entire History folder, click the Clear History option.
![]() Click the right-pointing arrow associated with the Earlier Today, a previous day, Last Week, or Older heading to expand the History listing, based on the timeframe you want to see.
Click the right-pointing arrow associated with the Earlier Today, a previous day, Last Week, or Older heading to expand the History listing, based on the timeframe you want to see.
![]() To revisit a webpage that’s listed, click its listing.
To revisit a webpage that’s listed, click its listing.
![]() To delete one of the webpage listings, click the X icon associated with that listing.
To delete one of the webpage listings, click the X icon associated with that listing.

Work with Safari’s History Folder
To view and manage Safari’s History folder, follow these steps:
![]() Launch the Safari web browser by clicking on the Safari icon located on the Dock, or access the Applications folder and click on the Safari icon or listing.
Launch the Safari web browser by clicking on the Safari icon located on the Dock, or access the Applications folder and click on the Safari icon or listing.
![]() Click the History dropdown menu located near the upper center of the screen.
Click the History dropdown menu located near the upper center of the screen.
![]() To view the entire History folder (in reverse chronological order, with the most recently visited webpages listed first), select the Show All History option.
To view the entire History folder (in reverse chronological order, with the most recently visited webpages listed first), select the Show All History option.
![]() To revisit a specific webpage, click its listing.
To revisit a specific webpage, click its listing.
![]() To see the contents of the History folder related to an earlier time period, scroll down and click Earlier Today, or a specific date.
To see the contents of the History folder related to an earlier time period, scroll down and click Earlier Today, or a specific date.
![]() To clear the entire History folder, scroll down to the very bottom of the listing and click the Clear History option.
To clear the entire History folder, scroll down to the very bottom of the listing and click the Clear History option.

Work with Chrome’s History Folder
To view and manage Chrome’s History folder, follow these steps:
![]() Launch the Chrome web browser. On a PC, click the Windows icon and then Google Chrome. On a Mac, click the Chrome app icon that’s displayed on the Dock, or access the Applications folder and click the Chrome icon or app listing.
Launch the Chrome web browser. On a PC, click the Windows icon and then Google Chrome. On a Mac, click the Chrome app icon that’s displayed on the Dock, or access the Applications folder and click the Chrome icon or app listing.
![]() On a Windows 10 PC, click the Customize and Control Google Chrome menu icon located in the upper-right corner of the browser window. On a Mac, click the History dropdown menu or click the Customize and Control Google Chrome menu icon.
On a Windows 10 PC, click the Customize and Control Google Chrome menu icon located in the upper-right corner of the browser window. On a Mac, click the History dropdown menu or click the Customize and Control Google Chrome menu icon.
![]() From the menu, click the History option, and then click the History option displayed in the submenu window.
From the menu, click the History option, and then click the History option displayed in the submenu window.

![]() Click any of the listed webpages to revisit it.
Click any of the listed webpages to revisit it.

![]() To delete one or more entries, click the checkbox to the left of a listing, and then click the Delete button found near the upper-right corner of the browser window.
To delete one or more entries, click the checkbox to the left of a listing, and then click the Delete button found near the upper-right corner of the browser window.
![]() To clear (delete) the contents of the entire History folder, click the Clear Browsing Data option.
To clear (delete) the contents of the entire History folder, click the Clear Browsing Data option.

![]() Click the Basic tab at the top of the Clear Browsing Data window, and then from the Time Range dropdown menu, select between the Last Hour, Last 24 Hours, Last 7 Days, Last 4 Weeks, or All Time Option.
Click the Basic tab at the top of the Clear Browsing Data window, and then from the Time Range dropdown menu, select between the Last Hour, Last 24 Hours, Last 7 Days, Last 4 Weeks, or All Time Option.

![]() Based on the History content you want to delete, click the checkboxes associated with Browsing History, Cookies and Other Site Data, and/or Cached Images and/or Files options.
Based on the History content you want to delete, click the checkboxes associated with Browsing History, Cookies and Other Site Data, and/or Cached Images and/or Files options.
![]() Click the Clear Data button.
Click the Clear Data button.

Delete Past Activities, Not Future Activities
Just to be clear, when you delete the contents of the History folder associated with your web browser, this deletes information about all webpages you’ve visited in the past. However, it does not turn off the History feature. Your future activities will be stored, unless you proactively turn on the privacy feature each time you begin surfing the web.
Managing Bookmarks and Other Information
As you’ll learn from Chapter 3, “Protect Your Security When Working with Emails,” one of the most common ways cybercriminals find and interact with innocent computer users is by initiating a phishing scheme. To do this, the criminal can create a fake website that’s designed to look like a legitimate company’s website, and then lure in computer users by tricking them into providing the fake website with personal information, often including their credit card or bank account details.
To get someone’s attention and direct them to the fake website, the criminal sends an important-looking email message with a link embedded in the email that leads to the fake website. To avoid becoming a victim of a phishing scheme, never respond to these emails.
One way to prevent yourself from accidentally visiting a fake website is to create a bookmark and store the correct website name and address (URL) for all the websites you frequent, such as your bank, email service, preferred airlines, and favorite online shopping sites. At the same time, turn on the feature that’s built into your web browser that warns you of potentially fraudulent websites.
Millions upon millions of websites and online services populate the Internet. To help you keep track of your favorites or the ones you frequent the most often, all the popular web browsers let you create a listing of saved bookmarks. Each bookmark includes the name and website address for one website.
The bookmarks list is something you create and customize. It’s not something that’s created automatically, like the History folder. However, many of the web browsers now keep track of your most frequently visited websites, and will maintain a separate listing of those for easy access later.
Three tasks are associated with bookmarks:
Creating and storing bookmarks
Accessing bookmarks to revisit websites or online services
Deleting bookmarks
Create a New Bookmark
Anytime you’re visiting a website and you know it’s one you’ll want to return to in the future, create a bookmark for it. Here’s how to create a new bookmark based on which web browser you’re using.
Bookmark with Google Chrome
![]() On the Google Chrome webpage you want to bookmark, click the star-shaped Create Bookmark icon located to the right of the Search/Web Address field.
On the Google Chrome webpage you want to bookmark, click the star-shaped Create Bookmark icon located to the right of the Search/Web Address field.

![]() You can edit the webpage’s name or title and choose to store the bookmark in your main Bookmarks folder or in a custom-named subfolder.
You can edit the webpage’s name or title and choose to store the bookmark in your main Bookmarks folder or in a custom-named subfolder.

Bookmark with Microsoft Edge
![]() On the Microsoft Edge webpage you want to bookmark, click the star-shaped Add to Favorites or Reading List icon located to the right of the Search/Webpage Address field.
On the Microsoft Edge webpage you want to bookmark, click the star-shaped Add to Favorites or Reading List icon located to the right of the Search/Webpage Address field.

![]() Click the Favorites or Reading List tab, and then edit the Name field.
Click the Favorites or Reading List tab, and then edit the Name field.
![]() Choose a save location by clicking in the Save In field, and then click the Add button to create the bookmark in Edge.
Choose a save location by clicking in the Save In field, and then click the Add button to create the bookmark in Edge.

Bookmark with Apple Safari
![]() On the Safari webpage you want to bookmark, click the Share icon (located to the right of the Search/Website Address field), and then click the Add Bookmark option.
On the Safari webpage you want to bookmark, click the Share icon (located to the right of the Search/Website Address field), and then click the Add Bookmark option.

![]() You can add the website’s title and a brief description for each bookmark.
You can add the website’s title and a brief description for each bookmark.
![]() Place the newly created bookmark into the main Bookmarks Menu, into a pre-created Favorites folder, or in any subfolder you create.
Place the newly created bookmark into the main Bookmarks Menu, into a pre-created Favorites folder, or in any subfolder you create.

Organize Bookmarks into Subfolders
Creating subfolders in your main Bookmarks folder enables you to better organize your bookmarks in whatever manner you see fit. For example, you can have folders called Personal, Finances, News, Travel, Kids, and so on, and then sort your bookmarks in the folders based on their category for easy reference later.
Access Your Bookmarks
After you’ve stored one or more bookmarks (or entries in your web browser’s Reading List), you can go back at any time and quickly revisit any of those websites.

Regardless of which web browser you use, bookmarks are stored in an industry-standard format, so you can easily import, export, or sync all your bookmarks between different web browsers running on the same computer, or between web browsers running on different computers that are linked to the same cloud-based account.
It’s also possible to set it up so your bookmarks immediately sync between all your computers and mobile devices, as long as they’re all linked to the same cloud-based account. For example, Windows PC users often use the Microsoft OneDrive cloud-based service, whereas Apple users use the Apple iCloud service. Google also has its own cloud-based service, called Google Drive, which can be used for syncing Google app-specific data (such as Chrome bookmarks).
You only need to set up syncing bookmarks between web browsers, between all your own computers, and with your mobile devices once.

Unless you use a special web browser plug-in, anyone who accesses your web browser—after logging into your computer using your username and password, if you have individual user accounts set up—will be able to view your Bookmarks folder and Reading List, and visit any of the webpages that are included in these folders.
If you also have your web browser set up to remember your usernames and passwords, that same person will be able to automatically log in to the bookmarked webpages using your username and password.
Expanding Your Web Browser’s Functionality Using Optional Plug-Ins
Multiple times throughout the year, each of the popular web browsers is updated with new features and functions, and potentially improved security measures. Periodically checking to make sure you’re using the latest version of your favorite web browser and promptly downloading and installing any new updates is important.
Microsoft Windows 10 users can set up their computer so new Edge updates are automatically downloaded and installed. Mac users can learn about Safari updates by visiting the Apple Mac App Store and clicking the Updates tab.
If you’re a Chrome user, launch the web browser and from a Mac, access the Chrome dropdown menu (in the upper-left corner of the screen) and select the About Google Chrome option to check for updates.
When running Chrome on a Windows PC, to determine whether an update is available, launch the web browser, click the Customize and Control Google Chrome menu icon, and click the Settings option. From the Settings menu, click the Main Menu icon (located in the upper-left corner of the browser window), and then click the About Chrome option.
On a mobile device, Chrome should automatically update based on your Play Store settings. You can check if there’s a new version available. Open the Play Store app on your Android phone or tablet. At the top left, tap Menu and then My Apps & Games. Apps with available updates are listed under Updates. Under Updates, look for Chrome. If it is listed, tap Update.
Beyond the features and functions that are built into your favorite web browser, an ever-growing selection of free and low-cost web browser plug-ins are available that can be used to add more functionality to your browser, often using applications created by third parties.
Some make it easier to turn on and set up privacy options when surfing the web, while others are used for ad blocking, to create a virtual private network (VPN), or to provide other types of functionality related to online shopping, using social media services, or using email services that are accessed via a website, for example.
After you’re comfortable using your favorite web browser, and you’ve invested the time to adjust all its preferences, security, and privacy-related options, visit the online-based directory of plug-ins available for your favorite browser and choose which ones you’d like to add. Then, anytime you want, you can review which plug-ins you have installed and later uninstall any that you no longer use or deem useful.
How to Find, Download, and Install Plug-Ins
Each popular web browser for PCs and Macs has its own directory of optional plug-ins (or extensions). Table 2.2 lists the website addresses for directories related to the most popular web browsers.
Table 2.2 Web Browser Plug-in Directories
Web Browser |
Plug-in Directory Website |
|---|---|
Apple Safari |
|
Google Chrome |
|
Microsoft Edge |
|
Mozilla Firefox |
|
Opera |
Just like an online-based app store, the plug-in directory for each web browser is sorted by category. Popular categories often include Productivity, Security, Bookmarking, Social Networking, Shopping, News, Translation, Photos, and Search Tools.
In the Security category, for example, you’ll discover plug-ins that serve as secure password managers, ad blockers, and virtual private networks (VPNs). Be sure to read a plug-in’s description before clicking the Install Now (or equivalent) button.
In general, you need only one plug-in for each new task. For example, although you’ll likely discover a dozen or more different ad blockers, you need only one. Read the descriptions and reviews (if applicable), and choose the one that will best meet your personal needs.
Discover When Your Privacy Is Being Compromised
Privacy Cleaner (from My Permissions, https://mypermissions.com) is an example of a free, security-oriented plug-in that helps to protect the personal information that’s stored on your computer. It’s available for most web browsers, including those running on mobile devices.
With this plug-in, anytime your web browser attempts to access or use personal information or content from your files, you’ll receive a real-time alert that explains what information is being accessed, by which application, and for what purpose.
Based on your personal web surfing habits, invest some time to periodically explore the online-based plug-in directory for your favorite web browser, and then install those that you feel will be helpful or make your online experiences more private and secure.
After you install a plug-in, its functionality gets incorporated directly into the web browser. When applicable, additional command icons or menu options will be added to the web browser that allow you to use the newly added functionality that will operate seamlessly with your compatible web browser.
Learning the Benefits of Using a Virtual Private Network or Two-Factor Authentication
A virtual private network (VPN) is a free or low-cost security tool that encrypts your data as it’s being transmitted to the Internet and masks your location. After you install it, you can turn a VPN on or off. It functions pretty much automatically, in the background, as you go about your regular Internet-related activities.
A VPN is most useful when you’re using a public Wi-Fi hotspot to connect to the Internet while you’re outside of your home—from an airport, restaurant, café, library, school, or hotel, for example.
Without added security measures, handling tasks such as online banking is usually not a good idea when you’re connected to a public Wi-Fi hotspot. However, using a VPN enhances your security and privacy and offers an added level of defense against hackers. You’ll learn more about how to choose, install, and use a VPN in Chapter 4, “Handle Online Banking Tasks Securely.”
When you use certain online services and websites, particularly those that involve sharing highly personal or confidential information, turning on the website’s two-factor authentication feature is one tool you can use to help prevent a hacker from breaking into your account, even if they discover your username and password.
As you’ll discover in Chapter 5, although two-factor authentication offers added security and protection, it also forces you to take one extra step each time you log in to a compatible online service or website. After providing your username and password, the website will transmit a one-time use code as a text message to your smartphone or send you an email with the one-time use code. You must correctly type in this code within a pre-defined timeframe before you’ll be granted access to your online account.
Thanks to quickly improving technology, the process of using two-factor authentication is being made faster and easier when a two-factor authentication key is used with your computer or mobile device. This is a physical, key-sized device that you hold next to your mobile device or plug in to the USB port of your computer. The key contains a special sensor that you’ll be prompted to touch at a specific time to log in to a compatible website or online service.
Two-factor authentication keys are available from a company called Yubico (www.yubico.com), and cost between $20.00 and $60.00 each. A growing number of online-based services, websites, and password manager applications already support these keys, and their popularity is growing quickly while the price for this technology is dropping.
Google also offers its Titan Security Key Kit ($50.00, https://store.google.com/us/product/titan_security_key_kit), which works with many Google online services, including Gmail, as well as a growing lineup of third-party websites and online services.
Another device, called EveryKey ($69.00, https://everykey.com), takes the authentication key concept to the next level. Using military grade security, EveryKey has the capability to unlock your smartphone, laptop, tablet, house door (if you have smart locks installed), car door (on compatible cars), and other access-controlled devices when you are nearby. At the appropriate time, EveryKey then locks them back down when you walk away. In terms of web surfing, EveryKey generates secure passwords for your website accounts, then automatically logs you in when you visit a website. If you lose your EveryKey, you can remotely freeze it so that no one else can use it.
Because this security key technology is still fairly new, there are different industry-standard security protocols being used to make them function, and only certain web browsers and specific online-based services currently support them. However, this is technology that’s quickly becoming more commonplace. In the not-so-distant future, these security keys will likely replace two-factor authentication as a security measure when handling everyday tasks related to online banking, email, shopping, and sharing files using a cloud-based service, for example.
Using Apps on Your Mobile Device to Better Handle Many Online Activities
Many of the functions you probably use every day on your smartphone or tablet somehow involve connecting to the Internet to acquire, download, upload, stream, and/or share data or files. Although you can use the mobile device’s web browser to access your favorite websites or to handle common Internet-related tasks, this is rarely the easiest or best option.
Most online banking services, portfolio management services, email services, online shopping sites, social media services, and other types of websites also have their own, proprietary mobile apps that can be downloaded and installed onto your mobile device to create an easier, seamless, and more streamlined experience that fully uses the smaller-size touchscreen built into your smartphone or tablet.
These specialized apps are available from the Apple App Store or Google Play Store, depending on the type of mobile device you’re using.
Whenever possible, take advantage of a specialized mobile app to handle an Internet-related task on your smartphone or tablet instead of visiting a specific website using the mobile device’s web browser. Your experience will be more secure, and the information you need to view will be displayed in a more visually acceptable format.
For example, a mobile app can take advantage of your smartphone or tablet’s fingerprint sensor or face scanner to confirm your identity before allowing you to complete a purchase or online transaction. The same app can also determine your exact location, when necessary, to guide you to the closest store or branch, or connect you to the company’s customer service department (using the smartphone’s calling capabilities).
If you need to make an online deposit while using your bank’s mobile app, instead of driving to a local branch or visiting an ATM, you can often use the camera that’s built in to your smartphone or tablet to scan the check(s) you want to deposit, and then securely initiate a remote deposit right from your Internet-connected mobile device.
As you’ll learn in Chapter 5, “Protect Your Privacy When Shopping Online,” the mobile apps associated with online-based shopping services, such as Amazon.com, not only use a bunch of security-related features built in to your smartphone or tablet to make online shopping from anywhere a safer experience, but these specialized shopping apps also have built-in tools to make your online shopping experience extremely fast and efficient, especially when you’re trying to find an item, doing a price comparison, or reordering an item.