
4. Handling Online Banking Tasks Securely

Online banking is secure, convenient, and easily done from your Internet-connected computer, smartphone, or tablet.
The focus of this chapter is on taking advantage of online-based financial-related services in a secure and efficient way. Topics include:
![]() How to safely handle online banking from your computer or mobile device
How to safely handle online banking from your computer or mobile device
![]() How to prevent hackers from breaching your online banking and financial accounts
How to prevent hackers from breaching your online banking and financial accounts
![]() Why you should create secure passwords that you periodically update
Why you should create secure passwords that you periodically update
![]() How to make secure online payments or money transfers
How to make secure online payments or money transfers
![]() Why you should not use your debit card to make online purchases
Why you should not use your debit card to make online purchases
Online banking is fast, easy, convenient, and it can be extremely secure. Although you may not have grown up using online banking, you should not be intimidated or afraid to use it to help you manage your money.
By visiting your financial institution’s website and setting up an online account that’s tied to your checking, savings, or credit card accounts, you can easily handle tasks including:
Checking your account balances
Transferring money between accounts
Determining whether a check or transaction has cleared
Depositing checks remotely via your mobile device
Paying bills online
Reviewing your statements

Shown here is the listing for the TD Bank mobile app on the Apple App Store. Click the Get button to download and install this app onto your iPhone. A separate iPad-specific app may also be available, as is an Android-based version.

When using the Bank of America mobile app on your smartphone, help is only a screen tap away. Simply access the Help feature and click the Call Now option.
Sending or Receiving Money Electronically
One commonly used online banking task that can easily and securely be accomplished using your institution’s website or app is to send or receive money electronically, often for free, and in minutes.
Most banks support a service called Zelle (www.zellepay.com). It allows you to quickly send money from your checking or savings account directly to someone else’s checking or savings account via your bank’s website or using your bank’s mobile app.
To send money to someone else, all you need is his or her name and email address or smartphone phone number. Likewise, if someone wants to send you money, you need to give that person your name and email address (or smartphone phone number). You never need to reveal your bank account numbers or related account details.
Whether you use Zelle or another service, both you and the other party need an active account with that money transfer service. An account can be set up, for free, in less than five minutes.
Addressing Online or Mobile Banking Security Concerns
Your bank or financial institution spends millions of dollars each year to install and maintain the most up-to-date and powerful online security features available. Despite this, breaches can still happen.
The good news is your account and money is almost always fully protected against online fraud and crime, especially if your bank or financial institution experiences a data breach.
If your bank account is compromised, although you’ll often recover your stolen money, the process could take time and will require you to go through a lot of time-consuming hassles. Knowing what to look for and taking a few basic proactive steps when handling online banking (and related tasks, like online shopping using your credit card) can prevent a lot of potential problems.
As you’ll discover in this chapter, you can help avoid becoming a victim of an online banking-related cybercrime.
Protecting Your Online Accounts
This section contains some basic strategies you should implement to help ensure a safe online banking experience.
Creating a Secure Password and Keeping It a Secret
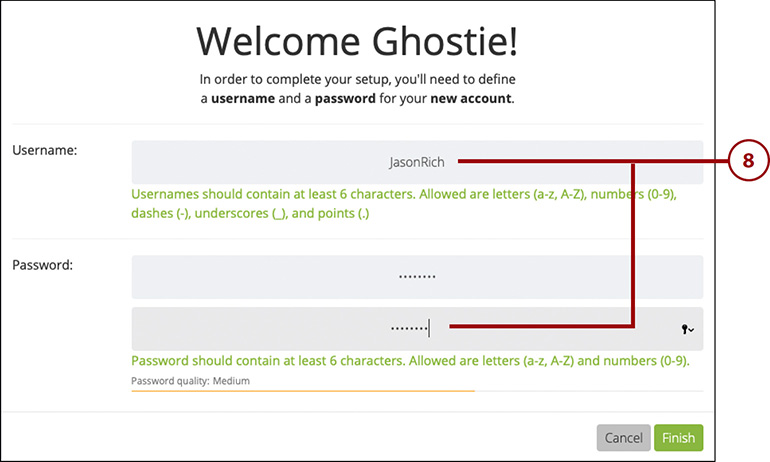
When you first establish your online account, you’ll be prompted to create a username and password. The bank or financial institution will likely have strict guidelines about the password you can create.
For example, your password will usually need to be at least six characters long, include upper- and lowercase letters, include at least one number, and perhaps need to include at least one special character (such as a period, exclamation point, or question mark).
Do not share your password with anyone. Your bank’s customer service or technical support department will never ask for your account password. If someone does request your account password (claiming it’s for verification purposes), you’re being scammed and not speaking with someone who represents your bank or financial institution.
Changing Your Password Periodically
Change your passwords for online bank and credit card accounts at least once every few months, and immediately if you believe your account has been compromised.
Avoid using public Wi-Fi to handle online banking tasks, unless you have a virtual private network (VPN) installed on the computer or mobile device. However, even a VPN may not be completely safe in a public area. If you perform online banking tasks over public Wi-Fi, change your online banking password afterward.
Using a Credit Card, not a Debit Card, to Make Online Purchases
It’s safer to use a credit card than a debit card when shopping online. If you use a major credit card and there’s a problem with your purchase or the merchant, you can call the credit card issuer, which will intercede on your behalf. You don’t pay the money while a dispute is being investigated and you aren’t immediately out of the money. Your liability is limited, usually to $50, and most credit card companies waive that amount.
Any time you make a purchase online using a debit card, however, the money for that purchase is immediately taken from your bank account and paid to the merchant. If you have a problem with the merchant, you either have to rely on that company to issue you a refund, or you need to file a fraud report with your bank or financial institution, which will usually require your account numbers to be changed and a new debit card to be issued before your bank will help you recover funds. Your liability may be limited, but usually to a much higher amount. This reduces your risk because money is not immediately withdrawn from your account. A chargeback is not possible using a debit card.
Using Electronic Payments at Retail Locations or Online
When you visit a retail store or restaurant and need to make a payment, you need to present your credit card or debit card to that merchant. The plastic card contains your name, card number, expiration date, and CVV number.
Someone working at that retail store could potentially copy your credit card information and then use it for fraud or to make unauthorized purchases. It’s also possible that a criminal has somehow hacked the merchant’s computer system and is able to acquire the payment information provided by customers. These scenarios are ongoing security concerns. To protect yourself, make sure your credit card is always in your sight.
Most credit cards now have chips, making it more difficult to copy information from the card. A chip card adds another layer of protection via an embedded microchip, which turns cardmember information into a unique code. When a chip card is used at a chip-enabled machine, it is difficult to duplicate or copy.
An electronic payment service, such as Apple Pay, Google Pay, or Samsung Pay, lets you make payments using your smartphone and the credit or debit card you have linked with the electronic payment service, but the merchant is never actually provided with any of your credit or debit card details.
Setting up an Apple Pay, Google Pay, or Samsung Pay account takes just minutes and needs to be done only once. After setting it up and linking it to your existing credit or debit card, you can use it to pay at hundreds of thousands of retail stores, restaurants, and vending machines throughout the United States (and when visiting many countries around the world).
Mobile electronic payment is more secure than credit or debit cards and cash. This is because mobile wallets use methods like encryption and tokenization to mask card account numbers when you enter them and when you pay.
There are some risks. If you lose your phone, which contains your account information, it’s like losing a credit card. Another security risk is a cybercriminal stealing your account numbers. The chance of this is small, but it increases if you add cards to your mobile wallet while using a public Wi-Fi. Hackers can re-create a mobile wallet’s registration system, where you’re required to enter your card’s data information.
Malware infection is another threat. Malware typically happens when a user clicks on a phony link or an ad sent by a hacker.
Regardless of which electronic payment service you opt to use, they all work almost the same way. There are no additional fees, and the transactions are more secure than when using a debit or credit card.
iPhone or Android users also can use Google Pay (formerly known as Android Pay), whereas Samsung Galaxy smartphone users can set up a Samsung Pay account. To learn more about each service and what equipment and credit/debit card issuers each is compatible with, visit the following websites:
Apple Pay: www.apple.com/apple-pay
Google Pay: https://pay.google.com/about
Samsung Pay: www.samsung.com/us/samsung-pay
Setting Up and Using Apple Pay
Apple Pay works with most iPhones and Apple Watches. An Android-based smartphone, Google Pay, or Samsung Pay (if you’re a Samsung Galaxy mobile device user) work almost the same way.
Whenever you’re at one of the hundreds of thousands of retail stores, restaurants, or vending machines that accept Apple Pay, instead of using your credit or debit card to make a payment, you simply press a few buttons on your mobile device to make a more secure payment.
Find Out Where to Use Apple Pay
You can use Apple Pay from your smartphone, tablet, or computer when you make an online purchase from a participating website. To find retail locations, restaurants, and websites that accept Apple Pay, look for the Apple Pay logo at the checkout location or visit www.apple.com/apple-pay/where-to-use.
For an electronic payment service like Apple Pay to work, you must set up the feature on your mobile device, and then link one or more of your debit cards or credit cards to the app. You need to do this only once. For Apple Pay on an iPhone, you link your card and account via the Wallet app. Using Google Pay requires the use of the Google Pay app; or to use the Samsung Pay service, you would use the Samsung Pay app.
You get several security benefits when you pay with an electronic payment service instead of using a debit or credit card to make a purchase or payment. When you use Apple Pay (or an equivalent service), the merchant never actually sees your name or has physical access to your credit or debit card (or any of the information on the card). The electronic payment service processes the payment securely and then pays the merchant after charging your account.
Because you don’t need to carry around the debit or credit cards to make payments, you reduce the risk of these cards getting lost or stolen. Plus, when you use a service like Apple Pay, a payment will be processed only if your smartphone identifies your fingerprint or face scan and you confirm your debit card PIN when making a debit card purchase.
Set Up Apple Pay to Work with Your iPhone
Follow these directions to set up Apple Pay to work with your iPhone and link a credit card or debit card to your Apple Pay account.
![]() From your iPhone’s Home screen, tap the Wallet icon to launch the app.
From your iPhone’s Home screen, tap the Wallet icon to launch the app.

![]() Tap the “+” icon displayed in the upper-right corner of the screen. When prompted, type in your Apple ID password.
Tap the “+” icon displayed in the upper-right corner of the screen. When prompted, type in your Apple ID password.

![]() From the Apple Pay information screen, click Continue. (Not shown.)
From the Apple Pay information screen, click Continue. (Not shown.)
![]() Use the camera built in to the back of your iPhone to scan the front of your credit or debit card. If you prefer, tap the Enter Card Details Manually option. After the debit or credit card number is scanned or entered, the Card Details screen appears.
Use the camera built in to the back of your iPhone to scan the front of your credit or debit card. If you prefer, tap the Enter Card Details Manually option. After the debit or credit card number is scanned or entered, the Card Details screen appears.

![]() Confirm that your name and card number are correct, and then tap Next. (Not shown.)
Confirm that your name and card number are correct, and then tap Next. (Not shown.)
![]() Enter or confirm the Expiration Date for the card, and then manually type in the three or four digit CVV code for the card. Tap Next to continue.
Enter or confirm the Expiration Date for the card, and then manually type in the three or four digit CVV code for the card. Tap Next to continue.

![]() Assuming your debit or credit card is compatible with the Apple Pay service, a Terms and Conditions screen appears. Tap Agree to continue. (Not shown.)
Assuming your debit or credit card is compatible with the Apple Pay service, a Terms and Conditions screen appears. Tap Agree to continue. (Not shown.)
![]() Some debit or credit card issuers require a Card Verification process. You’ll be asked whether you want to receive an email, text message, or place a call to your bank to proceed. The quickest option is to receive a verification code via text message. After you receive the code, type it in as part of the Apple Pay setup process on your iPhone. The debit or credit card will be added to the Wallet app.
Some debit or credit card issuers require a Card Verification process. You’ll be asked whether you want to receive an email, text message, or place a call to your bank to proceed. The quickest option is to receive a verification code via text message. After you receive the code, type it in as part of the Apple Pay setup process on your iPhone. The debit or credit card will be added to the Wallet app.

![]() It may take a few minutes for your bank or credit card issuer to activate Apple Pay for your card. The app notifies you when the process is complete. When you see the “[Card Name] is ready for Apple Pay” message appear, you’re all set.
It may take a few minutes for your bank or credit card issuer to activate Apple Pay for your card. The app notifies you when the process is complete. When you see the “[Card Name] is ready for Apple Pay” message appear, you’re all set.

![]() If you want, you can repeat these steps again with additional credit or debit cards. Then, when you launch the Wallet app to make a purchase, you can choose which card you want to use. As its name suggests, the Wallet app serves as a digital wallet to securely store your debit and/or credit card details. (The Samsung Pay app or Google Pay app serve a similar purpose, but on Android-based mobile devices.)
If you want, you can repeat these steps again with additional credit or debit cards. Then, when you launch the Wallet app to make a purchase, you can choose which card you want to use. As its name suggests, the Wallet app serves as a digital wallet to securely store your debit and/or credit card details. (The Samsung Pay app or Google Pay app serve a similar purpose, but on Android-based mobile devices.)

No Personal Details Are Displayed
After you add one or more debit or credit cards to the Wallet app and set them up to use with Apple Pay, Google Pay, or Samsung Pay, images of those cards are displayed in the app, but without your name, full account details, expiration date, or CVV number displayed for security purposes.
When making online purchases using Apple Pay, the merchant might ask to confirm your card’s CVV number. In this case, you will need to refer to the back of the original card. When making retail purchases using a debit card that’s linked with Apple Pay, you might need to type in your debit card’s PIN number to approve the purchase.
Make a Purchase Using Apple Pay, Google Pay, or Samsung Pay
Follow these steps to make a payment using Apple Pay. The process is similar if you use Google Pay or Samsung Pay.
![]() Tap the Wallet icon to launch the app, and select which credit or debit card you want to use to make the payment by tapping on the virtual card on your iPhone’s screen. The card that’s displayed prominently is the default card, which you can set within the wallet app; but you can tap on any displayed card to select it instead.
Tap the Wallet icon to launch the app, and select which credit or debit card you want to use to make the payment by tapping on the virtual card on your iPhone’s screen. The card that’s displayed prominently is the default card, which you can set within the wallet app; but you can tap on any displayed card to select it instead.

How to Set Apple Pay’s Default Card
To set the default card for Apple Pay, launch Settings, tap the Wallet & Apple Pay option, and then tap the Default Card option that’s displayed below the Transaction Defaults heading. Tap on one of the cards listed to add a checkmark to the listing. Exit out of Settings to save your selection. Setting up the default card only needs to be done once.
![]() Place your smartphone close to the merchant’s credit card reader. It does not have to touch.
Place your smartphone close to the merchant’s credit card reader. It does not have to touch.

![]() When a wireless connection is established within a few seconds, depending on which iPhone model you’re using, you may be prompted to press the Power/Sleep button on the side of the phone twice. (Not shown.)
When a wireless connection is established within a few seconds, depending on which iPhone model you’re using, you may be prompted to press the Power/Sleep button on the side of the phone twice. (Not shown.)
![]() Also depending on which iPhone model you’re using, you will be required to place your finger on the phone’s Touch ID sensor (the Home button), or look at the smartphone’s screen to use Face ID to approve the purchase. (Not shown.)
Also depending on which iPhone model you’re using, you will be required to place your finger on the phone’s Touch ID sensor (the Home button), or look at the smartphone’s screen to use Face ID to approve the purchase. (Not shown.)
![]() Within seconds, the transaction completes and a notification appears on your smartphone’s screen. The charge will be added to your credit card, or if you used a debit card, the funds will immediately be withdrawn from your account. (Not shown.)
Within seconds, the transaction completes and a notification appears on your smartphone’s screen. The charge will be added to your credit card, or if you used a debit card, the funds will immediately be withdrawn from your account. (Not shown.)
Using a Virtual Private Network for Online Banking via Wi-Fi
Most home networks already have a firewall installed from the Internet service provider. That’s your first line of defense at home. A virtual private network (VPN) offers added protection when you’re home and especially away. When you install and activate a VPN on your computer or mobile device, each time you access the Internet, everything you send or receive from your computer or mobile device will be automatically encrypted. Your Internet service provider might include free VPN functionality.
This encryption helps to ensure secure transmission of your data—locally and wirelessly from your computer or mobile device to the Wi-Fi hotspot modem or router you’re connected to—without the threat of an unauthorized person (such as a cybercriminal) eavesdropping on your activity as your data is being transmitted.
You can use a “remote access” VPN anytime you’re connecting wirelessly to the Internet using Wi-Fi. However, this is more important when you’re outside your home and using public Wi-Fi at a café, hotel, airport, library, school, recreation center, shopping mall, or other public location.
In addition to encrypting your data, a VPN also prevents a hacker from pinpointing your location (based on your modem or router’s unique IP address). The VPN disguises the IP address, making it appear as if you’re at another location.
Setting up a VPN on your computer and mobile devices costs very little (it’s sometimes free), and you can do it in minutes. You can subscribe to a VPN service that supports all your computers and mobile devices for a flat monthly or annual fee. You need to download and install the VPN on each computer and mobile device separately.
To find a VPN, search for “low cost VPN,” “free VPN,” “Windows 10 VPN,” or “smartphone VPN,” for example.
Some of your options include the following:
CyberGhost: www.cyberghostvpn.com
ExpressVPN: www.expressvpn.com
NordVPN: www.nordvpn.com
Norton WiFi Privacy: https://us.norton.com/wifi-privacy
PrivateVPN: https://privatevpn.com
When choosing which VPN service to subscribe to, you should consider the following:
Determine whether your Internet service provider includes free VPN functionality and what’s required to activate it.
Determine the number of servers the VPN uses and in which countries. This could impact the speed of your Internet connection. The more servers a service uses, the better.
Determine whether the same VPN service supports all your computers and mobile devices, including Windows PCs, Macs, iOS mobile devices, and Android mobile devices.
Determine the number of computers and mobile devices that can be used with each VPN subscription.
Make sure the VPN does not slow down your wireless Internet connection speed after a certain level of usage per month. Unlimited bandwidth should be included.
Determine the cost per month, and any discounts offered for prepaying for one or more years of service at once. CyberGhost, for example, charges $4.99 per month for up to seven computers or devices if you pay for one year upfront, but if you pay for three years upfront, the monthly fee drops down to $2.75 per month, so the total price is $99.00 for a three-year subscription.
Download and Install a VPN to Your Computer
Regardless of which VPN service you choose, the download and installation process is similar. After choosing which VPN service you want to use, follow these steps to download and install the VPN software onto your computer. CyberGhost is used on a Mac in this example.
![]() Launch your favorite web browser and visit www.cyberghostvpn.com.
Launch your favorite web browser and visit www.cyberghostvpn.com.
![]() Click the Get CyberGhost VPN button or the Buy Now button on the website.
Click the Get CyberGhost VPN button or the Buy Now button on the website.

![]() Choose the subscription plan that’s most appealing, and then choose your payment method.
Choose the subscription plan that’s most appealing, and then choose your payment method.

![]() Provide your email address and other requested information. (Not shown.)
Provide your email address and other requested information. (Not shown.)
![]() Confirm your payment and subscription order. Click the Buy Now option to proceed. Keep in mind that most VPN services include a 30-day, money-back guarantee. If you’re not happy with the service, request a full refund.
Confirm your payment and subscription order. Click the Buy Now option to proceed. Keep in mind that most VPN services include a 30-day, money-back guarantee. If you’re not happy with the service, request a full refund.

![]() The specialized VPN software from the VPN service downloads to your computer. Follow the on-screen prompts to prepare for installation. The process varies slightly if you’re using a Windows PC versus a Mac (shown here).
The specialized VPN software from the VPN service downloads to your computer. Follow the on-screen prompts to prepare for installation. The process varies slightly if you’re using a Windows PC versus a Mac (shown here).

![]() Install the newly downloaded software by using your mouse to drag the CyberGhost app icon to your computer’s Applications folder.
Install the newly downloaded software by using your mouse to drag the CyberGhost app icon to your computer’s Applications folder.

![]() On the CyberGhost website, set up your account username and password when prompted.
On the CyberGhost website, set up your account username and password when prompted.
![]() You’ll be provided with a PUK (Personal Unlocking Key) code that you can use to restore your account if you forget your account password. (Not shown.)
You’ll be provided with a PUK (Personal Unlocking Key) code that you can use to restore your account if you forget your account password. (Not shown.)
![]() After the CyberGhost software is installed, locate and open the Applications folder and double-click the CyberGhost app icon to launch it.
After the CyberGhost software is installed, locate and open the Applications folder and double-click the CyberGhost app icon to launch it.

![]() Click the Open button to continue, and follow the on-screen prompts.
Click the Open button to continue, and follow the on-screen prompts.

![]() Type in the username and password you set up when purchasing the subscription from the company’s website (refer to step 8). Click the Login button to continue.
Type in the username and password you set up when purchasing the subscription from the company’s website (refer to step 8). Click the Login button to continue.

![]() Click the application’s menu (the three lines in the upper-left of the screen) and click to turn on the virtual switches for the functions you want to activate. Options for this service include Prevent Online Tracking, Protection Against Malicious Websites, Ad-Blocker, Force HTTPS, Data Compression, and Extra Speed. You can turn on or off these features later by returning to this menu.
Click the application’s menu (the three lines in the upper-left of the screen) and click to turn on the virtual switches for the functions you want to activate. Options for this service include Prevent Online Tracking, Protection Against Malicious Websites, Ad-Blocker, Force HTTPS, Data Compression, and Extra Speed. You can turn on or off these features later by returning to this menu.
![]() Under the Simulated Country and Simulated Location headings, click the dropdown menu to choose a specific location. The default option is Automatic for both menus. In most cases, you can leave this setting as is.
Under the Simulated Country and Simulated Location headings, click the dropdown menu to choose a specific location. The default option is Automatic for both menus. In most cases, you can leave this setting as is.

![]() Click the Click Here to Start Protection button to activate the VPN software.
Click the Click Here to Start Protection button to activate the VPN software.

![]() Use your computer and web browser as you normally would, knowing that a virtual private network is in place for your added protection. At any time, you can temporarily turn off the VPN by clicking the Click Here to Stop Protection button.
Use your computer and web browser as you normally would, knowing that a virtual private network is in place for your added protection. At any time, you can temporarily turn off the VPN by clicking the Click Here to Stop Protection button.

There might be times when the Internet connection (or Wi-Fi hotspot) you’re using does not support a VPN. If you receive an error message stating that a VPN is not supported, you need to turn off the VPN to continue accessing the Internet. This is sometimes the case when logging into a corporate network or accessing the wireless Internet on a cruise ship or airplane, for example.
Download and Install a VPN to Your Mobile Device
If you plan to use the same VPN service on your computer and mobile devices, it’s typically easier to subscribe and set up your account using your computer. Then to download the service’s mobile app, visit the Apple App Store (iPhone or iPad) or Google Play Store (Android) to find, download, and install the appropriate mobile app.
In this example, the CyberGhost app was downloaded and installed onto an iPad. Again, the steps to accomplish this task using any VPN service (on an iPhone, iPad, or Android-based mobile device) will be similar. Follow these steps:
![]() From your mobile device’s Home screen, launch the App Store (or Google Play Store).
From your mobile device’s Home screen, launch the App Store (or Google Play Store).

![]() In the Search field, type in the name of the VPN service—in this example, CyberGhost. (Not shown.)
In the Search field, type in the name of the VPN service—in this example, CyberGhost. (Not shown.)
![]() From the displayed search results, click the Get button for the CyberGhost VPN app and type in your Apple ID password or use the Touch ID or Face ID feature built in to your iPad. The mobile app automatically downloads and installs.
From the displayed search results, click the Get button for the CyberGhost VPN app and type in your Apple ID password or use the Touch ID or Face ID feature built in to your iPad. The mobile app automatically downloads and installs.

![]() Click the Open button (while still in the App Store) to launch the app. In the future, launch the app by tapping its icon on the Home screen.
Click the Open button (while still in the App Store) to launch the app. In the future, launch the app by tapping its icon on the Home screen.

![]() Tap the Agree & Continue button to proceed. You only need to do this the first time you launch the app. (Not shown.)
Tap the Agree & Continue button to proceed. You only need to do this the first time you launch the app. (Not shown.)
![]() Tap the Allow VPN Access button to allow the CyberGhost app to adjust the iOS 12 operating system to function with the VPN. Tap the Allow button to confirm your decision. (Not shown.)
Tap the Allow VPN Access button to allow the CyberGhost app to adjust the iOS 12 operating system to function with the VPN. Tap the Allow button to confirm your decision. (Not shown.)
![]() Choose whether you want to enable app-related notifications. Click the Enable Notifications button, and then tap the Allow or Don’t Allow button, based on your personal preference. These notifications will tell you when the VPN is active and if it encounters any problems or security issues related to your Internet connection.
Choose whether you want to enable app-related notifications. Click the Enable Notifications button, and then tap the Allow or Don’t Allow button, based on your personal preference. These notifications will tell you when the VPN is active and if it encounters any problems or security issues related to your Internet connection.

![]() To set up a new subscription, click the Start Trial option. However, if you already have a paid CyberGhost subscription, tap the I Already Have an Account option.
To set up a new subscription, click the Start Trial option. However, if you already have a paid CyberGhost subscription, tap the I Already Have an Account option.

![]() When prompted, type in your CyberGhost Username and Password, and tap the Login button.
When prompted, type in your CyberGhost Username and Password, and tap the Login button.

![]() Swipe the icon displayed in the center of the screen to the right to activate the VPN on your mobile device.
Swipe the icon displayed in the center of the screen to the right to activate the VPN on your mobile device.

![]() After you see the VPN Connected message, you’re ready to surf the web. A tiny VPN icon now appears at the very top of your mobile device’s screen.
After you see the VPN Connected message, you’re ready to surf the web. A tiny VPN icon now appears at the very top of your mobile device’s screen.
![]() To customize the settings for the app, tap the menu icon located in the upper-left corner of the VPN Connected! screen.
To customize the settings for the app, tap the menu icon located in the upper-left corner of the VPN Connected! screen.

![]() Tap the Settings option from the menu.
Tap the Settings option from the menu.

![]() Go through each option displayed in the Settings menu and adjust it to meet your personal preferences. For example, under the When Joining a New WiFi option, choose whether you want the VPN to automatically activate each time you access a new Wi-Fi hotspot. Settings options include Ask, Always Connect, Terminate Connection, or Never Protect. Until you’re fully comfortable using the VPN, set this option to Ask, so you’re given the option to turn on or off the VPN each time you access a new Wi-Fi hotspot.
Go through each option displayed in the Settings menu and adjust it to meet your personal preferences. For example, under the When Joining a New WiFi option, choose whether you want the VPN to automatically activate each time you access a new Wi-Fi hotspot. Settings options include Ask, Always Connect, Terminate Connection, or Never Protect. Until you’re fully comfortable using the VPN, set this option to Ask, so you’re given the option to turn on or off the VPN each time you access a new Wi-Fi hotspot.

For the added level of protection, you always want to use a VPN while surfing the Internet or engaging in any online activities. However, you may encounter situations when a VPN is not supported by a Wi-Fi hotspot, or you encounter a significant reduction in connection speed while using the VPN from a specific location, in which case you should turn off the VPN.
![]() After adjusting the Settings-related options, close the app and use your mobile device as you normally would. Based on how you’ve set up the app, the VPN will function automatically in the background whenever you surf the web. To adjust any app-related settings in the future, relaunch the app from the Home screen. (Not shown.)
After adjusting the Settings-related options, close the app and use your mobile device as you normally would. Based on how you’ve set up the app, the VPN will function automatically in the background whenever you surf the web. To adjust any app-related settings in the future, relaunch the app from the Home screen. (Not shown.)
A VPN Is Just One Line of Defense
Keep in mind that adding a VPN to your computer and mobile device is an additional line of defense against certain types of criminal. A VPN is not a comprehensive online security tool designed to detect and stop all types of online crime attempts.
Being Aware of Banking-Related Phishing Schemes
As you learned in the previous chapter, one of the more convincing types of phishing schemes is an email with a fake warning message about your bank account, credit card account, or investment account. These often request that you immediately click a link in the email so your web browser opens and you’re redirected to a fake website (a process called website spoofing).
At this point, a virus or malware may be downloaded to your computer to wreak some type of havoc. Alternatively, you may be asked to type in your username, password, and perhaps other pertinent information, under the guise that your account information is being verified. The information could be used by cybercriminals to break into your real account, perpetuate some type of fraud, or assist them in stealing your identity.
To recap, when you receive one of these emails, no matter how authentic or legitimate it looks, take any or all the following steps that apply to your situation:
Delete the email without opening it.
Transfer the incoming email to your Spam or Junk folder and ignore it.
If you do open the email, do not click any links in the email, open or download any attachments to the email, respond to the email, or call any phone number listed in the email.
If you think the message in the email may be legitimately from your bank or financial institution, call the bank. You’ll find the number online, listed on the back of your credit or debit card, and printed on your monthly statement.
If you have accidentally provided a cybercriminal with information related to your account, report the situation immediately to your bank or financial institution and change your account password.
Signing Off from Your Online Banking Service When You’re Finished
Whether you’re handling online banking tasks from your computer on the bank’s website, or using the bank’s mobile app, when you’re finished with your session, always manually sign off from the account. Don’t just close the web browser or shut down the app and go on to doing something else.
After a few minutes of inactivity, your bank or financial institution will automatically log you out, but logging out as soon as you’re finished is a more secure practice.

Reporting a Suspected Problem Immediately
Get into the habit of checking your bank and credit card statements (either online or in paper form) on a regular basis. Look for fraudulent transactions, as well as legitimate transactions that were processed for the wrong amount (for example, your credit or debit card was charged $200.00 for a $20.00 meal at a restaurant). Also pay attention to the accuracy of your account balances.
As soon as you discover a problem with the account balance or any specific transactions, contact your bank or financial institution immediately. Based on the type of problem, you may be asked to change your online banking account’s password, while the bank issues you a new debit card or credit card with a new number. In some cases, your actual account numbers may need to be changed, if the bank discovers your account may have been compromised. Be sure to follow the directions provided by the bank’s representative.
Make Sure You Contact Your Actual Bank, Not an Impostor
When contacting the bank, either go to your local branch in person, or make sure you call the phone number that’s listed on the back of your debit/credit card, on your bank statement, or on the bank’s official mobile app or website. Do not call a phone number listed in what might be a fake website or phishing email.
Turning On Two-Factor Authentication for Your Online Accounts
One way to secure your online financial accounts is to turn on two-factor authentication—a free feature that almost all online banking services now offer.
After turning on this feature, each time you or anyone else attempts to log in to your online banking account, you’ll need your username, password, and a one-time use code that gets sent via text message to your smartphone or, in some cases, an email. In addition to discovering your username and password, someone attempting to access your online banking account would need that special code that can only be obtained directly from your smartphone or your email.
Turn On Two-Factor Authentication for Your Bank’s Website
To turn on two-factor authentication for your bank (in this case Bank of America), follow these steps:
![]() From your computer, launch your favorite web browser. (Not shown.)
From your computer, launch your favorite web browser. (Not shown.)
![]() Visit your bank’s website and log in using your existing username and password. (Not shown.)
Visit your bank’s website and log in using your existing username and password. (Not shown.)
![]() In the website’s Search field, type in Two-Factor Authentication.
In the website’s Search field, type in Two-Factor Authentication.
![]() Choose the search result for adjusting this setting. In this case, Bank of America calls two-factor authentication the “SafePass” feature.
Choose the search result for adjusting this setting. In this case, Bank of America calls two-factor authentication the “SafePass” feature.

![]() Click the Add SafePass button.
Click the Add SafePass button.

![]() Link your smartphone phone number to your account.
Link your smartphone phone number to your account.

![]() Provide the confirmation details requested. (Not shown.)
Provide the confirmation details requested. (Not shown.)
![]() Click the Place Order button.
Click the Place Order button.

![]() Click the Send Code button after reading the text in the Enhance Your Mobile Number Security window.
Click the Send Code button after reading the text in the Enhance Your Mobile Number Security window.

![]() Type in the code that’s sent as a text message to your smartphone and click Continue.
Type in the code that’s sent as a text message to your smartphone and click Continue.

![]() The SafePass option for Bank of America is now set up and active. The next time you log in, a one-time use code will be required to gain access to your account. (Not shown.)
The SafePass option for Bank of America is now set up and active. The next time you log in, a one-time use code will be required to gain access to your account. (Not shown.)
Managing Credit Card Accounts Online
If your major credit card is issued by your regular bank, you can manage that card, check your balance, make payments, or handle other card-related tasks directly from the bank’s website or mobile app.
However, if your credit card issuer is separate from your regular bank, you’ll need to access the credit card issuer’s website or use its mobile app to manage your account. This requires you to set up a separate username and password for each account. Once again, don’t set up multiple accounts with the same username and password.
Each credit card issuer also has its own proprietary mobile app, designed to make managing your credit card from your smartphone or tablet an easy and straightforward process. In some cases, the credit card’s mobile app will also inform you about the credit card’s promotional offers from merchants, plus manage your reward points.
Install the App for the Credit Cards You Use
To find, download, and install the credit card app for your specific credit cards, visit the Apple App Store (for iPhone or iPad), or Google Play Store (for Android-based mobile devices), and in the Search field, type in the name of your credit card or the card issuer. For example, American Express, Capital One, Chase, and Discover have separate apps for managing their respective credit cards.
The mobile app from your credit card issuer uses the security features built in to your smartphone or tablet to help keep your account secure. If the app is one that remembers your account username and password, if a stranger were to gain access to your mobile device, your fingerprint or face scan would be required to log in to the account.