Chapter 8. Web and Email
As you’ve seen, the NOOK Tablet is much more than just an ebook reader. With Android apps for pretty much anything you could imagine, it’s an on-the-go laptop replacement, but to live up to that billing, it needs to be able to access the Web. This chapter will show how to use the built-in web browser and native email client to make the NOOK Tablet the only device you’ll need on the go.
Web
When you launch the NOOK web browser for the first time (by pressing the NOOK Button and choosing Web from the Quick Nav Bar), you’ll see a “Welcome to NOOK” screen. If you’ve read this far in NOOK Tablet: Out of the Box, you probably don’t need the welcome videos or FAQs on this page, so you can get right into surfing the Web. If you know the address you want to visit, just tap inside the URL bar at the top of the screen and start typing. The browser will provide its best guess for what you might be looking for, as shown in Figure 8-1.

Either complete typing the full URL and tap Go on the far right of the URL bar, or tap one of the options provided by the browser to zoom to the page of your choice.
Now that you can navigate to a web page, here are the rest of the things you’ll most likely be interested in getting right into, after you’re off and running.
New window
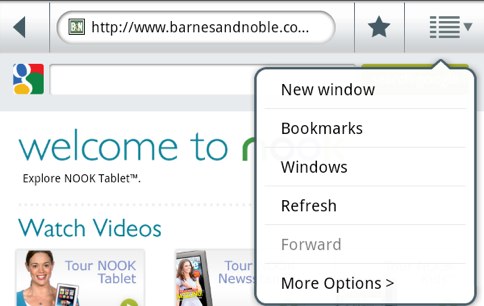
The NOOK browser does not offer tabbed browsing, but you can keep the active window open while opening a new window by tapping the drop-down icon next to the URL bar (Figure 8-2) and selecting “New window.” From the new page, you can type a new URL in the address bar or start typing in the address bar to search Google, as shown in Figure 8-1.
To return to the previously active window, see Windows.
Bookmarks
Tapping the drop-down icon next to the URL bar and selecting Bookmarks (or tapping the star icon to the left of the drop-down icon), displays the default bookmarks the NOOK thinks you might be interested in, along with any bookmarks you may have added on your own (Add bookmark), as shown in Figure 8-3.

Windows
To view all active windows (Figure 8-4), tap the drop-down icon to the right of the URL bar and select Windows. To revisit any of your recently viewed pages, just tap the page in the list.

Refresh
The Refresh option, available from the drop-down icon next the URL bar, reloads the current page.
Forward
If you’ve been browsing awhile and have tapped the Back arrow (to the left of the URL bar), tapping the drop-down icon to the right of the URL bar and selecting Forward brings you back to the page you were viewing before you went back.
Add bookmark
To add the current page to your bookmarks, tap the star next to the URL bar (or tap the drop-down icon and select Boomarks). You’ll see your already existing bookmarks, including an icon for the currently selected page with a “+ Add” label. Tap the icon, and in the dialog box that appears (Figure 8-5), give the page a name, confirm the URL, and tap OK. In the future, the new page will appear when you view your bookmarks (Bookmarks).

Find on page
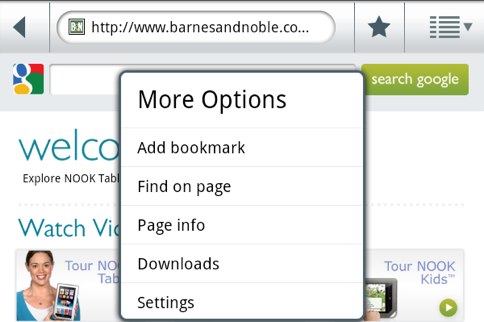
To search for a word or phrase on a web page, tap the drop-down icon, then More Options > (Figure 8-6), and tap “Find on page.” A text box will appear with the virtual keyboard. Type what you’re looking for, and the browser will find it as you type, as shown in Figure 8-7.

If the page contains multiple instances of the word or phrase, tap the forward or back buttons to the right of the number of mentions (next to the search box) to navigate to the next or previous instance.
Page info
Tapping the drop-down icon→More Options >→“Page info” displays the title and URL for the active page, as shown in Figure 8-8.

Downloads
Tapping the drop-down icon→More Options >→“Downloads” presents a list of all downloads from the Web. Tap an item from the list to open it in the default app for its respective format.
Settings
Tapping the drop-down icon→More Options >→“Settings” brings up all available settings for the web browser, as shown in Figure 8-9, Figure 8-10, and Figure 8-11, the options for which are fairly straightforward.


With the groundwork already laid with Android, the NOOK gets email right. Unlike other major features of the operating system, email doesn’t get title billing in the Quick Nav Bar. Instead, it’s a kind of a second-class citizen, sitting in your Apps library. To find it, press the Nook Button and tap “apps” in the Quick Nav Bar. Look for the app with an envelope icon, called Email, and tap it to open.
Your first screen will be a welcome to email setup. Here’s how to get connected.
Create an account
To begin the quick set-up process, which works with most popular email services (you might need to have your system administrator help you with Manual Setup for your work or other privately hosted email), type your email address and password in the corresponding fields (as shown in Figure 8-12) and tap Next.

The email app will automatically log you into your account, but before dumping you into your inbox, you have the option of giving your account a description (helpful, as you’ll see later, if you’re going to set up a second account) and adding your name (which will personalize the From: line in your outgoing emails), as shown in Figure 8-13.

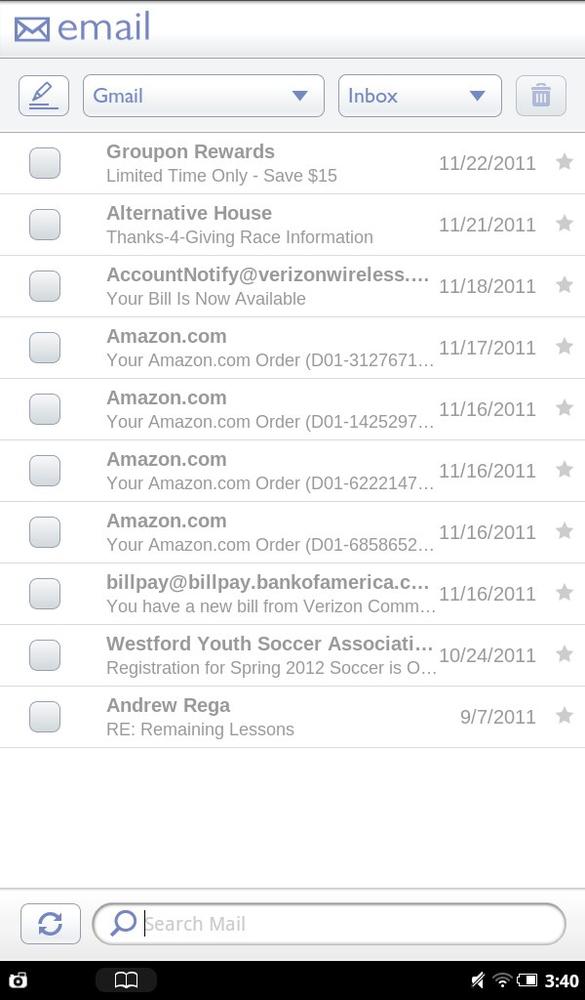
After tapping Done, you’ll see everything in your inbox, ready to read, respond to, or search, as shown in Figure 8-14.
To read a message, just tap it in the list. Your message will display on the full screen, with options at the top to return to your inbox (the left-facing arrow on the left), or move to the previous (the up arrow on the right) or next message (the down arrow on the right) in your inbox. Below the body of the message, you can tap options to reply, delete, or move it to a folder in your account, as shown in Figure 8-15.
To compose a new outgoing message, return to your inbox (press the left arrow key at the top of your message) and tap the pencil icon at the top of the screen (shown in Figure 8-14). To add a contact from your address book on the compose screen (shown in Figure 8-16), tap the icon with two people and a plus sign next to the To: field. Then, just add any Cc:/Bcc: recipients and a subject, type your message in the body text field (the “Enter message here” field), and tap Send.


Create another account
You’re not limited to just one account in the email app, which makes it easy to manage a number of accounts separately or together. To get started, from within your existing inbox, tap the drop-down menu with your existing account label. As shown in Figure 8-17, you’ll see an Accounts option.

Tapping Accounts from that menu displays a list of your existing accounts and a button to Add Account (see Figure 8-18). Tapping that brings you back to the screen shown in Figure 8-12. Just go through the steps in the same way to add the new account.

Combined Inbox
Now that you’re managing more than one account, tapping the Accounts drop-down menu shown in Figure 8-17 gives you a list of all of them, as shown in Figure 8-19.

Tap on either descriptive name for the inbox specific to that account, or choose Combined Inbox. Selecting that option lists all of your emails, from all accounts, mixed together in chronological order.