
Chapter 7
Recording Video
IN THIS CHAPTER
![]() Familiarizing yourself with Z fc video features
Familiarizing yourself with Z fc video features
![]() Recording video using the default settings
Recording video using the default settings
![]() Sorting out the Frame Size/Frame Rate and Video Quality options
Sorting out the Frame Size/Frame Rate and Video Quality options
![]() Adjusting audio-recording settings
Adjusting audio-recording settings
![]() Controlling video exposure, color, and focus
Controlling video exposure, color, and focus
![]() Playing and trimming videos
Playing and trimming videos
In addition to being a stellar still-photography camera, your Z fc enables you to record Ultra High Definition (UHD) video, better known as 4K video. You also can record short videos that automatically play in slow motion, enabling you to take a longer look at each moment of the action you record. You might use this feature to analyze a tennis player’s serve, for example. This chapter tells you how to take advantage of these and other video features.
Understanding a Few Video Basics
Before you dip your toe into video-recording waters, your lifeguard would like you to be aware of the following rules of the pool:
- The maximum continuous recording time for normal videos is 29 minutes and 59 seconds. Of course, your memory card must have enough free space to store the video. Exactly how much space you need to store a maximum-length video depends on two settings: Frame Size/Frame Rate and Video Quality, explained later in this chapter. But be aware that no matter what settings you use, to reach the maximum continuous recording time you need a card that has more than 32GB of available storage space. So unless you’re only going to be recording a few short video clips, start with an empty card with a capacity of 64GB or more.
If you use a memory card with a capacity of less than 32GB, your recording may be split into several 4GB files. For technical reasons that are too boring to explore, a single video clip can be only 4GB in size. During recording, the camera doesn’t let you know when it fills the first 4GB video container and opens a new one — on the surface, recording appears to be uninterrupted. It’s only when you go to play your video that you may discover that your recording was split into individual files. If you used a memory card that had more than 32GB of storage space, the camera joins the individual files into a single video, and you’re good to go. But with a lower-capacity card, the individual files aren’t merged into one. Nor do the clips play back in a continuous stream; you have to start each one manually. The only way to combine the files into a single video is to use a video-editing program. Long story short: Heed my earlier advice to use high-capacity memory cards for recording video.
 Also buy high-speed cards for the smoothest video recording. See Chapter 1 for help understanding card capacity and speed.
- For slow-motion videos, the maximum recording time is 3 minutes, but the final video is about 12 minutes in length. During the recording, the camera captures individual frames at a high rate so that when they are played back in slow motion, the action appears as smooth as possible.
- If the monitor or viewfinder display shows the letters REC with a slash through them, video recording isn't possible. You see this symbol if your memory card is too full to hold even a single clip, for example.
Shooting a Video Using Default Settings
Video enthusiasts will appreciate the fact that the Z fc enables you to tweak a variety of recording settings. But if you're not up to sorting through those options, just use the defaults, which produce a full-HD video, with sound recorded, and stored in the MOV file format.
The following steps explain how to record a video using the default settings. If you’re not sure whether you changed any settings, open the Video Recording menu and choose Reset Video Recording Menu before you start.
Set the Shooting mode switch on top of the camera to Auto.
In this mode, the camera selects most video settings for you.
Put the camera in Video mode by rotating the Photo/Video switch to the position shown in Figure 7-1.
The displays update to show video-related settings. The left screen in Figure 7-2 shows the monitor display; the right screen, the viewfinder.
If you see more or less data than shown in Figure 7-2, press the DISP button as needed to get to the display modes shown in the figure.
Later sections decode the various bits of data; for now, just pay attention to the available recording time, labeled in Figure 7-2. At the default settings, your video can be up to 29 minutes and 59 seconds long.
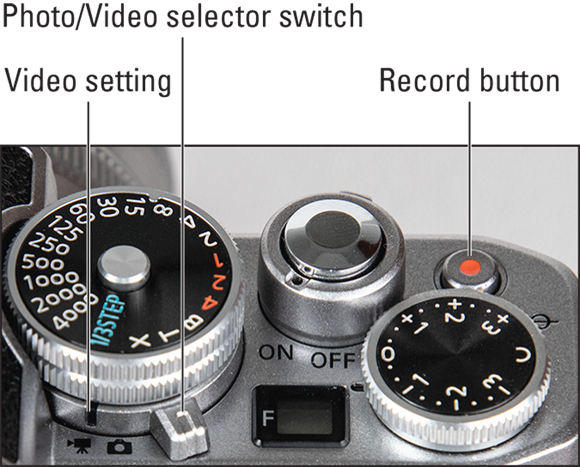
FIGURE 7-1: Set the Photo/Video switch to the Video position to record movies.

FIGURE 7-2: The available recording time appears in the monitor (left) and viewfinder (right).
If your lens has an auto/manual focus switch, set it to autofocus.
If your lens doesn’t have a switch, the camera’s default video settings automatically enable autofocusing, assuming that your lens supports that feature with the Z fc. If not, you must focus manually. (Chapter 4 shows you how.)
Compose your initial shot with your subject inside the red focus area brackets, one of which I labeled in Figure 7-2.
The black bars at the top and bottom of the display mark the vertical boundaries of the video frame. Videos always have a 16:9 aspect ratio.
Wait for the autofocus system to do its thing.
You don’t have to do anything to start autofocusing; at the default video-recording settings, autofocusing begins automatically, and focus is continuously adjusted as the camera sees fit.
 The human face/eye detection feature is turned on by default. This feature works just as it does for still photography: If the camera finds a face or an eye, a yellow focus frame appears over the face or eye. Focus is then based on that frame. A yellow triangle on the side of the focus frame means that you can move the frame over another face or eye. Use the Multi Selector to move the frame.
When the camera doesn't detect a face or eye, it typically sets focus on the object closest to the lens. If you want to verify where focus is being established, press the shutter button halfway. Green boxes appear in order to show where autofocus has been established. Release the button when you’re done to return to continuous autofocusing.
To begin recording, press the Record button, labeled in Figure 7-1.
Some shooting data disappears, and the recording symbol labeled in Figure 7-3 appears in the monitor. The area labeled Remaining recording time shows how many more minutes of video you can record. In the viewfinder, the time-remaining value appears in the lower right corner; the recording symbol is at top center.
To stop recording, press the Record button again.
Wait for the memory-card access light on the back of the camera to turn off before powering down the camera. While the light is on, data is being written to the memory card.
If you set the camera to Self-Portrait mode, as outlined at the end of Chapter 1, you can see yourself on the monitor while recording. This feature is helpful for video blogging or recording any video in which you are the star.
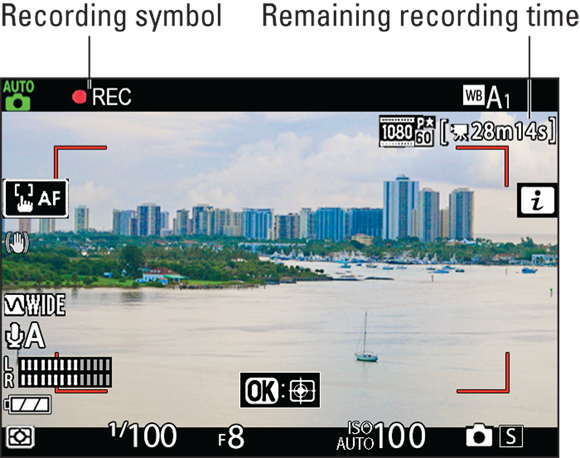
FIGURE 7-3: The recording symbol indicates that recording is in progress.
Adjusting Video Settings
For the most part, you change video settings using the same techniques as for still photography. The following list spells out the few differences that exist.
Select settings from the Video Recording menu, not the Photo Shooting menu. The two menus offer many of the same options, but you need to select them from the Video Recording menu to affect recording. The Video Recording menu offers four pages of options; Figure 7-4 shows just Page 1. As with still photography, many options are unavailable if you stick with the Auto Shooting mode. To access all available settings, you have to set the Shooting mode to P, S, A, or M. Some settings are available only when you use certain lenses, regardless of the Shooting mode.
Four menu settings — White Balance, Set Picture Control, Active D-Lighting, and Vibration Reduction — offer an option named Same as Photo Settings along with the normal array of choices you get when you take still photos. For example, Figure 7-5 shows the Video Recording menu choices for White Balance. If you select Same as Photo Settings, the camera uses whatever setting was in force before you switched to Video mode. That setting appears under the Same as Photo Settings option (Auto1, in the figure).
FIGURE 7-4: Use the Video Recording menu, not the Photo Shooting menu, to select settings.

FIGURE 7-5: If you choose Same as Photo Settings, the camera uses whatever setting was in force before you switched to Video mode.
In Video mode, the i menu offers the recording settings shown in Figure 7-6. If you’ve been using the i menu for still photography, you’ll notice that some settings, such as White Balance and Picture Control, are in their usual places on the menu. But the video i menu also offers settings specific to video recording.
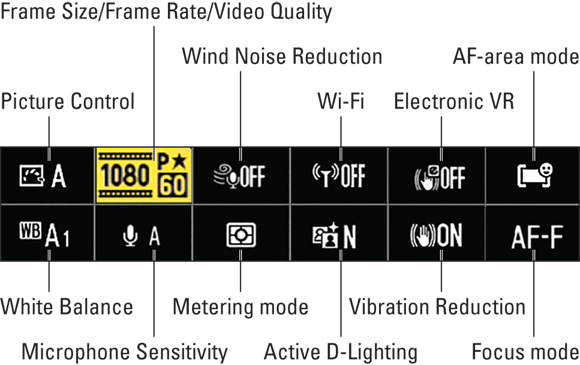
FIGURE 7-6: In Video mode, the i menu offers quick access to these settings.
When you choose a setting that offers the Same as Photo Settings option and that choice is selected, you see the symbol labeled in Figure 7-7. And here’s where things get a little tricky: If you change the setting via the i menu, the camera also selects that setting for still photography. So, if you want to use separate settings for stills and videos, don’t select the Same as Photo Settings option from the Video Recording menu.
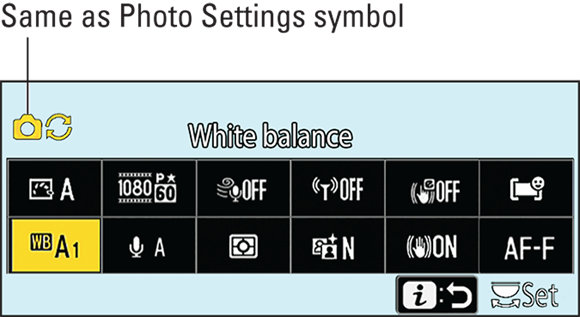
FIGURE 7-7: This symbol means that the Same as Photo Settings option is selected on the Video Recording menu.
- On the Custom Settings menu, head for the Video section for five additional video-related options. I talk about the first two options, which customize the i menu and some camera buttons, in Chapter 10. I cover the rest later in this chapter; see the section “Looking at Other Menu Options.”
Choosing a Video Format: MOV or MP4
Your camera offers two video formats: MOV and MP4. Set the format via the Video File Type option on the Video Recording menu, as shown in Figure 7-8.
MOV, which is the default, was developed by Apple for use with its QuickTime software, but now many Mac and PC programs can work with MOV files. MOV is also the only format that lets you use the camera’s timecode feature, explained in the section “Looking at Other Menu Options,” later in this chapter. Professional producers rely on timecode data during editing, but it’s useful for anyone who needs to be able to quickly find a particular frame in a long video clip.
MP4 was developed to provide greater compatibility on both computing platforms, and it’s now popular for video sharing online. If you’re planning to upload your video directly to social media, you may want to switch from MOV to MP4.
Another difference between the two formats is how audio is recorded. MOV files use an audio-encoding technology called Linear PCM (Pulse Code Modulation); MP4 files use AAC (Advanced Audio Coding). Both are capable of producing good-quality sound. But if you’re recording video that will be distributed over a platform that has specific audio requirements, the audio encoding type may help you decide which video format will work best.
Finally, there’s the issue of file size. If you’re a video expert, you may expect MOV to produce higher-quality video and larger files than MP4, which is how things generally work in the pro arena. Nikon does recommend MOV for best quality, but whether you notice any difference between the two formats depends on your subject, so experiment. As for file size, MOV does not produce significantly larger files than MP4 on the Z fc.
Whichever format you choose, the file size and look of your video are also affected by the Frame Size/Frame Rate and Video Quality settings, explained next.
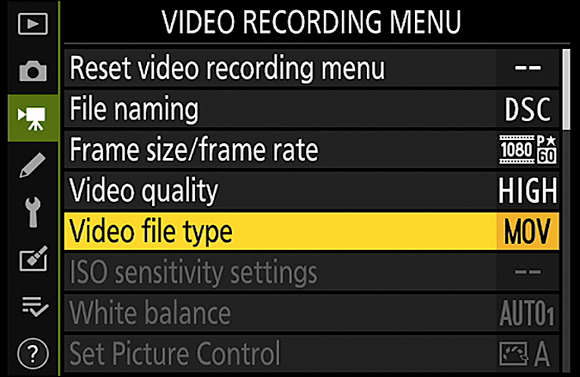
FIGURE 7-8: Your camera can record videos in either the MOV or MP4 file format.
Setting Frame Size, Rate, and Quality
In addition to choosing a file type (MOV or MP4), you also need to consider two other critical recording settings: Frame Size/Frame Rate and Video Quality (bit rate). The next section explains these options; if you’re already familiar with them and just want to know how to select the settings on the Z fc, skip to “Changing frame size, fps, and bit rate,” later in this chapter.
Understanding basic video terminology
Sit in a room full of budding videographers and you’ll hear statements like “My camera can record 1080p at 60 frames per second and a bit rate of 144 Mbps” followed by “Oh, that’s sad — my camera can do 4K at 120 frames per second and 144 Mbps.” I don’t advise joining in these one-upmanship games because, really, there are better ways to pass the time. But understanding the specs being tossed around is necessary if you want to choose the best video settings for your next recording.
In the examples I provided, the numbers refer to frame size, frame rate, and bit rate, in that order. Together, these options affect the quality of your video and the size of the file needed to store it. Here are the details:
- Frame size: Digital video is made up of pixels, the same tiny squares that create digital photos. For video, resolution is stated in terms of the number of horizontal pixels and vertical pixels used to create a single frame. You get two frame sizes:
- 3840 x 2160: This setting delivers the closest thing to the vaunted TV spec of 4K video, also known as Ultra High Definition (UHD) video. A 4K video has a horizontal frame size of about 4,000 pixels wide. (K in this case stands for one thousand pixels.)
- 1920 x 1080: The default recording setting, this frame size qualifies as Full HD (High Definition).
- Frame rate: This setting determines how many frames are created to produce one second of video, which is why frame rate is stated as fps, (frames per second). The frame rate affects the look of your video, as follows:
- 24fps is the standard for motion pictures. It gives your videos a softer, more film-like look.
- 25fps gives your videos a slightly sharper, more realistic look. This frame rate is the standard for television broadcast in countries that follow the PAL video-signal standard, such as some European countries.
- 30fps produces an even crisper picture than 25 fps. This frame rate is the broadcast video standard for the United States and other countries that use the NTSC signal standard.
50fps and 60 fps are often used for recording high-speed action, such as sports. With more frames per second, fast movements are rendered more smoothly. At lower frame rates, action footage can appear a little choppy.
How about 50 versus 60? You’re back to the PAL versus NTSC question: 50fps is a PAL standard, and 60 is an NTSC standard.
100fps and 120fps are often used to record action at high speed and then convert it to slow-motion video. Again, the lower of the two frame rates (100fps) is the PAL standard; 120fps is NTSC. Either way, the more frames you capture per second, the smoother the playback of the slo-mo version. The massive number of frames per second also should result in the smoothest regular playback.
 Don’t assume that maxing out the frame rate is ideal for all recordings. First, the highest frame rate produces a much larger file than a lower frame rate. Second, the uberhigh frame rate disables certain features: Face/eye-detection autofocus, Electronic VR, Flicker Reduction, and the option to output the video signal to an HDMI monitor during recording.
For the 30fps, 25fps, and 24fps frame rates, you can specify that you want the camera to record the action in a way that produces a good slow-motion video. This setting saves you the trouble of recording the scene at a high frame rate and then using a video-editing tool to turn the footage into a slow motion video. You can record up to a 3-minute clip, which takes about 12 minutes to play in full. But there are some critical drawbacks to this automated slo-mo feature: You can’t record sound, and all the limitations of using the 100fps and 120fps frame rate also apply.In the interest of full disclosure, Nikon wants you to know that the stated frame rates are rounded up (as they are on most recording devices). The actual frames-per-second values for the 24, 30, 60, and 120fps values are: 23.976, 29.97, and 59.94, and 119.88fps, respectively.
Video quality (bit rate): Bit rate refers to how much data is used to represent 1 second of video, measured in megabits per second (Mbps). A higher bit rate results in better video quality but a larger file.
On the Z fc, you set the bit rate via the Video Quality setting, with possible bit rates ranging from 14 to 144 Mbps. Nikon assigns the generic names High Quality and Normal Quality to its bit rate settings; the first results in the highest bit rate available for the selected frame size and frame rate. However, for many combinations of frame size and frame rate, the camera limits you to using the High Quality setting. Only a few combinations of frame size/frame rate enable you to select High Quality or Normal Quality.
All three settings affect the size of the video file, which in turn determines how much space it consumes on your memory card as well as the maximum length of the recording you can capture at one time. As an example, at 1920 x 1080, 60fps, and High Quality, one minute of video has a file size of about 430 megabytes (MB). One minute at 3840 x 2160, 30fps, and High Quality has a file size of more than double that, 1.05GB.
Table 7-1 lists the possible combinations of Frame Size/Frame Rate and Video Quality settings. Remember that for all but the slow-motion settings, that maximum recording time is 29 minutes and 59 seconds — again, assuming that your memory card has the capacity to store the entire video. For the slo-mo settings, the maximum recording time is 3 minutes (but the final video is about 12 minutes long).
TABLE 7-1 Frame Size/Frame Rate/Video Quality Combos
Frame Size | Frame Rate | Video Quality (bit rate) |
|---|---|---|
3840 x 2160 | 24, 25, 30 | High (144 Mbps) |
1920 x 1080 | 100, 120 | High (144 Mbps) |
50, 60 | High (56 Mbps) | |
Normal (28 Mbps) | ||
24, 25, 30 | High (28 Mbps) | |
Normal (14 Mbps) | ||
24 x 5 slo-mo | High (29 Mbps) | |
25 x 4 slo-mo | High (36 Mbps) | |
30 x 4 slo-mo | High (36 Mbps) |
Changing frame size, fps, and bit rate
Video frame size, frame rate (fps), and bit rate are presented on the Z fc as two settings: Choose the first two options via the aptly named Frame Size/Frame Rate setting; choose the bit rate via the Video Quality setting, which I feel is inaptly named because frame rate also affects video quality. But we must play the cards Nikon deals, so I’ll abandon that rant and get to the question of how to view and adjust both settings.
In the displays, the Frame Size/Frame Rate and Video Quality settings are indicated by the symbol highlighted in Figure 7-9. The first number — 1080, in the figure — tells you the frame size, albeit only the frame height. (This way of representing frame size is standard in the video industry.) The second number — 60, in the figure — is the frame rate. The p after the frame rate represents the fact that the camera records footage using progressive video technology. You don’t have any other option on the Z fc, but don’t fret: Progressive video is a more current technology than the other common one, interlaced video.
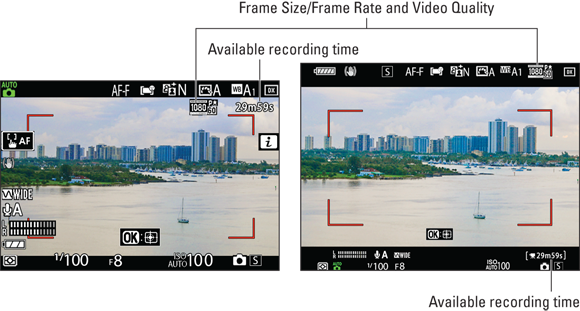
FIGURE 7-9: This symbol reports the Frame Size/Frame Rate and Video Quality settings.
The Video Quality setting — which, again, determines bit rate — is represented by a star, or lack thereof. When the star appears, as in the figure, the High setting is selected. At the Normal Video Quality setting, the star disappears. See Table 7-1 for the specific bit rate you get at each combination of Frame Size/Frame Rate and Video Quality settings.
Adjust the two settings as follows:
- Video Recording menu: Select Frame Rate/Frame Size from the menu, as shown in Figure 7-10, to set those two aspects of your video. Choose Video Quality from the menu to access that part of the recording setup.
- i menu: Go this route to select Frame Size/Frame Rate and Video Quality from one menu screen. Refer to Figure 7-6 for help finding the setting; it’s highlighted in the figure.

FIGURE 7-10: Choose Frame Size/Frame Rate from the Video Recording menu to see the frame width as well as frame height for each setting.
Whichever route you take, remember these additional considerations as you scan the list of possibilities:
- You’re locked into using the High Video Quality setting for certain Frame Size/Frame Rate combinations. The Normal and High settings both appear dimmed in the menus in this scenario because you can’t change the setting. See Table 7-1 for a look at the few recording combinations that enable you to select either High or Normal for the Video Quality setting.
- As you adjust the settings, keep an eye on the available recording time value, labeled in Figure 7-9. Remember that frame size, frame rate, and bit rate (the Video Quality setting) all contribute to file size. The larger the file size, the fewer minutes of video you can fit on the memory card. Additionally, your video may be split into multiple 4GB files if you use a low-capacity memory card. (See the section “Understanding a Few Video Basics” for a refresher on that topic.)
Controlling Audio
Your camera offers a built-in stereo microphone, which sucks in sound via two tiny holes hidden under the Nikon label, in the area labeled on the left in Figure 7-11. You also have the option of connecting an external microphone such as the Nikon ME-1 to the jack labeled on the right in the figure.
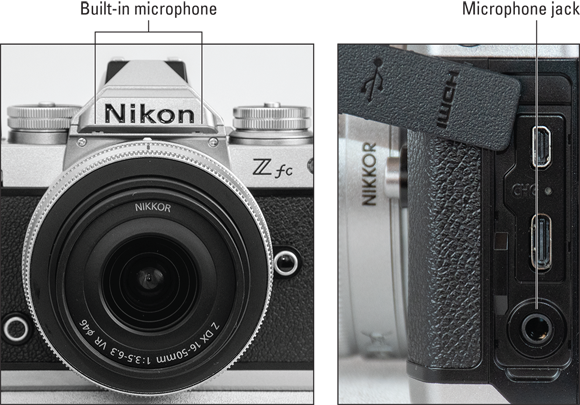
FIGURE 7-11: You can record audio with the internal microphone (left) or plug in an external mic (right).
The next few sections explain options for controlling audio recording.
Setting microphone sensitivity
The most critical audio control is Microphone Sensitivity, which determines the loudest sound the microphone can “hear.” You have these options:
- Auto Sensitivity: The camera automatically adjusts recording volume according to the level of the ambient noise. This setting is the default.
- Manual Sensitivity: You specify a recording level from 1 to 20, with a higher number increasing microphone sensitivity.
- Microphone Off: Choose this setting to disable audio recording.
Symbols representing the current setting appear in the areas highlighted in Figure 7-12. The microphone symbol with a letter A indicates the Auto Sensitivity option; with Manual Sensitivity, the number of your chosen recording level appears with the mic. Choose Microphone Off, and you see a microphone with a slash through it.
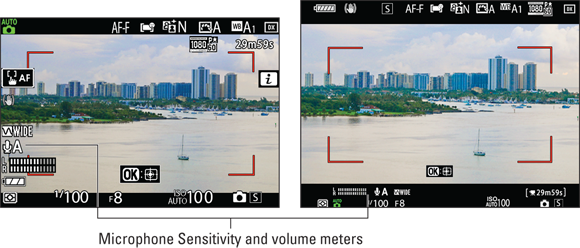
FIGURE 7-12: These symbols indicate the Microphone Sensitivity setting and volume level.
Beneath the microphone symbol are two horizontal bars that measure audio volume, as shown in Figure 7-12. When you’re recording stereo sound, the top bar shows the sound level of the left audio channel; the bottom bar, the right channel. (The built-in mic offers stereo recording.)
 Audio levels are measured in decibels (dB), and levels on the volume meter range from –40 (very soft) to 0 (as loud as can be measured digitally). Ideally, sound should peak consistently in the –12 range. The indicators on the meter turn yellow in this range. If the sound level is too high, the bar at the top of the meter turns red — a warning that audio may be distorted.
You can adjust the setting in two ways:
- Video Recording menu: Choose Microphone Sensitivity, as shown on the left in Figure 7-13, to see the selection screen shown on the right. The screen also offers volume meters to guide you. If you choose Manual Sensitivity, press the Multi Selector right to display the screen where you set the recording level. Press the OK button or tap the OK symbol on that screen to lock in your choice.
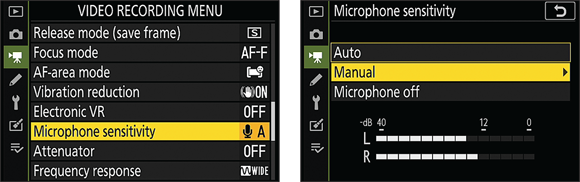
FIGURE 7-13: One way to establish microphone sensitivity is via the Video Recording menu.
 i menu: You also can choose the Microphone Sensitivity setting as well as another audio setting, Wind Noise Reduction, from the i menu. Figure 7-14 shows where to find both settings; the next section explains Wind Noise Reduction.

FIGURE 7-14: You also can adjust two audio settings via the i menu.
Adjusting other audio settings
Look for these additional audio options on the Video Recording menu:
Frequency Response: By default, this option is set to Wide, which tells the mic to respond to a large audio frequency, picking up sounds ranging from high-pitched sounds to deep bass notes. Your other choice is Vocal, which focuses the mic on the frequency of the human voice.
In the displays, the Frequency Response setting appears next to the symbol that indicates the Microphone Sensitivity setting. You see the label Wide, as in Figure 7-12, or Voice.
Wind Noise Reduction: Ever seen a newscaster out in the field, carrying a microphone that looks like it’s covered by a piece of foam? That foam-thing is a wind filter, which is, designed to lessen the sounds that the wind makes when it hits the microphone. When using the built-in microphone, you can enable a digital version of the same effect via the Wind Noise Reduction option. Essentially, the filter works by reducing the volume of noises that are similar to those made by wind. The problem is that some noises not made by wind can also be muffled when the filter is enabled. So when you're indoors or shooting on a still day, keep this option set to Off, as it is by default. Also note that when you use an external microphone, the Wind Noise Reduction feature has no effect.
You can change this setting from the Video Recording menu or the i menu (refer to Figure 7-14). When the filter is on, the symbol that appears on the i menu shows up next to the Frequency Response symbol in the displays. Turn the filter off, and the symbol disappears.
- Attenuator: At a concert or another loud venue, the noise level may be so high that audio sounds distorted no matter which Microphone Sensitivity setting you choose. If you experience this problem, try enabling the Attenuator feature on the Video Recording menu. Note that the camera doesn’t indicate in the displays that the feature is turned on except when you use the i menu to adjust the Microphone Sensitivity setting. Then the letters ATT appear over the volume meters on the setting screen.
Controlling and Monitoring Exposure
You can adjust video exposure by using many of the same tools that I cover in Chapter 3. The following list summarizes available options and points out where things diverge from still photography. Some options are available via the i menu; refer to Figure 7-6 to see where to find them. All settings are available from the Video Recording menu.
- Metering: Matrix (whole frame) exposure metering is the default; your other options are center-weighted metering or highlight-weighted metering. Spot metering isn’t available for video recording.
- ISO: You must use M Shooting mode to fully control ISO; use the ISO dial to select the setting. In other modes, the camera sets ISO, although the next option on this list gives you some control in P, S, and A modes.
- ISO Sensitivity Settings: Choose this option to uncover the following ISO controls:
- Maximum Sensitivity: In the P, S, and A Shooting modes, the camera adjusts ISO automatically, but you can use this setting to limit the highest ISO the camera can select.
- Set Auto ISO Control (Mode M): Turn on this option to enable Auto ISO for the M Shooting mode. If you do, the camera respects the current setting for the Maximum Sensitivity option.
Shutter speed: You must set the Shooting mode to M to select the shutter speed; the camera automatically adjusts that setting in all other modes, including S (shutter-priority autoexposure). Use the Shutter Speed dial techniques outlined in Chapter 3 to adjust the setting.
You can choose shutter speeds as high as 1/4000 second; the slowest shutter speed depends on the video frame rate (60fps, 30fps, and so on). You know that you’ve bumped up against the end of the shutter speed range when the camera refuses to select a slower speed.
- Aperture (f-stop): You can adjust the f-stop in A (aperture-priority autoexposure) or M (manual exposure) modes. Rotate the Sub-command dial or tap the setting on the touchscreen to adjust the f-stop.
Exposure Compensation: You can apply this adjustment in any Shooting mode. However, you're limited to a range of EV +3.0 to –3.0. Adjust the setting using the Exposure Compensation dial. Raise the value for a brighter exposure; lower it for a darker result.
In M Shooting mode, the Exposure Compensation setting has no effect unless you enable Auto ISO Control (mode M) from the ISO Sensitivity Settings menu option just described. If you do, the camera fiddles with ISO to achieve the Exposure Compensation adjustment.- Active D-Lighting: In P, S, A, and M Shooting modes, you can set the level of Active D-Lighting, which brightens shadows without lightening highlights. If you access the setting from the Video Recoding menu, you find an option not on the i menu: Same as Photo Settings, which automatically dials in the last Active D-Lighting amount you used for still photography. See the section “Adjusting Video Settings” for details about the Same as Photo Settings option.
- High ISO NR (Noise Reduction): The camera applies the Normal level of noise reduction when you use a high ISO. (Noise is the speckled defect that can occur at very high ISO settings.)
- Vignette Control: This setting aims to compensate for a lens phenomenon that causes corners of a scene to appear darker than they should. It’s set to Normal by default.
 AE Lock: Depending on your Shooting mode, the camera continuously adjusts one or more exposure settings to account for any changes in lighting conditions. You can interrupt the adjustment and record footage using the currently displayed exposure settings by pressing and holding the AE-L/AF-L button. Release the button to resume continuous exposure adjustment.
Any changes you make to exposure settings should be reflected in the brightness of the monitor and viewfinder displays. But this aspect of the live preview depends on a setting in the Shooting/Display section of the Custom Settings menu: Apply Settings to Live View must be turned on.
You may also want to add the Brightness histogram to the display, as discussed in Chapter 1. (Press the DISP button until the histogram appears.) But I find that the histogram obscures too much of the scene, so I prefer to enable it only for a quick check before I start recording.
In addition to the histogram, you have one other exposure guide at your disposal when the camera is in Video mode. You can display a black-and-white striped pattern — the zebra warning, in photo and video circles — atop areas that have a concentration of very bright pixels, indicating the potential for overexposed highlights, as shown in Figure 7-15. To turn on the alert, open the Custom Settings menu, choose Video, and enable Highlight Display, as shown as shown on the left in Figure 7-16.
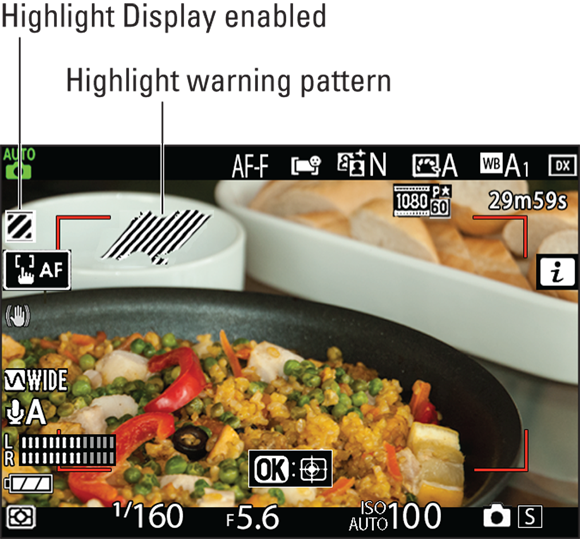
FIGURE 7-15: The black-and-white “zebra pattern” appears over areas that may be overexposed.
The option offers two settings, as shown on the right in the figure: Display Pattern lets you choose from two alert designs or turn off the feature. Highlight Display Threshold tells the camera how bright a pixel must be to be considered a potential problem. To understand this setting, remember that brightness values range from 0 (black) to 255 (white). The default threshold is 248, so areas that are a little darker than pure white are included. That’s a good thing because, if the light suddenly gets brighter, the 248-level pixels can easily blow out to full white (255), which destroys highlight detail. If you’re shooting a subject that’s mostly white or light tones, you may want to reduce the value a smidge. Be aware, though, that the overlay is just a warning sign: You must take steps to correct the potential overexposure problem; the camera doesn’t do it for you.

FIGURE 7-16: Enable Highlight Display from the Custom Settings menu.
When the feature is on, the Highlight Display setting symbol labeled in Figure 7-15 appears. Turn off the feature, and the symbol goes away.
Looking at Other Menu Options
In addition to settings reviewed earlier in this chapter, you can control other aspects of your cinematic effort, using these options:
- File Naming: By default, the names of video files begin with the letters DSC. Choose File Naming from the Video Recording menu to swap out those letters with three of your choosing — VID, perhaps. Any photos you shoot when the camera is in Video mode use your custom prefix, too. But when you shoot in Photo mode, your photos continue to use the default DSC prefix unless you change the File Naming setting on the Photo Shooting menu. Each menu controls filenames separately from the other.
Focus Mode and AF-Area mode: These settings control the camera’s focusing behavior the same way they do for still photography, detailed in Chapter 4. But both settings offer different options for video, as follows:
- Focus mode: The AF-A (automatic Focus mode adjustment) option is replaced by AF-F, which results in automatic, full-time autofocusing. This setting is the default and is your best option when recording action or any moving subject.
- AF-area mode: The Dynamic-area option that’s normally available when you set the Focus mode to AF-C is missing. Pinpoint AF-area mode, normally available when you set the Focus mode to AF-S, is also off limits for video recording. Remember, too, that when you use certain Frame Size/Frame Rate settings, face and eye detection autofocus options are unavailable.
The steps near the start of this chapter show you how to autofocus using the default settings: AF-F and Auto-area AF (People). You can adjust the settings from the Video Recording menu or the i menu. (Refer to Figure 7-6.)
For two advanced autofocusing options, open the Custom Settings menu and choose Video. On the next screen, you find these settings:
- AF Speed: This option sets the speed at which the camera adjusts focus when the Focus mode is set to AF-F or AF-C. You also can tell the camera whether to apply the speed change only during recording or anytime you put the camera in Video mode. If you opt for only-while-recording, the fastest possible focusing speed (+5) is always used when you’re not recording.
- AF Tracking Sensitivity: This feature, which is also relevant only when the AF-F or AF-C Focus modes are used, affects how quickly the camera shifts to a new focus target if your subject leaves the selected focus area. A lower value typically results in focus being better maintained on your subject. At a high value, the camera may jump immediately to a different subject in the selected focus area. Possible values range from 1 (High) to 7 (low). The default is 4.
Vibration Reduction and Electronic VR: These options aim to produce steadier shots when you handhold the camera. Vibration Reduction is built into some lenses, whereas Electronic VR is an antishake technology built into the Z fc. If your lens has a switch that enables regular Vibration Reduction (it may be called something else, such as Vibration Compensation), use the switch to turn the feature on and off. Otherwise, enable either or both options via the Video Recording menu or i menu, as shown in Figure 7-17. If the Vibration Reduction option is unavailable, your lens doesn’t support the feature or you control it by way of a lens switch.
Electronic VR is incompatible with certain Frame Size/Frame Rate settings. It’s unavailable for slow-motion options and for frame rates of 100fps and 120fps.
FIGURE 7-17: You can enable Electronic VR and Vibration Reduction from the video i menu.
- White Balance: Video colors are rendered according to the White Balance setting, detailed in Chapter 5. You control this option only in the P, S, A, or M Shooting modes. Adjust the setting by way of the Video Recording menu or the i menu. This setting is another one that offers the Same as Photo Settings option, detailed in the earlier section “Adjusting Video Settings.” That setting is the default.
- Picture Control: Also covered in Chapter 5, this setting alters sharpness, color saturation, and contrast. Again, if you shoot in P, S, A, or M mode, you can choose a Picture Control; otherwise, the camera is in charge. Change the setting by choosing Set Picture Control from the Video Recording menu or via the i menu. The Video Recording menu offers the Same as Photo Settings option, which is the default.
- Diffraction Compensation and Auto Distortion Control: Found on the Video Recording menu, these settings relate to defects created by certain lenses. The first option tries to compensate for loss of sharpness that can appear at the corners of images when you use a high f-stop value. The second setting addresses barrel distortion, which makes the scene appear to bulge outward, and pincushioning, which has the opposite effect. Whether you can use either feature depends on your lens.
- Flicker Reduction: Enable this option from the Video Recording menu if you notice monitor flickering that can be caused by certain types of lights, including fluorescent, mercury vapor, or sodium lamps.
Timecode: This feature is available when you set the Video File Type setting to MOV. It embeds a hidden time counter, or timecode, into your video. For each frame of video, the timecode tells you how many hours, minutes, and seconds into the recording the frame was captured. Following that, the timecode readout shows a frame number that distinguishes the individual frame from every other frame captured during the same second. (Remember that the camera is recording multiple frames per second.) So the value 00:23:15.09 represents the ninth frame that was captured at 23 minutes and 15 seconds into the recording.
Including timecode data makes it easy to search later for a particular point in a video. For example, you can keep a log during recording that notes “recital performer #1 at 00:04:25.10, performer #2 at 00:10:10.04” and so on. Or, if you’re recording a series of “takes” in which your star tries to complete a two-minute speech without stumbling, you can note “show boss best attempt at 00:28:29.15.”
To enable the feature, choose Timecode from the Video Recording menu, as shown in Figure 7-18. The four options work as follows:
- Record Timecodes: Set to On to include timecode data. If you connect the camera to an external recorder via HDMI cable, choose On with HDMI Output to send timecode data to that device. (See the camera instruction manual for a list of compatible recorders.)
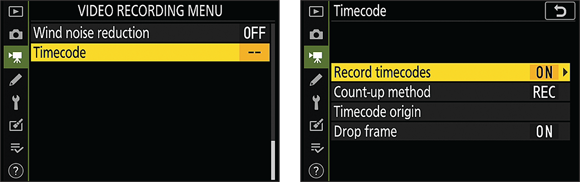
FIGURE 7-18: Turning on the Timecode feature makes it easier to search later for a specific part of your video.
- Count-up method: Record Run allows the timecode counter to operate only during recording. Free Run lets the counter continue indefinitely, even when the camera is off. The latter option is helpful when you’re recording short clips during a daylong event and want to be able to easily find footage shot during hour 4.
- Timecode origin: This setting controls the initial timecode value. Choose Reset to start your next recording at 00:00:00.0. Choose Current Time to synchronize the timecode with the camera’s clock (which you set via the Time Zone and Date option on the Setup menu). Choose Enter Manually to set a custom starting value.
Drop Frame: This setting has to do with the fact that when you set the frame rate to 30 frames per second, you actually get only 29.97 frames. This same discrepancy occurs for other frame rates. When Drop Frame is on, the camera intermittently skips a frame number in its count so that an hour of footage is reported as an hour by the timecode. As a result, it’s possible that if you search for a timecode value in an editing program, the program won’t find any such number. Don’t panic: The frame of video is there, just not at the timecode number you entered. Try adjusting the search number by a frame or two.
The default setting for Drop Frame is On. If you’re shooting for a client or video professional, ask whether to turn off the feature.
You can view timecode data during playback on the camera in the default playback display mode, as discussed in the next section. It’s also visible in some video-editing programs. But it doesn’t appear when you use most other video players.
- Record Timecodes: Set to On to include timecode data. If you connect the camera to an external recorder via HDMI cable, choose On with HDMI Output to send timecode data to that device. (See the camera instruction manual for a list of compatible recorders.)
Screening Your Videos
![]() To switch from shooting videos to viewing them, press the Playback button. In the default playback display mode, which shows one photo or video at a time, your screen should look something like the one in Figure 7-19.
To switch from shooting videos to viewing them, press the Playback button. In the default playback display mode, which shows one photo or video at a time, your screen should look something like the one in Figure 7-19.
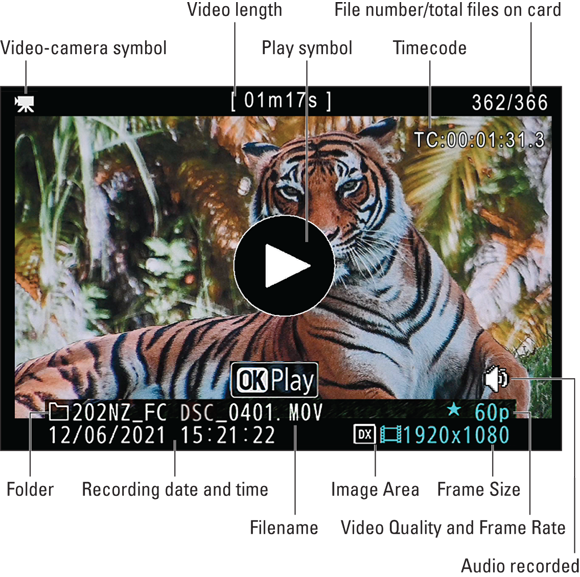
FIGURE 7-19: The default playback display mode shows this video data.
If you see multiple thumbnails rather than a single video frame like the one in Figure 7-19, tap the video thumbnail to display it all by its lonesome. Or, use the Multi Selector to highlight the thumbnail and then press the Zoom In button as many times as needed to get to single-frame view. If the camera is set to the Calendar display mode, see Chapter 8 to find out how to select the video you want to play and customize the display.
Notice a couple of things about the display shown in Figure 7-19: To help you distinguish a video from a photo, a video-camera symbol appears in the upper left corner of the screen, and the traditional “play” symbol — a right-pointing triangle — appears in the middle of the screen. (I labeled the triangle in the figure.) You also see other video-related data, including the Frame Size, Frame Rate, and Video Quality settings, as labeled in the figure. Timecode data appears in the upper right corner if you enabled that feature.
As explained in the section “Understanding a Few Video Basics,” at the start of this chapter, a long recording may be split into several video 4GB files, depending on the capacity of memory card you used. If the card had an available storage capacity of greater than 32GB, a maximum-length video should play as a single file. Otherwise, you have to play each 4GB clip individually.
To start playback of any video, tap the play symbol, tap the OK Play box, or press the OK button. After playback begins, you see the data labeled in Figure 7-20. The symbols at the bottom of the screen are there to remind you that you can use various dials and buttons to control playback. For example, the circular symbol at the far right end of the screen represents the Multi Selector, and the semicircle just to the left represents the Sub-command dial. Use the following techniques to pause, advance, or rewind through the video and to adjust playback volume:

FIGURE 7-20: The icons at the bottom of the screen remind you which buttons and dials to use to control playback.
- Stop playback: Press the Multi Selector up.
- Pause/resume playback: Tap the monitor to pause; tap again to resume. Or press the Multi Selector down to pause and press OK to resume.
- Fast-forward/rewind: Press the Multi Selector right or left to fast-forward or rewind the video, respectively. Press again to double the fast-forward or rewind speed; keep pressing to increase the speed. Hold the button down to fast-forward or rewind all the way to the end or beginning of the video. You also can tap on the progress bar, labeled in Figure 7-20, to advance or rewind the video to the spot you tap.
- Forward/rewind 10 seconds: Rotate the Sub-command dial to the right to jump 10 seconds through the video; rotate to the left to jump back 10 seconds. The camera pauses playback after every jump; tap the screen or press OK to resume playback.
- Advance frame by frame: Press the Multi Selector down or tap the screen to pause playback. Then press right to advance one frame; press left to go back one frame.
- Jump to end or beginning of video: Rotate the Main command dial left to go to the start of the video; spin the dial right to jump to the end.

 Adjust volume: Press the Zoom In button to increase volume and press the Zoom Out button to lower it. The number between the two symbols tells you the current volume level (15, in Figure 7-20). You also can tap the symbols to adjust volume. Use this trick to ensure that the volume is where you want it when the screening begins. Before starting playback, press the i button and then choose Volume Control to see just the volume controls. Again, use the Zoom In and Zoom Out buttons to raise or lower the volume. Tap OK or press the OK button to return to the initial playback screen.
 Exit the video: Tap the exit arrow, labeled in the figure, or press the Playback button to exit the video and return to the playback screen.
You can hide most or all of the onscreen data that appears with your video. Before starting playback, open the Playback menu, choose Playback Display Options, and turn on the None (Picture Only) option. After exiting the menu, press the DISP button to switch from the default playback display to the None display. (If you enabled other display options, you may need to press DISP more than once.) Chapter 8 details playback display settings.
If you want to screen your video on an external monitor, you can do so by connecting the camera to an HDMI TV. Chapter 10 details options related to this function.
Trimming Videos
If you want to lop off frames from the start of a video, the end of a video, or both, you can do it in the camera. Here’s the easiest method:
- Press the Playback button to put the camera in Playback mode.
- Press the Multi Selector left and right to scroll through photos and videos until you see the video you want to edit.
- Press the i button and then choose Trim Video.
You see a new version of the playback screen, which now sports the editing symbols shown in Figure 7-21. Notice the markers labeled Start Point and End Point in the figure. You move these markers to set new first and last frames for the video.
Only one marker is active at a time; the active marker is yellow. Initially, the Start Point marker is active.
Move the Start Point marker right until you reach the frame you want to use as the new first frame.
To move the marker, tap the Forward symbol, labeled in the figure, or press the Multi Selector right. (Other playback techniques outlined in the preceding section also work.) If you go too far, rewind by pressing the Multi Selector left or tapping the Rewind symbol.
- Activate the End Point marker by pressing the AE-L/AF-L button or tapping its symbol at the bottom of the screen.
Move the End Point marker left until you display the frame you want to use as the last frame of the video.
You can press the AE-L/AF-L button to toggle between the Start Point and End Point marker as many times as needed until you display the exact first and last frames you want to keep. Remember that the active marker is yellow.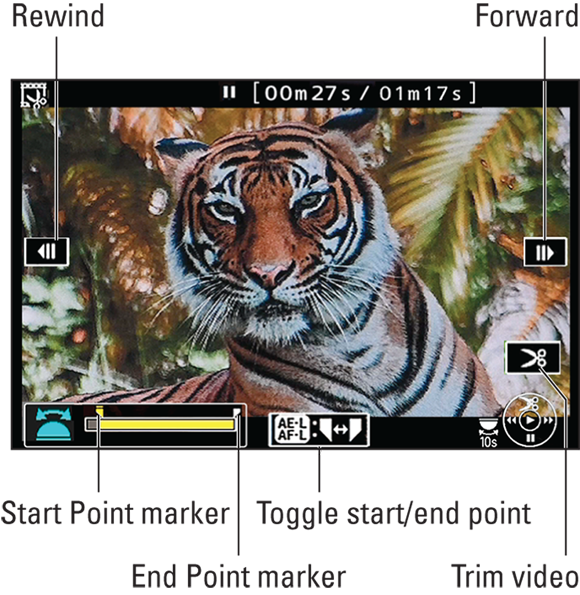
FIGURE 7-21: You can trim frames from the start and end of a video right in the camera.
To finalize the edit, press the Multi Selector up or tap the scissors symbol, labeled Trim video in the figure.
Now you see options that enable you to preview the video, save the video as a new file, overwrite the original file, or cancel the operation. To preview the video, select Preview and press OK. After the preview plays, you return to the menu screen.
- To preserve your original video and save the trimmed one as a new file, choose Save as New File.
When the camera is in Playback mode, a scissors symbol like the one you see in the upper left corner of Figure 7-21 indicates a trimmed video. (In the figure, the symbol simply shows that you’re using the trim function.)
Saving a Video Frame as a Still Image
To save a frame of the video as a still photo, play the video and pause playback when you reach the frame you want to save. (Press the Multi Selector down or tap the monitor to pause playback.)
![]() Next, press the i button or tap the i symbol to bring up the Edit Video screen. Choose Save Current Frame and then press the OK button. Your frame is saved as a JPEG photo; the photo resolution matches the video frame size.
Next, press the i button or tap the i symbol to bring up the Edit Video screen. Choose Save Current Frame and then press the OK button. Your frame is saved as a JPEG photo; the photo resolution matches the video frame size.