7.5. Data Pump Overview
The Data Pump facility is new to Oracle10g. It is a high-speed mechanism for transferring data or metadata from one database to another or to and from operating system files. Data Pump employs direct-path unloading and direct-path loading technologies. Unlike the older export and import programs (exp and imp), which operated on the client side of a database session, the Data Pump facility runs on the server. Thus, you must use a database directory to specify dump file and log file locations.
You can use Data Pump to copy data from one schema to another between two databases or within a single database. You can also use it to extract a logical copy of the entire database, a list of schemas, a list of tables, or a list of tablespaces to portable operating system files. Data Pump can be used to transfer or extract the metadata (DDL statements) for a database, schema, or table.
Data Pump is called from the command-line programs expdp and impdp or through the DBMS_DATAPUMP PL/SQL package.
7.5.1. Using Data Pump to Export Data
You initiate a Data Pump export by running the expdp program or by running a PL/SQL program that calls DBMS_DATAPUMP procedures. The EM Database Control also provides a graphical user interface for running Data Pump exports.
In this section, you will learn how to export data using both the command-line program expdp and the DBMS_DATAPUMP procedures. You will also be introduced to some of the EM Database Control screens for exporting data with Data Pump.
7.5.1.1. Executing Data Pump Exports from the Command Line
The Data Pump export program can operate in several modes, including database, schema, table, and tablespace. In a database mode export, the entire database is exported to operating system files, including user accounts, public synonyms, roles, and profiles. In a schema mode export, all data and metadata for a list of schemas is exported. At the most granular level is the table mode export, which includes the data and metadata for a list of tables. A tablespace mode export extracts both data and metadata for all objects in a tablespace list as well as any object dependent on those in the specified tablespace list. Therefore, if a table resides in your specified tablespace list, all its indexes are included whether or not they also reside in the specified tablespace list. In each of these modes, you can further specify that only data or only metadata be exported. The default is to export both data and metadata.
With some objects, such as indexes, only the metadata is exported; the actual internal structures contain physical addresses and are always rebuilt on import.
The files created by a Data Pump export are called dump files, and one or more of these files can be created during a single Data Pump export job. Multiple files are created if your Data Pump job has a parallel degree greater than one or if a single dump file exceeds the filesize parameter. All the export dump files from a single Data Pump export job are called a dump file set.
In the following sections, we will discuss how to execute the different modes of Data Pump exports.
7.5.1.1.1. Running Database Mode Exports
A full database export requires the database user to have the EXP_FULL_DATABASE role. For example, to perform a full database export to files in the chap7a and chap7b directories, execute the following:
expdp system/secret full=Y dumpfile=chap7a:fulla%U.dmp, chap7b:fullb%U.dmp
    filesize 2G parallel=2 logfile=chap7:full.log
These parameters tell the Data Pump program to connect to the database as user SYSTEM with a password of SECRET. The full=y parameter tells Data Pump to perform a database mode export. Data Pump writes a series of dump files alternating between the chap7a and chap7b directories. (These are database directory objects.) The %U in the filename tells Data Pump to insert a sequential number (00, 01, 02, 03, and so on, up to 99) into each filename. Each file is filled to 2GB in size. Data Pump spawns up to two slave processes to parallelize the load. Finally, the log file is placed in the chap7 directory (also a database directory object) and has the filename full.log.
7.5.1.1.2. Running Schema Mode Exports
To perform a schema mode export, omit the full=y parameter and instead include a schemas=schema_list parameter. The schema list is a comma-delimited list of schemas. Alternatively, to export your own schema, omit both the full= and the schema= parameters. Data Pump defaults to a schema mode export of your schema. To export another user's schema, you must have the EXP_FULL_DATABASE role.
For example, to Data Pump export the HR schema, run this:
expdp hr/hr dumpfile=chap7:hr.dmp logfile=chap7:hr.out
The dumpfile and logfile parameters work the same in all export modes—the database directory object is followed by a colon and then the filename. If your operating system is case sensitive, these names will be case sensitive as well.
7.5.1.1.3. Running Table Mode Exports
To perform a table mode export, include a tables=table_list parameter and omit any full or schema parameters. The table_list is a comma-delimited list of tables to export. These tables may be qualified with the owner using dot notation, such as HR.EMPLOYEES.
For example, to export the metadata only for the HR-owned jobs and job_history tables, run this:
expdp hr/hr dumpfile=chap7:job_tabs.dmp nologfile=y
    content=metadata_only tables=jobs,job_history
While the log is always displayed, the parameter nologfile=y tells Data Pump not to write a log file to disk. The content=metadata_only parameter tells Data Pump to export only the metadata, not the data in the tables. To specify data only (no metadata), replace the metadata_ only value with data_only.
7.5.1.1.4. Running Tablespace Mode Exports
A tablespace mode export requires that the database user have the EXP_FULL_DATABASE role. To export in tablespace mode, use the tablespaces=tablespace_list parameter to specify the tablespaces to be exported. The tablespace list is a comma-delimited list of tablespaces.
For example, to export all the objects, including their dependent objects, from the tablespace USERS, run this:
expdp system/password dumpfile=chap7:users_ts.dmp
    logfile=chap7:users_ts.out tablespaces=users
You can ask expdp for a full list of the supported parameters by specifying the parameter help=y. If your command line starts getting long, place some or all of the parameters in a file, and then direct expdp to read the file for additional parameters. Use parfile=directory:filename to tell expdp where to find the additional parameters. The directory parameter is a database directory object, and filename is the name of the parameter file.
7.5.1.2. Executing Data Pump Exports Using DBMS_DATAPUMP
The DBMS_DATAPUMP PL/SQL package provides a programmatic interface to Data Pump. This mechanism is ideal for scheduling export jobs from the database scheduler. Setting up a Data Pump export using the DBMS_DATAPUMP PL/SQL package is a little more verbose than the standalone program, but provides greater functionality and control.
NOTE
The most important options are covered in this chapter, but see the section "DBMS_DATAPUMP" in the PL/SQL Packages and Types Reference manual for full details on all the options.
The basic flow of a PL/SQL-initiated Data Pump session is the following:
Obtain a handle to a Data Pump session.
Define the dump and log files.
Define any filtering conditions, such as a list of schemas or tables to include or exclude.
Launch the Data Pump session.
Disconnect from the session.
The following example exports a schema mode of the user HR:
DECLARE
  h1    NUMBER;  -- handle for the Data Pump session
BEGIN
   -- Obtain a handle to an export Data Pump session
   h1 := dbms_datapump.open (
           operation => 'EXPORT'   -- export not import
          ,job_mode => 'SCHEMA'),  -- schema mode
--        ,job_mode => 'FULL'),     -- database mode
--        ,job_mode => 'TABLE'),   -- table mode
-- ,job_mode => 'TABLESPACE'), -- tablespace mode
-- define the log file
dbms_datapump.add_file(
handle => h1 -- from the OPEN call
,filename => 'hr.out' -- file name
,directory => 'CHAP7' -- database directory object
,filetype =>dbms_datapump.ku$_file_type_log_file);
-- define the dump file
dbms_datapump.add_file(
handle => h1 -- from the OPEN call
,filename => 'hr.dmp' -- file name
,directory => 'CHAP7' -- database directory object
,filetype => dbms_datapump.ku$_file_type_dump_file);
-- define the schemas to export
dbms_datapump.metadata_filter(
handle => h1 -- from the OPEN call
,name => 'SCHEMA_EXPR' -- schema name filter
-- ,name => 'INCLUDE_NAME_EXPR' -- table name filter
-- ,name => 'EXCLUDE_NAME_EXPR' -- table name filter
-- ,name => 'TABLESPACE_EXPR' -- tablespace name filter
,value => 'IN(''HR'')'), -- name list
-- invoke Data Pump
dbms_datapump.start_job(
handle => h1); -- from the OPEN call
-- run the job in the background
dbms_datapump.detach(handle => h1);
END;The code in this PL/SQL example exports a schema. If you want to run an export in a different mode, change the comments on the JOB_MODE parameter in the OPEN procedure. Use 'FULL' for a database mode export, 'TABLE' for a table mode export, or 'TABLESPACE' for a tablespace mode export. A full database export does not require the METADATA_FILTER procedure call. When you execute this PL/SQL block, the job scheduler initiates the Data Pump job. You can monitor it through the data dictionary views DBA_DATAPUMP_JOBS or USER_ DATAPUMP_JOBS or by examining the log file.
7.5.1.3. Executing Data Pump Exports with Enterprise Manager Database Control
You can use the Enterprise Manager (EM) Database Control as a menu-driven interface to Data Pump export jobs. This program steps you through several options and then shows you the PL/SQL code that it will execute. Therefore, you can also use the EM Database Control to learn more about using the PL/SQL interface.
Open Database Control by pointing your browser to the appropriate URL, and then follow these steps:
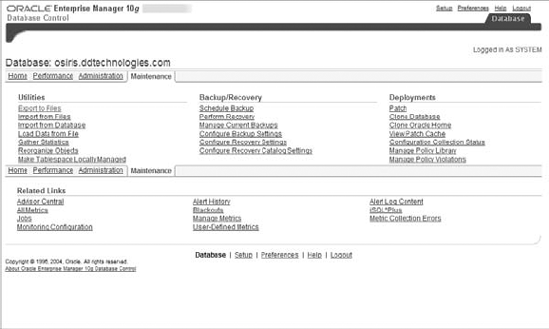
On the Maintenance tab of the EM Database Control main menu, click the Export To Files link, as shown in Figure 7.5.
Figure 7.5. The EM Database Control main menu
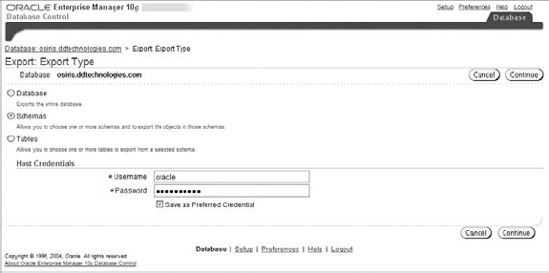
Select an export type, as shown in Figure 7.6, and click Continue.
Figure 7.6. Selecting an export type
After stepping through several menu-driven pages, you can review the export job settings as well as the PL/SQL code that will initiate the job, as shown in Figure 7.7.
When you submit the job, it is scheduled to run from the job scheduler, so you won't see the results immediately.
Figure 7.7. The Data Pump Export: Review screen

7.5.2. Using Data Pump to Import Data
Import is the counterpart to export. Export extracts data and metadata from your database, and import loads this extracted data into the same database or into a different database, optionally transforming metadata along the way. These transformations let you, for example, copy tables from one schema to another or remap a tablespace from one database to another.
Data Pump imports, like exports, can be initiated from a standalone program, from a PL/SQL program using DBMS_DATAPUMP, or from the EM Database Control. In this section, you will learn how to use these Data Pump interfaces to import data or metadata into your database.
7.5.2.1. Executing Data Pump Imports from the Command Line
The Data Pump import program, impdp, has several modes of operation, including full, schema, table, and tablespace. In the full mode, the entire content of an export file set is loaded. In a schema mode import, all content for a list of schemas in the specified file set is loaded. The specified file set for a schema mode import can be from either a database or a schema mode export. With a table mode import, only the specified table and dependent objects are loaded from the export file set. With a tablespace mode import, all objects in the export file set that were in the specified tablespace list are loaded.
With all these modes, the source can be a live database instead of a set of export files. Table 7.5 shows the supported mapping of export mode to import mode.
| Source Export Mode | Import Mode |
|---|---|
| Database
Schema Table Tablespace Live database | Full |
| Database
Schema Live database | Schema |
| Database
Schema Table Tablespace Live database | Table |
| Database
Schema Table Tablespace Live database | Tablespace |
The IMP_FULL_DATABASE role is required if the source is a live database or the export session required the EXP_FULL_DATABASE role. Several parameters control the behavior of the Data Pump import program. These parameters are listed in Table 7.6.
| Import Parameter | Description |
|---|---|
| Full=y | Specifies a full mode import. |
| Schemas=schema_list | Specifies a schema mode import. schema_list is a comma-delimited list of schemas to import. |
| Tables=table_list | Specifies a table mode import. table_list is a commadelimited list of tables to import. |
| tablesspaces=tablespace_list | Specifies a tablespace mode import. tablespace_list is a comma-delimited list of tablespaces to import. |
| content=content_option | Specifies whether data, metadata, or both are imported. Valid values are: DATA_ONLY (data only), METADATA_ONLY (metadata only), and the default ALL (both). |
| network_link=db_link | Specifies the live database accessed via the database link. db_link should be used as the import source. |
| dumpfile=dir:file | Specifies the dump file location and name. dir is a database directory object. file is the filename. |
| logfile=dir:file | Specifies the log file location and name. dir is a database directory object. file is the filename. |
| directory=dir | Specifies the file location to use for both the dump file and log file. dir is a database directory object. |
| nologfile=y | Specifies that no log file should be written. sqlfile=dir:file Specifies the file location and name to write the metadata/ DDL statements to. dir is a database directory object. file is the filename. |
| job_name=identifier | Specifies a name for the import job. This name is visible from data dictionary views. The default is system generated. |
| parallel=degree | Specifies the maximum number of active threads/processes operating on behalf of the import. The default is 1. |
| parfile=dir:file | Specifies the file location and name of the parameter file that Data Pump Import should use. dir is a database directory object. file is the filename. |
| reuse_datafiles=option | Specifies whether datafiles should be overwritten in CREATE TABLESPACE statements. Valid values for option are: Y, which means overwrite existing files, and N, which means do not overwrite existing files. |
| remap_datafile=source:target | Specifies how to change the source and target datafile names that appear in CREATE TABLESPACE, CREATE LIBRARY and CREATE DIRECTORY statements. source is the datafile name from the export or live database. target is the datafile name to use in the import. |
| remap_schema=source:target | Specifies the source and target schema names when importing into a different schema than the export was taken from. Multiple remap_schema entries can be used. source is the schema from the export or live database. target is the schema to import into. |
| remap_tablespace=source:target | Specifies the source and target tablespace names when they change between the source export files / live database and database. Multiple remap_tablespace entries can be used. source is the tablespace name from the export or live database. target is the tablespace name that the source objects should be placed in. |
| include=object_list | Specifies a comma-delimited list of object types to include in the import. See the examples following this table for more information. |
| exclude=object_list | Specifies a comma-delimited list of object types to exclude from the import. See the examples following this table for more information. |
You must include one parameter to specify the mode, either full, schemas, tables, or tablespaces. You can include several other parameters on the command line or place them in a file and use the parfile= parameter to instruct impdp where to find them. Here are some examples of imports:
Read the dump file FULL.DMP and extract all DDL, placing it in the file FULL.SQL. Do not write a log file.
impdp system/password full=y dumpfile=chap7:FULL.DMP
   nologfile=y sqlfile=chap7:FULL.SQL
Read the data accessed via database link PROD and import schema HR into schema HR_TEST, importing only metadata, writing the log file to the database directory chap7, and naming this log file HR_TEST.imp.
impdp system/password network_link=prod schemas="HR"
   remap_schema="HR:HR_TEST" content=metadata_only
   logfile=chap7:HR_TEST.imp
Read the dump file HR.DMP and write to the SQL file HR_proc_give.sql all the DDL to create any procedures with a name LIKE 'GIVE%'. Do not write a log file.
impdp system/password full=y dumpfile=chap7:HR.DMP
   nologfile=y sqlfile=chap7:HR_proc_give.SQL
   include=PROCEDURE:"LIKE 'GIVE%'"
Read the data accessed via database link PROD and import only the data from HR.DEPARTMENTS into schema HR_TEST.DEPARTMENTS. Write a log file to file DEPT_DATA.log.
impdp system/password network_link=prod schemas="HR"
   remap_schema="HR:HR_TEST" content=data_only
   include=TABLE:"= 'DEPARTMENTS'"
   logfile=chap7:HR_TEST.imp
The combinations of parameters that you can use in copying data and metadata allow you, the DBA, flexibility in administering your databases.
7.5.2.2. Executing Data Pump Imports Using DBMS_DATAPUMP
The DBMS_DATAPUMP PL/SQL package supports import operations as well as export operations. As with the export functionality, this PL/SQL technique is more verbose and easily integrated into database-scheduled jobs. All the functionality available in the standalone program impdp is also available with the PL/SQL package. This section shows you the important options and coding syntax that you will need for the exam.
NOTE
To obtain full documentation, see the PL/SQL Packages and Types Reference manual.
The following example shows how to use the PL/SQL package to read the data accessed via database link PROD and import schema HR into schema HR_TEST, importing only metadata, writing the log file to the database directory chap7, and naming this log file HR_TEST.imp:
DECLARE
  h1    NUMBER;  -- handle for the Data Pump session
BEGIN
   -- Obtain a handle to an import Data Pump session
   h1 := dbms_datapump.open (
           operation => 'IMPORT'  -- import not export
          ,job_mode => 'SCHEMA'   -- schema mode
          ,remote_link=>'PROD'),     -- db_link name

   -- define the schemas to import
    dbms_datapump.metadata_filter(
      handle => h1             -- from the OPEN call
     ,name => 'SCHEMA_EXPR'    -- schema name filter
     ,value => 'IN(''HR'')'), -- name list

    -- define the schema remapping
   dbms_datapump.metadata_remap(
      handle => h1             -- from the OPEN call
     ,name => 'REMAP_SCHEMA'  -- change schema referencess
-- ,name => 'REMAP_TABLESPACE' -- change tablespace refs
-- ,name => 'REMAP_DATAFILE' -- change datafiel refs
,old_value => 'HR' -- source value
,value => 'HR_TEST'), -- target value
-- Do not import data (only metadata)
dbms_datapump.data_filter(
handle => h1 -- from the OPEN call
,name => 'INCLUDE_ROWS' -- data filter name
,value => 0); -- do not include data
-- define the log file
dbms_datapump.add_file(
handle => h1 -- from the OPEN call
,filename => 'HR_TEST.imp' -- file name
,directory => 'CHAP7' -- database directory object
,filetype =>dbms_datapump.ku$_file_type_log_file);
-- invoke Data Pump
dbms_datapump.start_job(
handle => h1); -- from the OPEN call
-- run the job in the background
dbms_datapump.detach(handle => h1);
END;The Data Pump import via PL/SQL gives you the most options to execute Data Pump imports, but as you can see in the previous example, it is also the most programmatic and requires you to be very familiar with the constructs used by Data Pump. To help familiarize yourself with these constructs, you can use the GUI interface provided by the EM Database Control, which is discussed in the next section.
7.5.2.3. Executing Data Pump Imports with EM Database Control
One of the simplest ways to get experience with Data Pump is to use EM Database Control to step through setting up an import job. The EM program helps you define the necessary parameters for a Data Pump session, shows you the PL/SQL program that will be executed, and gives you the option of initiating the import job immediately or running it later at a specific time.
To execute a Data Pump import job from the EM Database Control, follow these steps:
On the EM Database Control main menu, click the Maintenance tab, and then either click Import From Files to import from a previously created export dump file set or click Import From Database to import from a live database.
Enter the dumpfile name and location if you are importing from an export file set (displayed as Import From Files), or enter the db_link name if you are importing from a live database. You will also need to select which mode of import you want to run: full, schema, or table. The full option is displayed as Entire Files in the EM Database Control.
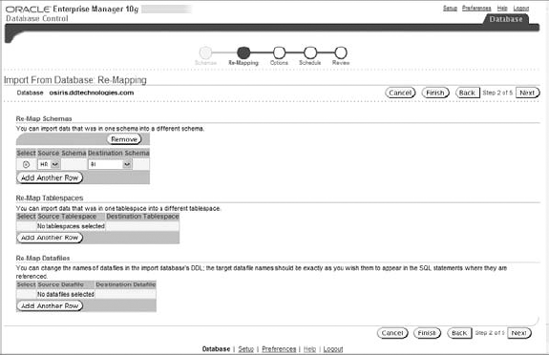
The EM Database Control prompts you to specify any remapping—schema, tablespace, or datafile. See Figure 7.8 for the remapping options. Remapping a schema allows you to change the schema owner between the source and target databases; for example, you can copy all of the objects owned by user HR in the source to user HR_TEST in the target. Likewise, you can remap a tablespace or datafile, so that all objects in the source tablespace/ datafile remap to a different target tablespace/datafile.
Figure 7.8. Defining the import remapping options
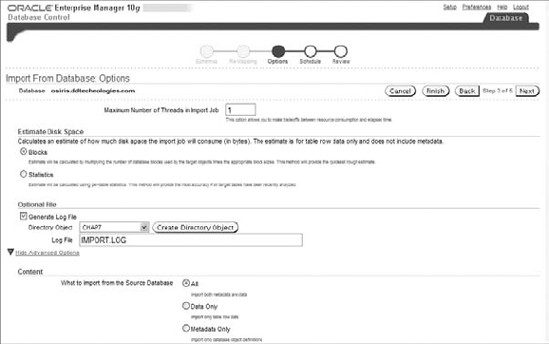
The EM Database Control now prompts you to specify any additional options. To see the full range, click the Show Advanced Options link. You can choose the content (data, metadata, or both) as well as any filtering conditions you choose to specify. Figure 7.9 shows the import options.
Figure 7.9. Defining the import remapping options
Name the job and schedule its start time—immediately or at a future time. The PL/SQL program and your selected options will be presented for review before you initiate the job.
7.5.3. Monitoring the Progress of a Data Pump Job
You can monitor the progress of all Data Pump jobs in the database by querying the DBA_ DATAPUMP_JOBS data dictionary view. The following example shows how to query this dictionary view:
SELECT owner_name owner, job_name ,operation
      ,job_mode,state
FROM dba_datapump_jobs;

OWNER  JOB_NAME        OPERATION  JOB_MODE STATE
------ --------------- ---------- -------- -----------
SYSTEM full_meta       EXPORT     FULL      EXECUTING
SYSTEM ESTIMATE000026  EXPORT     SCHEMA    NOT RUNNING
Once the Data Pump job completes, it will be deleted from this view.