
Using Other TOAD Utilities
TOAD contains many other useful utilities. These modules are covered in the next few sections: the schema browser, SQL Modeler, the DBA Module, SQL*Loader assistance, a NT scheduler, and source-code control.
The Schema Browser
The Schema Browser separates database objects in a selected schema by type, using tabs (or with a drop-down list that you can select through the options menu). The left panel lists the objects and the right panel displays the details (see Figure 16.15 and 16.16). To see the tables in a schema, click the Tables tab and a list of the tables displays in the objects panel. Object details are displayed in tabs in the Details panel. To see a table's columns, simply click the Columns tab in the Details panel. To see a table's data, click the Data tab. To manually edit, add, or delete data in the Schema Browser, simply double-click on the cell.
Figure 16.15. TOAD Schema Browser.

Figure 16.16. TOAD Schema Browser configuration.

You can change the options and appearance of the schema browser via the menu bar View, Options and clicking the Schema Browser section or by right-mouse clicking on the Schema Browser itself.
The Status panel shows what session you have currently selected. The CNT on the Status panel shows how many objects are in the object list for the object tab that has been selected.
Some objects have object name and other filtering capability. On the Schema Browser page, Tables, Data tab and Views, Data tab, a four-way filter button displays a dialog box where you can sort and/or filter. The filter can display four states: empty (default), filtered (only display certain objects, ascending/descending filtered (only display certain objects in a particular order), ascending/descending empty (display all objects in a particular order).
TOAD can create scripts (through the Create Script buttons on the object tabs), for most objects that are displayed in the Schema Browser. You can copy object names and column data from the Schema Browser panels to a clipboard or another application.
TIP
Creating scripts from the database is a good practice, as scripts stored on the computer might not accurately reflect what is in the database.
The View, Options, Schema Browser page provides numerous options for the Schema Browser.
To Create a User using the Schema Browser:
1. |
Open the Schema Browser window. |
2. |
Click the User tab on the object panel. |
3. |
Click the Create New User button on the User object panel. |
4. |
The Create User window will display. (You can also access the window through the Create, User menu item.) |
5. |
Fill in the user information on each tab: User, Tablespace, Roles, System Privileges, and Grants. |
6. |
When you are done, click OK. |
This procedure copies column names from the list on the Tables/Columns tab or the Views/Columns tab via multi-select list and copy.
From Tables, Columns
1. |
Click the Column you want to copy. To select more than one column, press CTRL while clicking the columns you want to select. To select a continuous block of columns, select the starting point, press SHIFT, and click the ending part of the blocked selection. |
2. |
Press CTRL+C or select Edit, Copy from the menu. |
The selection is copied to the clipboard. In this example, the following selection is copied to the clipboard.
MOVIECOPYID, COPYFORMAT, COPYCONDITION
SQL Modeler
The SQL Modeler dialog box lets you quickly create the framework of a SELECT, INSERT, UPDATE, or DELETE statement allowing you to view the generated code, execute, and view the results.
The Table Model Area lets you graphically lay out a query, as shown in Figure 16.17. Drag-and-drop columns from one table to another to create joins between the tables. Click the Generated Query tab to view the generated SQL query. Click the Execute button, and the results will display in the Query Results tab near the bottom. Notice that there are various tabs to show the various outputs such as the explain plan, the data output, and so on.
Figure 16.17. TOAD SQL modeler.

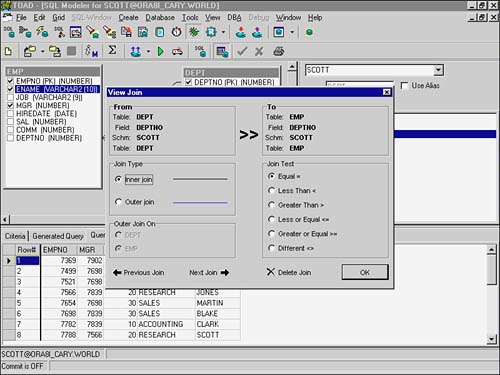
To perform a join, drag-and-drop a column from one table to another table column. A line between the related tables is automatically drawn showing the relationship. Double-click the line to adjust the properties (inner join, outer join, and so on). See Figure 16.18.
Figure 16.18. TOAD SQL Modeler entity relationships.
TOAD DBA
The optional DBA module is designed to make common DBA tasks easy. It offers security, storage, and database object management (see Figure 16.19). You can compare and synchronize schemas. It has Oracle Import, Export, and SQL*Loader interfaces. The DBA module adds extra features to the Create menu, the Schema Browser, and the DBA menu. A TOAD Monitor feature lets you view database performance, (see Figure 16.20) and TOAD also contains a proportional spacemap showing you how objects appear in the tablespaces (see Figure 16.21).
Figure 16.19. TOAD DBA.

Figure 16.20. TOAD DBA monitoring.

Figure 16.21. TOAD DBA spacemap.

You can create entire databases, alter libraries, profiles, roles, rollback segments, snapshots, tablespaces, and more.
SQL*Loader Wizard
The TOAD SQL*Loader is a utility that lets you graphically build a control file for use with the Oracle SQL*Loader, a database server application (see Figure 16.22). You configure the location of the utility in the View, Options, Executables page.
Figure 16.22. TOAD DBA SQL*Loader utility.

Throughout the SQL*Loader Interface, you can move your mouse pointer over a field to display microhelp for that field.
To Load a Data File:
TIP
Save Button
Click Save at any time to save the control file. The control file is also automatically saved whenever you click Execute Now.
Execute Now Button
This executes your control file.
TOAD Job Scheduler
The SQL*Loader has a scheduler that lets you schedule the load as a windows task. Clicking the Schedule button opens the NT Job Scheduler window. You can set the time for it to run and the frequency. Once you click OK, your job is added.
TOAD Source Code Control
TOAD supports Source Code Control through most major source control vendors (see Figure 16.23). Source Control is run through the Procedure Editor. The toolbar on the Procedure Editor contains the check-in and check-out buttons.
Figure 16.23. TOAD DBA Source Code utility.

NOTE
You must set the Source Control options including the Source Control provider from the View, Options, Source Control page. Source Control does not work with database objects; it only works with files.