Chapter 10
Shrink That Puppy and Slap a Label on It
IN THIS CHAPTER
![]() Downsizing audio files with MP3 compression
Downsizing audio files with MP3 compression
![]() Understanding bitrates and sample rates
Understanding bitrates and sample rates
![]() Dissecting ID3 tags: They’re not just for music anymore
Dissecting ID3 tags: They’re not just for music anymore
You’ve finished your final edit (and if you think we’re skirting blasphemy whenever we use the E word, trust us — creativity sometimes demands a sacrifice). At last you’re ready to compress your mondo-super-sized AIFF or WAV file down to the format that inspires terror and indigestion in RIAA representatives everywhere: MP3.
The MP3 format was designed to reduce the amount of data (via compression) required for digitized audio while still retaining the quality of the original recording. MP3 files are the best way to keep the audio small enough in size to make it a quick-and-easy download, and it’s this format that podcasting uses to get content efficiently from podcaster to podcatching client. Although creating MP3s is a simple enough process, you do need to make some tradeoffs between quality and compression.
A Kilobit of Me, and a Whole Lot of You: Understanding Kbps
The compression process begins with proper bitrate settings, measured in Kbps (kilobits per second). Bitrate is a method of measuring data transmission from one point to the next. The higher the Kbps value, the more data being transferred between two points. The more data being transferred per second, the better the quality of information. With each rate of data transfer offered by recording applications, you can digitally reproduce the various qualities of audio:
- 8 Kbps, matching the vocal quality of a telephone conversation
- 32 Kbps, yielding audio quality similar to AM radio
- 96 Kbps, yielding audio quality similar to FM radio
- 128 Kbps, matching audio CD quality, and the most common Kbps used for MP3 compression of music
- 192 Kbps, a “Higher Quality” setting Kbps used for MP3 compression of music; better audio sound, but larger data files
You aren’t married to this listing of Kbps by any stretch of the imagination. Figure 10-1 shows that Audacity offers in its Preferences plenty of variations from the five common settings. Tweak until you find the Kbps best suited for your podcast.

FIGURE 10-1: You find a wide variety of bitrates for compressing your podcast to MP3 with Audacity.
 It’s a tradeoff: The higher the bitrate, the larger your file size is — but the smaller your bitrate, the lower your audio quality is. A good idea is to experiment: Compress your podcast using one bitrate, save it that way, and then change your bitrate to something higher (or lower), save it, and play back each clip to compare how they load and how they sound. Note any changes in sound quality and file size. When you find that happy medium between quality and compression, stick with that number for your current and future podcasts.
Setting bitrates in Audacity
Changing bitrates in Audacity is a multistep process. The first step is to get your editor all set for creating MP3 files:
Choose Audacity ⇒ Preferences (Mac OS) or choose Edit ⇒ Preferences (Windows).
The Preferences window opens.
- Choose the File Formats option in the left column (see Figure 10-2).
- Click the Download Free Copy of LAME button in the MP3 Export Setup section.
- Follow the steps for your OS as outlined on the web page to download the proper files.
- Open the archive file (no need to worry — it’s a safe download) and drop it into your Audacity folder.
- Return to Audacity and click the Find Library button.
- Choose Applications ⇒ Audacity (Mac) or My Computer ⇒ (Main Drive) ⇒ Program Files ⇒ Audacity (Windows) to navigate to the
libmp3lamefile. - Select the
libmp3lamefile and click Open.

FIGURE 10-2: Before setting bitrates in Audacity, you need to download a LAME file.
This step in setting up the LAME Library is a one-time thing. You won’t have to repeat this process again unless you move the library to another location.
Now you’ve come to the point where you set the bitrate. When you have a file, follow these steps to export it as an MP3 file:
- Choose File ⇒ Export.
- From the Format menu, select MP3 Files.
Next to the Format: MP3 Files menu, click Options.
The Specify MP3 Options dialog box opens, as shown in Figure 10-3.
Choose your desired bitrate from the Quality drop-down menu.
If you’re following our recommendation from the Cheat Sheet for this book, you would set the bitrate to 128.
 You can also set up your Bit Rate Mode (Constant) and your Channel Mode (Joint Stereo). Constant bitrate ensures the bits are output at a steady (constant) rate despite the audio that is being used (including silence). Variable bitrate attempts to do a bit of compression — for example, the bitrate of a complex music sample would take more space than that of the same length of time in a spoken piece with several pauses. Although variable length audio sounds good on the surface, it can present problems to the listener — actual playback times may not be correct, causing problems when people pause a long podcast. Joint Stereo refers to a technique that saves some space when your recording includes mono channels or tracks. Rather than using the space of a stereo track (left and right) to save that information, joint stereo techniques recognize it and save space by only using half the space.
- Click OK to return to the Export window.
- Name your file and then click OK.
- You will be prompted to fill out your ID3 tags (see the ID3 tag section of this chapter).

FIGURE 10-3: Under the MP3 options, you can set bitrates and other variables for your compressed audio.
After you set the bitrate for this one file, your settings are automatically applied to other MP3 files created from this point. Only when you go into the Options for MP3 files will you change bitrates.
Changing bitrates in iTunes
It doesn’t matter how your audio files get into iTunes, be it from Audacity, GarageBand, or anywhere else. When you get the files in to iTunes, you can easily convert them to a different bitrate, change the file format, or make any number of other changes to the file.
 You can’t get better quality out of a file by changing it from a lower bitrate to a higher bitrate. For example, once a file has been saved at 32 Kbps, converting it to 128 Kbps won’t make it sound any better.
To set the bitrate in iTunes and create an MP3, follow these steps:
Choose iTunes ⇒ Preferences (Mac OS) or choose Edit ⇒ Preferences (Windows).
The Preferences window opens.
- In the Preferences window, click the Import Settings button.
From the Import Using drop-down menu, select MP3 Encoder.
The MP3 Encoder dialog box opens.
- From the Settings drop-down menu, select your desired bitrate (shown in Figure 10-4).
- Import your podcast episode (currently in an uncompressed format) in iTunes by double-clicking on the file.
- Click the audio in iTunes and then go to File ⇒ Convert ⇒ Create MP3 Version.

FIGURE 10-4: The iTunes options for sampling rates.
Care for a Sample, Sir? (Audio Sample Rates)
When you have a grasp of bitrates, you're ready to move on to sample rates. This may strike you as a tad redundant, particularly when you see the list of common audio-sample rates. A strange déjà vu makes you wonder whether you’re in the real world or exist merely as part of The Matrix. No biggie — sometimes technology is redundant.
As we discuss in the preceding section, bitrate is a measurement of how much audio data is transferred between two points, such as the computer and your headset. The sampling rate is a measurement of audio samples taken from a continuous signal (a signal of a varying quantity, defined over a period of time) in order to create a discrete signal (a signal made up of samples from a continuous signal).
Very simply, the sample rate determines the maximum sound frequency that can be reproduced — the value you set is twice the frequency value. For example, a 44.1 kHz sample rate can reproduce sounds up to 22.05 kHz, which is slightly above the range of human hearing.
The most common audio sampling rates found in MP3 encoders are
- 8,000 Hz / 8 kHz, telephone-quality recording or lo-fi
- 22,050 Hz / 22 kHz, equal to AM radio transmission
- 32,000 Hz / 32 kHz, equal to FM radio transmission, minimum sound quality on a digital video camcorder
- 44,100 Hz / 44 kHz, audio-CD quality
- 48,000 Hz / 48 kHz, digital TV, DVD, films, maximum sound quality on digital video camcorder, and professional-grade audio recording
As with your audio-recording applications, you have a range of bitrates available — and you can type in your own custom sampling rates.
Using different sample rates in compressed audio files does not affect the file size — only the bitrate and duration affect file size. A high sample rate at a low bitrate can result in poor signal representation and thus poor quality, but if you’re using at least 64 Kbps (bitrate), there’s no good reason to ever use anything except 44.1 kHz as the sample rate.
Be careful when using a sample rate other than a multiple of 11. Choosing a sample rate other than 11.025 kHz, 22.5 kHz, or 44.1 kHz can produce an effect similar to the voices of Alvin and the Chipmunks. It might be funny at first, but most listeners won’t stick around to hear your entire message.
Changing sample rates in Audacity
Sample rates are located in the Preferences window and extremely simple to either change or customize to your podcast’s personal needs. Follow these steps to customize sample rates in Audacity:
Choose Audacity ⇒ Preferences (Mac OS) or File ⇒ Preferences (Windows).
The Preferences window appears.
- Click the Quality option in the left column.
Select your desired bitrate from the Default Sample Rate drop-down menu (as shown in Figure 10-5), or enter your own custom sampling rate by selecting the Other option and entering a number.
If you’re entering a custom sampling rate, make sure you enter the rate in hertz (Hz) and not kilohertz (kHz). For example, if you decide your sampling rate is 44.1 kHz, you must enter 44100, not 44.- Click OK.

FIGURE 10-5: Changing your audio sampling rate in Audacity.
Changing sample rates in iTunes
iTunes makes the process of changing the sample rate easy — what else would you expect from Apple?
 To get an idea of what a good sampling rate is, look at the podcasts your aggregator is pulling down and check the settings. Press ⌘ +I (Mac) or Ctrl+I (Windows) to see the MP3 Summaries. Settings may vary from file to file. As you work out the final technical details of your podcast, make sure that one of them is the setting that best suits your needs and (of course) your ear.
Follow these steps to change the sample rate in iTunes:
Choose iTunes ⇒ Preferences (Mac OS X) or Edit ⇒ Preferences (Windows).
The Preferences window appears.
- In the Preferences window, click the Import Settings button.
From the Setting drop-down menu, select the Custom option.
The iTunes MP3 Encoder dialog box opens.
Select your desired sampling rate from the Sample Rate menu.
Apple loves to make things easy for its users, and we love that. However, Apple sometimes takes out the “I did it MY WAY!” alternative and does not allow for custom settings. Here, iTunes keeps this sampling to the common settings, so you’re given no leeway. Note that iTunes offers your sampling rates at kilohertz (kHz), a more common, recognizable presentation of a sampling rate. Again, this is Apple looking out for you, keeping it to the basics.Click OK.
You return to the Import Settings window. The default settings for your MP3 compressions are now visible in the Details area.
ID3 Tags: The 411 of Podcasting
Is it soup yet? Not quite yet. Adding ID3 tags is the final step before you can upload the podcast to your website. This is the final detail (okay, batch of details) that not only tells other podcasters who you are, but also tells listeners what your podcast is all about, and which episode they’re listening to.
Because this is a final detail, we find that some podcasters either skip it or just don’t care how they tag their podcasts. And there goes any hope for their listeners to effectively organize podcasts in a computer’s media player or remind drivers of what they are listening to while on their commute. Maybe some podcasters are unaware of where or how to identify their podcasts — or want to get their content out to the fans ASAP without taking the time to implement these tags.
Whatever the case, we entreat you: Stop the madness, stop the insanity, and stop the monkeys. Proclaim your true self for the sake of media players everywhere — implement your ID3 tags!
Tell me about yourself: All about ID3 tags
First created in 1996, ID3 tags were designed to be added to audio files in order to have the artist, album, and track title displayed in a computer’s MP3 player when the file is played back. The current ID3 tags now include composer, bitrate, album art, and even genre.
Of course, another question that comes to mind is why would a podcaster want to even bother with ID3 tags?
Look at a podcast you’re listening to, regardless of whether you are old schooling it on a portable MP3 player or listening through your desktop computer. Your podcatching client probably organizes your various feeds by the date downloaded, either with the most recent show at the bottom or at the top of your playlist, depending on the player’s preferences. Each individual podcast has an episode title, an artist, and a podcast (show) title. If the podcaster working with the ID3 tags is particularly savvy, artwork associated with your show is also displayed.
Now hop from podcast to podcast in your MP3 player, and you can tell which people care — or don’t — about identifying their shows. Some podcasts simply use obscure numbers that could be a date, but when you hear two episodes of the podcast back to back, you find out the number and the date read at the intro of the show (provided there is one) don’t match up (confusing). With ID3 tags in place, you can now look at your player and get an idea of exactly what you’re listening to.
When you add ID3 tags to your podcast, you set apart individual podcasts from one another, making each one unique but keeping it grouped with your podcast show.
IDentity crisis: Making ID3 tags work for podcasting
Some ID3 tags really don’t work for podcasting. Album? Track number? Composer? You're podcasting, not producing music. Your responsibility (as a podcaster) is to redefine the following tags we have found useful for the podcasting medium:
- Song or Name: This should be the name or number of your episode. Examples are
Show #19, Episode 3: One of Those Faces, BOOK THREE: Chapters 39 & 40. - Artist: This one is pretty self-explanatory. You’re the artist behind this podcast, so let people know who you and your group are. Put in your name (or at least the pseudonym you're using as a podcaster) or the name of your podcasting team. For example,
Philippa Ballantine,August Grappin, andDr. Kelli Dunlap and Josué Cardona. - Album: Here is the name of your show, your show’s website, or your network if you are part of a podcast network. Good examples are
The Shared Desk,Destiny Community Podcast, andPodrunner. - Album Artist: Often left blank, this tag can be a bit tricky for users. You can use it to refer to the show artwork artist, the production studio, or the creator of the podcast. Examples are
Imagine That! StudiosandGeek Therapy Podcast Network. - Composer: This tag can be used to feature the name of your producer or head editor. You can enter your engineer’s name, or the studio where the show is produced. For example, The Shared Desk artists is listed as
Imagine That! Studiosbut the composers areTee Morris & Pip Ballantineas the show is co-produced and co-hosted. - Grouping: This tag may remain blank until you’re affiliated with a network or distribution hub of some kind. Good examples are
QuickAndDirtyTips.comandGeek to Geek Podcast Network. - Genre: The genre “Podcast” wasn’t offered in drop-down menus of MP3 creators, but with the growing popularity of the medium, it’s becoming more and more common.
- Year: The year this podcast episode was produced.
- Track Number: Purely optional, this ID3 tag allows you to make sure your podcasts remain in some kind of sequential order. For podcast novelists, the track numbers coincide with the chapter numbers. If podcasts follow a season of multiple episodes, the Track Number coincides with the episode in that season.
BPM: If you are into staying fit and are listening to or producing a workout podcast, you want to fill in this ID3 tag as BPM is for Beats Per Minute. BPM is also good if your podcast is a house music-dance mix podcast. A good example of a podcast showing off BPM is any one mixed by D.J. Steve boy (
Pod runner). If you’re using iTunes and don’t see the Podcast genre, you can manually type Podcast into the field.- Comments: As with comments you leave in XML, you can give a quick two or three lines of show notes for your podcasts. It’s also a great place to put in any Creative Commons notices, websites for more information of the show and its hosts, and special dedications.
There may be other tags offered, but for what we do in podcasting, the tags going unnamed can remain blank.
Reminiscent of John Cleese’s aside in a Monty Python robbery sketch (“Adapt, and improve. That’s the motto of the Round Table”), we podcasters must adapt these ID3 tags to our podcasts to improve how they appear in our players. On playback, the ID3 tags appear on the listeners’ interfaces, offering a quick glance at the content of the podcast (as shown in Figure 10-6).
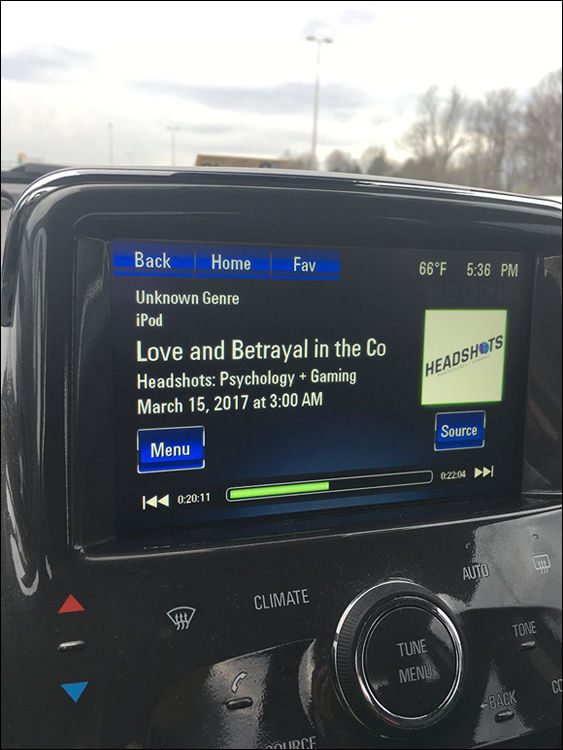
FIGURE 10-6: How a properly tagged podcast appears on a car’s stereo system.
A peril in working with ID3 tags is spelling errors. There is no spell check in Audacity, iTunes, or any other tag editor. Because many directories, search engines, and players rely on the ID3 tags to organize and properly display your show, make sure to double-check the spelling of your show title, names of people involved, and any other text you’re putting in place. Also, some editors like iTunes create “quick fill” databases that help you fill in your File Info quickly. This database also includes the misspellings. So, when filling in your ID3 tags, take your time and check your spelling.
Creating and editing ID3 tags in Audacity
Unlike iTunes where you tag individual files after they are created, Audacity lets you set up a template for the ID3 tags that gets applied when MP3 files are created. To create this template, open Audacity and follow these steps:
Choose File ⇒ Open Metadata Editor.
The Edit ID3 Tags (for MP3 Exporting) window opens (shown in Figure 10-7). The ID3v2 option is already selected by default.
- Fill in these fields:
- Title: The episode name and/or number
- Artist: The podcaster or name of the podcasting crew
- Album: The show’s name or website
- Track Number: Optional, unless numerical order is a priority in your podcast
- Year: The podcast publication’s year
From the Genres drop-down menu, select the option best suited to your podcast.
Click the More button to add a customized tag (refer to Figure 10-7). You can also add additional ID3 tags and save your tags as a template.Give a brief description of your podcast in the Comments field.
Don’t make your comments a long, detailed description of your podcast’s content. Keep it simple and brief. For example, if the creators of The Average Geek Show (
http://www.averagegeekshow.com) were to write comments for Show #88, it wouldn’t say “On this show we share the mic with Kenny Rotter of the Dumbells & Dragons podcast, chat about Star Wars, Joss Whedon directing Batgirl, and how Chris Evans is looking at the future of reprising his role as Captain America.” Instead, the podcast would boil down this description to “Show #88 — Geek News with Dumbells & Dragons host, Kenny Rotter.”- Click Done.
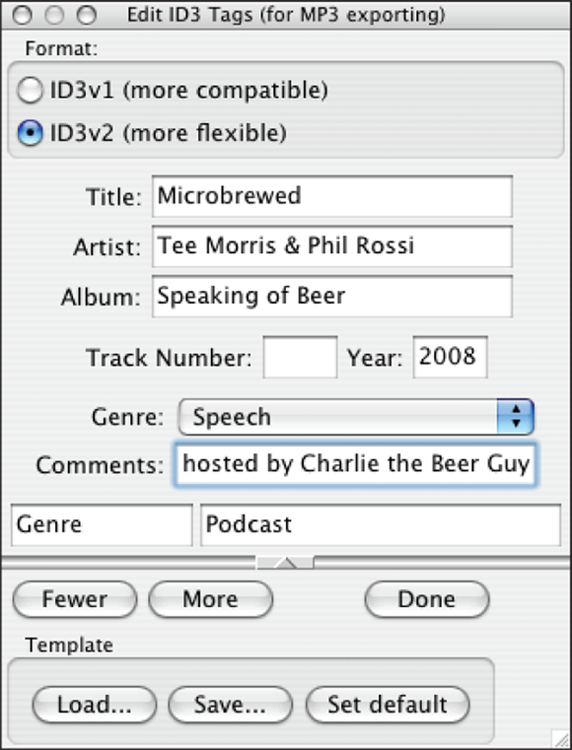
FIGURE 10-7: The Edit ID3 Tags (for MP3 Exporting) window in Audacity.
And that’s it! When Audacity generates your MP3, your show is tagged and ready for uploading.
Audacity’s ID3 tagger does have its limitations. It cannot embed artwork into your audio metadata. For that extra touch, use an ID3 Tag editor such as IDTE (https://sourceforge.net/projects/idteid3tagedito) or iTunes, as we discuss later.
Creating and editing ID3 tags in iTunes
Using iTunes to tag your files offers more flexibility in customizing genres and even incorporating artwork than Audacity does. Apple’s media player, encoder, and podcatcher also make adding and editing ID3 tags extremely easy. Follow these steps:
Single click your newly created MP3 in iTunes. Choose Edit ⇒ Get Info or press ⌘ +I (Mac) or Ctrl+I (Windows).
The Info window appears, which gives you a summary of your MP3 file.
- Fill in the following fields:
- Song: The episode name or number.
- Artist: The name of the podcaster or podcasting crew.
- Album: The show’s name or website.
- Album Artist: This would be a good spot to give credit to the artwork artist or show producer.
- Composer: Fill in this field if you have a separate sound engineer, a tech guru handling the editing, or if you’re doing the work yourself.
- Grouping: If you’re part of a group or network like Farpoint Media, or FriendsInTech, give credit here.
- Genre: Select one of the offered genres from the drop-down menu, or you can select the genre in the field and type Podcast (or whatever genre you want to use to classify your work).
- Year: The podcast publication’s year.
- Track Number: This is optional, unless numerical order is a priority in your podcast.
BPM: If you’re doing an exercise show or a music podcast featuring original house mixes, give your Beats Per Minute here. Listeners will dig that.
One of the cool bonuses of iTunes is how you can create custom genres. Choose Edit ⇒ Get Info ⇒ Info and enter your own genre here. Or go to the song in your iTunes Library and click in the Genre column and edit the genre name. When you return to the Info window later, you can see your custom genre offered as an option on the Genre drop-down menu.- Comments: A brief version of show notes.
- Take a last look at your ID3 tags to make sure everything is spelled properly and listed the way you want it, and then click OK.
Album Art: Getting Graphic with Your Podcast
A big piece of successful podcasting is marketing — and a big part of marketing is branding. Your podcast logo (or album art) is very important to help set you apart. Although not all media players will offer this feature, don’t discount its importance. A large percentage of podcast listeners use iTunes and listen at their computers — where the album art may be prominently displayed. Also, Apple is now requiring Album Art as part of registering your podcast with its directory.
Once you have your album artwork designed, and you have your tagged MP3 ready to go, incorporating artwork into your podcast episode takes only a handful of shortcuts and clicks:
Import your MP3 file into iTunes if you have not already.
Your ID3 tags should be present in this file.
- Single-click the podcast episode and then choose Edit ⇒ Get Info or press ⌘ +I (Mac) or Ctrl+I (Windows).
- In the Info window, single-click the Artwork tab and then click the Add Artwork button to locate your show art.
Click OK to import your show art.
If you have a Finder window open to where your artwork resides, you can also click and drag your show art into the Album Artwork window.
Take a last look at your ID3 tags to make sure everything is spelled properly and listed the way you want it, and then click OK.
If your logo is in a format that iTunes recognizes, it appears in the Artwork field, as shown in Figure 10-8. See the sidebar “Art for art’s sake” to make sure your logo has the appropriate format.

FIGURE 10-8: Show Art is a podcaster’s way to brand a show, and give your episode a slick final touch when played back on various media devices.