
Chapter Summary
Problem | Solution | Listing |
|---|---|---|
Matching multiple URLs with a single route | Use routing wildcards | 1–9 |
Redirecting one URL to another | Use a redirection route | 10 |
Navigating within a component | Use a relative URL | 11 |
Receiving notifications when the activated URL changes | Use the Observable objects provided by the ActivatedRoute class | 12 |
Styling an element when a specific route is active | Use the routerLinkActive attribute | 13–16 |
Using the routing system to display nested components | Define child routes and use the router-outlet element | 17–21 |
Preparing the Example Project
For this chapter, I will continue using the exampleApp project that was created in Chapter 22 and has been modified in each subsequent chapter. To prepare for this chapter, I have added two methods to the repository class, as shown in Listing 26-1.
You can download the example project for this chapter—and for all the other chapters in this book—from https://github.com/Apress/pro-angular-9. See Chapter 1 for how to get help if you have problems running the examples.
Adding Methods in the repository.model.ts File in the src/app/model Folder
The new methods accept an ID value, locate the corresponding product, and then return the IDs of the next and previous objects in the array that the repository uses to collect the data model objects. I will use this feature later in the chapter to allow the user to page through the set of objects in the data model.
Removing Optional Parameters in the form.component.ts File in the src/app/core Folder
Removing Route Parameters in the table.component.html File in the src/app/core Folder
Adding Components to the Project
I need to add some components to the application to demonstrate some of the features covered in this chapter. These components are simple because I am focusing on the routing system, rather than adding useful features to the application. I created a file called productCount.component.ts in the src/app/core folder and used it to define the component shown in Listing 26-4.
You can omit the selector attribute from the @Component decorator if a component is going to be displayed only through the routing system. I tend to add it anyway so that I can apply the component using an HTML element as well.
The Contents of the productCount.component.ts File in the src/app/core Folder
The Contents of the categoryCount.component.ts File in the src/app/core Folder
The notFound.component.ts File in the src/app/core Folder
Declaring Components in the core.module.ts File in the src/app/core Folder

Running the example application
Using Wildcards and Redirections
The routing configuration in an application can quickly become complex and contain redundancies and oddities to cater to the structure of an application. Angular provides two useful tools that can help simplify routes and also deal with problems when they arise, as described in the following sections.
Using Wildcards in Routes
Adding a Button in the table.component.html File in the src/app/core Folder

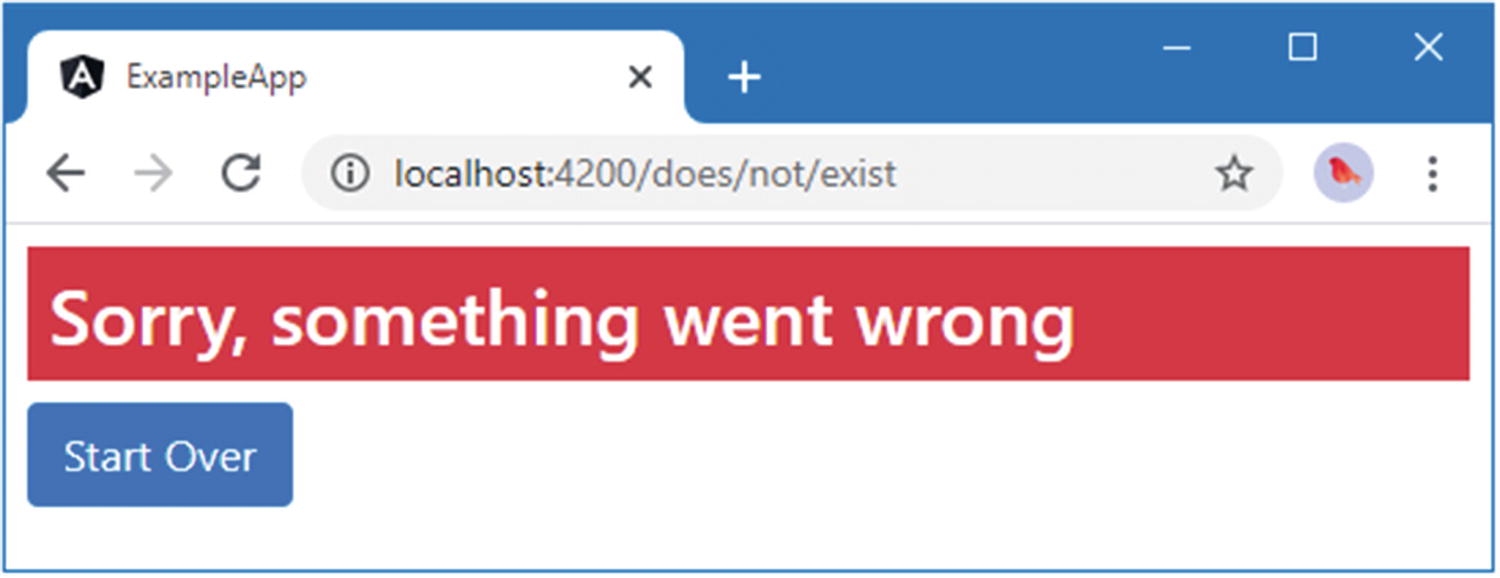
The default navigation error
This isn’t a useful way to deal with an unknown route because the user won’t know what routes are and may not realize that the application was trying to navigate to the problem URL.
Adding a Wildcard Route in the app.routing.ts File in the src/app Folder
Using a wildcard route
Clicking the Start Over button navigates to the / URL, which will select the table component for display.
Using Redirections in Routes
Using Route Redirection in the app.routing.ts File in the src/app Folder
The pathMatch Values
Name | Description |
|---|---|
prefix | This value configures the route so that it matches URLs that start with the specified path, ignoring any subsequent segments. |
full | This value configures the route so that it matches only the URL specified by the path property. |

Performing a route redirection
The other routes in Listing 26-10 redirect the empty path to the /table URL, which displays the table component. This is a common technique that makes the URL schema more obvious because it matches the default URL (http://localhost:4200/) and redirects it to something more meaningful and memorable to the user (http://localhost:4200/table). In this case, the pathMatch property value is full, although this has no effect since it has been applied to the empty path.
Navigating Within a Component
The examples in the previous chapter navigated between different components so that clicking a button in the table component navigates to the form component and vice versa.
Adding Buttons to the form.component.html File in the src/app/core Folder
These buttons have bindings for the routerLink directive with expressions that target the previous and next objects in the data model. This means that if you click the Edit button in the table for the lifejacket, for example, the Next button will navigate to the URL that edits the soccer ball, and the Previous button will navigate to the URL for the kayak.
Responding to Ongoing Routing Changes
Although the URL changes when the Previous and Next buttons are clicked, there is no change in the data displayed to the user. Angular tries to be efficient during navigation, and it knows that the URLs that the Previous and Next buttons navigate to are handled by the same component that is currently displayed to the user. Rather than create a new instance of the component, it simply tells the component that the selected route has changed.
This is a problem because the form component isn’t set up to receive change notifications. Its constructor receives the ActivatedRoute object that Angular uses to provide details of the current route, but only its snapshot property is used. The component’s constructor has long been executed by the time that Angular updates the values in the ActivatedRoute object, which means that it misses the notification. This worked when the configuration of the application meant that a new form component would be created each time the user wanted to create or edit a product, but it is no longer sufficient.
The Observable Properties of the ActivatedRoute Class
Name | Description |
|---|---|
url | This property returns an Observable<UrlSegment[]>, which provides the set of URL segments each time the route changes. |
params | This property returns an Observable<Params>, which provides the URL parameters each time the route changes. |
queryParams | This property returns an Observable<Params>, which provides the URL query parameters each time the route changes. |
fragment | This property returns an Observable<string>, which provides the URL fragment each time the route changes. |
These properties can be used by components that need to handle navigation changes that don’t result in a different component being displayed to the user, as shown in Listing 26-12.
If you need to combine different data elements from the route, such as using both segments and parameters, then subscribe to the Observer for one data element and use the snapshot property to get the rest of the data you require.
Observing Route Changes in the form.component.ts File in the src/app/core Folder
The component subscribes to the Observer<Params> that sends a new Params object to subscribers each time the active route changes. The Observer objects returned by the ActivatedRoute properties send details of the most recent route change when the subscribe method is called, ensuring that the component’s constructor doesn’t miss the initial navigation that led to it being called.

Responding to route changes
The effect of navigation is obvious when the activated route changes the component that is displayed to the user. It may not be so obvious when just the data changes. To help emphasize changes, Angular can apply animations that draw attention to the effects of navigation. See Chapter 28 for details.
Styling Links for Active Routes
Defining a Route in the app.routing.ts File in the src/app Folder
Adding Category Filter Support in the table.component.ts File in the src/app/core Folder
Adding Filter Elements in the table.component.html File in the src/app/core Folder
The important part of this example is the use of the routerLinkActive attribute, which is used to specify a CSS class that the element will be assigned to when the URL specified by the routerLink attribute matches the active route.

Filtering products
If you click the Soccer button, the application will navigate to the /table/Soccer URL, and the table will display only those products in the Soccer category. The Soccer button will also be highlighted since the routerLinkActive attribute means that Angular will add the button element to the Bootstrap bg-primary class.
Fixing the All Button
The navigation buttons reveal a common problem, which is that the All button is always added to the active class, even when the user has filtered the table to show a specific category.
Configuring the Directive in the table.component.html File in the src/app/core Folder

Fixing the All button problem
Creating Child Routes
The URLs and the Components They Will Select
URL | Component |
|---|---|
/table/products | The ProductCountComponent will be displayed. |
/table/categories | The CategoryCountComponent will be displayed. |
/table | Neither component will be displayed. |
Configuring Routes in the app.routing.ts File in the src/app Folder
Child routes are defined using the children property, which is set to an array of routes defined in the same way as the top-level routes. When Angular uses the entire URL to match a route that has children, there will be a match only if the URL to which the browser navigates contains segments that match both the top-level segment and the segments specified by one of the child routes.
Notice that I have added the new route before the one whose path is table/:category. Angular tries to match routes in the order in which they are defined. The table/:category path would match both the /table/products and /table/categories URLs and lead the table component to filter the products for nonexistent categories. By placing the more specific route first, the /table/products and /table/categories URLs will be matched before the table/:category path is considered.
Creating the Child Route Outlet
Adding an Outlet in the table.component.html File in the src/app/core Folder
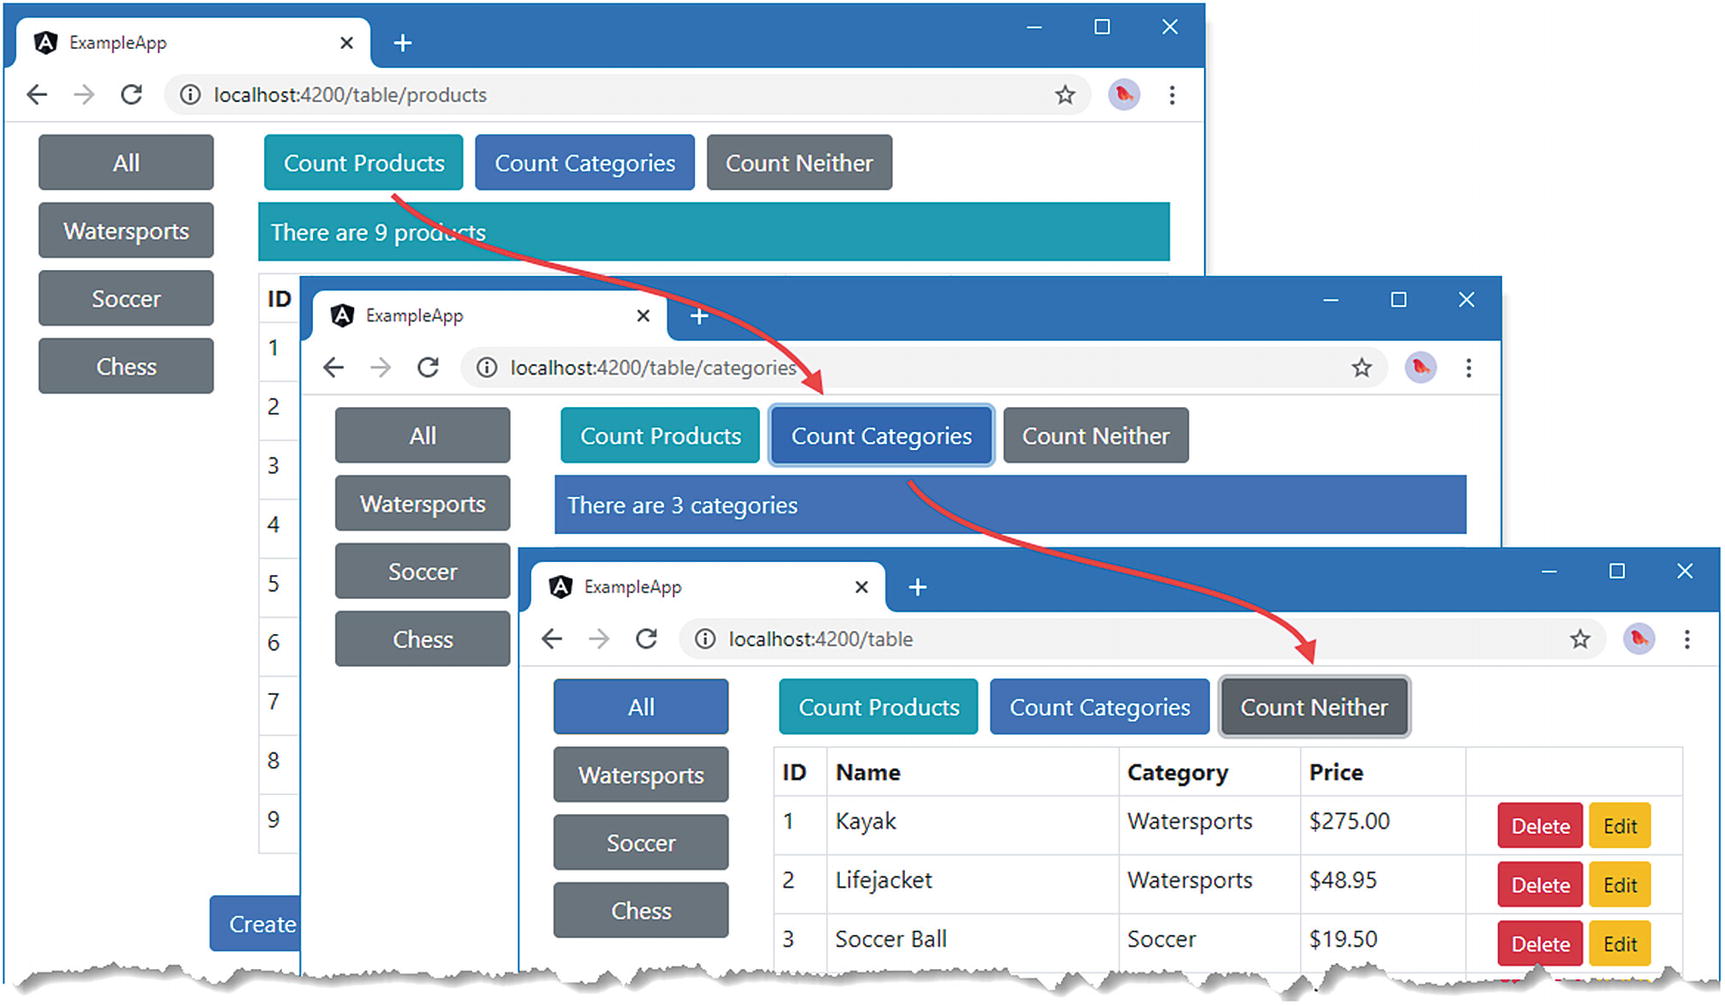
Using child routes
Accessing Parameters from Child Routes
The New URLs Supported by the Example Application
Name | Description |
|---|---|
/table/:category/products | This route will filter the contents of the table and select the ProductCountComponent. |
/table/:category/categories | This route will filter the contents of the table and select the CategoryCountComponent. |
Adding Routes in the app.routing.ts File in the src/app Folder
The type of the children property is a Routes object, which makes it easy to minimize duplication in the route configuration when you need to apply the same set of child routes in different parts of the URL schema. In the listing, I have defined the child routes in a Routes object called childRoutes and used it as the value for the children property in two different top-level routes.
Using Relative URLs in the table.component.html File in the src/app/core Folder
When Angular matches routes, the information it provides to the components that are selected through the ActivatedRoute object is segregated so that each component only receives details of the part of the route that selected it.
In the case of the routes added in Listing 26-20, this means the ProductCountComponent and CategoryCountComponent receive an ActivatedRoute object that only describes the child route that selected them, with the single segment of /products or /categories. Equally, the TableComponent component receives an ActivatedRoute object that doesn’t contain the segment that was used to match the child route.
The ActivatedRoute Properties for Child-Parent Route Information
Name | Description |
|---|---|
pathFromRoot | This property returns an array of ActivatedRoute objects representing all the routes used to match the current URL. |
parent | This property returns an ActivatedRoute representing the parent of the route that selected the component. |
firstChild | This property returns an ActivatedRoute representing the first child route used to match the current URL. |
children | This property returns an array of ActivatedRoute objects representing all the child routes used to match the current URL. |
Ancestor Routes in the productCount.component.ts File in the src/app/core Folder
The pathFromRoot property is especially useful because it allows a component to inspect all the routes that have been used to match the URL. Angular minimizes the routing updates required to handle navigation, which means that a component that has been selected by a child route won’t receive a change notification through its ActivatedRoute object if only its parent has changed. It is for this reason that I have subscribed to updates from all the ActivatedRoute objects returned by the pathFromRoot property, ensuring that the component will always detect changes in the value of the category route parameter.

Accessing the other routes used to match a URL
Summary
In this chapter, I continued to describe the features provided by the Angular URL routing system, going beyond the basic features described in the previous chapter. I explained how to create wildcard and redirection routes, how to create routes that navigate relative to the current URL, and how to create child routes to display nested components. In the next chapter, I finish describing the URL routing system, focusing on the most advanced features.