
Chapter 3
Miking: Getting a Great Source Sound
IN THIS CHAPTER
![]() Exploring microphone techniques
Exploring microphone techniques
![]() Miking drums
Miking drums
![]() Miking amplified instruments
Miking amplified instruments
![]() Miking acoustic instruments
Miking acoustic instruments
You can do all the right things to get your Pro Tools software ready to record tracks (see Book 3, Chapter 1 for more on that topic), but it won’t mean diddly if you don’t know how to set up your mics properly.
As you’ll soon find out, the location of a microphone in relation to your instrument or a singer has a huge impact on the sound of your recording. In fact, just a movement of an inch or two or even a slight turn of the mic can bring out different characteristics in the sound. The art of placing mics is one that you will undoubtedly spend a lifetime discovering.
In this chapter, you discover the fundamentals of using microphones to get a good source sound. You explore tried-and-true miking methods along with some practical miking tips and tricks that you can use right away. You also examine the use of compression and mic placement to control and eliminate transients — the usual peaks in the instrument’s sound.
Tracing Typical Microphone Techniques
Regardless of the style of microphone you use — or the type of instrument you record — you can use one or more of the following mic placement techniques to capture the sound you want:
- Spot (or close) miking: Put your microphone within a couple feet of the sound source. This includes instrument-mounted mics.
- Distant miking: Pull your mic back three to five feet from the sound.
- Ambient miking: Place your mic way back in a room.
- Stereo miking: Set up two mics at various distances from one another.
- Combining miking strategies: Use a combination of the four traditional placement strategies listed here.
This section introduces you to the four traditional mic placement strategies employed in recording. I cover the characteristics and purposes of each of these four methods and get a look at how each relates to a particular tonal or sound quality. I also discuss how you can combine these strategies.
Spot miking
Spot miking (also called close miking) involves placing your microphone within a couple of feet of the sound source. People with a home-recording setup use this technique most often because it adds little of the room (the reverb and delay) to the recorded sound. Figure 3-1 shows the close miking placement.
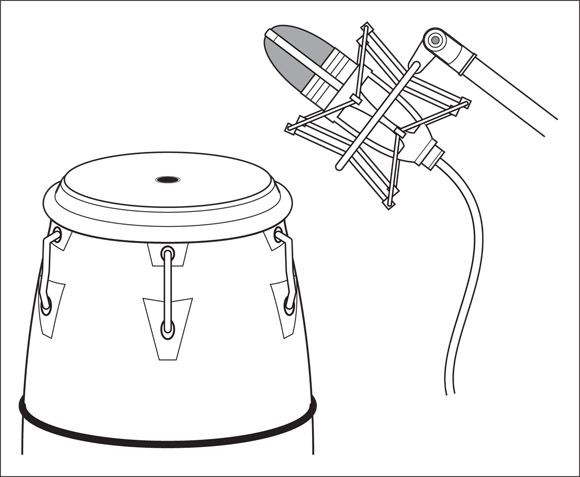
FIGURE 3-1: Spot miking places a mic within a few feet of the sound source.
Spot miking tends to create a less natural sound and can compromise the quality of your recordings if you’re not careful. It can also offer advantages if you record multiple instruments in one pass or if your room doesn’t sound good. Here are some things to consider when using spot miking:
- Transients are more extreme. Distance from a sound source tames the initial attack of an instrument. Spot miking picks up more transient material, which can make the sound of the instrument seem harsh and can overload your mic, preamp, or converter without your seeing it on your level meters. You need to listen closely to your recorded sound to make sure that you don’t have distortion. A solution to this problem is to move the mic back a bit or point it slightly away from the instrument.
- The room isn’t part of the recording. This can be good or bad, depending on the sound of your room:
- On the plus side, it can keep a bad-sounding room from ruining the sound of your track by putting it so far in the background of the recording that it isn’t really heard on your tracks.
- On the downside, you lose the natural ambience of an instrument that gives it its character, so if you have a nice-sounding room, this technique may not be the best choice (depending on how many instruments are playing at once — see the next bullet point).
- You can isolate each instrument. Spot miking can help you keep multiple instruments separated in your tracks, so if you record your band live, you can create some isolation among instruments. (This assumes that you use a microphone with a cardioid polar pattern. Book 3, Chapter 2 has more details on this.) This makes mixing a lot easier. Because of the downside that I list in the previous bullet, I’m a big fan of using room mics (using the ambient technique described in the section “Ambient miking,” later in this chapter) in conjunction with spot mics to create a more realistic sound.
- Even minor adjustments in mic placement can have a huge impact on your recorded sound. Because the mic is so close to the sound source, small adjustments to the mic’s placement make a noticeable difference, and the mic may not capture the complete sound of the instrument. Finding the spot that sounds the best may take you a while.
- The closer you put your mic, the more bass you record. I mention this in Chapter 2 of this mini-book, but it bears repeating here. As you move a mic with a cardioid polar pattern in close to the sound source, the mic picks up more bass energy. This is called the proximity effect. It can be an advantage for some applications — rounding out the sound of a vocal, for instance — but it can also cause problems with some instruments such as acoustic strings, where you don’t want the extra bass muddying the sound. To counter this effect, use an omnidirectional or figure-8 mic or move the cardioid-pattern mic away from the sound source until the bass is more manageable. (See Book 3, Chapter 2 for a rundown of the different types of mics.)
 With spot miking, where you place the mic is much more crucial than it is with any other technique. Because the mic is so close to the sound source, small adjustments to the mic’s placement make a noticeable difference, and the mic might not capture the complete sound of the instrument. Finding the spot that sounds the best can take some trial and error.
Distant miking
When you use distant miking, you place mics about three or four feet away from the sound source. (See Figure 3-2.) Distant miking enables you to capture some of the sound of the room along with that of the instrument. An example of a distant miking technique is using an overhead drum mic, with which you can pick up the whole drum set to some extent. Coupled with a few select spot mics, you can record a natural sound.
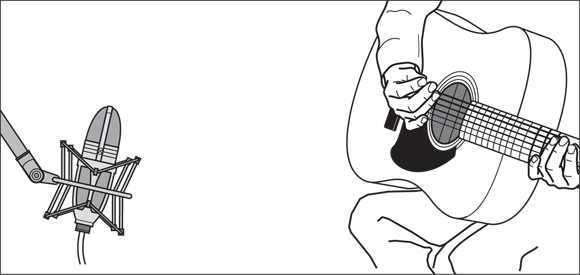
FIGURE 3-2: Distant miking places a microphone three or four feet from the sound source.
Distant miking has its pluses and minuses. Here are some things to remember if you use this technique:
- You can get a more natural sound. By moving the mic back a few feet from its source, you give the instrument a chance to breathe a bit and allow the sound to blend a little with the room in which it’s played. You also eliminate the impact of the proximity effect (see the previous section) and correct the balance between the body of the instrument’s sound and the transient from the initial attack. This often creates a more pleasing, natural sound.
- Other instruments may bleed into your track. If you record more than one instrument at the same time, distant miking increases the bleed of other instruments into the track of the instrument that you want to record. The solution to this is to use the spot-miking technique instead, move the instruments farther apart, adjust the mics so that the blind spot of the mic is facing the instrument you don’t want to record, or place gobos (acoustic baffles) between the instruments.
- The sound of the room is important. With the mic farther away from the instrument, more of the room sound (the reverb and delay) is picked up in relation to the instrument. As a result, you hear more of the room in your tracks. This can be nice if your room sounds good, but it can get in the way if your room doesn’t.
- Multiple mics can cause phase problems. Whenever you use more than one mic on a source such as a band or drum set, the relationship of these mics to the source and to one another plays a significant role in the sound you get. If the mics aren’t placed properly, some frequencies may drop out. Called phase cancellation, this is the result of the recorded waveforms reaching each mic at slightly different times. The sidebar “Problems with stereo miking” and the section “Mic combinations,” later in this chapter, explain this phenomenon in more detail.
Ambient miking
Using ambient miking places the mic far enough away from the sound source so you capture more of the room sound (the reverb and delay) than the sound of the actual instrument. (See Figure 3-3.) You can place the mic a couple of feet away from the source but pointed in the opposite direction, or you can place it across the room. You can even put the mic in an adjacent room (although this is an unorthodox technique, I’ll admit). The distance that you choose varies from instrument to instrument. For example, a flute would need a little closer mic than a double bass would.
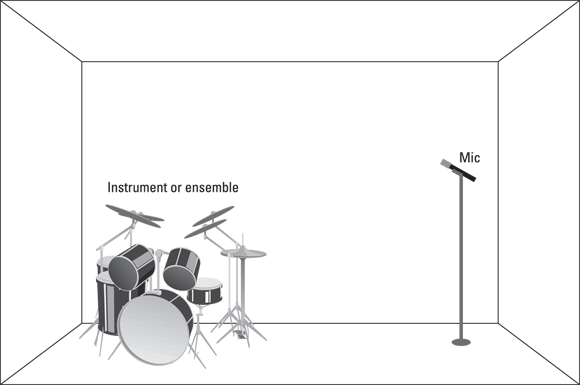
FIGURE 3-3: Ambient miking involves placing the mic so it picks up more of the room’s sound than the instrument’s sound.
Ambient miking definitely has its place, but using this technique requires forethought. Consider the following when you use this technique:
- You lose the attack of the instrument. Because the mic is so far from the sound source, it picks up more of the ambience of the room than the attack of the instrument (hence, the name of the technique). To counter this effect, use distant or spot mics for the instruments that you want to have a more pronounced presence, and blend these mics with the ambient mic when you mix.
- You need a good room. Ambient miking relies on the sound of the room to create a pleasing ambience. If your room doesn’t sound great, you’re better off using a closer miking technique instead. On the other hand, if you can find a great room in which to record — a church or auditorium, for instance — setting up a mic in the middle of the room (you must listen for the best placement by walking around the room as the music plays) can give your tracks that extra something that can set them apart from the run-of-the-mill home recordings.
- Placement is key. Just as each instrument has a sweet spot, each room has a place that sounds best. Take your time finding this location and put your ambient mic there.
- Watch for phase problems. Because an ambient mic is typically used in conjunction with another mic or two (or more), you must keep the relationship among the mics correct; otherwise, you’ll have problems with the phase of the recorded waveforms. (I introduce the concept of phase cancellation in the preceding section, “Distant miking.”)
 Ambient mic placement works well in those places where the room adds to the sound of the instrument. Home recordists sometimes use stairwells, bathrooms, or rooms with wood paneling to liven up the sound. The sound you record is ambient (hence the name): steeped in the sonic qualities of the surroundings. If you mix this with a spot mic, you can end up with a natural reverb. If your room doesn’t add to the sound of the instrument, you’re better off not using any ambient mics. You can always add a room sound by using effects in the mixing process. (See Book 6, Chapter 5 for more on using effects.)
Stereo miking
Stereo miking involves using two mics to capture the stereo field of the instrument. You can use a variety of stereo miking techniques as well as some pretty complicated ways of using two mics to record. The three most common approaches, however, are X–Y (coincident) pairs, the Blumlein technique, and spaced pairs. You can also find stereo mics that do a good job on their own of capturing the stereo field of an instrument.
Stereo miking has the advantage of capturing a natural stereo image. When you listen to performances that were recorded with well-placed stereo miking, you can hear exactly where on the stage each instrument performed. Of course, there is an art to such wonderful stereo miking. You can’t just randomly set up a couple of mics in a room and get a good stereo sound. Capturing a stereo image with two mics requires some careful planning.
X–Y pairs
X–Y (also called coincident) stereo miking uses two mics placed next to each other so that the diaphragms are at almost-right angles (anywhere from 90–135 degrees) as close together as possible without touching one another. X–Y stereo miking is the most common type of stereo mic setup and the one you’ll probably use if you do any stereo miking. Figure 3-4 shows a basic X–Y setup. Notice how the mics in this figure are attached to a special mounting bracket. This bracket makes positioning the mics easy.
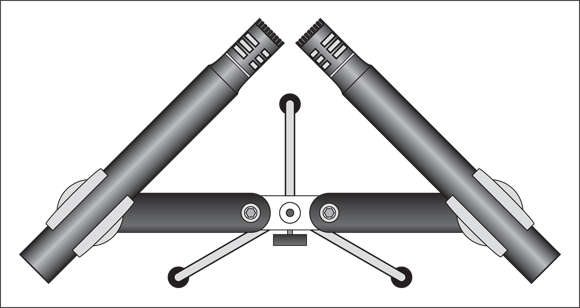
FIGURE 3-4: The X–Y stereo mic approach uses two matched microphones placed close together.
When you record using the X–Y technique, keep these points in mind:
- The stereo image (the placement of the instruments in the sonic environment) isn’t as wide or as realistic as it is in real life. The X–Y technique is easy to set up and results in a decent sound, so (as with all things in life) you have to deal with the compromise this ease creates. No solution to this exists, so if a wide stereo image is important to you, consider using a different stereo technique, such as the spaced pair or perhaps a Jecklin disk. (See the Sidebar “Problems with stereo miking,” later in this chapter, for more about using a Jecklin disk.)
- Don’t use two mics when one is enough. After you get a pair of nice mics for X–Y miking, you’ll want to use them on everything. A stereo-mic approach to a classical guitar composition is nice, but honestly, recording the acoustic guitar in a rock ballad with five other instruments playing isn’t necessary and just makes life more complicated when you mix the song (see the section “Mic combinations,” later in this chapter).
Keep some distance between the mics and the sound source. The X–Y technique has no benefit over a single mic if you place your mics within a couple feet of the sound source.
You simply don’t have enough space for a stereo image to develop until you’re at least 6 feet from the instrument or group of instruments. In fact, I recommend being at least 10 feet from the sound source before using the X–Y stereo miking approach.
Blumlein technique
The Blumlein technique is named after Alan Dower Blumlein, who patented this approach in 1931. Blumlein stereo miking involves placing two figure-8 mics in much the same way as the X–Y pattern (at right angles to one another with the diaphragms as close together as possible). The two mics are mounted on separate stands, one above the other.
The advantage with this technique is that the figure-8 mics pick up signals from both the front and back. This produces a very natural sound. You also don’t have to contend with any proximity effects (enhanced bass response that comes from being close to the sound source) because figure-8 mics don’t produce this effect. Figure 3-5 shows this technique. (For more on figure-8 mics, see Book 3, Chapter 2.)

FIGURE 3-5: The Blumlein technique uses two figure-8 mics placed at right angles to one another.
Here are some suggestions for when you should use this technique:
- The room sound is important. Because the Blumlein technique uses figure-8 mics that can pick up the sound on the other side of the mics than your instruments, you end up recording quite a bit of room sound with your instruments. This is one of the reasons that this technique sounds as good as it does, but your room must add to the quality of your sound, not hinder it.
- Find the best place in the room. Take some time to find the best place to put the mics. The placement may not be in the center of the room or the front of the band. Instead, it may be off to one side or closer to the back or front. This advice holds true for all miking, but with the Blumlein technique (or when using omnidirectional mics with the other techniques), correct mic placement can make the difference between a decent recording and a truly awesome one.
- Get a sturdy stand that can handle both mics. Using two stands to hold both mics makes moving them around (to find the sweet spot in the room) a real pain in the you-know-what. You can easily find mic-stand adapters that hold both mics. These can be an invaluable investment.
Spaced pairs
Spaced-pair stereo miking places two mics at a distance in front of the instrument(s) you want to record as well as at a distance from one another. This approach can work well if you record an ensemble that takes up a fairly large amount of room. Figure 3-6 shows a top view of a typical spaced stereo mic setup.

FIGURE 3-6: To use the spaced-pair approach, place two mics away from the sound source and apart from one another.
Keep the following things in mind when using the spaced-pair stereo-miking technique:
- Follow the rule. One of the most important things to consider when stereo miking with spaced pairs is that you’ll experience phase problems if you don’t space the mics properly. Fortunately, experienced recordists have discovered a basic guideline that makes it easier to place the mics. Called the 3:1 rule, this guideline says that you should place the mics three times farther apart than they are from the sound source. Doing so minimizes potential phase problems.
- Break the rule if necessary. As handy as the 3:1 rule is, it isn’t foolproof. At times, this rule doesn’t produce the best sound. Later in this chapter, I offer one of these instances for placing drum overheads in a three-mic technique. Use the rule as a guide, but trust your ears to determine the best place to put a spaced pair of mics (or a single mic, a pair, or a group of mics).
Stereo microphones
If you want to record an instrument in stereo and don’t want the hassle of fiddling with setting up stereo pairs, you can use a stereo mic. Stereo mics basically have two diaphragms in them and use a special cord that allows you to record the output from each diaphragm on a separate track. This type of microphone acts like an X–Y pair, so follow the guidelines and suggestions that I offer in the section “X–Y pairs,” earlier in this chapter, when using one of these. Take a look at an inexpensive stereo condenser mic in Figure 3-7.
FIGURE 3-7: A stereo microphone can do a good job of capturing a natural stereo image.
Mic combinations
Often you’ll want to use more than one mic. The possible combinations are almost limitless: You can use several spot mics on one instrument, you can use a spot mic and an ambient mic, you can have a distant mic and a spot mic, or… . Well, you get my point.
As exciting as these possibilities can be, keep the following points in mind to get the best sound when you combine multiple mics:
Be aware of phase relationships. Each mic interacts with all the other ones when you record, and you need to take the time to set up each mic so that it doesn’t interfere with any others. This means honoring the 3:1 rule for stereo mics (see the section “Spaced pairs,” earlier in this chapter). The only way to ensure that your phase is good is to record a snippet of a song (or a whole song if you want) and then listen to your tracks.
Listen to each mic individually and then together to see whether any frequencies drop out. If frequencies drop out, finding the problem mics will take some detective work. You need to play pairs of mics that you recorded until you find the problem; then you need to adjust each mic until the problem goes away. If you do this enough, you’ll get pretty good at placing mics and making phase relationships work.
Be aware of bleed between mics. This is mainly for bands that want to play together while still maintaining as much isolation as possible. A string quartet rarely needs isolation because all the instruments blend well together live; this blending is integral to the overall sound. However, a rock band with miked amps usually needs enough isolation so that you can do some tweaking to each instrument when you mix.
In addition, a band that plays well together and can nail the performances can have more bleed — whereas a band with a marginal player or two (you know whether you have one in your band) who has to perform additional takes or punch-ins to fix a weak performance requires much more isolation. Doing a punch-in to a live, bleed-filled performance (for instance, if your bass player flubbed a few notes) can sound wrong in the mix.
- Use only as many mics as you need. Every additional mic that you add to your setup complicates your recording process considerably. To keep things simple, use as few mics as possible to get the sound you want.
If you’re using a digital recorder, it probably has a phase switch that enables you to fix the phase problems later if you missed them as you recorded. This isn’t as optimal as recording without this problem, but it may allow you to save an otherwise-good set of tracks.
Taming Transients
The single most difficult part of getting a good sound with a microphone is dealing with sudden, extreme increases in the sound signal. These blips are transients, and they happen when a drum is first struck, when a vocalist sings certain syllables (for example, those that begin with P), and when a guitar player picks certain notes. In fact, because you can’t always control the amount of force that you apply to an instrument, transients can happen any time — with any instrument — and without warning. (Highly-trained musicians produce fewer transients because they have a greater mastery over their muscular movements.)
In digital recording, all it takes is one slight, unexpected note to cause clipping and distortion, ruining what might be a perfect musical performance. Believe me: Nothing is as heart-wrenching as listening to the perfect take and hearing the unmistakable sound of digital distortion. Although you can’t eliminate transients completely (they are part of an instrument’s character), you can tame the extreme transients that often cause digital overs (a thick signal at too high of a level, resulting in distortion). You can lash ’em down in three ways:
- Set your levels properly so the transients don’t overload the converters.
- Make sure you have proper mic placement.
Run the signal through a compressor when recording.
A compressor is a piece of hardware (not included in your Avid interface) that controls the dynamics of your signal to keep your levels from getting too high.
Setting your levels properly
Back in the days of 16-bit digital recording (in ancient times, oh, ten years or so ago), you wanted to record at as high a level as possible without going over the maximum of 0 decibels (dB). The idea was to ensure the highest-possible fidelity by using as many of the available 16 bits as possible. If you recorded at lower levels, you used fewer bits, resulting in lower fidelity and higher noise levels.
Now, in the advanced age of digital, your best bet is to record with 24-bit resolution. Those extra 8 bits gained since the olden days free you from having to record at the highest level possible. In fact, you can put your max levels down around –12 dB and still end up with great-sounding tracks. Giving yourself that kind of room (called, logically enough, headroom) allows an instrument’s transients to be recorded without causing problems with your converters.
I highly recommend recording with peak levels no more than –12 dB or –10 dB unless you run the incoming signal through a compressor before it hits your converters. Sure, your tracks will be quieter, but you can deal with that during mixing (Book 6, Chapter 1) and mastering (Book 7, Chapter 1).
Placing mics properly
A microphone that’s too close to a loud sound source (or pointed too directly at the point of attack) can easily pick up extreme transients. In most cases, all you have to do is to pull the mic away from the instrument a little or turn it ever so slightly so it avoids picking up too high a signal. (I cover mic setup thoroughly in the “Setting Up Your Mics: Some Suggestions” section.)
The main thing to keep in mind when placing your microphones is to experiment. Don’t be afraid to spend time making small adjustments. After all, the track you save can be your own.
Compressing carefully
Compressors are processors that allow you to control the dynamics of a signal — extremes of loudness or softness — and boy, are they ever versatile. You can use them on the front end while tracking (recording) instruments to ward off any stray transients. You can use them to level off an erratic performance. And you can use them to raise the overall apparent level of a mixed song. In this section, you explore the first use of compression: the control of transients. (You can find out about the other ways to use compression in Book 6, Chapter 3 and in Book 7, Chapter 2.)
The compressor is an invaluable tool when you record digitally because it enables you to record at high levels without worrying as much about digital clipping. The only problem is that the careful use of compression is an art that normally takes a while to get the hang of. Don’t worry, though. In this chapter, you get some guidelines for using compression. And in Book 6, Chapter 4, I offer quite a few conservative compression settings for a variety of instruments to get you started.
Pro Tools includes a compressor plug-in with the software program. You can use this built-in compression if you’re tweaking a session you already recorded. For that matter, you can use this feature when you’re recording your tracks, but that won’t do you any good. Remember that the Pro Tools compression system is digital: It can’t work with analog signals. Your signal has to go through the A/D converter (and get changed from analog to digital) on its way to being recorded. The A/D converter in your audio interface — not the compression plug-in — is first in line after the preamp. All this defeats the purpose of using a compressor to control transients. (Bummer.) In fact, the A/D converter is usually where you often get your first dose of distortion. (Ditto.) If you’re serious about using compression on the front end to tame those transients, consider using an external preamp that you can insert into the signal chain before the A/D converter: that is, before the signal gets to your audio interface.
Compressors have a series of dials that allow you to adjust several parameters:
- Threshold: This setting dictates the level at which the compressor starts to act on the signal, listed in decibels. For the most part, you want to set the threshold level so the compressor acts on only the highest peaks of the signal.
- Ratio: This setting determines the amount that the compressor affects the signal. The ratio — such as 2:1, for instance — means that for every decibel that the signal goes over the threshold setting, it is reduced by two. In other words, if a signal goes 1 dB over the threshold setting, its output from the compressor will only be ½ dB louder. The ratio is the one parameter that varies considerably from instrument to instrument because the level of the transient varies.
- Attack: This knob controls how soon the compressor starts, well, compressing. The attack is defined in milliseconds (ms); the lower the number, the faster the attack. For the most part, you’re trying to control transients, and they happen at the beginning of a note. Therefore, you want the attack set to act quickly.
- Release: This parameter controls how long the compressor continues to affect the note after it starts. Like the attack, the release is defined in milliseconds. Because transients don’t last very long, your best bet is usually a short release time if you’re using compression on the front end.
- Gain: Use this knob to adjust the level of the signal leaving the compressor. The setting is listed in decibels. Because adding compression generally reduces the overall level of the sound, you use this control to raise the level back up to where it was going in.
- Hard knee or soft knee: Most compressors give you the option of choosing one or the other of these odd-sounding settings (or they do it for you, based on the setting you’ve chosen). Both refer to how the compressor behaves as the input signal passes the threshold.
- A hard knee applies the compression at an even rate, regardless of how far over the threshold the level is. Thus, if you choose a compression setting of 4:1, the compressor applies this ratio for any signal over the threshold limit. Hard-knee compression is used for instruments such as drums, where you need to clamp down on any transients quickly.
- The soft knee, by contrast, applies the compression at a varying rate that depends on how far over the threshold setting the signal is. The compressor gradually increases the ratio of the compression as the signal crosses the threshold until the amount matches the level you set. Soft-knee compression is used on vocals and on instruments where the signal doesn’t have fast peaks.
Using compression is an art form. There is no one way to get the sound you want. Although I go into detail on compression and offer some great compressor settings for a variety of applications in Book 6, Chapter 4, keep in mind a couple of things while you think about using compression on your tracks:
- You can always add compression to a recorded track, but you can never take it away. If you’re not sure how much compression to apply to a particular situation, you’re much better off erring on the side of too little because you can always run the sound through another compressor if you need to.
- If you can hear a change in the sound of your signal, you most likely have it set too high. The reason to use a compressor on the front end is to eliminate extreme transients, which you can’t hear when you play anyway. If your compression setting changes the sound at all, you would want to turn it down slightly — unless, of course, you’re going for that effect.
Setting Up Your Mics: Some Suggestions
When you start to record, you discover an almost infinite number of ways to set up your mics. I can’t go into them all here (as if I really knew them all, anyway), but what I can do is share the miking approaches that I use and have found to work for me. Okay, they’re not just my approaches; they’re pretty common ways for miking a variety of instruments.
Telling you that a particular mic position will work for you is like telling you that you’ll like a particular ice cream flavor. I don’t know your tastes, goals, or specific recording conditions, so I can’t truly know what will work for you beforehand. Think of the miking techniques in this chapter as a starting point — and don’t be afraid to experiment until you find the sound you want. There’s no absolute right or wrong when it comes to miking. There’s only what works for you and what doesn’t. (Book 3, Chapter 2 talks more about microphone types and how they’re used.)
Vocals
Regardless of the type of studio you have or the style of music that you record, you’ll probably record vocals at some point. And unfortunately, vocals are one of the most challenging instruments to do well. First, you have to find the right mic for the person who’s singing, and then you need to try different approaches in order to get the best sound out of him or her. Fortunately, you’re in luck. In the next few sections, I lead you through the (sometimes complicated) process of getting good lead and backup vocal sounds.
The room and the vocals
To get the best recording of vocals possible, you need a dead room — a room with no reverberation. (Book 2, Chapter 1 has some tips on how to deaden your room.) Recording vocals in a dead room gives a sense of “presence” and allows you to add compression to the vocals without making them sound distant. (That “distance” results because the compressor raises the level of the background noise, particularly the reverberation from a live room that bounces the sound around a lot.)
The easiest way to deaden your room for vocal recording is to hang curtains, carpet, or blankets around the room, or to use the absorbent side of the reflector/absorber panels that I discuss in Book 2, Chapter 1. Try to cover the area in front — and to both sides — of the vocal with sound-absorbent materials. (If you use the reflector/absorber panels described in Book 2, Chapter 1, you’d better use stands because the panels are only four feet tall.)
The mics and the vocals
You have a lot of options for miking vocals. The type of mic you use dictates where you place it. Here’s the gist:
Dynamic mic: Dynamic mics sound best when you place them close to the singer’s mouth. The effect that you get is gritty. (Huh? Okay, by gritty, I mean dirty. That’s no help either? Let me see… .)
Dynamic mics produce a midrange-dominated sound: The high frequencies aren’t reproduced well. You’ll find that when a singer sings with the mic right in front of his or her mouth, the sound lacks even more high frequencies because of the proximity effect. That is, close range enhances the low-frequency response. What you get is a deep, bass-heavy sound that’s often described as gritty or dirty. This type of sound can be great for matching the mood of some styles of rock and blues music.
To set up a dynamic mic for this purpose, just put it on a stand so the singer can get his or her mouth right up against the windscreen. With this type of singing style, I recommend a compressor setting that pumps and breathes — that is, you can hear the compressor working. See my discussion of compression in Book 6, Chapter 4 for a recommended setting.
Large-diaphragm condenser mic: Large-diaphragm condenser mics are those most commonly used for vocals. These mics can clearly reproduce the entire audible frequency spectrum, emphasizing the low mids (200 to 500 Hz) slightly at the same time. What you get is a nice warm, full-bodied sound. (That sounds like I’m describing a wine.) The proximity effect (how close the singer is to the mic) determines how nice and warm-bodied the sound is. The closer the singer is, the deeper and richer the tone can be.
When you set up a large-diaphragm condenser mic for vocals, place the mic in such a way that the nasty sibilants (the sound from singing S and Sh sounds) and pesky plosives (pops from singing P, K, and T syllables) don’t mess up your recordings. To deal with plosives and sibilants, you can either use a pop filter (see Book 2, Chapter 1) or have the singer sing past (instead of right into) the mic. If you want the singer to sing past the mic, you can
- Place the mic above the singer and set it at an angle pointing away from him or her. (See the left side of Figure 3-8.)
- Set up the mic below the singer and angle it away from him or her. (See the right side of Figure 3-8.)
- Put the mic off to the side and face it toward the singer (the center of Figure 3-8) but not squarely in the path of the vocal.
Small-diaphragm condenser mic: Small-diaphragm condenser mics create a much brighter, airier sound than their large-diaphragm cousins. You don’t get the low-mid warmth of the large-diaphragm beast, so a small-diaphragm mic probably won’t be your first choice as a vocal mic unless (for example) you’re recording a female vocalist with a soprano voice and you want to catch the more ethereal quality of her higher frequencies.
You set up a small-diaphragm mic the same way you set up a large diaphragm mic.
Ribbon mic: A ribbon mic is a good choice if you’re looking for an intimate, crooner-type sound. (Think Frank Sinatra.) The ribbon mic is thought to add a silky sound to the singer’s voice, produced by a slight drop-off in the high frequencies (not as severe as you’d get from a dynamic mic). To my drum-abused ears, ribbon mics have a kind of softness that large-diaphragm condenser mics don’t have. The sound is more even, without the pronounced low-mid effect.
If you use a ribbon mic, you can set it up the same way you set up a condenser mic. You just need to be more careful about singing directly into a ribbon mic because the ribbon can break if you sing, speak, or breathe too hard into it.
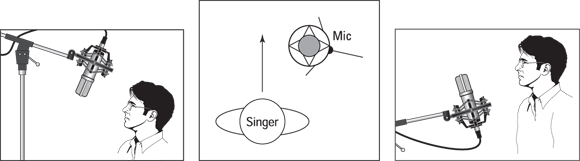
FIGURE 3-8: Place the mic at different angles to control sibilance and plosives.
Backup vocals
To record backup vocals, you can either track each part separately (using the same mic placement techniques that I describe earlier), or you can have all the backup singers sing at once into one or two mics. If you go for the latter method, you can use a stereo pair of mics, a figure-8 mic, or an omnidirectional mic.
If you use a stereo pair, I recommend setting them up in a coincident X–Y pattern. Have the vocalists stand next to each other, facing the mics at a distance of about three or four feet. Either large- or small-diaphragm mics work best for this setup. Check out Figure 3-9 for a neat top view of this arrangement.
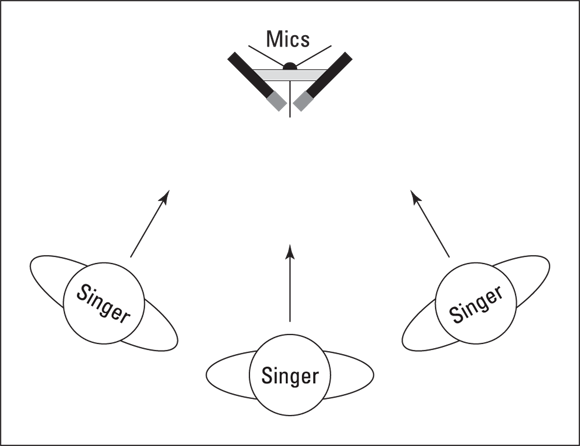
FIGURE 3-9: The X–Y stereo miking pattern can work well for backup vocals.
If you choose to use a figure-8 mic, the singers can be placed at opposite sides of the mic (see Figure 3-10). The advantage of this setup is that the singers can look at each other while they sing, which helps keep the vocals tight.
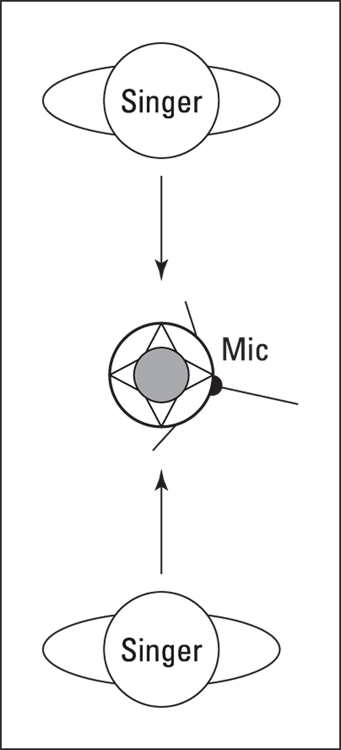
FIGURE 3-10: Backup singers can stand on either side of a figure-8 mic and see each other.
An omnidirectional mic can also work well for backup vocals. In this case, the singers stand in a circle around the mic, as shown in Figure 3-11.
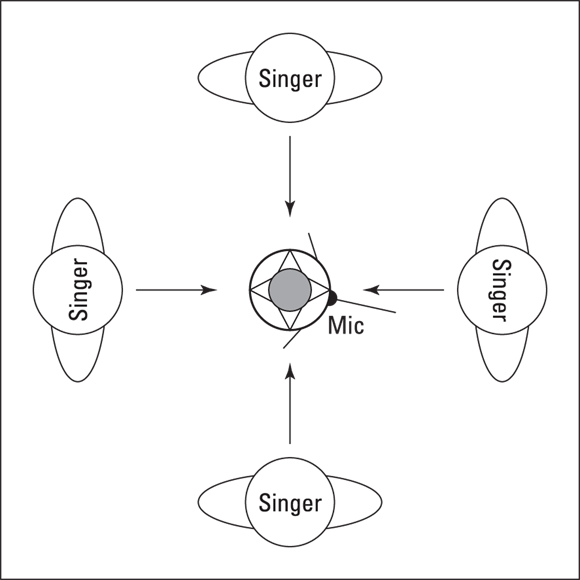
FIGURE 3-11: Singers stand in a circle around an omnidirectional mic.
Electric guitar
Miking your electric guitar is a personal thing. Every guitar player, it seems to me (although I don’t play guitar, so what do I know?), spends an awful lot of time getting his or her “sound.” If you’re a real guitar player, you undoubtedly take great pride in getting your sound exactly right on tape — er, disc. You likely spend countless hours tweaking your amp and adjusting the mic to get it just right. On the other hand, if you’re not a (harrumph) “real” guitar player, you might just want to record the part and get it over with. Either way, you can start looking for that perfect guitar sound by placing your mics in one (or more) of the ways that I outline later in this section.
The room and the guitar
Whether you play through a small jazz chorus amp or power-chord your way through a six-foot Marshall stack, the room that you play in has less impact on your sound than it does if you play drums or sing. For the most part, look for a room that is fairly dead — a room without natural reverberation. You can always add effects later.
Guitar miking involves mostly spot mics, so your only consideration when recording a guitar and using an amp is how your neighbors feel about the noise, er, your most excellent guitar playing.
If you have finicky neighbors, you can plug your guitar directly into your audio interface. You can then add effects and tweak the sound in Pro Tools.
The mics and the guitar
The type of mic you choose depends largely on the type of sound you’re looking for. For example, if you’re looking for a distorted rock guitar sound with effects, you can get by just fine with a dynamic mic. If you favor a clean sound, a small-diaphragm condenser mic might work better for you. If you’re going for a warm, full-bodied sound, try using a large-diaphragm condenser mic.
No matter which type of mic you use, you get the best sound from your amp speakers by putting the mic about 2–12 inches away from the cabinet, with the mic pointing directly at the cone of one of the amp speakers (specifically, the center of the speaker, which is that cone-shaped thing in the box). You can see this positioning in Figure 3-12.
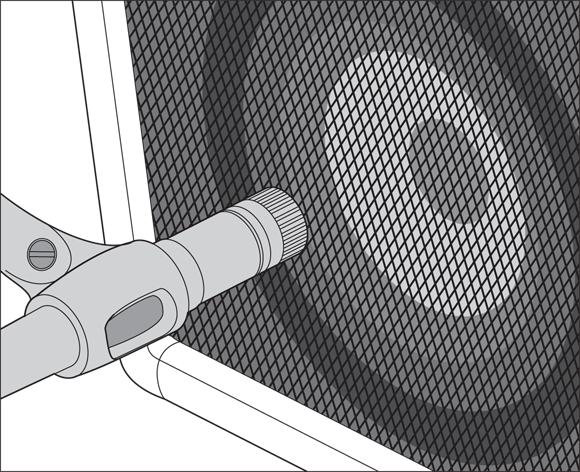
FIGURE 3-12: Start by placing a mic near the cone of a speaker in your amp.
You might want to experiment with how far the mic is from the amp and the angle at which you point it. Sometimes just a slight movement in or out, left or right, can make all the difference in the world. You can even try pointing the mic at different speakers (if your amp has more than one) because each speaker has a slightly different sound.
For speaker cabinets that have more than one speaker, I know some engineers who actually disconnect all but one speaker to lower the overall volume without losing the intense, distorted sound. This can be especially beneficial if you have one of those amp stacks with a volume knob that goes to 11, and you just gotta crank the amp to get your “tone.” (Come on, rockers, you know who you are.) This way you don’t overload the mic (which creates the wrong kind of distortion) and can still get that nasty sound you’re looking for.
If you can’t quite get the sound that you want from your amp with the one mic pointed at the speaker cone, try adding a second mic about three or four feet away — also pointed directly at the speaker cone — to get a more ambient sound. This arrangement might also give your sound more life, especially if you have a room with natural reverberation. If you add a second mic, however, remember to watch for phase differences between the mics and make adjustments accordingly. (I discuss phase cancellation earlier in this chapter.)
Are you sick of the same old sound coming out of your amp? Wanna really shake things up (and I mean this literally)? Well, put your guitar amp in a tiled bathroom and crank it up. You can put a mic in the bathroom with your amp (a couple of feet away) and maybe another one just outside the door (experiment with how much you close or open the door). The effect is, well… . Try it and find out for yourself.
Electric bass
When you mic an electric bass, getting a good sound can be a real bear. Your two adversaries are muddiness (lack of definition) and thinness (a pronounced midrange tone). These seem almost polar-opposite characteristics, but they can both exist at the same time. I outline the best way to avoid these problems in the following sections.
Running your bass guitar directly into the board — via a direct box, your amp’s Line Out jack, or an instrument input on your audio interface — gives the guitar a punchier sound.
The room and the bass
The sound of an electric bass guitar can get muddy awfully fast. Your best bet is to choose a room that doesn’t have a lot of reflective surfaces (such as paneled walls and wooden floors) that bounce the sound around. A dead room is easier to work with. Don’t make your room too dead, however, or it just sucks the life out of your amp’s tone. If you can get your amp to sound good in your room, placing the mic properly is easy.
Don’t be afraid to be creative and to try recording your bass in different rooms. Look for a room with a warm sound to it. One thing, though: The bathroom amp trick doesn’t work too well for a bass guitar, but it can be fun to try anyway.
The mics and the bass
Because the bass guitar produces low frequencies, a dynamic mic or a large-diaphragm condenser mic works well. I personally avoid using small-diaphragm condensers and ribbon mics for an electric bass, but try them if you want. Who knows? You might end up with an awesome bass track.
Mic placement for the electric bass is similar to the guitar; you place a single mic 2–12 inches away from one of the speakers. Sometimes, with bass, you can angle the mic and let the speaker’s sound kind of drift past the diaphragm. Potentially, it’s a great sound. For a bass, skip the distant mic (which generally just adds muddiness to the sound).
Acoustic guitars and such
At the risk of offending banjo, dobro, or ukulele players, I’m lumping all guitarlike (strummed or picked) acoustic string instruments together. I know, they all sound and play differently, but the microphone-placement techniques are similar for all these instruments. Allow me to explain.
Because all these instruments have a resonating chamber and are played with the instrument facing forward, you can pretty much use the same mic placement for any of them. You use different types of mics for different instruments, and I get to that in a minute.
The room and acoustic instruments
For recording acoustic instruments, the room plays a role in the sound that you end up recording. Unless you have a great-sounding room, you want to minimize its impact on your instrument’s sound. You can do this in a couple of ways:
- By recording with spot mics
- By placing absorber/reflectors in strategic places around your room
- Absorber-side-out (toward the walls) if the room is too live
- Reflector-side-out if the room is too dead
For example, if your studio is in a spare bedroom with carpeting and that awful popcorn stuff on the ceiling, you can put a couple of the reflector panels around your guitar player and the mic. This adds some reverberation to your guitar. Any unwanted reflections from the ceiling or walls are shielded from the mics because the absorber sides of the panels are facing the rest of the room.
The mics and the acoustic instruments
I prefer to use condenser mics when recording acoustic instruments. The type of condenser mic you use depends on the overall tonal quality that you want to capture or emphasize. For example, if a guitar has a nice, woody sound that you want to bring out in the recording, a large-diaphragm condenser mic is a good choice. On the other hand, if you’re trying to capture the brightness of a banjo, a small-diaphragm mic is a better choice.
You can position your microphone in a variety of ways, and each accents certain aspects of the instrument’s sound. Even a slight adjustment to the mic can have a significant impact on the sound. You might have to experiment quite a bit to figure out exactly where to put a mic.
To help with your experimentation, listen to the guitar carefully and move the mic around (closer in and farther out, to the left and right) until you find a spot that sounds particularly good. You need to get your ears close to the guitar to do this.
Here are some suggestions to get you started:
- Put the mic about 6–18 inches away from and 3–4 inches below the point where the neck meets the body of the guitar (or banjo, or whatever). Then make minor adjustments to the direction in which the mic points. Pointing it toward the sound hole(s) often gives you a richer, deeper tone. (This can translate to muddiness on some instruments.) Turning the mic more toward the neck brings out the instrument’s brighter qualities. (See the image on the left in Figure 3-13.)
- Place a mic about three feet away from the instrument and point it directly at the sound hole. At this distance, you capture the rich sound from the sound hole and the attack of the strings. See the center image in Figure 3-13.
- Put a mic about six inches out from the bridge of the guitar. Try pointing the mic in different directions (slight movements of an inch or less can make a huge difference) until you find the spot that sounds best to you. See the image on the right in Figure 3-13.
- Try setting up a mic at about the same distance and angle from the instrument as the player’s ears. Point the mic down toward the instrument so the mic is a couple of inches away from either side of the musician’s head. This is an unorthodox approach that I like because I’ve found that guitar players adjust their playing style and intonation to correspond to what they’re hearing when they play. With this technique, you’re trying to capture exactly what the musician hears.
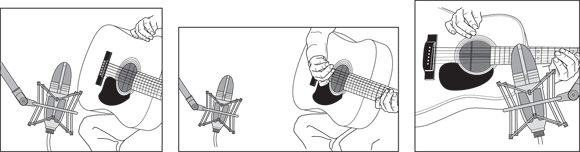
FIGURE 3-13: Position the mic like this to produce a good acoustic instrument sound.
Horns
There’s nothing like the sound of a skilled horn player. Sure, you can use a synthesizer or sampler to play horns, but it’s not quite the same. Luckily, horns, such as trumpets, trombones, and saxophones, use similar miking techniques, so if you want to mic horns, you don’t have to understand a ton of different techniques.
Understanding the role of the room
Because of the high volume levels of most horns and the fact that you mic them fairly closely, you don’t get a ton of impact from the acoustics of the room. Unless your room sounds really bad (for example, a small spare bedroom with carpeting and a low ceiling), you can deal with any room sound that bleeds into the mic.
If you have a small room that adds an unwanted sound to the instrument, surround the horn player with acoustic panels; the setup is similar to what I describe in the section “Vocals,” earlier in this chapter. You can experiment with using either the reflective or absorptive side of the panels to record the sound that you want. Generally speaking, err on the side of a more dead room — you can always add reverb later.
Making the most of the mics
For most horns, a decent condenser mic — large- or small-diaphragm — works well. If you want a richer tone, a ribbon mic is the way to go. In fact, whenever I mic horns, I pull out a ribbon mic first, and it usually stays out until the session is over.
You can place the mic from 3 inches to a foot or more from the instrument, depending on the instrument and the sound you’re looking for. For example, a trumpet, because of its high sound-pressure levels (SPLs, or volume), would sound best with the mic a little farther away than the placement for a tenor sax. This is especially true with ribbon mics, because too much pressure can blow the ribbon.
Most horns generally sound better if the mic is placed just to the side of the bell (the part where the sound comes out). This keeps the SPL that the mic picks up low enough to avoid distortion and not blow your precious ribbon. For some of the louder instruments, choose a condenser mic with a high SPL rating and/or a pad switch, or move the mic away from the instrument a bit. (A pad switch reduces the amount of sound — usually by 10dB to 20dB — that the mic’s internal circuits process, allowing you to have a louder signal without distortion.)
If you want to record more than one horn instrument at a time (a couple of trombones, for instance), you can use a figure-8 condenser mic and position each horn player on either side of the mic. As an alternative, use one or more mics a couple feet away from the players.
Piano
If you’re lucky enough to have a real piano to record, you’ll probably want to record it live rather than use a piano patch on a synthesizer. The following sections give you suggestions on how to effectively mic a piano.
Harnessing the sound of the room
Pianos can be tough to record if your room doesn’t sound great. Because of the size of the instrument — especially if it’s a grand or a baby grand piano — you need a large room with a high ceiling to get the best sound. If you have an upright piano in a living room, for example, you may find it easier to just record a piano patch (sound) on a decent synthesizer.
If your room doesn’t add to the sound of the piano, use a closer mic placement than you would if your room sounded great.
Managing the mics
Condenser mics are a must for recording piano. Either small- or large-diaphragm mics work well. Your mic placement depends largely on the sound you want. Here are a few examples:
- Funky rock or ragtime sound: Place your mic close in toward the hammers. In this case, I would use two mics — one over the higher register and one over the lower, 6 to 12 inches away from the hammers.
- Natural classical-type sound: Move the mics out from the instrument — 2 to 6 feet is usually good, depending on how much room sound you want in the mix. The farther you move the mics outside of the lid, the higher you should place the mics because the sound moves up as it goes out. A good reference is to use the lid as a guide.
The farther outside the instrument you put the mics, the more room sound you pick up.
If you don’t want to use a traditional condenser mic or if you want to try another approach to piano miking, you can use a boundary mic. A boundary mic is an omnidirectional mic that attaches to the instrument. You can find a decent-sounding boundary mic for about $50 from Radio Shack (Cat. #33-3022) or for a few more dollars from most other microphone manufacturers. Just mount the boundary mic to the underside of the piano’s lid (consult your mic’s manual for details on mounting it) to get the best sound. You can also use two boundary mics — one over the lower register and one over the higher one.
Strings
Stringed instruments — violin and fiddle, viola, cello, and acoustic bass — can be a lot of fun to mic. They have a rich tone and produce an almost unlimited variety of textures. Each instrument has a different tonal spectrum, but because they all have the same basic shape and design (f-holes, strings, bows, and so on), they can all be thought of similarly. You can try any of the techniques that I describe for one of these instruments on the rest of them. For example, try the mic technique from the cello on the fiddle and see what you think. Your options are many, so experiment and use what you like.
Making the most of the room
As with any other acoustic instrument, the room can have profound impacts on the sound that you capture. Unless you have a really nice-sounding room, try to isolate the instrument from the room’s sound. In this case, spot miking is the best choice. On the other hand, if you have access to a great-sounding room or concert hall in which to record, by all means add room mics or use a stereo-miking technique.
Making sense of the mics
My favorite type of mic for classical string instruments is a small-diaphragm condenser unit, although on occasion I reach for a large-diaphragm condenser mic. A dynamic mic may produce an interesting effect, but it doesn’t capture the most natural sound.
You can place the mic for each of the string instruments as follows:
- Violin, fiddle, and viola: These all sound great with a mic placed 1 to 2 feet above and behind the instrument and facing down at the instrument’s body.
- Cello and double bass: For these instruments, place the mic several feet away from the instrument (between 4 and 8 feet) and point it toward the f-hole in the instrument. This allows you to capture the sound of the entire instrument. The only drawback is that you also get a fair amount of the sound of the room. If you don’t want the effects of your room recorded, you can place acoustic panels on either side of the mic.
- Ensembles: Ensembles sound best when miked with a stereo pair placed between 8 and 20 feet away. You can use any of the stereo-miking techniques that I describe earlier in this chapter. If you’re miking soloists, you may also need to add a spot mic or two for their instruments. If so, follow the recommendations that I provide earlier in this list and watch for phase problems.
Drum set
If you’re like most musicians, getting great-sounding drums seems like one of the world’s great mysteries. (You know, along the lines of how the pyramids were built or how to cure cancer.) You can hear big, fat drums on great albums but when you try to record your drums, they always end up sounding more like cardboard boxes than drums. Fret not (hey, at least I didn’t say that in the guitar section) because I have solutions for you.
First things first: Tuning your drums
The single most important part of getting killer drum sounds is to make sure your drums are tuned properly and that they have good heads on them. (Okay, that’s two things.) Seriously, if you spend some time getting the drums to sound good in your room, you’re already halfway to the drum sound of your dreams. There isn’t space to go into detail here (especially if you play a large kit), but if you want specific drum-tuning guidance, you can do a search on the Internet or (ahem) check out a copy of my book, Drums For Dummies (Wiley).
You’re looking for a clear, open tone on your drums. By and large, resist the temptation to apply duct tape or other dampeners to the drumheads. Drums that are deadened and don’t ring clearly are definitely going to sound like cardboard boxes when you record them.
After you get your drums tuned as well as you can, the next step is to take care of any rattles that might be coming from the stands or mounting hardware. Tighten up any loose hardware and move any stands that may be touching one another. You might need to make some small adjustments to the pitches of your drums if they’re causing any hardware to rattle.
If you still have some ringing or unwanted overtones, you can deaden the drums slightly. Cotton gauze taped lightly on the edge of the head (away from the drummer) is often enough. If you want a really dry sound on your snare drum, you can use the wallet trick: Have the drummer place his or her wallet on the head. (Use the drummer’s wallet — it’ll probably be lighter because it probably doesn’t have any money in it.)
When the tuning of your drums is perfect, you’re ready to start placing some microphones. You can choose from an unlimited number of miking configurations, only a few of which I can cover here. (It would take a whole book to cover them all.)
The room and the drums
The room influences the drums’ sound more than it influences that of the other instruments. If you’re looking for a big drum sound, you need a fairly live room (one with lots of reflection).
I know you’re thinking, “But all I have to work with is a bedroom for a studio, and it’s carpeted.” No worries; you can work with that. Remember, if you have a home studio, potentially you have your whole home to work with. Here are a couple of ideas to spark your imagination:
- Buy three or four 4-x-2-feet sheets of plywood and lean them up against the walls of your room. Also place one on the floor just in front of the kick drum. This adds some reflective surfaces to the room.
- Put the drums in your garage (or living room, or any other room with a reverberating sound) and run long mic cords to your mixer. If you have a laptop computer for your Pro Tools system, you can just throw it under your arm and move everything into your garage. Or, better yet, take all this stuff to a really great-sounding room and record.
- Set up your drums in a nice-sounding room and place an additional mic just outside the door to catch some additional ambient sound. You can then mix this with the other drum tracks to add a different quality of reverberation to the drums.
Kick (bass) drum considerations
The mic of choice for most recording engineers when recording a kick drum is a dynamic mic. In fact, you can find some large-diaphragm, dynamic mics specifically designed to record kick drums.
No matter where you place the mic, you can reduce the amount of boominess that you get from the drum by placing a pillow or blanket inside the drum. Some people choose to let the pillow or blanket touch the inside head. I prefer to keep it a couple of inches away from the inside head, but sometimes it’s okay to let it touch the outside head.
That said, you can place your mic in several ways (all conveniently illustrated in Figure 3-14):
- Near the inside head: If you take off the outside head or cut a hole in it, you can stick the mic inside the drum. Place the mic two to three inches away from the inside head and a couple of inches off center. This is the standard way to mic a kick drum if you have the outside head off or if a hole is cut in it. This placement gives you a sharp attack from the beater hitting the head.
- Halfway inside the drum: You can modify the preceding miking technique by moving the mic back so it’s about halfway inside the drum. In this case, place the mic right in the middle, pointing at where the beater strikes the drum. This placement gives you less of the attack of the beater striking the head and more of the body of the drum’s sound.
- Near the outside head: If you have both heads on the drum, you can place the mic a few inches from the outside head. If you want a more open, boomy sound (and you have the drum’s pitch set fairly high), point the mic directly at the center of the head. If you want less boom, offset the mic a little and point it about two-thirds of the way toward the center.
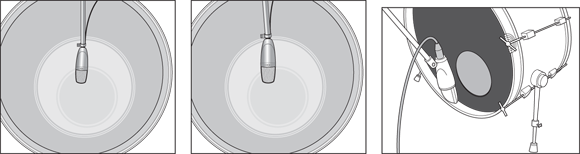
FIGURE 3-14: You can place a mic in several places to get a good kick-drum sound.
If your drum sounds thin after trying these mic-placement approaches, you can try these two things:
- Tune the drum slightly higher. In your quest for a deep bass tone, you might have tuned the drum too low. (This is especially common if you have a large bass drum.) In this case, the drum’s fundamental tone might be too low to be heard clearly. Raising the pitch a bit usually solves the problem.
- Create a tunnel with acoustic panels. Putting the mic in the tunnel often helps if you have a room that’s too dead. Place two of the panels on their sides (reflective surfaces facing into the room) with one end of each panel near the outside of the drum. Angle the panels out so that where they are farthest from the drum set, the distance between them is just less than four feet. Then lay the other two panels (reflective surface facing down) across the side panels to create a tunnel. You can also place a piece of plywood on the floor under these panels to further increase the resonance. Place the mic halfway into the tunnel, facing the center of the drum.
Snare-drum considerations
A snare drum is probably the most important drum in popular music. The bass guitar can cover the kick drum’s rhythm, and the rest of the drums aren’t part of the main groove. A good, punchy snare drum can make a track, whereas a weak, thin one can eliminate the drive that most popular music needs.
Because the snare drum is located so close to the other drums (especially the hi-hats), a cardioid pattern mic is a must. The most common mic for a snare drum is the trusty Shure SM57. The mic is generally placed between the hi-hats and the small tom-tom about one or two inches from the snare drum head (see Figure 3-15). Point the diaphragm directly at the head. You might need to make some minor adjustments to eliminate any bleed from the hi-hats. This position gives you a nice, punchy sound.
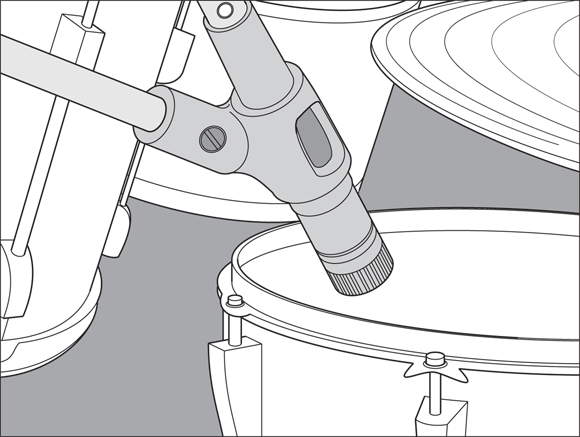
FIGURE 3-15: The proper placement for a snare-drum mic.
If you want a crisper tone, you can add a second mic under the drum. Place this mic about an inch or two from the head with the diaphragm pointing at the snares. Make minor adjustments to minimize any leakage from the hi-hats.
If you have the available tracks, record each snare mic to a separate track and blend the two later during mixdown. If you don’t have the available tracks, blend them until you have the sound that you want. You can also try reversing the phase of the bottom mic. (Some preamps have a phase switch for each channel, or you can reverse the phase by choosing AudioSuite⇒ Other⇒ Invert from the main menu.) Some people prefer the sound of the bottom mic this way.
Tom-toms
Tom-toms sound best when you use a dynamic mic. For mounted toms (the ones above the kick drum), you can use one or two mics. If you use one mic, place it between the two drums about four to six inches away from the heads. (Figure 3-16 shows this placement option.) If you use two mics, place one above each drum about one to three inches above the head.
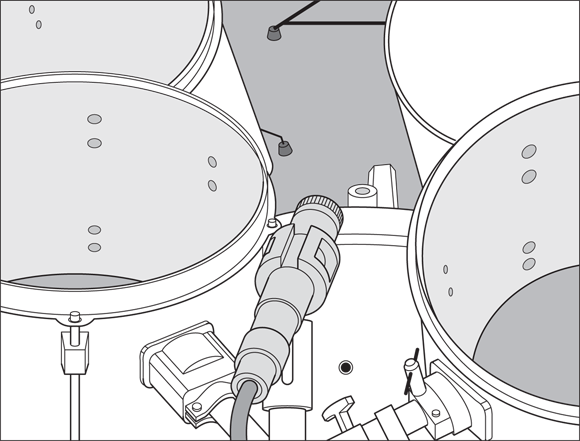
FIGURE 3-16: Miking mounted tom-toms with one mic.
If you want a boomy sound with less attack, you can place a mic inside the shell with the bottom head off the drum.
Floor toms are miked the same way as mounted tom-toms:
- Place a single mic a couple of inches away from the head near the rim.
- If you have more than one floor tom, you can place one mic between them or mic them individually.
If you want to apply compression to the tom-toms, start with the settings that I list for the snare drum in the preceding section.
Hi-hats
Hi-hats are generally part of the main groove — as such, they’re important enough that you want to spend some time getting a good sound. You’ll probably have problems with a few other mics on the drum set picking up the hi-hats, particularly the snare drum mic and overhead mics. Some people don’t even bother miking the hi-hats for this reason.
I like to mic hi-hats because, to me, these cymbals often sound too trashy through the snare-drum mic. If you mic the hi-hats, make sure that the snare-drum mic is picking up as little of the hi-hats as possible by placing it properly and/or using a noise gate (a dynamic processor used to filter unwanted noise).
You can use either a dynamic mic or, better yet, a small diaphragm condenser mic for the hi-hats. The dynamic mic gives you a trashier sound, and the small diaphragm condenser mic produces a bright sound. You can work with either by adjusting the EQ. I usually add just a little bit (4 dB or so) of a shelf equalizer set at 10 kHz to add just a little sheen to the hi-hats. Book 6, Chapter 3 covers EQ in detail.
Place the mic about three to four inches above the hi-hats and point it down. The exact placement of the mic is less important than the placement of the other instrument mics because of the hi-hats’ tone. Just make sure your mic isn’t so close that you hit it instead of the cymbal.
Cymbals
You want to know one secret to the huge drum sound of the Led Zeppelin drummer, John Bonham? Finesse. He understood (I’m guessing, because I never really talked to him about this) that the drums sound louder and bigger in a mix if the cymbals are quieter in comparison. So he played his cymbals softly and hit the drums pretty hard. This allowed the engineer to boost the levels of the drums without having the cymbals drown everything else out. Absolutely brilliant.
Because the drums bleeding into the overhead mics is inevitable and the overhead mics are responsible for providing much of the drums’ presence in a mix, playing the cymbals softly allows you to get more of the drums in these mics. This helps the drums sound bigger.
Ask (no, demand) that your drummer play the cymbals more quietly. Also use smaller cymbals with a fast attack and a short decay. Doing these things creates a better balance between the drums and cymbals and makes the drums stand out more in comparison.
Small-diaphragm condenser mics capture the cymbals’ high frequencies well, though many digital recordists like the way a ribbon mic mellows the cymbals. You can mic the cymbals by placing mics 12 to 18 inches above each cymbal or by using overhead mics set 1 to 3 feet above the cymbals (see the next section).
The whole kit
Most of the time, you want to have at least one (but preferably two) ambient mics on the drums, if for no other reason than to pick up the cymbals. These (assuming you use two mics) are overhead mics, and (as the name implies) you place them above the drum set (usually by means of a boom stand). The most common types of mics to use for overheads are large- and small-diaphragm condenser mics because they pick up the high frequencies in the cymbals and give the drum set’s sound a nice sheen (brightness). You also might want to try a pair of ribbon mics to pick up a nice, sweet sound on the overheads.
To mic the drum set with overhead mics, you can use either the X–Y coincident technique or spaced stereo pairs. Place them one to two feet above the cymbals, just forward of the drummer’s head. Place X–Y mics in the center and set up spaced stereo pairs so they follow the 3:1 rule. (The mics should be set up three to six feet apart if they are one to two feet above the cymbals.) This counters any phase problems. Point the mic down toward the drums, and you’re ready to record. Figure 3-17 shows both of these setups.
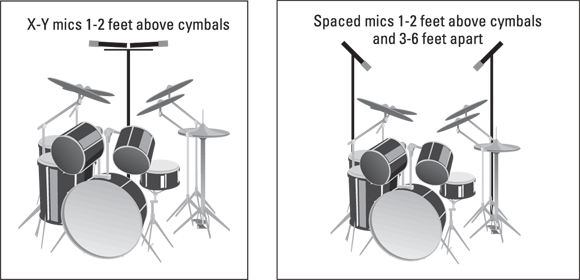
FIGURE 3-17: Overhead mics capture the cymbals and the drums.
Hand drums
Hand drums can be anything from the familiar conga to unusual drums such as the North African tar, Middle Eastern doumbek, or Brazilian Pandeiro. Because you might encounter many types of hand drums, this section gives you some general guidelines when recording any hand drum.
Your selection in mics depends on the type of drum and its tonal characteristics. For example, conga drums occupy the middle of the frequency spectrum and produce a loud sound that a large diaphragm condenser mic can capture well. Or if you want a tighter, drier sound, you can use a dynamic mic. If you choose the dynamic mic, the mic colors the sound of your recording.
If you want to record any number of the smaller, higher-pitched hand drums, use either a large or small diaphragm condenser mic and skip the dynamic mic altogether.
Mic placement also varies considerably among the various hand drums. Listen to the sound of the drum and find a place where you like what you hear. For the most part, placing the mic anywhere from one to three feet from the drum creates the fullest sound. If you want a lot of attack, you can place the mic closer. You lose some of the drum’s depth, however, when you place the mic closer than one foot.
Percussion
Miscellaneous percussion instruments, such as shakers and triangles, are nice additions to many styles of music. These instruments sound best with a good condenser mic. I choose a large or small diaphragm mic, depending on the characteristics that I want to pick up. For instance, a shaker can sound great with a large diaphragm mic because this mic brings out the lower frequencies of the instrument slightly and softens the overall sound a bit.
The room and the percussion
Most of the time, the room doesn’t have a huge effect on percussion instruments because you mic them closely. If your room does get in the way, use the acoustic panels in much the same way that I suggest for vocals earlier in this chapter (partially surround the mic and musician with baffles).
The mics and the percussion
Both large and small diaphragm mics work well for percussion. The main thing to remember when recording percussion instruments is that they can have a high SPL (Sound Pressure Level, or just plain volume), so you might need to pad the mic, move it back, or turn it sideways from the sound source.
As far as mic placement goes, I like to put a single mic anywhere from 6–18 inches away, depending on the size of the instrument. For example, because maracas are loud, I put the mic back a bit (18 inches), whereas with an egg shaker, I find that 6 to 8 inches often sounds best. But when I record an agogô bell or an Afuche, I like to have a little room in the mix to give the instrument more depth. In this case, I mic from a couple feet away.