
Working with Visual Studio Project Templates
Using the Silverlight Toolkit
Working with data binding
Silverlight is one of the most popular new facets of .NET and is used to broadcast the Olympic Games, Netflix HD streaming, and financial analyst dashboards and is quickly gaining popularity as a principal enterprise application development platform. Silverlight is a web browser plug-in runtime environment for executing .NET code. Originally dubbed WPF/E for Windows Presentation Framework Everywhere, Silverlight offers a powerful vector-based presentation engine for creating dynamic content. Most development in Silverlight is done in C# or VB.NET. But because the underlying runtime environment is a special CLR that is compatible with F# code, a few tweaks can unleash the full power of F# in Silverlight applications.
Silverlight is a Rich Internet Application (RIA) platform for developing both enterprise and public Web-based applications. Silverlight 3 and later versions include support for out-of-browser applications and network status awareness for enabling offline mode. Silverlight 4 supports printing, local fonts, webcam, microphone, group policy object support, and many other features that make it an excellent platform for both Web and enterprise development.
The recommended architecture for Silverlight development separates the application into two tiers not including the database tier. The client tier includes presentation logic, for example client-side validation and animation, plus potentially some client-side business logic needed for lightweight calculations to reduce round trips to the server. See Figure 22-1. The application server tier includes server side validation, business logic, and database interaction. The client tier is implemented in Silverlight and deployed as a XAP file that is executed in the Silverlight CLR runtime in the browser. The application server tier can be implemented using RIA Services or any number of service platforms including Azure, XML Web Services, and OData. Sensitive intellectual property is one consideration when determining where to place the business logic. Also, data that requires secure access should be filtered on the server. For example, it would not be wise to cache project names on the client if the user is not allowed to have access to them. The business logic to filter the project names would run on the application server.

By leveraging the processing power of the user's computer to handle any quick response of presentation data, Silverlight has an advantage over other web development platforms such as ASP.NET. Because the CLR is multithreaded and GPU-accelerated, it also is a richer development platform than Flash. Because of F#'s built-in constructs such as asynchronous workflows, F# can easily take full advantage of Silverlight's multithreading capability on the client, exploiting the increasing number of cores per system produced by the many-core era of computing.
Using Isolated Storage, a Silverlight application can cache data and user preferences on the client machine for offline use or quicker responsiveness while the application connects to the backend systems. Be aware though, it is wise to keep sensitive data, sensitive logic, and intellectual property behind the firewall. A XAP file is just a ZIP file with a different name, and the contents can be reverse engineered. Enterprise applications built on Silverlight may present less concern regarding reverse engineering if only employees can access and download the Silverlight application as opposed to a publicly accessible application hosted on the Web open to anyone with an Internet connection. During the system design phase, it is important to plan how and where the code executes in a Silverlight application. Proper planning and architecture accounts for security, scalability, and performance.
As mentioned earlier, Silverlight is a web browser plug-in runtime environment for executing .NET code. It uses a special CLR that is portable on both Windows and Macintosh computers. Also, through the Mono project called Moonlight, Silverlight is also available unofficially on Linux. Officially, Silverlight 3 and 4 are supported on Windows XP through Windows 7 in IE 7, IE 8, and Google Chrome. For the Mac, Silverlight 3 is supported in Safari on Intel hardware. The following table shows official support for Silverlight versions:
IE 6 SP2 | IE 7 & 8 | Firefox 3 | Safari | Google Chrome | |
|---|---|---|---|---|---|
Windows Vista/7 | Silverlight 1, 2, 3, and 4 | Silverlight 1 and 2 | Silverlight 2, 3, and 4 | ||
Windows XP/2003 | Silverlight 1, 2, 3, and 4 | Silverlight 1, 2, 3, and 4 | Silverlight 1 and 2 | Silverlight 2, 3, and 4 | |
Mac OS 10.4/10.5 Intel | Silverlight 1, 2, and 3 | Silverlight 1, 2, and 3 |
Silverlight 1.0 released to Web in 2007 only supported JavaScript. Since Silverlight 2, released in 2008, Silverlight has included a .NET runtime environment. Because Silverlight requires a special lightweight CLR, a compiler target is required to generate Silverlight-compatible MSIL. Visual Studio provides templates for making the build process easier.
Visual Studio 2010 includes a project template called the "F# Silverlight Library" for creating code that can execute in the browser in a Silverlight application. Unfortunately, Visual Studio 2010 does not include a template for building the entire Silverlight application in F#, but it is possible to use C# or VB.NET templates to build the Silverlight application project and reference an F# class library for all the logic. An F# Silverlight application template written by Dmitry Lomov, a developer on the F# team, has been available on MSDN Code Gallery with limitations and documented issues. Perhaps as it continues to mature it will be included in one of the Silverlight or F# releases.
One of the best free extensions for developing Silverlight is the Silverlight Toolkit. The Silverlight Toolkit from CodePlex provides rich graphing tools and controls for building Silverlight applications. Additional Silverlight controls are also available from various third-party component venders.
F# Silverlight development with Visual Studio 2008 requires the F# CTP and the Microsoft Silverlight 3 Tools for Visual Studio 2008 SP1 found on Microsoft Download Center plus Luke Hoban's "F# for Silverlight" project templates for Silverlight 3.0 found on MSDN Code Gallery at
http://code.msdn.microsoft.com/fsharpsilverlight
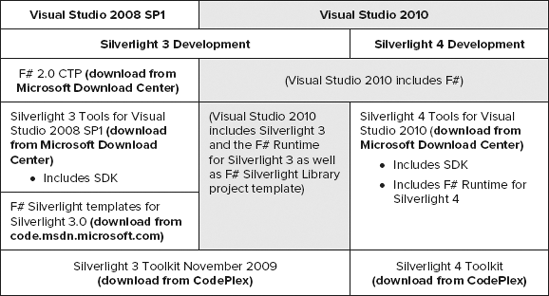
Depending on which version of Visual Studio will be used for development (2008 or 2010) and which version of Silverlight (3 or 4) is targeted, various downloads are required. Note that Silverlight 4 development is not supported on Visual Studio 2008. Figure 22-2 shows the necessary components.
The key project template in Visual Studio that hosts the XAML files and builds the XAP file is called the Silverlight Application project template. The template for a Silverlight application creates two projects, one for building the Silverlight XAP file and another for building a web site that will host the Silverlight binaries and any services needed for communicating back to the server from the client application.
The C# or VB Silverlight application includes XAML files for laying out the user interface. Silverlight and WPF (Windows Presentation Framework) both use XAML for user interface development. There are only minor differences between Silverlight and WPF and, in fact, it is possible to write applications that can be compiled into both Silverlight and WPF. The similarities between the two are no accident; the original name for Silverlight was WPF/E or Windows Presentation Framework Everywhere. So skills gained from using one framework easily translate to the other.
The web site project by default includes an ASP.NET page for testing the Silverlight application, even though Silverlight does not require ASP.NET for hosting, only HTML. This project template is handy for rapid application development, because it facilitates building and running a Silverlight application and automatically connecting the debugger to both the web server process in the Visual Studio "Cassini" service and the Silverlight process on the browser. It also deploys the XAP file to a ClientBin folder that the HTML references.
When the build environment is set up, creating some sample data in F# and binding it to a chart provides a basic understanding of the chart tools. To demonstrate the ease and power of combining F# and Silverlight, this chapter demonstrates how to manipulate the chart by running the data through a moving average algorithm implemented in an F# function in just three lines of code. Moving average is often used in financial applications to visualize trends when the data series is volatile and erratic. F# provides not only a great way to express and manipulate data, but also to analyze data. Combined with Silverlight, F# can be a powerful tool for manipulating and visualizing data.
A Silverlight application template is a special Visual Studio project template that compiles and builds into a package designed to run in the browser in the Silverlight runtime. The project includes XAML (XML for describing the UI), .NET assemblies, and other resources such as images that are packaged into a XAP file to be deployed to a web server. The XAP file is downloaded by a browser using HTML tags referencing the XAP file on the Web server. When the XAP file has been downloaded by the browser, it executes the XAP in a special .NET CLR designed to be portable across operating systems including Macintosh and Linux. This model is similar to other browser plug-ins such as the JVM (Java Virtual Machine) and Adobe Flash.
Note
One major advantage for F# programmers that Silverlight has over Flash is that it allows an F# developer to use a single language for both browser client logic and server side logic. This reduces the need for JavaScript, AJAX, and other client-side scripting languages and frameworks. It also allows for better usage of client-side resources such as Memory and CPU.
For both C# and VB there are three Visual Studio project templates in the Silverlight category:
Silverlight Application
Silverlight Class Library
Silverlight Navigation Application
The first template is the simplest template to get a full Silverlight application started. It includes two XAML files (one for the application in general and one for the page.) The second template, the C#/VB Silverlight Class Library, is equivalent to the F# Silverlight Library template. The third template is useful for applications that require multiple screens by providing a navigation framework using the Visual State Manager from the System.Windows namespace in Silverlight 3 and .NET 4. The navigation application template is useful when building multiple page navigation without the overhead of browser post backs and full-page reloads.
The Silverlight Application Template Wizard prompts for the version of Silverlight. Visual Studio 2010 includes only Silverlight 3. Silverlight 4 Tools for Visual Studio 2010 is required for Silverlight 4 development. With Visual Studio 2008, the Visual Studio Tools can be installed to support Silverlight 3 (not 4.) The examples in this book use Silverlight 3 but will work with Silverlight 4 without any changes. The result of the Template Wizard is a single solution with two projects. Both projects by default have the same name except the web project has a .Web suffix to distinguish between the Silverlight application (which creates the XAP file) and the website hosting the application (hosting the XAP, HTML and/or ASPX, and other server-side services such as RIA Services or web services.) In fact, this second project is optional because the first project can be compiled and run in Visual Studio without a website project. The web project is unnecessary because, when the Silverlight application is set as the startup project instead of the .Web project, and is started with F5, a test HTML page is placed in the bin directory and Visual Studio launches a browser/debugger instance for debugging the XAP file.
In the Solution Explorer, the Silverlight project includes two XAML files: App.xaml and MainPage.xaml. These two files include code behind written in C# (or VB.) A later example in this chapter includes only a single line of C# required to delegate all the work to an F# library.
When the Silverlight project is compiled, the build process packages it into a XAP file. As mentioned previously, the XAP file is actually a zip file with a .xap extension. Changing the extension to .zip facilitates the ability to examine the contents. In fact, this technique is often handy when debugging deployment issues.
The web project includes two TestPage files in the Solution Explorer, one ASPX TestPage (ASP.NET) and the other HTML. It doesn't matter which one is used, but initially the ASPX page is set as the default startup page. The Set As Start Page in the context-sensitive menu can be used to switch between the two. After the project is built, the web project includes a folder called ClientBin where the build process copies the XAP file created by building the Silverlight project.
With Visual Studio 2010, the designer window for the MainPage.xaml starts out with a blank rectangular surface, 300 pixels by 400 pixels, ready for UI components. One way to confirm that the build process is working and the Silverlight prerequisites are installed and configured properly is to drag a Button control from the toolbox onto the surface, place it in the top-left corner, and hit F5 to run the application. If everything is working properly and the build is successful, a browser window pops up with a single button on the page.
Visual Studio 2008 may require manipulation of the XML directly or a designer tool such as Microsoft Expression to lay out the components visually. To add the button directly in the XML, place a Button element inside the Grid element (between the <Grid x:Name="LayoutRoot"> tag and the </Grid> tag):
<Button Content="Button" Height="23" HorizontalAlignment="Left"
Margin="14,14,0,0" Name="button1" VerticalAlignment="Top" Width="75" />
XAML is an XML implementation that stands for eXtensible Application Markup Language and is used in Silverlight applications to describe the UI elements, layout, and behavior such as animation.
The XAML file includes a code-behind file in a similar fashion to Web Forms. The XML is used to declare the graphical components such as buttons and charts and important attributes including name and type.
Examining the XAML for MainPage.xaml created in the previous section reveals:
<UserControl x:Class="SilverlightAppTest.MainPage"
 xmlns="http://schemas.microsoft.com/winfx/2006/xaml/presentation"
 xmlns:x="http://schemas.microsoft.com/winfx/2006/xaml"
 xmlns:d=http://schemas.microsoft.com/expression/blend/2008
 xmlns:mc="http://schemas.openxmlformats.org/markup-compatibility/2006"
 mc:Ignorable="d"
 d:DesignWidth="640"
 d:DesignHeight="480">
  <Grid x:Name="LayoutRoot">
    <Button Content="Button"
            Height="23"
            HorizontalAlignment="Left"
            Margin="14,14,0,0"
            Name="button1"
            VerticalAlignment="Top"
            Width="75" />
  </Grid>
</UserControl>
The XAML for this user control includes several namespaces that need to be added to in order to support additional controls and libraries. The UserControl element is the root XML document element and contains all the other elements. The Grid element has a name attribute assigned the value LayoutRoot that is used in examples later in this chapter to pass to F# a handle on the UI. Inside the grid is the button added in the previous section. The button contains attributes to describe its size and position, but most important has a name attribute that is used inside F# for acquiring a handle to this component to register events such as the Click event.
After the basic Silverlight build environment is prepped, it is easy to start building an F# Silverlight Library and get instant feedback verifying that the Silverlight Library is functioning properly in the Silverlight CLR.
The F# Silverlight Library is similar to an F# Library except that the build script targets the Silverlight CLR, which has more limitations than full .NET CLR. Because it is targeted at the Silverlight CLR, this project cannot be referenced from other non-Silverlight projects.
The library project can include Silverlight event handling code, application logic, service calls to the host server, and all the Silverlight application code. It is possible to build the entire Silverlight UI in F# as well, although because Silverlight utilizes XAML for presentation separation to enable designer tools such as Microsoft Expression that enable parallel graphic design and development by separate teams, it is wise to refrain from UI code as much as possible by implanting it declaratively in XML.
To verify that the F# Silverlight Library is wired up properly and executing in the browser, create a simple HelloWorld function in the Module1.fs provided by the project template and call the function from the Silverlight application.
module Module1

let HelloFromFsharp =
    "hello from F# at " + System.DateTime.Now.ToString()
Reference the Silverlight library from the Silverlight application project and add an event handler to the button. This can be done by double-clicking a button added to the designer surface in Visual Studio 2010 and adding the following line of code to the event hander generated by the designer:
button1.Content = Module1.HelloFromFsharp;
For Visual Studio 2008, wire up the event handler using XML in the XAML by adding the following attribute and value to the Button element.
Click="button1_Click"
Then in the code-behind for the MainPage, add a method in C# to handle the event:
private void button1_Click(object sender, RoutedEventArgs e)
{
    button1.Content = Module1.HelloFromFsharp;
}
To move the event handler over to F#, pass a root object in the XAML tree such as the UserControl and find the controls to register events as demonstrated later in the WireUpEvents function. With a reference to a control, event handlers can be added using F# as follows:
control.EventName.Add( fun(_) ->
    // event handler code here
    )
The UserControl along with all controls inheriting from System.Windows.FrameworkElement in Silverlight include a useful method to find a control by name called FindName. A downcast to the control type needed is required:
let button1 : Button = downcast container.FindName("button1")Wire up the controls by finding them and then adding event handlers.
static member WireUpEvents (container:UserControl) =
    let button1 : Button = downcast container.FindName("button1")
    button1.Click.Add(fun(_) ->
        button1.Content <- Module1.HelloFromFsharp
        )
Now the C# code in the Silverlight application can be a one line of code addition in the MainPage partial class constructor, after InitializeComponent:
public MainPage()
{
    InitializeComponent();
    SilverlightEvents.WireUpEvents(this.LayoutRoot);
}
The full source for the SilverlightEvents.fs file contains a namespace and an open statement to qualify the Silverlight controls:
namespace FSharpPro

open System.Windows.Controls

type SilverlightEvents() =
    static member WireUpEvents (container:UserControl) =
        let button1 : Button =
            downcast container.FindName("button1")

        button1.Click.Add(fun(_) ->
            button1.Content <- Module1.HelloFromFsharp
)The previous section described how to build a Silverlight application using a C# template that can be used to test a Silverlight Library. Good unit tests exclude dependencies and focus only on a single unit of functionality. Unfortunately, because the Silverlight Library is compiled to DLL (.NET Assembly) that can only be referenced by Silverlight applications, simply referencing this project from a test project will not build. One technique to test the F# Silverlight Library without using the Silverlight application is to create a regular F# Library and place a file link in the project to each F# source file in the Silverlight Library. This new project includes all of the source code but has settings to compile it against the regular CLR. The new library can be referenced to build and run other test projects using any .NET testing library including NUnit or Visual Studio Team Test.
The Silverlight Toolkit includes unit testing templates for C# and VB for Silverlight projects. These could also be used to test an F# Silverlight Library.
To use the chart controls described next, download and install the Silverlight toolkit from CodePlex located at http://www.codeplex.com/Silverlight.
There are two versions of the Toolkit: one for Silverlight 3 and one for Silverlight 4. Download the appropriate one or both if needed and install them.
The Silverlight Toolkit offers a full set of rich controls including mature components such as the DatePicker, TabControl, and TreeView. It also includes data visualization controls for creating scatter, pie, bubble bar, and line charts.
As mentioned earlier, the toolkit also includes a Silverlight Unit Test Application project template for C# and VB.
Line charts are fairly straightforward to work with. Simply place a chart on the XAML surface, and add a LineSeries to it. To create an area chart, simply use an AreaSeries instead of a LineSeries. The LineSeries can be declared with XAML, loaded from a static resource at design time, or created at runtime programmatically. See Figure 22-3 for an example of a line chart.
To add the chart to the user control, an XML namespace is added to the UserControl element.
xmlns:chartingToolkit="clr-
namespace:System.Windows.Controls.DataVisualization.
Charting;assembly=System.Windows.Controls.DataVisualization.Toolkit"
Then add the Chart element to the contents of the Grid element.
<chartingToolkit:Chart
   Title="Chart Title"
   Name="chart1"
   Margin="12,41,12,0"
   Height="274">
</chartingToolkit:Chart>
XAML is used to declaratively add a line series using a point collection by placing it inside the Chart element. Visual Studio 2010 automatically displays the chart in the designer (see Figure 22-4).
<chartingToolkit:LineSeries
      DependentValuePath="Y"
      IndependentValuePath="X">
      <chartingToolkit:LineSeries.ItemsSource>
         <PointCollection>
            <Point>0,15</Point>
            <Point>35,5</Point>
            <Point>60,3</Point>
            <Point>75,35</Point>
            <Point>100,50</Point>
         </PointCollection>
      </chartingToolkit:LineSeries.ItemsSource>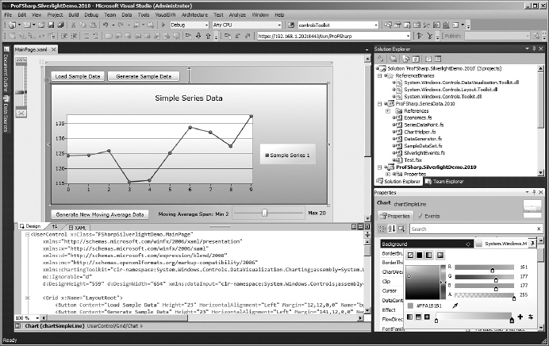
</chartingToolkit:LineSeries>Visual Studio 2010 includes a built-in designer to enable WYSIWYG (what you see is what you get) design of the Silverlight XAML. (See Figure 22-5.) This allows for adjusting the background gradients and other design elements for getting rapid feedback without rebuilding and running the application in the browser.

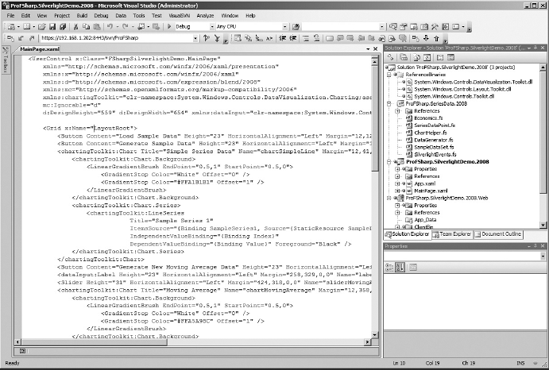
With Visual Studio 2008 there is no XAML designer for Silverlight built in. Expression Blend allows designers to open Visual Studio solution files and modify the XAML and even launch the application without Visual Studio (see Figure 22-6). It is possible to use Expression Blend as a designer tool to get the same WYSIWYG functionality found in Visual Studio 2010 and in some ways more.
Expression Blend 3 is targeted at Visual Studio 2008 and Silverlight 3 development and design. Expression Blend 4 is targeted at Visual Studio 2010 and Silverlight 4 development and design. When both developers and designers can work on the same files at the same time, there is more opportunity to work together and provide rapid feedback and development cycles. If a developer is also doing design work, both tools can be used together at the same time on the same solution. When switching between Visual Studio and Expression Blend, each tool prompts when the other updates. This prompt can be suppressed in Visual Studio under Tools
Data binding in Silverlight (as with WPF) can be done declaratively using XAML or programmatically using the Binding class.
One nice aspect of Silverlight is the ability to bind data at design time. This can be helpful for designers to understand what the application looks like with sample data. To bind chart data at design time, one approach is to provide a series of points that can be loaded by Visual Studio 2010's designer. A series data point can be defined using a type with object-oriented members. Note that it is possible to make these data points immutable. The following sample F# code defines a data type to store each data point:
type SeriesDataPoint(index, value) =
    member this.Index with get() = index
    member this.Value with get() = value
A sample data set modeled after the C# samples provided in the following Silverlight Toolkit example exposes a static member that can be loaded by the XAML designer. This uses an ObjectCollection instance (from the System.Windows.Controls namespace) with 10 data points using the SeriesDataPoint type defined earlier. A reference to the System.Windows.Controls.Toolkit assembly is required to access the ObjectCollection type.
open System.Windows.Controls

type SampleDataSet() =
    static member SampleSeries =
        let data = new ObjectCollection()
        data.Add(new SeriesDataPoint(0, 124.1))
        data.Add(new SeriesDataPoint(1, 124.3))
        data.Add(new SeriesDataPoint(2, 125.7))
        data.Add(new SeriesDataPoint(3, 115.4))
        data.Add(new SeriesDataPoint(4, 115.9))
        data.Add(new SeriesDataPoint(5, 125.0))
        data.Add(new SeriesDataPoint(6, 133.6))
        data.Add(new SeriesDataPoint(7, 131.9))
        data.Add(new SeriesDataPoint(8, 127.3))
        data.Add(new SeriesDataPoint(9, 137.3))
        data

For the XAML designer to load this ObjectCollection, declare the SampleDataSet class as a resource in the App.xaml file.
To provide design time binding, the Application.Resource element must be added to the Silverlight application using XAML. Modifying the App.xaml file, which is provided by the Silverlight Application template, results in the following XAML:
<Application
xmlns="http://schemas.microsoft.com/winfx/2006/xaml/presentation"
             xmlns:x="http://schemas.microsoft.com/winfx/2006/xaml"
             x:Class="FSharpSilverlightDemo.App"
             >
    <Application.Resources>
      <!-- put resources here -->
    </Application.Resources>
</Application>

An additional XML Namespace to reference the SampleDataSet type applied to the Application element is required to load the data. Note that this XML namespace includes the CLR namespace and the assembly name.
xmlns:sampleData="clr-
namespace:ProFSharp.SeriesData;assembly=ProFSharp.SeriesData"
When the XML namespace has been properly added to the App.xaml file, then it is possible to insert the resource. This allows referencing the SampleDataSet class in the MainPage.xaml for design time binding.
<Application.Resources>
<sampleData:SampleDataSet x:Key="SampleDataSet"/>
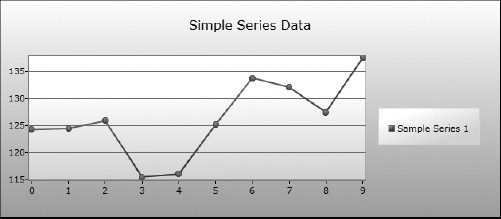
</Application.Resources>Finally to see what the chart looks like at design time, include a LineSeries element with binding to the SampleDataSet.SampleSeries member using the curly brace syntax {Binding SampleSeries, Source={StaticResource SampleDataSet}}
<chartingToolkit:Chart
   Title="Simple Series Data"
   Name="chart1"
   Margin="12,41,12,0"
   Height="274">
    <chartingToolkit:Chart.Series>
      <chartingToolkit:LineSeries
        Title="Sample Series 1"
        ItemsSource="{Binding SampleSeries,
            Source={StaticResource SampleDataSet}}"
        IndependentValueBinding="{Binding Index}"
        DependentValueBinding="{Binding Value}" />
    </chartingToolkit:Chart.Series>
</chartingToolkit:Chart>

In the preceding example, the IndependentValueBinding attribute binds the line series to the Index property of the SeriesDataPoint class. The DependentValueBinding attribute binds the Value property. With these two properties, the chart can display the points on a Cartesian coordinate system with an x- and y-axis. The Index is plotted on the x-axis and the Value on the y-axis.
typeSeriesDataPoint(index, value) = member this.Indexwith get() = index //IndependentValueBinding member this.Valuewith get() = value //DependentValueBinding
When compiled, the XAML designer in Visual Studio 2010 can load the static resource and bind the series to the chart. Note that Visual Studio 2008 does not have designer support, so this chart will not be visible without running the application. If a development team is limited to Visual Studio 2008 for Silverlight 3 development, design time support can be found in Expression Blend 3. Expression Blend 4 is designed to work with Visual Studio 2010 solutions.
To add a series programmatically at runtime to the chart, assign the data (the ObjectCollection) to the LineSeries.ItemSource property. The following code defines a helper function to bind the DependentValueBinding to the "Value" property and the IndepenentValueBinding to the "Index" property. Note that this helper function takes the data as a parameter:
namespace ProFSharp.ChartHelper

open System.Windows.Controls.DataVisualization.Charting
open System.Windows.Data //for data binding

type DataConverter =
    static member CreateLineSeries title data =
        let series = new LineSeries()
        series.ItemsSource <- data
        series.DependentValueBinding <- new Binding("Value")
        series.IndependentValueBinding <- new Binding("Index")
        series.Title <- title
        series
Following is an example of adding another event handler and wiring up a button to add a second line series from a second static sample series using the helper function previously defined:
buttonLoadSampleData.Click.Add(fun(_) -> letdata= SampleDataSet.SampleSeries2 let series = DataConverter.CreateLineSeries "Series 2"datachart.Series.Add(series) )
Adding a series to a chart automatically updates the Silverlight display. The problem with using this approach to update an existing chart is that it requires that the series be cleared and a new series created and added to the chart. This approach causes the new series to appear in a different color, because the chart assumes that it is a whole new series. To modify a series in place, and have Silverlight Toolkit chart animate the change, the SeriesDataPoint must implement the INotifyPropertyChanged interface:
namespace ProFSharp.ChartHelper open System.ComponentModel type SeriesDataPoint(index:int, value:float) = let mutable v = valuelet propertyChanged = Event<_, _>()member this.Index with get() = index member this.Value with get() = v andset(value) = v <- value
propertyChanged.Trigger(this, PropertyChangedEventArgs("Value"))interface INotifyPropertyChanged with[<CLIEvent>] member this.PropertyChanged = propertyChanged.Publish
The INotifyPropertyChanged interface contains only one member, the PropertyChanged event. One way to implement this event is using the CLIEventAttribute to decorate the event and use the event Publish property to publish the event. A setter has been added to the Value property to make the SeriesDataPoint mutable. In the preceding example, if a change is made to the "Value" property, the setter triggers the event using the Trigger method and passes the property name as part of the EventArgs.
If the Silverlight Toolkit sample application is executed, several charts update by themselves every two seconds. This effect was accomplished by implementing the INotifyPropertyChanged interface. With a framework for updating the graph, now it is possible to visualize some interesting data manipulation using the Silverlight Toolkit.
Data by itself can be interesting to visualize, but often the trends or patterns in data can be more useful. In the financial sector and in economics, the moving average is a common model often applied to time series data to assist analysts in understanding trends and help predict future directions of a series. But looking for patterns in data can be useful for a range of solutions including security attack detection or business intelligence applications. An algorithm for calculating moving average in F# takes the data and chunks it into windows and calculates the average of each window:
let MovingAverage period data =
     Seq.windowed period data
     |> Seq.map Array.average

let testdata = [1.0 .. 10.0]
let result = MovingAverage 4 testdata

The output of these three let statements to the F# Interpreter are:
val MovingAverage : int -> seq<float> -> seq<float>
val testdata : float list =
  [1.0; 2.0; 3.0; 4.0; 5.0; 6.0; 7.0; 8.0; 9.0; 10.0]
val result : seq<float>
Viewing the result in FSI displays the first few items in the sequence.
> result;;
val it : seq<float> = seq [2.5; 3.5; 4.5; 5.5; ...]
>
The result is a moving average based on the period applied. The average of the first four points are (1 + 2 + 3 + 4)/ 4 = 2.5, which is the first value of the series result. The second set is (2 + 3 + 4 + 5)/4 = 3.5 and so on through the sequence. The Seq.windowed function returns a sequence that produces sliding windows of the input elements as arrays of the size specified.
If the testdata value contains ten elements (the floating point numbers 1 through 10) then Seq.windowed 4 testdata returns ten arrays each containing four elements:
> Seq.windowed 4 testdata;;
val it : seq<float []> =
  seq
    [[|1.0; 2.0; 3.0; 4.0|]; [|2.0; 3.0; 4.0; 5.0|];
     [|3.0; 4.0; 5.0; 6.0|]; [|4.0; 5.0; 6.0; 7.0|]; ...]
>
Take that sequence of windows and using the pipe forward operator, pipe it into the Seq.map function to apply the average of each array.
Seq.windowed period data
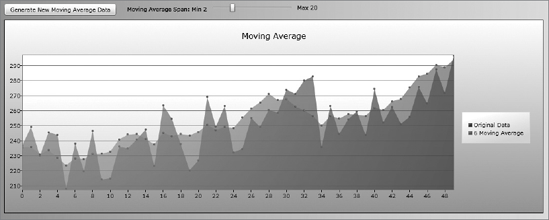
|> Seq.map Array.averageOverlaying the moving average on the chart provides an augmented view of the original data. Using a slider control or other input control, the user interface can provide input for the moving average period function and provide a parameter to animate the chart.
Using a C# or VB Silverlight Application project to host the XAML and build the XAP file, an F# Silverlight Library project to put all the application logic, and the Silverlight Toolkit to provide visualization, the application framework is ready to generate some interesting charting. Leveraging the INotifyPropertyChanged to provide animation to the data points and a slider control to give the user the ability to change the range of the moving average period window, the following example puts together a MovingAverageModel to store the SeriesDataPoint collection as a generic List. When the UpdateSeries method is called as a result of a mouse event, a new moving average is calculated and the data point Value property is updated.
type internal MovingAverageModel(chart:Chart, slider:Slider) =
    // used for animated data bining
    let mutable m_dynamicItemsSource =
        new System.Collections.Generic.List<SeriesDataPoint>()
    // stores the original data
    let mutable m_data = []
    // stores the moving average range (window size)
    let mutable m_range = 1

    member private this.GetMovingAverageSeries movingAverage =
        let title = String.Format("{0} Moving Average", m_range)
        DataConverter.ConvertSequenceToAreaSeries title movingAverage

    member private this.InitSeries =
        chart.Series.Clear()
        // generate moving average using range and data
let movingAverage = MovingAverage m_range m_data
// build both AreaSeries sets
let series1 =
DataConverter.ConvertSequenceToAreaSeries "Original Data" m_data
let series2 = this.GetMovingAverageSeries movingAverage
chart.Series.Add(series1)
// generate dynamic item source used for animated data binding
let array = List.toArray(m_data)
let max = array.Length - 1
for i in 0..max do
m_dynamicItemsSource.Add(new SeriesDataPoint(i, array.[i]))
series2.ItemsSource <- m_dynamicItemsSource
chart.Series.Add(series2)
this.UpdateSeries()
()
member this.Init() =
//initialize members
m_dynamicItemsSource <-
new System.Collections.Generic.List<SeriesDataPoint>()
m_range <- (int slider.Value)
m_data <- List.ofSeq <| GenerateData 200.0 50.0 50
this.InitSeries
//naive forcast algorithm based on historical flow
member internal this.Forcast last index =
let distance = index - last + 2
let pastPoint = m_dynamicItemsSource.Item(last - distance)
let lastPoint = m_dynamicItemsSource.Item(last - 1)
let trend = lastPoint.Value - pastPoint.Value
lastPoint.Value + trend
member internal this.UpdateSeries() =
m_range <- (int slider.Value)
let movingAverage = MovingAverage m_range m_data |> Seq.toList
for point in m_dynamicItemsSource do
if point.Index < movingAverage.Length then
point.Value <- movingAverage.Item(point.Index)
else
point.Value <- this.Forcast movingAverage.Length point.Index
()
let legend = chart.Series.[1].LegendItems.Item(0) :?> LegendItem
legend.Content <- m_range.ToString() + " Moving Average"
()
member
this.UpdateMovingAverage(args:RoutedPropertyChangedEventArgs<float>) =
let oldVal = int args.OldValue
let newVal = int args.NewValue
if oldVal = newVal then
()
elif (Math.Abs(oldVal - newVal) > 4) then
m_range <- newVal
this.UpdateSeries()()
else
m_range <- newVal
()

To complete the application, wire up the model to the chart. Add a slider and buttons and add event handlers to trigger the model to generate new data. The sample code downloadable from the book's site at www.wrox.com will product the graph seen in Figure 22-7.
static member WireUpMovingAverageChart (container:UserControl) =
   let chart : Chart = downcast container.FindName("chartMovingAverage")
   let slider : Slider = downcast container.FindName("sliderMovingAverage")

   let model = new MovingAverageModel(chart, slider)
   model.Init()
   let buttonNewData : Button = downcast container.FindName("buttonNewData")
   buttonNewData.Click.Add(fun(_) -> model.Init())

   slider.MouseLeftButtonUp.Add(fun(_) -> model.UpdateSeries())
   slider.ValueChanged.Add(fun(callback) -> model.UpdateMovingAverage(callback))
   ()

This example generates the data randomly. For a true application, the next step would be to add a server-side component using RIA Services or another Silverlight-accessible service. Silverlight has the capability to consume restful services, WCF, Web services, and more. By placing the data source on the server, the data can be controlled and protected. Perhaps the service may require a monthly subscription, may be throttled by priority, or may provide limited access based on security roles. All these scenarios are possible by building services. And those services can also be built in F#.
This chapter leverages the powerful capabilities of F# to build rich, dynamic, and responsive Silverlight applications. Currently the tools are limited for F# Silverlight Application templates, but a C# or VB Silverlight Application template can be used to delegate all the important code to an F# Silverlight Library. Because Microsoft has implemented the FSharp.Core.dll (the F# runtime) for Silverlight, F# code can run in a multitude of browsers on multiple operating systems including Macintosh OS, Firefox, and Google Chrome browsers. Silverlight is a flexible application framework for both public Web applications and for Enterprise applications. Because Silverlight is a client-side technology, it can be easily deployed on any web server, including Linux and UNIX-based systems. As long as the users have installed the Silverlight plug-in in their browser, they can take advantage of all the power it offers. That is why Silverlight has been used for everything from the broadcast of the Olympics to real-time dashboards for financial advisors. Together F# and Silverlight make a powerful pair.