
Texinfo is a text-formatting system used by the GNU Project to produce both online documentation in the form of hypertext Info pages, and printed manuals through TEX from a single-source file. By providing Texinfo source, users can convert the documentation to Info, HTML, DVI, PostScript, PDF, or plain text files.
Texinfo is documented completely through its own Info pages,
which are readable within Emacs (using the C-h i command) or a separate Info reader,
such as info. If the GNU Info
pages are installed in your system, complete Texinfo documentation is
contained therein. Just as you’ll find yourself using
groff to write a manual page, you’ll use Texinfo
to write an Info document.
In this section, we present a simple Texinfo source file—chunks at a time—and describe what each chunk does as we go along.
Our Texinfo source file will be called vacuum.texi and describe a fictitious vacuum command. As usual, you can enter the source using a plain-text editor:
input texinfo @c -*-texinfo-*-
@c %**start of header
@setfilename vacuum.info
@settitle The Empty Info File
@setchapternewpage odd
@c %**end of header
This is the header of the Texinfo source. The first line is a
TEX command used to input the Texinfo macros
when producing printed documentation. Commands in Texinfo begin with
the “at” sign, @. The @c command begins a comment; here, the
comment -*-texinfo-*- is a tag
that tells Emacs this is a Texinfo source file so that Emacs can set
the proper major mode. (Major modes were discussed in “Tailoring
Emacs” in Chapter
19.)
The comments @c %**start of
header and @c %**end of
header are used to denote the Texinfo header. This is
required if you wish to format just a portion of the Texinfo file.
The @setfilename command specifies the filename
to use for the resulting Info file, @settitle
sets the title of the document, and @setchapternewpage
odd tells Texinfo to start new chapters on an
odd-numbered page. These are just cookbook routines that should be
used for all Texinfo files.
The next section of the source file sets up the title page, which is used when formatting the document using TEX. These commands should be self-explanatory:
@titlepage
@title Vacuum
@subtitle The Empty Info File
@author by Tab U. Larasa
@end titlepage
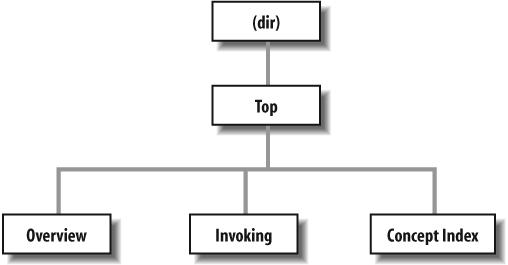
Now we move on to the body of the Texinfo source. The Info file is divided into nodes, where each node is somewhat like a “page” in the document. Each node has links to the next, previous, and parent nodes, and can be linked to other nodes as cross-references. You can think of each node as a chapter or section within the document with a menu to nodes below it. For example, a chapter-level node has a menu that lists the sections within the chapter. Each section node points to the chapter-level node as its parent. Each section also points to the previous and next section, if they exist. This is a little complicated, but will become clear when you see it in action.
Each node is given a short name. The topmost node is called
Top. The @node command is used to start a node; it
takes as arguments the node name, as well as the names of the next,
previous, and parent nodes. As noted earlier, the next and previous
nodes should be on the same hierarchical level. The parent node is
the node above the current one in the node tree (e.g., the parent of
Section 2.1 in a document is Chapter
2). A sample node hierarchy is depicted in Figure 20-2.
Here is the source for the Top node:
@c    Node, Next, Previous, Up
@node Top,    ,        , (dir)

@ifinfo
This Info file is a close approximation to a vacuum. It documents
absolutely nothing.
@end ifinfo

@menu
* Overview::              Overview of Vacuum
* Invoking::              How to use the Vacuum
* Concept Index::         Index of concepts
@end menu
The @node command is
preceded by a comment to remind us of the order of the arguments to
@node. Here, Top has no previous or next node, so they
are left blank. The parent node for Top is (dir), which denotes the systemwide Info
page directory. Supposedly your Info file will be linked into the
system’s Info page tree, so you want the Top node to have a link back to the
overall directory.
Following the @node command
is an abstract for the overall document, enclosed in an
@ifinfo...@end ifinfo pair. These commands are
used because the actual text of the Top node should appear only in the Info
file, not the TEX-generated printed
document.
The @menu...@end menu commands demarcate
the node’s menu. Each menu entry includes a node name followed by a
short description of the node. In this case, the menu points to the
nodes Overview, Invoking, and Concept Index, the source for which
appears later in the file. These three nodes are the three
“chapters” in our document.
We continue with the Overview node, which is the first
“chapter”:
@c    Node,     Next,    Previous, Up
@node Overview, Invoking,       , Top
@chapter Overview of @code{vacuum}

@cindex Nothingness
@cindex Overview
@cindex Vacuum cleaners

A @code{vacuum} is a space entirely devoid of all matter. That means no
air, no empty beer cans, no dust, no nothing. Vacuums are usually found

in outer space. A vacuum cleaner is a device used to clean a vacuum.
See @xref{Invoking} for information on running @code{vacuum}.
The next node for Overview
is Invoking, which is the second
“chapter” node and also the node to appear after Overview in the menu. Note that you can
use just about any structure for your Texinfo documents; however, it
is often useful to organize them so that nodes resemble chapters,
sections, subsections, and so forth. It’s up to you.
The @chapter command begins a chapter, which has an effect only when formatting the source with TEX. Similarly, the @section and @subsection commands begin (you guessed it) sections and subsections in the resulting TEX document. The chapter (or section or subsection) name can be more descriptive than the brief name used for the node itself.
You’ll notice that the @code command is
used in the chapter name. This is just one way to specify text to be
emphasized in some way. @code should be used
for the names of commands, as well as source code that appears in a
program. This causes the text within the @code
command to be printed in constant-width type in the
TEX output, and enclosed in single quotes
(like 'this') in the Info
file.
Following this are three @cindex commands, which produce entries in the concept index at the end of the document. Next is the actual text of the node. Again, @code marks the name of the vacuum “command.”
The @xref command produces a cross-reference to another node, which the reader can follow with the f command in the Info reader. @xref can also make cross-references to other Texinfo documents. See the Texinfo documentation for a complete discussion.
Our next node is Invoking:
@node Invoking, Concept Index, Overview, Top
@chapter Running @code{vacuum}

@cindex Running @code{vacuum}
@code{vacuum} is executed as follows:

@example
vacuum @var{options} @dots{  }
@end example
Here, @example...@end example sets off an
example. Within the example, @var denotes a
metavariable, a placeholder for a string provided by the user (in
this case, the options given to the vacuum
command). @dots{ } produces
ellipsis points. The example will appear as:
vacuum options ...in the TEX-formatted document, and as:
vacuum OPTIONS ...
in the Info file. Commands, such as @code and @var, provide emphasis that can be represented in different ways in the TEX and Info outputs.
Continuing the Invoking
node, we have the following:
@cindex Options
@cindex Arguments
The following options are supported:

@cindex Getting help
@table @samp
@item -help
Print a summary of options.

@item -version
Print the version number for @code{vacuum}.

@cindex Empty vacuums
@item -empty
Produce a particularly empty vacuum. This is the default.
@end table
Here, we have a table of the options that our fictitious vacuum command supposedly supports. The command @table @samp begins a two-column table (which ends up looking more like a tagged list), where each item is emphasized using the @samp command. @samp is similar to @code and @var, except that it’s meant to be used for literal input, such as command-line options.
A normal Texinfo document would contain nodes for examples,
information on reporting bugs, and much more, but for brevity we’re
going to wrap up this example with the final node, Concept Index. This is an index of
concepts presented in the document and is produced automatically
with the @printindex command:
@node Concept Index,, Invoking, Top
@unnumbered Concept Index

@printindex cp
Here, @printindex cp tells the formatter to include the concept index at this point. There are other types of indices as well, such as a function index, command index, and so forth. All are generated with variants on the @cindex and @printindex commands.
The final three lines of our Texinfo source are as follows:
@shortcontents
@contents
@bye
This instructs the formatter to produce a “summary” table of contents (@shortcontents) and a full table of contents (@contents), and to end formatting (@bye). @shortcontents produces a brief table of contents that lists only chapters and appendices. In reality, only long manuals would require @shortcontents in addition to @contents.
To produce an Info file from the Texinfo source, use the makeinfo command. (This command, along with the other programs used to process Texinfo, is included in the Texinfo software distribution, which is sometimes bundled with Emacs.) The command:
eggplant$ makeinfo vacuum.texiproduces vacuum.info from vacuum.texi. makeinfo uses the output filename specified by the @setfilename command in the source; you can change this using the -o option.
If the resulting Info file is large, makeinfo splits it into a series of files named vacuum.info-1, vacuum.info-2, and so on, where vacuum.info is the top-level file that points to the various split files. As long as all the vacuum.info files are in the same directory, the Info reader should be able to find them.
You can also use the Emacs commands M-x makeinfo-region and M-x makeinfo-buffer to generate Info from
the Texinfo source.
The Info file can now be viewed from within Emacs, using the
C-h i command. Within the Emacs
Info mode, you’ll need to use the g command and specify the complete path to
your Info file, as in the following example:
Goto node: (/home/loomer/mdw/info/vacuum.info)TopThis is because Emacs usually looks for Info files only within its own Info directory (which may be /usr/local/emacs/info on your system).
Another alternative is to use the Emacs-independent Info reader, info. The command
eggplant$ info -f vacuum.infoinvokes info, reading your new Info file.
If you wish to install the new Info page for all users on your system, you must add a link to it in the dir file in the Emacs info directory. The Texinfo documentation describes how to do this in detail.
To produce a printed document from the source, you need to have TEX installed on your system. The Texinfo software comes with a TEX macro file, texinfo.tex, which includes all the macros used by Texinfo for formatting. If installed correctly, texinfo.tex should be in the inputs directory on your system. If not, you can copy texinfo.tex to the directory where your Texinfo files reside.
First, process the Texinfo file using:
eggplant$ tex vacuum.texiThis produces a slew of files in your directory, some of which pertain to processing and to the index. The texindex command (which is included in the Texinfo package) reformats the index into something the display systems can use. The next command to issue is therefore:
eggplant$ texindex vacuum.??Using the ?? wildcard runs
texindex on all files in the directory with
two-letter extensions; these are the files produced by Texinfo for
generating the index.
Finally, you need to reformat the Texinfo file using TEX, which clears up cross-references and includes the index:
eggplant$ tex vacuum.texiThis should leave you with vacuum.dvi, a device-independent file you can now view with xdvi or convert into something printable. See "TeX and LaTeX" earlier in the chapter for a discussion of how to print .dvi files.
As usual, there’s much more to learn about this system. Texinfo has a complete set of Info pages of its own, which should be available in your Info reader. Or, now that you know the basics, you could format the Texinfo documentation sources yourself using TEX. The .texi sources for the Texinfo documentation are found in the Texinfo source distribution.