
Hour 8. Controlling Program Flow
At its heart, C# is a procedural programming language, so statements are executed sequentially in the order they appear in the source code. This execution order is referred to as program flow. As you might imagine, following only a strict execution order would provide little flexibility. What is missing is a way to control or change what statements are executed based on the result of testing conditions. C# provides control flow statements that change the order of execution.
All the control flow statements have the same basic characteristics; they select any number of statements to be executed based on a given set of conditions. These statements are grouped into three main categories, described by their primary behavior. Selection statements and jump statements are most closely related. They both select a statement that will be executed only once, whereas iteration statements repeatedly execute that statement. Jump statements are unconditional, but selection and iteration statements enable conditions to restrict which statements will be executed and how many iterations the execution will occur.
In this hour, you learn the syntax for each of the different control flow statements, learn how they behave, and how to write and test conditions that control program flow. More important, you learn the differences between them and when one type of control flow statement should be used over another.
Understanding the Selection Statements
Selection statements are perhaps the most common form of control flow statements available. They enable a single statement (from a number of possible statements) to be executed based on the value of an expression.
The if Statement
The most basic selection statement is the if statement, which selects a statement based on the result of a Boolean expression.
The basic syntax for an if statement is
if ( boolean-expression )
embedded-statement
A slightly more advanced syntax is
if ( boolean-expression )
consequence-statement
else
alternative-statement
If the result of boolean-expression evaluates to true, control is transferred to the consequence-statement. If the result of boolean-expression evaluates to false and an else portion is present, control is transferred to the alternative-statement. When control reaches the end of the statement executed, it is then transferred to the next statement.
The statement executed can be any valid statement, including another if statement. In this syntax, the second statement is said to be a nested if statement.
In the code shown in Listing 8.1, “y <= 10” displays if the condition (y > 10) evaluates to false and the condition (x > 10) evaluates to true.
Listing 8.1. Nested if Statements
int x = 20, y = 10;
if (x > 10)
{
if (y > 10)
{
Console.WriteLine("y > 10");
}
else
{
Console.WriteLine("y <= 10");
}
}
Caution: The “Mismatched Else” Problem
A common problem when writing if statements is known as the “mismatched else” problem, where the formatting of the code does not match the actual control flow:
int x = 20, y = 10;
if (x > 10)
if (y > 10)
Console.WriteLine("y > 10");
else
Console.WriteLine("y <= 10");
The code here visually looks like the else is the alternative of if (x > 10). In reality, it is actually the alternative of if (y > 10).
To help prevent this problem, it is a good idea to always use braces to make it clear which else goes with which if.
If you need to check a series of exclusive conditions, it is possible to cascade if statements by joining an if statement to the else portion of a previous if statement. In such a series, all the if statements will be executed in sequence until one of them evaluates to true.
Listing 8.2 shows a cascaded if statement. If the condition (x > 10) evaluates to true, “x > 10” displays. If the condition (x < 10) evaluates to true, “x < 10” displays; otherwise, “x = 10” displays.
Listing 8.2. A Cascaded if Statement
int x = 20, y = 10;
if (x > 10)
{
Console.WriteLine("x > 10");
}
else if (x < 10)
{
Console.WriteLine("x < 10");
}
else
{
Console.WriteLine("x = 10");
}
The switch Statement
Switches can be thought of as the natural progression from cascaded if statements. They provide similar functionality but are more compact and flexible. The switch statement selects a statement list based on a label that corresponds to the value of the expression.
The syntax of a switch statement is
switch ( expression )
{
case constant-expression :
statement-list
break;
default :
statement-list
break;
}
The body of the switch is the switch-block and contains one or more switch-sections. Each switch-section contains at least one label followed by a statement-list.
The type of expression establishes the governing type of the switch and can be sbyte, byte, short, ushort, int, uint, long, ulong, char, the nullable version of those types, the string type, or an enumerated type. The expression is evaluated only once.
The label for a switch-section must be a constant expression that is unique within the same switch-block and be implicitly convertible to the governing type. For switches whose governing type is string or a nullable type, a case label of null is permitted.
The evaluation of expression is case sensitive, so a switch-section will only be executed if its label exactly matches.
If the value of expression matches one of the constants in a case label, control is transferred to the first statement after that label. If no matching case is found, control is transferred to the first statement after the default label, if present; otherwise, control is transferred to the next statement after the switch.
In Listing 8.3, if the condition (x == 0) or (x == 1) evaluates to true, the value of x displays; otherwise, “Invalid” displays.
Listing 8.3. A Simple switch Statement
int x = 4;
switch (x)
{
case 0:
Console.WriteLine("x = " + x);
break;
case 1:
Console.WriteLine("x = " + x);
break;
default:
Console.WriteLine("Invalid");
break;
}
You might have noticed that the code for case 0 and case 1 is identical. To eliminate this redundancy, you can provide a list of labels with no intervening statements.
Unlike other programming languages, such as C and C++, switch statements in C# do not allow fall through of switch-sections, which occurs when execution starts in one switch-section and continues through to another switch-section.
To prevent fall through, C# requires all switch-sections to end in a statement with an unreachable endpoint, of which an unconditional jump statement is one example. The most common is the break statement.
By not allowing such fall-through behavior, C# eliminates a common bug found in C and C++ programs and allows the order of the switch-sections to be changed without affecting the behavior of the statement.
Listing 8.4 shows the same switch statement from Listing 8.3 but uses case fall through. Because there are no intervening statements, the “no fall-through rule” is not violated, and control is transferred to the first statement after the last label in the list.
Listing 8.4. A switch Statement Using Case Fall Through
int x = 4;
switch (x)
{
case 0:
case 1:
Console.WriteLine("x = " + x);
break;
default:
Console.WriteLine("Invalid");
break;
}
Scope within a switch statement is bounded by the entire switch-block, not each switch-section. This means that any local variables or constants declared inside a switch-section are local to the entire switch-block, not just that switch-section.
If you need to restrict scope to within a specific switch-section, you can create an additional nested scope by enclosing the statement list in curly braces.
Iteration Statements
Although selection statements enable one-time execution of a statement based on the value of an expression, iteration statements, also called looping statements, repeatedly execute the same statement. Iteration statements evaluate their expression each time, or iteration, through the loop. A top-tested loop evaluates the expression before the statement executes, whereas a bottom-tested loop evaluates the expression after the statement executes.
To terminate the loop early, without reevaluating the expression, you can use any of these jump statements: break, goto, return, or throw. The continue statement passes control to the next iteration.
The while Statement
A while statement is a top-tested loop that repeatedly executes an embedded statement until the boolean-expression evaluates to false. Because the expression is evaluated before each iteration, the statement can be executed zero or more times.
The syntax for a while statement is
while ( boolean-expression )
embedded-statement
If the result of evaluating boolean-expression is true, control is transferred to the embedded-statement. When the statement finishes executing, control is transferred to the start of the loop, where the expression is reevaluated.
If the result of evaluating boolean-expression is false, control is transferred to the next statement after the while statement. If the result of the boolean-expression is initially false, the embedded-statement never executes.
In Listing 8.5, the statements inside the body of the loop execute until i is greater than or equal to 10. If the i++; statement were not included in either the body of the loop or as part of the boolean-expression, the loop would execute forever.
Listing 8.5. The while Statement
int i = 0;
while (i < 10)
{
Console.WriteLine(i);
i++;
}
The do Statement
A do statement also repeatedly executes an embedded statement until the boolean-expression evaluates to false. Unlike the while statement, a do statement is a bottom-tested loop, so the embedded-statement is executed once before the boolean-expression is evaluated. This means it is guaranteed to execute at least one time.
The syntax for a do statement is
do
embedded-statement
while ( boolean-expression );
If the result of evaluating boolean-expression is true, control is transferred to the beginning of the loop where the embedded-statement is executed again. If the result of evaluating boolean-expression is false, control is transferred to the next statement after the do statement.
In Listing 8.6, the statements inside the body of the loop execute if i is less than 10. Just as in the while statement, if the i++; statement were not included in either the body of the loop or as part of the boolean-expression, the loop would execute forever.
int i = 0;
do
{
Console.WriteLine(i);
i++;
}
while (i < 10);
The for Statement
The for statement is possibly the most misunderstood iteration statement because it looks the most complex; however, it still provides the same basic behavior of the other iteration statements. It also repeatedly executes an embedded statement until a specified expression evaluates to false.
The syntax of a for statement is
for ( initializer ; condition ; iterator )
embedded-statement
The for statement is most commonly used for sequential processing and iterating over arrays.
What makes a for statement look complex is the three different expressions, or sections, all of which are optional. Each section must be separated by a semicolon, even when it is omitted.
The initializer can be either a single local variable initialization or a comma-separated list of local variable initialization statements. Any local variables declared in the initializer are scoped to the condition, iterator, and embedded statement.
Tip: Initializer Declaration Space
Think of the entire for statement as being defined inside “invisible braces” that define the local variable declaration space for the initializer.
The condition must be a Boolean expression. If you omit the condition, the expression defaults to true.
Finally, the iterator can be either a single expression or a comma-separated list of expressions that usually change the corresponding local variables declared in the initializer.
Just as it is possible to create an infinite loop using a while statement, you can create a for statement that runs forever by omitting all three sections in the declaration:
for ( ; ; ;)
{
Console.WriteLine("line");
}
If you look at the while statement from Listing 8.5 again, you should see some elements that look similar to the different sections of the for statement. A while statement and a for statement are interchangeable; the for statement is a more compact way to write the same code. Figure 8.1 shows a comparison between a while statement and a for statement, which should make the relationship between them clear.
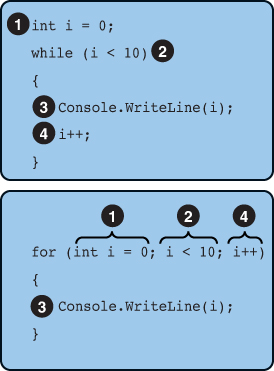
Figure 8.1. Comparison of a for and while statement.
Looking at the sequence of events that occur when a for statement executes, it is the same sequence as a while statement:
1. The initializer is executed, if present. If there are multiple expressions, they are executed in the order they are written. The initializer is executed once at the beginning of the statement.
2. If condition evaluates to true, control is transferred to the embedded statement.
3. The embedded statement is executed.
4. The statements in the iterator are evaluated, if present, and the condition is reevaluated. If condition evaluates to false, control is transferred to the next statement after the for statement.
The foreach Statement
The foreach statement executes a statement for each element in an array or collection. Unlike a for statement, a foreach statement cannot be used to add or remove items from the source collection.
The syntax of a foreach statement is
foreach ( type identifier in expression )
embedded-statement
If expression is an array type, an implicit conversion to IEnumerable is performed; otherwise, the collection must implement either IEnumerable or IEnumerable<T> or provide an appropriate GetEnumerator method.
The type and identifier of a foreach statement is the iteration variable and corresponds to a read-only local variable scoped only to the embedded statement.
As the iteration progresses through the elements in the collection, the iteration variable represents the current element.
The foreach statement is the only iteration statement that does not contain a condition to be evaluated. The embedded statement continues to execute for all the elements in the collection or a jump statement has terminated the loop. For a collection or single-dimensional array, the elements are traversed in increasing order starting with index 0. If expression is a multidimensional array, the elements are traversed in increasing order, starting with the rightmost dimension, then the next left dimension, and then continuing to the left.
If the collection contains no elements, the embedded statement is not executed.
The code in Listing 8.7 displays each character of a string on a single line.
Listing 8.7. The foreach Statement
string s = "This is a test.";
foreach (char c in s)
{
Console.WriteLine(c);
}
Jump Statements
Jump statements are different from selection and iteration statements because they unconditionally and immediately transfer control to a new location, called the target of the jump statement.
Although not commonly used, C# does provide a goto statement, which transfers control to a statement marked by a label. The goto statement can also target a specific case or the default case in a switch statement.
The syntax for a goto statement is
goto identifier;
goto case constant-expression;
goto default;
For example, the following code will transfer control to the default case when x = 0 and when x = 1 will transfer control to the line of code immediately following the Finish label after executing the code specified by case 1.
int x = 4;
switch (x)
{
case 0:
goto default;
case 1:
Console.WriteLine("x = " + x);
goto Finish;
default:
Console.WriteLine("Invalid");
break;
}
Finish:
Console.WriteLine("End");
Just as with the break and continue statements, any statements in the same block appearing after the goto statement are not executed.
The use of a goto statement is strongly discouraged in everyday practice because it is easy to misuse and can result in code that is difficult to read and maintain. Code that makes heavy use of goto statements is often referred to as “spaghetti” code because of the resemblance the program flow has to a plate of spaghetti.
The break Statement
The break statement is used to exit the nearest switch, while, do, for, or foreach statement. If multiple statements are nested within each other, only the innermost statement is exited.
Listing 8.8 shows the same for statement from Figure 8.1 using a break statement that causes the loop to terminate after four iterations.
Listing 8.8. The break Statement
for (int i = 0; i < 10 ; i++)
{
Console.WriteLine(i);
if (i == 3)
{
break;
}
}
The continue Statement
The continue statement starts a new iteration of the nearest while, do, for, or foreach statement. If multiple statements are nested within each other, the continue statement applies only to the innermost statement. Any statements between continue and the end of the loop body are skipped.
It is important to realize that a continue statement causes the expression, or the iterator section of a for statement, to be reevaluated.
Listing 8.9 shows the same for statement from Figure 8.1 using a continue statement that causes the first three iterations to be skipped.
Listing 8.9. The continue Statement
for (int i = 0; i < 10 ; i++)
{
if (i < 3)
{
continue;
}
Console.WriteLine(i);
}
The return Statement
You have already seen the return statement in Hour 4, “Understanding Classes and Objects the C# Way,” when you learned about methods and properties. The return statement causes control to return to the caller of the member containing the return statement. A return statement can be used with an expression, as you saw from the examples in Hour 4, in which case it can be used only in a class member that has a non-void return type. A return statement can also be used without an expression, in which case it can be used only in a class member that has a void return type, including constructors and finalizers.
Summary
In this hour, you moved away from foundational aspects and learned how to control your application by making decisions, repeating sections of code under certain conditions, and unconditionally jumping to different sections of code.
Knowing how to control the flow of an application is the most central concept in programming. These seemingly simple flow control statements provide the most power and flexibility the C# language has to make an application behave in ways that solve a specific problem.
Q&A
Q. What are the types of control flow statements available in C#?
A. C# provides three types of control flow statements:
• Selection statements, which enable for the selection of a single statement to be executed based on the value of an expression from a number of possible statements.
• Iteration statements, which repeatedly execute the same statement based on the value of an expression evaluated at each iteration.
• Jump statements, which unconditionally transfer control to a new location.
Q. What is the difference between the while and do statements?
A. The while statement provides a top-tested loop, whereas the do statement provides a bottom-tested loop. This means that the embedded statement in a while loop might execute zero or more times, whereas the embedded statement in a do loop executes at least one time.
Workshop
Quiz
1. Does the switch statement enable the same code to be used for multiple cases?
2. Can a switch statement have more than one default case?
3. How many times will the following while statement execute?
int i = 10;
while (i < 10)
{
Console.WriteLine(i);
i++;
}
4. How many times will the following do statement execute?
int i = 10;
do
{
Console.WriteLine(i);
i++;
} while (i < 10)
5. What will this for statement do?
for (int i = 0; ; i++)
{
Console.WriteLine(i);
}
A. Generate a compiler error.
B. Print the value of i one time.
C. Do nothing.
D. Print the value of i forever.
6. Are the three components of a for statement required?
7. Can the identifier declared in a foreach statement be used outside the scope of the iteration?
8. When a jump statement has been reached, will the statements occurring after the jump statement be executed?
9. Are jump statements supported within the embedded statement of the iteration statements?
Answers
1. Yes, the same code can be used by multiple cases if they are specified sequentially and contain no intervening statements.
2. No, a switch statement can have only one default case.
3. The statement will not execute because the condition is tested first and fails because i is equal to 10.
4. The statement will execute once. At the end of the first iteration, the condition is tested and fails because i is equal to 10.
5. The correct answer is D. By omitting the condition section of the for loop, it continues processing forever because there is no termination condition.
6. No, each component in a for statement is optional.
7. This is called the iteration variable and is equivalent to a read-only local variable that is scoped to the embedded statement.
8. No. A jump statement unconditionally transfers control to a new location so any statements that appear after the jump statement within the same scope will not be executed.
9. Yes, all the iteration statements support using jump statements within the embedded statement.
Exercises
1. Add a Refresh method to the IPhoto interface with the following signature:
void Refresh()
Implement this method in the Photo class. The method should contain a single if statement. For the boolean-expression, test to determine that this.source is not null. For the consequence-statement, use the following code:
this.image = BitmapFrame.Create(this.source);
this.exifMetadata = new ExifMetadata(this.source);
this.exists = true;
For the alternative-statement, use the following code:
this.image = null;
this. exifMetadata = new ExifMetadata();
this.exists = false;
In the PhotoViewer(Uri) constructor, add a call to Refresh() after the statement that sets the source field.