
Anyone who uses a computer should be familiar with tools that find and replace text. Such tools are typically rudimentary, but a find and replace tool for a Web design application has stiffer requirements. Not only does it need to be able to locate and replace text in the body of Web pages, but it must also be able to locate and replace text that appears in code. Most importantly, it must be able to distinguish between the two. The word “button,” for example, has an entirely different connotation when used in the body of a page than when used in code. If you wanted to replace all HTML buttons with image buttons, you wouldn’t want to also replace the phrase “button-down shirt” with the phrase “image-down shirt.”
The find and replace tool in Expression Web is well-suited to performing intelligent find and replace for Web sites. It offers features that are specifically designed for searching HTML code, and it provides a powerful search capability utilizing regular expressions. Regular expressions (sometimes referred to as “regex”) are specialized search strings that match patterns in text or code. As you’ll see in this chapter, the use of regular expressions adds powerful search capabilities that would not be possible otherwise.
Finding and replacing a simple word or phrase is a straightforward endeavor. In Web design, however, things are rarely simple. Suppose you have designed a Web site that contains hundreds of pages with Social Security numbers (SSNs) on them. Because of new requirements in your company, you are charged with the task of reformatting these SSNs. You need to keep the last four digits and replace the rest of each SSN with asterisks. A simple find and replace just won’t suffice, but a regular expression is perfect for such a job.
The most efficient way of working with regular expressions is to separate your search into parts. When looking for an SSN, we need to find three numbers followed by a dash, two numbers followed by another dash, and then four numbers. Additionally, the first digit of the series must be between 0 and 7.
Note
The actual structure of an SSN is more restrictive than the regular expression used here. To keep the regular expression example less complex, I opted for a simpler pattern.
The final regular expression looks like this:
[0-7][0-9]^2-[0-9]^2-{[0-9]^4}
If you’re unfamiliar with regular expressions, this example may appear to have a fairly complex syntax, but it’s actually quite simple. Let’s break it apart so you’ll fully understand how the language works.
The first set of numbers we want to match consists of three digits and is known as the area number. The first digit must be between 0 and 7 because the Social Security Administration has never issued an SSN with an area number higher than 728.
The regular expression to match this pattern is as follows:
[0-7][0-9]^2
The first part of this expression, [0-7], indicates that any single digit between 0 and 7 will produce a match. The second part of the expression, [0-9]^2, indicates that any two digits between 0 and 9 will produce a match. The ^ character is the repeat expression character, and it is followed by the number of times the preceding expression should be repeated.
The middle set of numbers we want to match consists of two digits between 0 and 9 and is known as the group number. The syntax for the regular expression is [0-9]^2. This syntax should now be familiar to you. It means that we want to match a character between 0 and 9 and then repeat that expression two times.
The last set of numbers we want to match consists of four digits between 0 and 9 and is called the serial number. The syntax for the regular expression is [0-9]^4. The curly braces surrounding this portion of the regular expression will be explained in the “Replacing Text” section later in this chapter.
Between each set of numbers is a dash character. A dash is a special kind of character because not only can you write a regular expression to look for a dash in some text, but it is also used in regular expression syntax. (In the regular expression we’re using in this chapter, the dash is used to indicate a range of digits.) To actually find an explicit dash in text, you need to specify that you are looking for an actual dash and not using it as part of the regular expression.
The character, called the escape character, does just that. By preceding a character with the , you are telling Expression Web that you want to match that character. Therefore, the regular expression - will match a dash character in text.
The Find and Replace dialog (shown in Figure 16.1) is made up of three tabs:
Find—. Provides tools for locating text within one or more Web pages.
Replace—. Provides tools for locating and replacing text within one or more Web pages.
HTML Tags—. Provides tools for locating and replacing HTML code.

To find specific text in one or more Web pages, open the Find and Replace dialog by selecting Edit, Find. Enter the text you wish to search for in the Find What textbox, select the desired options, and click Find All to display the search results. You can choose to search from the insertion point up, from the insertion point down, or in all directions by selecting the desired radio button in the Direction section.
Note

If the radio buttons in the Direction section are all disabled, see “Cannot Select Search Direction” in the “Troubleshooting” section of this chapter.
You can specify where to search for the text entered using the radio buttons in the Find Where section of the Find and Replace dialog. The following options are available:
All Pages—. Searches for the specified text in all pages in the current Web site.
Open Page(s)—. Searches for the specified text in all open pages.
Selected Page(s)—. Searches for the specified text in all selected pages. Pages can be selected in the Folder List task pane or in Folders View.
Current Page—. Searches for the specified text in the current page only.
→ | For more information on using the Folder List task pane and Folders View, see “A Tour of Expression Web”, p. 3 (Chapter 1). |
Tip
Some of the options in the Find Where section may be disabled based on what you currently have open in Expression Web.
You can also specify additional options for searching in the Advanced section. Check the Regular Expression checkbox if the text you have entered is a regular expression. If you would like to search source code for the text you have entered, check the Find in Source Code checkbox. The other options should be self-explanatory.
Note
If the Find in Source Code checkbox is disabled, see “Find in Source Code Disabled” in the “Troubleshooting” section of this chapter.
Note
If searches in source code don’t return results when they should, see “Source Code Searches Don’t Work” in the “Troubleshooting” section of this chapter.
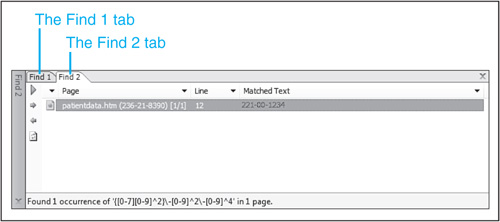
When you click Find All, Expression Web displays the results in the Find 1 task pane by default. You can display the results in a second task pane (the Find 2 task pane) by selecting the Find 2 radio button in the Display Results In section. Figure 16.2 shows the results of a search for SSNs using the regular expression shown in Figure 16.1. The results are displayed in the Find 2 task pane, but previous search results in the Find 1 task pane can be recalled easily by clicking the Find 1 tab to display the Find 1 task pane. This is useful in cases where you want to start a new search but are not yet finished working on results from a previous search.
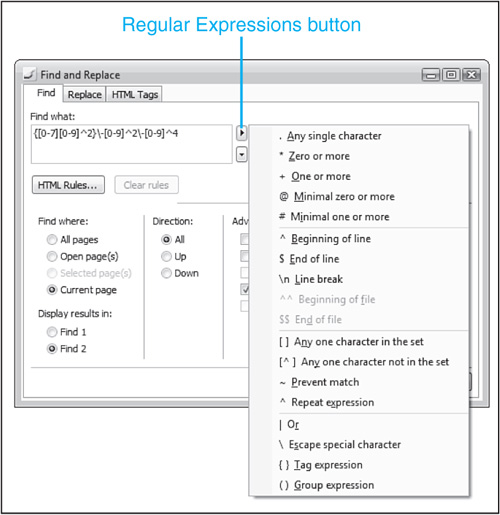
If you need assistance with entering a regular expression search, click the Regular Expressions button, as shown in Figure 16.3. Simple regular expressions can be built easily using this method.
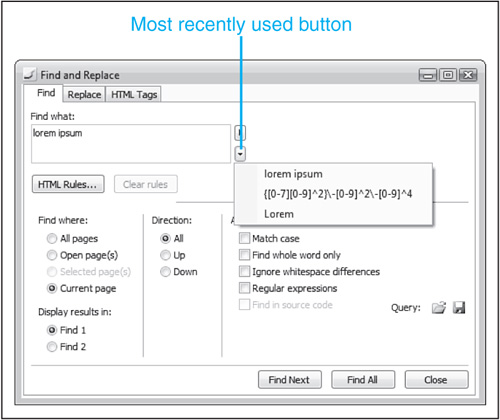
Complex regular expressions will likely require manual entry instead of using the Regular Expressions button. Fortunately, Expression Web keeps a list of recently used searches so you can easily recall a complex search later. By clicking the Most Recently Used button, you can access a list of previously entered searches, as shown in Figure 16.4.
→ | For an even better way of saving complex searches, see “Saving Queries,” p. 283, later in this chapter. |
To replace text, open the Find and Replace dialog by selecting Edit, Replace. If the Find and Replace dialog is already open, you can simply click the Replace tab. Enter the text you want to search for in the Find What textbox and the text that should replace it in the Replace With textbox, as shown in Figure 16.5.

You can also use regular expressions when replacing text. Remember that the requirements for our Social Security example are that all SSNs should be reformatted so that only the last four digits of the number are displayed. All other digits should be replaced with asterisks. Without regular expressions, you wouldn’t be able to perform such a complex replace, but with regular expressions, it’s fairly straightforward.
We’ve already covered the regular expression used to locate SSNs. Here it is again:
[0-7][0-9]^2-[0-9]^2-{[0-9]^4}
I’ve already explained everything in the regular expression with the exception of the curly braces. Curly braces in a regular expression allow you to store the result of the expression inside the braces so it can be used later on. An expression inside curly braces is called a tagged expression. You can have any number of tagged expressions in a regular expression.
Tagged expressions are used when replacing text using regular expressions. Let’s look at a specific example using the SSN replacement we’re performing. Consider the following SSN:
232-00-2323
When our regular expression locates this SSN, it should replace it with the following:
***-**-2323
Replacing the numbers with asterisks is simple, but we also need to leave the last four digits as they are. We could just change the regular expression so that it located all patterns of ###-## and just replaced them with asterisks. However, there may be instances of that pattern that aren’t SSNs. For example, suppose the pages also contain employee numbers and they are in the format ###-##. In that case, we would be replacing the employee numbers with asterisks, and that’s not what we want.
Tagged expressions are the perfect solution to this problem. By using tagged expressions, we can use our regular expression as-is and easily perform the replace operation that is required.
Figure 16.6 shows the Find and Replace dialog ready to perform the SSN replacement. The regular expression in the Replace With textbox shows the asterisks that will be used in place of the first five numbers in the SSN. The expression 1 that appears in place of the last four digits will be replaced with the result of the first tagged expression.

Tip
As previously mentioned, you can have any number of tagged expressions. The first one is 1, the second is 2, and so on. There is an additional tagged expression, �, that can be used to refer to the entire string that was matched by a regular expression.
The Regular Expressions button next to the Replace With textbox (see Figure 16.7) provides easy access to tagged expressions. Simply click the Regular Expressions button and then choose the desired tagged expression to have it inserted into your regular expression.

Let’s add an additional level of complexity to the SSN search. Suppose there are many places where SSN-type patterns are presented in the Web site, but you only want to find and replace the ones that are actual SSNs. All the actual numbers appear inside <div> tags and are styled with a CSS class called empData. What may at first seem like an impossible task is actually made easy using HTML rules.
→ | For more information on CSS styles, see “Creating Style Sheets,” p. 289 (Chapter 17). |
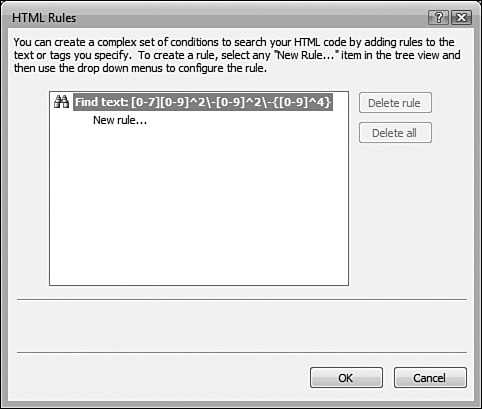
To access HTML rules, click the HTML Rules button in the Find and Replace dialog. When you do, the HTML Rules dialog is displayed, as shown in Figure 16.8.
Let’s configure an HTML rule to replace the SSN found in the sample Web site in the ExamplesCh17FilesWebsite folder on the CD that accompanies this book.
Open the Web site in Expression Web.
Open the default.htm page.
Select Edit, Replace to display the Find and Replace dialog.
In the Find What textbox, enter the following regular expression:
[0-7][0-9]^2-[0-9]^2-{[0-9]^4}In the Replace With textbox, enter the following regular expression:
***-**-1
Click the HTML Rules button.
Select New Rule in the dialog.
From the New Rule dropdown, select Inside Tag.
From the tag dropdown, select div.
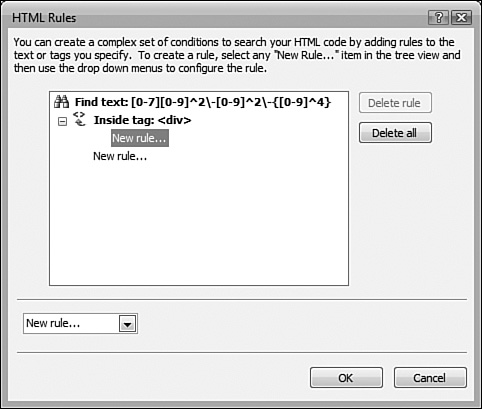
Select New Rule directly under the Inside Tag rule, as shown in Figure 16.9.
From the New Rule dropdown, select With Attribute.
From the attribute dropdown, select Class.
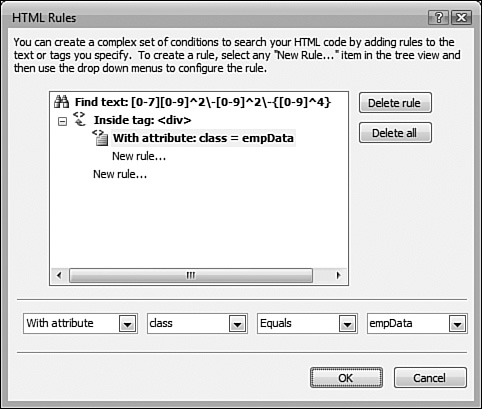
Click inside the [any value] dropdown and enter “empData”, as shown in Figure 16.10.
Click OK to add the new HTML rule.
After the HTML rule has been added, the text of the HTML rule will be displayed next to the Clear Rules button, as shown in Figure 16.11.

Make sure that the All Pages radio button is selected and click Replace All to perform the replacement.
In addition to searching for and replacing text within a page, you can also search and replace or modify HTML tags using the Find and Replace dialog.
To find and replace HTML tags, select Edit, Find or Edit, Replace and click the HTML Tags tab. Select the desired tag in the Find Tag dropdown and select the replace action from the Replace Action dropdown if desired. Depending on what you select in the Replace Action dropdown, other options will be made available.
Let’s change the empData class in default.htm to employeeData. Open the Web site and open default.htm. Complete the following steps to replace the class attribute’s value:
Select Edit, Replace.
Click the HTML Tags tab.
From the Find Tag dropdown, select div.
In the Replace Action dropdown, select Set Attribute Value.
In the Attribute dropdown, select Class.
In the To dropdown, enter “employeeData”, as shown in Figure 16.12.
Click Replace All to replace the class attribute.

Switch to Code View and look at the <div> tag. Notice that the empData CSS class has been changed to employeeData.
The SSN example used in this chapter is a fairly simple one. Much more complex searches are possible, and if you add a series of HTML rules to the mix, configuring a search can be a time-consuming process. That’s not a big deal if your search is a one-time thing, but if you find yourself in the position of having to perform a particular search more than once, being able to save the search for later use can save a lot of time.
Expression Web can save searches you perform using the Query buttons in the Find and Replace dialog. Click the Save Query button to save a query and the Open Query button to open a previously saved query.
Note
Expression Web queries are saved in the AppDataRoamingMicrosoftExpressionWeb DesignerQueries folder in the current user’s profile path by default.
Expression Web queries are saved as .fpq files and are in XML format. The code below shows the XML for the SSN example used in this chapter:
<?xml version="1.0" encoding="utf-8" ?>
<fpquery version="1.0">
  <queryparams />
  <find text="[0-7][0-9]^2-[0-9]^2-{[0-9]^4}">
    <rule type="insideTag" tag="div">
      <rule type="attribute" attribute="class" compare="=" value="empData" />
    </rule>
  </find>
  <replace text="***-**-1" />
</fpquery>
I’d like to search from the insertion point down, but the radio buttons in the Direction section are all disabled and I can’t change the setting.
Make sure that a page is open and that Current Page is selected in the Find Where section. Setting search direction is only valid when you are searching within the current page.
I’m trying to select the Find in Source Code checkbox, but it’s disabled.
If you have a page open and Current Page is selected in the Find Where section, the Find in Source Code checkbox is disabled. If the page is open in Design View, searches are performed on text inside the Web page. If the page is open in Code View, searches are performed on source code.
I have a page open in Code View. I want to search in source code and I have Current Page selected. However, even though I am entering HTML code that should be found, no search results are produced.
Chances are you have an HTML rule applied to your search. Find in Source Code is always disabled and deactivated when HTML rules are applied. Clear the rule by clicking the Clear Rules button if you want to search in HTML code.
As mentioned previously in this chapter, Expression Web saves a list of previously used searches so you can access them by clicking the Most Recently Used button shown earlier in Figure 16.4. Expression Web saves a long list of recent searches, and it’s likely that you may want to clear them out or edit them from time to time. Expression Web doesn’t provide any user interface element for editing or removing recent searches, but you can do it manually by editing the Registry.
Caution
Be careful when editing the Registry. If you make modifications without knowing what you’re doing, you can cause serious problems with your applications or with Windows itself.
Most recently used searches are stored in the following Registry key:
HKEY_CURRENT_USERSoftwareMicrosoftExpressionWeb Designer12.0FindMRU
To make changes or remove recent searches, make sure Expression Web is not running and then perform the following steps:
Open a command prompt.
From the command prompt, type “regedit” and press Enter.
Expand the HKEY_CURRENT_USER section.
Expand the Software section under HKEY_CURRENT_USER.
Expand the Microsoft section under Software.
Expand the Expression section under Microsoft.
Click once on the Web Designer folder under Microsoft to select it.
Select File, Export.
Enter “ewd_backup.reg” for the filename and save the file to your Desktop or another accessible area. This will create a backup of the Web Designer section of the Registry.
Expand the Web Designer section.
Expand the 12.0 section under Web Designer.
Click once on the FindMRU folder to select it.
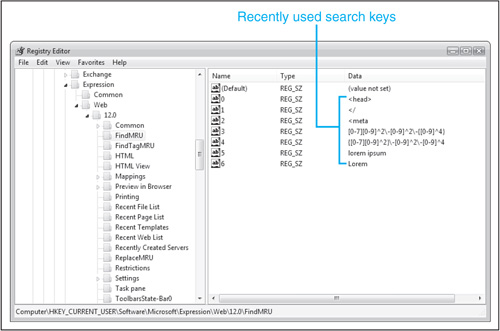
You should see Registry keys similar to the ones in Figure 16.13. Note that the names of these keys are in incremental order beginning at 0. To remove all entries from the recent list of searches, select all keys with a numeric value and press Delete to delete them.
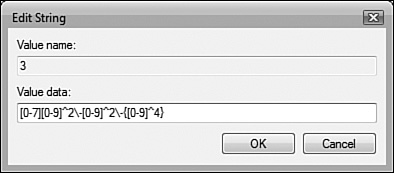
If you’d like to edit an entry, double-click on the entry and modify it as needed. Click OK to commit the change, as shown in Figure 16.14.
If you’d like to remove one or more entries but not all of them, make sure that any remaining entries are in numerical order beginning at 0. To renumber a specific key, select it and then press F2. Enter the new name and press Enter to commit it.
If you make any errors while editing the Registry, close the Registry Editor and double-click on the .reg file you saved before you began editing the Registry. Click Yes when asked if you want to add the information to the Registry.
As a final note, if you make changes to the recent searches and your changes don’t show up in Expression Web, make sure that Expression Web is closed when you are making your changes. If it is closed and your changes still don’t take effect, it’s likely that an instance of EXPRWD.EXE is running and you just can’t see it. Right-click in an empty area of your task bar and select Task Manager from the menu. Click the Processes tab and look for EXPRWD.EXE. (You can click the Image Name column to search by that column.) If you find an active instance, select it and click End Process to get rid of it. You should then be able to successfully edit your recent searches.