Navigating the Galaxy Tab
In the last chapter, we went through the initial setup for your new Galaxy Tab. Now it is time to explore the interface and features of your new Galaxy Tab.
The Physical Buttons and Hardware
Figure 2-1 shows the hardware features visible on the front and sides of the 10.2 inch Galaxy S tablet.

Figure 2-1. The front of the 10.2 inch tablet
On the top of the tablet, you can see what looks like two cameras. Instead, it’s actually one camera and a motion/proximity sensor. The motion sensor is used for gesture control. For example, the screen capture gesture is swiping your hand from the right to the left of the screen.
The top edge of the tablet has two buttons. The short button is the power button, and the longer button is the volume toggle.
The bottom of the tablet has three buttons. This is mostly familiar to Samsung phone owners. The Back button to the right goes either back to the previous screen or closes an open app, depending on where you are in the app. The Home button returns you to the Home screen (we’ll describe what that is as we progress through this chapter). The Recent Apps button is in the place where most Samsung phones put the Menu button. Recent Apps lets you toggle between recently opened apps. This is actually a pretty standard configuration for Android tablets, although the Nexus series tablets from Google swap the position of the Back and Recent Apps button.
Rounding out the physical hardware are the jacks and ports. There’s a headphone jack, a USB Port, and an SD card slot. On the back of the tablet, there is a rear-facing camera with flash and an infrared blaster for using as a remote control with Samsung TVs.
As mentioned in Chapter 1, Samsung created a modified version of Android with the TouchWiz UI (User interface). TouchWiz adds a few features to your tablet, and Samsung provides a few new apps that take advantage of this new interface.
Home Screen
The Home Screen is not the first thing that you see when you turn your device on. It is usually the second. The first thing you see is the Lock Screen, which we will get to later in this chapter. If you swipe to open your device (the default setting), you’ll see the Home Screen. Figure 2-2 shows a fresh Galaxy Tab S Home screen with all of the basic interface parts labeled.

Figure 2-2. The Home Screen
Let’s go over each part and the role that they play in using your Galaxy Tab.
Notification icons are little alerts to let you know that something has happened in the background, such as you have a new email message, one of your apps was updated, your download has finished, your friend has made a new Facebook post, or you were just mentioned in a tweet. App programmers can create custom icons and choose when apps give you a notification, if at all.
If you see notifications and want to see more details, just drag your finger from the top of the screen downward, as if you’re pulling shade down on a window. You’ll see a screen similar to Figure 2-3. This is the notification panel.

Figure 2-3. The Notification Panel
The notification panel is a one-stop action shop for your notifications, but it also lets you quickly change preferences. This is a TouchWiz enhancement, as the standard Android tablet just pulls down a simple notification panel. We’ll circle back to this screen for more details, but right now let’s focus on the notifications.
The small notifications on the top of the screen are now larger icons with more information, and you can take some actions, depending on the notification. If you have an email message, you can tap on it to open the message. Tap on a downloaded or updated app to launch it. Photos offer the option to either launch photo editing or share.
If you don’t want to see a notification anymore (an email message you’ll ignore until later, for example) swipe the notification to the left with your finger to dismiss it.
Status icons let you know about your device, including your battery charge level, the clock’s time, the tablet’s Wi-Fi status, GPS status, and speaker status (on or muted to vibrate only).
Widgets are small, often interactive apps that run on a portion of your Home screen. There are widgets that display weather information, allow you to control your playlists, display your eBook library, and more. By default, the first widgets you’ll see will be links to download free Samsung apps and bonus content. By tapping on the widget, you’ll launch the Samsung app store to download the free bonus apps (Figure 2-4). This requires that you have a Samsung account, as covered in Chapter 1.

Figure 2-4. The Samsung bonus apps
Once you’ve installed your bonus apps, there’s no point in keeping the widget on your Home screen. It’s easy to remove it:
- Press your finger down on the widget and hold it until you feel the tablet vibrate slightly (this is known as the long-press).
- Keep your finger pressed to the widget and drag it upward onto the trash icon labeled “Remove” (Figure 2-5).

Figure 2-5. Remove widgets by dragging them to the trash
You can also resize and reposition widgets by using the long-press and then dragging.
These small icons on your Home screen are just shortcuts to launch apps. Using the same method you’d use for widgets (long-press and then drag), you can remove app shortcuts from your Home screen or drag them to different positions.
Note Removing an app from the Home screen does not delete the app. It just removes the Home screen shortcut.
Tap on this shortcut to see all of the files on your tablet. If you’ve ever used an older Android tablet, you’ll really appreciate how amazing it is to see all your files. This includes documents, music, pictures, and even apps. Figure 2-6 shows the My Files area. (In my case, My Files was full of screen captures used to write this book.)

Figure 2-6. My Files
Home Screen Navigation
The Home screen on the Galaxy Tab S is a bit different than a standard Android tablet. The Galaxy S offers two main home screens, which you can use for app shortcuts or widgets. Swipe left or right to switch between screens.
There’s also a third (and fourth) screen that provide a tiled view. Swipe three times to get to this view or just tap on the tiled icon in the Home screen navigation area. Think of this as widgets on steroids. Figure 2-7 shows the default configuration for the first tiled Home screen view.
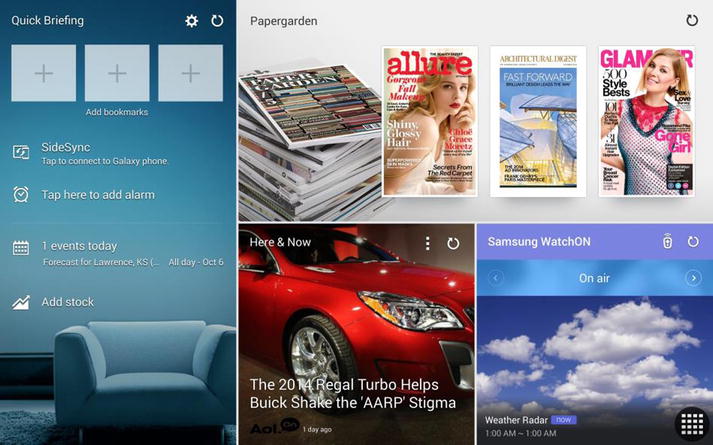
Figure 2-7. Tiled view of the Home screen
The second screen (Figure 2-8) default is all about office productivity and offers email, calendar, and document editing widgets.
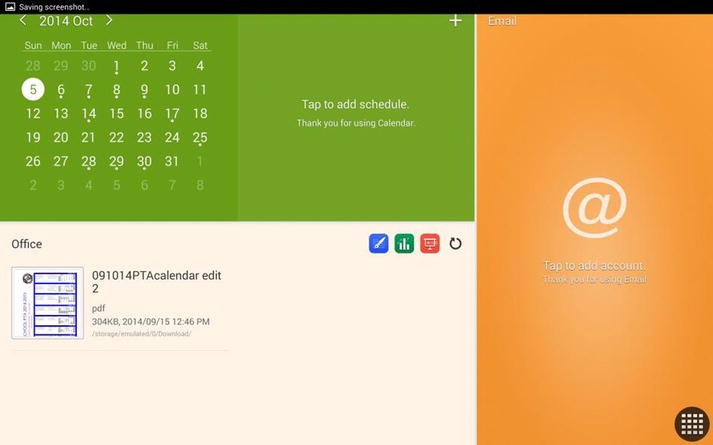
Figure 2-8. The second tiled Home screen view centers on productivity
You can add or remove tiled widgets from these two screens by long-press dragging, just as you can with the default Home screen view, as shown in Figure 2-9.

Figure 2-9. Editing the default layout
In the earliest versions of Android, the app tray was invoked from the bottom of the screen like a tool drawer. In the Galaxy Tab S, the app area is just launched by tapping on the icon on the bottom right corner of the screen (Figure 2-10). Here the screens can be navigated by swiping left or right with a finger, and you will go through as many screens as it takes to display all the apps and only apps in this area. Other versions of Android put widgets in this area as well, but Samsung puts them in a separate area.

Figure 2-10. The Apps screen
Going Beyond the Home Screen Basics
Now that we’ve explored the basic interface, let’s circle back and dig a little deeper with a few of those screens. First, let’s revisit the Notification Panel and get to know it a little better.
The Notification Panel
As you saw earlier, swipe with your finger downward from the top of the screen to invoke the Notification Panel. Let’s take a look at the top area first, as shown in Figure 2-11.

Figure 2-11. The top row of the Notification Panel
There are a lot of hidden features here. First, we have the quick settings. If you want to toggle your Wi-Fi on or off, set the sound to vibrate only, or turn on Bluetooth, you can do that with a single tap. If you need to adjust the main settings or preferences, you can do so by tapping the gear shape. You would use the gear shape for doing something more complex, such as adding an email account or changing your location settings for the internal clock.
The square window-looking icon is actually a link to even more quick settings, as shown in Figure 2-12.
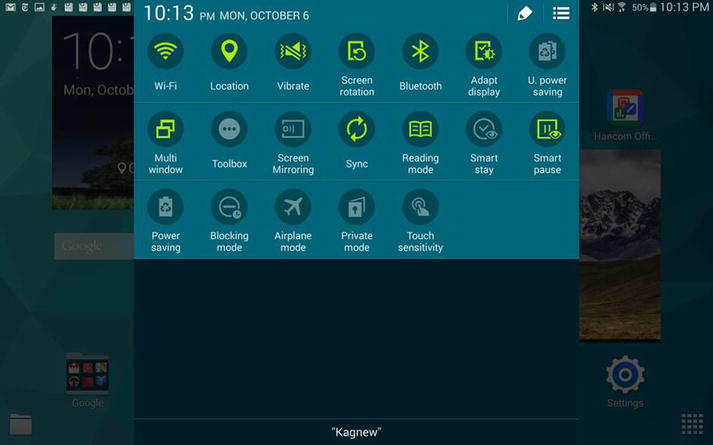
Figure 2-12. All the quick settings
You probably aren’t going to use all of those settings often, and you may not use some of the default quick settings that often, either. Adjust which quick settings appear in your Notification Panel by tapping on the pencil icon on the top of this screen.
Now we’ll move on to the items just under the quick settings (Figure 2-13). Here you’ll see the S Finder and Quick Connect.

Figure 2-13. The Quick connect and S Finder
These two buttons are used in conjunction with other devices. S Finder finds other Samsung devices, such as TVs and phones, so you can quickly share content, for example, sharing a song or a video file. The Quick Connect is similarly meant for quick file sharing, only centered on non-Samsung devices, such as laptop computers.
Below the buttons, you’ll see slider controls for screen brightness and volume. The Quick Settings button can toggle volume on or off, but this lets you fine-tune it.
Deeper into My Files
The second area to explore further is the My Files screen, which you launch by tapping on the My Files icon from the bottom left of the Home screen.
The first area to notice is on the left side of the screen, as shown in Figure 2-14.

Figure 2-14. The filters for My Files
If you want to know what you have on your device, sometimes it’s helpful to not have it all in a jumble. You can sort by when an item was downloaded by tapping on the Timeline button. Sort by items that are stored on your SD card (if you have one installed) by tapping on Device storage. Filter items to only images, videos, documents, apps, or audio files by tapping on the respective filter. You can also swipe upward to find more filtering choices, including the ability to filter items to only those stored in Dropbox.
The next area to notice is the upper right corner (Figure 2-15).

Figure 2-15. View options
The first icon looks like a series of squares. If you tap on this, it will change the My Files display from the default list view to large icons. Tap it again for smaller icons, and tap it a third time to return to list view. The pie chart shows the tablet’s data usage. This is important if you have a tablet with a built in cellular data plan. Because downloads eat up a lot of data, you can check usage from this view. The magnifying glass is Search, of course. In this case, you can search through your files by name. The final icon offers more “menu” choices. You can sort the files, for example.
The final thing to pay attention to is the information on the items themselves. In list view, you can see the file name, size, type, and date the file was last modified. This is pretty powerful stuff.
Summary
In this chapter, we learned more abut the interface in the Galaxy Tab S. It uses a modified version of Android called TouchWiz and offers more features than the standard Android tablet. In the next chapter, we’ll explore some practical ways to use your Galaxy Tab S.