CHAPTER 16
Managing System Center Operations Manager 2007 R2
IN THIS CHAPTER
Exploring Operations Manager cmdlets
Processing alerts in bulk
Automating maintenance mode
Discovering, deploying, and managing agents and network devices
Exploring discovered inventory
Working with overrides
Creating monitoring scripts in Windows PowerShell
Where to find and share Windows PowerShell scripts for Operations Manager
The command shell that comes with System Center Operations Manager 2007 R2 (OpsMgr) provides the means to perform many tasks you might normally perform in the OpsMgr Operations console from the command line instead. It also provides a convenient way to perform bulk administration and recurring tasks that would be labor-intensive or simply not possible from the console user interface. To successfully launch the command shell, you must be a member of an Active Directory security group with membership in the Operations Manager Administrators user role. All OpsMgr command shell instances connect directly to the OpsMgr Root Management Server (RMS), and the connection will fail without OpsMgr Administrator privileges.
Exploring the Available Cmdlets
The OpsMgr command shell contains 87 product-specific cmdlets for managing an Operations Manager 2007 (OpsMgr) deployment. The first cmdlet you may want to try is Get-OperationsManagerCommand, which returns a list of all the cmdlets contained in the OpsMgr Windows PowerShell snap-in. Once you have the list of cmdlets for OpsMgr in hand, you can use Get-Help (with the -Full, -Detailed, or -Examples switch parameters) to retrieve syntax and examples to help you get started writing your own command shell scripts when no sample exists.
By loading the OpsMgr Windows PowerShell snap-in, you can access any of these cmdlets in a Windows PowerShell script. In fact, one of the most common uses of the OpsMgr command shell is for bulk administrative tasks that cannot be easily performed in the Operations console. Such scripts are often configured as part of a scheduled task to run on a recurring basis. To connect to an OpsMgr management group from a Windows PowerShell script, you must first load the OpsMgr Windows PowerShell snap-in, specify the root management server, and set the working location to OperationsManagerMonitoring using the Set-Location cmdlet. Inserting the following code snippet at the beginning of any OpsMgr Windows PowerShell script enables you to run the script from any Windows PowerShell session or as part of a scheduled task. Just replace the name of the root management server (RMS) assigned to the $rootMS variable with the name of your RMS.
$RootMS = “myrms.contoso.com”
Add-PSSnapin “Microsoft.EnterpriseManagement.OperationsManager.Client” `
-ErrorVariable errSnapin;
Set-Location “OperationsManagerMonitoring::” -ErrorVariable errSnapin;
New-ManagementGroupConnection -ConnectionString:$rootMS -ErrorVariable `
errSnapin;
Set-Location $rootMS -ErrorVariable errSnapin;
When configuring a script to run as a scheduled task, make sure the user account used to run the script has Administrator rights in the target OpsMgr environment.
Working with Alerts
Alerts are the basis for most of your daily administrative effort in OpsMgr. When an alert is raised, it has to be determined if the alert is actionable; in other words, “Does this alert represent a real problem?” If so, the next step is to review the product knowledge contained in the alert to determine the root cause and identify an appropriate resolution. Sometimes, error conditions may occur repeatedly over an extended period of time. Occasionally, interruptions in network connectivity or application failures can result in a large number of non-actionable alerts called an alert storm. In these last two situations, the OpsMgr cmdlets provide a way to easily identify which alerts are occurring most often in your OpsMgr deployment, as well as how to process alerts in bulk. In this section, you learn how to work with OpsMgr alerts using the Windows PowerShell cmdlets that come with the OpsMgr command shell.
Processing Alerts in Bulk
Because many thousands of alerts can be generated in large environments (or any environment under the wrong circumstances), bulk processing of alerts is one of the most common uses of the OpsMgr command shell. Because the number of objects you are working with can be so large, the syntax you use to query OpsMgr is very important. For example, the following query for alerts will be successful only if there are no more than a few thousand alerts:
get-alert | where-object {($_.Name -like “File group*”) -and `
($_.ResolutionState -eq 0)}
This next example performs the same task as the previous line of code, but in a way that will run much faster in larger environments, even when tens of thousands of open alerts are present:
Get-Alert -Criteria “Name Like ‘File group%’ AND ResolutionState=0”
Note
When using the -Criteria parameter, bear in the mind that, unlike a string comparison using Where-Object, the Criteriavalue is case-sensitive. ![]()
The reason behind the performance difference is that when the -Criteria parameter is used, the value passed is provided directly to the SQL Server database, and only the relevant data is returned. This reduces the objects that must be passed all the way back to the Windows PowerShell console. A Where-Object clause is the equivalent of a select * statement in SQL — all the results are returned and then sorted. The -Criteria statement is equivalent to a select * … where statement in SQL, returning only the data of interest. When coupled with the Resolve-Alert cmdlet, you can close alerts in bulk as well. This following code offers an easy way to remove open alerts based on the criteria of your choice:
Get-Alert -Criteria —Name Like ‘Script%’ AND ResolutionState=0” `
 | Resolve-Alert
This method is commonly used to close aging non-actionable alerts (like the common “script or executable failed to run” error) or alerts generated in an alert storm (such as when network connectivity results in large numbers of alerts due to the transient condition). Depending on your requirements, you can schedule this script in Task Scheduler to run automatically.
A common question from OpsMgr administrators is, “How can I retrieve a list of the most common alerts in my environment?” Retrieving a list of the most commonly occurring alerts may seem like a simple task, but it can be quite challenging due to the differences between the way rules and monitors function. Rules that generate alerts typically generate a single alert, and until that alert is closed, no additional alerts are created. Instead, the RepeatCount property of the alert is incremented. Retrieving the most commonly occurring alerts based on their RepeatCount property in reality presents the most commonly occurring rule-generated alerts, as shown in this example, which returns the 10 most common alerts:
Get-Alert | Sort-Object -Property RepeatCount -Descending | Select-Object `
-Property Name,RepeatCount,MonitoringObjectPath -First 10
Monitors work much differently. Because monitors are state-aware, monitor-generated alerts for a single monitor do not repeat — they are in a resolution state of New (when the error condition occurs) or Resolved (when the error condition is improved and the alert is closed). The RepeatCount for monitor-generated alerts is always zero.
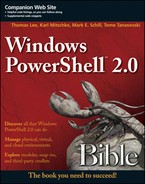
Creating a single combined report to present top alerts across rules or monitors requires tabulating repeated occurrences in a consistent manner by counting occurrences grouping them on alert ID. The sample script in Listing 16-1 (written by Andreas Zuckerhut) uses an in-memory DataTable for storage and tabulation of both rule and monitor-generated alerts. The results are written to a comma-separated value file c:TopAlerts.csv.
Note
You can find the original source and related information at www.systemcentercentral.com/BlogDetails/tabid/143/IndexId/50372/Default.aspx. ![]()
LISTING 16-1 TopAlerts.psl Script
#Create Datatable

$AlertTable = New-Object System.Data.DataTable “AlertTable”
$AlertTable.Columns.Add((New-Object System.Data.DataColumn ID,([string])))
$AlertTable.Columns.Add((New-Object System.Data.DataColumn Name,([string])))
$AlertTable.Columns.Add((New-Object System.Data.DataColumn AlertCount,([int])))
$AlertTable.Columns.Add((New-Object System.Data.DataColumn IsMonitorAlert, `
([string])))
foreach ($Alert in (Get-Alert))
{
  #Check if Alert exists already.

  $AlertExists = $False

  foreach ($Row in $AlertTable.Rows)

  {
     if ($Row.ID -eq $Alert.MonitoringRuleId.ToString())

     {

        $AlertExists = $True

        #In case it does, we just merge the Repeatcount
        $Row.AlertCount = $Row.AlertCount + ($Alert.RepeatCount + 1)

     }
}

if ($AlertExists)
  {
  }
  else
  {
        #If the Alert doesn't exist, add it to the DataTable.
        $NewRow = $AlertTable.NewRow()
        $NewRow.ID = $Alert.MonitoringRuleId.ToString()
        $NewRow.Name = $Alert.Name
        $NewRow.AlertCount = ($Alert.RepeatCount + 1)
        $NewRow.IsMonitorAlert = $Alert.IsMonitorAlert
        $AlertTable.Rows.Add($NewRow)
  }
}

$AlertTable = ($AlertTable | Sort-Object -Property AlertCount -Descending)

$AlertTable | Select-Object -First 10 | Export-Csv -path c:TopAlerts.csv `
 -NoTypeInformation
The output of this script, a “Top 10 Alerts Report,” is shown in Figure 16-1.
FIGURE 16-1 Default troubleshooting packs
Updating Custom Fields in Alert Properties in Bulk
OpsMgr alerts include a number of read-write fields, including Owner, TicketId, ResolutionState, and 10 custom fields, named CustomFieldl through CustomField10.
OpsMgr administrators routinely use these to store values to support a number of integration scenarios, such as result status of an Opalis Integration Server workflow to correct an error condition, or to store categorization information for alert forwarding through the OpsMgr Connector Framework.
Although it is not always convenient to update these fields from an existing OpsMgr workflow (rule, monitor, or discovery), you can use Windows PowerShell to update these fields on a schedule or on demand when the situation warrants. The following sample script writes the computer principal name to CustomFieldl and the name of the management pack containing the workflow that generated the alert in CustomField2. The Update() method at the end of the script writes the user-defined reason for the update presented on the History tab in alert properties.
#Retrieve open alerts
foreach ($alert in Get-Alert -Criteria 'PrincipalName is not null `
and ResolutionState = 0')

{
  #Update custom fields
  $alert.CustomField1 = $alert.PrincipalName
  $alert.ResolutionState = 1
  if ($alert.IsMonitorAlert -eq $False) { $alert.CustomField2 = `
((Get-Rule $alert.MonitoringRuleId).GetManagementPack()).DisplayName
  }
  else {
   $alert.CustomField2 = (Get-Monitor
$alert.ProblemId).GetManagementPack().DisplayName
  }
  $alert.Update(“Alert update via Windows PowerShell”)
}
The output of this script is shown in Figures 16-2 and 16-3.
FIGURE 16-2 Updated Alert Properties (Custom Fields tab)

FIGURE 16-3 Updated Alert Properties (History tab)

Automating Maintenance Mode
Placing a computer or other objects into maintenance mode instructs OpsMgr to stop monitoring and stop alerts for these objects for the duration indicated. Among recurring administrative tasks that require automation, maintenance mode is perhaps the most common. Fortunately, you can make short work of this using the OpsMgr cmdlets for PowerShell.
Adding and Removing Objects and Groups
When you place an object into maintenance mode in OpsMgr 2007, the object you specify “and all contained objects” are placed into maintenance mode by default. When you put a group object into maintenance mode, this means that OpsMgr automatically places all the objects contained in the group into maintenance mode as well.
When executing group maintenance mode, you are not restricted to groups of computers. You can place groups of objects of any type(s) into maintenance mode (health service, SQL databases, IIS websites, and so on) to avoid alerts being raised during scheduled application maintenance.
The script shown in Listing 16-2 places a group and all contained objects into maintenance mode. Download this script from the book's website and run it from a command prompt using the following syntax specifying the target group and root management server:
.StartMaint.ps! -GroupName ‘Test Group’ -rootMS ‘myrms.contoso.com’
LISTING 16-2 StartMaint.psI Script
param ($groupName, $rootMS, $MMLength)

#Load OpsMgr snap-in and connect to RMS
Add-PSSnapin “Microsoft.EnterpriseManagement.OperationsManager.Client”
Set-Location “OperationsManagerMonitoring::”
$MG = New-ManagementGroupConnection -ConnectionString $rootMS
if($MG -eq $null)
{
Write-Host “Failed to connect to $rootMS”
return
}

Set-Location $rootMS

$startTime = Get-Date
$endTime = $startTime.AddHours($MMLength)
$GroupName = Get-MonitoringClass | Where-Object {$_.DisplayName -eq $groupName}
$GroupID = Get-MonitoringObject $GroupName.Id

New-MaintenanceWindow -StartTime $startTime -EndTime $endTime `
-Reason“ApplicationInstallation” -Comment none -MonitoringObject $GroupID
If you need to remove a group from maintenance mode earlier than expected, you can do so on demand, using the StopMaintenanceMode() method. However, to end maintenance mode, you have to explicitly specify in the script that maintenance mode should be ended for all contained objects as well by specifying a TraversalDepth of recursive.
The script in Listing 16-3 removes a group and all contained objects from maintenance mode. Download this script from the book's website. Run it from a command prompt using the following syntax and specifying the target group and root management server:
.StopMaint.ps! -GroupName ‘Test Group’ -rootMS ‘myrms.contoso.com’
LISTING 16-3 StopMaint.psI Script
param ($groupName, $rootMS)

#Load the Operations Manager snapin and connect to the Root Management Server
add-pssnapin “Microsoft.EnterpriseManagement.OperationsManager.Client”;
Set-Location “OperationsManagerMonitoring::”;
$mgConn = New-ManagementGroupConnection -connectionString:$rootMS;
if($mgConn -eq $null)
{
[String]::Format(“Failed to connect to RMS on ‘{0}’”,$rootMS)
return
}

Set-Location $rootMS

$MonitoringClassCG = Get-MonitoringClass | `
Where-Object {$_.DisplayName -eq $groupName}
$MonitoringGUID = Get-MonitoringObject $MonitoringClassCG.Id

$MonitoringGUID.StopMaintenanceMode([DateTime]::Now.ToUniversalTime(), `
[Microsoft.EnterpriseManagement.Common.TraversalDepth]::Recursive)
Tip
A very common mistake in group maintenance mode scripts is a lot of extra code to enumerate the members of the group and to put each of these objects into maintenance mode explicitly. Because the default behavior of maintenance mode is to include “object and all contained objects,” this is unnecessary and places additional performance overhead on the RMS. ![]()
Automating Client-Side (Remote) Maintenance Mode
A common complaint of about maintenance mode in OpsMgr is that it requires server administrators to have some knowledge of OpsMgr, because maintenance mode is initiated either through the OpsMgr console UI or through the command shell.
Client-side maintenance mode (sometimes called remote maintenance mode) solutions eliminate this requirement. Client-side maintenance mode refers to a custom solution that allows server administrators to place servers into maintenance mode directly from the Windows computer on which they are about to perform maintenance without opening the Operations console or running a Windows PowerShell script directly. Though multiple methods exist to achieve this objective, all versions have some high-level components in common:
- A custom management pack that installs a small application (usually an HTML application) on the desktop. The application allows the server administrator to start or end maintenance mode for the server, as well as set maintenance mode duration. When the server administrator requests to start or end maintenance mode, the requested maintenance settings are written to a Windows event in the Operations Manager Event Log.
- Rules running on the agent that detect the “Maintenance Mode ON” and “Maintenance Mode OFF” events and trigger a response on the RMS.
- A Windows PowerShell maintenance mode script (hosted on the RMS) that places the computer, health service, and health service watcher in maintenance mode when triggered by the rule (running on the server) that detects the maintenance mode request.
Tip
To prevent any alerts from being raised during maintenance mode on a computer, three objects must be placed into maintenance mode in OpsMgr: the computer object, the health service, and the health service watcher. In the R2 release of OpsMgr 2007, a change was introduced in the maintenance mode feature. Now, when a computer is placed into maintenance mode, the health service and health service watcher objects for the computer are placed into maintenance mode automatically. ![]()
The following simple Windows PowerShell script is used to place a computer (and thus health service and health service watcher) into maintenance mode. With some simple modifications, it can be extended to facilitate client-side maintenance mode.
param($rootMS,$urlName,$minutes,$comment,$reason)
Add-PSSnapin “Microsoft.EnterpriseManagement.OperationsManager.Client” `
-ErrorVariable errSnapin

Set-Location “OperationsManagerMonitoring::” -ErrorVariable errSnapin
New-ManagementGroupConnection -ConnectionString $rootMS -ErrorVariable errSnapin
Set-Location $rootMS -ErrorVariable errSnapin


$ComputerName = (Get-MonitoringClass -Name Microsoft.Windows.Computer) | `
Get-MonitoringObject | Where-Object {$_.DisplayName -eq $urlName}

$startTime = Get-Date
$endTime = $startTime.AddMinutes($minutes)

“Putting URL into maintenance mode”
New-MaintenanceWindow -StartTime $startTime -endTime $endTime `
-MonitoringObject $ComputerName -comment$comment -Reason $reason
Note
You can download a working example of client-side maintenance mode from Derek Harkin's OpsMgr blog at http://derekhar.blogspot.com/2009/11/new-agent-maintenance-mode.html. ![]()
Deploying and Configuring OpsMgr Agents and Network Devices
Agent installation and configuration are tasks generally associated with the OpsMgr Operations console UI. However, many recurring tasks are associated with agent deployment configuration. The good news is, whether you want to configure heartbeat, agent proxy, agent failover settings, or even agent deployment, these tasks can all be automated with Windows PowerShell.
Configuring Agent Failover Without AD Integration
The Active Directory integration feature, which is used to assign agent failover settings in OpsMgr, provides a means to control primary and failover management server assignments for agent-managed computers. However, some organizations require granularity in agent failover assignment that is not easily achieved through an Active Directory-integrated assignment. With a little help from the Get-Agent, Get-ManagementServer, and Set-ManagementServer cmdlets, agent failover settings can be updated in bulk on demand.
The sample script shown next sets the primary and failover management servers for the specified agent(s). To run this script, update the $rootMS variable with the name of your RMS, and update $PriMS and $SecMS with the names of the primary and failover management servers. To specify which agents will be updated, change the value of the query criteria assigned to the $agent variable.
$rootMS= “opsmgr.contoso.com”
#Initializing the OpsMgr Powershell provider and Connecting to Mgmt Group
Add-PSSnapin “Microsoft.EnterpriseManagement.OperationsManager.Client” `
-ErrorVariable errSnapin
Set-Location “OperationsManagerMonitoring::” -ErrorVariable errSnapin
New-ManagementGroupConnection -ConnectionString $rootMS -ErrorVariable errSnapin
Set-Location $rootMS -ErrorVariable errSnapin

# Retrieve a list of agents and assign to variable $agent
# In this example, all servers with server name starting with ‘FS’
$agents = Get-Agent -Criteria “Name LIKE ‘FS%’” # set variables for primary ` and secondary management servers.
# make sure the WHERE clause in each one-liner below matches only 1 MS!
$PriMS = Get-ManagementServer | Where-Object {$_.Name -eq ‘ms1.contoso.com’}
$SecMS = Get-ManagementServer | Where-Object {$_.Name -eq ‘ms2.contoso.com’}

#Loop through list of agents and update primary and failover MS settings
ForEach ($agent in $agents) {
Set-ManagementServer -PrimaryManagementServer $PriMS `
-AgentManagedComputer $agent -FailoverServer $SecMS | Out-Null
}
Managing SNMP Device Failover
In OpsMgr, Simple Network Management Protocol (SNMP)-enabled devices are monitored through an SNMP GET for the SysName property issued from a proxy agent every 2 minutes. If the proxy agent responsible for monitoring the network device goes down, the SNMP devices polled by this agent will not be assigned to a new proxy agent automatically. Because this proxy agent can be simply an agent on a managed computer or from a management server, how you assign new proxy agent settings depends on whether the proxy agent is a managed computer or a management server.
If the proxy agent is a managed computer, the following script changes the proxy agent for the network device of your choice to a new agent-managed computer you designate:
param($rootMS,$proxyAgent, $deviceName)

#connect to mgmt group

Add-PSSnapin Microsoft.EnterpriseManagement.OperationsManager.Client
Set-Location OperationsManagerMonitoring::
New-ManagementGroupConnection -ConnectionString $serverName
Set-Location $ServerName

#Retrieve all our monitored network devices
$netDevices = Get-RemotelyManagedDevice | Where-Object {$_.Name  `
-like $deviceName}

#Retrieve agent that will serve as proxy agent
$proxy = Get-Agent | Where-Object {$_.PrincipalName -like $proxyAgent }

#Sets the proxy of all network devices to the specified proxy server
Set-ProxyAgent -ProxyAgent $proxy -Device $netDevices
Download this script from the book's website, run it from a Windows PowerShell prompt on a computer with the OpsMgr command shell installed, and pass the needed parameters from any Windows PowerShell prompt as shown here:
.snmpproxy.ps1 -RootMS “opsmgr.contoso.com” -ProxyAgent “svr1.contoso.com” `
-DeviceName ‘10.1.1.1’
If the proxy agent you want to assign is a management server or gateway server, the syntax you use to retrieve the proxy agent details must be updated to retrieve the correct computer. The syntax to run the script is the same as the previous script, but the method within the script used to retrieve the proxy agent has been modified to retrieve the designated management server rather than a managed computer.
param($rootMS,$proxyAgent, $deviceName)

#connect to mgmt group
$ServerName=$rootMS
Add-PSSnapin Microsoft.EnterpriseManagement.OperationsManager.Client
Set-Location OperationsManagerMonitoring::
New-ManagementGroupConnection -ConnectionString:$serverName;
Set-Location $ServerName

#Retrieve all our monitored network devices
$netDevices = Get-RemotelyManagedDevice | Where {$_.Name -like $deviceName}

#Retrieve agent that will serve as proxy agent
$mea=“ Microsoft.EnterpriseManagement.Administration”
$crit=New-Object -Type “${mea}.ManagementServerCriteria(“Name = ‘$proxyagent’”)”

#Sets the proxy of all network devices to the specified proxy server
Set-ProxyAgent -ProxyAgent $proxy -Device $netDevices
Caution
When updating primary and failover settings for OpsMgr agents, be absolutely certain the management server and/or gateways specified in the script are in fact reachable from the network segments where agents reside. If you specify a management server that is inaccessible due to firewall or routing restrictions, you can leave agents in an orphaned state. Reversing this condition requires updating settings locally on all affected agents. ![]()
Automating Agent Discovery and Deployment
Though System Center Essentials 2010 (SCE) has a scheduled discovery feature to enable automated daily discovery of new computers on the network, this feature is not available in OpsMgr due to the other enterprise deployment options available. However, if you would like to discover new servers on your network on a scheduled basis, this is entirely possible with Windows PowerShell. In fact, by using LDAP queries to scope the search, you can filter the discovery within Active Directory to ensure agents are deployed only to the desired computers.
Automating discovery and agent deployment for Windows computers in Windows PowerShell involves the following high-level steps:
- Define an LDAP query to scope the computer discovery (using the New-LdapQueryDiscoveryCriteria cmdlet and LDAP query language).
- Start the discovery of the target computer from the specified management server (using Start-Discovery, taking the LDAP query as input).
- Upon successful discovery, perform a push-install of the agent from the specified management server to target computer (using Install-Agent).
The script shown in Listing 16-4 discovers the specified computer (represented by $targetAgent) in the specified domain using the specified management server (represented by $targetMS). Upon successful discovery, the agent binaries are pushed from the management server to the target computer and installed.
Running the script in Listing 16-4 discovers computer webserver1 in the contoso domain using management server mgmtsvr1.contoso.com and deploys the agent using the push deployment method:
.WindowsDiscovery.ps1 -RootMS ‘rms.contoso.com’ -Domain ‘contoso’ `
-TargetMS ‘mgmtsvr1.contoso.com’ -TargetAgent webserverl
LISTING 16-4 WindowsDiscovery.ps1 Script
Param ($rootMS,$Domain,$targetMS,$targetAgent)

#Initialize the OpsMgr Provider
Add-PSSnapin Microsoft.EnterpriseManagement.OperationsManager.Client

# Set the location to the root of the provider namespace.
Set-location OperationsManagerMonitoring::

#create a connection to the Management Group
New-ManagementGroupConnection $rootMS

#change the path
Set-location $rootMS

#configure LDAP query setting
$ldap_query = New-LdapQueryDiscoveryCriteria -Domain $Domain `
- LdapQuery “(sAMAccountType=8053063 69)(name=$targetAgent*)”

#configure discovery setting
$windows_discovery_cfg = New-WindowsDiscoveryConfiguration `
- LdapQuery $ldap_query

# discoveryresults
$discovery_results = Start-Discovery -ManagementServer (Get-ManagementServer | `
where {$_.Name -eq “$targetMS”}) -WindowsDiscoveryConfiguration `
$windows_discovery_cfg

#install agents based on the criteria of your search in the -targetMS parameter
Install-Agent -ManagementServer (Get-ManagementServer | Where-Object `
{$_.Name -eq “$targetMS”}) `
-AgentManagedComputer $discovery_results.CustomMonitoringObjects
This script can be extended to accept a list of computers as input to perform discovery in batch. However, be careful not to perform more than a few computers at a time to avoid overloading your management group.
Verifying Agent Load Balance Across Management Servers
Balancing the agent load across management servers is an important factor in ensuring server utilization is optimized. However, agent load-balancing across management groups is not performed automatically, so periodically checking the agent count across all management servers can shed light on disparities in agent load.
The following example retrieves a count of agents grouped by the primary management server to which they report. Download this script from the book's website, and run the script from any Windows PowerShell prompt on a server with the OpsMgr Windows PowerShell snap-in installed. Before you do, change the value of $rootMS to the name of your RMS.
$rootMS = “nyc-omcm.contoso.com”
#Initialize the OpsMgr Provider
Add-PSSnapin “Microsoft.EnterpriseManagement.OperationsManager.Client”
Set-Location “OperationsManagerMonitoring::”

#set Management Group context to the provided RMS
New-ManagementGroupConnection -ConnectionString $rootMS
Set-Location $rootMS

#Retrieve list of agents
$agent = Get-Agent | Sort-Object -Property Name

#Output a list of management servers and agent count for each
$agent | Group PrimaryManagementServerName -NoElement | Sort Name `
| Select-Object Name, Count | Export-Csv -NoTypelnformation `
-Path c:agents.csv
Exploring Discovered Inventory Data
You can explore the objects discovered by OpsMgr using the Operations console. However, you can also explore the discovered inventory in your OpsMgr deployment using Windows PowerShell and learn a few things about object types (classes), their base classes, and any relationships that cannot be viewed in the graphical user interface (GUI). Exploring discovered inventory via Windows PowerShell will give you insight into management pack internals you cannot gain from the console GUI.
Enumerating Classes and Discovered Instances
You can explore the discovered inventory in your OpsMgr deployment from the command shell. You can retrieve a class or classes with the Get-MonitoringClass cmdlet:
Get-MonitoringClass | Where-Object {$_.Name -eq `
“Microsoft.Windows.Server.Computer”}
To retrieve instances of the class that have already been discovered by OpsMgr, simply pipe the output to Get-MonitoringObject:
Get-MonitoringClass -Name “Microsoft.Windows.Server.Computer” |
Get-MonitoringObject
Much like classes in the .NET world, every class in OpsMgr is derived from a base class and inherits all the properties of the base class. For example, the Windows Server class (Microsoft.Windows.Server.Computer) is derived from the base class Windows Computer (Microsoft.Windows.Server.Computer). The following script enumerates all the classes derived from a specified class using the GetDerivedMonitoringClass() method:
#Replace Microsoft.Windows.Computer with the class of your choice
$Class = ‘Microsoft.Windows.Computer’


$DerivedClasses = (get-monitoringclass | where {$_.Name -eq `
“$Class”}).GetDerivedMonitoringClasses()

   Write-Host “The following are derived classes of $Class ”
   Write-Host “ ”

foreach ($DerivedClass in $DerivedClasses) {
   Write-Host “Class Name:” $DerivedClass.DisplayName “(” $DerivedClass.Name “)”
}
Figure 16-4 displays the output of the sample, enumerating classes of the Microsoft.Windows.Computer (Windows Computer) class.
FIGURE 16-4 Enumeration of derived classes

With a couple of small changes, you can enumerate the derived classes recursively, meaning that the derived classes of derived classes will be enumerated as well, all the way down the class hierarchy. The output will be multiple collections of derived classes, grouped by the base class from which they are derived.
#Replace system.entity with the class of your choice
$Class = ‘Microsoft.Windows.Server.Computer’

Write-Host Report for derived classes of $Class
Write-Host “==================================================================”


$DerivedClasses = (get-monitoringclass | where {$_.Name -eq `
“$Class”}).GetDerivedMonitoringClasses()
foreach ($DerivedClass in $DerivedClasses) {
   Write-Host “ ”
   Write-Host “Derived classes based on ” $DerivedClass.DisplayName “(” `
$DerivedClass.Name “)”
   Write-Host “The following classes are derived from ” `
$DerivedClass.DisplayName “:”
  (get-monitoringclass -Name $DerivedClass ).GetDerivedMonitoringClasses() | `
select DisplayName, Name
}
Figure 16-5 displays the output of the sample, enumerating classes of the Microsoft.Windows.Computer (Windows Computer) class.
FIGURE 16-5 Recursive enumeration of derived classes

Tip
Classes are sometimes referred to as object types or targets, depending on where you look in the OpsMgr UI and product documentation. Just remember that no matter which is used, they all have the same meaning in OpsMgr terms. ![]()
Enumerating Monitored Objects and Relationships
You can use the GetMonitoringRelationshipClasses() method to explore the relationships between classes in Operations Manager. Given a target class, this method returns all the relationships for which the target class is either the source or the target. Again, nothing fancy, but this simple function does provide an easy way to enumerate relationships without opening multiple management packs in the MPViewer utility or the Management Pack (MP) Authoring console.
As with enumeration of derived classes, you can extend this function to enumerate all child classes and their relationships recursively.
function GetRelationships {
  param ($Class)
    (Get-MonitoringClass | -Name $Class).GetMonitoringRelationshipClasses()| `
      Format-List DisplayName,Description
    #call the function specifying target class in quotes

  }
  GetRelationships “Microsoft.SQLServer.DBEngine” | Select-Object DisplayName,Name
Figure 16-6 displays the output of the sample, enumerating classes of the Microsoft.Windows.Computer (Windows Computer) class.
FIGURE 16-6 Enumeration of class relationships

Windows PowerShell and the Command Notification Channel
OpsMgr notification capabilities include a command notification channel that can be used to launch batch files, scripts, and command-line utilities. Though this is one of the less commonly used notification channels, it can be very useful when email notification is not your desired delivery format. This section explores how to use the command channel to extend the off-the-shelf notification functionality in OpsMgr using Windows PowerShell in the command notification channel.
Performing Simple Event and Log File Creation from the Command Channel
For test environments or auditing purposes, you can use Windows PowerShell in the OpsMgr command channel to log alert details of your choosing to a text file — a notification log of sorts. The script in Listing 16-5 logs key details of an OpsMgr alert to a text file when called from a command notification channel. You can download this script from the book's website.
LISTING 16-5 NotificationEventLog.ps1 Script
#Verify log file exists…if not, create it
if(Test-Path -Path c:scriptsmylog.txt -PathType Leaf)
{
    “File c:scriptsmylog.txt already exists.”
}
else
{
  $file = New-Item -ItemType file ‘c:scriptsmylog.txt’

  $info = “----Alert generated at $DateTime----”
  $info += “$AlertName`n$AlertDesc`n$MngdEntity`n$Severity ”
  $info += “----End of alert----”

  $info | Out-File -FilePath $file
}
Implementing this script as part of an OpsMgr command notification channel and subscription requires completing the following configuration tasks:
- Download this script from the book's website and save to a directory on the RMS (c:scripts is used in this example) as PoshLog.psl.
- Configure a command notification channel in the OpsMgr Operations console.
- Configure a notification subscription that utilizes the command notification channel.
Once you have completed step 1, the command notification subscription should be configured similar to the image in Figure 16-7, using the values shown here.
FIGURE 16-7 Command channel configuration for Windows PowerShell

Full path of the command file:
c:windowssystem32windowspowershellv1.0powershell.exe
Command-line parameters:
-Command “& C:ScriptsPoshLog.ps1” `
-DateTime $Data/Context/DataItem/DataItemCreateTimeLocal$ `
-AlertName $Data/Context/DataItem/AlertName$ `
-AlertDesc $Data/Context/DataItem/AlertDescription$ `
-MngdEntity $Data/Context/DataItem/ManagedEntityFullName$ `
-Severity $Data/Context/DataItem/Severity$ `
Startup directory:
C:Scripts
Once you have entered these values and saved your changes, configure a notification subscription for the alert sources, resolution states, severities, and priorities of your choice.
Note
For detailed steps on how to create a notification command channel in OpsMgr, see http://technet.microsoft.com/en-us/library/dd440871.aspx.
For detailed steps on how to configure an OpsMgr notification subscription, see http://technet.microsoft.com/en-us/library/dd440889.aspx. ![]()
To test your work, create an error condition to trigger an alert on one of the monitored computers in your test environment.
Forwarding SNMP Traps with Windows PowerShell
The SNMP trap-forwarding functionality present in Microsoft Operations Manager 2005 (MOM) was not carried forward to OpsMgr 2007. Though this was not a widely used feature, it is one that is definitely missed by more than a few organizations relying on OpsMgr to deliver alert data to other monitoring and reporting systems.
Fortunately, this problem can be resolved using the command notification channel, a command-line trap generator (like trapgen.exe, available at http://www.ncomtech.com/trapgen.html), and Windows PowerShell. The script shown in Listing 16-6 forwards OpsMgr alert details to the SNMP trap receiver. You can download this script from www.wiley.com/go/WindowsPowerShellBible. You will need to update the IP addresses of the RMS and remote trap receiver to which traps should be sent.
LISTING 16-6 TrapForward.ps1 Script
Param($DateTime, $AlertName, $AlertDesc, $MngdEntity, $Severity )

#===================================================================
#Retrieve the monitoring object
#===================================================================
$object = Get-MonitoringObject -Id $Param0

#===================================================================
#Assign XPath replacements to variables (for later trap construction)
#===================================================================

#Target Trap Catcher (Destination for the trap)
$Param0 = “-s 7 -d 192.168.1.50”

#RMS IP Address (Source of the trap)
$Param1 = “-i 192.168.1.20”

#SNMP Community String
$Param2 = “-c public”

#Notification Timestamp
$Param3 = “$DateTime”

#RMS Server Name
$Param4 = “rms.contoso.com”

#Alert Name
$Param6 = “$AlertName”

#Class Name…Full Display Name (ManagedEntity)
$Param7 = “$MngdEntity”

#Alert Description
$Param8 = “$AlertDesc”

#Severity
$Param9 = “$Severity”

#================================================
#Construct the trapgen command line and send trap
#================================================

#The following two lines are actually one single line
$cmdLine = “c:	ools	rapgen.exe $Param1 $Param2 $Param3 `
$Param4 $Param5 $Param6 $Param7 $Param8 $Param9”

#Run TrapGen.exe with parameters created above
Invoke-Expression -Command $cmdLine | Out-Null
Implementing this script as part of an OpsMgr command notification channel and subscription requires completing the following configuration tasks:
- Download this script from the book's website and save to a directory on the RMS (c:scripts is used in this example) as TrapForward.psl. Be sure to update the IP addresses of RMS and remote trap receiver as mentioned previously.
- Copy trapgen.exe to a directory on the RMS (c: ools is used in this example).
- Configure a command notification channel in the OpsMgr Operations console.
- Configure a notification subscription that utilizes the command notification channel, using the following settings:
Full path of the command file:
c:windowssystem32windowspowershellv1.0powershell.exe
Command-line parameters:
-Command “& C:ScriptsTrapForward.ps1” `
-DateTime $Data/Context/DataItem/DataItemCreateTimeLocal$ `
-AlertName $Data/Context/DataItem/AlertName$ `
-AlertDesc $Data/Context/DataItem/AlertDescription$ `
-MngdEntity $Data/Context/DataItem/ManagedEntityFullName$ `
-Severity $Data/Context/DataItem/Severity$ `
Startup directory:
C:Scripts
Once you have entered these values and saved your changes, configure a notification subscription for the alert sources, resolution states, severities, and priorities of your choice.
To test your work, create an error condition to trigger an alert on one of the monitored computers in your test environment.
Overrides
Workflows (rules, monitors, overrides, and so on) in OpsMgr can be modified (tuned) through overrides. The parameters made available for modification by the management pack author (the overridable parameters) can be modified for a specific object (instance), a group of objects, or all instances of the class targeted by the workflow. Over time, the creation of overrides can make determining the source of the settings tedious for OpsMgr administrators. In the most dynamic OpsMgr environments (such as those of service providers and hosters), the need often arises to create overrides programmatically to keep up with new monitored objects being introduced to the environment. Fortunately, the OpsMgr cmdlets make all of this possible.
Retrieving and Converting Overrides into Readable Reporting Format
When troubleshooting unexpected behavior or an unhealthy environment, OpsMgr administrators may want to see which workflows have overrides applied, and the settings of each. You can retrieve the existing overrides for all management packs in an OpsMgr environment by retrieving all management packs and passing the list to the Get-Override cmdlet:
Get-ManagementPack | Get-Override
With a Where-Object clause, you can target the query to overrides for a specific management pack:
Get-ManagementPack -Name ‘Microsoft.SQLServer.2008.Monitoring’ | `
Get-Override
Unfortunately, the Context and ContextInstance of the override (at minimum) are not clear when overrides are retrieved in this way, making it impossible to determine the target object type and instance to which the override was applied.
If you would like to export all overrides from multiple management packs into a single report including all the details of the override (property, target, value), Windows PowerShell requires a couple of extra steps to match a name to the GUIDs presented in the default output. The sample script in Listing 16-7, written by Daniele Muscetta (Microsoft) and enhanced by MVP Pete Zerger, goes beyond the available cmdlets to retrieve the Display Name of the Context and ContextInstance to provide a user-friendly report of the overrides present in an OpsMgr environment.
LISTING 16-7 Export Overrides into an Overrides Report
#define the path you want to export the CSV files to
$exportpath = “c:scriptsexport”

#gets all UNSEALED MAnagement PAcks
$mps = Get-ManagementPack | Where-Object {$_.Sealed -eq $false}

#loops thru them
foreach ($mp in $mps)
{
  $mpname = $mp.Name
  Write-Host “Exporting Overrides info for Management Pack: $mpname”

  #array to hold all overrides for this MP
  $MPRows = @()

  #Gets the actual override objects
  $overrides = $mp | Get-Override

  #loops thru those overrides in order to extract information from them
  foreach ($override in $overrides)
   {
      #Prepares an object to hold the result
      $obj = New-Object System.Management.Automation.PSObject

      #clear up variables from previous cycles.
$overrideName = $null
      $overrideProperty = $null
      $overrideValue = $null
      $overrideContext = $null
      $overrideContextInstance = $null
      $overrideRuleMonitor = $null

      # give proper values to variables for this cycle for output.
      $name = $mp.Name
      $overrideName = $override.Name
      $overrideProperty = $override.Property
      $overrideValue = $override.Value
      trap { $overrideContext = “”; continue } $overrideContext = `
      $override.Context.GetElement().DisplayName
        trap {$overrideContextInstance=“”; continue} $overrideContextInstance `
        = (Get-MonitoringObject -Id $override.ContextInstance).DisplayName

      if ($override.Monitor -ne $null){
          $overrideRuleMonitor = $override.Monitor.GetElement().DisplayName
      } elseif ($override.Discovery -ne $null){
          $overrideRuleMonitor = $override.Discovery.GetElement().DisplayName
      } else {
          $overrideRuleMonitor = $override.Rule.GetElement().DisplayName
      }

      #fills the current object with those properties
      #$obj = $obj | Add-Member -MemberType Property `
- Name overrideName - Value $overrideName - PassThru
      $obj = $obj | Add-Member -MemberType NoteProperty `
- Name overrideProperty - Value $overrideProperty - PassThru
      $obj = $obj | Add-Member -MemberType NoteProperty `
- Name overrideValue - Value $overrideValue - PassThru
      $obj = $obj | Add-Member -MemberType NoteProperty `
- Name overrideContext - Value $overrideContext - PassThru
      $obj = $obj | Add-Member -MemberType NoteProperty `
- Name overrideContextInstance - Value $overrideContextInstance - PassThru
      $obj = $obj | Add-Member -MemberType NoteProperty `
- Name overrideRuleMonitor - Value $overrideRuleMonitor - PassThru
      $obj = $obj | Add-Member -MemberType NoteProperty `
- Name MPName - Value $name - PassThru
      $obj = $obj | Add-Member -MemberType NoteProperty `
- Name overrideName - Value $overrideName - PassThru


      #adds this current override to the array
      $MPRows = $MPRows + $obj
  }

  #Store up the overrides for all packs to a single variable
$MPRpt = $MPRpt + $MPRows

}
  #exports cumulative list of overrides to a single CSV

  $filename = $exportpath + “overrides.csv”
  $MPRpt | Export-CSV -path $filename -NoTypeInformation
Creating Overrides Programmatically
In large and active environments, you may want to create overrides programmatically when a rule is found to be causing large numbers of alerts. The sample script in Listing 16-8 creates an override that sets the Enabled property of the matching rule name assigned to the $rule variable to False (which disables the rule). By specifying an unsealed management pack in the $mp variable, you can save the override to a dedicated overrides management pack rather than to the Default Management Pack.
Download this script from the book's website and run from an Operations Manager command shell prompt.
LISTING 16-8 Rule Override Creation Script
$SourceMP = Get-ManagementPack | Where-Object { $_.Name -match `
‘Microsoft.SQLServer.2008.Monitoring’ }
$mp = Get- ManagementPack | Where-Object {$_.FriendlyName -match ‘SQL 2008 `
Overrides’ }
#This does successfully retrieve the MP.
$rule = Get-Rule -ManagementPack $SourceMP | Where-Object { $_.Name -match `
‘Microsoft.SQLServer.2008.NumberDeadlocksPerSecond’ }
$Target = Get-MonitoringClass | Where-Object { $_.Name -match `
‘Microsoft.SQLServer.2008.DBEngine’ }

$override = New-Object `
Microsoft.EnterpriseManagement.Configuration.Management`
PackRulePropertyOverride($mp,‘DeadlockOverride’)

# Casting some of the generic types needed by the monitor override properties `
using reflection (::op_Implicit())

$Rule = [Microsoft.EnterpriseManagement.Configuration.ManagementPackElement
Reference``1[Microsoft.EnterpriseManagement.Configuration.ManagementPackRu le]]::op_Implicit($Rule);

$override.Rule = $Rule
$Override.Property = ‘Enabled’
$override.Value = ‘false’
$override.Context = $Target
$override.DisplayName = ‘Disable deadlock monitoring for SQL 2008’
$mp.Verify()
$mp.AcceptChanges()
Notifications
You can do some reporting and bulk processing on notification subscriptions with relative ease by using the command shell. With the Get-Notification cmdlet, reporting on notification subscription configuration is possible, and with Enable-Notification and Disable-Notification, you can enable or disable notification subscriptions without launching the Operations console.
Enabling and Disabling Notifications
When maintenance operations are being undertaken for your network infrastructure, you may want to disable the notification subscriptions used to send email notifications of alert conditions to avoid filling your Inbox with non-actionable alerts. To disable all enabled notification subscriptions, use the following code:
Get-NotificationSubscription | Where-Object {$_.Enabled -eq $true} |
Disable-NotificationSubscription
When the event is complete and you are ready re-enable notification, you can do so with the Enable-NotificationSubscription cmdlet. To enable all disabled notification subscriptions, use the following code (which looks very similar to the code used to disable the subscriptions):
Get-NotificationSubscription | Where-Object {$_.Enabled -eq $false} |
Enable-NotificationSubscription
Working with Notification Recipients
With the Get-NotificationSubscription cmdlet, you can specify the recipients on a notification subscription:
Get- NotificationSubscription | Format-List DisplayName, `
@{Label=“Criteria”Expression={$_.Configuration.Criteria}}
Note
You can also use Windows PowerShell to update the recipients in an OpsMgr notification subscription, as shown in the blog post “Operations Manager - Set email address for a notification device” at http://cornasdf.blogspot.com/2009/06/operations-manager-set-email-address.html. ![]()
Monitoring Scripts in Windows PowerShell
OpsMgr uses modules in management packs to define workflows. Originally, with the release of OpsMgr 2007 R2, Microsoft introduced a new module that made using Windows PowerShell much more efficient. The new efficiency comes from the fact that a single Windows PowerShell instance is opened on the agent and is shared by all monitored scripts, rather than a unique instance being launched for each. Since the introduction of this feature, the use of Windows PowerShell for monitoring functions (rather than just administration) in OpsMgr management packs has become commonplace.
You can create custom two-state and three-state monitors for OpsMgr in Windows PowerShell to support a variety of custom monitoring scenarios where no native management pack exists. The sample script in Listing 16-9 verifies availability of a remote FTP site. Replace the username and password with a read-only user account in order to safely implement this script for a live site.
LISTING 16-9 Two-State FTP Site Availability Monitor Script
#Instantiate OpsMgr Scripting API and create a Property Bag
$api = New-Object -ComObject ‘MOM.ScriptAPI’
$bag = $api.CreatePropertyBag()

# Get the object used to communicate with the server.
$Request = [System.Net.WebRequest]::Create(“ftp://ftp.mydomain.com/mydir/”)
$Request.Method = [System.Net.WebRequestMethods+Ftp]::ListDirectoryDetails

# This example assumes the FTP site uses anonymous logon.
# Username/password not real
$Request.Credentials = New-Object System.Net.NetworkCredential “myuser”, `“MyPassword”

$Response = $Request.GetResponse()
$ResponseStream = $Response.GetResponseStream()

# Read and display the text in the file
$Reader = New-Object System.Io.StreamReader $Responsestream
[System.Console]::Writeline($Reader.ReadToEnd())

# Display Status
“Download Complete, status:”
$response.StatusDescription

if ($response.StatusDescription -match ‘226’){
  #Write-Host “We hit a TRUE match”
  $bag.AddValue(“State”,“GOOD”)
  #Submit Property Bag
  $bag
     }
else {
  #If not exists STATE=BAD
  #Write-Host “We hit a False match”
  $bag.AddValue(“State”,“BAD”)

  #Submit Property Bag
  $bag
  }

# Close Reader and Response objects
$Reader.Close()
$Response.Close()
Note
A few management pack authoring tutorials on the Internet demonstrate how to incorporate a Windows PowerShell-based monitoring script into a unit monitor using the OpsMgr Management Pack Authoring Console. The two most comprehensive are shown here.
For detailed steps on how to implement a two-state unit monitor for OpsMgr containing a Windows PowerShell script, see “How to create a monitor based on a Windows PowerShell script” on the Microsoft TechNet website at http://technet.microsoft.com/en-us/library/ff381420.aspx.
OpsMgr MVP Stefan Koell wrote a four-part series on how to implement a two-state unit monitor in Windows PowerShellat www.systemcentercentral.com/BlogDetails/tabid/143/IndexId/50085/Default.aspx. ![]()
Sample OpsMgr Scripts and Other Community Resources
A handful of sites on the Internet have sizable collections of Windows PowerShell scripts for OpsMgr, as well as sources of free assistance as you write and customize scripts for your own environment.
Where to Find and Share Samples on the Web
By using the examples of experienced PowerShell scripters as a starting point, you can reuse and customize existing scripts to suit your specific need. A couple of great sources of Windows PowerShell scripts for OpsMgr are available on the Internet.
The first is the community website System Center Central (www.systemcentercentral.com). One of the community members maintains a list of all the OpsMgr-related Windows PowerShell scripts he can find on his “Master collection of PowerShell scripts” page at www.systemcentercentral.com/BlogDetails/tabid/143/IndexID/60930/Default.aspx.
You can also find a number of scripts directly from the OpsMgr Product Team at Microsoft, but these are spread out in a couple of different places. Good starting points include the following TechNet blog sites:
- Boris Yanushpolsky's blog at http://blogs.msdn.com/b/boris_yanushpolsky/
- Jonathan Almquist's blog at http://blogs.technet.com/b/jonathanalmquist/
Finally, the community code repository Poshcode.org has a few scripts under the “SCOM” and “OpsMgr” categories at www.poshcode.org.
Good sources for Windows PowerShell scripts are popping up all the time, so keep an eye out for new sources on OpsMgr-related blogs and Twitter.
Where to Find Free Support on Authoring Windows PowerShell Scripts for OpsMgr
Sometimes, sample scripts just are not enough and you need an expert. When you need a helping hand, a number of great support forums exist where you can get free help with your script authoring efforts. The most active locations for discussions specific to OpsMgr 2007 R2 are shown here.
The Extensibility forum on the OpsMgr TechNet Forums is well-tended by OpsMgr scripting experts from Microsoft and the community. You can find it at http://social.technet.microsoft.com/Forums/en-US/operationsmanagerextensibility/threads.
You can always find help from the PowerShell TechNet Forums, which is perhaps the most active support forum in the world for Windows PowerShell assistance. You can findit at http://social.technet.microsoft.com/Forums/en-US/winserverpowershell/threads. Be mindful that these scripting experts may not be OpsMgr experts, so be patient when posting here!
Finally, System Center Central (www.systemcentercentral.com/tabid/60/tag/Forums+Operations_Manager/Default.aspx) is a community site well-tended by OpsMgr specialists with advanced Windows PowerShell scripting skills, so you can generally get ample assistance there as well.
Please be mindful of forum etiquette when posting to these sources. Participants are generally supporting the community for free on a best-effort basis, so response time, verbosity, and accuracy of the answers you receive may vary.
Summary
In this chapter, you explored the available OpsMgr cmdlets to automate recurring and bulk administrative tasks in OpsMgr 2007 R2.
You learned how to report on the top alerts in your OpsMgr deployment. You also explored how to parse and update alerts in bulk, with due attention to performance optimization in your Windows PowerShell scripts.
You explored the options for automating maintenance mode in OpsMgr, including maintenance mode for agents, maintenance mode for groups, and even maintenance mode remotely from agent-managed computers.
You learned how to fully automate the discovery of Windows computers and then automate deployment of the OpsMgr agent to discovered computers. You also investigated the options for determining the load distribution of agents in your OpsMgr environment, as well as how to redistribute the load of Windows agents and monitored network devices across multiple management servers.
You worked with Windows PowerShell scripts to explore discovered inventory in your OpsMgr environments to provide greater visibility into the monitored objects and how these objects are related. You then explored how to report on the overrides present in your OpsMgr deployment, as well as how to automate the creation of new overrides using Windows PowerShell.
Finally, you learned how to write monitoring scripts for OpsMgr in Windows PowerShell and where to go for sample scripts and online support when you need a helping hand.
Next, you learn to leverage Windows PowerShell in your Microsoft Deployment Toolkit 2010 (MDT) task sequences to enhance your deployment capabilities.