
Chapter 19
Building Presentations with Keynote
In This Chapter
![]() Creating a new presentation
Creating a new presentation
![]() Adding slides
Adding slides
![]() Using selection boxes
Using selection boxes
![]() Entering and editing text
Entering and editing text
![]() Formatting text
Formatting text
![]() Adding presenter’s notes
Adding presenter’s notes
![]() Inserting media and shapes
Inserting media and shapes
![]() Running a slideshow
Running a slideshow
![]() Printing slides and notes
Printing slides and notes
It seems like only yesterday that I was giving business presentations with a clunky overhead projector and black-and-white acetate transparencies. Fancy color gradients and animation were unheard of, and the only sound my presentations made was the droning of the projector’s fan. I might as well have been using tree bark and chalk.
Thank goodness those “cave painting” days are gone forever because cutting-edge presentation software like Keynote makes slide creation easy and — believe it or not — fun! This is the application that Steve Jobs once used for his Macworld keynotes every year, and there’s so much visual candy available that you’ll never need to shout to wake your audience again.
In this chapter, I first demonstrate how simple it is to build a stunning Keynote presentation. Then you can see how to start and control your slide display from your keyboard (or even your iPhone, iPad, or iPod touch). And don’t forget that you can print your slides and notes so your audience can keep a copy of your brilliant work.
Creating a New Keynote Project
As do the other applications in the iWork suite, Keynote begins the document creation process with a Theme Chooser window. To create a new presentation project, follow these steps:
- Click the Launchpad icon on the Dock.
- Click the Keynote icon (which looks like a speaker’s lectern).
- Click the New Document button in the lower-left corner of the Open dialog.
The Theme Chooser window shown in Figure 19-1 appears. (I have to say that these are probably the most stunning visual building blocks I’ve ever seen in a presentation application.)
- Choose the aspect ratio, using the Standard or Wide buttons at the top of the window.
Although you don’t necessarily need to select an exact match for the screen resolution of your iMac, it’s a good idea to select the closest value to the maximum resolution of your projector. (If someone else is providing the projector, the Standard size is the more compatible choice.) If you’ll present on a typical high-resolution computer monitor, widescreen will provide a better display.
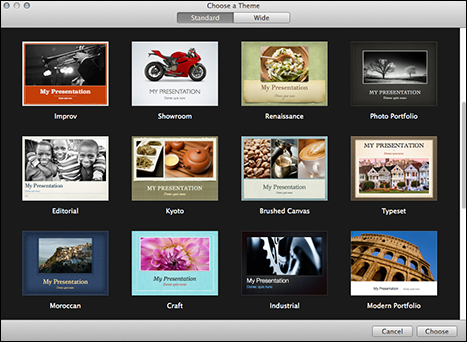
Figure 19-1: Select a template from the Theme Chooser window.
- Click the theme thumbnail that most closely matches your needs.
- Click the Choose button to open a new document that uses the theme you selected.
Opening a Keynote Presentation
If an existing Keynote presentation file is visible in a Finder window, you can double-click the document icon to open the project. If Keynote is already running, however, follow these steps to load a project from within the application:
- Press
 +O to display the Open dialog.
 - Click the desired drive in the Devices list at the left of the dialog; then click folders and subfolders until you’ve located the Keynote project. If the project is stored in your iCloud folder, click the iCloud button at the top left of the dialog and then double-click the desired project thumbnail.
If the project is stored on your hard drive, the All My Files location can quickly display all your documents, or you can use the Search box at the top of the Open dialog to locate the document by name or by some of the text it contains.
- Double-click the filename to load it.
 If you want to open a Keynote document that you’ve edited in the recent past, things get even easier! Just choose File⇒Open Recent, and you can open the document with a single click from the submenu that appears.
Saving Your Presentation
Because Keynote provides full support for the OS X Auto-Save feature, saving your work often isn’t as critical as it used to be. To safeguard your work in a world of power failures, though, follow these steps:
- Press +S.
If you’re saving a document that hasn’t yet been saved, the familiar Save As sheet appears.
- Type a filename for your new document.
- From the Where pop-up menu, choose a location to save the document.
By default, Keynote saves the project directly to your iCloud folder (iCloud appears in the Where pop-up menu), making it available to other Macs and iOS devices using the same Apple ID. To select a location not available from the Where pop-up menu, click the button with the down-arrow symbol to expand the sheet. You can also create a new folder from the expanded sheet.
- Click Save.
 You can create a version of a Keynote presentation by choosing File⇒Save. To revert the current presentation to an older version, choose File⇒Revert To. Keynote gives you the option of reverting to the last saved version, or you can click Browse All Versions to browse multiple versions of the presentation and revert to any saved version.
Putting Keynote to Work
Ready for the 5-cent tour of the Keynote window? Launch the application and create or load a project, and you’ll see the tourist attractions shown in Figure 19-2:
- Slides list: Use this thumbnail list of all the slides in your project to help you navigate quickly. Click a thumbnail to switch instantly to that slide.
The Slides list can also display your project in outline format, allowing you to check all your discussion points. (This is a great way to ferret out any “holes” in your presentation’s flow.) While in outline mode, you can still jump directly to any slide by clicking the slide’s title in the outline. To display the outline, choose View⇒Outline. You can switch back to the default Navigator Slides list by choosing View⇒Navigator.
- Layout pane: Your slide appears in its entirety in this pane. You can add elements to and edit the content of the slide from the Layout pane.
- Toolbar: As does the toolbar in Pages and Numbers, the Keynote toolbar makes it easy to find the most common controls you’ll use while designing and editing your slides. Clicking an icon on the toolbar performs an action, just as selecting a menu item does.
- Presenter Notes pane: If you decide to add notes to one or more slides (either for your own use or to print as additional information for your audience), click the View icon on the toolbar and select Show Presenter Notes (or choose View⇒Show Presenter Notes) to open the Notes pane. This text box appears under the Layout pane.
- Format Drawer: Keynote displays this pane on the right side of the window when you click the Format button, allowing you to format selected text and images on the fly.
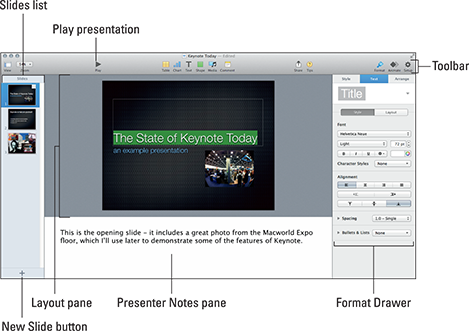
Figure 19-2: The Keynote window is dominated by the Layout pane.
Adding Slides
Keynote creates a single Title slide when you first create a project. However, not many presentations are complete with just a single slide! To add more slides to your project, use one of these methods:
- Click the New Slide button at the bottom of the Slides list (which bears a plus sign).
- Choose New Slide from the Slide menu.
- Press +Shift+N.
- Right-click an existing slide in the Slides list and choose New Slide from the menu that appears.
Keynote adds the new slide to your Slides list and automatically switches to the new slide in the Layout pane.
Need a slide that’s very similar to an existing slide you’ve already designed? Right-click the existing slide and choose Duplicate to create a new slide just like it. (Consider it cloning without the science.)
To move slides to different positions in the Slides list (that is, change the order in your Keynote presentation), drag each slide thumbnail to the desired spot in the list.
Working with Text and Graphics Boxes
All the text and graphics placeholders on your first Title slide appear within boxes. Keynote uses these boxes to manipulate text and graphics. You can resize a box (and its contents) by clicking the box and dragging one of the handles that appear around the edges of the box. (Your cursor will change into a double-sided arrow when you’re “in the zone.”) A side selection handle drags only its edge of the frame, whereas corner selection handles resize both adjoining edges of the selection frame.
To keep the proportions of a box constrained, hold down Shift while dragging its corner handles.
Boxes make it easy to move text and graphics together (as a single unit) to another location within the Layout pane. Click in the center of the box and drag the box to the desired spot; Keynote displays alignment lines to help you align the box with other elements around it (or with regular divisions of the slide, like horizontal center). As you can see in Figure 19-3, I’m moving a box on the slide to a new location, and Keynote has supplied an alignment line to help me place it correctly.
To select a box, click it once. To select text or graphics within a box (see the following section), double-click the box.

Figure 19-3: Alignment lines are provided by Keynote as you move boxes.
When you’re resizing a photo in a box, hold down the Shift key while you drag the frame. This will tell Keynote to preserve the aspect ratio of the image so that the vertical and horizontal proportions remain fixed. You can also flip images horizontally or vertically from the Arrange menu.
To delete an image, just click it to select it and press the Delete key.
Adding and Editing Slide Text
As with Pages, which also uses boxes for text layout, you can add or edit text in Keynote with ease. For example, say you have a box with the placeholder text Double-click to edit. Just double-click in that box, and the placeholder text disappears, leaving the field ready to accept new text. Any new text you type appears at the blinking cursor within the box.
You can easily add a new text box at any time. Just click the Text button in the Keynote toolbar and click one of the sample styles that appear. Your new text box appears in the middle of the slide.
To edit existing text in your Keynote document, click — using the bar-shaped cursor to select just the right spot in the text — and drag the insertion cursor across the characters to highlight them. Type the replacement text, and Keynote obligingly replaces the old text with the new text you type.
To delete text, click and drag across the characters to highlight them; then press Delete. You can also delete an entire box and all its contents: Right-click the offending box and choose Delete from the menu that appears.
When the contents of a box are just right and you’re finished entering or editing text, click anywhere outside the box to hide it from view. You can always click the text again to display the box later.
Formatting Slide Text for the Perfect Look
Keynote doesn’t restrict you to the default fonts for the theme you chose. It’s easy to format the text in your slides: a different font family, font color, text alignment, and text attributes (such as bolding and italicizing) on the fly.
Select the desired text by double-clicking a box and then dragging the text cursor to highlight the characters. Now apply your formatting using one of these two methods:
- The Format Drawer: The font controls in the Format Drawer work in one of two ways: Either click a font control to display a pop-up menu or click a button to immediately perform an action. Opening the Font Size pop-up menu, for example, displays a range of sizes for the selected text. With a single click of the B (bold) button, add the bold attribute to the highlighted characters. To create bullets and lists, click the Text tab at the top of the Format Drawer.
- The Format menu: The controls on the Keynote Format menu generally mirror those in the Format Drawer. To change the alignment from the Format menu, click Format and hover the cursor over the Text menu item. To change text attributes, click Format and hover your mouse over the Font menu.
Using Presenter’s Notes in Your Project
As I mention earlier, you can type presenter’s text notes in the Notes pane. I use them for displaying related topic points while presenting my slideshow. However, you can also print the notes for a project along with the slides, so presenter’s notes are also great for including reminders and To Do points for your audience in handouts.
To type your notes, just click within the Notes pane; if that pane is hidden, choose View⇒Show Presenter Notes, or click the View button at the far left of the Keynote toolbar and choose Show Presenter Notes. When you’re done adding notes, click in the Slides list or the Layout pane to return to editing mode.
To display your notes while practicing, use the Keynote Rehearsal feature. Click the Play menu at the top of the Keynote window, choose Rehearse Slideshow, click the Tools icon at the top right, and select the Presenter Notes check box to enable it. Now you can scroll through the notes while the slideshow runs! (More on slideshows in a second.)
Every Good Presentation Needs Media
Adding audio, photos, and movies to a slide is drag-and-drop easy in Keynote! Simply drag an image, an audio, or a movie file from a Finder window and place it at the spot you want within your document.
You can also use the Media Browser. To do so, click the Media button on the toolbar and then click the Photos, Music, or Movies tab to select the desired type. Keynote displays the contents of your various media collections (such as your iPhoto and iTunes libraries). When you find the file you want to add, drag it to the spot you want in the document. Figure 19-4 illustrates the Media Browser in action.
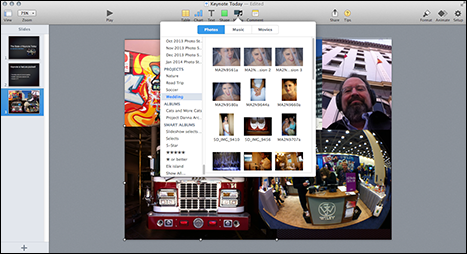
Figure 19-4: It’s not just photos. You can add audio and movie clips to a slide, too!
Adding a Background Shape
Text often stands out on a slide when it sits on top of a background shape. To add a shape (such as a rectangle or circle) as a background for your text, follow these steps:
- Click the insertion cursor in the location you want.
- Click the Shape button on the Keynote toolbar and choose a shape.
The shape appears in your document.
- Click the center of the shape and drag it to a new spot.
As with image boxes, you can resize or move shapes. Earlier in this chapter, read about how to do just that.
- When the shape is properly positioned and sized, select it and choose Arrange⇒Send to Back.
You want to “send the shape to the back” so that any text you enter sits in front of the shape — not hidden behind it.
Of course, you’re not limited to creating shapes and graphics within Keynote; consider using applications like Adobe Photoshop or Illustrator to create graphics that you can import into your slides! As I mention earlier, you can easily drag and drop your new graphic into a slide from a Finder window.
Creating Your Keynote Slideshow
The heart of a Keynote presentation is the slideshow that you build from the slides you’ve created. A Keynote slideshow is typically presented as a full-screen presentation, with slides appearing in linear order as they are sorted in the Slides list.
You run a Keynote slideshow simply by clicking the Play button on the toolbar or by choosing Play⇒Play Slideshow from the menu. You can advance to the next slide by clicking, or by pressing the right bracket key, which looks like this: ].
Of course, other controls are available besides just the ones that advance to the next slide! Table 19-1 illustrates the key shortcuts you’ll use most often during a slideshow.
Table 19-1 Keynote Slideshow Shortcut Keys
|
Key |
Action |
|
] (right bracket) |
Next slide |
|
[ (left bracket) |
Previous slide |
|
Home |
Jump to first slide |
|
End |
Jump to last slide |
|
C |
Show or hide the pointer |
|
(number) |
Jump to the corresponding slide in the Slides list |
|
U |
Scroll notes up |
|
D |
Scroll notes down |
|
N |
Show current slide number |
|
H |
Hide slideshow and display last application used (the presentation appears as a minimized icon on the Dock) |
|
B |
Pause slideshow and display a black screen (press any key to resume the slideshow) |
|
Esc |
Quit |
Keynote offers a number of settings that you can tweak to fine-tune your slideshow. To display these settings, choose Keynote⇒Preferences and click the Slideshow button in the Preferences window.
If you have an iPhone, iPad, or iPod touch handy and you’ve installed the iOS version of Keynote on your device, display the Preferences window and click the Remote tab to link your device to your iMac and Keynote. Now you can use your handheld device as a remote and use it during your slideshow!
Printing Your Slides and Notes
Okay, I’ll be honest: I don’t always print handouts for every presentation I give. However, if you’re presenting a lengthy slideshow with plenty of information that you’d like your audience to remember or refer to later, nothing beats handouts that include scaled-down images of your slides (and, optionally, your presenter’s notes).
You’re not limited to just paper, though! You can also use Keynote to create an electronic PDF (portable document format) file instead of a printed handout, which your audience members can download from your website. Or, if you’re an educator with access to an interactive whiteboard (such as a SMART Board), you can use this new technology with Keynote.
To print your slides and notes, follow these steps:
- Within Keynote, choose File⇒Print or press +P.
Keynote displays the Print sheet that you see in Figure 19-5. (Note that some printer-specific features may be different on your screen.)
- Click the desired format; each format displays a different set of Layout options.
- Slide: Print each slide on a separate page at full size. You can optionally choose to print the presenter notes for each slide as well.
- Grid: Print multiple slides on a page at a reduced size. From the Slides per Page pop-up menu, specify the number of slides that Keynote should print on each page.
- Handout: Print a handout with multiple slides per page (and, optionally, with presenter’s notes). Again, you can choose how many slides will appear on each page.
- Outline: Print the contents of your Slides list in Outline view.
- Select the pages to print.
- To print the entire document, select the All radio button.
- To print a range of selected slides, select the From radio button and then enter the starting and ending pages.
- Select or deselect additional options from the Options section.
- Click the Print button to send the job to your printer.
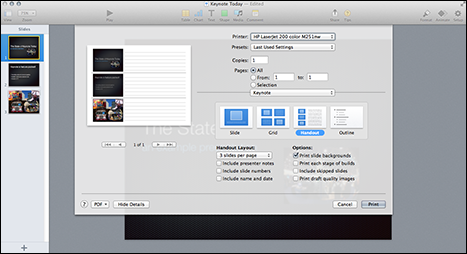
Figure 19-5: Keynote offers a wide range of printing options for your slides and notes.
You can also send a copy of your finished presentation as an attachment within Mail or Messages — or, if the presentation is saved to your iCloud folder, you can provide others with a web link through Twitter or Facebook. I invite you to click the Share button on the toolbar to explore your sharing options. Note that sharing a link for viewing a presentation is different from sending an actual copy of the Keynote document. For example, if your recipient will need to edit your presentation, you should send a copy rather than a link.