Chapter 21. Introducing multitasking
iOS 4 is muscled up with tons of exciting new features. We’ve covered the Game Kit framework, local notifications, the Event Kit framework, GCD, and iAd in previous chapters. In this chapter, it’s time to introduce multitasking! Multitasking is a feature that has been requested on iOS since its first release. But there’s limited screen size and battery life on the iPhone or iPad, so generally only one application is visible and active at a time. In iOS 4 and later, with multitasking introduced, applications can continue running in the background.
What’s multitasking? It’s one of the important and exciting API features in iOS 4. When the user quits an application, instead of terminating, the application will enter the background state; you can use this feature to support fast app switching and running tasks in the background.
In this chapter, we’ll first cover the multitasking basics, the application’s lifecycle on iOS 4, followed by the background state and best practices based on an app’s lifecycle transitions. Then we’ll talk about how to adopt fast app switching on the iPhone and iPad and how to update the application interface with the correct user data when the application gets restarted from the background state. Finally, we’ll use a demo app to explain how to finish a task in the background with an expiration handler. First, let’s explore some basics on multitasking.
21.1. Overview of multitasking
Multitasking is the ability to let the device run more than one application at once. For example, you may want to listen to music using the Pandora application while performing other tasks such as checking your email.
In the past, Apple had a few arguments against multitasking on iOS; the primary ones were that it slows down the device, degrades the battery life, and makes for an overall poor user experience. If you allow the user to run too many applications at once, the device will eventually run out of memory and start killing those applications. Running many applications at the same time quickly drains battery life. Because running an app requires processing power, the constant strain on the processor will soon result in a drained battery.
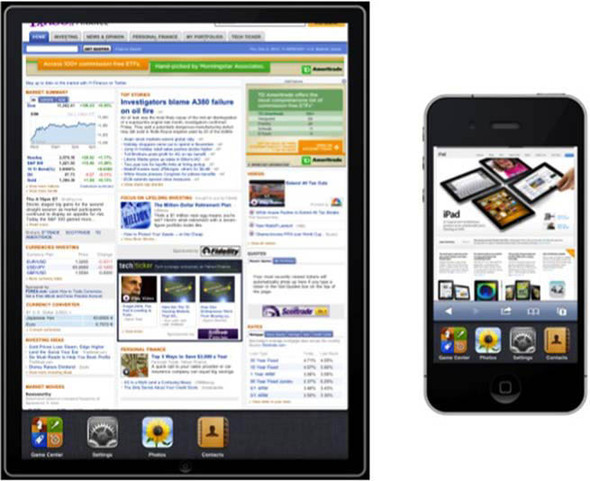
In iOS 4, Apple has implemented the ability for programs to run in the background. Figure 21.1 shows the multitasking UI on the iPhone and iPad. This isn’t true multitasking per se, but it’s getting closer and addresses most of users’ other gripes.
Figure 21.1. Multitasking UI on the iPad and iPhone
Applications that need to execute operations in the background are restricted to certain tasks, including the following:
- Requesting a set amount of time to finish a task
- Implementing specific services allowed by Apple, including location tracking, audio playback, and voice over IP services
By default, all applications that are compiled for iOS 4 will support multitasking. But after the user taps the Home button, the app will go into the background suspended state unless the background running mode is added.
Because most applications don’t require constant usage, the system automatically puts them into a suspended state when the user exits them. When the user resumes the application, it should load into the last state it was in when the user exited it. This is more of a fast application-switching model. A great comparison is that when you’re reading a book, you may want to take a break and get a cup of coffee, so you put a bookmark at the page where you stopped. When you return, you can continue from the exact same page where you left off.
Next we’ll look at the application lifecycle and how to enable multitasking on iOS 4.
21.1.1. Application lifecycle
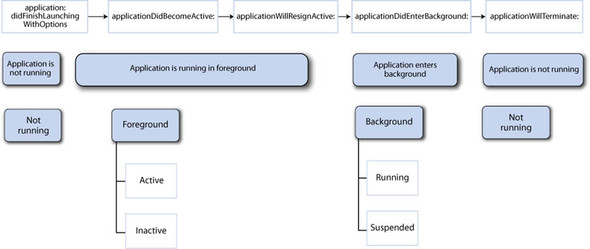
With iOS multitasking support, the application lifecycle expands to not running, running in the foreground, and running in the background, as shown in figure 21.2. When the application launches, it will move from the not-running state to the foreground, stay inactive briefly, and become active. That’s when the MainWindow.xib file gets loaded into the application. While the application is running in the foreground state, an SMS message or an incoming call could pop out and interrupt the current application, which therefore would become inactive.
Figure 21.2. Application’s lifecycle in iOS 4
When the user taps the Home button, the application will move from the foreground state to the background. The application may continue running if the background mode is supported on the device (iPhone 3G and iPod Touch 2nd Gen don’t support the background state at all), such as background audio. When a user is listening to their iPod and taps the Home button, the application still plays music in the background state.
Most applications will stay in the suspended state after moving to background mode and won’t execute code in the suspended state. When the user switches back to this application after some time, it will automatically return from the background to the foreground state, where it was left previously.
Sometimes, when the system is running low on memory, applications with heavy memory usage in the background are terminated in order to free up more memory for the foreground application. Another possibility is that the user will manually terminate the application from the multitasking UI stack.
In iOS 4, it’s important to understand the application’s lifecycle in order to design a responsive and smooth-transitioning application. For example, when you’re designing a game application, you should pause the game when there’s an incoming call and save important data before the application quits or moves to the background state. How can you monitor the application’s lifecycle during runtime?
Two solutions are available on iOS 4. One solution is to respond to each major callback method in the application delegate. Another way is to observe the notifications from the notification center. Table 21.1 has a complete list of application delegate methods and notifications.
Table 21.1. A complete list of application delegate callbacks and notifications
|
Method |
Notification |
Description |
|---|---|---|
| application:didFinishLaunchingWithOptions: | UIApplicationDidFinishLaunchingNotification | The application launches. |
| application-DidBecomeActive: | UIApplication-DidBecomeActiveNotification | The application runs actively in the foreground. |
| application-WillResignActive: | UIApplication-WillResignActiveNotification | During interruption, the application becomes inactive. |
| application-DidEnterBackground: | UIApplication-DidEnterBackgroundNotification | The application enters the background state. |
| application-WillEnterForeground: | UIApplication-WillEnterForegroundNotification | The application resumes from the background. |
| application-WillTerminate: | UIApplication-WillTerminateNotification | The application is terminated and not running. |
Inside the application’s delegate, you can monitor the application’s lifecycle state and transitions; at the time of writing, six major callbacks are available in the application delegate:
- application:didFinishLaunchingWithOptions—This is the most important method and has been used in the entire book. This method can be used to initialize the application and prepare it for running in the foreground state, such as loading the Main Window nib file.
- applicationDidEnterBackground—This is the key callback method to prepare the application for the background state. Use this method to release shared resources, save user data, invalidate timers, and store enough application state information to restore your application to its current state. If the application supports background execution, this method will be called instead of applicationWillTerminate when the user taps the Home button.
- applicationWillEnterForeground—This method is sent when the application resumes from the background state and will enter the foreground. You can use this method to restore the application and undo the changes before the application enters the background. For example, the application can load the resources and restore the data.
- applicationDidBecomeActive—This method can be used to customize application behavior when the application becomes active in the foreground. For example, it will be called when the interruption is gone or when the application continues transition from inactive state to active state after the method applicationWillEnterForeground gets called. Use this task to restart the tasks paused previously. For example, you should continue the game, restart the timer, and update the user interface.
- applicationWillResignActive—This method gets called when the application is about to move from active to inactive state. This can occur for certain types of temporary interruptions (such as an incoming phone call or SMS message) or when the user quits the application and it’s about to start the transition to the background state. You can use this method to pause ongoing tasks, disable timers, and tune down OpenGL ES usage.
- applicationWillTerminate—This method is called when the application is about to be terminated. The application will transit back to the not-running state.
You can use the notifications in table 21.1 to monitor the application’s transition states with the notification center. For example, you can use the following code snippet to register a notification for UIApplicationWillResignActiveNotification inside the view controllers:
NSNotificationCenter *notifCenter = [NSNotificationCenter defaultCenter];
[notifCenter addObserver:self selector:@selector(resignActive:)
name:UIApplicationWillResignActiveNotification object:nil];
As you can tell, in order to smoothly support multitasking in the application, you need to consider saving the application’s data properly before the application moves to the background and reload the necessary data before the application launches from the background mode.
You may have more questions related to the background state at this point, which is important to understand for multitasking in iOS 4. We’ll take a closer look at the application’s background state in the following section.
21.1.2. How to enable multitasking
The applications built under iOS 4 are automatically enabled for multitasking. But in order to support certain constantly running types of multitasking, the background mode must be declared in advance. To do so, include the UIBackgroundModes key in the application’s Info.plist file. Table 21.2 contains a detailed list for the multitasking mode.
Table 21.2. Multitasking mode list in Info.plist
|
UIBackgroundModes |
Descriptions |
|---|---|
| Audio | The application plays audible content to the user while in the background, such as the music application Pandora or a turn-by-turn audio navigation application. |
| Location | The application keeps the user informed about current location updates, even while running in the background. This mode is designed for a turn-by-turn navigation application. Note that a significant location change or region-monitoring location service doesn’t have to register for the location mode because the specific location update isn’t required. |
| VoIP | The application provides the ability for the user to make phone calls using an internet connection. |
The value for the UIBackgroundModes key is an array that may contain one or more strings. For example, the turn-by-turn navigation application will need both location service and audio running in the background mode, so you must add both audio and location to the Info.plist. We’ll touch on how to monitor significant location changes in the background in section 21.5 and continue with advanced background audio in the next chapter.
21.2. Background state
Background state is important for iOS 4. In this section, we’ll look at the definition of the background state under iOS 4 and explore the application lifecycle with the background state.
21.2.1. Understanding the background state
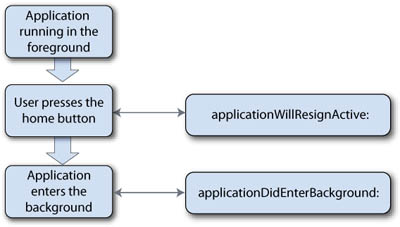
When the application is about to enter the background state, a couple of application delegate methods will be called. The process flow chart in figure 21.3 demonstrates the process. When user taps the Home button, the application will move from the foreground to the background. The application delegate method application-DidEnterBackground: gets called.
Figure 21.3. Application moves from the foreground to the background.
The application delegate method applicationDidEnterBackground: has only about 6 seconds to finish the task; then it may enter the suspended state. You want to make sure your application performs some best practices before the application transitions to the background:
- Save user data—Save important user data in a few seconds or incrementally, such as saving data at each stage in the middle of the game.
- Reduce memory usage—The system will terminate apps in the background when the memory is exhausted in order to free up memory for the foreground application.
- Stop GPU usage—OpenGL framework–related objects must be released or the application will be terminated.
- Finish long-running tasks—We’ll cover this in detail in section 21.4.
After the application continues running in the background for about 6 seconds, the system will move the application to the suspended state. The system takes a snapshot of the application’s current image, and the application can’t perform any task or execute code after it’s suspended.
How does the application resume in the foreground? When the user launches an application that’s in the background state, the application delegate sends a message to the applicationWillEnterForeground: method in order to restart any services or tasks. Once the application resumes running in the foreground, a second message, applicationDidBecomeActive:, will be sent, as shown in figure 21.4.
Figure 21.4. The application restarts from the background and resumes in the foreground.
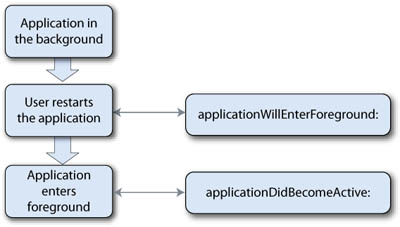
In the stage when the application moves from the background to the foreground, you should undo the changes made before the application entered the background. For example, OpenGL framework objects need to be re-created. You may also want to respond to screen-rotation events and update the user interface.
21.2.2. Opting out of the background state
The background state provides many possibilities for applications on iOS. But if for some reason you wish to turn off the background state, you can add the UIApplicationExitsOnSuspend key to your application’s Info.plist file and set its value to YES. If your application does opt out of the background state, the application will directly move to the not-running state once the user taps the Home button, which means the applicationWillTerminate: method of the application delegate is called instead.
In this section, you learned the basics of multitasking on iOS 4, saw how to monitor the application’s state change in the lifecycle, and thoroughly explored the background state. Next, you’ll practice writing real code for multitasking.
21.3. Using fast app switching
As we mentioned earlier, fast app switching offers a great user experience. When users want to switch between two apps, they double-tap the Home button to enable the multitasking UI, as shown previously in figure 21.1. All applications built on iOS 4 will support fast app switching automatically—no additional setup is required. In this section, you’ll build an application that will handle fast app switching smoothly.
21.3.1. Building a simple application for fast app switching
Start Xcode, and create a new project with the iOS template Navigation-Based Application. Name the application Quick. In this application, you want to keep track of each time the application launches from the not-running state or resumes from the background state. All the data collected will be listed on the table view.
In order to collect user data every time the application starts, you’ll use the application delegates application:didFinishLaunchingWithOptions: and application-WillEnterForeground: to save the launching time. Single-click the QuickAppDelegate.m file, and add the changes from the following listing.
Listing 21.1. Implement QuickAppDelegate to collect user data when app launches
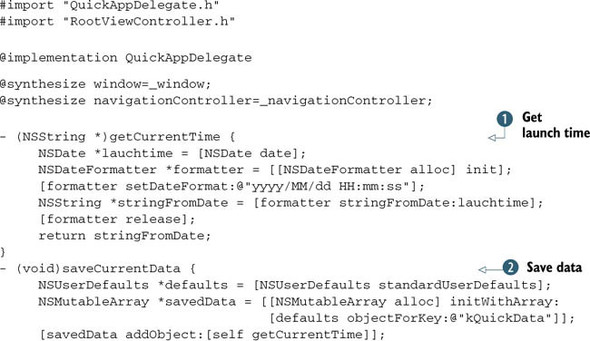
In the application delegate, you want to get the system time when the application starts. You define the method getCurrentTime ![]() to get the system time using NSDate and convert the time to string format including the date and time as “yyyy/MM/dd HH:mm:ss”; then you define another method,
saveCurrentData
to get the system time using NSDate and convert the time to string format including the date and time as “yyyy/MM/dd HH:mm:ss”; then you define another method,
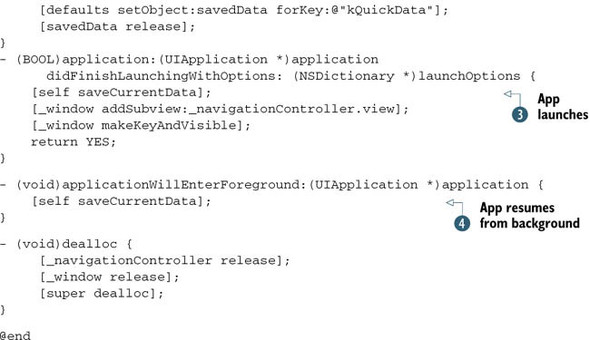
saveCurrentData ![]() , to save the launch time with NSUserDefaults, which you learned how to do in chapter 8. There are two callback methods in the application delegate related to the application launch time. First is application:didFinishLaunchingWithOptions:
, to save the launch time with NSUserDefaults, which you learned how to do in chapter 8. There are two callback methods in the application delegate related to the application launch time. First is application:didFinishLaunchingWithOptions:![]() . It occurs when the application initially launches from the not-running state, so you want to save the new launch data here. The second method, in applicationWillEnterForeground:
. It occurs when the application initially launches from the not-running state, so you want to save the new launch data here. The second method, in applicationWillEnterForeground: ![]() , occurs when the application relaunches from the background to continue running in the foreground state, so you need to save
this new user data as well.
, occurs when the application relaunches from the background to continue running in the foreground state, so you need to save
this new user data as well.
You’ve now prepared the application delegate for collecting the launch time data; in the next section you’ll make sure the table view can display the user data correctly.
21.3.2. Updating the user interface in the view controller
Single-click the RootViewController.h file, and add in the changes from the following code snippet:
#import <UIKit/UIKit.h>

@interface RootViewController : UITableViewController {
     NSArray *events;
}
@property (nonatomic, retain) NSArray *events;
@end
You’ll use the array events as the table view’s data source. Move to the RootViewController.m file. You want to make sure that each time the application launches, the table view will reload the data that you’ve saved inside the application delegate, as shown in the following listing.
Listing 21.2. Implementing the RootViewController.m file to update the user interface
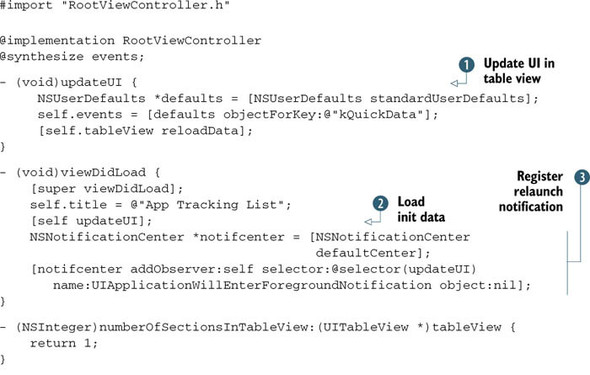
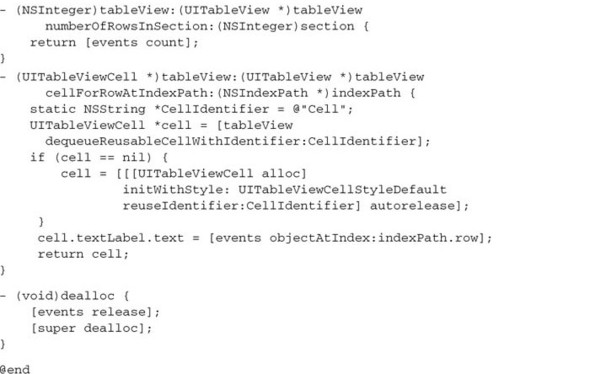
In listing 21.2 you use the array events as the table view’s data source. Each row will display the launching date you’ve saved in the application
delegate methods. First, you create a new method updateUI ![]() to reload the data from NSUserDefaults and update the table view’s data and the table view’s user interface. When the table view controller is first created, you
need to load the data with the method updateUI
to reload the data from NSUserDefaults and update the table view’s data and the table view’s user interface. When the table view controller is first created, you
need to load the data with the method updateUI ![]() . Then you define the notification
. Then you define the notification ![]() to get notified by the system in order to reload the table view’s data when the application relaunches from the background.
Inside the table view delegate methods, you define the table view’s row number and display content. Then, when the view controller
is released, you need to release the retained object events in the memory.
to get notified by the system in order to reload the table view’s data when the application relaunches from the background.
Inside the table view delegate methods, you define the table view’s row number and display content. Then, when the view controller
is released, you need to release the retained object events in the memory.
With all the new changes included, save the project. Build and launch the application. You should see a UI display similar to the one shown in figure 21.5.
Figure 21.5. The Quick application keeps tracking the application’s launch time and updating the table view’s UI whenever the application starts.
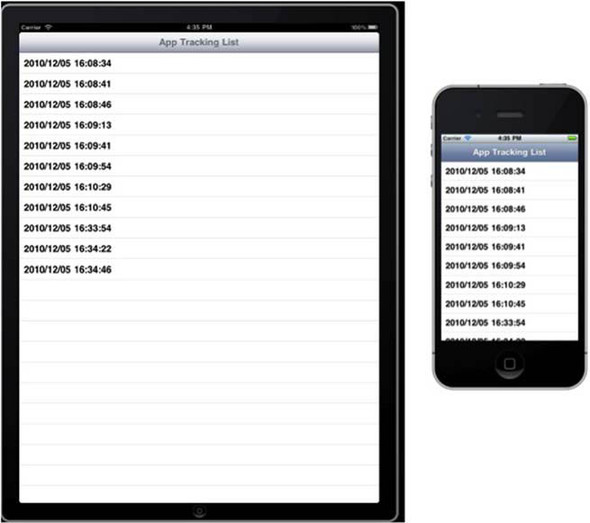
Quit the application, double-tap the Home button when the multitasking UI appears, relaunch the application, and notice that the new time stamp is successfully added to the table view even though the application is launched from the background.
Congrats: you’ve learned how to save the application’s user data inside the application delegate callback methods and how to update the user interface when the application launches from background to foreground by using the notification inside the view controller. You can use this demo application to test out different application state changes. Playing around with different cases will help you understand how to update the user interface and respond to changes correctly.
Next, we’ll look at a more in-depth use for the multitasking API: how to finish a task in the background.
21.4. Task completion in the background
In the previous sections, we went through multitasking basics and fast app switching. Most of the time, it will be good enough for an application to use only fast app switching. But some applications may need extra time to finish the task in the background state before being suspended: for example, uploading a photo to the cloud, tweeting your current status, or downloading the latest RSS feeds. When the user taps the Home button, the application can continue running for about 6 seconds in the background before the application is suspended. In this section, we’ll look at the task-completion API and build a demo app for practice.
21.4.1. Task-completion API
With the task completion in the background, the user doesn’t have to wait until the task is completed, but you need to tell the application how to start and when to end the task in the background. How can you do that? iOS 4 provides a pair of methods under UIApplication to wrap up a big task in between. You can begin the task assignment by calling beginBackgroundTaskWithExpirationHandler:, and when it’s done, you call the method endBackgroundTask: to end the task.
Here are the basics to use the task-completion API:
- Define the identifier for the background task in the application’s delegate applicationDidEnterBackground: method.
- Indicate the start of the task by assigning the expiration handler, calling the method beginBackgroundTaskWithExpirationHandler:. The definition of this method is listed here:
-(UIBackgroundTaskIdentifier) beginBackgroundTaskWithExpirationHandler:
(void(ˆ)(void))handler This method will take a block as an argument and return the task’s unique identifier. - End the task. Call the method endBackgroundTask: to end the task by calling the task identified in step 2.
As you can tell, the task-completion API is easy to follow. The remaining time in the background for task completion can be accessed from the UIApplication’s property: backgroundTimeRemaining. In case a few tasks are waiting to be done, you can use this property to check the remaining time in between tasks.
21.4.2. Finishing a task in the background
Back in section 21.1, you learned about the application’s lifecycle in iOS 4. When the application moves from the foreground to the background state, its delegate method applicationDidEnterBackground: will be called.
Listing 21.3 is an example of a task-completion API, showing how to finish a task in the background before the applications gets suspended. You can create a window-based project from the iOS template project in Xcode, because this part of API will only make changes to the app delegate file. In the app delegate header file, add in the task identifier: UIBackgroundTaskIdentifier bgTask. Define bgTask as a property of the app delegate, and synthesize it in the.m file.
Next, add the new changes from the following listing to the app delegate file.
Listing 21.3. Task completion in the background
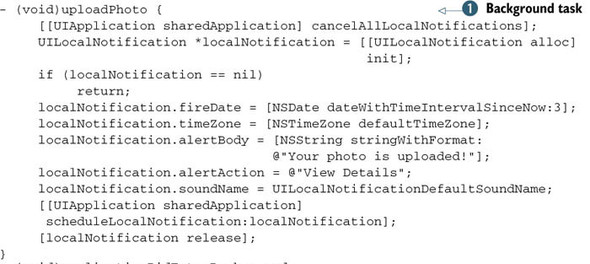
In this application, you want to finish a task, and after completion, send a local notification out to notify the user that
the work is done. This example uses a simple method uploadPhoto ![]() to demonstrate the local notification setup in the background state. If you’re interested, you can look up Flickr’s photo-uploading
API and add real photo uploading code into this method.
to demonstrate the local notification setup in the background state. If you’re interested, you can look up Flickr’s photo-uploading
API and add real photo uploading code into this method.
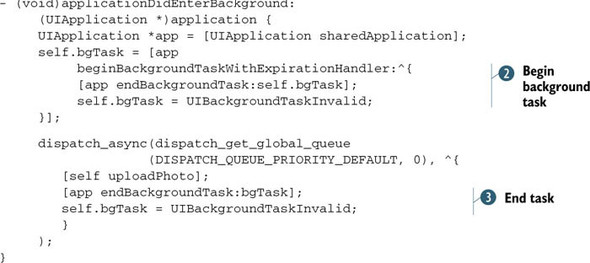
Because the main purpose of this listing is to demonstrate the task-completion API, let’s take a closer look at how the job
is done here. In the method applicationDidEnterBackground: you start the bgTask by calling the method beginBackgroundTaskWithExpirationHandler ![]() . The argument for the expiration handler is a block to end the task and release the bgTask. Then, with the help of Grand Central Dispatch (GCD), the task uploadPhoto gets called, and you end the task by calling the method endBackgroundTask:
. The argument for the expiration handler is a block to end the task and release the bgTask. Then, with the help of Grand Central Dispatch (GCD), the task uploadPhoto gets called, and you end the task by calling the method endBackgroundTask: ![]() and release the task identifier by assigning the UIBackgroundTaskInvalid value to bgTask
and release the task identifier by assigning the UIBackgroundTaskInvalid value to bgTask ![]() . We covered the GCD back in chapter 16.
. We covered the GCD back in chapter 16.
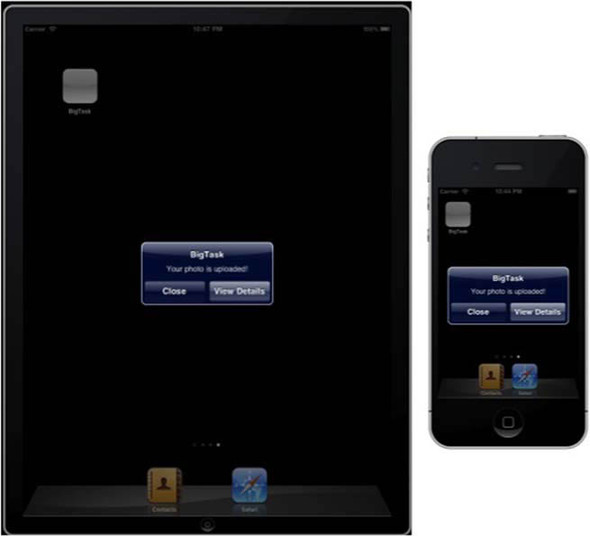
Save the changes, and build and run the application. Tap the Home button to let the application enter the background. When the application completes the task in the background, it will send out a local notification, as shown in figure 21.6.
Figure 21.6. The application finishes the task in the background and sends out a local notification on the iPad and iPhone.
Cool! You just managed to finish a task in the background. Always keep in mind that the permission and time limit are not guaranteed when you use the task-completion API. That’s why it’s a good practice to end the task gracefully instead of letting it get suspended when it doesn’t finish in time.
Next, we’ll cover how to monitor location changes in the background on iOS 4.
21.5. Monitoring location changes in the background
We covered the Core Location framework in chapter 10 and the Map Kit framework in chapter 18. Because iOS provides an easy-to-use Core Location framework and Map Kit framework, developers have the chance to build creative and amazing applications. For example, Foursquare is one of the most-famous location-based social applications. With iOS 4’s location service, you can even check in to places through Foursquare while the app isn’t running. You may ask, “How did they do that? Will the battery drain quickly because the location service consumes a lot of power?”
In iOS 4, an application can monitor location changes even though the application isn’t running. The best part is, you don’t need to worry about battery usage in this case. In this section, we’ll first look at the techniques behind background location monitoring and then explore the new API under iOS 4 for background location monitoring.
21.5.1. An overview of the location service in the background
As mentioned in chapter 10, the location service will use more battery power when the accuracy requirement is higher. Of the three location service providers—cell phone tower, wi-fi, and GPS—cell phone tower uses the least power and provides acceptable accuracy (the 300-meter accuracy is good enough for the majority of cases).
There are several ways to track the user’s location in the background, some of which don’t require the application running regularly in the background:
- Significant location changes and region-based location monitoring—The significant location change service offers a low-power way to receive location data through cell phone towers and is highly recommended when precise location data isn’t required. With this service, location updates are generated only when the user’s location changes significantly—for instance, when the user moves from one cell tower range to another. If the application is suspended or not running when an updated location occurs, the system will wake it up in the background to handle the event. This service is available in iOS 4 and only on devices that contain a cellular radio, such as the iPhone and iPad with 3G. The region-based location monitoring works exactly the same way as significant location changes.
- Regular location updates before the application gets suspended—Before the application gets suspended, you can access the regular location service for a few seconds. The application won’t be restarted once it’s suspended and a new location update occurs.
- Accurate and continuous location updates—An application needs accurate location updates, both in the foreground and background states, for example, a turn-by-turn navigation application. It should add the UIBackgroundModes key to its Info.plist file and add the location string to the array value.
If your application doesn’t need to provide precise and continuous location information to the user, the significant location change service works out the best. This service provides location updates in the background and can even wake up a suspended or not-running application. Combine this feature with the region monitor in the core location, and you can create an awesome application.
In case the application requires precise and continuous location data, such as a navigation application, you need to declare the location service in the Info.plist. Keep in mind that it increases power consumption because of the GPS usage, but it’s available for applications that truly need it. The device should be plugged into the power supply in the real-time case.
We focused on the significant location change service here, mainly because the other options are the same in the background as the regular location updates in the foreground, which we covered in chapter 10.
21.5.2. Monitoring significant location change
The significant location change service offers a low-power location service for devices with cellular radios. The location data isn’t as accurate as that of the GPS, but it’s suitable for most cases. For example, you can use this background location service to trace how far the user has driven their car.
Use the method significantLocationChangeMonitoringAvailable to check if the current device supports significant location change monitoring. You can use the following code snippet to verify the availability:
BOOL available = [CLLocationManager
significantLocationChangeMonitoringAvailable];
When this service is available, you can use two methods in CLLocationManager to start and stop receiving the updates:
-(void)startMonitoringSignificantLocationChanges;
-(void)stopMonitoringSignificantLocationChanges;
Remember to turn off this service when you no longer need to receive the updates. Otherwise, the system will still wake up the application whenever new updates are available. That may annoy the user because it’s unnecessary.
When the application isn’t running, the new location updates will wake up the application. How can you handle this update in the application? Remember the application delegate method in the application’s lifecycle that we discussed in section 21.1? In this case, the application:didFinishLaunchingWithOptions: method gets called, and the dictionary launchOptions contains the UIApplicationLaunchOptionsLocationKey key. You can use this method to restart the CLLocationManager if it’s not available. You can use the CLLocationManager delegate method location-Manager:didUpdateToLocation:fromLocation: to get the new location data.
21.5.3. Monitoring region-based location change
The region-based location updates service works exactly the same way as the significant location updates. The new location update wakes up the application, even though the application may be suspended or not running at all. You can use two methods available in CLLocationManager to start and stop the monitoring for a region:
- (void)startMonitoringForRegion:(CLRegion *)
    desiredAccuracy:(CLLocationAccuracy);
- (void)stopMonitoringForRegion:(CLRegion *);
Before using the region-based location monitoring service, make sure the application has this service available. For the hardware availability, you can use the CLLocation-Manager class method + (BOOL)regionMonitoringAvailable;.
But even if the device can support the region-based location monitoring service, the user can enable or disable the region monitoring service in the settings. Therefore, you also need to check to see if this service is currently enabled. Use the CLLocationManager class method regionMonitoringEnabled to do so.
The region-based location service will send the new location to the CLLocation-Manager’s delegate methods. Table 21.3 lists the important delegate methods for the region-monitoring location service.
Table 21.3. Region-based location-monitoring methods
|
Description |
Methods |
|---|---|
| User entered the specified region. | -(void)locationManager:(CLLocationManager *) manager didEnterRegion:(CLRegion *)region; |
| User left the specified region. | -(void)locationManager:(CLLocationManager *) manager didExitRegion:(CLRegion *)region; |
| A region monitoring error occurred. | -(void)locationManager:(CLLocationManager *) manager monitoringDidFailForRegion: (CLRegion *) region withError:(NSError *)error; |
The region-based location service can be helpful and is easy to implement. For example, you can use this service to notify the user that a grocery store is nearby, or in a todo list application you can remind the user to pick up clothes from the dry cleaner when they are near it.
21.6. Summary
Multitasking is useful in many ways. With the application running in the background, you can provide an amazing user experience with the iOS 4 platform. Instead of yanking the user out of the application when the app quits, with a little extra work you can have the application return to the previous state or, even better, perform operations without the application running in the foreground.
Try to adopt fast app switching in your application. It will give the user a chance to resume the application.
In the next chapter, we’ll spend more time on continuous location updates in the background and build an application together. We’ll also tackle multitasking in depth; we’ll show how to enable audio playing in the background and control the background audio through remote-control events.