
Chapter 12. Customizing COM’s View of .NET Components
In This Chapter
• Customizing Data Types
• Customizing Structure Layout
• Exposing Class Interfaces
• Using Visual Basic .NET’s ComClassAttribute
• Making APIs Invisible to COM
• Customizing Registration
• Providing Your Own GUIDs
• Providing Your Own DISPIDs
• Controlling Interface Derivation
• Returning a Specific HRESULT
• Disabling Type Library Marshaling of .NET Interfaces
• Creating Multi-Cultured Methods
• Using Optional Parameters in Any Language
• Exposing .NET Objects as COM+ Objects
The Common Language Runtime (CLR) provides reasonable default behavior when exposing .NET components to COM. This default behavior is safe in the face of versioning, and almost always matches what a COM client expects to see. The result is that .NET component authors mostly don’t need to know or care whether some of their clients may live in the unmanaged neighborhood. COM-specific modifications to .NET components are sometimes necessary, however. This chapter discusses the many ways to tune and customize a .NET component to get the exact behavior you want in the COM world.
The lesson of this chapter is that customization is done with custom attributes. COM Interoperability is one of the areas of the .NET platform that makes the most use of custom attributes, with a whopping 30 attributes in the System.Runtime.InteropServices namespace. These custom attributes enable the developer to customize everything from data marshaling to registration by providing extra information to the Interop Marshaler and tools like REGASM.EXE. Specifically, this chapter examines the following customizations:
• Customizing data types
• Customizing structure layout
• Exposing class interfaces
• Using Visual Basic .NET’s ComClassAttribute
• Making APIs invisible to COM
• Customizing registration
• Providing your own GUIDs
• Providing your own DISPIDs
• Controlling interface derivation
• Returning a specific HRESULT
• Disabling type library marshaling of .NET interfaces
• Creating multi-cultured methods
• Using optional parameters in any language
• Exposing .NET objects as COM+ objects
Customizing Data Types
As discussed in previous chapters, the way in which data types are exposed to COM can be customized with MarshalAsAttribute, InAttribute, and OutAttribute. These attributes affect the behavior of the Interop Marshaler, and can affect what the types look like in an exported type library depending on the change. This section examines the following topics:
• Customizing arrays
• Detecting incorrect use of MarshalAsAttribute
• Customizing data flow
MarshalAsAttribute Basics
MarshalAsAttribute can be marked on parameters, return types, and fields. To customize a property’s type, you must place the attribute on the get accessor’s return type and set accessor’s parameter, for example:
C#:

Visual Basic .NET:

C++:

Caution
Version 7.0 of the Visual C++ .NET compiler has a bug that makes it impossible to mark a property get accessor’s return value with MarshalAsAttribute. If you attempt to apply the attribute to the get accessor’s return value, the complier places it on the set accessor’s parameter instead (if one exists)!
MarshalAsAttribute has a required parameter that is a value of the UnmanagedType enumeration, as well as a handful of named parameters that can or must be used with certain values. Table 12.1 lists every value of the UnmanagedType enumeration along with how to use it with MarshalAsAttribute—what data types you can place it on, what it means, and what MarshalAsAttribute options are used with it. The emphasized rows contain values that can be used to change the default behavior of COM Interoperability. The values in the other rows never need to be used with COM signatures, but could be used to make default behavior explicit.
Tip
It often isn’t necessary to mark parameters with MarshalAsAttribute because every possible parameter type has default marshaling behavior, as demonstrated by Table 9.1 in Chapter 9, “An In-Depth Look at Exported Type Libraries.” Become familiar with the default behavior so you don’t end up littering your signatures with unnecessary custom attributes. Besides slightly increasing the size of your metadata, overuse of MarshalAsAttribute can decrease the readability of your code.
Table 12.1. Every UnmanagedType Value Used with MarshalAsAttribute, Types on Which Each is Valid When Using COM Interoperability, and Each Value’s Meaning


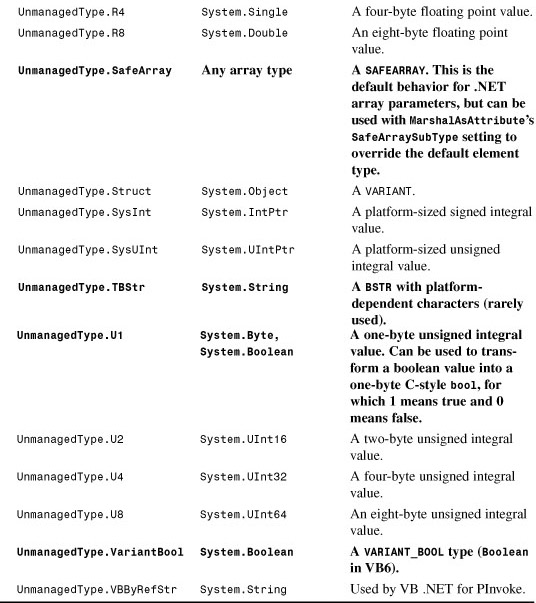
See Part VI, “Platform Invocation Services,” for explanations of the UnmanagedType values that can’t be used with COM Interoperability. Some of the values (such as UnmanagedType. Interface) that aren’t very useful for COM Interoperability can be useful for PInvoke. Although UnmanagedType.ByValTStr can be used with COM Interoperability, you can’t export a signature that uses this value to a type library, because a type library can’t capture the notion of a platform-dependent character set.
Caution
Use caution when exposing System.Text.StringBuilder parameters to COM with version 1.0 of the CLR. When a string allocated in unmanaged code is marshaled to a StringBuilder, the Interop Marshaler only copies 32 bytes of the string (32 ANSI characters or 16 Unicode characters). See Chapter 18, “The Essentials of PInvoke,” for more information about StringBuilder.
MarshalAsAttribute, like the other custom attributes in System.Runtime.InteropServices, has an Inherited property set to false. Therefore, the attribute must be explicitly marked everywhere to get the marshaling behavior you’d expect. If you write a class that implements an interface with methods that use MarshalAsAttribute, no .NET compilers enforce that you place the same attributes on the implemented method signature. This is because the method, with or without such attributes, works the same way for .NET clients. Such methods, of course, look different from a COM perspective. Thus, if you don’t mark the attribute everywhere, COM clients could see different behavior depending on whether they call through your interface or your class (through its class interface). Listing 12.1 shows source code that makes the mistake of not marking the GiveMoney signature with UnmanagedType.Currency everywhere it’s used. ClassInterfaceAttribute is used to make the type information for class interfaces visible, as explained in the “Exposing Class Interfaces” section. Listing 12.2 shows the interface definitions that would be in an exported type library.
Listing 12.1. Incorrect C# Source Code in Which Not Every Occurrence of the Same Signature Is Marked with the Same MarshalAsAttribute

Listing 12.2. The Contents of the Type Library Exported from the Assembly Whose Source is in Listing 12.1


In the resulting type library, notice that IDonate’s GiveMoney method and _Humanitarian’s GiveMoney method have the expected CURRENCY type (Lines 11 and 80), yet _Philanthropist’s GiveMoney signature has a DECIMAL parameter (Line 58) because MarshalAsAttribute was omitted on the Philanthropist class. All of these signatures can be used from COM without error, but it presents unmanaged code with inconsistencies. Plus, for this example, the _Philanthropist.GiveMoney method can’t be called from a Visual Basic 6 client because VB6 doesn’t support DECIMAL types. Whenever you use Decimal types representing money in .NET signatures, it’s a good idea to mark them with UnmanagedType.Currency so COM clients can use them naturally.
Caution
When marking types with MarshalAsAttribute, be sure to mark every occurrence of the signature. For example, if the signature appears in an interface, you should place the attribute in the interface’s signature as well as the signature in any classes that implement it.
Customizing Arrays
When exposing array fields or parameters to COM, there are three UnmanagedType values that can be used: ByValArray, LPArray, and SafeArray. Only ByValArray is supported for fields, and only LPArray and SafeArray are supported for parameters.
UnmanagedType.ByValArray must be used with MarshalAsAttribute’s SizeConst named parameter so the Interop Marshaler knows how many array elements to marshal in either direction. When using UnmanagedType.LPArray, it’s important to either use MarshalAsAttribute’s SizeConst named parameter or SizeParamIndex named parameter so the Interop Marshaler knows how many elements to marshal for arrays allocated in unmanaged code. Whereas SizeConst can be set to the number of array elements to be marshaled, SizeParamIndex can be set to the zero-based index of the parameter that contains the number of array elements at run time. The array parameter marked with MarshalAsAttribute and the size parameter indicated by SizeParamIndex must both be passed by-value, so the SizeParamIndex mechanism is not as flexible as IDL’s size_is.
MarshalAsAttribute’s ArraySubType named parameter can be set to an UnmanagedType value, but not all of the enumeration’s values are valid. For instance, an element type of UnmanagedType.LPArray isn’t allowed. If no element type is specified, the default unmanaged representation of the managed array element type is assumed. Therefore, the element type only needs to be specified for cases like making an array of Object types looking like an array of IDispatch types rather than an array of VARIANTs.
When defining new .NET APIs, exposing arrays as SAFEARRAYs is the preferred method. You should keep this default behavior unless you’re especially concerned about unmanaged C++ clients, for whom dealing with SAFEARRAYs can be cumbersome. Although arrays are exposed as SAFEARRAYs by default, you can use UnmanagedType.SafeArray along with the SafeArraySubType named parameter to customize the type of the array’s elements. In fact, this is the only valid MarshalAsAttribute named parameter you can use with UnmanagedType. SafeArray (besides SafeArrayUserDefinedSubType, described later). For example, SizeConst and SizeParamIndex aren’t valid because all of the array size information is stored inside the SAFEARRAY structure. SafeArraySubType, when used, must be set to a value of the System. Runtime.InteropServices.VarEnum enumeration. Although it has 44 values (in order to stay faithful to the unmanaged definition of this famous enumeration), only a subset of them are valid for a SAFEARRAY’s element type. Table 12.2 lists the valid values of VarEnum when setting the value of SafeArraySubType. As in Table 12.1, values that change default marshaling behavior are emphasized.
Table 12.2. Valid Values Describing SAFEARRAY Element Types
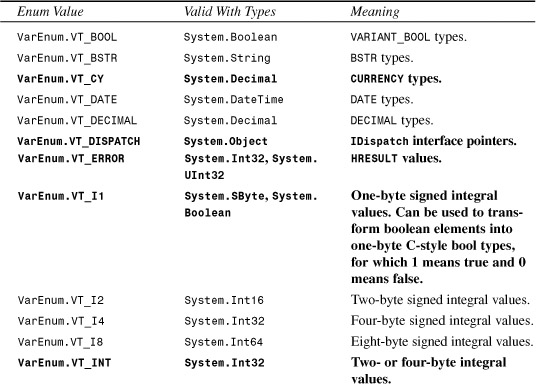

Table 12.2 leaves out one important option. Any of the VarEnum values in the table can be used as a SafeArraySubType when placing MarshalAs(UnmanagedType.SafeArray, ...) on a System.Array type. Using UnmanagedType.SafeArray on System.Array enables the exposure of this generic array type as a specific type of SAFEARRAY rather than an _Array class interface. By default, System.Array is exposed as a SAFEARRAY of VARIANTs, so every VarEnum value except for VarEnum.VT_VARIANT changes the default marshaling behavior in this case.
Caution
In version 1.0 of the CLR, using MarshalAs(UnmanagedType.SafeArray, VarEnum.VT_CY) on an array of Decimal types does not work as expected, causing the Interop Marshaler to fail with a SafeArrayTypeMismatchException. To work around this, you could use do-it-yourself marshaling with IntPtr, as described in Chapter 6, “Advanced Topics for Using COM Components.”
MarshalAsAttribute has another array-related named parameter: SafeArrayUserDefinedSubType. This can be used with UnmanagedType.SafeArray only when SafeArraySubType is set to VarEnum.VT_RECORD, VarEnum.VT_DISPATCH, or VarEnum.VT_UNKNOWN. It is set to a Type object to represent the array’s element type. This is only useful when the marked data type is the generic System.Array, to be able to expose a SAFEARRAY to COM with an arbitrary rank or non-zero lower bounds.
Detecting Incorrect Use of MarshalAsAttribute
Because MarshalAsAttribute is a pseudo-custom attribute, it is treated differently at compile time than regular custom attributes. The benefit is that, unlike regular custom attributes, more error-checking than usual is available at compile time. You won’t get compile-time errors for using an UnmanagedType value that isn’t appropriate for the data type it’s attached to, but you will get compilation errors for the following mistakes:
• Placing MarshalAsAttribute on a target it doesn’t belong on (like a property or assembly).
• Using MarshalAsAttribute with an UnmanagedType value only allowed on fields (such as ByValTStr) on a parameter or return type.
• Using MarshalAsAttribute named parameters that can’t be used with the UnmanagedType value, or omitting a named parameter that’s necessary with the UnmanagedType value.
• Giving values for any MarshalAsAttribute parameters outside the valid range.
Such a compile-time error in C# might look like the following:
error CS0647: Error emitting
'System.Runtime.InteropServices.MarshalAsAttribute'
attribute -- 'SizeConst is required for a fixed string.'
Other errors, such as putting an UnmanagedType value on an unrelated type, can be caught by the type library exporter. For example, running TLBEXP.EXE on an assembly containing a method which has MarshalAs(UnmanagedType.BStr) on a Decimal parameter gives the following warning:
Type library exporter warning processing 'MyClass.MyMethod(decimalParameter),
MyAssembly'. Warning: The method or field has an invalid
ELEMENT_TYPE/NATIVE_TYPE combination.
ELEMENT_TYPE refers to the .NET data type, and NATIVE_TYPE refers to the UnmanagedType value. Unfortunately, such warnings are not seen during type library export when using the Register for COM Interop inside Visual Studio .NET.
Whereas some errors are caught during compilation and some are caught during type library export, some errors in using MarshalAsAttribute are simply ignored! Therefore, it is important to be careful when marking types with MarshalAsAttribute.
Caution
Mismatches in SafeArraySubType values and the types they’re applied on are not caught as errors by compilers nor the type library exporter. For example, you could mark a managed array of double types with MarshalAs(UnmanagedType.SafeArray, SafeArraySubType=VarEnum.VT_BSTR) and the exporter happily produces a type library signature with an array of strings. Such errors can cause bad run-time problems, so be sure to follow the rules in Table 12.2 to avoid making these mistakes.
Customizing Data Flow
Using MarshalAsAttribute isn’t the only way to customize the behavior of a parameter. You can also use two more custom attributes—InAttribute and OutAttribute—to customize the direction of data flow. These attributes affect data flow across managed/unmanaged boundaries the same way that IDL’s [in] and [out] attributes do. See Chapter 4, “An In-Depth Look at Imported Assemblies,” for descriptions of their behavior.
By default, by-value parameters (except for StringBuilder types) are treated as [In], by-reference parameters are treated as [In, Out] and out-only parameters (as defined by C#) are treated as [Out]. OutAttribute is often used on a by-reference parameter to simulate C#’s out keyword in other .NET languages. InAttribute and OutAttribute are often used together on by-value array or formatted class parameters to get the in/out behavior that most people expect. InAttribute alone can be used on a by-reference parameter to suppress outward marshaling as a performance optimization, when appropriate.
Caution
Visual Basic .NET requires that you either use the full name of the InAttribute custom attribute or surround In with square brackets (for example, <[In]>) because In is a keyword. This doesn’t apply to the OutAttribute custom attribute, however, because Out is not a keyword.
Customizing Structure Layout
You’ve seen that user-defined value types are exported as structures in a type library. Unlike in the managed world, however, the exact memory layout of a structure is important to COM. This layout can be customized using StructLayoutAttribute. StructLayoutAttribute requires that you specify a member of the LayoutKind enumeration. This can be one of three values:
• LayoutKind.Auto. The CLR chooses how to arrange the fields in the structure. This should never be used when interacting with unmanaged code, because the memory layout chosen is unpredictable.
• LayoutKind.Sequential. The fields are arranged sequentially, in the order they appear in source code. This is the default in C#, Visual Basic .NET, and C++.
• LayoutKind.Explicit. The fields are arranged using byte offsets specified by the user on each field using a second custom attribute: FieldOffsetAttribute.
StructLayoutAttribute also enables you to optionally set additional information, such as CharSet, which affects how string and character fields are marshaled. The following C# struct demonstrates the use of CharSet:
[StructLayout(LayoutKind.Sequential, CharSet=CharSet.Unicode)]
public struct MyStruct
{
string Field1;
[MarshalAs(UnmanagedType.ByValTStr, SizeConst=256)] string Field2;
}
String fields (such as Field1) are by default treated as LPSTR or LPWSTR, based on the CharSet value of the containing struct. C#, Visual Basic .NET, and C++ assume an ANSI character set by default. When marked with UnmanagedType.ByValTStr, the string is either a buffer of ANSI or Unicode characters, also depending on the CharSet value. Thus, the previous value type gets exported to COM as follows:
struct tagMyStruct
{
LPWSTR Field1;
unsigned short Field2[256];
} MyStruct;
Tip
Using LayoutKind.Explicit, you can create a union in managed code! Simply mark each field with the same offset of zero. For example:
[StructLayout(LayoutKind.Explicit)] public struct MyStruct{ [FieldOffset(0)] short Field1; [FieldOffset(0)] int Field2; [FieldOffset(0)] long Field3;}
This causes each field to overlap in the same memory location. Reference types (such as classes and arrays) and primitive types are not allowed to overlap.
These attributes are critical when trying to define all sorts of existing Win32 structures, but when defining .NET value types, you should stick to the default behavior as much as possible to avoid confusion. The most important point is that, when defining .NET value types, marking them with LayoutKind.Sequential or LayoutKind.Explicit make them usable from COM. With automatic layout, exported structs look just fine in a type library, but attempting to use them from COM causes run-time errors. Fortunately, the default layout for value types defined in C#, VB .NET, and C++ is sequential, so nothing special needs to be done to make value types COM-friendly in these languages.
Exposing Class Interfaces
Chapter 8, “The Essentials for Using .NET Components from COM,” introduced the notion of a class interface—an interface generated by the CLR that provides access to public members of the class (including members from base classes) for COM clients. The behavior of class interfaces exposed to COM is controlled with ClassInterfaceAttribute. This attribute has one required parameter that is a value of the ClassInterfaceType enumeration. The values are the following:
• ClassInterfaceType.AutoDispatch. An empty-looking class interface is generated with the name _ClassName that derives from IDispatch. COM clients must call the class’s members through IDispatch’s Invoke method. This is the default setting.
• ClassInterfaceType.None. No class interface is generated. With this setting, only the members of implemented interfaces (and the members of any interfaces or class interfaces exposed for base classes) can be invoked from COM. The first listed interface becomes the default interface that can be invoked late-bound through IDispatch. (Depending on the compiler and the situation, this “first” interface might not always be the first one listed in source code.) If a class marked with ClassInterfaceType.None doesn’t implement any interfaces, the default interface available to COM clients is _Object, the auto-dual class interface for System.Object. Any interfaces (including class interfaces) from base classes are still exposed to COM, unless every class in the inheritance chain is marked with ClassInterfaceType.None.
• ClassInterfaceType.AutoDual. A dual class interface is generated that exposes type information for the same members that could be invoked in an auto-dispatch class interface. This is the most convenient option for clients, but also the most dangerous for the owner of the component. Choosing this limits the kinds of modifications that can be made to the class without breaking COM clients in the future.
ClassInterfaceAttribute can be marked on classes or assemblies. Placing the attribute at the assembly level is a shortcut for placing it on every class in the assembly. Furthermore, the assembly-level ClassInterfaceAttribute setting can be overridden on a class-by-class basis by marking individual classes with ClassInterfaceAttribute and a different ClassInterfaceType value. This pattern is frequently used with the custom attributes in System.Runtime.InteropServices.
Why are auto-dispatch class interfaces exposed to COM by default? Because the exported type library contains no type information for auto-dispatch class interface members, unmanaged clients cannot (easily) cache DISPIDs or depend on interface layout. This is great because the ordering of members and their DISPIDs can easily change if .NET component authors are not careful. With the default setting, almost any class updates that are compatible for .NET clients are also compatible for COM clients, as discussed in the previous chapter.
Auto-dual class interfaces, on the other hand, are useful in a controlled environment, but can present problems in the face of versioning. Because COM interfaces are tied to the layout of their methods, adding members to anywhere but the end of a class would cause early-bound COM clients to end up calling different members than they thought they were, most likely resulting in a crash. Even adding members at the end of a class is catastrophic for derived classes that expose an auto-dual class interface, because any derived class members are pushed later in the v-table! Real .NET interfaces exposed to COM don’t have this problem because they don’t include the base members of .NET interfaces in the v-table.
Adding new members to a class or rearranging its members cannot adversely affect COM clients that late bind to auto-dispatch class interfaces, with one exception. As mentioned in the previous chapter, the exception to the version-safety of auto-dispatch class interfaces is overloaded methods, whose name decorations (_2, _3, and so on) can change based on the order they appear. Adding or moving method overloads is dangerous for COM clients. For the following class:
public class C
{
// COM client can call this as "OverloadedMethod"
public void OverloadedMethod() { ... }
// COM client can call this as "OverloadedMethod_2"
public void OverloadedMethod(string str) { ... }
// COM client can call this as "OverloadedMethod_3"
public void OverloadedMethod(short s) { ... }
}
COM clients could call these methods as OverloadedMethod, OverloadedMethod_2, and OverloadedMethod_3, respectively. If the author of C adds an overload in the middle without changing the assembly version number (or ships it with publisher policy claiming that the assembly is compatible with a previous version), then the public APIs have now changed for COM clients only. This could be done as follows with the C class:
public class C
{
// COM client can call this as "OverloadedMethod"
public void OverloadedMethod() { ... }
// COM client can call this as "OverloadedMethod_2"
public void OverloadedMethod(long l) { ... }
// COM client can call this as "OverloadedMethod_3"
public void OverloadedMethod(string str) { ... }
// COM client can call this as "OverloadedMethod_4"
public void OverloadedMethod(short s) { ... }
}
![]()
A COM client that calls OverloadedMethod_3, late-bound or not, is now calling a different method than it used to.
The recommended solution for COM-friendly .NET classes is to use ClassInterfaceType.None and implement an interface that contains all the methods of the class. Examples of this can be seen in the mscorlib assembly with the following class/interface pairs:
• AppDomainSetup and IAppDomainSetup in the System namespace.
• AppDomain and _AppDomain in the System namespace.
• RegistrationServices and IRegistrationServices in the System.Runtime.InteropServices namespace.
• TypeLibConverter and ITypeLibConverter in the System.Runtime.InteropServices namespace.
(Note that _AppDomain is actually a real .NET interface, not a class interface generated for COM clients.) The benefit of this is that developers are likely to be more careful when adding members to the class because adding members to the corresponding interface can’t be done in a version-compatible way. And if members were only added to the class and not the interface (to avoid versioning problems) COM clients wouldn’t break; they simply wouldn’t be able to take advantage of the new functionality.
Caution
Using ClassInterfaceType.None is the only way to expose your own default interface to COM, although which interface becomes the default can be unreliable for classes that implement multiple interfaces. Usually the order that the interfaces are listed in metadata matches the order in source code, but it ultimately depends on your .NET compiler. For example, a C# class that implements two interfaces that are related via inheritance always lists the base interface first in metadata, regardless of their order in source code.
Caution
Auto-dual class interfaces expose all of the methods of base classes, even if the base class has no class interface or an auto-dispatch class interface. Exposing such an auto-dual class interface by an author who doesn’t control the base classes is a very bad idea. Because the designer of a base class didn’t expose an auto-dual class interface, she may decide to add methods to the class without changing its version number (or applying a policy to make it treated as version-compatible). Any derived auto-dual class interfaces would then be broken because additional methods are inserted in the middle of the interface.
Therefore, never ship a class that exposes an auto-dual class interface unless all of its base classes also expose an auto-dual class interface. Even then, use caution if the base class definitions are not under your control.
If a class author chooses to expose an auto-dual class interface (such as for System. Reflection.Assembly), this does not mean that she cannot add members in the future in a compatible way. The author can add the members and mark them with a custom attribute that makes them invisible to COM (discussed in the “Making APIs Invisible to COM” section). This way, .NET clients can take advantage of the new methods but the class interface that COM clients rely on doesn’t change. Of course, COM clients aren’t able to call these new methods, but at least the functionality they already rely on continues to work. If the author wants the new methods to be available to COM, she should give the new assembly an incompatible version number and set the policy so that existing COM clients bind to the older assembly but new ones can choose to bind to the new one.
Using Visual Basic .NET’s ComClassAttribute
Visual Basic .NET defines its own custom attribute for COM Interoperability with the goal of making the process of exposing a Visual Basic .NET class to COM easier. However, due to poor versioning behavior, it’s probably best to avoid using this custom attribute altogether.
This custom attribute is Microsoft.VisualBasic.ComClassAttribute, and can be marked only on classes. When you mark a class with ComClassAttribute, the VB .NET compiler marks the class with <ClassInterface(ClassInterfaceType.None)> and makes the class implement a hidden nested interface called _ClassName. By doing this, Visual Basic .NET effectively creates its own kind of class interface that’s distinct from auto-dispatch or auto-dual class interfaces. ComClassAttribute also causes the VB .NET compiler to do a few extra tasks when the marked class has events. This is the best feature of ComClassAttribute, and is described in Chapter 13, “Exposing .NET Events to COM Clients.”
ComClassAttribute has four constructors:
Public Sub New()
Public Sub New(_ClassID As String)
Public Sub New(_ClassID As String, _InterfaceID As String)
Public Sub New(_ClassID As String, _InterfaceID As String, _EventId As String)
When adding a new “COM class” in a Visual Basic .NET project (Project, Add New Item..., COM Class), Visual Studio .NET creates the following template:
<ComClass(ComClass1.ClassId, ComClass1.InterfaceId, ComClass1.EventsId)> _
Public Class ComClass1
#Region "COM GUIDs"
' These GUIDs provide the COM identity for this class
' and its COM interfaces. If you change them, existing
' clients will no longer be able to access the class.
Public Const ClassId As String = "9CC4547F-CE33-46A4-8583-36AC54C93693"
Public Const InterfaceId As String = "38A6BBD7-6BA6-431E-A94B-B69C50AAFE45"
Public Const EventsId As String = "49447BA2-37D8-4853-A09F-1C94A07DFDED"
#End Region
' A creatable COM class must have a Public Sub New()
' with no parameters, otherwise, the class will not be
' registered in the COM registry and cannot be created
' via CreateObject.
Public Sub New()
MyBase.New()
End Sub
End Class
The ClassId value is used for the class’s CLSID, and the InterfaceId value is used for the generated _ComClass1 interface’s IID. The EventsId value is explained in the following chapter. Having to use fixed GUIDs for the .NET class and its generated interface is not ideal because it places the responsibility of proper versioning on the programmer. If you don’t change the CLSID from one version of your assembly to another, it’s easy to introduce incompatible types that break existing COM clients. Furthermore, as discussed in the previous chapter, fixed GUIDs negatively impact side-by-side assemblies.
Despite the danger of using explicit GUIDs, using the ComClassAttribute overload that expects all three GUIDs is the best one to use, due to the way that the VB .NET compiler automatically chooses any GUIDs that you don’t explicitly pass. Unlike the CLR’s algorithm for automatically generating GUIDs (covered in the previous chapter), the VB .NET compiler generates different GUIDs each time you recompile (using Build, Rebuild Solution in Visual Studio .NET), even if nothing about the assembly or class changes! This behavior is very bad because a simple re-compilation can break your compatibility with COM clients.
The nested _ClassName interface generated by the VB .NET compiler is a dual interface containing all the public COM-visible members defined directly on the class. Unlike auto-dual or auto-dispatch class interfaces, it does not provide access to members of base classes. Although this attribute internally uses the recommended approach of ClassInterfaceType.None with an explicitly defined interface, the problem is that the developer doesn’t have enough control over this interface generated by the VB .NET compiler. If you add or rearrange members of a class marked with ComClassAttribute, its auto-generated interface changes (while keeping the same IID if you passed one to the attribute’s constructor) and can easily break COM clients. If you had explicitly defined the interface implemented by a .NET class instead, then you would have had to go out of your way to break compatibility with COM.
Making APIs Invisible to COM
By default, all public types and members are exposed to COM whereas non-public types and members are not. (The two exceptions to this rule are non-public fields of a value type, as discussed in Chapter 9, “An In-Depth Look at Exported Type Libraries,” and interfaces marked with ComImportAttribute, discussed in Chapter 21, “Manually Defining COM Types in Source Code.”) This behavior can be changed with ComVisibleAttribute, which takes a boolean parameter. The custom attribute can be placed on assemblies, classes, structs, enums, methods, properties, fields, interfaces, and delegates.
Using ComVisibleAttribute, you can’t make private types or members appear public, but you can make public types or members appear private. Thus, ComVisibleAttribute is used to restrict the direct use of a .NET component from COM. Like C#’s internal keyword which means “public inside the assembly but private outside,” ComVisibleAttribute enables you to express “public to .NET clients but private to COM clients.” If you mark an assembly with ComVisible(false), you can override the setting on individual types (classes, structs, etc.) to make them visible to COM. This is the only scenario in which the attribute overriding behavior works. For example, you can’t mark a class with ComVisible(false) and some of its methods with ComVisible(true) and expect the marked methods to be visible.
As discussed in Chapter 8, a COM-invisible type does not appear in an exported type library and is not registered. A COM-invisible member is omitted from the COM view of an interface (including the class interface, if one is generated). This, along with behavior enforced internally by the CLR, means that:
• A COM-invisible class cannot be created from COM.
• A COM-invisible interface can never be accessed via IUnknown’s QueryInterface method (unless it’s also marked with ComImportAttribute, which overrides ComVisibleAttribute).
• A COM-invisible member cannot be called from COM, even when late binding via IDispatch.
If a COM-invisible type is used as a parameter in a COM-visible method in a COM-visible type, one of two things can occur:
• If the invisible type is a reference type, the parameter is replaced with an IUnknown interface pointer. COM clients could only query for COM-visible interfaces and any standard interfaces implemented by the CCW except for IDispatch.
• If the invisible type is a value type, there is no generic replacement for it in the exported method, so the type library exporter skips the entire method. Unless the method appears at the end of an interface, there would be a gap between its surrounding methods that some type library viewers display with a dummy method.
The effects of having invisible types exposed as visible parameters are demonstrated in Listing 12.3.
Listing 12.3. Exporting an Assembly Containing a COM-Visible Type with Members That Use COM-Invisible Types

The exporter reports the method with the invisible value type parameter as a warning, giving the following message:
Type library exporter warning processing 'IAmVisibleToAll.Method2(x),
Chapter12'. Warning: Non COM visible value type IAmVisibleToAll is being
referenced either from the type currently being exported or from
one of its base types.
Tip
If you decide to selectively make some types invisible to COM, make sure that the transitive closure is invisible, otherwise you might frustrate clients with unusable visible APIs that rely on invisible types. The least confusing thing to do for your customers is to leave everything visible to COM.
Marking a field of a value type or formatted reference type with ComVisible(false) has no effect because it’s impossible to hide a structure’s field from unmanaged code. Marking a field of a regular reference type with ComVisible(false) does have an effect; it hides the property that normally would be exposed for such a field.
Having gone through all the details of hiding types and members from COM, keep in mind that you really can’t prevent COM clients from using your APIs. If nothing else, someone could write a COM-visible intermediate .NET layer that hands out all your COM-invisible functionality to COM. But, as demonstrated in Chapter 10, “Advanced Topics for Using .NET Components,” by simply deriving from a COM-invisible class, a .NET class exposes these base members automatically—and can even expose them via an auto-dual class interface. If you have versioning concerns about users of your class doing this, you could make your class sealed (NotInheritable in VB .NET) or mark every member of the class with ComVisible (false). COM clients could still use these members as long as the class implements an interface that doesn’t mark the members as COM-invisible.
Customizing Registration
Chapter 8 explained what REGASM.EXE places in the registry for each .NET class. To recap, for each public, COM-visible, and COM-creatable class in a regular .NET assembly, the built-in registration process places the following entries in the registry:

These entries enable the activation of the component via class identifier (CLSID) or programmatic identifier (ProgID) using the CLR execution engine as the in-process server. To customize these registry entries, COM Interoperability provides two features. One is a simple way to customize ProgIDs, and the other is a more complex but extremely flexible way to add or change arbitrary information at registration time. COM Interoperability also enables you to customize registered GUIDs, but this is covered in the next section because GUIDs have a wider scope than just registration.
Choosing Your Own ProgID
By default, the ProgID registered for a .NET class is simply the fully-qualified name (namespace + class name). Using ProgIdAttribute, you can change a class’s ProgID to any string you’d like. ProgIdAttribute can be placed on classes only, and has one required string parameter that becomes the new ProgID. Why would you want to change the default ProgID? In most cases you won’t, because it could cause confusion for COM users. The reason for this custom attribute’s existence is that the fully-qualified class name is not always a valid ProgID. The rules of COM dictate that a ProgID must:
• Have 39 characters or less.
• Contain no punctuation besides periods—not even underscores.
• Not start with a digit.
• Be different from the class name of any OLE 1 application.
Thus, if you have a class name that violates any of these conditions, you might consider changing the ProgID. The first condition is pretty easy to break because a namespace alone can often be around 30 characters. That said, none of the classes in the .NET Framework use ProgIdAttribute, even for long names such as System.Runtime.InteropServices. RegistrationServices. Another reason for changing the default ProgID is to create a .NET class that replaces an existing COM class in a compatible way. This is discussed in Chapter 14, “Implementing COM Interfaces for Binary Compatibility.” To suppress the registration of any ProgID for a .NET class, pass an empty string or null to ProgIdAttribute.
Caution
To the users of case-sensitive languages, be aware that the case of “ProgID” differs between System.Type.GetTypeFromProgID and System.Runtime.InteropServices. ProgIdAttribute (plus a few more APIs whose case matches ProgIdAttribute).
Adding Arbitrary Registration Code
If your COM clients require additional registry entries than those listed in the previous section, you basically have two options to provide these entries:
• Add logic to your installation program to add the necessary registry entries. This can easily be done with one of Visual Studio .NET’s “Setup and Deployment Projects.”
• Hook into the standard registration process. It’s possible to define a registration method and an unregistration method that get invoked by the RegistrationServices. RegisterAssembly API in System.Runtime.InteropServices, the same method called by REGASM.EXE to perform assembly registration.
The first option is pictured in Figure 12.1. To create a setup project with custom registry entries, perform the following steps:
1. In Visual Studio .NET, create a new Setup Project, found under the Setup and Deployment Projects folder in the New Project dialog.
2. Inside the project, select the View, Editor, Registry menu to use the Visual Studio .NET Registry Editor.
Figure 12.1. Adding custom registry entries in a Visual Studio .NET deployment project.

The registry editor is easy to use, although it only works with static information. For example, you most likely need to know the CLSID of your .NET class and hard-code it into the registry keys. The easiest way to know your CLSIDs is to mark your .NET classes with explicit CLSIDs (as shown in the next section). However, using explicit CLSIDs is not preferred because it involves more effort and is error-prone when it comes to versioning.
The second option can be done using two custom attributes—ComRegisterFunctionAttribute and ComUnregisterFunctionAttribute. A method marked with either one of these attributes must be static and return void (a Shared Sub in Visual Basic .NET), and have one by-value System.Type parameter.
When each class is registered by REGASM.EXE (or RegistrationServices.RegisterAssembly) a method marked with ComRegisterFunction is executed if it exists. Similarly, when each class is unregistered using REGASM.EXE with the /unregister option (or RegistrationServices. UnregisterAssembly) a method marked with ComUnregisterFunction is executed if it exists. These methods can do anything you want, but typically they only update the registry using the APIs in the Microsoft.Win32 namespace. If registering an assembly causes a security exception to be thrown, chances are that the assembly has a custom registration function that doesn’t have permission to do what it’s trying to do. This can often happen when registering assemblies from the intranet zone.
When executed, the System.Type parameter is the type of the class being registered. This is handy for getting information like the class’s CLSID, because you don’t know the CLR-generated GUID when defining the class. To obtain the CLSID of the class being registered, simply use System. Type’s GUID property. An example of a custom registration and unregistration function is demonstrated in the following Visual Basic .NET code:

The preceding code is an example of how to register a .NET class with an arbitrary COM component category. The extra registry key added by the registration function adds a category indicated with {00021493-0000-0000-C000-000000000046} under the Implemented Categories registry branch. This GUID (also known as a Category ID, or CATID) belongs to the “Internet Explorer Browser Band” category.
Tip
Custom unregistration functions should be robust enough to handle double unregistration. In other words, if a user runs REGASM.EXE with the /u option twice in a row on your assembly, your unregistration function should not throw an exception. When using RegistryKey.DeleteSubKey to accomplish key deletion, this is as simple as using the overloaded method with two parameters and passing false for the second throwOnMissingSubKey parameter. All custom unregistration functions in this book use this overloaded method in order to be well-behaved.
Tip
Registration functions should use an overload of System.Guid.ToString to ensure that GUIDs written to the registry have their customary curly braces. Passing “B” as a string format specifier parameter can do just that. For a System.Guid object g, this:
g.ToString("B")
is equivalent to:
"{" + g.ToString() + "}"
The following table shows the handful of GUID format specifiers available:

The pair of custom registration methods can have any visibility—public, private, protected, and so on—and still be invoked by the system. In fact, private registration and unregistration functions are recommended because there should be no need to expose them to your users. The class containing the methods, however, must be public and COM-visible. If not, the assembly registration process would skip over the class without checking its methods.
An assembly can have multiple registration and unregistration functions, but one type cannot have more than one of each. Such an error is caught by the RegistrationServices API, so REGASM.EXE, for example, would print a message like the following:
RegAsm error: Type ABC has more than one COM registration function.
If any classes derive from a base class with a registration function, the function is called for the base class as well as every class that derives from it. The one exception is that if a derived class defines its own registration function, the base function is not called by the system. Instead, if desired, the derived function is responsible for calling the base function. In short, RegisterAssembly invokes the most derived method marked with ComRegisterFunction and the most derived method marked with ComUnregisterFunction—at most one per class. Furthermore, the System.Type parameter is always set to the type of the class currently being registered, so a single registration function in a base class may get invoked several times, each time with a different parameter value. Having generic registration and unregistration functions in a common base class can be useful so derived classes that may require custom registration can get it with no effort and without even realizing that custom registration is occurring. (If a derived class happens to define its own custom registration function, however, it would need to know to call the base function.)
There are four main guidelines for implementing custom registration functions:
1. Define registration and unregistration functions only if absolutely necessary.
2. Although it is possible to define only one or the other, implement both a registration and an unregistration function as a complimentary pair.
3. Be sure that the unregistration function undoes everything that was done in the registration function.
4. Although arbitrary code could be written inside such methods, stick to modifying the registry. This is most easily done using the Windows Registry APIs provided by the .NET Framework in the Microsoft.Win32 namespace (in the mscorlib assembly).
Developers are strongly discouraged from using custom registration functions because user-written registration code is error-prone and hard to track. This mechanism is provided solely for backward compatibility with COM clients that expect the extra registration.
Windows Media Player is one example of a COM client that looks in a special section of the registry to locate COM objects that implement visualizations. More information on this is given in Chapter 24, “Writing .NET Visualizations for Windows Media Player.” Listing 12.6 shows what registering such an object for Windows Media Player might look like using the Windows Registry APIs provided by the .NET Framework.
Listing 12.6. Custom Registration Required for Plugging a Component into Windows Media Player

Unfortunately, there are two major drawbacks that make ComRegisterFunctionAttribute and ComUnregisterFunctionAttribute useless in some common deployment scenarios. First, the registry files (.reg files) produced by REGASM.EXE do not contain any information about custom registration because there’s no standard mechanism for REGASM.EXE to determine what a custom registration function does; it simply invokes it. The fact that .reg files can be incomplete is not a big deal by itself because users shouldn’t directly be using these files anyway. (In version 1.0, the .reg files produced contain the full path of mscoree.dll, which can change on a machine-by-machine basis. Also, the backslashes in this path are not properly escaped, so using them directly won’t even work on the same machine without modifications.)
The second drawback is that the built-in Visual Studio .NET support for registering an assembly in a Setup project bases its actions on the .reg file produced by REGASM.EXE. It does this intentionally because of the widely-held belief that user-written registration code should be avoided whenever possible. That way, the uninstallation process is guaranteed to clean up everything that was installed. You can exercise the built-in support using the following steps:
1. Inside a Visual Studio .NET Setup Project, select Project, Add, Assembly... from the menu.
2. Select the assembly that you want added to the Setup project using the Component Selector dialog, which works much like the Add Reference dialog introduced in Chapter 3, “The Essentials for Using COM in Managed Code.”
3. Select the assembly in the Solution Explorer then change its Register property in the Properties window to something other than vsdraDoNotRegister, as shown in Figure 12.2.
Figure 12.2. Registering an assembly with built-in Visual Studio .NET support.

When building a Setup project with assemblies to be registered upon installation, Visual Studio .NET effectively runs REGASM.EXE with its /regfile option on any appropriate assemblies to figure out what to register when the installation is run. It treats all InProcServer entries specially, however, so they work on any computer.
If you want to run custom registration functions in a Setup project, you must add a custom action to run REGASM.EXE during the installation and possibly uninstallation phases.
Providing Your Own GUIDs
The automatically-generated GUIDs should always be sufficient, but if you’d like to choose your own GUIDs, you can use the GuidAttribute custom attribute to mark a variety of targets with a GUID. Be careful when doing this, however, because it’s easy to make mistakes (such as using the same CLSID in multiple versions of a class and limiting its side-by-side capability). The attribute has one required string parameter that must be in a format like “051fdbdb-f1a0-41ef-bf21-ddae8bd34546” (with dashes but no curly braces). The attribute can be placed on the following targets, taking on the following meanings:
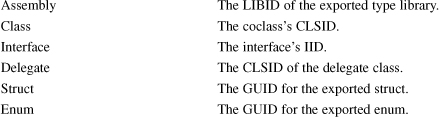
For example, you can use GuidAttribute to choose your own LIBID as follows:
C#:
[assembly:Guid("051fdbdb-f1a0-41ef-bf21-ddae8bd34546")]
Visual Basic .NET:
<Assembly:Guid("051fdbdb-f1a0-41ef-bf21-ddae8bd34546")>
C++:
[assembly:Guid("051fdbdb-f1a0-41ef-bf21-ddae8bd34546")]
Providing Your Own DISPIDs
As covered in earlier chapters, a DISPID is a number assigned to members of an interface derived from IDispatch. By default, DISPIDs are automatically assigned to members of exported interfaces. There’s no real compelling reason to choose your own DISPIDs when defining new .NET types, but it can be done with the DispIdAttribute. This attribute can be placed on methods, properties, and fields, and has a required integer parameter set to the DISPID’s value.
The special DISPID value DISPID_NEWENUM (-4) should normally not be marked directly but rather obtained by implementing IEnumerable, as shown in the previous chapter. Of course, when implementing IEnumerable “privately,” DispId(-4) should be added to the strongly-typed public enumeration method named GetEnumerator, if it exists.
The special DISPID value DISPID_VALUE (0) also does not normally need to be used. When defining a default property in managed code (which, at the metadata level, is indicated by the class or interface having the DefaultMemberAttribute) the type library exporter automatically marks it with a DISPID equal to zero. When defining a default method, however, the type library exporter assigns it a regular DISPID unless you manually mark it with DispId(0). This is asymmetrical to the type library importer, which generates DefaultMemberAttribute when encountering default methods in a type library.
As described in Chapter 8, auto-generated class interfaces have a default ToString property. However, if you define your own default property (using DefaultMemberAttribute or DispIdAttribute) or default method or field (using DispIdAttribute), ToString is assigned a regular DISPID because only one member can be the default. This is demonstrated with the C# code in Listing 12.7.
Listing 12.7. Exposing a Different Default Member Than ToString to COM Clients


The C1 class uses a standard C# indexer, which produces similar metadata to the default member in C2. The only difference between these default members is that C2’s Item property does not have a parameter (and thus isn’t treated by C# as a default member). The C3 class has a default method rather than a property. The DispId(0) is needed to be treated as a default member by COM, and the DefaultMember("Item") is needed to be treated as a default member by .NET. Either one could be used independently, but using both provides a consistent picture to both worlds. Notice that C3.Item is transformed from a method to a property when exposed to COM. This is done for the same reason that ToString is transformed to a property, and is mainly for the benefit of Visual Basic 6 clients.
Caution
The results of marking a class’s member with DispId(0) is a little quirky when inheritance is involved. Every member of an interface must have a unique DISPID, which is why marking a member with DispId(0) causes the exporter to give the base ToString property a regular DISPID. However, if more than one member (excluding ToString) is marked with DispId(0) anywhere in the class or its base classes, the custom attributes are ignored and ToString is left as the default member for the corresponding class interface.
Controlling Interface Derivation
By default, all .NET interfaces are seen as dual interfaces from COM. This gives COM clients both choices—the flexibility of late binding or the performance of early binding. If you don’t want to expose dual interfaces, this behavior can be modified with InterfaceTypeAttribute. This custom attribute can be placed on—you guessed it—interfaces. This custom attribute has one required parameter—a value of the ComInterfaceType enumeration. This enumeration defines three values:
• ComInterfaceType.InterfaceIsDual. This is the default behavior, so this value never needs to be used explicitly.
• ComInterfaceType.InterfaceIsIUnknown. Exposes the interface as deriving directly from IUnknown, so COM clients cannot late bind to members of the interface.
• ComInterfaceType.InterfaceIsIDispatch. Exposes the interfaces as a dispinterface, so late binding is the only way for COM clients to call its members.
Usually there’s no need to change the default behavior when defining new .NET interfaces. One area in which these attributes are essential is the re-definition of COM interfaces, so the metadata can faithfully represent the original interface definitions (covered in Chapter 21). You could mark an interface with InterfaceType(ComInterfaceType.InterfaceIsIUnknown) if you want to disallow late binding to the interface’s methods. However, a class implementing such an interface could make the methods available through its class interface if it didn’t specify ClassInterface (ClassInterfaceType.None). Also, using InterfaceType(ComInterfaceType. InterfaceIsIDispatch) is necessary when exposing event interfaces to Visual Basic 6 clients. This technique is described in Chapter 13.
Caution
Beware of the misleading InterfaceIsIDispatch name. This does not simply mean an interface deriving from IDispatch, because such an interface can be (and usually is) dual. An interface marked with InterfaceIsIDispatch can only be called using late binding. Think of it as “InterfaceIsDispOnly.” Furthermore, as with all the COM Inter-operability custom attributes, it is not valid to combine the enumeration values with bitwise operators. For example (in Visual Basic .NET terminology), ComInterfaceType. InterfaceIsIUnknown Or ComInterfaceType.InterfaceIsIDispatch does not give you a dual interface—that’s what ComInterfaceType.InterfaceIsDual is for.
A hint that tells you that the enumeration’s values are not bit flags is that the enumeration itself is not marked with System.FlagsAttribute. This custom attribute should be marked on any enumerations that represent bit flags. Although not all enumerations in the .NET Framework obey this rule (as there are several that represent bit flags yet are not marked with Flags), the enumerations in the System.Runtime. InteropServices namespace do (plus their names actually end with a Flags suffix).
InterfaceTypeAttribute cannot be used to affect auto-generated class interfaces. Class interfaces fabricated by the CLR are either dual or disp-only based on the ClassInterfaceAttribute custom attribute.
Returning a Specific HRESULT
You can control the failure HRESULTs seen by COM clients by the type of exceptions thrown in error situations. Assuming .NET clients might use your .NET component, you should avoid throwing a COMException. Instead, stick to the .NET exception types such as ApplicationException, ArgumentException, and so on. Refer to the table in Appendix D, “.NET Exception to HRESULT Transformations,” to see how each exception is exposed as an HRESULT return value.
If you must return a well-known COM HRESULT that isn’t covered by the .NET exceptions (such as DISP_E_EXCEPTION), go ahead and throw a COMException with that value. You could even throw a COMException with a success HRESULT value to make the method return a success HRESULT to COM, but this is strongly discouraged due to the cost of throwing an exception.
The preferred way to expose success HRESULTs to COM is to use the familiar PreserveSigAttribute, valid on methods only. As you’ve seen throughout previous chapters, placing PreserveSigAttribute on a method causes whatever return type to remain the return type in the COM signature. Listing 12.8 demonstrates the good and the bad ways of returning a success HRESULT to COM.
Listing 12.8. Returning the Success HRESULT S_FALSE (a Value of 1) from C# Code
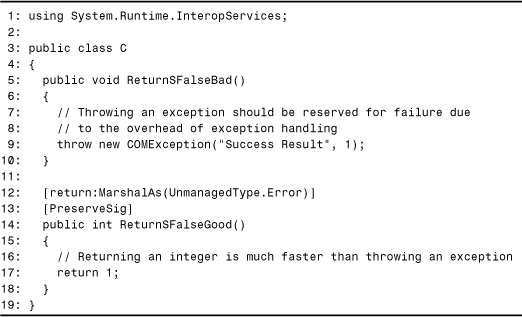
When throwing the “success exception” on Line 9, a description is given simply because no constructor for COMException accepts only an HRESULT value. MarshalAsAttribute is used on Line 12 so the exported method looks like it returns an HRESULT in the exported type library rather than simply a long type.
Tip
Both techniques in Listing 12.8 should be done only if absolutely required for backward compatibility. Throwing a success exception is bad for performance, and returning an HRESULT with PreserveSigAttribute is not appropriate for .NET clients. If you’re creating new .NET APIs, there should be no reason to create a design involving success HRESULTs (or HRESULTs at all, for that matter).
Disabling Type Library Marshaling of .NET Interfaces
By default, all .NET interfaces are registered with the OLE Automation type library marshaler. When an exported type library is registered (using REGASM.EXE’s /tlb option, for instance), the following entries are added to the registry for each interface:
HKEY_CLASSES_ROOTInterface{IID}[default]="InterfaceName"
HKEY_CLASSES_ROOTInterface{IID}ProxyStubClsid(Default)=
"{00020424-0000-0000-C000-000000000046}"
HKEY_CLASSES_ROOTInterface{IID}ProxyStubClsid32(Default)=
"{00020424-0000-0000-C000-000000000046}"
HKEY_CLASSES_ROOTInterface{IID}TypeLib[default]="{LIBID}"
HKEY_CLASSES_ROOTInterface{IID}TypeLibVersion="Major.Minor"
(The GUID {00020424-0000-0000-C000-000000000046} is the LIBID for the OLE Automation type library.) This means that if a .NET interface needs to be marshaled COM-style across context boundaries (apartments, threads, or processes), the interface had better only use OLE Automation-compatible data types and the exported type library had better be registered.
Just as with traditional COM objects, you can register your own proxy/stub marshaler for .NET objects to handle interface marshaling if type library marshaling is not acceptable. Custom proxy/stub marshalers can achieve higher performance, can work with any data types, and usually don’t require a type library containing the interface definitions to be registered. There is no extra support in the .NET Framework or Visual Studio .NET for creating such a proxy/stub marshaler, however. You could create one by defining the interfaces that need to be marshaled in IDL and running MIDL.EXE to generate the proxy/stub code, just as you did before .NET existed.
The problem with registering a custom proxy/stub marshaler is that registering an exported type library adds the registry entries shown previously and can overwrite registry entries for a custom proxy/stub marshaler. Furthermore, it’s pretty easy to accidentally register a type library, as opening one in OLEVIEW.EXE causes this registration. To prevent this from happening, you can use AutomationProxyAttribute to suppress this registration.
AutomationProxyAttribute has a boolean parameter, and can be marked on classes, interfaces, or assemblies. Just like ComVisibleAttribute, a default behavior can be marked for an entire assembly and overridden on individual types. Because AutomationProxyAttribute only applies to COM interfaces, marking it on a class determines the behavior of the class interface, if it exists.
The default for all interfaces is AutomationProxy(true), but marking an interface with AutomationProxy(false) means that the type library exporter will mark the exported interface with the TYPEFLAG_FPROXY flag. This flag is what suppresses the interface registration. Typically when this flag is set, [oleautomation] is not set (and vice-versa), but the [oleautomation] flag appears for all exported interfaces regardless of AutomationProxyAttribute settings. The TYPELIB_FPROXY flag is not displayed by OLEVIEW.EXE, so the only way to see the difference between interfaces marked with AutomationProxy(false) and interfaces that aren’t is to register an exported type library and notice the difference in registration.
If you must define an interface that uses types that are not OLE Automation-compatible, the best approach is to define a COM interface in IDL that gets registered with a proxy/stub marshaler, and then import a type library containing its definition so it can be implemented by a .NET class. Such an interface doesn’t need to be marked with AutomationProxyAttribute to affect its proper registration because MIDL already takes care of that when emitting its definition to a type library.
Creating Multi-Cultured Methods
COM methods and properties sometimes have a special parameter containing a locale identifier (LCID) marked in a type library with the lcid IDL attribute. Such a parameter enables the method implementer to take special action based on the user’s locale. The parameter is marked with lcid so rich clients can recognize its purpose and automatically pass an appropriate value for it. For example, Visual Basic 6 hides lcid parameters just like it hides HRESULT return values. At run time, the Visual Basic 6 runtime fills in the value of the user’s locale, obtained from the operating system. Similarly, COM’s ITypeInfo.Invoke method handles the LCID for the user.
.NET methods and properties that wish to expose an lcid parameter to COM can do so using LCIDConversionAttribute. This has an integer parameter that represents a zero-based offset of which parameter should be the lcid parameter. Unlike the zero-based offset used with MarshalAsAttribute’s SizeParamIndex named parameter, this offset doesn’t refer to an existing parameter, but one that is inserted into the COM definition. For example, marking a method as follows:
[LCIDConversion(0)]
void MultiCulturalMethod(int a, int b) { ... }
causes a new 0th parameter to be inserted containing the LCID. The view from IDL is:
HRESULT MultiCulturalMethod([in, lcid] long p1, [in] long a, [in] long b);
and the view from a VB6 user’s perspective is the same as if no LCID were listed because the runtime takes care of the extra parameter. LCIDConversionAttribute can be used with any number from 0 to the number of parameters, so you could make the last parameter of the preceding method an LCID parameter by marking it as follows:
[LCIDConversion(2)]
void MultiCulturalMethod(int a, int b) { ... }
In this case the third parameter contains the LCID (or the second, counting from zero):
HRESULT MultiCulturalMethod([in] long a, [in] long b, [in, lcid] long p3);
In fact, although an lcid parameter can appear anywhere, the convention is for the last parameter (not counting the retval parameter) to contain the LCID.
Because, from the perspective of the .NET method implementer, the lcid parameter does not exist, how can you find its value and take action appropriately? You can find its value from the current thread’s culture, obtained from the CurrentCulture on the System.Threading.Thread class.
LCIDConversionAttribute is only allowed on a method. Therefore, to use it with a property you must place it on the get and/or set accessors. For example, in Visual Basic .NET:
Public Property MyProperty As String
<LCIDConversion(0)> _
Get
...
End Get
<LCIDConversion(0)> _
Set
...
End Set
End Property
LCIDConversionAttribute is not supported on dispinterfaces.
Using Optional Parameters in Any Language
For languages (like C#) that don’t support optional parameters, it is still possible to define methods with optional parameters, thanks to the OptionalAttribute custom attribute. Although C# clients ignore the attribute, COM clients or even .NET clients written in Visual Basic .NET can treat them optionally! For example, the following C# method:
using System.Runtime.InteropServices;
using System;
public class UsingOptional
{
public void HasOptional([Optional] int x, [Optional] object y)
{
Console.WriteLine("x = " + x);
Console.WriteLine("y = " + y);
}
}
can be called from Visual Basic .NET as follows, omitting both parameters:
Public Module Client
Public Sub Main
Dim x as UsingOptional = new UsingOptional()
x.HasOptional()
End Sub
End Module
Because C# doesn’t know anything about optional parameters, what will it see inside the method at run time? Missing value type parameters appear as zeroed-out structures, and missing reference type parameters appear as System.Reflection.Missing types. Thus, running the previous code would produce the following output:
x = 0
y = System.Reflection.Missing
Unfortunately, there’s no way to specify default values for optional parameters unless the language supports it.
When designing .NET APIs, it’s a good idea to avoid optional parameters because they aren’t always supported. If you’re primarily concerned about COM clients, however, optional parameters are a better choice than overloaded methods due to name conflict resolution (_2, _3, ...). OptionalAttribute is mainly intended for manually defining COM interfaces that use optional parameters in languages like C#. This technique is shown in Chapter 21.
Exposing .NET Objects As COM+ Objects
Any .NET class that derives from System.EnterpriseServices.ServicedComponent (defined in the System.EnterpriseServices assembly) can be exposed as a COM+ configured component. An assembly containing at least one serviced component acts as a COM+ application. COM+ attributes that customize component behavior are configurable in managed code as .NET custom attributes in the System.EnterpriseServices namespace. These custom attributes include:
• ApplicationCrmEnabledAttribute. Can be marked on an assembly to enable the Compensating Resource Manager (CRM). Unlike the others, this custom attribute resides in the System.EnterpriseServices.CompensatingResourceManager namespace.
• ApplicationAccessControlAttribute. Can be marked on an assembly to control the security of the host application.
• ApplicationActivationAttribute. Can be marked on an assembly to control whether the assembly runs as a library application or a server application. By default, assemblies are treated as library applications.
• ApplicationIDAttribute. Can be marked on an assembly to specify an application identifier (AppID). This is a GUID in the same string format used with System.Runtime.InteropServices.GuidAttribute.
• ApplicationNameAttribute. Can be marked on an assembly to control the name of the COM+ application.
• ApplicationQueuingAttribute. Can be marked on an assembly to control the queuing support of the host application.
• AutoCompleteAttribute. Can be marked on a method to enable automatic object deactivation when the method call returns.
• ComponentAccessControlAttribute. Can be marked on a class to enable or disable security checks.
• COMTIIntrinsicsAttribute. Can be marked on a class to enable passing context properties from the COM Transaction Integrator (COMTI) into the COM+ context.
• ConstructionEnabledAttribute. Can be marked on a class to enable support for a construction string and to provide a default string.
• DescriptionAttribute. Can be marked on an assembly, class, interface, or method, to apply descriptions that can be seen in the Component Services (COM+) Explorer.
• EventClassAttribute. Can be marked on a class to designate it as an event class in the COM+ loosely-coupled events system.
• EventTrackingEnabledAttribute. Can be marked on a class to advertise that it supports events and statistics tracking.
• ExceptionClassAttribute. Can be marked on a class to designate it as an exception class for a queued component.
• IISIntrinsicsAttribute. Can be marked on a class to enable ContextUtil.GetNamedProperty to access ASP intrinsics.
• InterfaceQueuingAttribute. Can be marked on a class or interface to enable queuing support.
• JustInTimeActivationAttribute. Can be marked on a class to enable or disable just-in-time activation.
• LoadBalancingSupportedAttribute. Can be marked on a class to advertise whether it contributes to load balancing.
• MustRunInClientContextAttribute. Can be marked on a class to state that it must be activated in its caller’s context.
• ObjectPoolingAttribute. Can be marked on a class to configure its object pooling characteristics, such as minimum pool size, maximum pool size, and a timeout for object creation.
• PrivateComponentAttribute. Can be marked on a class to make it usable only from other components in the same COM+ application.
• SecureMethodAttribute. Can be marked on an assembly, class, or method to ensure a certain level of security on method invocations.
• SecurityRoleAttribute. Can be marked on an assembly, class, interface, or method to add and configure roles.
• SynchronizationAttribute. Can be marked on a class to set its synchronization behavior to one of the SynchronizationOption enumeration values: Disabled, NotSupported, Required, RequiresNew, or Supported.
• TransactionAttribute. Can be marked on a class to set its transactional behavior to one of the TransactionOption enumeration values: Disabled, NotSupported, Required, RequiresNew, or Supported.
For more information about .NET Enterprise Services, see the .NET Framework SDK documentation.
Conclusion
You’ve now seen how to use most of the custom attributes in System.Runtime.InteropServices to customize your .NET applications to be COM-conscious. The designers of COM Inter-operability intended that in the vast majority of cases, none of these custom attributes would be necessary. You should find this to be true, with MarshalAsAttribute being by far the most widely-used custom attribute.
With all the custom attributes used by COM Interoperability, it can often be confusing to know what context they can be used in. After all, a custom attribute is meaningless unless someone looks for it and acts upon it. Some custom attributes are used during import but are ignored by the type library exporter. For example, it is not possible to set flags in the exported type library using TypeLibFuncAttribute, TypeLibTypeAttribute, or TypeLibVarAttribute. Although the type library importer marks metadata with these when encountering type library flags such as hidden, restricted, and so on, the type library exporter ignores these custom attributes. On the other hand, some custom attributes are only used during export and never emitted by the type library importer, whereas other custom attributes are used in both directions.
To keep all of the custom attributes straight, Table 12.3 lists, in alphabetical order, the custom attributes in System.Runtime.InteropServices and explains which attributes are involved with the four main processes—importing, exporting, registration, and run-time marshaling. The only attribute from this namespace that is not listed is DllImportAttribute. This custom attribute is only used for PInvoke, and is covered in depth in Part VI, “Platform Invocation Services.”
Table 12.3. The COM-Related Custom Attributes in System.Runtime.InteropServices (Minus the “Attribute” Suffix for Brevity), Marked by the Processes That Use Them

Some of the attributes emitted by the type library importer might surprise you. The type library importer always marks imported coclasses with a ClassInterfaceAttribute value of ClassInterfaceType.None because they don’t have a class interface from the CLR’s perspective. The importer only uses the ComVisibleAttribute to make newly-generated event classes invisible to COM. Also, the importer only marks methods of dispinterfaces with PreserveSigAttribute.
The exporter honors ComImportAttribute by resolving references to such types to the original type library rather than the assembly containing the .NET definition. This attribute is described in Chapter 21. The registration process ensures that registering classes marked with ComImportAttribute does not overwrite necessary COM entries. This mechanism enables the registration of Interop Assemblies. The exporter uses ImportedFromTypeLibAttribute to know when to export a referenced assembly and when to resolve a reference to an original type library instead. ImportedFromTypeLibAttribute is used during registration to determine whether a type library should be unregistered when a user runs REGASM.EXE with the /u and /tlb options.
IDispatchImplAttribute is described in Chapter 14. Although it doesn’t visibly affect an exported type library, it changes the run-time behavior of the IDispatch interface that .NET components expose to COM. One last point worth noting is that AutomationProxyAttribute is not used directly by the .NET registration process. Because the exported type library changes when using this attribute, the standard COM type library registration that occurs when using REGASM.EXE’s /tlb option changes.
Chapter 13 focuses solely on one custom attribute—ComSourceInterfacesAttribute. Using this, you can expose events to COM in a natural way rather than forcing COM clients to call the add and remove accessors displayed in Chapter 10.