
Chapter 15. Creating and Deploying Useful Primary Interop Assemblies
In This Chapter
• Primary Interop Assembly or Brand New Assembly?
• Creating a Primary Interop Assembly
• Deploying and Registering a Primary Interop Assembly
• Writing IDL That Produces Good Type Libraries
• What About ActiveX Controls?
As discussed in Chapter 3, “The Essentials for Using COM in Managed Code,” a Primary Interop Assembly (PIA) is the official assembly for a corresponding type library, digitally signed and distributed by the author of the type library. The notion of PIAs is simply a convention used by tools such as Visual Studio .NET and TLBIMP.EXE to encourage clients of a COM component to use the same Interop Assembly that others are using. Since the identity of .NET types is based on the assembly in which they reside, it’s important that COM types have a single .NET definition. In addition, PIAs are incredibly useful for distributing an assembly with customizations to make using the COM component easier from managed code. Several of the PIAs distributed by Microsoft have customizations that solve incompatibilities or limitations of the type library importer.
Creating and deploying a PIA is not hard to do, but this chapter also focuses on what makes some type libraries produce better PIAs than other type libraries when doing nothing more than using the importer to create PIAs. We’ll also discuss how you can tweak your own IDL files to create type libraries that achieve the best results. You may want to refer to Chapter 7, “Modifying Interop Assemblies,” which applies to Primary Interop Assemblies just as much as it applies to any other Interop Assemblies. Chapter 7 is extremely important for customizing the PIAs created using the techniques in this chapter in ways that can’t be done in a type library.
This chapter focuses on existing COM components that you cannot (or simply don’t want to) modify. Chapter 16, “COM Design Guidelines for Components Used by .NET Clients,” focuses on ways to either add new functionality to existing COM components, modify existing COM components, or write brand new COM components that naturally work well in .NET, making the task of creating a good Primary Interop Assembly that much easier.
Primary Interop Assembly or Brand New Assembly?
Before looking into the process of creating a Primary Interop Assembly, let’s step back and view the motivation for creating one. Many people view the creation of a Primary Interop Assembly as a temporary measure to satisfy .NET clients until the COM component itself is rewritten in managed code as a brand new assembly (which doesn’t rely on the original COM component). It might make sense, however, to put off rewriting the COM component indefinitely.
Although the CLR’s interoperability services enable incremental migration, these same interoperability services remove the need for migration in the first place! Because the same old COM components can be used in .NET applications, why bother rewriting them? Here are some reasons you might replace old COM components with new .NET components:
• Deployment is easier when a .NET application doesn’t rely on COM components. For example, registering COM components makes the goal of xcopy deployment impossible.
• If you plan on improving a COM component and adding features that involve significant development, migration to .NET might be appropriate to take advantage of new features, higher productivity, easier maintainability, and so on.
• You might want to expose XML Web services or replace RPC or DCOM communication with SOAP, which can be done naturally by taking advantage of the .NET Framework.
• Using interoperability services involves some overhead, so an all-.NET application might perform better than one using COM and .NET.
• If you want to provide .NET clients with the most natural experience, sometimes migration is necessary for COM components whose use from managed code would be awkward without major rewriting, due to fundamental differences in programming models.
There can be many good reasons for migration, but you should be absolutely sure that migration makes sense in your application before beginning such an undertaking. For large COM components, the process of redesigning, rewriting, and testing replacement .NET components takes a significant amount of time and resources. It’s not as simple as using a wizard to convert Visual Basic 6 code to Visual Basic .NET code, or recompiling unmanaged C++ code with the /CLR switch; it can be a major undertaking to transform code to take advantage of the underlying .NET platform.
If you currently have a Web application with ASP Web pages that use COM objects, it might make sense to convert these ASP pages to ASP.NET pages. This is often easier than migrating COM components to .NET components, although converting ASP pages to take advantage of the new ASP.NET programming model and host of features is non-trivial. You can even do this conversion incrementally, because ASP and ASP.NET can run side-by-side. Be aware, however, that the ASP Application and Session objects (used to store application and session state) are completely separate from the ASP.NET Application and Session objects.
If you currently have a standalone Win32 application, migrating it to a .NET Windows Forms application is questionable. Besides adding the requirement that all clients must have the .NET Framework redistributable package (as opposed to requiring it on all Web servers), the features gained by using .NET Windows Forms are usually not nearly as dramatic as the features gained by using ASP.NET. If the existing client application serves as an ActiveX container, however, there’s a good case for migration because hosting Windows Forms controls in arbitrary ActiveX containers is not officially supported, as mentioned in Chapter 8, “The Essentials for Using .NET Components from COM.”
Tip
Re-using existing Win32 graphical clients with .NET back-end components is one of the most productive uses of COM Interoperability as an alternative to migration.
Creating a Primary Interop Assembly
A Primary Interop Assembly isn’t necessarily different from any other Interop Assembly except for a single custom attribute—System.Runtime.InteropServices. PrimaryInteropAssemblyAttribute—marking it as such. There is no support in Visual Studio .NET for creating a Primary Interop Assembly, but it can be easily done with the type library importer SDK utility (TLBIMP.EXE). By importing a type library using its /primary option, TLBIMP.EXE marks the output assembly with PrimaryInteropAssemblyAttribute. This custom attribute contains the type library’s major and minor version numbers. The type library’s LIBID is already captured in an assembly-level GuidAttribute that all Interop Assemblies contain. (Its filename is also captured in the ImportedFromTypeLibAttribute, but this is just for informational purposes.)
This section examines the following topics that are essential for creating a Primary Interop Assembly:
• Generating a strong name
• Handling references to other type libraries
• Naming the output assembly
• Customizing the metadata
Generating a Strong Name
All Primary Interop Assemblies must have a strong name, so TLBIMP.EXE requires that the /primary option must be used with one of three command-line options to specify a strong name key or key pair:
• /publickey:FileName.This option should be used with a binary file containing only your public key. In this case, the resultant strong-named assembly is considered partially signed. Only the public key (and not the private key, of course) is used in an assembly’s strong name, so it’s valid to create a partially signed Primary Interop Assembly and even install it into the Global Assembly Cache. However, partially-signed assemblies don’t have the same protection as fully-signed assemblies. For example, anyone who knows your public key could have created the assembly without needing to know your private key. Or, someone with access to your deployed files could tamper with your assembly after you distribute it without being detected by the CLR, since the assembly’s original contents were not hashed with your private key and stored in the assembly’s manifest. (For these reasons, partially-signed assemblies are typically given less privileges than fully-signed assemblies.) Therefore, partially-signed assemblies should only be created for testing purposes, or as a precursor to fully-signing it using the Assembly Linker SDK utility (AL.EXE). The two-step process of creating a partially-signed assembly and fully signing it later, known as delay signing, is a common practice since developers often don’t have direct access to the company’s private key.
• /keyfile:FileName.This option should be used with a binary file containing your key pair (both the public and private key). In this case, the resultant strong-named assembly is fully-signed and ready for deployment.
• /keycontainer:KeyContainerName.This option should be used with the name of a key container containing your key pair (both the public and private key). This name is used by your computer’s cryptographic service provider (CSP) to locate and use the key pair. Depending on the CSP, this option can be considered safer than /keyfile since the key data doesn’t have to be stored as an unencrypted file in the file system. For example, a CSP may store keys in hardware, minimizing the possibility of them being compromised. A key container can be created using the Windows CryptAcquireContext API. See MSDN Online (msdn.microsoft.com) for more information. As with using /keyfile, the resultant strong-named assembly is fully-signed and ready for deployment.
There’s a fourth signing option that can be used at the same time as using /keyfile or /keycontainer, and that’s the /delaysign option. Specifying this option means that only the public key will be extracted from the key file or key container, so the output assembly is partially signed. The output is the same as using the /publickey option, except that you’re in possession of the private key but deliberately ignoring it. This option should only be used for testing purposes.
If you don’t already have a key pair of your very own, you can generate one using the Strong Name utility (SN.EXE) that is included in the .NET Framework SDK. For example, I can create my own key file at any time by simply executing the following at a command prompt:
sn –k "Adam's Top-Secret Key Pair.snk"
Then, I can create a Primary Interop Assembly for my type library by executing:
TlbImp AdamCo.tlb /keyfile:"Adam's Top-Secret Key Pair.snk" /primary
Handling References to Other Type Libraries
Creating a Primary Interop Assembly may not be quite as simple as just using TLBIMP.EXE’s /primary and /keyfile options if your type library references other type libraries. The rules governing Primary Interop Assemblies state that a PIA can only reference other PIAs, because duplicate definitions could be produced otherwise. TLBIMP.EXE enforces this rule, and looks for dependent PIAs for any type library you attempt to import.
Tip
To determine if your type library references other type libraries, you can open it with OLEVIEW.EXE and look for any importlib statements at the beginning of the library block, for example:
importlib("stdole2.tlb");
Most type libraries reference stdole2.tlb, the type library for OLE Automation, which fortunately already has a PIA that ships with Visual Studio .NET.
When attempting to generate a PIA for a type library that depends on other type libraries, you have four possible scenarios:
• If your type library references another type library that has a PIA registered on your computer, TLBIMP.EXE automatically makes your PIA reference the registered PIA.
• If your type library references another type library that has a PIA, but the PIA is not registered on your computer, you can either register the PIA using REGASM.EXE (discussed in the “Deploying and Registering a Primary Interop Assembly” section), or use the /reference option to list the PIA file at the command line. For example:
tlbimp TalkingComponents.tlb /primary /keyfile:MyKey.snk /reference:SpeechEngine.dll
• If your type library references another type library for your own COM component that doesn’t have a PIA, generate a PIA for the dependent type library. Then follow the instructions for the previous scenario of registering it or using /reference when generating the PIA that depends on it.
• If your type library references another type library for another company’s COM component that doesn’t have a PIA, you should attempt to obtain a PIA from that company so you can reference it. There may eventually be a standard place to search for and obtain PIAs, but nothing exists at the time of writing.
Creating a PIA for some type libraries may involve a mixture of the previous techniques if they reference multiple type libraries.
Naming the Output Assembly
The TLBIMP.EXE utility has two important options (/out and /namespace) that enable you to control the output assembly’s filename and namespace, respectively. As described in the following sections, the use of either option requires some careful consideration of the needs of your users and your plans for the future of your COM components.
Choosing a Filename
It’s imperative that you choose a filename that doesn’t conflict with an existing DLL name such as one that’s a part of your application or one in the Windows system32 directory. Often, a COM component may have a DLL and a standalone type library with the same name, such as MSHTML.DLL and MSHTML.TLB. If the type library has a library name that matches its file name (minus the extension), then TLBIMP.EXE produces an assembly with a conflicting filename by default—MSHTML.DLL (assuming you saved it to a different directory than the original file).
Conflicting filenames can cause all sorts of confusion. For example, imagine that you need to make a PInvoke call into an entry point in the original MSHTML.DLL. (See Chapter 18, “The Essentials of PInvoke,” for more information about PInvoke.) If an Interop Assembly named MSHTML.DLL is encountered first in the current path or if it’s already loaded, the CLR will attempt to call the function in the Interop Assembly and fail to find the desired entry point.
Fortunately, when Visual Studio .NET users import a type library in the IDE, the resultant assembly is given the name Interop.LibraryName.dll, which is unlikely to have a conflicting name with any existing DLLs. But when creating an Interop Assembly using TLBIMP.EXE, as you must do when creating a Primary Interop Assembly, be aware that its default behavior of producing LibraryName.DLL can cause it to be loaded instead of an unmanaged DLL with the same name.
Choosing a Namespace
As with the default filename chosen by TLBIMP.EXE, the default namespace is set to the library’s name. When deciding whether to accept the default namespace or choose a new one, consider the following:
• The library name is always a single word, for example MSHTML, SHDocVw, MSXML, SpeechLib, and so on, so using it as a namespace doesn’t look very .NET-like. The .NET convention for a namespace is CompanyName.TechnologyName, using pascal casing and no abbreviations, so you might consider choosing a namespace that matches the conventions.
• If you anticipate that you’ll be creating revamped .NET APIs in the future that replace the COM APIs, you might want to reserve the best namespace for later to provide a clear separation between the old types and the new types. In the meantime, your Primary Interop Assembly could use a namespace like CompanyName.TechnologyName.Compatibility or CompanyName.TechnologyName.Interop. If you plan on migrating functionality from COM to .NET while keeping your public APIs compatible, you might as well use your ideal namespace like CompanyName.TechnologyName now.
• Visual C++ and Visual Basic COM clients already use the library name like a namespace, so keeping the library name as the Primary Interop Assembly namespace can make life easier for clients porting existing code to .NET languages. For example, a class like SpeechLib.SpVoice remains SpeechLib.SpVoice instead of something like Microsoft.Speech.Interop.SpVoice, giving clients a degree of source code compatibility. Changing the namespace usually isn’t a big deal, however, since most people use it once in C++ or simply omit it in Visual Basic 6.
• Assemblies typically have the same filename as their primary namespace (plus a .dll extension), so choosing a namespace that matches the PIA filename might be desirable. Using TLBIMP.EXE’s /out option automatically changes the default namespace to match the filename (without .dll). Be extremely careful when using /out without the /namespace option, however, because whatever case you use from a command prompt—mylibrary, MyLibrary, MYLIBRARY, and so on—will become the case of the namespace.
There’s one more way to choose a namespace besides TLBIMP.EXE’s /namespace option. It provides some more flexibility, but it involves recompiling your type library. The type library importer recognizes an IDL custom attribute that can be marked on the library statement, containing a string with the namespace desired for an imported assembly (whether it’s a PIA or not). This custom attribute’s name (GUID) is 0F21F359-AB84-41E8-9A78-36D110E6D2F9, and it can be used as follows:
[
uuid(18343A02-E9B7-40BA-A8F6-AFB47510A0BF),
version(1.0),
custom(0F21F359-AB84-41E8-9A78-36D110E6D2F9, "MyCompany.MyTechnology")
]
library MyLibrary
{
...
};
Importing an assembly for this type library always results in a namespace of MyCompany.MyTechnology, even if you try to give it a different namespace using /namespace or /out. The attribute does not affect the output assembly’s filename in any way (and if the string in the attribute ends with .dll when placed on a library statement, the suffix is ignored).
So far, there’s been no compelling reason to use this custom attribute instead of TLBIMP.EXE’s /namespace option. But there is an interesting aspect of this custom attribute—it can be placed on individual types to customize their names and namespaces on a type-by-type basis. This means that you can make the type library importer produce an assembly containing types in multiple namespaces. Listing 15.1 demonstrates this technique.
Listing 15.1. Using an IDL Custom Attribute Recognized by the Type Library Importer to Choose Namespace-Qualified Names for Types Defined in an IDL File

The custom attribute, when used in Lines 6–7 and 20–21, simply causes the two interfaces to be given two distinct sub-namespaces of MyCompany.MyTechnology. In Lines 29–30, the custom attribute renames the enumeration to get rid of the now-redundant 3D prefix. Renaming types using this custom attribute is a legal thing to do, but it’s probably not a good idea to make use of this functionality since clients may have trouble searching for the renamed types.
When using this IDL custom attribute on type definitions, the string must include the namespace and type name. These attributes on types always override any namespace specified by the same attribute on the library statement or specified by a user running the type library importer.
Changing the appearance of your APIs via namespace hierarchies or type renaming is probably not worth the trouble if you’re eventually planning on overhauling your public APIs with a purely managed implementation. If you don’t anticipate changing the APIs in the future, however, using the IDL custom attribute shown in Listing 15.1 can be a handy way of cleaning up and .NET-ifying your APIs.
Customizing the Metadata
It’s often necessary to customize the Primary Interop Assembly produced by the type library importer. Chapter 7 covered the process of making modifications plus all the common modifications one usually needs to make. Chapter 21, “Manually Defining COM Types in Source Code,” also discusses how to customize metadata describing COM types, but uses a different route that avoids the type library importer altogether. These same techniques apply to Primary Interop Assemblies, so they won’t be covered in this chapter.
How do you know if the Primary Interop Assembly needs the customizations shown in Chapters 7 and 21, or if it’s ready to be released as-is? One good sign is if TLBIMP.EXE gives no errors or warnings when importing your type library. However, some warnings—such as the importer encountering a pointer to a pointer to a structure that it converts to a System.IntPtr type—are unavoidable without redesigning the COM component and okay to leave alone.
Most importantly, however, is to realize that getting no errors or warnings from TLBIMP.EXE doesn’t mean that the PIA is useable! Be sure to “kick the tires” a little and try it out from a .NET perspective before releasing it. It’s a good idea to browse your PIA using either the Visual Studio .NET object browser or ILDASM.EXE and, if nothing else, write some small programs that exercise your COM component. Before even invoking the type library importer, it might be worthwhile to view your type library in OLEVIEW.EXE to get a good idea about the type of APIs you’ll be exposing to .NET. If you’re used to viewing them in IDL files or in Visual Basic 6, you might be surprised by what the type library actually contains. Type libraries for Visual Basic 6 COM components contain hidden interfaces, and type libraries created by MIDL from IDL files can omit important information (such as the size_is attribute), or use different data types (such as long instead of BOOL).
Caution
Don’t use TLBIMP.EXE’s lack of errors or warnings as a stamp of approval for your Primary Interop Assembly! Running TLBIMP.EXE with no warnings is neither sufficient nor necessary for producing a good Primary Interop Assembly! In most cases, (such as C-style array parameters that look just like pointers to a single instance) the type library doesn’t have enough information for the importer to issue a warning. If there were enough information, no warning would be necessary because the importer would be able to do the right thing!
One important decision to make when generating a Primary Interop Assembly with TLBIMP.EXE is whether to use the /sysarray option to convert SAFEARRAY parameters and fields to System.Array types. If your type library doesn’t use SAFEARRAYs, then it makes no difference. If your public APIs use SAFEARRAYs but they are always single-dimensional with zero lower bounds, then you should definitely not use /sysarray, so the imported arrays can be naturally used in .NET languages. If your public APIs use SAFEARRAYs that could be multi-dimensional or have non-zero lower bounds, then you should either use the /sysarray option or consider some alternatives discussed in Chapter 7.
Deploying and Registering a Primary Interop Assembly
Creating a Primary Interop Assembly doesn’t do any good if nobody can find it. Visual Studio .NET, TLBIMP.EXE, and AXIMP.EXE look for certain registry values to locate PIAs. The tool that can be used for registering a Primary Interop Assembly is none other than the Assembly Registration SDK utility, REGASM.EXE. It can be used as follows:
regasm MyPIA.dll
When registering a Primary Interop Assembly, REGASM.EXE adds the following registry value in addition to the usual ones:
HKEY_CLASSES_ROOTTypeLib{LIBID}Major.MinorPrimaryInteropAssemblyName
This value has a string containing the assembly’s full name, for example:
stdole, Version=2.0.0.0, Culture=neutral, PublicKeyToken=b03f5f7f11d50a3a
Notice that the value appears under where the type library is registered. This is a natural location because Visual Studio .NET already looks at registered type libraries when presenting the list of COM components in its Add Reference dialog.
The rules for locating a PIA from its assembly name are no different than usual. Because the client attempting to locate the assembly in this case is Visual Studio .NET (or sometimes TLBIMP.EXE or AXIMP.EXE), however, the assembly better be installed into the Global Assembly Cache or it won’t be found. If the assembly can’t be found, Visual Studio .NET imports a fresh Interop Assembly from the type library without notifying the user.
To avoid the requirement of Global Assembly Cache installation, you can use REGASM.EXE’s /codebase option. Besides registering the assembly’s location under every CLSID entry, it registers the assembly’s location under the type library branch with the following value (for PIAs only):
HKEY_CLASSES_ROOTTypeLib{LIBID}Major.MinorPrimaryInteropAssemblyCodeBase
This value’s string is in “codebase format,” for example:
file:///C:/Program Files/My Application/MyPIA.dll
With such a value registered, Visual Studio .NET, TLBIMP.EXE, and AXIMP.EXE are able to find and use a Primary Interop Assembly from the directory specified. There is no way to get REGASM.EXE to apply /codebase only to the Primary Interop Assembly entries or only to the regular CLSID entries, other than using its /regfile option to produce a registration file and manually editing it. Using a REGASM.EXE-generated registration file is an acceptable way to register PIAs, unlike the case for regular assemblies, because Interop Assemblies do not contain custom registration functions, and the registration files produced do not contain InProcServer32 values.
Also, note that REGASM.EXE supports Primary Interop Assemblies that have multiple PrimaryInteropAssemblyAttribute markings. This can be useful so a single Primary Interop Assembly can represent multiple versions of the same type library (as long as all versions have the same LIBID). When encountering such a PIA, REGASM.EXE places the PrimaryInteropAssemblyName value and (if applicable) the PrimaryInteropAssemblyCodeBase value under each type library version. TLBIMP.EXE, however, does not support creating a Primary Interop Assembly corresponding to more than one type library. To do this, you’d need to resort to the techniques in Chapter 7.
Because any dependent PIAs registered on your computer are automatically referenced when creating a PIA, you may not always be aware of the dependencies that your PIA has. It’s important to be aware of all dependencies so you know what needs to be shipped and registered along with your PIA. A good way to double-check is to open the PIA using ILDASM.EXE and open its manifest. There, besides the ever-present reference to the mscorlib assembly, you’ll see every other assembly your PIA requires, for example:
.assembly extern mscorlib
{
.publickeytoken = (B7 7A 5C 56 19 34 E0 89 ) // .zV.4..
.ver 1:0:3300:0
}
.assembly extern DependentAssemblyOne
{
.publickeytoken = (54 5E 88 26 7B A4 28 1F ) // T^.&{.(.
.ver 1:1:0:0
}
.assembly extern DependentAssemblyTwo
{
.publickeytoken = (54 5E 88 26 7B A4 28 1F ) // T^.&{.(.
.ver 6:0:0:0
}
Tip
Use the /verbose mode when importing a type library with TLBIMP.EXE. Among other output, this will display any assemblies that it automatically references plus any dependent type libraries it automatically generates.
To summarize, all Primary Interop Assemblies and their dependent Primary Interop Assemblies must be registered and installed in the appropriate location on any software developer’s computer. The registration is only useful when a Visual Studio .NET user references a type library, or when a TLBIMP.EXE or AXIMP.EXE user imports a type library that references other type libraries with PIAs. A Primary Interop Assembly does not have to be registered in order to work at run time. So when shipping a product to a non-developer end user, registering Primary Interop Assemblies is not necessary.
Tip
Although registering Primary Interop Assemblies on end user computers is not necessary, registering any Interop Assemblies with REGASM.EXE on an end user’s computer (primary or not) can be beneficial anyway, as explained in Chapter 6, “Advanced Topics for Using COM Components.” Because REGASM.EXE registers .NET class types under their corresponding CLSIDs, the CLR can use this information to minimize the number of times that COM objects are wrapped in the System.__ComObject type.
Writing IDL That Produces Good Type Libraries
It should be obvious that having a type library describing the types in your COM application goes a long way in making it easily accessible from .NET programs. With a type library, you can instantly generate a Primary Interop Assembly using TLBIMP.EXE or a regular Interop Assembly by referencing the type library in Visual Studio .NET.
Fortunately, creating a type library is already a natural part of COM development. COM components written in Visual Basic 6 have a type library automatically generated and embedded in the output DLL or EXE (for project types such as ActiveX EXE, ActiveX DLL, and ActiveX Control, although not Standard EXE). Using the ATL COM AppWizard in Visual C++ 6 or the updated ATL Project Wizard in Visual C++ .NET also generates an embedded type library.
If you ship a Primary Interop Assembly with your COM component, as you should, a type library isn’t necessary for .NET components to compile against your types, but shipping a type library is still convenient for any COM clients, such as Visual Basic 6 programs. Note that shipping (and registering) a type library is always necessary if you rely on the OLE Automation marshaler to marshal your interfaces across context boundaries (type library marshaling).
Tip
For maximum usability, make sure any COM types you define reside in a type library. This includes classes, interfaces, structures, unions, and enums. Only defining them in a C++ header file or IDL file isn’t enough. You should define them inside a library block in an IDL file so MIDL includes them when compiling a type library.
When creating a type library, there are some guidelines to follow to take advantage of the transformations done by the type library importer. These apply to developers who create IDL files that are compiled to a type library using the MIDL compiler (as is the case with Visual C++ projects). Visual Basic 6 programmers don’t have direct control over the kind of issues discussed in this section, but fortunately the automatically-generated type libraries follow these guidelines anyway.
Although you can tweak your Primary Interop Assembly using the techniques from Chapter 7, it’s much easier to tweak your type library so it automatically produces the correct results when imported. This is especially true for COM components still under development. The kind of manual modifications to PIAs would have to be automated since APIs could be in a state of flux, perhaps on a daily basis.
Having a type library isn’t even necessary for creating a PIA since one can be created manually from any .NET language (as shown in Chapter 21). However, this is a lengthy, error-prone process, and also suffers if your COM types are still under development and constantly changing.
This section covers the following topics for those who deal with IDL files directly, such as C++ programmers:
• Referencing external types
• Defining classes
• Defining structures, enums, and unions
• Using constants appropriately
• Avoiding ignored constructs
• Registering the type library
Although Visual C++ .NET has introduced attributed programming, which can remove the need for a separate IDL file, the same concepts apply in making sure that the right information gets into the project’s type library.
Referencing External Types
The MIDL compiler has two ways to reference types defined externally to the current IDL file—the import directive and the importlib directive.
The import directive is much like using #include in C++; it dumps definitions of interfaces, typedefs, and constants into the current IDL file as a pre-processing step. Fortunately, using import only brings in definitions that you use in your IDL file (plus any dependent definitions). So the following line, which often appears at the top of standard IDL files:
import "oaidl.idl";
has no effect unless you make use of one of the types defined inside. This is true regardless of where import is used—inside or outside of the library statement. Be aware, however, that using a single type from an imported file can suck in a whole bunch of definitions. By the single action of using IRecordInfo as a parameter type from oaidl.idl, the type library MIDL generates not only contains the definition of IRecordInfo, but also the ITypeInfo, ITypeComp, and ITypeLib interfaces, 11 structs, seven enums, two unions, and a typedef.
The importlib directive, which must appear inside a library statement, references a type library rather than an IDL file. Any definitions in the referenced type library are available for use by your IDL file, but none of them get copied into the output type library as they do in the import case. Because of this, any type libraries listed in importlib statements need to be distributed with your type library. The price of not having duplicated definitions is that your type library, not just your IDL file, has dependencies.
The importlib semantics match the .NET mechanism of referencing assemblies. Because .NET type identities are based on the assembly in which they are defined, they are never duplicated in the source code for other assemblies as a pre-processing step. Instead, the types must be referenced via their containing binary files and these dependent files must be available wherever the referencing programs are used.
Therefore, it should come as no surprise that using importlib rather than import in your type library works better when the type library is imported to an assembly. Any separate type libraries referenced using importlib are imported as separate assemblies, whereas any type definitions referenced using import are imported to the same assembly since the type library used as input for the type library importer shows no evidence that import was used. The difference between using import and importlib is pictured in Figure 15.1.
Figure 15.1. Using the IDL import directive “flattens out” type definitions by copying them into the type library, which can cause undesirable duplicate definitions for .NET clients.
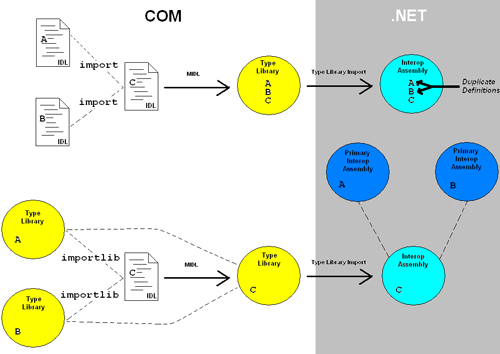
Both cases in the diagram involve defining a type C that uses the externally defined types A and B in its signatures. In the case when import is used, the type library produced by MIDL contains the definitions of A, B, and C just as if they were all defined in the same IDL file. Therefore, the type library importer creates an Interop Assembly with all three types. If Primary Interop Assemblies containing the official .NET definitions of A and B exist (as shown in the diagram), the A and B types exposed by C are completely incompatible, causing difficulties for .NET clients.
In the case when importlib is used (which requires existing type libraries with the definitions of A and B), the type library produced by MIDL only contains the definition of C, referencing the other two type libraries for the necessary definitions of A and B. Because this dependency information is preserved in the type library, the importer knows to create an Interop Assembly with only the definition of C, then find or create dependent assemblies containing definitions of A and B. In Figure 15.1, the importer automatically references the Primary Interop Assemblies, which results in an optimal experience for .NET clients.
Fortunately, referencing a type library in a Visual Basic 6 project uses importlib in the project’s type library. Many C++-based COM projects, however, use import in their type libraries. In fact, the documentation for MIDL recommends import instead of importlib for three main reasons:
• In COM, duplicate definitions don’t cause problems since type identity is based on GUIDs rather than the definition’s location.
• Using import is easier because you don’t have to worry about having dependent type libraries available and registered.
• Many COM types aren’t defined in a type library, so using import is sometimes the only option. You could create a type library with the definitions of the needed COM types, but (unless you’re the author of the types) that would be no better than using import and causing those types to be defined in your own type library.
Using import rather than importlib is fine for a COM-only world but, now that .NET is in the picture, it’s no longer desirable.
Tip
Always prefer importlib rather than import when creating a type library from an IDL file. One of the unenforceable rules of creating a Primary Interop Assembly is that it should not contain any type definitions whose official definition belongs elsewhere. Using import can easily violate this rule.
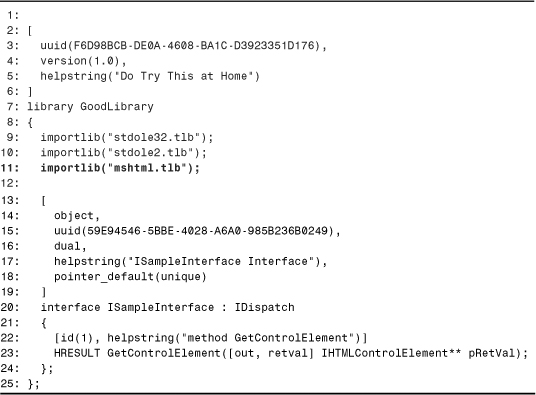
Listing 15.2 demonstrates the discouraged use of import to be able to use the IHTMLControlElement in the Microsoft HTML Object Library, whereas Listing 15.3 demonstrates the encouraged use of importlib for the same scenario. This library has a publicly available IDL file (MSHTML.IDL), type library (MSHTML.TLB), and even a Primary Interop Assembly (Microsoft.mshtml.dll, distributed with Visual Studio .NET). Therefore, importing a type library based on Listing 15.2 incorrectly duplicates type definitions, whereas importing a type library based on Listing 15.3 correctly references the Primary Interop Assembly.
Listing 15.2. Using the IDL import Directive to Reference Types in Other IDL Files Can Cause Type Identity Problems in .NET
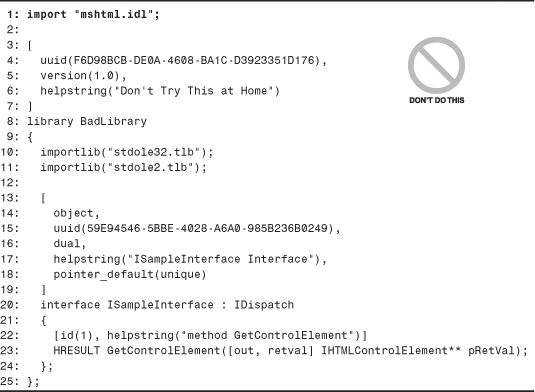
![]()
Listing 15.3. Using the IDL importlib Directive to Reference Types in Other Type Libraries Is the Best Mechanism When Imported for .NET
What should you do if the external type you wish to use is not defined in any type library? You can take the same steps that are recommended for using types defined in someone else’s type library for which you don’t have a Primary Interop Assembly, mentioned in the FAQ sidebar earlier in the chapter. This includes omitting external interfaces from coclass lists, replacing interface parameters with IUnknown or IDispatch (which requires source code changes), and duplicating struct or enum definitions.
Tip
Don’t worry about using parameters with the ITypeInfo, IEnumVARIANT, and IDispatchEx types defined in an IDL file. These interface types are treated specially by the type library importer and custom marshaled to the System.Type, Sytem.Collections.IEnumerator, and System.Runtime.InteropServices.Expando.IExpando types, respectively. This only applies to parameters and fields, however, so a coclass should avoid listing one of these interfaces as being implemented because the .NET class will appear to implement a custom definition of ITypeInfo, IEnumVARIANT, or IDispatchEx.
Defining Classes
Because classes don’t play a big role in COM, they are sometimes overlooked when defining a type library. Neither .NET nor COM clients require a class definition since a class can be instantiated using its registered CLSID or ProgID. After instantiation, a class’s members can be invoked either by casting to an appropriate interface or by late binding to the object (if it implements IDispatch).
However, .NET clients expect to be able to instantiate an object without using COM-specific mechanisms. In C#, Visual Basic .NET, and C++, this means using the new keyword (New in VB .NET). Defining a class in a type library enables the type library importer to create a .NET class definition that can be used with the new keyword. Although COM-specific mechanisms must be used by the CLR to instantiate the object, the .NET client doesn’t need to be aware of this. Even in COM, defining a class in a type library should be done for Visual Basic 6 clients so they can use New instead of calling CreateObject with a ProgID.
There are two separate issues to consider when defining a coclass in an IDL file:
• Listing implemented and source interfaces
• Choosing an appropriate default interface
Listing Implemented and Source Interfaces
A COM class is defined in an IDL file as follows:
[uuid(3050f2c4-98b5-11cf-bb82-00aa00bdce0b)]
coclass HTMLInputImage
{
[default] dispinterface DispIHTMLInputImage;
[source, default] dispinterface HTMLInputImageEvents;
interface IHTMLInputImage;
interface IHTMLControlElement;
interface IHTMLElement;
};
Although MIDL requires that a coclass lists at least one interface (either an implemented or source interface), you should make sure that any coclass statements you define list all interfaces that you expect to be used from .NET clients (omitting IUnknown and IDispatch, for example). For the identity reasons listed in the last section, any external COM interfaces that are only defined in an IDL file should probably be omitted from the list.
.NET clients can still use interfaces not listed by the coclass statement (since casts result in QueryInterface calls), but listing them has the following advantages:
• It ensures that a .NET definition of the interface gets imported. Otherwise, clients might need to find or create their own interface definition in order to cast the object to the interface type and call its members.
• The CLR can determine that casting the coclass interface to a different interface can succeed based on metadata alone (when the instance’s class type isn’t System.__ComObject) rather than resorting to a poorer-performing QueryInterface call.
• For clients that may use the class type directly (rather than its imported coclass interface), it can be implicitly coerced to any of the listed interface types rather than requiring an explicit cast.
• The type library importer can only transform source interfaces into .NET events if a coclass lists its source interfaces. Otherwise, .NET clients that wish to hook up event handlers need to do a lot more work by manually setting up connection points as they would in unmanaged C++.
Tip
Although listing both implemented and source interfaces is important when defining a coclass in an IDL file, listing all source interfaces is far more important than listing all implemented interfaces. If a coclass statement omits an implemented interface that already has a .NET definition, a .NET client can still easily cast an instance of the coclass to the interface. If a coclass statement omits a source interface, however, a .NET client has to do a lot more work, as demonstrated in Chapter 5, “Responding to COM Events.” Fortunately, any VB6-friendly connectable coclass would already list a source interface since failure to do so prevents event handling from Visual Basic 6.
Choosing an Appropriate Default Interface
Every coclass has an interface that’s treated as its default interface. This is either the one marked with [default] or the first interface listed. The default interface is important for .NET clients due to two transformations done by the type library importer, described in Chapter 4, “An In-Depth Look at Imported Assemblies”:
• A coclass interface is generated with the name of the coclass that derives from the default interface.
• If a coclass is defined in the same type library as its default interface, and if no other coclass in the same type library claims to implement the interface, any parameters or fields of the default interface type are replaced with the coclass interface.
Due to these transformations, a coclass’s default interface should accurately represent the entire class. Visual Basic 6 classes use an automatically-generated class interface as the default interface, which contains all the members of the class. This type of default interface works best when imported to an assembly.
The important thing is that you must choose a default interface, otherwise one will be chosen for you! If you don’t already have an interface containing all the class’s members (and don’t want to define one), you should choose an interface that:
• most naturally represents the class’s important functionality
• will not be implemented by coclasses in other type libraries
The second point means that you shouldn’t choose a famous COM interface as a default interface; rather, it should be one you defined yourself. Here’s an example demonstrating why. The following class lists its interfaces in alphabetical order, not paying attention to the implied default designation being assigned to the first interface:
[
uuid(147E9116-9628-4BBE-BA31-9F555C0BDFA6),
helpstring("MultiPurposeObject Class")
]
coclass MultiPurposeObject
{
interface IProvideClassInfo;
interface IReader;
interface IWriter;
};
![]()
Because IProvideClassInfo is the default interface, the imported MultiPurposeObject coclass interface derives from it, which may seem a little strange since either IReader or IWriter is probably more appropriate. Furthermore, suppose that the type library defining MultiPurposeObject also defines an interface with the following pair of methods, unrelated to MultiPurposeObject:
HRESULT IsGoodClass([in] IProvideClassInfo* classInfo,
[out, retval] VARIANT_BOOL bRet);
HRESULT GetInfo([out, retval] IProvideClassInfo** pRetVal);
If no other coclass in the type library lists IProvideClassInfo as an implemented interface, these methods get imported as follows (in C# syntax):
public MultiPurposeObject GetInfo();
public bool IsGoodClass([in] MultiPurposeObject classInfo);
The parameters are replaced with the coclass interface! Having GetInfo return a MultiPurposeObject interface rather than an IProvideClassInfo interface seems odd, but everything still works just as if it returns an IProvideClassInfo interface since the coclass interface derives from it. So, calling the method can still be done with code like the following (in C#):
IProvideClassInfo classInfo = obj.GetInfo();
But the C# code could also call it like so:
MultiPurposeObject mpo = obj.GetInfo();
Had the MultiPurposeObject coclass listed any source interfaces, the preceding line of code could mislead the .NET client into believing that it can hook up event handlers to the returned object. After all, the MultiPurposeObject .NET definition would inherit event members. But the GetInfo method could easily return a non-connectable object that implements IProvideClassInfo, causing an exception if the client attempted to hook up handlers to any events.
If a client wants to call IsGoodClass, it has to pass an object that implements the MultiPurposeObject interface. Although this interface has the same IID as IProvideClassInfo, you can’t substitute one for the other in managed code without a cast:
IProvideClassInfo classInfo = obj.GetInfo();
bool b = IsGoodClass((MultiPurposeObject)classInfo);
This cast works only if the source object is an RCW, because in this case the cast results in a successful QueryInterface call. If you wanted to pass a .NET object that implements the .NET definition of IProvideClassInfo, you’d have to change the class’s definition or wrap it in a second class that implements the MultiPurposeObject interface. Furthermore, as discussed in Chapter 14, “Implementing COM Interfaces for Binary Compatibility,” version 1.0 of the CLR doesn’t properly expose such .NET objects to COM when the parameter or field is defined as a coclass interface type.
Tip
If your coclass doesn’t implement any interfaces that are good candidates for the parameter and field replacement done with coclass interfaces, you should mark IUnknown or IDispatch as its default interface. Because these interfaces are defined in a different type library than your own, your coclass would no longer qualify for these transformations. Version 1.0 of TLBIMP.EXE provides no way to suppress the coclass interface parameter and field replacement that is done for coclasses that qualify.
By now, you should be convinced that you must be really careful about which interface you mark as the default. A rule governing the importer’s parameter/field replacement is supposed to prevent such confusion: The replacement is only done if the coclass and its default interface are defined in the same type library. The problem in the IProvideClassInfo case is that the definition is obtained via the IDL import directive on ocidl.idl, so they appear to be defined in the same type library.
Tip
When creating a Primary Interop Assembly, be sure to check all of your default interfaces and determine whether or not the potential parameter/field replacement makes sense for all reasonable situations. It’s important because the parameter/field replacement applies to any type libraries that reference your interface definition, even if those dependent type libraries contain coclasses that also implement your interface!
Defining Structures, Enums, and Unions
The most important guideline when defining a structure in an IDL file is to mark it with a GUID. That’s because in version 1.0 of the CLR, the Interop Marshaler’s support for SAFEARRAYs of user-defined structures (SAFEARRAYs with the VT_RECORD type) only works with structures that have GUIDs. Marking a structure with a GUID has the following IDL syntax:
typedef [uuid(3215A2FA-ED29-45AE-97EA-7BABC5E4C18E)]
struct MyStructure
{
short MyField;
} MyStructure;
Fortunately, any UDTs defined in Visual Basic 6 are automatically marked with GUIDs when emitted to a type library. However, many structures defined originally in an IDL file do not have GUIDs. It’s certainly an easy thing to forget when writing struct definitions manually.
The other guideline for defining structures, which also applies to enums and unions, deals with choosing names. MIDL generates its own names for structures, enums, and unions that it believes to be nameless. These auto-generated names are always ugly, like __MIDL___MIDL_itf_MyProject_1010_0001, so you want to avoid this from happening wherever possible. The following are two IDL definitions of a structure:
Do use:
typedef [uuid(7EC0FB07-3B65-45F6-9F7D-1AB93F53781C)]
struct MyNamedType
{
short MyField;
} MyNamedType;
Don’t use:
typedef struct
{
short MyField;
} MyUnnamedType;
![]()
The portion in bold is where MIDL picks up the name of the struct. The second struct, while a legal definition, gets an automatically-generated name from MIDL (and isn’t marked with a GUID as it should be). Also notice that the first struct uses the same identifier before and after the curly braces. This is legal, and the best way to define a struct in IDL. The common pattern of adding a tag prefix to the first identifier causes the imported structure to begin with the undesirable tag prefix.
Don’t use:
typedef struct tagMySecondNamedType
{
short MyField;
} MySecondNamedType;
![]()
To make matters more confusing, OLEVIEW.EXE displays structs using the following rule:
typedef [...] struct tagStructName
{
...
} StructName;
So the three previously defined structures would be incorrectly viewed as follows:
typedef [uuid(7EC0FB07-3B65-45F6-9F7D-1AB93F53781C)]
struct tagMyNamedType
{
short MyField;
} MyNamedType;
typedef [public]
__MIDL___MIDL_itf_myproj_1010_0001 MyUnnamedType;
typedef struct tag__MIDL___MIDL_itf_myproj_0209_0001
{
short MyField;
} __MIDL___MIDL_itf_myproj_1010_0001;
typedef struct tagtagMySecondNamedType
{
short MyField;
} tagMySecondNamedType;
This unfortunate behavior is one of the aspects of OLEVIEW.EXE that limits its usefulness as a type library disassembler.
Notice that MIDL does generate a typedef for the auto-named structure. Since the type library importer imports two copies of a non-primitive typedef (one with the original name and one with the typedef name), any .NET signatures that use the second structure definition as a parameter would fortunately use the .NET value type with the desired name (MyUnnamedType). The metadata would still be cluttered, however, with useless types named by MIDL.
Using Constants Appropriately
Many IDL files make use of two equivalent directives—cpp_quote and midl_echo—in order to inject text directly into C++ header files produced by the MIDL compiler. One problem with using these directives is that there’s a tendency to use them too heavily such that only C++ clients can take full advantage of useful items, ignoring the needs of other languages. An example of this is often seen with constant values.
Rather than using cpp_quote or midl_echo to define constants in a header file only, you should define constants inside a module block in order to make the identifiers available to everyone consuming the type library. The following code snippets demonstrate this:
Don’t use:
cpp_quote("#define MAX_LENGTH 256")
cpp_quote("#define MIN_LENGTH 3")
![]()
Don’t use:
#pragma midl_echo("#define MAX_LENGTH 256")
#pragma midl_echo("#define MIN_LENGTH 3")
![]()
Do use:
module MyConstants
{
const unsigned short MaxLength = 256;
const unsigned short MinLength = 3;
};
Make sure that the module block is defined inside the library statement so it gets emitted to the type library produced by MIDL. Defining constants this way not only makes them available for .NET and Visual Basic 6 users, but it still makes them available in the MIDL-generated C++ header file. For example, MIDL generates the following for the preceding MyConstants module:
#ifndef __MyConstants_MODULE_DEFINED__
#define __MyConstants_MODULE_DEFINED__
/* module MyConstants */
const unsigned short MaxLength = 256;
const unsigned short MinLength = 3;
#endif /* __MyConstants_MODULE_DEFINED__ */
Avoiding Ignored Constructs
There are two classes of ignored constructs to be aware of—those that appear in an IDL file and are omitted from a type library (simply because they cannot be expressed in a type library’s binary format), and those that appear in a type library but are omitted from an Interop Assembly.
For example, the following commonly-used IDL attributes do not exist inside a type library:
• size_is
• length_is
• first_is
• last_is
• max_is
• min_is
• iid_is
• switch_is
• async
• ref
• unique
• ptr
There are three main constructs that are emitted to type libraries but ignored by the type library importer:
• IDL custom attributes (except for the one used to control imported namespaces and type names)
• Methods in a module block
• Typedefs of primitive types
There’s no technical reason for the omission of these items, so they could be added to an Interop Assembly manually. But, because the type library importer doesn’t handle these for you, it’s best to avoid them if at all possible.
Registering the Type Library
As mentioned in Chapter 6, registering a type library can sometimes be necessary for using COM components in .NET. There’s nothing inherent in .NET that requires type library registration, but registration might be required for cross-context COM marshaling. Most COM interfaces rely on the OLE Automation marshaler to marshal interfaces pointers across COM contexts. But the OLE Automation marshaler requires a type library to be registered (which places information about the type library under each interface’s IID in the registry) in order to get the type information it needs to be able to marshal the interface.
You should ensure that your COM components are registered appropriately to support cross-context marshaling when deployed. Often, type libraries embedded in DLLs are registered at the same time the COM components themselves are registered via REGSVR32.EXE. This is the case for COM DLLs generated by Visual Basic 6 or ATL because their implementation of DllRegisterServer, which is called by REGSVR32.EXE, registers the embedded type library. Standalone type libraries can be registered by calling the LoadTypeLibEx Win32 API with the REGKIND_REGISTER flag (see Chapter 22, “Using APIs Instead of SDK Tools,” for an example). The REGASM.EXE SDK utility also registers type libraries, but only for ones that it exports from assemblies.
For COM components that rely on custom proxy/stub marshaling, make sure that the appropriate proxy/stub marshaler is registered for your interfaces instead of the type library. Accidentally registering a type library marshaler can result in incorrect marshaling for types that aren’t supported by the OLE Automation marshaler, such as C-style arrays. Recall that type libraries can be accidentally registered by doing something as innocent as opening them with OLEVIEW.EXE, but this won’t necessarily affect the registration of interfaces. See Chapter 12, “Customizing COM’s View of .NET Components,” for more information.
Caution
The default behavior of the Visual C++ 6 ATL COM Wizard does not properly register a proxy/stub DLL when selecting Allow merging of proxy/stub code. See Chapter 6 for steps to fix this problem.
What About ActiveX Controls?
There’s no such thing as a “Primary ActiveX Assembly”; one ActiveX Assembly is no more official than another. This is fine, because the only interesting types defined in an ActiveX Assembly are the Ax-prefixed classes, and there’s no compelling reason for .NET components to send an instance of one to another .NET component. Any cross-assembly communication should be done with the core classes and interfaces from a Primary Interop Assembly.
What this means, however, is that Visual Studio .NET users selecting your ActiveX control from the Customize Toolbox dialog will not be automatically redirected to your pre-built, potentially customized, ActiveX Assembly. You should still create, customize (using AXIMP.EXE’s /source option), sign, and ship an ActiveX Assembly. Users will just need to know to select your new component from the .NET Framework Components tab of the Customize Toolbox dialog rather than the COM Components tab.
You should be sure that any ActiveX Assembly that you create references only Primary Interop Assemblies. If you don’t plan on publicly exposing any members that use types from the referenced assemblies, it’s not strictly necessary but it’s still a good idea because otherwise you’d be shipping your component with assemblies that are potentially duplicates of PIAs already installed on the user’s computer. Because AXIMP.EXE only runs on a type library and has no way to reference pre-imported assemblies (as does TLBIMP.EXE’s /reference option), you can follow these steps to create an ActiveX Assembly that references PIAs:
1. Create a Primary Interop Assembly for the type library describing the ActiveX control(s) using TLBIMP.EXE. This may involve creating or obtaining PIAs for dependent type libraries.
2. Register the Primary Interop Assembly (plus any dependent PIAs) using REGASM.EXE. If you don’t also install it in the Global Assembly Cache, be sure to use the /codebase option.
3. Run AXIMP.EXE on the type library. The ActiveX control importer checks for a registered Primary Interop Assembly before invoking the type library importer, and will use it if it can locate the assembly.
The other option would be to use AXIMP.EXE’s /source option, then reference the necessary PIAs when compiling the output C# source code.
Tip
It’s a really good idea use AXIMP.EXE’s /source option to generate C# source code for the ActiveX assembly and customize its contents. As discussed in Chapter 5, the types generated by the ActiveX importer do not conform to .NET guidelines. In the generated source code, you should rename the ...Event classes to ...EventArgs classes, perhaps capitalize the public fields of these classes, and make them derive from System.EventArgs. Another user-friendly change would be to rename the delegate types from SourceInterfaceName_MethodNameEventHandler to simply MethodNameEventHandler, as long as the name doesn’t conflict with others.
Note that when compiling source code generated from AXIMP.EXE, you’ll need to reference System.Windows.Forms.dll and System.dll in addition to the corresponding Interop Assembly (and its dependencies).
Conclusion
Although the main purpose of this chapter is to describe how to create and deploy Primary Interop Assemblies, we also discussed IDL tweaks to make a type library for which the importer produces a usable PIA naturally. This can hopefully avoid the need to disassemble, modify, and reassemble the result. It’s easy to generate one with TLBIMP.EXE and have the urge to ship it as-is (especially if there were no warnings during import), but it may not necessarily be usable from .NET languages depending on what techniques are used in the input type library.
We also discussed issues with migrating existing COM components, something which needs serious evaluation before undertaking. The huge time and effort required by migration often doesn’t pay off. Sometimes a good approach is to attempt to use COM Interoperability and see if it meets your needs before planning a large migration.
Although using the type library importer is the easiest and recommended way to create a Primary Interop Assembly, it’s sometimes desirable to create a Primary Interop Assembly in source code, especially if you’re planning on making additions to the assembly. For example, you could create a brand new assembly in your favorite language and mark it as a Primary Interop Assembly by simply using PrimaryInteropAssemblyAttribute and registering it appropriately. Then, this assembly could define new .NET types that encapsulate definitions of COM types in a way that hides any COM complexity, handling things like resource management or custom data type transformations. However, PIAs must at least contain public definitions of all the types in the original type library. An assembly that’s radically different should just be considered the next version of a technology and not be tied to an older type library.
COM Interoperability is not the only way to re-use COM components in .NET. Instead, you could use existing COM objects via the other technologies described in Chapter 2, “Bridging the Two Worlds—Managed and Unmanaged Code.” For example, by exposing your APIs as simple static entry points, you can use PInvoke to expose unmanaged functionality with higher performance. You could then create a new .NET object model that encapsulates these APIs in a .NET style. This technique is used throughout the .NET Framework—for example, the System.IO namespace encapsulates the Windows file system APIs and the System.Windows.Forms namespace encapsulates a whole bunch of Windows APIs inside .NET object models.
Mixed mode programming using Visual C++ .NET is the most raw and powerful option. Whereas PInvoke and COM Interoperability make use of the Interop Marshaler for data transformations and Visual J# .NET automatically handles Java/.NET transformations, any data transformations in mixed-mode C++, such as exposing a .NET String type for a char* or BSTR type, need to be done manually by the programmer. To help with this, several helper functions exist in a vcclr.h header file that ships with the .NET Framework SDK, or in the System.Runtime.InteropServices.Marshal class.
Visual C++ .NET is valuable for gradual migration and fine-grained mixing of managed and unmanaged types. For algorithms that must be ultra-efficient, you can take advantage of optimized unmanaged code that perhaps can’t be matched by the .NET just-in-time compiler. There are three main drawbacks to writing managed code using Visual C++ .NET:
• The generated assemblies contain some unmanaged code in addition to IL, so are not instantly portable to other platforms.
• In an environment with multiple .NET application domains, programming in C++ requires great care with unmanaged code interaction. When you call unmanaged code that calls back into managed code, you need to manually ensure that it executes in the proper application domain.
• Assemblies produced by Visual C++ do not pass .NET verification, but this often doesn’t matter for assemblies that interoperate with unmanaged code anyway.