
Chapter 7: Using CloudFormation Templates to Deploy Workloads
CloudFormation templates offer DevOps engineers an easy way to create, manage, and provision related resources automatically. They also allow you to stand up the same infrastructure over and over again quickly, be it for development, testing, production, or disaster recovery. They are not only an essential concept to know of, but also to understand for the DevOps professional exam.
In this chapter, we're going to cover the following main topics:
- Essential CloudFormation topics
- Creating nested stacks with dependencies
- Adding a helper script to a CloudFormation template
- Understanding how to detect drift in previously created stacks
- Using the Cloud Development Kit (CDK) as an open source framework
Technical requirements
In dealing with the CloudFormation templates, this chapter will be a bit more hands-on than previous chapters, which have focused more on theory. You should be comfortable with the YAML syntax. And at this point, you should be comfortable with both the AWS Management Console as well as the CLI. Most of the templates discussed in this chapter are too large to type out entirely on the following pages, as some CloudFormation templates can become a few thousand lines in length. We have included the templates discussed here in the GitHub repository for this book in the Chapter-7 section: https://github.com/PacktPublishing/AWS-Certified-DevOps-Engineer-Professional-Certification-and-Beyond/tree/main/Chapter-7.
Essential CloudFormation topics
As we look to make repeatable pieces of infrastructure that can be built with automation, having the correct Infrastructure as Code (IaC) tool allows for the implementation of these repeatable processes. It is these repeatable processes where the CloudFormation service comes into play. CloudFormation is IaC that can be checked into source control systems such as CodeCommit or GitHub. The fact that it is a piece of code allows it to be versioned and collaborated on with multiple team members. It can also be added to an automated build pipeline as part of a CI/CD process.
CloudFormation templates have the flexibility to be built in either the JSON or YAML programming languages. Using YAML allows you to put comments and use short codes in your template. However, you do need to stick to the strict YAML formatting guidelines.
Once you have created a template, especially one with the proper mappings and without hardcoded references, then it has the ability to be reused over and over again. This means that you can use it both in multiple regions and across numerous accounts.
The anatomy of a CloudFormation template
A CloudFormation template can contain many different sections. There is only one mandatory section when creating CloudFormation templates, and that is the resources section. Sections don't necessarily need to be added in a particular order; however, as you look at different examples, there is a logical order in the way that sections are structured since some sections reference other sections.
Format version
This is the version that the CloudFormation follows. It is an optional section. If added, it is usually the first section of the template.
Description
The description is a small section of text that tells users about the template. It must always follow the format version of the template. Descriptions are beneficial as you start to gather a more extensive collection of templates and then have the ability to quickly know what the template's purpose is and what type of resources it will create. It is an optional section.
Metadata
This section contains objects that provide additional information about the template. It is an optional section.
Parameters
This is a section of values that can be passed into the template at runtime. Default values can also be defined in lieu of needing user input. These values can then be used when creating your resources. You can also refer to parameters from the Resources and Output sections of the template. This is an optional section.
Rules
Rules are used to validate one or more parameters that are transferred to a template at runtime. Rules can help enforce things such as making sure that a large enough EC2 instance is being spun up in a production environment or that particular subnets are used. Rules very often validate the input of parameters . This is an optional section.
Mappings
Using the intrinsic Fn:FindInMap function allows CloudFormation to find the corresponding key to the matching value. One of the most frequent scenarios for the use of the mappings section is when declaring the correct Amazon Machine Image (AMI) for particular regions being used, ensuring that the template is reusable in more than a single region. This is an optional section.
We will look a bit more into mappings when we look at the intrinsic Fn:FindInMap function.
Conditions
Although CloudFormation templates don't have a lot of logical programming available to them, conditions inside of the template allow for certain values to be assigned or certain resources in the template to be created based on values being present. A good example would be if the stack were being created in the test environment, then it would create a database. However, if it were being created in the production environment, it would not. This is an optional section.
Resources
This section actually declares the resources and their properties that will be created by the CloudFormation template. Resources can be a whole variety of AWS services from EC2 instances to IAM users to even chatbots and Step Functions. There are few services that AWS offers that cannot be created via CloudFormation templates. This is a required section.
Outputs
Outputs allow for the declaration of a key-value pair along with a corresponding description that can be consumed by an end user once the stack has completed creation or can be consumed by another stack. In the case of an end user, you might want to output the URL or IP of an EC2 instance that has just been spun up so that you don't have to go hunting around the console for it. Alternatively, in the case of creating outputs for other stacks to consume, Amazon Resource Names (ARNs) are one of the main items that can be used in other stacks as reference points. This is an optional section.
Launching CloudFormation templates
Once you have your template ready to go, then you can launch it from either the AWS Management Console or the Command-Line Interface (CLI). We will go through the process of using the template located in the GitHub repository named sqs-queues.yml. If you would like to follow along with the following exercise, then go to the repository and download this template. Alternatively, you can use one of your own CloudFormation templates, bearing in mind that the parameters and resources will not be the same as we go along, but the process will still follow the same steps:
- Take the downloaded template and upload it to your S3 bucket, which we created in Chapter 4, Amazon S3 Blob Storage. (In our case, our bucket's name is devopspro-beyond.):
$aws s3 cp sqs-queues.yml s3://devopspro-beyond/sqs-queues.yml
- Now that the template has been uploaded, log in to the AWS Management Console and navigate to the CloudFormation service page at https://us-east-2.console.aws.amazon.com/cloudformation/.
- Click the orange button on the right-hand side labeled Create stack.
- Under Pre-requisite – Prepare template, make sure that the radio button is already selected for the Template is ready option:

Figure 7.1 – CloudFormation prerequisites
- Under Specify template, make sure that that the Amazon S3 URL option is already selected and then in the URL field, type the value of the location of your template, which in our case is https://devopspro-beyond.s3.us-east-2.amazonaws.com/sqs-queues.yml:

Figure 7.2 – CloudFormation Specify template screen
- Click the orange Next button at the bottom of the page.
- We now need to fill out a few details before we can proceed. We'll start with the Stack name. Name your stack SQSqueue (no spaces are allowed).
- Next, fill out the rest of the Parameters by adding your address for the AlarmEmail field and the name of the queue for the QueueName field. You can leave the other two values at their defaults. After you have done this, press the orange Next button at the bottom of the page:

Figure 7.3 – Entering the parameters for the template
- On the next page, labeled Configure stack options, scroll down to the bottom of the page and click on the orange Next button.
- We are now at the point where we can review what we have entered, and if everything looks correct, scroll down to the bottom of the page and click the orange button, which is labeled Create Stack.
Once we start the creation process, we will be taken to the Stacks screen, where we can see the CREATE_IN_PROGRESS notification while our stack is being created.
There is a menu at the top of this section that allows you to see the specific resources that each stack creates, specific stack info, any outputs that you have declared for the stack to show after its creation, the parameters you entered when creating the stack, the actual template used to create the stack, and change sets used on the stack.
When you launch a CloudFormation template, that template is saved in an S3 bucket, which AWS creates in the region in which you are launching the template if you have not previously saved the template into an S3 bucket. Each time that you either update the template or launch a new version, a new copy of the template is added to this bucket.
Using the CLI to launch templates
After going through all the steps from the Management Console to launch a template, we can see that if we are going to automate our deployments as part of a CI/CD pipeline, then doing this each and every time would not be practical. The AWS CLI does have a deploy command that allows us to launch a stack with one line. Before we run the command, be sure that you have downloaded the YAML template from the GitHub repository in the Chapter-7 folder. Once downloaded, open up your terminal window and either copy or move that template to your working directory or change your working directory to where you have downloaded the template:
An example of the CLI command to launch a template is shown as follows:
$aws cloudformation deploy --template my-template.json --stack-name CLI-stack --parameter-overrides Key1=Value1 Key2=Value2
With this single command, we have replicated all of the steps that we went through before. As noted previously, our template should be in an S3 bucket with a random name since we uploaded it as part of the creation process, and the CloudFormation service stored it on our behalf.
Using change sets
If your CloudFormation stack needs to be updated, sometimes you may like to know and understand how the existing resources currently running will be affected. Change sets allow you to preview how changes will impact the currently running resources before any changes take place, and then allow you to cancel the update if the changes would be detrimental to current resources, or proceed if the change would execute as expected.
Note
Change sets don't tell you if your CloudFormation will run successfully upon execution. They can't foresee account limit updates that you might run into, or determine whether you possess the correct IAM permissions to update a resource.
Steps to execute a change set
Let's look at both the mandatory and optional steps required for executing a change set on a stack:

Figure 7.4 – CloudFormation change sets
With the basis for how to execute a change set under our belts, we will now update our original CloudFormation stack – SQSqueue – with a change set.
Using a change set to update our stack
If you haven't already done so, then download the template named sqs-queues_change_set.yml from the GitHub repository in the Chapter-7 folder. This is the file that we will use to create our change set. Also, make sure that you have your browser open to the AWS Management Console and have navigated to the CloudFormation service, then proceed with the following steps:
- From the CloudFormation Stacks page, you should see your SQSqueue stack in a CREATE_COMPLETE state. Click on the stack name to be taken to the page with details about the stack. This is where we can perform the change set:

Figure 7.5 – Our previously created CloudFormation stack
- On the horizontal menu under the stack name, you will see a number of choices, including Change sets on the very right-hand side. Click on the Change sets option:

Figure 7.6 – CloudFormation stack menu with the Change sets option highlighted on the right
- Once in the Change Sets section, click on the button labeled Create change set.
- At this point, a new screen will appear with the heading Prerequisite – Prepare template. You will be presented with three choices. Select the choice in the middle that reads Replace current template:

Figure 7.7 – CloudFormation change sets Prepare template screen
- This will make another set of selections appear underneath the initial set of radio buttons. This time instead of uploading our template to S3 prior to creating the change set, we will upload our template (sqs-queues_change_set.yml) here using the Choose file button and selecting the YAML file that we downloaded previously from the GitHub repository. After you have uploaded the file, click the orange button labeled Next.
- The next screen, Parameters, should confirm the parameters we entered previously when we first created our template. We are not changing any of the parameters at this time so just click the orange Next button at the bottom of the page.
- On the next screen, Configure stack options, we do not make any changes. You can scroll down to the bottom of the page and click the orange Next button.
- Now, finally, on the Review page, we will have to check one more option at the bottom of the page acknowledging that our new stack is going to create an IAM role needed for the Lambda function to be added. Under the Capabilities heading, click the check box acknowledging that this new template is creating IAM permissions. Once you have done this, you can click the orange button labeled Create change set.
- A window should now pop up, giving you the option to name this change set before its actual creation. You may name the change set if you like, or just click the orange Create change set button at the bottom right.
- Once the change set has been created, then you should see a status of CREATE_PENDING as CloudFormation does the calculations of what is actually about to be changed in the current stack based on what has been requested by the new template that you have created with the change set. Once completed, then the orange Execute button will appear on the top right-hand menu. Scroll down and look under the Changes header to see the two changes that will be executed on your stack. Once you are satisfied with the changes, scroll back up and click the orange Execute button:

Figure 7.8 – Changes to be executed on the stack by the change set
- You will now be taken back to the Events section of your SQSqueue stack and see an UPDATE_IN_PROGRESS status until the update is complete.
Just because you have created a change set doesn't mean that you have to execute it. You could have multiple change sets sitting in your Change set tab waiting for execution as you and your team think about which changes should be implemented. It's important to note that unless you delete a change set, then anyone with the permissions to your stack could execute it.
At this point, we have updated our original stack to add a Lambda function along with the IAM role, which the Lambda function needs in order to operate. Everything went smoothly during our operation, but what happens if we have conflicts, missing information, or errors in our template? We will find out next as we talk about the rollback features of CloudFormation.
Rollback features of CloudFormation
If the operations fail when creating or updating a stack in CloudFormation, then the stack will roll back to its previous state. There is also a feature available known as a rollback trigger. These triggers allow you set user-defined alarms that CloudWatch can monitor and, in the case of failure, roll back the stack.
The monitoring period can be set to last from 0 to 180 minutes while your stack is being created or your change set is updating it. We will look at an example of creating a change set update next that includes a rollback trigger.
We could create a CloudWatch alarm to watch over our stack by using the CLI command like the following:
aws cloudwatch put-metric-alarm --alarm-name "SQS_stack_errors"
--alarm-description "example alarm" --namespace "SQS_log_errors"
--metric-name Errors --statistic Maximum --period 10
--evaluation-periods 1 --threshold 0
--treat-missing-data notBreaching
--comparison-operator GreaterThanThreshold
Once we've created that alarm, we can use the ARN returned back to us for use in our rollback trigger. If you need to find the ARN, use the CloudWatch describe-alarms command:
aws cloudwatch describe-alarms --alarm-names "SQS_stack_errors"
We need to create a piece of JSON code and push it to a variable in order to pass that ARN to our command-line option:
RB_TRIGGER=$(cat <<EOF
{
"RollbackTriggers": [
{
"Arn": "arn:aws:cloudwatch:us-east-2:470066103307:alarm:SQS_stack_errors",
"Type": "AWS::CloudWatch::Alarm"
}
],
"MonitoringTimeInMinutes": 5
}
EOF
)
This will now give us the information that we need in order to create the rollback trigger:
aws cloudformation create-change-set
--change-set-name "SQS-UPDATE"
--stack-name "SQSqueue"
--template-url "https://devopspro-beyond.s3.us-east-2.amazonaws.com/sqs-queues_change_set.yml"
--change-set-type "UPDATE"
--parameters ParameterKey=QueueName,ParameterValue=chapter7
--capabilities CAPABILITY_IAM
--rollback-configuration "$RB_TRIGGER"
Currently, only a CloudWatch alarm is supported as a monitor for a rollback trigger.
We will cover CloudWatch alarms in greater detail in Chapter 15, CloudWatch Metrics and Amazon EventBridge.
Intrinsic functions in CloudFormation
CloudFormation has several functions built into it that work with both JSON and YAML templates to expand the power and capabilities of the templates. We have the ability to stack or combine intrinsic functions.
Note
Intrinsic functions can only be used on certain sections of a CloudFormation template. As of the publishing of this book, intrinsic functions can be used in resource properties, outputs, metadata attributes, and update policy attributes.
We will now look at some of the more common intrinsic functions, along with some examples of their usage. There are additional functions available for use in the YAML templates. In the function headings, the short form, will be shown if available after the original code, separated by a pipe:
- Fn::FindInMap | !FindInMap
The FindInMap function returns a value based on the key in the Mappings section:
Mappings:
RegionMap:
us-east-1:
HVM64: "ami-032930428bf1abbff"
us-east-2:
HVM64: "ami-027cab9a7bf0155df"
us-west-1:
HVM64: "ami-088c153f74339f34c"
eu-west-1:
HVM64: "ami-015232c01a82b847b"
ap-southeast-1:
HVM64: "ami-0ba35dc9caf73d1c7"
ap-northeast-1:
HVM64: "ami-0b2c2a754d5b4da22"
Resources:
EC2Instance:
Type: "AWS::EC2::Instance"
Properties:
ImageId: !FindInMap
- RegionMap
- !Ref 'AWS::Region'
- HVM64
InstanceType: t2.small
- Fn::GetAZs | !GetAZs
The GetAZs function will return the list of Availability Zones in a given region. This can be especially helpful for creating dynamic templates that move from region to region:
PublicSubnet1:
Type: AWS::EC2::Subnet
Properties:
AvailabilityZone:
Fn::Select:
- 0
- Fn::GetAZs: ""
- Fn::GetAtt
The GetAtt function is helpful for getting an attribute, especially an ARN, from a resource that was created previously in the template. This function in particular is one that makes CloudFormation templates especially dynamic:
SourceSecurityGroupName: !GetAtt EC2.SourceSecurityGroup.GroupName
Condition functions
The optional conditions section contains statements that define the circumstances where resources may or may not be created or configured based on dynamic options.
Scenarios for the use of conditions in CloudFormation templates include the following:
- You are trying to use the same template for both the DEV and PROD environments without having to change anything except for possibly parameter values.
- You want to specify the number of EBS volumes to mount via a drop-down list.
- You want to create a CloudWatch dashboard or not based on user selection.
Note
During a stack update, you cannot update conditions by themselves. You can update conditions only when you include changes that add, modify, or delete resources.
You can use condition functions to help evaluate items such as AWS-provided variables or input gathered from parameters and then create additional resources if certain conditions apply:
- Fn::And
This function returns true if all the specified conditions passed to it return true.
- Fn::Equals
This function compares two different values and then returns true if the values are equal.
In the following example, the template will or won't create Public Subnets based on a value passed in the Parameters section of the template:
Conditions:
PublicSubnetsCondition:
Fn::Equals: [ !Ref CreatePublicSubnets, "true" ]
NoPublicSubnetsCondition:
Fn::Equals: [ !Ref CreatePublicSubnets, "false" ]
- Fn::If
This returns one value if the specified condition evaluates to true, and another value if the specified condition evaluates to false.
- Fn::Not
This returns true for a condition that evaluates to false, and returns false for a condition that evaluates to true.
- Fn::Or
This returns true if any of the specified conditions evaluate to true.
CloudFormation best practices
As you start to work to build out your IaC in CloudFormation templates, there are some best practices and recommendations to follow that have been set forth by AWS. These tips can help you more effectively organize and plan your resource creation, along with minimizing the time that you spend troubleshooting initial runs of your templates.
Don't embed sensitive information in your templates
Rather than placing secrets or sensitive information that could be compromised directly in a CloudFormation template, store secrets inside of AWS Secrets Manager. Even better, the best practice is to use a dynamic reference. A dynamic reference allows you to cite an external value in Systems Manager (SSM) Parameter Store or AWS Secrets Manager. For SSM Parameter Store, it supports both ssm, which are plaintext values, and ssm-secure, which are encrypted values.
So instead of using template-based parameters for the database username and password that you create, your RDS resource block can look like this:
MySQLInstance:
Type: 'AWS::RDS::DBInstance'
Properties:
DBName: MyRDSInstance
AllocatedStorage: '20'
DBInstanceClass: db.t2.micro
Engine: mysql
MasterUsername: '{{resolve:secretsmanager:MyRDSSecret:SecretString:username}}'
MasterUserPassword: '{{resolve:secretsmanager:MyRDSSecret:SecretString:password}}'
Use AWS-specific parameter types
To make AWS specialized parameter input easier on both yourself and your users, especially when asking for items that could need looking up in your account. Rather then use a string for the type of parameter you can define the AWS specific type of parameter. These could be items such as security group IDs, VPC IDs, or Route53 HostedZone IDs. A good example of this would be AWS::EC2::KeyPair::KeyName, which would then provide a dropdown of the EC2 keypairs available.
Make use of parameter constraints
If you are not using an AWS-specific parameter and using a string parameter, the use of parameter constraints can help catch user mistakes on parameter entry before the template even starts to create and then has to take the time to roll back. Parameter constraints are constructed like regular expressions and can also have a description for the user so that they have a better understanding of what needs to be entered.
Understand how to use AWS::CloudFormation::Init to deploy software to EC2 instances
When you launch an EC2 instance from a CloudFormation template, software running on that instance can be installed and configured using the cfn-init helper script and the AWS::CloudFormation::Init resource. These helper scripts can be used to install not only system scripts but also necessary system packages via the OS package manager, such as apt or yum.
Modularize your templates
Making your templates modular allows you to accomplish a few things at the same time. The first and most important is to make your templates reusable. This becomes especially relevant as we start talking about nested templates. The second is to allow multiple team members to concentrate on the smaller templates where they have more subject matter expertise.
Lint templates before attempting to launch
Just like any other form of code, CloudFormation templates should go through a verification process to make sure that there are no formatting issues with the template before you attempt to launch it. There is a built-in template checker right from the AWS CLI that you can use to find any issues that might be present in your templates.
The AWS CloudFormation Linter (cfn-lint) is an open source tool that intergrates into most IDEs and is a tool that can be run either via the command line, inside of the IDE itself, or integrated into a CI/CD pipeline. The tool will validate both JSON and YAML templates and includes additional checks for things in line with CloudFormation best practices.
Note
Although these best practices don't usually appear in the context of the test questions, these are more relevant for day-to-day usage of CloudFormation and making you the best DevOps professional that you can be.
Creating nested stacks with dependencies
As you start to organize your templates logically, you will find that breaking your larger templates up into smaller, more manageable pieces is a smart strategy. It will not only make them easier to work with but also allows for greater reusability with each template having a specific purpose, such as creating a VPC with subnets or a set of reusable IAM roles. Adding outputs to these smaller templates can allow other templates to use the resources other templates have created previously, acting like building blocks stacked on top of each other to create a complete solution. This also allows multiple team members to work on separate sections of the cloud infrastructure as each person can concentrate on their area of expertise. If you have a team member whose strength is networking then they can concentrate on the VPC and networking pieces of the stacks. If you have another team member who has a background in databases, then they can concentrate on the nested piece that creates and configures the database(s), including any specialized parameter groups for that particular database engine.
Nested stacks all start with a root or parent stack, depicted in Figure 7.9 with the letter A. The root stack then has other child stacks as its resources instead of other AWS services. We can also see in the diagram that the stack labeled B is providing outputs that are being consumed by level C. The stack on level C creates another child stack, as well as resources whose outputs are consumed by the stack on level D:

Figure 7.9 – CloudFormation nested stacks
Another benefit that nested stacks can provide is the ability to go beyond the 200 resource limit for CloudFormation templates.
Note
Nested stacks can be more complex to troubleshoot as a whole. If you run into errors while creating and deploying nested CloudFormation stacks, then try deploying just the single template that is causing you issues and then update for your changes.
Packaging up your nested stack for deployment
Once you have all your templates ready to upload to S3, then you can package them all together using the AWS CLI. Since nested stacks need their child templates to be in S3 for deployment, this saves you time in having to upload each template individually. It will then generate a new template for us and give us the command for deploying the full nested stack using that newly generated template. The generic code for creating a CloudFormation package looks like the following:
$aws cloudformation package
--template-file /path_to_template/template.json
--s3-bucket bucket-name
--output-template-file packaged-template.json
We will look at this command in greater depth when we go through our exercise of creating a nested template with the AWS CLI.
Let's recap what the package command does:
- It creates a ZIP file with all of your child template files and extra code such as lambda code.
- It uploads those items into the S3 bucket designated by you.
- It generates a new template with your local templates and replaces it with the S3 URIs.
Creating a nested stack using the AWS CLI
In the following exercise, we will create a nested stack using a set of templates that you can find on the GitHub repository under the Chapter-7/nested directory. Download all of these YAML templates before you begin the following exercise. Also, make a note of the S3 bucket that you want to deploy the package to. As we noted earlier when we showed the example command, an S3 bucket is necessary as part of the CLI command to upload the files:
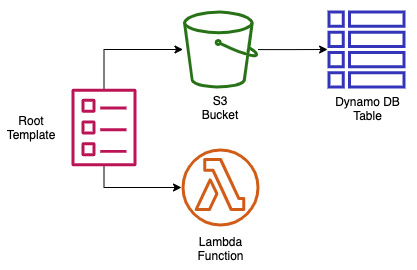
Figure 7.10 – Items created in the nested stack exercise
The diagram in Figure 7.10 shows what we are about to package and deploy using our nested template:
- Open up your terminal so that you have access to your AWS CLI.
- Now navigate to the folder where you have downloaded all of the files to create the nested stack. If you have downloaded the book's entire GitHub repository, then the path will be Chapter-7/nested.
- Because the packaging for nested stacks only works one level deep, we will have to manually upload our nested_dynamo.yml template (make sure that you substitute your own bucket name when performing the following command):
aws s3 cp nested_dynamo.yml s3://devopspro-beyond/
- Open the nested_root.yml file and edit the default value for the S3 URL for the HTTPS value of the bucket where you placed the nested_dynamo.yml file.
- Once in the nested directory, perform the following command:
aws cloudformation package
--template-file nested_root.yml
--s3-bucket devopspro-beyond
--output-template-file packaged_template.yml
- Once completed, the package command should tell you that it was successful and give you a cut and paste command to run, where you need to substitute the stack name at the end of the command:
Successfully packaged artifacts and wrote output template to file packaged_template.yml.
Execute the following command to deploy the packaged template:
aws cloudformation deploy --template-file /AWS-Certified-DevOps-Engineer-Professional-Certification-and-Beyond/Chapter-7/nested/packaged_template.yml --stack-name <YOUR STACK NAME>
- Run the command to create your nested stack, but be sure to change the stack name and to add the flag for --capability CAPABILITY_IAM:
aws cloudformation deploy --template-file /AWS-Certified-DevOps-Engineer-Professional-Certification-and-Beyond/Chapter-7/nested/packaged_template.yml --stack-name Chapt7 --capabilities CAPABILITY_IAM
- Log in to the AWS Console and go to the CloudFormation service. At this point, you should be able to see both your root stack and the nested stacks that you have created. By clicking on the Resources tab, you can see all of the resources that you just created.
- If you don't want to incur charges then delete the stack.
Using DependsOn to order resources
Although CloudFormation creates the resources in the order you specify in your template, it does not wait for the completion of any one resource before starting to build the next resource unless specifically instructed. The DependsOn construct allows you to pause the creation of specific resources until other resources have been completed.
There are a number of situations in which you would want to invoke DependsOn. The first set of scenarios involve those resources that need access to the internet, and hence they require an internet gateway to be completed before moving forward.
Adding wait conditions to a template
A WaitCondition adds a pause to the tasks that your template is performing on your stack until a success signal has been received, indicating readiness to move on.
Whenever a WaitCondition is added as a resource to a CloudFormation template, you must couple this with a WaitConditionHandle resource.
Note
Even though the DependsOn construct and WaitCondition resource seem similar in function, they are different in a few ways. First is the fact that DependsOn is a much simpler implementation as it doesn't require a helper script. DependsOn also doesn't check for a success or failure signal for a resource once it has been created and therefore only governs the order of items produced in the template. A WaitCondition, on the other hand, needs to explicitly receive a success signal and will make the template (or change set) pause until this signal is received.
Using curl to signal
When using curl to signal to the WaitCondition that the resource, in most cases an EC2 instance, is done with its configuration, then it can be done dynamically. The first step is to create the WaitHandle, and then to construct the URL that the CloudFormation will use in the curl command. At that point, we are ready to call the curl command from within the UserData section of the template. We can see an example of this in an abbreviated template snippet, as shown next:
ServerWaitCondition:
Type: 'AWS::CloudFormation::WaitCondition'
DependsOn: Server
Properties:
Handle: !Ref ServerWaitHandle
Timeout: '1200'
…
UserData: !Base64
'Fn::Join':
-"
- - |
#!/bin/bash -v
- |
# Send Wait Condition URL
- '/usr/local/bin/aws s3 cp s3://'
- !Ref BucketFolder
- |
/templates/success.json /tmp/a
- SignalURL=
- !Ref ServerWaitHandle
- |+
- |
echo $SignalURL
- curl -T /tmp/a "
- !Ref AdminServerWaitHandle
- |
"
The WaitCondition is the signal that is used in concert with one of the few helper scripts available in CloudFormation. Next, we will look at the different helper scripts available in CloudFormation templates.
Adding a helper script to a CloudFormation template
In CloudFormation, there are a few different helper scripts, written in Python, that allow you to install software and start services when requesting and configuring EC2 instances as part of a template:

Table 7.1 – CloudFormation helper scripts
As you can see, using these helper scripts provided by CloudFormation can greatly simplify EC2 configuration. Next, we will see how to detect drift in CloudFormation templates if your infrastructure deviates from your template code.
Understanding how to detect drift in CloudFormation templates
CloudFormation templates allow you to create and manage your infrastructure and resources as code in the various AWS accounts that you oversee. Following this method of provisioning items as code that can be checked in and out of version control is a best practice since it is repeatable, rather than trying to build and maintain cloud assets by hand.
Can you stop people from altering the assets you have provisioned in this manner? Unless you have used IAM policies to prevent groups from modifying any resources other than those submitted through CloudFormation templates or via code deployment pipelines, then there is a chance that there could be drift in some of the resources spun up by your CloudFormation templates.
When you initiate a check for drift detection, the CloudFormation service compares the current stack and the resources that are currently provisioned versus what was originally specified in the template used to create or update that particular stack. It then reports any differences that it finds.
With a good understanding of CloudFormation templates under our belt, we will now look at a complimentary service – AWS Service Catalog. Service Catalog is another tool in the AWS management toolbox that allows your users to quickly and easily provision resources that have been pre-created with a set guardrails around them.
Managing templates with Service Catalog
As we continue the conversation about CloudFormation templates, we start to look at other ways to manage the templates in an organization. The Service Catalog product from AWS allows us to use our CloudFormation templates and create a self-service portal for users to provision known patterns of items as long as they have been given the appropriate access. These templates, which now become products in our Service Catalog, can even become parameterized so that our user can choose items such as a vetted, predefined set of EC2 instance sizes and AMIs in the case of EC2.
First, you need to understand a few concepts regarding Service Catalog. The first concept is a product. A product is an IT service that you want to make available on AWS. This could be something as simple as a single S3 bucket or as complex as an EC2 instance backed by an RDS database along with predefined CloudWatch alerts. The next concept to understand in Service Catalog is a portfolio. Portfolios are groupings of specific products along with configuration information. Portfolios are also tied to particular user groups, and give those user groups access to launch the products.
Looking at Figure 7.11, we can see the two different workflows that are available in Service Catalog from both an administrator's and user's perspective. The top view shows how an administrator would load up a template containing an EMR cluster, an S3 bucket, and CloudWatch alarms for repeated use as a product for the data users' group.
Any user in the data user's group can then quickly provision not only the EMR cluster but a corresponding S3 bucket along with relevant S3 alarms after entering a few pieces of relevant information into the Service Catalog screens:

Figure 7.11 – Service Catalog workflows
Service Catalog also allows you to update the templates containing your products and release newer versions with updated features. This can give your users the choice of which version to use: a version they are familiar with, or a version with newer features.
There are quite a number of situations where this can become useful:
- When a solutions architect needs to be able to quickly provision a demo environment for a customer sales call.
- The QA team would like to stand up a QA environment for testing.
- In a marketing department, where they would like a promotional application to run for a specific period of time.
- A data scientist who needs a set of specialized software provisioned, such as an EMR cluster or a server with R Studio, but doesn't have the background in system administration to install and configure all of the necessary software and secure it correctly.
Access control in Service Catalog is handled via IAM. The Service Catalog administrators create IAM roles specific to the products in the catalog so that users have just enough access to run the services provisioned by the catalog.
There are a number of different types of constraints that you can place on products in your Service Catalog in order to apply governance.
There are template-based constraints that can shrink the number of options available to users when launching a product. Examples of this include the sizes of an EC2 instance or RDS instance or the languages allowed for a Lambda product.
Tag-based constraints either enforce specific tags that need to be filled in when launching a product or disallow users to use any additional tagging besides those tags that have already been predefined.
You can specify a particular SNS topic to receive updates about a product using notification constraints.
Defining which IAM roles can be used to run a particular product and be controlled via a launch constraint. This provides Service Catalog administrators an extra set of controls to say which services are allowed to be governed by the Service Catalog product.
We just discovered how Service Catalog can allow even non-developers to quickly spin up predefined patterns of AWS infrastructure for users. These users don't need to worry about how to configure the underlying resources since all of that is handled by the underlying CloudFormation templates.
We will next examine another way of creating CloudFormation templates that allows us much more flexibility then only using JSON or YAML in the Cloud Development Kit.
Using the Cloud Development Kit
Developers are used to creating reusable libraries and using things like loops to take care of repetitive tasks. The Cloud Development Kit (CDK) allows those with a programming background to use a variety of languages (TypeScript, JavaScript, Python, Java, and C#) to create CloudFormation templates using techniques that they know, such as the following:
- Logic (if statements, for loops)
- Object-oriented techniques
- Organization via logical modules
This is in contrast to CloudFormation templates, which require you, your developers, or DevOps personnel to write them in either JSON or YAML, although both of these options are somewhat universal in nature and can be picked up in a short time with or without a programming background. CloudFormation templates are also quite limiting in the number of programmatic options and logic that you can perform while creating your stacks:

Figure 7.12 – CDK workflow
In Figure 7.12, you can see the workflow of how a developer would create an app using the CDK. This app then creates a stack that deploys the CloudFormation template to the AWS cloud environment.
Concepts of the AWS CDK
Inside of the AWS CDK, there are three essential components – apps, stacks, and constructs – that developers can use to create cloud services.
Apps
With the AWS CDK, you are building an application, which in turn is an app and is composed of the CDK App class.
Stacks
Units of deployment in the AWS CDK are stacks, and all resources defined within the scope of a stack are provisioned as a single unit. Since CDK stacks are implemented as CloudFormation stacks, any boundaries or restrictions that CloudFormation stacks need to abide by also are present for CDK stacks.
Constructs
The building blocks of the AWS CDK are constructs. These can be a single AWS resource like a load balancer, or a single component consisting of multiple resources such as a VPC and subnets. Constructs create reusable components that can be shared like any other piece of code.
Advantages of using the AWS CDK
We will examine some of the advantages of using the CDK over normal CloudFormation templates.
Faster development process
With the AWS CDK you have the ability to use the languages that you natively program in, such as Python, TypeScript, .NET, Go and Java. In using these languages you retain the ability to create object, loops, and conditions that you are familiar with rather than having to learn domain-specific functions and work-arounds.
Code completion within your IDE
Using popular IDEs such as Visual Studio Code allows for code completion using the language of your choice when programming with the AWS CDK.
The ability to deploy code and IaC synchronously
Since the AWS CDK uses the same native language that you write your code in, combining pieces of infrastructure along with the code that would run your application becomes easy without any context switching.
Summary
In this chapter, we looked at how to create IaC using both CloudFormation templates and the CDK. We examined some best practices of template construction and organization. We also practiced hands-on implementation of deploying and updating CloudFormation templates into stacks using both the AWS Management Console and the CLI.
In the next chapter, we will begin our examination of some of the AWS code tools that are part of the SDLC process, starting with CodeCommit and CodeBuild. We will create a code repository and commit to it using CodeCommit and then start building out code using AWS CodeBuild. Finally, we will see how we can tie both services together by triggering the CodeBuild job from pushes to our CodeCommit repository.
Review questions
- What are the two major components of CloudFormation?
- You have been contracted by a company to help review and optimize their CI/CD processes, especially in the area of IaC. The company currently has a single CloudFormation template, which they have developed over time, that is used to create the IAM account roles, VPCs, subnets, Lambda functions, CloudWatch alarms, along with SNS topics and other resources, including databases and EKS EC2 instances and their corresponding AutoScaling groups. How would you go about creating a recommendation for optimizing their process?
a. Check the current template to make sure that it has the correct DependsOn and WaitCondition embedded so that all resources come up without conflicts.
b. Create a plan on how to break up their large template.
c. Use the CloudFormation package command to package all of the templates together.
d. Take the smaller templates and launch with a single deploy command.
- After assessing a client's needs for a repeatable three-tier web application, you have decided to build a CloudFormation template that you can hand over at the end of the engagement. The middleware Linux servers have an elaborate user data script that takes a while to run in order to install completely. These servers are sitting behind a Network Load Balancer resource and need to be fully operational before being added. How can you make sure that the servers are fully operational and configured correctly before you attach them to the Network Load Balancer resource? (Choose two.)
a. Make sure that the Network Load Balancer resource is located directly after the middleware servers in the CloudFormation resources section of the template.
b. Add a WaitCondition that depends on the middleware servers. Once the user data finishes, it uses cfn-signal to notify that it is ready.
c. Launch everything from a nested template where the middleware servers are in a template launched from the Load Balancer template.
d. Add a WaitCondition that depends on the middleware servers. Once the user data finishes configuring the middleware servers, it uses a curl command to notify a pre-signed URL that they are ready.
- You are working at a large enterprise company and have a number of projects in the backlog that are waiting to be deployed to different AWS cloud environments. In order to minimize the amount of time it takes for each deployment, you want to create a reusable set of components that can be easily swapped out based on the architecture of each project. There is already a basic CodePipeline service instance in place to add the test and deployment steps. Whatever solution you choose should be able to be checked into a code version control system and be tested easily. How should you organize your resources for optimal reusability?
a. Use the AWS CDK to create apps made of a shared library of components. Add a testing library and then run the tests as a step in CodePipeline before deploying to the development environment.
b. Create a library of small resource-specific CloudFormation templates that can be easily nested and packaged up according to the architecture guidelines. Use the yamllint and cfn-lint commands to lint the CloudFormation templates as a test step in CodeBuild to catch any errors.
c. Develop a foundation of 5-10 blueprint patterns that all projects fall into. Using these blueprints, develop a library of CloudFormation templates with parameters and conditions so that they meet the majority of your project's needs. Use the cfn-lint command to lint the CloudFormation templates as a test step in CodeBuild to catch any errors.
d. Create CloudFormation templates for each solution that have the necessary parameter values and conditions so that they work seamlessly on any Region and can be used in any environment (DEV, TEST, and PROD). Upload the templates to CodeCommit for version control.
Review answers
- Templates and stacks
- b
- b and d
- a