
Chapter 12. Application and Window Native Menus
Operating systems provide facilities for creating menus; these menus are called native menus. Adobe AIR supports working with native menus, and the recipes in this chapter show you how to build several types of native menus. At this writing, AIR supports application, window, context, and pop-up menus. Application and window menus serve the same purpose but on different platforms. Specifically, window menus are available only on Windows, and application menus are available only on Macs. Computer users are familiar with the typical native menus, so the usability of your AIR application improves a lot when you offer users application or window menus.
To create native menus, the Adobe AIR classes to use are flash.display.NativeMenu and flash.display.NativeMenuItem.
To create context menus, you can also use the classes flash.ui.ContextMenu and flash.ui.ContextMenuItem.
Note
AIR enables you to create system tray and Dock icon menus as well. See Chapter 13 for more information on these custom taskbar and Dock menus.
Creating a Native Menu
Problem
You want to create a menu for your AIR application and present the menu as an application menu or window menu depending on the user’s operating system.
Solution
Use the NativeMenu constructor
to create the base menu, attach child NativeMenuItem objects, and then set the
top-level base menu as the menu for the AIR application or window
depending on your preference or the operating system.
Discussion
When working with the AIR menu API, always keep in mind that menus are platform specific. Table 12-1 points out two important differences between native menus in an AIR application deployed on Windows vs. a Mac.
Windows | Mac | |
Supported menu? | Window menu | Application menu |
Default menu present? | No | Yes |
On Windows, you can create a native window menu that applies only
to a particular window and is automatically displayed below the title
bar. To add a native menu to a window, create a NativeMenu object, and assign it to the
menu property of the NativeWindow object (covered in Creating a Native Window Menu (Windows)).
On Mac, you can create a native application menu that applies to the whole application only. Every application running on Mac OS X creates a default application menu to which you can add items, add subitems, or remove existing items.
To add a native menu to your application on a Mac, create a
NativeMenu object, and assign it to
the menu property of the NativeApplication object (covered in Creating a Native Window Menu (Mac)).
To create a NativeMenu object
as the top-level menu for an application or window menu, just use the
NativeWindow constructor:
var baseMenu:NativeMenu = new NativeMenu();
ActionScript/Flex
The following code shows the start of a new AIR application that creates a window menu on Windows and an application menu on a Mac:
<?xml version="1.0" encoding="utf-8"?>
<mx:WindowedApplication xmlns:mx="http://www.adobe.com/2006/mxml"
    layout="absolute"applicationComplete="init()>
    <mx:Script>
        <![CDATA[

          private function init():void{

              var baseMenu:NativeMenu = new NativeMenu();
              var myMenu:NativeMenu = new NativeMenu();>
              baseMenu.addSubmenu(myMenu, "Example Menu");

              if(NativeApplication.supportsMenu){
                    this.nativeApplication.menu = baseMenu;
              }

              if(NativeWindow.supportsMenu){
                    this.nativeWindow.menu = baseMenu;
              }
          }
    ]]></mx:Script>
</mx:WindowedApplication>
ActionScript/Flash
If you are using Flash for your AIR application and windows, you need to set this ActionScript class as the document class for your Flash file:
package com.newmovieclip.aircookbook.chapter12{

    import flash.display.*;
    import flash.desktop.*;

    public class Step1 extends Sprite{

        public function Step1():void{
            var baseMenu:NativeMenu = new NativeMenu();
            var myMenu:NativeMenu = new NativeMenu();
            baseMenu.addSubmenu(myMenu, "Example Menu");
            if(NativeApplication.supportsMenu){
                NativeApplication.nativeApplication.menu = baseMenu;
            }
            if(NativeWindow.supportsMenu){
                this.stage.nativeWindow.menu = baseMenu;
            }
        }
    }
}
JavaScript
The following code shows the start of a new AIR application that creates a window menu on Windows and an application menu on a Mac:
<html>
<head>
<meta http-equiv="Content-Type" content="text/html; charset=utf-8" />
<title>Create Native Menu step 1</title>

<script src="AIRAliases.js" type="text/javascript"></script>
<script type="text/javascript">
function initialize(){
    var application = air.NativeApplication.nativeApplication;

    var baseMenu = new air.NativeMenu();
    var myMenu = new air.NativeMenu();
    baseMenu.addSubmenu(myMenu, "Example Menu");

    if(air.NativeApplication.supportsMenu){
        application.menu= baseMenu;
    }
    if(air.NativeWindow.supportsMenu){
        this.nativeWindow.menu = baseMenu
    }
}
</script>
</head>
<body onLoad="initialize()">
</body>
</html>
Adding Items to the Base Menu
Next, you must add menu items to the top-level menu. To begin,
create an instance of the NativeMenuItem class by calling the
constructor and passing in the label for the menu item as a parameter.
Two methods are available to add a menu item to a menu: addItemAt
and addItem. The first way, using
addItemAt, allows you to specify
the index position where you want to add the menu item, with the
position count starting at 0.
In ActionScript/Flex/Flash, the code for this is as follows:
<mx:Script>
    <![CDATA[

        private function init():void{

            var baseMenu:NativeMenu = new NativeMenu();

            var menuItemA:NativeMenuItem = new NativeMenuItem("Menu Item A");
            baseMenu.addItemAt(menuItemA,0);


            if(NativeApplication.supportsMenu) {
                this.nativeApplication.menu.addSubmenu(baseMenu, "Example Menu");
            }

            if(NativeWindow.supportsMenu) {
                this.nativeWindow.menu.addSubmenu(baseMenu, "Example Menu");
            }

        }    ]]>
    </mx:Script>

var menuItemA:NativeMenuItem = new NativeMenuItem("Menu Item A");
baseMenu.addItemAt(menuItemA,0);
In JavaScript, the code is as follows:
var menuItemA = new air.NativeMenuItem("Menu Item A");
baseMenu.addItemAt(menuItemA,0);
The second way to add items to a menu is to use the addItem method. To use this method, you just
need to replace the addItemAt
method with the addItem method in
the previous code examples, but you do not need to provide an index
position, because the menu items are placed in the same order as you
add them.
You can make your native menus more accessible for the user in two ways. The first is by using keyboard shortcuts, and the second is by setting a mnemonic index.
Note
The first way, adding keyboard shortcuts to your menu, is explained in Assigning Keyboard Shortcuts to Menu Items.
The second possibility to make your menu more accessible and
usable is by setting a mnemonic index. A mnemonic is a memory aid; in
NativeMenuItem objects in AIR, the
mnemonic index refers to a character in the menu
label at the corresponding position, and in the display, the character
at this index is underlined. On Windows, the menu item is accessible
by pressing that underlined key when the menu is in focus. On a Mac,
this mnemonic index is irrelevant, because the default mnemonic for
the menu item is the first letter or two of the menu, followed by
pressing the Return key.
If you have more menu items that use the same significant letter on Windows, the user has to press that key as many times as necessary to cycle through the matching items until the desired item is highlighted; then the user presses Enter. For ease of use, a best practice is to try to choose a unique significant letter for every menu item because it makes the user experience more enjoyable.
You can set a significant letter (a mnemonic) using a position
index of the label String. Keep in
mind that the index starts at 0. The following example uses the letter
u as the mnemonic:
var menuItemC:NativeMenuItem = new NativeMenuItem("Menu Item C");
menuItemC.keyEquivalent = "C";

menuItemC.mnemonicIndex=10;
By combining key equivalents and mnemonics, you can make your menus more accessible, so it is a best practice to use both methods.
Responding to Menu Events
Problem
You have created a menu in your AIR application and want
to react to the events dispatched by the nativeMenu and NativeMenuItem objects.
Solution
Add an event listener for selecting and displaying events of the
NativeMenu or NativeMenuItem object.
Discussion
When a user chooses a menu item, the NativeMenuItem dispatches a select event. By registering a listener to the NativeMenuItem object, you can react to the
select event.
ActionScript/Flex/Flash
In this example, you first create a new instance of the
NativeMenuItem class. Next you add
a listener to listen for the select
event. When the select event is
dispatched by the NativeMenuItem
instance, the selectHandler
function is executed:
var menuItemC:NativeMenuItem = new NativeMenuItem("Menu Item C");
menuItemC.addEventListener(Event.SELECT,selectHandler);

private function selectHandler(event:Event):void{
    trace(event.target.label);
}
JavaScript
The following code makes a menu item and attaches a
listener to it for the select
event:
var menuItemC = new air.NativeMenuItem("Menu Item C");
menuItemC.addEventListener(air.Event.SELECT,selectHandler);
The selectHandler function in
JavaScript looks like this:
function selectHandler(event){
    air.trace(event.target.label);
}
This example just traces the label, but of course in a real-life
situation you would write your specific actions for that menu item in
the selectHandler function.
Listening for Select Events
Because select events bubble up to the containing menus, you can also listen for select events on a parent menu.
ActionScript/Flex
This simple menu example traces the label of the selected menu item but registers only one listener to the base menu:
<?xml version="1.0" encoding="utf-8"?>
<mx:WindowedApplication xmlns:mx="http://www.adobe.com/2006/mxml"
    layout="absolute"
    applicationComplete="init()"
    >
    <mx:Script>
        <![CDATA[

            private function init():void{

                var baseMenu:NativeMenu = new NativeMenu();

                var menuItemEng:NativeMenuItem = new NativeMenuItem("English");
                var menuItemEs:NativeMenuItem = new NativeMenuItem("Spanish");
                var menuItemDe:NativeMenuItem = new NativeMenuItem("German");
                var menuItemNl:NativeMenuItem = new NativeMenuItem("Dutch");

                baseMenu.addItem(menuItemEng);
                baseMenu.addItem(menuItemEs);
                baseMenu.addItem(menuItemDe);
                baseMenu.addItem(menuItemNl);

                baseMenu.addEventListener(Event.SELECT,selectHandler);

                if(NativeApplication.supportsMenu){
                    this.nativeApplication.menu = baseMenu;
                }

                if(NativeWindow.supportsMenu){
                    this.nativeWindow.menu = baseMenu;
                }
            }
            private function selectHandler(event:Event):void{
                    trace(event.target.label);
            }
        ]]>
    </mx:Script>
</mx:WindowedApplication>
ActionScript/Flash
This simple menu example traces the label of the selected menu item but registers only one listener to the base menu:
package com.newmovieclip.aircookbook.chapter12{

    import flash.display.*;
    import flash.desktop.*;
    import flash.events.*;

    public class Step3 extends Sprite{

        public function Step3():void{
            var baseMenu:NativeMenu = new NativeMenu();

            var menuItemEng:NativeMenuItem = new NativeMenuItem("English");
            var menuItemEs:NativeMenuItem = new NativeMenuItem("Spanish");
            var menuItemDe:NativeMenuItem = new NativeMenuItem("German");
            var menuItemNl:NativeMenuItem = new NativeMenuItem("Dutch");

            baseMenu.addItem(menuItemEng);
            baseMenu.addItem(menuItemEs);
            baseMenu.addItem(menuItemDe);
            baseMenu.addItem(menuItemNl);

            baseMenu.addEventListener(Event.SELECT,selectHandler);

            if(NativeApplication.supportsMenu){
                NativeApplication.nativeApplication.menu = baseMenu;
            }
            if(NativeWindow.supportsMenu){
                this.stage.nativeWindow.menu = baseMenu;
            }
        }
        private function selectHandler(event:Event):void{
            trace(event.target.label);
        }
    }
}
JavaScript
This simple menu example traces the label of the selected menu item but registers only one listener to the base menu:
<html xmlns="http://www.w3.org/1999/xhtml">
<head>
<meta http-equiv="Content-Type" content="text/html; charset=utf-8" />
<title>Create Native Menu step 3</title>

<script src="AIRAliases.js" type="text/javascript"></script>
<script type="text/javascript">
function initialize(){
    var application = air.NativeApplication.nativeApplication;
    var baseMenu = new air.NativeMenu();

    var menuItemEng = new air.NativeMenuItem("English");
    var menuItemEs = new air.NativeMenuItem("Spanish");
    var menuItemDe = new air.NativeMenuItem("German");
    var menuItemNL = new air.NativeMenuItem("Dutch");

    baseMenu.addItem(menuItemEng);
    baseMenu.addItem(menuItemEs);
    baseMenu.addItem(menuItemDe);
    baseMenu.addItem(menuItemNL);

    baseMenu.addEventListener(air.Event.SELECT,selectHandler);

    if(air.NativeApplication.supportsMenu){
        application.menu= baseMenu;
    }
    if(air.NativeWindow.supportsMenu){
        this.nativeWindow.menu = baseMenu
    }
}
function selectHandler(event){
    air.trace(event.target.label);
}
</script>
</head>
<body onLoad="initialize()">
</body>
</html>
Updating Before Display
Regarding menu display listeners, imagine that you want to
update the menu contents or item appearance before the menu is shown
to the user. This is where the displaying menu
event comes in. The displaying event is dispatched just before a
menu is displayed to the user. For example, in the listener for the
displaying event of a History menu, you could change the menu items to
reflect the current list of recently viewed documents.
ActionScript/Flex/Flash
The following code shows how to register a listener for the
displaying event, which is similar
to using the select event:
var baseMenu:NativeMenu = new NativeMenu();
var historyMenuItem:NativeMenuItem  = new NativeMenuItem("History");
basemenu.addItem(historyMenuItem);
historyMenuItem.addEventListener(Event.DISPLAYING, displayingHandler);

private function displayingHandler(event:Event):void{

    //update the recently viewed documents
    trace("displaying");
}
JavaScript
The following code shows how to register a listener for the
displaying event, which is similar
to using the select
event:
var baseMenu = new air.NativeMenu();
var historyMenuItem = new air.NativeMenuItem("history");
baseMenu.addItem(historyMenuItem);
historyMenuItem.addEventListener(air.Event.DISPLAYING, displayingHandler);

function displayingHandler(event){

    //update the recently viewed documents
    air.trace("displaying");
}
Adding a Menu Separator
Solution
Instantiate a NativeMenuItem,
and in the constructor, set the second parameter (isSeparator)
to true; then add the instance to the
NativeMenu instance.
Discussion
Adding a menu separator is actually simple; you add it like it is
a regular menu item and then specify that it actually is a separator.
You can do that in the second parameter of the nativeMenuItem constructor. It is not
necessary to give the menu item a label because it is not displayed. In
following example, the label for the separator is left blank.
ActionScript/Flex/Flash
In ActionScript/Flex/Flash, use the following code:
var baseMenu:NativeMenu = new NativeMenu();

    var menuItemEng:NativeMenuItem = new NativeMenuItem("English");
    var menuItemEs:NativeMenuItem = new NativeMenuItem("Spanish");
    var menuItemDe:NativeMenuItem = new NativeMenuItem("German");
    var menuItemNl:NativeMenuItem = new NativeMenuItem("Dutch");
    var mySeparator:NativeMenuItem = new NativeMenuItem("",true);

    baseMenu.addItem(menuItemEng);
    baseMenu.addItem(menuItemEs);

    baseMenu.addItem(mySeparator);

    baseMenu.addItem(menuItemDe);
    baseMenu.addItem(menuItemNl);
JavaScript
var baseMenu = new air.NativeMenu();

    var menuItemEng = new air.NativeMenuItem("English");
    var menuItemEs = new air.NativeMenuItem("Spanish");
    var menuItemDe = new air.NativeMenuItem("German");
    var menuItemNL = new air.NativeMenuItem("Dutch");

    var mySeparator = new air.NativeMenuItem("",true);


    baseMenu.addItem(menuItemEng);
    baseMenu.addItem(menuItemEs);
    baseMenu.addItem(mySeparator);
    baseMenu.addItem(menuItemDe);
    baseMenu.addItem(menuItemNL);
Creating Nested Menus
Solution
Create a submenu in the given menu item by setting the submenu property of the menu item.
Discussion
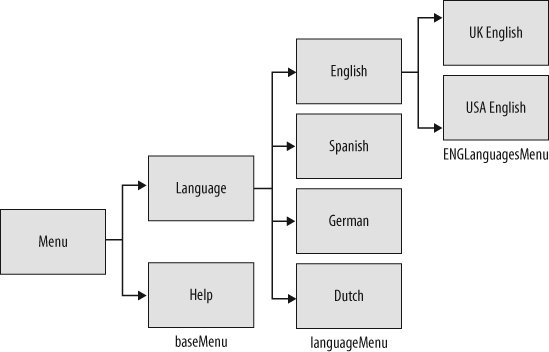
To create a nested menu structure, you add a NativeMenuItem object to the parent menu and
then assign the NativeMenu object to
the menu item’s submenu property. You
can also write it in a shorter way by using the addSubmenu method of the NativeMenu class.
The following example uses both ways to create the nested menu structure shown in Figure 12-1.
ActionScript/Flex
For a nested menu structure, use this code:
<?xml version="1.0" encoding="utf-8"?>
<mx:WindowedApplication xmlns:mx="http://www.adobe.com/2006/mxml"
    layout="absolute"
    applicationComplete="init()"
    >
    <mx:Script>
        <![CDATA[

            private function init():void{

                var baseMenu:NativeMenu = new NativeMenu();
                var languageMenu:NativeMenu = new NativeMenu();
                var engLanguagesMenu:NativeMenu = new NativeMenu();

                var menuItemEng:NativeMenuItem = new NativeMenuItem("English");
                //define submenu items
                    engLanguagesMenu.addItem(new NativeMenuItem("UK English"));
                    engLanguagesMenu.addItem(new NativeMenuItem("USA English"));
                //add the engLanguagesMenu as submenu of menuItemEng
                menuItemEng.submenu = engLanguagesMenu;

                var menuItemEs:NativeMenuItem = new NativeMenuItem("Spanish");
                var menuItemDe:NativeMenuItem = new NativeMenuItem("German");
                var menuItemNl:NativeMenuItem = new NativeMenuItem("Dutch");

                languageMenu.addItem(menuItemEng);
                languageMenu.addItem(menuItemEs);
                languageMenu.addItem(menuItemDe);
                languageMenu.addItem(menuItemNl);

                //add all the languages as submenu of the baseMenu
                //with a label 'Language'
                baseMenu.addSubmenu(languageMenu,"Language");
                baseMenu.addItem(new NativeMenuItem("Help"));
                baseMenu.addEventListener(Event.SELECT,selectHandler);

                if(NativeApplication.supportsMenu){
                    this.nativeApplication.menu = baseMenu;
                }

                if(NativeWindow.supportsMenu){
                    this.nativeWindow.menu = baseMenu;
                }
            }
            private function selectHandler(event:Event):void{
                    trace(event.target.label);
            }
        ]]>
    </mx:Script>
</mx:WindowedApplication>
ActionScript/Flash
The code for a nested menu structure is as follows:
package com.newmovieclip.aircookbook.chapter12{

    import flash.display.*;
    import flash.desktop.*;
    import flash.events.*;

    public class Step4 extends Sprite{

        public function Step4():void{
            var baseMenu:NativeMenu = new NativeMenu();
            var languageMenu:NativeMenu = new NativeMenu();
            var engLanguagesMenu:NativeMenu = new NativeMenu();

            var menuItemEng:NativeMenuItem = new NativeMenuItem("English");
            //define submenu items
                engLanguagesMenu.addItem(new NativeMenuItem("UK English"));
                engLanguagesMenu.addItem(new NativeMenuItem("USA English"));
            //add the engLanguagesMenu as submenu of menuItemEng
            menuItemEng.submenu = ENGLanguagesMenu;
            var menuItemEs:NativeMenuItem = new NativeMenuItem("Spanish");
            var menuItemDe:NativeMenuItem = new NativeMenuItem("German");
            var menuItemNl:NativeMenuItem = new NativeMenuItem("Dutch");

            languageMenu.addItem(menuItemEng);
            languageMenu.addItem(menuItemEs);
            languageMenu.addItem(menuItemDe);
            languageMenu.addItem(menuItemNl);

            //add all the languages as submenu of the baseMenu
            //with label 'Language'
            baseMenu.addSubmenu(languageMenu,"language");
            baseMenu.addItem(new NativeMenuItem("Help"));
            baseMenu.addEventListener(Event.SELECT,selectHandler);

            if(NativeApplication.supportsMenu){
                NativeApplication.nativeApplication.menu = baseMenu;
            }
            if(NativeWindow.supportsMenu){
                this.stage.nativeWindow.menu = baseMenu;
            }
        }
        private function selectHandler(event:Event):void{
            trace(event.target.label);
        }
    }
}
JavaScript
To create a nested menu structure, follow this example:
<html xmlns="http://www.w3.org/1999/xhtml">
<head>
<meta http-equiv="Content-Type" content="text/html; charset=utf-8" />
<title>Create Native Menu step 3</title>

<script src="AIRAliases.js" type="text/javascript"></script>
<script type="text/javascript">
function initialize(){
    var application = air.NativeApplication.nativeApplication;
    var baseMenu = new air.NativeMenu();
    var languageMenu = new air.NativeMenu();
    var engLanguagesMenu = new air.NativeMenu();

    var menuItemEng = new air.NativeMenuItem("English");
    //define submenu items
        engLanguagesMenu.addItem(new air.NativeMenuItem("UK English"));
        engLanguagesMenu.addItem(new air.NativeMenuItem("USA English"));
    //add the engLanguagesMenu as submenu of menuItemEng
    menuItemEng.submenu = engLanguagesMenu;
    var menuItemEs = new air.NativeMenuItem("Spanish");
    var menuItemDe = new air.NativeMenuItem("German");
    var menuItemNL = new air.NativeMenuItem("Dutch");

    languageMenu.addItem(menuItemEng);
    languageMenu.addItem(menuItemEs);
    languageMenu.addItem(menuItemDe);
    languageMenu.addItem(menuItemNL);

    //add all the languages as submenu of the baseMenu
    //with label 'language'
    baseMenu.addSubmenu(languageMenu,"Language");
    baseMenu.addItem(new air.NativeMenuItem("Help"));
    baseMenu.addEventListener(air.Event.SELECT,selectHandler);

    if(air.NativeApplication.supportsMenu){
        application.menu= baseMenu;
    }
    if(air.NativeWindow.supportsMenu){
        this.nativeWindow.menu = baseMenu
    }
}
function selectHandler(event){
    air.trace(event.target.label);
}
</script>
</head>
<body onLoad="initialize()">
</body>
</html>
Creating a Native Window Menu (Windows)
Solution
Add a native menu to a window by creating a NativeMenu object, and assign it to the
menu property of the NativeWindow object.
Discussion
You can check whether the user is on a Mac or Windows
platform by using the NativeWindow.supportsMenu
Boolean value. If that value returns true, then you are sure the user is on a
Windows platform, because at the time of this writing only the Windows
platform will return true for this
property.
For ActionScript/Flex, use the following lines:
if(NativeWindow.supportsMenu){
    this.nativeWindow.menu = baseMenu;
}
For ActionScript/Flash, use this variation:
if(NativeWindow.supportsMenu){
    this.stage.nativeWindow.menu = baseMenu;
}
In JavaScript, follow this example:
if(air.NativeWindow.supportsMenu){
    this.nativeWindow.menu = baseMenu
}
The native menu called baseMenu
is the menu you created in Creating a Native Menu.
Creating a Native Window Menu (Mac)
Solution
Add a native menu to your application by creating a NativeMenu object, and assign it to the
menu property of the NativeApplication object.
Discussion
You can check whether the user is on a Mac platform by using the
NativeApplication.supportsMenu
      Boolean
value. If that value returns true, then you are sure the user is on the Mac
platform, because at the time of this writing only the Mac platform will
return true for this property.
For ActionScript/Flex, the code you need is as follows:
if(NativeApplication.supportsMenu){
    this.nativeApplication.menu = baseMenu;
}
For ActionScript/Flash, use this code:
if(NativeApplication.supportsMenu){
    NativeApplication.nativeApplication.menu = baseMenu;
}
In JavaScript, follow this example:
if(air.NativeApplication.supportsMenu){
    application.menu= baseMenu;
}
The native menu called baseMenu
is the menu you created in Creating a Native Menu.
Creating a Context Menu (ActionScript)
Solution
Assign a NativeMenu instance or
a ContextMenu instance to the
contextMenu property of one or more
display objects.
Discussion
Every display object that inherits from the InteractiveObject base class has a contextMenu property that you can set to a
NativeMenu or ContextMenu object. Just be sure you use
NativeMenuItem objects with the
NativeMenu instance and use ContextMenuItem objects with the ContextMenu objects. You cannot mix those two
kinds of menu items. The context menu API in Adobe AIR does not support
submenus, so when you need a nested menu as part of a context menu, use
a NativeMenu menu with NativeMenuItem objects, and attach it to your
interactive object. In addition, in a context menu, you must add all
items to the customItems
array.
ActionScript/Flex
The following example adds a simple command menu when you right-click the AIR application. Because the example focuses on creating the context menu, the command functionality is not implemented here.
<?xml version="1.0" encoding="utf-8"?>
<mx:WindowedApplication xmlns:mx="http://www.adobe.com/2006/mxml"
    layout="absolute"
    applicationComplete="init()"
    >
    <mx:Script>
        <![CDATA[

            private function init():void{
                //create the contextMenu
                var backgroundColorMenu:ContextMenu = new ContextMenu();

                backgroundColorMenu.customItems.push(new ContextMenuItem("RED"));
                backgroundColorMenu.customItems.push(new ContextMenuItem("GREEN"));
                backgroundColorMenu.customItems.push(new ContextMenuItem("BLUE"));
                backgroundColorMenu.addEventListener(Event.SELECT,selectHandler);

                 //attach the contextMenu tot the label component
                myLabel.contextMenu = backgroundColorMenu;

            }
            private function selectHandler(event:Event):void{
                trace("You choose color : " + event.target.label);
            }
        ]]>
    </mx:Script>
    <mx:Label x="48" y="43" text="AIR CookBook rocks" id="myLabel"/>
</mx:WindowedApplication>
ActionScript/Flash
The following example adds a simple command menu when you right-click the AIR application. Because the example focuses on creating the context menu, the command functionality is not implemented here.
package com.newmovieclip.aircookbook.chapter12{

    import flash.display.*;
    import flash.desktop.*;
    import flash.events.*;
    import flash.ui.*;

    public class Step7 extends Sprite {

        public function Step7():void {
            //create red square
            var squareSprite:Sprite = new Sprite();
            squareSprite.graphics.beginFill(0xFF0000,1);
            squareSprite.graphics.drawRect(0,0,100,100);
            squareSprite.graphics.endFill();
            addChild(squareSprite)

             //make contextMenu and attach to the squareSprite
            var backgroundColorMenu:ContextMenu = new ContextMenu();
            backgroundColorMenu.customItems.push(new ContextMenuItem("Red"));
            backgroundColorMenu.customItems.push(new ContextMenuItem("Green"));
            backgroundColorMenu.customItems.push(new ContextMenuItem("Blue"));

            backgroundColorMenu.addEventListener(Event.SELECT,selectHandler);
             //attach contextMenu    tot the red square
            squareSprite.contextMenu=backgroundColorMenu;
        }
        private function selectHandler(event:Event):void{
            trace("You choose color : " + event.target.label);
        }
    }
}
Creating a Context Menu (JavaScript)
Solution
Create a NativeMenu object,
attach the NativeMenuItem objects or
submenus you want, and then display your custom menu in place of the
default menu.
Discussion
In JavaScript, the only way to show a custom menu when the user
right-clicks an object in your AIR application is to use the NativeMenu and NativeMenuItem classes.
Start by creating a regular NativeMenu as demonstrated in Creating a Native Menu. Because you are in an HTML
environment, however, you need to make sure the default context menu is
not shown. To prevent this, you must write a function that listens to
the JavaScript oncontextmenu event
that is dispatched when the user right-clicks. When the event is
received by the handler function, call the event object’s preventDefault method. Finally, display the
custom menu by calling the display
method of the NativeMenu instance.
The code looks like this:
<html xmlns="http://www.w3.org/1999/xhtml">
<head>
<meta http-equiv="Content-Type" content="text/html; charset=utf-8" />
<title>Create context menu</title>

<script src="AIRAliases.js" type="text/javascript"></script>
<script type="text/javascript">
var backgroundColorMenu;

function initialize(){
    backgroundColorMenu= new air.NativeMenu();
    backgroundColorMenu.addItem(new air.NativeMenuItem("RED"));
    backgroundColorMenu.addItem(new air.NativeMenuItem("GREEN"));
    backgroundColorMenu.addItem(new air.NativeMenuItem("BLUE"));
    backgroundColorMenu.addEventListener(air.Event.SELECT,selectHandler);
}
function showContextMenu(event){
    event.preventDefault();
    //display the contextMenu
    backgroundColorMenu.display(window.nativeWindow.stage,
       event.clientX, event.clientY);
}
function selectHandler(event){
    air.trace(event.target.label);
}
</script>
</head>
<body onLoad="initialize()">
<p oncontextmenu="showContextMenu(event)">AIR Cookbook rocks !</p>
</body>
</html>
Assigning Keyboard Shortcuts to Menu Items
Solution
Set a key equivalent to every menu item that needs a keyboard
shortcut by setting the keyEquivalent
property of the NativeMenuItem
instance.
Discussion
A good way to make your menu more accessible and usable is by using keyboard shortcuts.
To assign a key equivalent to a native menu item in ActionScript/Flex/Flash, use these lines:
var menuItemC:NativeMenuItem = new NativeMenuItem("Menu Item C");

menuItemC.keyEquivalent = "c";
The code you need in JavaScript is as follows:
var menuItemC = new air.NativeMenuItem("Menu Item C");
menuItemC.keyEquivalent = "c";
A key equivalent consists actually of two parts: a primary key
String and an Array of modifier keys that also must be
pressed. For Windows, the default modifier key is the Ctrl key. For the
Mac, it is the Command key.
Because the previous code does not specify any special key modifier, the actual shortcuts will be Ctrl+C on Windows and Command+C on the Mac.
If you want to add the Shift key to the modifier array, simply specify the primary key in uppercase. AIR automatically will add the Shift key to the modifier array. For example, the ActionScript/Flex/Flash code
var menuItemC:NativeMenuItem = new NativeMenuItem("Menu Item C");
menuItemC.keyEquivalent = "C";
and the JavaScript code
var menuItemC = new air.NativeMenuItem("Menu Item C");
menuItemC.keyEquivalent = "C";
specify the shortcut Ctrl+Shift+C for Windows and the shortcut Command+Shift+C for the Mac.
The Shift key is always added to a modifier array, even if you define the modifier array yourself. You can define the modifier array in ActionScript/Flex/Flash as follows:
var menuItemC:NativeMenuItem = new NativeMenuItem("Menu Item C");
menuItemC.keyEquivalent = "C";
menuItemC.keyEquivalentModifiers = [Keyboard.CONTROL];
Or you can define the modifier array in JavaScript as follows:
var menuItemC = new air.NativeMenuItem("Menu Item C");
menuItemC.keyEquivalent = "C";
menuItemC.keyEquivalentModifiers = [Keyboard.CONTROL];
This code does the same thing as the previous snippet. The only difference is that you now define the Ctrl modifier yourself instead of using the default value.
Enabling and Disabling Menu Items
Solution
Set the enabled property of the
NativeMenuItem object to true (default) to enable a menu item or
false to disable it.
Discussion
When a menu item is disabled, it is grayed out and does not
dispatch select events. By setting
the enabled property to true or false, you can enable or disable a NativeMenuItem object.
To disable a menu in ActionScript/Flex/Flash, follow this example:
var menuItemEs:NativeMenuItem = new NativeMenuItem("Spanish");
menuItemEs.enabled = false;
To disable a menu in JavaScript, use the following lines:
var menuItemEs = new air.NativeMenuItem("Spanish");
menuItemEs.enabled = false;
Toggling Menu Items
Solution
Set the checked property of the
NativeMenuItem object to true to display a check mark next to the menu
item label.
Discussion
Every menu item has a built-in checked state. You can use this
state to indicate that a menuItem is
active. When a menu item is checked, a check mark is automatically shown
next to the menu item label. The only thing you need to do to display a
check mark next to the label is to set the checked property of the NativeMenuItem object to true or false depending on whether the item needs to
be checked.
To do so in ActionScript/Flex/Flash, use the following:
var menuItemEs:NativeMenuItem = new NativeMenuItem("Spanish");
menuItemEs.checked = true;
To do so in JavaScript, use the following:
var menuItemEs = new air.NativeMenuItem("Spanish");
menuItemEs.checked = true;