
A Quick Tour of Adobe Illustrator (2021 Release)
Lesson overview
In this interactive demonstration of Adobe Illustrator (2021 release), you’ll get an overview of the main features of the application.
This lesson will take about 45 minutes to complete. To get the lesson files used in this chapter, download them from the web page for this book at www.adobepress.com/IllustratorCIB2021. For more information, see “Accessing the lesson files and Web Edition” in the Getting Started section at the beginning of this book.

In this demonstration of Adobe Illustrator, you’ll be introduced to some key fundamentals for working in the application.
Starting the lesson
For the first lesson of this book, you’ll get a quick tour of the most widely used tools and features in Adobe Illustrator, offering a sense of the many possibilities. Along the way, you’ll create artwork for an ice cream store. First, you’ll open the final artwork to see what you will create in this lesson.
To ensure that the tools and panels function exactly as described in this lesson, delete or deactivate (by renaming) the Adobe Illustrator preferences file. See “Restoring default preferences” in the “Getting Started” section at the beginning of the book.
 Note
NoteIf you have not already downloaded the project files for this lesson to your computer from your Account page, make sure to do so now. See “Getting Started” at the beginning of the book.
Start Adobe Illustrator.
Choose File > Open, or click Open in the Home screen that is showing. Open the L00_end.ai file in the Lessons > Lesson00 folder.
 Note
NoteText in the final file has been converted to shapes so you can view the file without worrying about fonts.
Choose View > Fit Artboard In Window to see an example of the artwork you’ll create in this lesson. Leave the file open for reference, if you’d like.
Creating a new document
In Illustrator, you can start a new document using a series of preset options, depending on your needs. In this case, you will print the artwork you create as a postcard, so you will choose a preset from the Print presets to start.
Choose File > New.
In the New Document dialog box, select the Print preset category along the top of the dialog box.
Make sure the Letter document preset is selected.
 Note
NoteThe figures in this lesson were taken using Windows and may look slightly different from what you see, especially if you are using macOS.
In the Preset Details area on the right, change the following:
Name (below Preset Details): IceCreamLogo
Units (to the right of Width): Inches
Orientation: Landscape
Click Create, and a new, blank document opens.
Choose File > Save As. If the Cloud Document dialog box opens, click Save On Your Computer to save the file on your computer.

In the Save As dialog box, leave the name as IceCreamLogo.ai, and navigate to the Lessons > Lesson00 folder. Leave Adobe Illustrator (ai) chosen from the Format menu (macOS) or Adobe Illustrator (*.AI) chosen from the Save As Type menu (Windows) and then click Save.
In the Illustrator Options dialog box that appears, leave the Illustrator options at their default settings and then click OK.
Choose Window > Workspace > Essentials, and then choose Window > Workspace > Reset Essentials to reset the workspace.
Drawing a shape
Drawing shapes is the cornerstone of Illustrator, and you’ll create many of them in the coming lessons. To start your project, you’ll create a circle that will become the ice cream in an ice cream cone.
![]() Note
Note
Learn more about creating and editing shapes in Lesson 3, “Using Shapes to Create Artwork for a Postcard.”
Choose View > Fit Artboard In Window.
The white area you see is called the artboard, and it’s where your printable artwork will go. Artboards are like pages in Adobe InDesign or physical papers on a desk that can be different sizes and arranged to suit your design.

Press and hold on the Rectangle tool (
 ) in the toolbar on the left and select the Ellipse tool (
 ). Note
If you don’t see the size of the ellipse as you draw it, make sure that Smart Guides are turned on. Choose View > Smart Guides. A checkmark next to the Smart Guides menu item means they are on.
Move the pointer into the middle of the white artboard and, while pressing the Shift key to make a perfect circle, drag down and to the right. When the gray measurement label next to the pointer shows a width and height of approximately 1.5 inches, release the mouse button and then the key.

Editing shapes
Most shapes are live, which means you can edit them without switching away from the tool you’re drawing with. Next you’ll create copies of the circle, reposition the copies, and resize them.
![]() Note
Note
Learn more about editing shapes in Lesson 3, “Using Shapes to Create Artwork for a Postcard,” and Lesson 4, “Editing and Combining Shapes and Paths.”
With the circle still selected on the artboard, choose Edit > Copy, and then choose Edit > Paste In Place to paste a copy in the same place as the original.
Move the pointer over the blue circle in the center of the circle. When the pointer changes (
 ), drag it to the right (see the figure for how far).
As you drag, you’ll probably see magenta lines appear as well as the gray measurement label showing you the distance you are dragging it. Those are a part of Smart Guides, which are turned on by default.
With the circle still selected, press the Shift key and drag the upper-right corner point away from the center to make the shape larger. When the gray measurement label shows a width and height of approximately 2.1 in, release the mouse button and then the key.

With the circle still selected on the artboard, move the pointer over the blue circle in the center of the shape. When the pointer changes (
), drag it down and to the left (see the figure for how far). Leave the circle selected.
Select the Selection tool (
 ) in the toolbar on the left.
With the larger circle still selected, to make a copy of it, choose Edit > Copy and then Edit > Paste In Place. A new copy is pasted directly on top of the larger circle.

Drag the new circle up so it looks like the figure.
To deselect them, choose Select > Deselect.
Choose File > Save to save the document.
Applying and editing color
Applying color to artwork is a common Illustrator task. Shapes you create can have a stroke (border) and can also be filled with a color. You can apply and edit swatches, which are the colors that come with each document by default, and create your own colors. In this section, you’ll change the fill color of the circles.
![]() Note
Note
Learn more about fill and stroke in Lesson 8, “Using Color to Enhance Artwork.”
Drag across all three circles to select them.
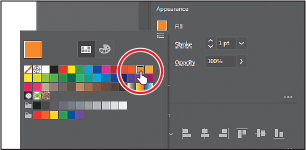
With the circles selected, click the Fill color box (
 ) to the left of the word “Fill” in the Properties panel, which is to the right of the Document window. In the panel that opens, make sure that the Swatches option (
 ) is selected at the top to show the default saved colors, called swatches. Move the pointer over an orange swatch, and when a tool tip appears (“C=0 M=50 Y=100 K=0”), click to apply the orange color to the fill of the shapes.
While you can use the default swatches, you can also create your own colors and save them as swatches to reuse later.
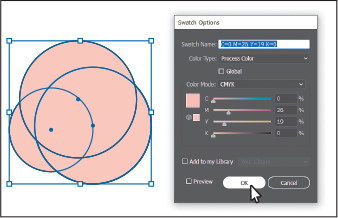
With the Swatches panel still showing, double-click the orange swatch you just applied to the shapes to edit the color.
In the Swatch Options dialog box, select Preview to see the change to the selected circles. Change the values to C=0, M=26, Y=19, K=0 to make a light pink color. Click OK to save the change you made to the swatch.
Press the Escape key to hide the Swatches panel.
![]() Note
Note
Going forward, you’ll find you need to hide panels such as the Swatches panel before you continue. You can press the Escape key to do this.
Editing strokes
A stroke is the outline (border) of artwork such as shapes and paths. There are a lot of appearance properties you can change for a stroke, including width, color, dashes, and more. In this section, you’ll adjust the stroke of the circles.
![]() Note
Note
Learn more about working with strokes in Lesson 3.
With the circles still selected, click the word Stroke in the Properties panel.
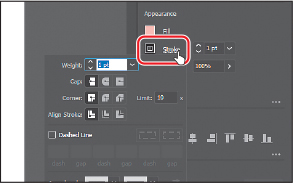
In the Properties panel, when you click an underlined word, more options appear in a panel. In this case, options for the stroke (border) of the circles.
In the Stroke panel, change the following options:

Stroke Weight: 6 pt
Click Align Stroke To Outside (
 ) to align the stroke to the outside of the circles.
There are a lot of options for strokes from making the stroke a dashed line to adding arrowheads, and more.
Press the Escape key to hide the Stroke panel.

Leave the shapes selected.
Working with layers
Layers allow you to organize and more easily select artwork. Next, using the Layers panel, you’ll start to organize your artwork.
![]() Note
Note
Learn more about working with layers and the Layers panel in Lesson 10, “Organizing Your Artwork with Layers.”
Choose Window > Layers to show the Layers panel to the right of the document.
Double-click the text “Layer 1” (the layer name) in the Layers panel. Type Artwork, and press Return or Enter to change the layer name.

Naming layers can be helpful when organizing content. Currently, the circles you created are on this layer.
Click the Create New Layer button (
 ) at the bottom of the Layers panel on the right, to create a new, blank layer.
Since the Layers panel is so tall, the figure at right shows a shorter version, indicated by the dashed line.
Double-click the new layer name, Layer 2, and type Text. Press Return or Enter to change the layer name.

By creating multiple layers in your artwork, you can control how overlapping content is displayed. Anything you place on the Text layer will be stacked above content on the Artwork layer.
When you add text to the project in a few sections, you will select the Text layer so the text is on that layer.
Creating shapes using the Shape Builder tool
The Shape Builder tool (![]() ) is a tool for creating complex shapes by merging and removing simpler shapes. Next you’ll create the top of the ice cream by combining the circles using the Shape Builder tool.
) is a tool for creating complex shapes by merging and removing simpler shapes. Next you’ll create the top of the ice cream by combining the circles using the Shape Builder tool.
![]() Note
Note
Learn more about working with the Shape Builder tool in Lesson 4.
With the three circles still selected, select the Shape Builder tool (
 ) in the toolbar on the left.
Move the pointer to roughly where you see the pointer in the first part of the following figure. Press the Shift key, and drag across the circles to combine them, following the second part of the figure for where to drag. Release the mouse button and then the key.

With the shapes still selected, you’ll change the stroke alignment now. Previously, you set it to go around the outside of the path; that’s why the top part looks strange.
Select the Selection tool (
) in the toolbar.Click the Properties panel tab to show the panel. Click the word Stroke to show the Stroke panel. Click Align Stroke To Center (
 ) to align the stroke to the center of the borders of the circles.
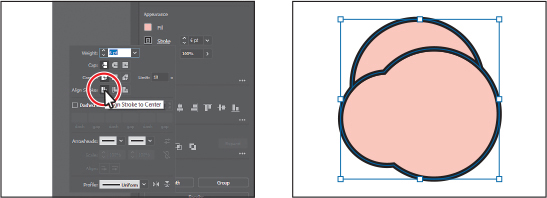
Choose Select > Deselect to deselect the ice cream, then choose File > Save.
Working with type
Next you’ll add text to the project and change its formatting. You’ll choose an Adobe font that requires an internet connection to activate. If you don’t have an internet connection, you can simply choose another font that you already have installed. First, you’ll select the layer named Text to put the text on that layer.
![]() Note
Note
Learn more about working with type in Lesson 9, “Adding type to a Project.”
Click the Layers panel tab in the upper-right to show the Layers panel. Click the Text layer to select it so the text goes on that layer.
Select the Type tool (
 ) in the toolbar on the left, and click in an empty area toward the bottom of the artboard.
Placeholder text will appear with the selected placeholder text, “Lorem ipsum.” Type ICE CREAM BAR.

Select the Selection tool (
) so the text object is selected.Click the Properties panel tab in the upper-right corner of the application window to show the panel. In the Character section of the Properties panel, select the font size, and type 34. Press Return or Enter to accept the size change.

Next you’ll apply an Adobe font, which requires an internet connection. If you don’t have an internet connection or access to the Adobe fonts, you can choose any other font from the Font Family menu.
Click the arrow to the right of the Font Family field in the Properties panel with the font name “Myriad Pro.” In the menu that appears, click Find More to see a listing of Adobe fonts after they are initialized.
 Note
NoteIf a message appears in the font menu, you can click the X in the corner to close it.
The list of fonts you see may be different from the figure.
Scroll down in the menu to find the font named Oswald. Click the arrow to the left of the Oswald font name to show the font styles (circled in the following figure).
Click the Activate button (
 ) to the far right of the Oswald Regular font name to activate it.
If a dialog box appears asking to activate the font, click OK.
NoteIf you can’t get the fonts to activate, you can go to the Creative Cloud desktop application and click the Fonts icon (
 ) in the upper right to see what the issue may be, or simply choose a font you have on your system.
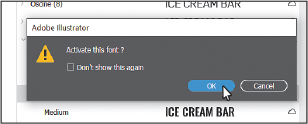
Click the Show Activated Fonts button (
 ) to filter the font list and show the fonts you’ve activated. It may take some time for the font to be activated. Move the pointer over the words “Oswald Regular” in the menu that appears to show a live preview of the selected text. Click Oswald Regular to apply it.
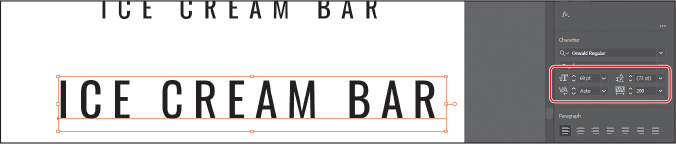
Below the font family, change the Tracking (
 ) value by selecting the value in the field and typing 400 (circled in the following figure). Press Return or Enter to accept the change. Tracking is how you can add or remove spacing between characters. Leave the text selected.
Choose File > Save.
Warping text
You can create some great design effects by warping text into different shapes using envelopes. You can make an envelope out of an object on your artboard, or you can use a preset warp shape or a mesh grid as an envelope.
![]() Note
Note
Learn more about working with warping text in Lesson 9, “Adding type to a Project.”
With the Selection tool selected, and the text still selected, copy and paste the text by choosing Edit > Copy and then Edit > Paste.
Drag the text below the other text on the artboard.
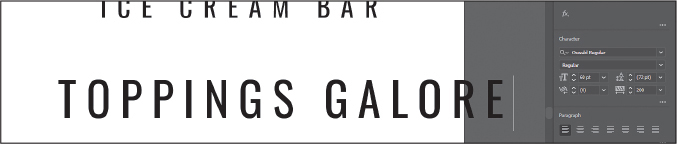
With the text object selected, change the font size to 60 in the Properties panel on the right, and the Tracking from 400 to 200.
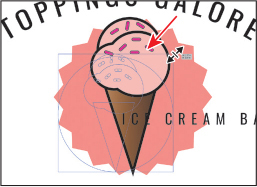
Select the Type tool and move the pointer over the text and triple-click to select it. Type TOPPINGS GALORE.
Select the Selection tool (
) in the toolbar. Choose Object > Envelope Distort > Make With Warp to open the Warp Options dialog box. In that dialog box, change the following:Style: Arc
Bend: 35%
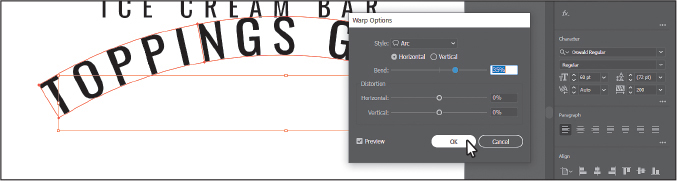
Click OK.
 Tip
TipTo edit the warp options again in the Warp Options dialog box, click the Warp Options button in the Quick Actions section of the Properties panel.
The text is now in a shape, but is still editable.
With the Selection tool selected, drag the curved text up above the ice cream.

Creating with the Curvature tool
With the Curvature tool (![]() ), you can draw and edit paths quickly to create paths with smooth, refined curves and straight lines. In this section, you’ll explore the Curvature tool while creating the ice cream cone.
), you can draw and edit paths quickly to create paths with smooth, refined curves and straight lines. In this section, you’ll explore the Curvature tool while creating the ice cream cone.
![]() Note
Note
Learn more about working with the Curvature tool in Lesson 6, “Using the Basic Drawing tools.”
Click the Layers panel tab in the upper-right to show the panel. The next artwork you create needs to be on the Artwork layer, not the text layer, so select the Artwork layer.

Select the Curvature tool (
 ) in the toolbar. Note
If the pointers you see don’t match the figures, make sure Caps Lock is not on.
Move the pointer into the ice cream shape (see the first part of the following figure). Click and release to start drawing a shape.
Move the pointer down below the ice cream shape; click and release (see the second part of the figure). Move the pointer away after clicking to see a curving path.
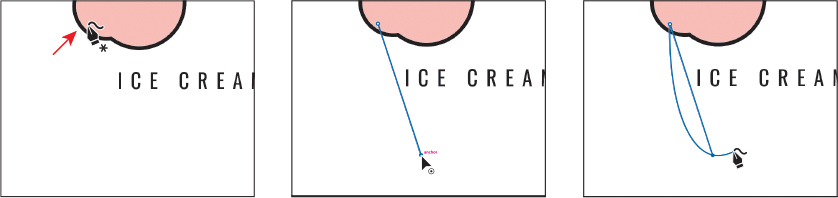
Every time you click, you are creating what is called an anchor point. The anchor points you add control the shape of the path.
Move the pointer back into the bottom of the pink ice cream shape, on the right. Click and release to continue drawing a shape. Move the pointer away and notice the path curving in different ways as you move it.

Move the pointer over where you first clicked. When the pointer shows a small circle next to it (
 ), click to close the path, creating a shape.
Move the pointer over the point you made at the bottom of the shape. That part of the path is curved by default, but we don’t want it to be curved. When the pointer looks like this
 , double-click to make it a corner. Do the same for the other two points at the top of the shape.
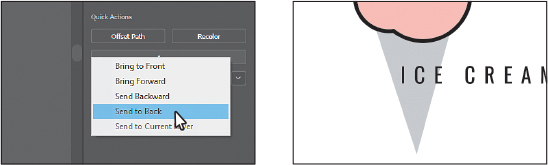
With the new ice cream cone artwork selected, next you’ll change the order of the artwork and put the ice cream cone behind the ice cream shape.
Click the Properties panel tab in the upper-right to show the panel again. Click the Arrange button in the Quick Actions section of the Properties panel. Choose Send To Back to put it behind the ice cream shape.
Choose Select > Deselect so it’s no longer selected.
Creating and editing a gradient
Gradients are blends of two or more colors that you can apply to the fill or stroke of artwork. Next you’ll apply a gradient to the ice cream cone.
![]() Note
Note
Learn more about working with gradients in Lesson 11, “Gradients, Blends, and Patterns.”
With the Selection tool (
) selected, click in the ice cream cone shape to select it.In the Properties panel, click the Fill color box and make sure the Swatches option (
) is selected. Select the white-to-black swatch with the tool tip “White, Black.” Leave the panel with the swatches showing.
At the bottom of the panel, click the Gradient Options button to open the Gradient panel. An arrow is pointing to the button in the previous figure. You can drag the Gradient panel by the title bar at the top to move it around.
In the Gradient panel, do the following:
Click the Fill box to make sure you are editing the fill (circled in the following figure).
Double-click the little black color stop (
 ) on the right side of the gradient slider in the Gradient panel (an arrow is pointing to it in the figure).
Click the Swatches button (
) in the panel that appears. Select a darker brown swatch.
Double-click the little white color stop (
 ) on the left side of the gradient slider in the Gradient panel (an arrow is pointing to it in the figure).
Select a lighter brown swatch.

Click the X at the top of the Gradient panel to close it.
Change the Stroke Weight in the Properties panel (to the right of the word “Stroke”) to 6 pt by clicking the up arrow several times.

Creating symbols
A symbol is reusable art stored in the Symbols panel. Symbols are useful because they can help you save time and can save on file size as well. You will now create a symbol from a rectangle you create to make sprinkles for the ice cream.
![]() Note
Note
Learn more about working with symbols in Lesson 14, “Creating Artwork for a T-Shirt.”
Click in the top pink ice cream shape to select it. Zoom in to it by choosing View > Zoom In a few times.
Press and hold on the Ellipse tool (
), then select the Rectangle tool () in the toolbar on the left. On the ice cream shape, drag to make a small rectangle as you see in the figure.
Change the stroke weight in the Properties panel to 1 pt.

Click the Fill color and change the fill to a bright, festive color, like magenta.

With the rectangle selected, zoom in by choosing View > Zoom In a few times.
Drag any of the Live Corners widgets (
 ) toward the center of the rectangle to round the corners. If you drag far enough, you will see red curved lines, indicating that it is as round as the corners can make it. Note
If you don’t see the corner radius widgets, zoom in closer.

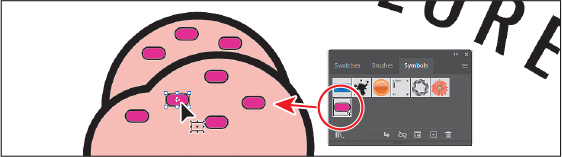
Choose Window > Symbols to open the Symbols panel. Click the New Symbol button (
 ) at the bottom of the panel to save the selected artwork as a symbol.
In the Symbol Options dialog box that appears, name the symbol Sprinkles and click OK. If a warning dialog box appears, click OK.

The artwork now appears as a symbol in the Symbols panel, and the rectangle on the artboard you used to create the symbol is now a symbol instance. For the next step, you may want to zoom out by choosing View > Zoom Out a few times.
Select the Selection tool (
) in the toolbar.From the Symbols panel, drag the sprinkles symbol thumbnail onto the artboard about seven times. You’ll arrange them later.
NoteYour sprinkles symbol instances may be in different locations than those in the figure. That’s okay.
Click the X at the top of the Symbols panel group to close it.
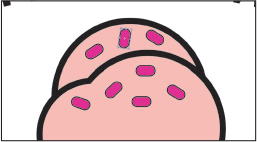
With one of the sprinkles on the artboard selected, move the pointer just off of a corner. When the rotate arrows appear, drag to rotate it.

Select the other sprinkles on the ice cream and rotate them one at a time. If you want, drag each around on the ice cream.
Editing symbols
One of the best parts about symbols is that you can easily edit the original symbol and all of the instances update.
Double-click any of the pink sprinkles instances on the ice cream. Click OK in the warning dialog box that appears.
The artwork is now in Isolation mode, where you can’t select other artwork and you are looking at the original artwork for the Sprinkles symbol.

Click the rounded rectangle artwork on the artboard. In the Properties panel on the right, make sure Maintain Width And Height Proportions to the right of Width (W:) and Height (H:) is deselected (it looks like this:
 ). Change the Width to 0.3 and the Height to 0.1 by selecting and typing in the values. Press Return or Enter after the last value you entered.
Press the Escape key to exit the Isolation mode and all of the sprinkles instances are updated.

Click one of the sprinkles on the ice cream. To select them all, choose Select > Same > Symbol Instance.
Choose Object > Group to group them together.
Choose Select > Deselect and then choose View > Fit Artboard In Window.
Working with effects
Effects alter the appearance of an object without changing the base object. Next you’ll apply an effect to a shape you make in the background.
![]() Note
Note
Learn more about effects in Lesson 13, “Exploring Creative Uses of Effects and Graphic Styles.”
Press and hold on the Rectangle tool (
) in the toolbar and select the Ellipse tool (). Over the top of the ice cream cone group, Shift-drag to make a circle like the one in the figure. Release the mouse button and then the key. Note
NoteDon’t worry about the position of the circle for now.
In the Properties panel, select the Stroke value, type 0, and press Return or Enter to remove it.
Click the Fill color in the Properties panel. In the panel that opens, click the Color Mixer (
 ) to mix a color (an arrow is pointing to it in the figure). Change the color values to C=0, M=50, Y=36, K=0. Press Return or Enter after entering the last value to close the panel.
In the Quick Actions section of the Properties panel, click Arrange and choose Send To Back so the circle is behind the grouped ice cream shapes.

Click the Choose An Effect button (
 ) in the Properties panel on the right, and choose Distort & Transform > Zig Zag.
In the Zig Zag dialog box, select Preview to see your changes, then set the following options (if necessary):
Size: 0.14 in
Absolute: Selected
Ridges Per Segment: 8
Points: Corner

Click OK.
Aligning artwork
Illustrator makes it easy to align or distribute multiple objects relative to each other, the artboard, or a key object. In this section, you’ll move all of the artwork into position and align some of it to the center of the artboard.
![]() Note
Note
Learn more about aligning artwork in Lesson 2, “Techniques for Selecting Artwork.”
With the Selection tool (
) selected, drag the circle with the effect applied approximately centered behind the ice cream cone (see the following figure).To select everything, choose Select > All.
To deselect the text, press the Shift key and click the TOPPINGS GALORE text and the ICE CREAM BAR text, then release the key. The entire ice cream cone and background shape should be selected.

To keep them together, click the Group button in the Properties panel on the right.
To make the ice cream cone artwork smaller, Shift-drag the corner of the box around it, toward the center. I dragged until it showed a width of about 3.75 inches in the gray measurement label next to the pointer. Release the mouse button and then the Shift key.
Drag each object into position like you see in the figure. It doesn’t have to match exactly.

To select everything, choose Select > All.
Click the Align To Selection option (
 ) in the Properties panel to the right of the document, and choose Align To Artboard from the menu. Any content you apply an alignment to will now align to the edges of the artboard.
Click the Horizontal Align Center button (
 ) to align the selected artwork to the horizontal center of the artboard.
Choose Select > Deselect.

Choose File > Save, and then choose File > Close.