
2. Creating and Viewing a Document
What You’ll Do
Create a New Document from a Template
Create a New Document Using Document Presets
Change the View with the Zoom Tool
Change Guides & Pasteboard Options
Move Around with the Hand Tool
Introduction
You can either open an existing document or create a new one to work on in InDesign. When you create a new document, you can create one from scratch or use one of the built-in types, such as document, book or library. The built-in document presets make it easy to create documents for specific purposes without the hassle of specifying individual settings. However, if you know the individual settings you want, you can create a new document from scratch.
InDesign uses two main Screen Modes: Normal and Preview. Normal mode displays the area inside document pages, guides, pasteboard, bleed, and slug areas, while Preview mode simply displays the area inside document pages. There are two additional Screen Modes: Bleed and Slug. The bleed is an area outside the trim of the page where objects still print, while slug is an area outside the page trim that may or may not print.
Having problems squinting at the small details of a document? Using the Zoom tool is a great way to get you focused where you need to be. Zooming into a specific section of a document makes touching up the fine details just that much easier.
InDesign’s navigation and measurement systems—rulers, grid, guides, smart guides—are more than just information; they represent control of the document and control of the creative process. In addition, the Info panel gives you up-to-date information on the exact position of the cursor inside the document, as well as detailed color space and profile information that can be indispensable in preparing your designs.
Creating a New Document
Creating a new InDesign document requires more thought than creating a new word processing document. For example, there are the number of pages, page size, columns, and margins considerations to keep in mind. The page size option also includes compact disc and monitor (New!) sizes for interactive documents. You can also set advanced options for the bleed and slug. The bleed is an area outside the trim of the page where objects still print, while slug is an area outside the page trim that may or may not print. The slug is typically used to add non-printing information to a document. As you specify new document settings, you can save your settings as a preset for use in the future. You can create as many new documents as you need. Once a new document is created, you have access to all of InDesign’s design, text, and manipulation tools to create anything you can imagine.
Create a New Document
![]() Click the File menu, point to New, and then click Document.
Click the File menu, point to New, and then click Document.
![]() Click the Document Preset list arrow, and then select a preset, or choose your own options to create a custom document.
Click the Document Preset list arrow, and then select a preset, or choose your own options to create a custom document.
![]() Select from the following options:
Select from the following options:
• Number of Pages. Specify the number of pages you want in the document.
• Facing Pages. Select to use facing pages (left and right), like a book. Deselect to use single pages in order.
• Master Text Frame. Select to use a common text frame from a master.
![]() Select from the following Page Size options:
Select from the following Page Size options:
• Page Size. Select a preset page, compact disc(New!), or monitor (New!) size from the list.
• Width and Height. Specify a custom width and height for a custom document size.
• Orientation. Select the Portrait or Landscape button.

![]() Select from the following Columns options:
Select from the following Columns options:
• Number. Specify the number of columns you want for the pages.
• Gutter. Specify the space between the columns.
![]() Select from the following Margins options:
Select from the following Margins options:
• Top and Bottom. Specify the top and bottom margin size at the top and bottom edges of the document.
• Inside and Outside. If Facing Pages is selected, specify Inside margins for the space between the pages (to make room for the binding) and Outside margins for the edges of each page.
• Make All Settings the Same. Click the chain icon to make all settings the same or allow selection of different settings.
![]() Click the More Options button (if you want), and then select the advanced options you want:
Click the More Options button (if you want), and then select the advanced options you want:
• Bleed. Specify the bleed values for top, bottom, inside and outside.
• Slug. Specify the slug values for top, bottom, inside and outside.
• Make All Settings the Same. Click the chain icon to make all settings the same or allow selection of different settings.
![]() To save custom settings as a preset, click Save Preset, type a name, and then click OK.
To save custom settings as a preset, click Save Preset, type a name, and then click OK.
![]() Click OK.
Click OK.


Creating a New Document from a Template
A template is a special document that makes it easier to create a new document. If you frequently use an existing document, such as Books or Brochures, to start a new document, then you should create a template, which uses the InDesign Template (INDT) file format. You can create your own template or use one provided by InDesign. InDesign comes with a variety of templates, such as Newsletters, Menus, Manuals, Labels and Stickers, Forms, Datamerge, Certificates, Catalogs, CD-DVD labels, Brochures, and Books. When you create a new document from a template, the document appears with the template extension (INDT), which you can then save as a normal InDesign document with the INDD extension. Instead of using an Open dialog box from within the program, InDesign uses Adobe Bridge to access and select templates for use back in InDesign.
Create a New Document from a Template
![]() Click the File menu, and then click New From Template.
Click the File menu, and then click New From Template.
• You can also click From Templates in the Welcome Screen dialog box.
Adobe Bridge opens, displaying the Templates folder for InDesign, which contains individual folders with different types of templates.
![]() Navigate to the folder location where the template you want to use is stored.
Navigate to the folder location where the template you want to use is stored.
![]() Double-click the template file you want to use.
Double-click the template file you want to use.
The template file opens back in InDesign.

Create a Template Document
![]() Open a new or existing document.
Open a new or existing document.
![]() Create a custom document.
Create a custom document.

![]() Click the File menu, and then click Save As.
Click the File menu, and then click Save As.
![]() Type a name for the new template.
Type a name for the new template.
![]() Click the Save as Type (Win) or Format (Mac) list arrow, and then click InDesign CS4 template.
Click the Save as Type (Win) or Format (Mac) list arrow, and then click InDesign CS4 template.
![]() Navigate to the location where you want to store the template.
Navigate to the location where you want to store the template.
• If you want to store your template along with the pre-built InDesign templates, then save your template in the following location:
For Windows: Program Files/Common Files/Adobe/Templates/en_US/InDesign/6.0
For the Macintosh: Computer Macintosh HD/Users/name/Application Support/Adobe/Templates/en_US/InDesign/6.0
![]() Select the Always Save Preview Images with Documents check box to save a preview image with the document for use in dialog boxes and other thumbnails as a preview.
Select the Always Save Preview Images with Documents check box to save a preview image with the document for use in dialog boxes and other thumbnails as a preview.
![]() Click Save.
Click Save.

Creating a New Document Using Presets
If you frequently use custom settings to create an InDesign document, you can save time by creating a preset. You can create a preset when you create a new document in the New Document dialog box or you can create and manage presets in the Document Presets dialog box. After you create a preset, you can export and share it with others, which they can import with the Load button in the Document Presets dialog box. When you no longer need a preset, you can delete it. However, you can’t delete the [Default] preset.
Create a New Document Using Presets
![]() Click the File menu, point to Document Presets, and then select a preset.
Click the File menu, point to Document Presets, and then select a preset.
• You can also click the File menu, point to New, click Document, and then select a preset.
The New Document dialog box appears, displaying the selected preset.
![]() Click OK.
Click OK.

Did You Know?
You can save a preset in the New Document dialog box. Click the File menu, point to New, click Document, specify the settings you want, click Save Preset, type a name, and then click OK twice.
See Also
See “Creating a New Document” on page 28 for more information on saving a preset in the New Document dialog box.
Work with Presets for New Documents
![]() Click the File menu, point to Document Presets, and then click Define.
Click the File menu, point to Document Presets, and then click Define.
![]() Perform any of the following:
Perform any of the following:
• New. Click New, specify the options that you want, and then click OK.
• Edit. Select a custom preset (not a predefined one), click Edit, change the options, and then click OK.
• Delete. Select a custom preset (not a predefined one), and then click Delete.
• Import. Click Load, navigate to the preset file, select it, and then click Open.
• Export. Select a preset, click Save, specify a location and name, and then click Save.
![]() Click OK.
Click OK.


Setting Up a Document
After you create a document, you can use the Document Setup command on the File menu and the Margins and Columns command on the Layout menu to change document settings. In the Document Setup dialog box, you can specify the number of pages, page size, orientation, and advanced settings for bleed and slug. In the Margins and Columns dialog box, you can specify margin, column, and gutter settings. The changes you make in the Margins and Columns dialog box are only applied to the current page or two page spread and not the entire document. If you want to change the entire document, you need to change the master page.
Change Document Options
![]() Click the File menu, and then click Document Setup.
Click the File menu, and then click Document Setup.
![]() Select from the following options:
Select from the following options:
• Number of Pages. Specify the number of pages you want in the document.
• Facing Pages. Select to use facing pages (left and right), like a book. Deselect to use single pages in order.
• Master Text Frame. Select to use a common text frame from a master.
![]() Select from the following Page Size options:
Select from the following Page Size options:
• Page Size. Select a preset page size from the list.
• Width and Height. Specify a custom width and height for a custom document size.
• Orientation. Select the Portrait or Landscape button.
![]() Click the More Options button (if you want), and then select the advanced options you want:
Click the More Options button (if you want), and then select the advanced options you want:
• Bleed and Slug. Specify the bleed and slug values for top, bottom, inside and outside.

![]() Click OK.
Click OK.

Change Margins and Column Options
![]() Click the Layout menu, and then click Margins and Columns.
Click the Layout menu, and then click Margins and Columns.
![]() Select from the following Columns options:
Select from the following Columns options:
• Number. Specify the number of columns you want for the pages.
• Gutter. Specify the space between the columns.
![]() Select from the following Margins options:
Select from the following Margins options:
• Top and Bottom. If Facing Pages is selected, specify Inside margins for the space between the pages (to make room for the binding) and Outside margins for the edges of each page.
• Inside and Outside. Specify the inside and outside margin size at the left and right edges of the document.
• All Settings the Same. Click the chain icon to make all settings the same or click again (the icon will now be a broken chain) to allow selection of different settings.
![]() Click OK.
Click OK.

Changing the Display View
InDesign uses two main modes: Normal and Preview. Normal mode displays document pages, guides, pasteboard, bleed, and slug areas, while Preview mode displays the area inside the page boundaries. There are two additional modes: Bleed and Slug. The bleed is an area outside the trim of the page where objects still print, while slug is an area outside the page trim that may or may not print. Bleed mode displays the bleed area and document pages, while Slug mode displays the slug area and document pages. In addition to the display modes, you can also preview aspects of your output, such as overprinting, color proofs and separations, and flattened artwork.
Change the Display View
![]() Click the Screen Mode button on the Application bar or on the bottom of the Tools panel, and then select one of the following modes:
Click the Screen Mode button on the Application bar or on the bottom of the Tools panel, and then select one of the following modes:
• Normal. Shows the guides, pasteboard, bleed, and slug areas.
• Preview. Shows the area inside the page boundaries.
The pasteboard is replaced by a colored background, which you can change in Guides & Pasteboard preferences.
• Bleed. Shows the area inside the page boundaries and the bleed area.
• Slug. Shows the area inside the page boundaries and the slug area.

Did You Know?
You can temporarily hide all of InDesign’s panels and Tools panel. Press the Tab key to hide the panels. Press the Tab key a second time to display the hidden panels. Hold down the Shift key, and then press the Tab key to hide the panels, but not the Tools and Control panels.
Display Output Views
• Overprint Preview Mode. Displays an ink preview with blending, transparency, and overprinting in color separated output. Click the View menu, and then click Overprint Preview.

• Separations Preview Mode. Displays separations as they print. Click the Window menu, point to Output, and then click Separations Preview.

• Flattener Preview Mode. Displays and highlights artwork areas that are flattened when saved or printed. Click the Window menu, point to Output, and then click Flattener Preview.
• Soft Proofs. Displays your artwork as it will appear on a monitor or output device. Click the View menu, point to Proof Setup, and then select a proof type.
Did You Know?
You can rotate the Spread view and edit content. (New!) Display the two page spread you want to rotate, click the View menu, point to Rotate Spread, and then choose 90° CW (clockwise), 90° CCW (counter clockwise), or 180°. Edit the content you want. To restore the view, click Clear Rotation.
Changing the View with the Zoom Tool
Working with the Zoom tool gives you one more way to control exactly what you see in InDesign. The Zoom tool does not change the active image, but allows you to view the image at different magnifications. The Zoom tool is located towards the bottom of InDesign’s Tools panel, and resembles a magnifying glass. The maximum magnification of an InDesign document is 4000%, and the minimum size is 5.0%. Large documents are difficult to work with and difficult to view. Many large documents, when viewed at 100%, are larger than the maximum size of the document window, requiring you to reduce the zoom in order to view the entire image. In addition to the Zoom tool, you can also select view options to fit the page or spread to the window, show the actual size, or show the entire pasteboard.
Zoom In the View of an Image
![]() Select the Zoom tool on the Tools panel.
Select the Zoom tool on the Tools panel.

![]() Use one of the following methods:
Use one of the following methods:
• Click on the document. The image increases in magnification centered on where you clicked.
• Drag to define an area with the Zoom tool. The image increases in magnification based on the boundaries of the area you dragged.
• Set a specific view size. Click the Zoom Level button on the Application bar, and then select a specific percentage size magnification.
• Fit Page in Window. Click the View menu, and then click Fit Page In Window.
• Fit Spread in Window. Click the View menu, and then click Fit Spread In Window.
• Actual Size. Click the View menu, and then click Actual Size.
• Show Entire Pasteboard. Click the View menu, and then click Entire Pasteboard.

Zoom Out the View of an Image
![]() Select the Zoom tool on the Tools panel.
Select the Zoom tool on the Tools panel.

![]() Hold down the Alt (Win) or Option (Mac) key, and then click on the screen to reduce the magnification of the active document.
Hold down the Alt (Win) or Option (Mac) key, and then click on the screen to reduce the magnification of the active document.
Timesaver
Press Ctrl+= (Win) or ![]() (Mac) for Zoom In and press Ctrl+- (Win) or
(Mac) for Zoom In and press Ctrl+- (Win) or ![]() (Mac) for Zoom Out.
(Mac) for Zoom Out.
The zoom reduction centers at the spot where you click on the active document.
Important
The best way to really see what the printed results of your artwork will look like is to view the image (even if it is too big for the screen) at 100%.

Did You Know?
You can zoom in or out using shortcut keys regardless of what tool you’re currently using. To zoom in, press Ctrl+Spacebar (Win) or ![]() (Mac) and click or drag to define an area. To zoom out, press Ctrl+Spacebar+Alt (Win) or
(Mac) and click or drag to define an area. To zoom out, press Ctrl+Spacebar+Alt (Win) or ![]() (Mac) and click or drag to define an area.
(Mac) and click or drag to define an area.
Viewing and Using Rulers
Carpenters know that precise measurements are essential to making things fit, so they have a rule: Measure Twice, Cut Once. The designers of InDesign also know that measurements are essential and give you several measuring systems—among them are the rulers. Rulers are located on the top and left sides of the active document window, and serve several purposes. Rulers start numbering at the top left corner of the page. You can move this point, known as the zero point, to another position. Rulers let you measure the width and height of the active image, they let you place guides on the screen to control placement of other image elements, and they create markers that follow your cursor as you move. As you can see, rulers are critical in the design of a document by helping you correctly align image design elements. The default measurement is in picas, which you can change in Preferences. You can also change the origin, which allows you to use rulers across spreads and spines.
Change Ruler Options
![]() Click the Edit (Win) or InDesign (Mac) menu, point to Preferences, and then click Units & Increments.
Click the Edit (Win) or InDesign (Mac) menu, point to Preferences, and then click Units & Increments.
![]() Click the Origin list arrow, and then select an option:
Click the Origin list arrow, and then select an option:
• Spread. Displays rulers for two pages at a time, as in a book or magazine.
• Page. Displays rulers for one page at a time.
• Spine. Displays rulers for the area where two page spreads are bound together.
![]() Click the Horizontal and Vertical list arrows, and then select a measurement from the available options.
Click the Horizontal and Vertical list arrows, and then select a measurement from the available options.
• If you selected Custom, enter the number of points for each unit on the ruler.
![]() Click OK.
Click OK.
Important
If the Rulers are not visible in the active document, click the View menu, and then click Show Rulers.

Work with Rulers
• Show or Hide Rulers. Click the View menu, and then click Show Rulers or Hide Rulers.
Timesaver
Press Ctrl+R (Win) or ![]() (Mac).
(Mac).
• You can also click the View Options menu (New!) on the Application bar, and then click Rulers.
• Change Measurement Units. Right-click (Win) or Option-click (Mac) a ruler, and then select a unit of measure.
• Change Ruler Origin. Point to the upper-left corner where the rulers intersect, and then drag the pointer to where you want the new ruler origin.
When you change the ruler origin on a spine with facing pages, the X values are positive for right-sided pages and negative for left-sided pages (New!).
• Reset Ruler Origin. Double-click the upper-left corner where the rulers intersect.

Did You Know?
You can change the number of points per inch in InDesign. Points are used to measure font characters. In the Units & Increments Preferences dialog box, you can change the points per inch. Click the Edit (Win) or InDesign (Mac) menu, point to Preferences, click Units & Increments, specify an option, and then click OK.
Using Guides
A guide is a nonprinting vertical or horizontal line that helps you align text and graphic objects. You can quickly show and hide guides, lock them in place, and align objects to them. With the Snap to Guides command, you can align an object to a guide. When the object’s edge comes within a specified distance in pixels of a guide, it snaps to the guide point. When you no longer need one or all of the guides, you can quickly select and remove them.
Create and Move Guides
![]() Click the View menu, and then click Show Rulers to display the ruler bars within the document window.
Click the View menu, and then click Show Rulers to display the ruler bars within the document window.
![]() Move to the vertical or horizontal Ruler bar, and then click and drag into the document.
Move to the vertical or horizontal Ruler bar, and then click and drag into the document.

![]() Return to the Ruler bar and continue to drag until you have all your guides properly set.
Return to the Ruler bar and continue to drag until you have all your guides properly set.
![]() To lock the existing guides in place, click the View menu, point to Grids & Guides, and then click Lock Guides.
To lock the existing guides in place, click the View menu, point to Grids & Guides, and then click Lock Guides.
![]() Click the Selection tool on the Tools panel to drag existing guides to a new position (make sure Lock Guides is not selected).
Click the Selection tool on the Tools panel to drag existing guides to a new position (make sure Lock Guides is not selected).

Work with Guides
• Show or Hide Guides. Click the View menu, point to Grids & Guides, and then click Show Guides or Hide Guides.
Timesaver
Press Ctrl+; (Win) or ![]() (Mac).
(Mac).
• You can also click the View Options menu (New!) on the Application bar, and then click Guides.
• Lock/Unlock Guides. Click the View menu, point to Grids & Guides, and then click Lock Guides.
Timesaver
Press Alt+Ctrl+; (Win) or ![]() (Mac).
(Mac).
• Lock/Unlock Column Guides. Click the View menu, point to Grids & Guides, and then click Lock Column Guides.
• Snap Objects to Guides. Click the View menu, point to Grids & Guides, and then click Snap To Guides.
When you drag an object near a guide, the object snaps to it.
Timesaver
Press Shift+Ctrl+; (Win) or ![]() (Mac).
(Mac).
• Delete Guides. Click the ruler guide with one of the Selection tools, and then press the Delete or Backspace key.
• Delete All Guides. Right-click (Win) or Ctrl-click (Mac) a ruler, and then click Delete All Guides (New!).

Changing Guides & Pasteboard Options
InDesign uses several different types of guides to show different areas of a document. Ruler guides are user-defined guides for moving and aligning objects. Margin guides show the current margins in the document. Column guides show current column settings for a page or master page. Bleed and Slug guides show the bleed and slug areas in a document. You can use Guides & Pasteboard preferences to set guide settings, such as color and display options, and pasteboard settings, such as color in Preview view and size above and below the document. You can also specify a snap to distance to align an object to a guide.
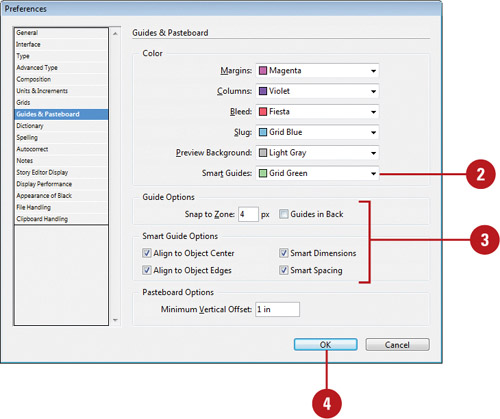
Change Guides & Pasteboard Preferences
![]() Click the Edit (Win) or InDesign (Mac) menu, point to Preferences, and then click Guides & Pasteboard.
Click the Edit (Win) or InDesign (Mac) menu, point to Preferences, and then click Guides & Pasteboard.
![]() Select from the following Guides & Pasteboard options:
Select from the following Guides & Pasteboard options:
• Margins. Specify a guide color for margins.
• Columns. Specify a guide color for columns.
• Bleed. Specify a guide color for the bleed area.
• Slug. Specify a guide color for the slug area.
• Preview Background. Specify a color for the pasteboard background in Preview view.
• Snap to Zone. Enter a value to specify the distance in pixels when an object snaps to a guide.
• Guides in Back. Select to show guides in the background of text and objects.
• Minimum Vertical Offset. Enter a size to increase the pasteboard area above and below the document.
![]() Click OK.
Click OK.

Change the Appearance of Ruler Guides
![]() Click the Layout menu, and then click Ruler Guides.
Click the Layout menu, and then click Ruler Guides.
![]() Click the Color list arrow, and then select a color.
Click the Color list arrow, and then select a color.
![]() Click the View Threshold list arrow, and then select the lowest view percentage at which the ruler guides will be visible.
Click the View Threshold list arrow, and then select the lowest view percentage at which the ruler guides will be visible.
When you increase the threshold, guides are hidden at low magnifications and are visible at high magnifications.
![]() Click OK.
Click OK.

Using Smart Guides
 ID 1.10
InDesign gives you the ability to use Smart Guides (New!) to help align shapes and objects as you draw or drag to move, rotate, or resize. They appear automatically as you draw or move an element, and then disappear after the element is drawn or moved. They enable you to visually align one object to another with a minimum of effort. Smart Guides also display alignment and measurement information, known as Smart Dimensions (New!), such as distances between objects, angles of rotation, and whether an object matches the size of nearby objects, to make drawing and alignment even easier. You can also use Smart Spacing (New!) to evenly space multiple elements by snapping objects into position. Smart Guides are automatically turned on by default. You can use Guides & Pasteboard preferences to set color and information display options to customize your Smart Guides.
Use Smart Guides
![]() Open or create a multi-layered document.
Open or create a multi-layered document.
![]() To turn Smart Guides on and off, click the View menu, point to Grids & Guides, and then click Smart Guides.
To turn Smart Guides on and off, click the View menu, point to Grids & Guides, and then click Smart Guides.
• You can also click the View Options menu (New!) on the Application bar, and then click Smart Guides.
![]() To draw a shape and use Smart Guides, select a shape tool from the Tools panel, and then drag to draw the shape.
To draw a shape and use Smart Guides, select a shape tool from the Tools panel, and then drag to draw the shape.
As you draw the shape, Smart Guides appear to help you create shapes that match and align to other objects.

![]() Select the Selection tool on the Tools panel, and then select and drag the objects you want to move and align.
Select the Selection tool on the Tools panel, and then select and drag the objects you want to move and align.
As you move the object, Smart Guides appear to help you align it with other objects.

![]() Release the mouse and the guides disappear.
Release the mouse and the guides disappear.
Change Smart Guide Preferences
![]() Click the Edit (Win) or InDesign (Mac) menu, point to Preferences, and then click Guides & Pasteboard.
Click the Edit (Win) or InDesign (Mac) menu, point to Preferences, and then click Guides & Pasteboard.
![]() Click the Smart Guides list arrow, and then select a guide color.
Click the Smart Guides list arrow, and then select a guide color.
![]() Select from the following options:
Select from the following options:
• Align to Object Center. Select to display guides along the center of objects, art, and bleeds.
• Align to Object Edges. Select to display guides along edges of objects, artboard, and bleeds.
• Smart Dimensions. Select to enable the Smart Dimensions feature, which allows you to show width, height or rotation of an object, and indicate when the size or rotation matches nearby objects.
• Smart Spacing. Select to enable the Smart Spacing feature, which allows you to evenly space multiple items by snapping objects into position.
• Snap to Zone. Enter a value to specify the distance in pixels when an object snaps to a guide.
• Guides in Back. Select to show guides in the background of text and objects.
![]() Click OK.
Click OK.
Using the Grid
A grid is a checkerboard display that you can use to help you align text and graphic objects. There are two types of grids: Document and Baseline. The document grid displays a checkerboard pattern, which is helpful for aligning objects, while the baseline grid displays horizontal lines, which is helpful for aligning text. The grid appears behind your text and artwork, so it doesn’t get in the way. With the Snap to Document Grid command, you can align an object to a gridline. When the object’s edge comes within a specified number of pixels of a gridline, it snaps to the gridline point. You can use Grids preferences to set grid settings, such as color and spacing.
Work with the Grid
• Show or Hide Document Grid. Click the View menu, point to Grids & Guides, and then click Show Document Grid or Hide Document Grid.
Timesaver
Press Ctrl+’ (Win) or ![]() (Mac).
(Mac).
• Show or Hide Baseline Grid. Click the View menu, point to Grids & Guides, and then click Show Baseline Grid or Hide Baseline Grid.
Timesaver
Press Alt+Ctrl+’ (Win) or ![]() (Mac).
(Mac).
• You can also click the View Options menu (New!) on the Application bar, and then click Baseline Grid.
• When you use a measurement system other than points, baseline grid values still use points to match text size and leading (New!).
• Snap Objects to Gridline. Click the View menu, point to Grids & Guides, and then click Snap To Document Grid.
Timesaver
Press Shift+Ctrl+’ (Win) or ![]() (Mac).
(Mac).
When you drag an object near a gridline, it snaps to the gridline.


Change Grid Preferences
![]() Click the Edit (Win) or InDesign (Mac) menu, point to Preferences, and then click Grids.
Click the Edit (Win) or InDesign (Mac) menu, point to Preferences, and then click Grids.
![]() Select from the following Baseline Grid options:
Select from the following Baseline Grid options:
• Color. Specify a grid color.
• Start. Specify a start value for the baseline.
• Relative To. Specify the location of the start value relative to the page or margin.
• Increment Every. Specify a measurement for the interval of gridlines. The default is 12 points.
• View Threshold. Specify the lowest view percentage at which the grid is visible.
![]() Select from the following Document Grid options:
Select from the following Document Grid options:
• Color. Specify a grid color.
• Gridline Every (Horizontal and Vertical). Specify a measurement for the interval of gridlines.
• Subdivisions (Horizontal and Vertical). Specify the number of grid subdivisions.
• Grids in Back. Select to show grids in the background of text and objects.
![]() Click OK.
Click OK.

Moving Around with the Hand Tool
One of those little used, but handy, tools is InDesign’s Hand tool. The Hand tool (so named because it resembles an open hand) lets you quickly move the active image within the document window without ever using the scroll bars. For example, you’ve zoomed the image beyond the size that fits within the document window and you need to change the visible portion of the document. It’s a simple operation, but a handy one to know.
Move a Page Around in the Document Window
![]() Select the Hand tool on the Tools panel.
Select the Hand tool on the Tools panel.

![]() Drag in the active document to move it.
Drag in the active document to move it.

![]() Click and hold to zoom in. Release the mouse to return to the previous magnification.
Click and hold to zoom in. Release the mouse to return to the previous magnification.

Did You Know?
You can quickly access the Hand tool whenever you need it. Hold down the Spacebar to temporarily change to the Hand tool. Drag in the active document to the desired position, and then release the Spacebar. You’re instantly returned to the last-used tool. It’s important to note that you cannot use the Spacebar to access the Hand tool if you are currently using the Type tool.
See Also
See “Changing the View with the Zoom Tool” on pages 38-39 for more information on increasing and decreasing the view magnification.
Working with the Info Panel
InDesign’s Info panel gives you a wealth of data on the current document. The Info panel displays information on the x and y (horizontal/vertical) position of your mouse cursor within the active document window. In addition, when you’re using one of InDesign’s drawing, measuring, or transformation tools, the Info panel gives you up-to-date information on the size of the object you’re creating. When an object is selected, the Info panel display the x and y position, width (w) and height (h). If you select multiple objects, only information that is the same for all selected objects appears in the Info panel. When you’re using the Zoom tool, the Info panel displays the magnification factor and the x and y position. The Info panel also displays color information when you choose to show options.
Create a Specific Size Object
![]() Select a drawing tool on the Tools panel, and then drag to create a shape.
Select a drawing tool on the Tools panel, and then drag to create a shape.
![]() Release the mouse when the Info panel displays the desired dimensions.
Release the mouse when the Info panel displays the desired dimensions.
![]() To display color fill and stroke information for a selected object, click the Options menu, and then click Show Options.
To display color fill and stroke information for a selected object, click the Options menu, and then click Show Options.

![]() To change cursor, fill or stroke information, click the related icon (with a small black triangle), and then select an option.
To change cursor, fill or stroke information, click the related icon (with a small black triangle), and then select an option.
Did You Know?
You can measure the distance between objects. Select the Measure tool in the Tools panel, and then click two points, or click the first point and drag to the second point. Use Shift-drag to constrain the tool to multiples of 45 degrees. The Info panel displays the distances from the x and y axes, the absolute horizontal and vertical distances, the total distances, and the angle measured.
Creating and Displaying Workspaces
As you work with InDesign, you’ll open, close, and move around windows and panels to meet your individual needs. After you customize the InDesign workspace, you can save the location of windows and panels as a workspace, which you can display by using the Workspace menu on the Application bar (New!) or the Workspaces submenu on the Window menu. You can create custom workspaces, or use one of the workspaces provided by InDesign, which are designed for space and workflow efficiency. The built-in workspaces include Essentials, Book, Interactivity, Printing and Proofing, and Typography (New!). If you no longer use a custom workspace, you can remove it at any time.
Create a Workspace
![]() Open and position the panels and add the custom menus you want to include in the workspace.
Open and position the panels and add the custom menus you want to include in the workspace.
![]() Click the Workspace menu on the Application bar (New!) (the menu name displays the current workspace), and then click New Workspace.
Click the Workspace menu on the Application bar (New!) (the menu name displays the current workspace), and then click New Workspace.
• You can also click the Window menu, point to Workspace, and then click New Workspace.
The New Workspace dialog box appears.

![]() Type a name in the Name box.
Type a name in the Name box.
![]() Select or deselect check boxes to include Panel Locations and Menu Customization.
Select or deselect check boxes to include Panel Locations and Menu Customization.
![]() Click OK.
Click OK.

Did You Know?
You can hide a panel. Click the Window menu, and then click on a panel name to remove the check mark.
Display a Workspace
![]() Click the Workspace menu on the Application bar (New!) (the menu name displays the current workspace), and then select a panel option:
Click the Workspace menu on the Application bar (New!) (the menu name displays the current workspace), and then select a panel option:
• Custom panel name. Displays a custom panel layout that you created.
• Advanced, Book, Essentials, Getting Started, Interactivity, Printing and Proofing, Typography, or What’s New. Displays panel layouts created by Adobe for specific purposes in InDesign (New!).

Delete a Workspace
![]() Click the Workspace menu on the Application bar, and then click Delete Workspace.
Click the Workspace menu on the Application bar, and then click Delete Workspace.
• You can also click the Window menu, point to Workspace, and then click Delete Workspace.
The Delete Workspace dialog box appears.
![]() Select the workspace you want to delete.
Select the workspace you want to delete.
![]() Click Delete.
Click Delete.
The workspace is now deleted.

Using Undo and Redo
Probably one of the greatest inventions of the computer industry is the ability to Undo, and Redo. Now, if we could just figure out how to give real life an undo feature... that would be something. InDesign gives us the ability to undo our past mistakes, and redo something we wished we had not undone. However, you can no longer view actions, such as Set Preview and Show Guides with the undo feature (New!).
Undo or Redo One Action at a Time
• Click the Edit menu, and then click Undo to reverse your most recent action, such as typing a word or formatting a paragraph.
Timesaver
Press Ctrl+Z (Win) or ![]() (Mac) to undo.
(Mac) to undo.
• Click the Edit menu, and then click Redo to restore the last action you reversed.
Timesaver
Press Shift+Ctrl+Z to redo your undo.
