
In the Organizer, you can find photos several different ways. You can use the Keyword Tags palette, Find bar, Find menu, Timeline, and the star rating filter.
Many of the search methods revolve around keyword tags. A keyword tag is an information label that a program or you create and attach to photos to make them easier to locate. You can create your own custom tags with information important to you and attach multiple tags to the same photo for improved organization using the Keyword Tags palette. When you create a new keyword tag, you can place it under any category or sub-category for added organization. If you have attached a keyword to a photo and then later decide you no longer want it, you can remove the keyword tags from the photo.
The Find bar is useful for quick and easy searches. You can perform a search for photos by simply dragging keyword tags and other items onto the bar. The Find menu, on the other hand, is more effective for detailed searches for specific attributes related with a photo. The Find menu provides almost every conceivable way to search for photos and other media files in the Photo Browser. For example, you can find photos by metadata details using multiple search criteria.
In the Photo Browser, the Timeline organizes all your photos in a chronological order along a timeline. The Timeline is separated into months and years, and displays a bar to indicate the number of photos in the specified time, where you can click to view the photos you want. In the Organizer, you can rate your photos based on your own rating scale from 1 to 5 stars. After your have rated your photos and other media files, you can use the star rating filter on the Find bar to quickly find the images and files you want.
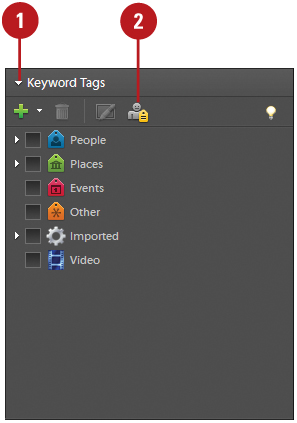
A keyword tag is an information label that a program or you create and attach to photos to make them easier to locate. You can create your own custom keyword tags with information important to you and attach multiple keyword tags to the same photo for improved organization. For example, you can create a custom keyword tag called Whale and attach it to every photo that includes a whale. You can create and manage keyword tags using the Keyword Tags palette. The Keyword Tags palette, available in the Task pane, includes four default categories: People, Places, Events, and Other. You can create, modify, and reorder categories and sub-categories for better organization and management (New!). You can also create, edit, delete, and move keyword tags.
 In the Organizer (in Photo Browser view), display the Keyword Tags palette in the Task pane.
 Use the following methods to work with the Keyword Tags palette:
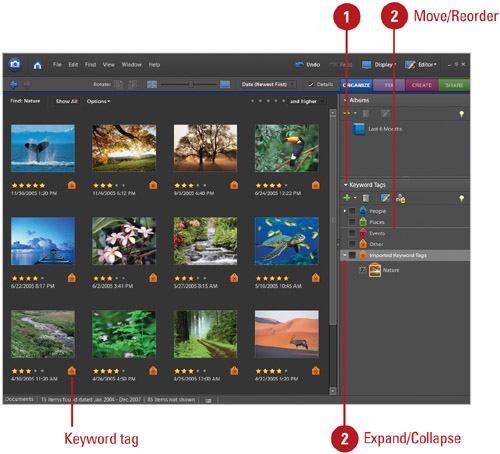
Expand/Collapse. Click the triangle next to the category or subcategory to expand or collapse the keyword tags within it.
Move/Reorder. Drag a keyword tag, category, or sub-category from one position to another. A horizontal line appears to indicate the new position.
Trouble?
If you cannot move a keyword tag, click the Manual option for Categories, Sub-Categories, and Keyword Tags in Keyword Tags and Album preferences.
See Also
See “Setting Keyword Tags and Albums Preferences” on page 36 for information on setting preference options.
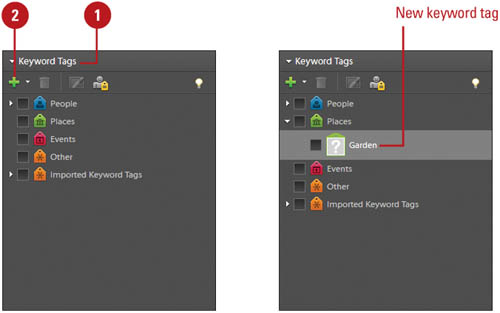
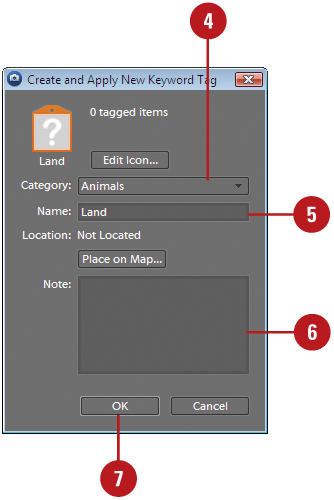
In the Keyword Tags palette, you can quickly and easily create, edit, and delete keyword tags (New!). When you create a new keyword tag, you can place it under any category or subcategory in the Keyword Tags palette, which you always change and modify later. When you create a new keyword tag, the tag appears with a questions mark icon, which gets changed when a photo or other media file is attached to the keyword tag.
- In the Organizer (in Photo Browser view), display the Keyword Tags palette in the Task pane.
- Click the New button in the Keyword Tags palette, and then click New Keyword Tag.
 Click the Category list arrow, select a category or subcategory.
Subcategories are indented in the list.
 Type the name for the keyword tag.
 To associate the tag with a place on a map, click Place on Map, type an address, and then click Find.
 To include a note, type the information you want about the keyword tag.
 Click OK.
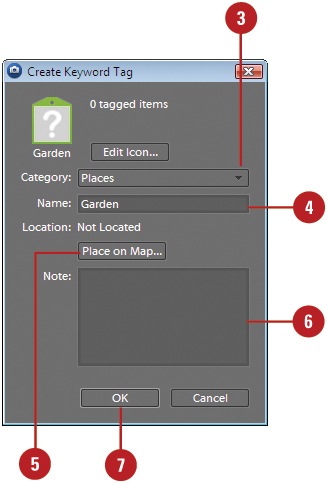
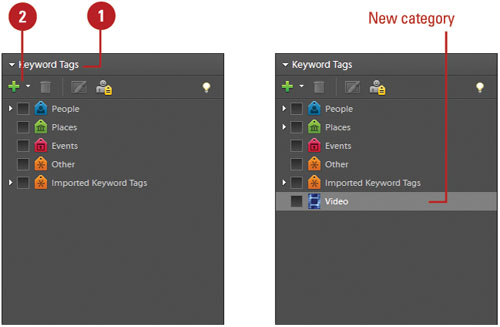
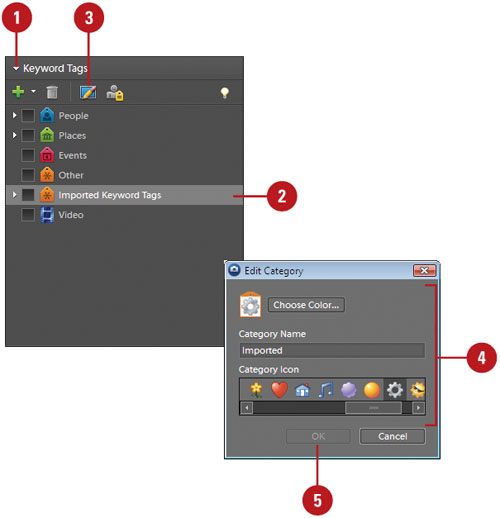
Categories and sub-categories make it easier to manage and work with keyword tags (New!). When you create a new keyword tag, you can place it under any category or sub-category in the Keyword Tags palette. As photos and projects change, you can change category and sub-category names and locations, or delete ones you no longer use. You can make all of these changes in the Keyword Tags palette.
- In the Organizer (in Photo Browser view), display the Keyword Tags palette in the Task pane.
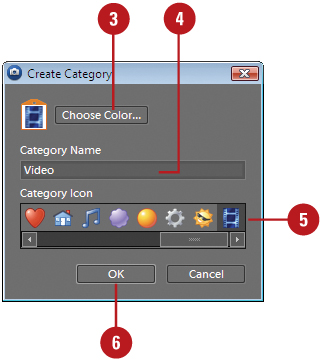
- Click the New button in the Keyword Tags palette, and then click New Category.
- Click Choose Color, select a color using the Color Picker, and then click OK.
- Type a category name.
- Click a category icon.
- Click OK.
Did You Know?
You can delete a category or sub-category. Before you delete a category or sub-category, remember it also deletes all the keyword tags within it. Display the Keyword Tags palette in the Task pane, select the category or sub-category you want to delete, click the Delete button in the Keyword Tags palette, and then click OK.
- In the Organizer (in Photo Browser view), open the Keyword Tags palette in the Task pane.
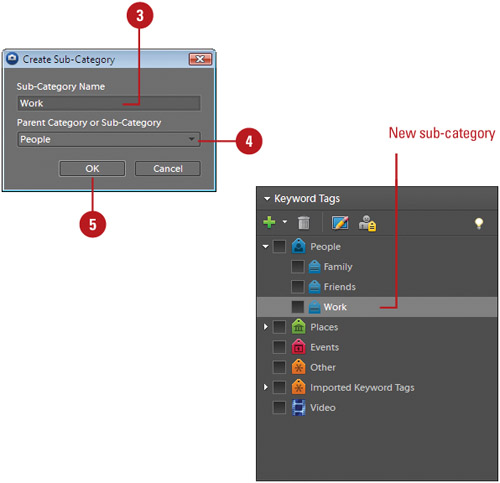
- Click the New button in the Keyword Tags palette, and then click New Sub-Category.
- Type a sub-category name.
- Click the Parent Category or Sub-Category list arrow, and then select the category or sub-category where you want to place the new sub-category.
- Click OK.
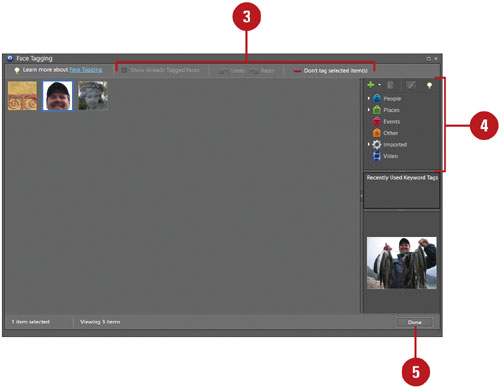
The Keyword Tags palette includes the option to automatically find faces for keyword tags. The Find Faces for Tagging button in the Keyword Tags palette displays faces in photos that you can use to apply existing keyword tags, or create and apply new tags. When you apply faces to tags, Photoshop Elements removes those faces from the dialog box to reduce clutter and confusion.
- In the Organizer (in Photo Browser view), display the Keyword Tags palette in the Task pane.
- Click the Find Faces for Tagging button in the Keyword Tags palette, and then click Yes to confirm and click OK to skip photos, if necessary.
To get better results from the faces search, press Ctrl as you click the Find Faces for Tagging button. However, the search time is longer.
- Work with faces using any of the following options:
Apply a Tag to a Face. Drag the tag onto the face or drag the face onto the tag. You can tag multiple selected photos at once.
View Entire Photo. Select the face and view the thumbnail.
Remove a Face. Select the face, and then click Don’t tag selected Items.
- Use the Keyword Tags palette in the dialog box to create, edit, and organize keywords.
- Click Done.
After you have created a keyword tag, you can attached it to one or more photos. You can attach multiple tags to the same photo or set of photos. You attach keyword tags to photos by either dragging one or more selected photos from the Photo Browser onto the selected tags in the Keyword Tags palette, or dragging selected tags in the Keyword Tags palette onto any of the selected photos in the Photo Browser.
- In the Organizer (in Photo Browser view), display the Keyword Tags palette in the Task pane.
- Select the photos you want to attach keyword tags.
- Use either of the following methods:
Select one or more tags and then drag them from the Keyword Tags palette onto the selected photos.
Select one or more tags and then drag the photos onto the tags in the Keyword Tags palette.
Did You Know?
You can export and import keyword tags. Display the Keyword Tags palette, click the New button in the Keyword Tags palette, click Save Keyword Tags to File, click an export option, click OK, type a name, specify a folder location, and then click Save to export the file as an XML (Extensible Markup Language) file. You can use the From File command on the New button menu to import the keyword tags from an exported file.
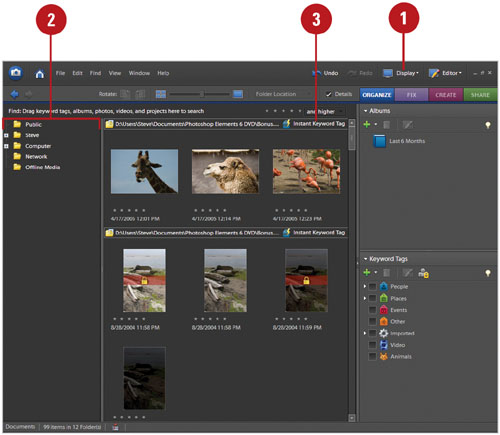
In Folder Location view, you can quickly attach keyword tags to all the managed files (photos included in the catalog) in a folder with the name of the folder as the keyword tag. If you have your photos organized into folders with descriptive names, this can be a very quick and easy way to attach keyword tags to photos. In Folder Location view, photos are organized and displayed by folder with a path location and name at the top along with an Instant Keyword Tag button. The Instant Keyword Tag button attaches the folder name as a keyword tag to all the photos in a selected folder. If you don’t want to attached a keyword tag to a photo, you need to remove it from the folder, or remove the keyword tag later.
- In the Organizer (in Photo Browser view), click the Display button, and the click Folder Location.
- In the folder hierarchy, select the folder containing the photos you want to tag, if necessary.
- Click the Instant Keyword Tag button.
- Click the Category list arrow, and then select a category or sub-category.
Sub-categories are indented in the list.
- Change the name for the keyword tag, if desired.
- To include a note, type the text you want about the keyword tag.
- Click OK.
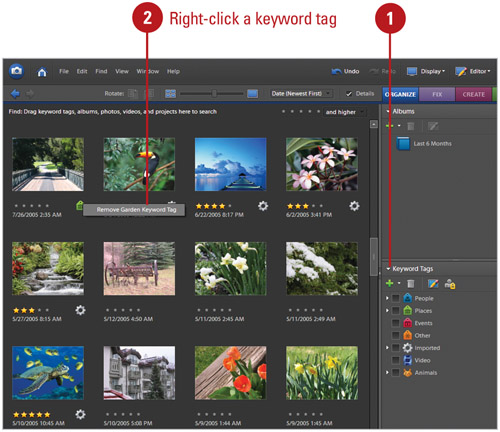
If you have attached a keyword to a photo and then later decide you no longer want it, you can remove the keyword tags from the photo. The Photo Browser uses two different ways to remove keyword tags from a single photo. You can right-click the photo thumbnail, or right-click a keyword tag icon under a photo, depending on your current view, and then select a remove keyword tag command.
- In the Organizer (in Photo Browser view), display the Keyword Tags palette in the Task pane.
- Use any of the following methods to remove a keyword tag from photos:
Photo in Thumbnail view. Right-click the photo, point to Remove Keyword Tag, and then click <tag name>.
Photo in larger view. Right-click a keyword tag icon under the photo, and then click Remove <tag name> Keyword Tag.
Multiple Photos in any view. Select the photos, right-click one of them, point to Remove Keyword Tag from Selected Items, and then click <tag name>.
Did You Know?
You can change keyword tags to sub-category or vice versa. Right-click a keyword tag in the Keyword Tags palette, and then click Change <name> keyword tag to a sub-category, or right-click a sub-category in the Keyword Tags palette, and then click Change <name> sub-category to a keyword tag.
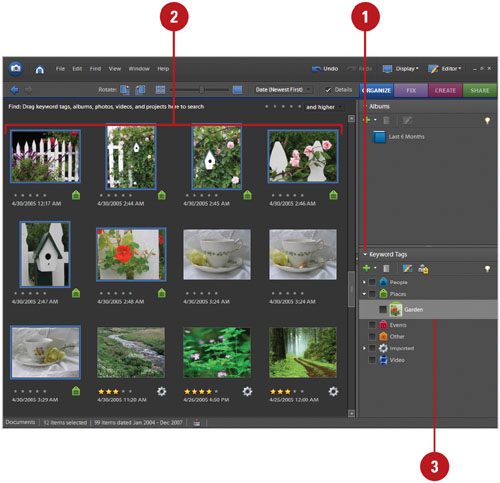
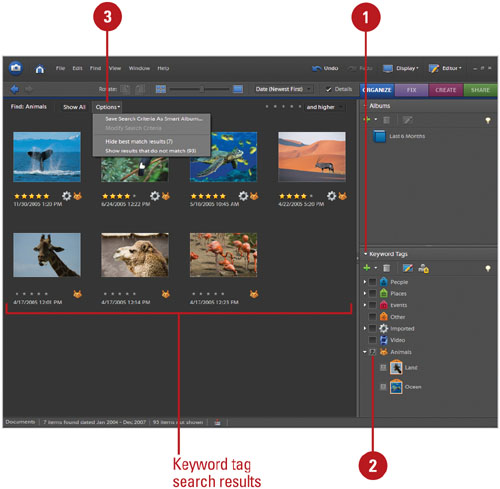
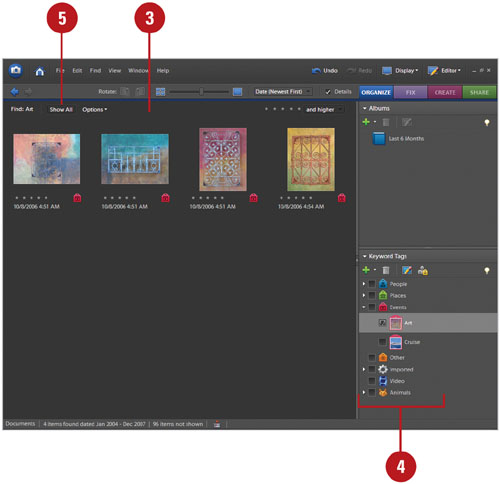
After you have taken the time to attach keyword tags to your photos, you can use the power of the Keyword Tags palette to quickly locate the photos you want to view or edit. Searching for photos with attached keyword tags is quick and easy. All you need to do is double-click the keyword tag or click the box next to the one or more tags that you want to display. If you want to create a more detailed search, you can use the Find bar. When you search by keyword tags, the results are displayed in views of best matches (all criteria matches), close matches (one or more, but not all criteria matches), and no matches. You can switch between these views by using the Options menu on the Find bar.
- In the Organizer (in Photo Browser view), display the Keyword Tags palette in the Task pane.
- Use any of the following methods:
Double-click a keyword.
Click the box next to one or more tags.
Drag one or more tags from the Keyword Tags palette to the Find bar.
- To change the views in the search results, click the Options button, and then click the view you want:
Show/Hide Best Match Results. Click to toggle between showing and hiding the best match results where all the criteria matches.
Show/Hide Results That Do Not Match. Click to toggle between showing and hiding results that do not match.
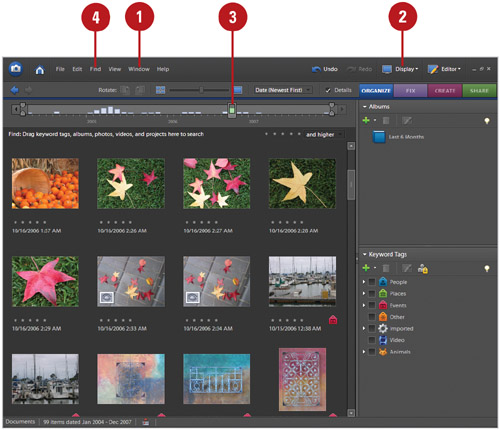
The Find bar allows you to quickly search for photos by dragging keyword tags and other items onto the bar. The Find bar appears below the Navigation bar in the Photo Browser with the text Find: Drag keyword tags, albums, photos, videos, and projects here to search. After you drag an item to the Find bar to perform a search, you can refine it by dragging other items to the Find bar. The Find bar expands to show the search tag, available options, and the result below in the Photo Browser.
- In the Organizer (in Photo Browser view), open the Keyword Tags palette.
- Drag a tag onto the Find bar.
The Find bar expands to show the tag and search results appear in the Photo Browser.
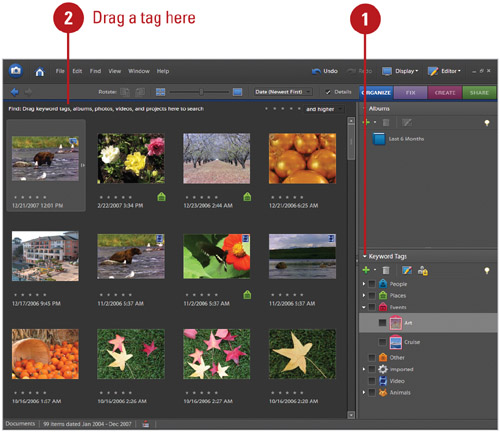
- To refine the search, drag another tag onto the Find bar.
- To start a new search, right-click a tag, category, or sub-category, and then click New Search Using <tag, category, or subcategory name>.
- To close the Find bar, click Show All.
Did You Know?
You can exclude photos from a search. In the Keyword Tags palette, right-click the tag of the photos you want to exclude from the search, click Exclude Photos with <tag, catalog, or subcategory name> from Search Results. To undo the exclude command from a tag, click the Exclude icon next to the tag in the Keyword Tags palette.
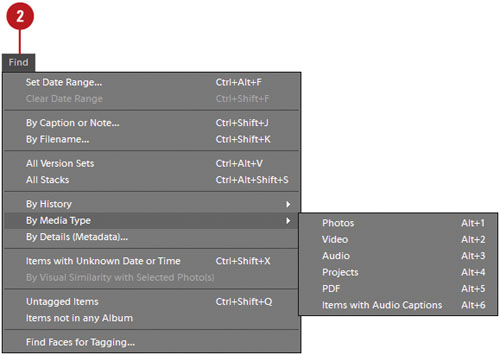
The Find menu provides almost every conceivable way to search for photos and other media files in the Photo Browser. For example, you can find photos by caption or note, filename, all version sets, all stacks, history, media type, details (metadata), items with unknown date or time, visual similarity, untagged items, and items not in any albums. The Find menu is not the best for quick searches. It’s most effective for detailed searches for specific attributes related with a photo.
- In the Organizer, display the Photo Browser.
- Use the Find menu to use the find option you want:
Untagged Photos. Click the Find menu, and then click Untagged Items.
Captions or Notes. Click the Find menu, click By Caption or Note, type a search word or phrase, select an option to match the only the beginning or any part of any word, and then click OK.
Filename. Click the Find menu, click By Filename, type a filename, and then click OK.
All Version Sets. Click the Find menu, and then click All Version Sets. To expand a version set, right-click it, point to Version Set, and then click Expand Items in Version Set.
Visual Similarity. Select one to four photos, click the Find menu, and then click By Visual Similarity With Selected Photo(s).
Photos Used in Projects. Click the Find menu, point to By History, and then Used in Projects. Select one or more items, and then click OK.
Imported On. Click the Find menu, point to By History, and then click Imported on. Select one or more items, and then click OK.
E-mailed To. Click the Find menu, point to By History, and then click E-mailed to. Select one or more items, and then click OK.
Exported On. Click the Find menu, point to By History, and then click Exported on. Select one or more items, and then click OK.
Order or Shared Online. Click the Find menu, point to By History, and then click Ordered Online or Shared Online. Select one or more items, and then click OK.
By Media Type. Click the Find menu, point to By Media Type, and then select one of the following media types: Photos, Video, Audio, Projects, PDF, or Items with Audio Captions.
Unknown Dates or Times. Click the Find menu, and then click Items with Unknown Date or Time.

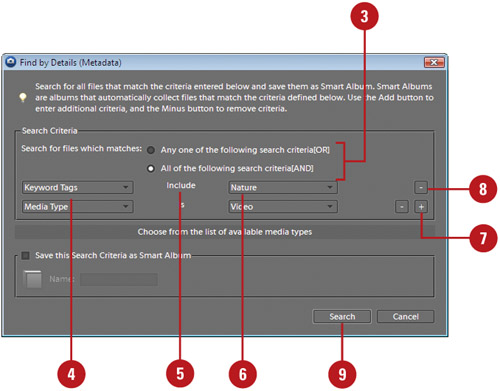
When you take a photo with your digital camera, the image file includes additional information besides the photo, know as metadata. The metadata for a photo typically includes the date and time, shutter speed and aperture, and camera model. In addition to the default metadata, you can add your own custom metadata and keyword tags to an image file too. Finding photos by metadata is useful when you want to search for several different details. The Find by Details (Metadata) dialog box allows you to search for multiple attributes with specific criteria. After you perform a search, you can use the Modify Search Criteria command on the More Options menu (on the Find bar) to make adjustments.
- In the Organizer, display the Photo Browser.
- Click the Find menu, and then click By Details (Metadata).
- Click the Search for files which matches options you want, either Any one of the following search criteria[OR] or All of the following search criteria[AND].
- Click the first pop-up menu, and then select a metadata type.
- Click the second pop-up menu, and then select a range for the search, such as Is, or Contains.
- Click the third pop-up menu, and then type or choose the metadata name or value you want to find.
- To include another set of metadata search criteria, click the plus sign (+) to the right of the third pop-up, and then specify new values for the two or three pop-up menus (repeat Steps 4 thru 6).
 To remove a set of metadata search criteria, click the minus sign (-) to the right of the third pop-up.
 Click Search.
- Perform a search by details (metadata) using the Find menu or any other search method.
- In the search results, click the Options menu on the Find bar, and then click Modify Search Criteria.
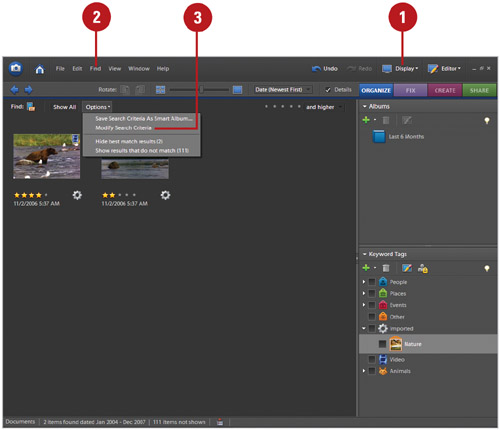
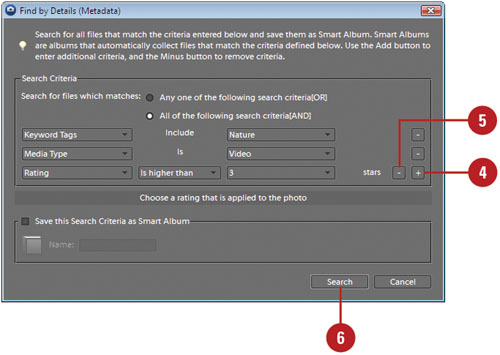
- To add a set of metadata search criteria, click the plus sign (+) to the right of the third pop-up, and then specify new values for the two or three pop-up menus.
- To remove a set of metadata search criteria, click the minus sign (-) to the right of the third pop-up.
- Click Search.
Did You Know?
You can write keyword tag information into your files. In the Photo Browser, select one or more files, click the File menu, click Write Keyword Tag And Properties Info To Photos, and then click Yes. This manually writes tag information into the IPTC Keyword section in the header of the file.
In the Photo Browser, the Timeline organizes all your photos in a chronological order along a timeline. The Timeline is separated into months and years, and displays a bar to indicate the number of photos in the specified time. When you want to view the photos within a time range, simply point to the Time to view a tool tip showing the range, and then click a point or drag to select a range of time. You can also search for keyword tags to refine a search and then use the Timeline to find photos within a specific time period.
- In the Organizer (in Photo Browser view), click the Window menu, and then click Timeline.
- Click the Display button on the Shortcuts bar, and then click Thumbnails View, Import Batch, or Folder Location.
- Navigate the Timeline using any of the following methods:
Use the arrows at the ends of the Timeline to display a section of the Timeline.
Click a bar, or drag the date marker to view photos in the range.
Drag the end-point markers to view a range.
- To set a date range, click the Find menu, and then click Set Date Range, type a start and end date, and then click OK.
To reset the date range, click the Find menu, and then click Clear Date Range.
- To hide the Timeline, click the Window menu, and then click Timeline.
Rating are a part of everyday living. We rate almost everything. From restaurants to movies, everyone has a rating. It’s a 1-star, a 5-star, or something in between. In the Organizer, you can rate your photos based on your own rating scale from 1 to 5 stars. After your have rated your photos and other media files, you can use the star rating filter on the Find bar to quickly find the images and files you want. If you want to find files with ratings higher or lower than the selected star rating, you can use the Ranking menu next to the star rating filter to select the options you want.
- In the Organizer, display the Photo Browser.
- Click one of the stars in the star rating filter on the Find bar.
- Click the Ranking menu next to the star rating filter, and then select one of the options.
and higher. Find items in the selected star rating and higher.
and lower. Finds items in the selected star rating and lower.
Only. Finds only items in the selected star rating.
