
Albums in Photoshop Elements are similar to the photo albums you have at home. Albums allow you to store and organize photos into groups. In addition to creating individual albums, you can also create a group of albums. You can add a photo to one or more albums and arrange them into any order you want. Instead of adding photos to an album one or more at a time, you can create a smart album, which is an album set with search criteria. After you set the search criteria, any photo in the catalog that meets the criteria automatically appears in the smart album. You create and work with albums, album groups, and smart albums in the Albums palette on the Task pane.
The tools on the Fix tab (New!) make it easy to correct common photo problems, such as poor exposure in contrast, color balance, or color saturation. The tools include Auto Smart Fix, Auto Color, Auto Levels, Auto Contrast, Auto Sharpen, Auto Red Eye Fix, and Crop. The word Auto in front of most of the commands indicates that Photoshop Elements does all the work. All you need to do is select the photos you want to change and then click the button on the Fix tab you want to use. It’s as easy as that.
A stack is a group of photos with visually similar properties. A stack is useful for keeping similar variations of the same photo together in one place. A version set is a type of stack that contains one original photo and its edited versions. When you edit a photo in the Organizer, Photoshop Elements automatically creates a copy of the edited photo and a version set. This keeps the original in tact, yet still makes the changes you want. When you edit a photo in the Editor using Full Edit or Quick Fix, you need to manually save your changes to create a version set.
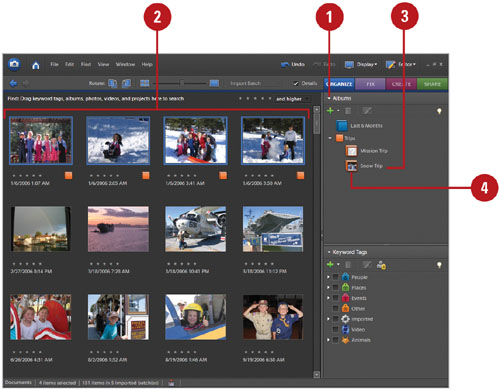
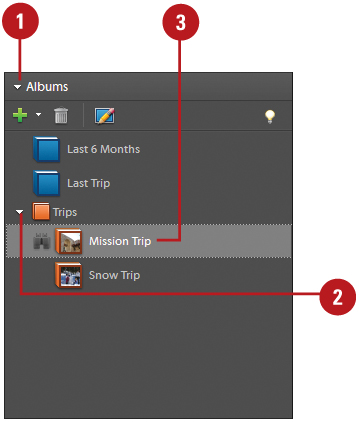
Albums in Photoshop Elements are similar to the photo albums you have at home. Albums allow you to store and organize photos into groups. You can add a photo to one or more albums and arrange them into any order you want. To help with organization, you can create photo groups. Each photo in an album has a number in the upper-left corner, indicating its order in an album. You create, edit, remove, and organize photos within albums in the Albums palette in the Task pane.
 In the Organizer (in Photo Browser view), display the Albums palette in the Task pane.
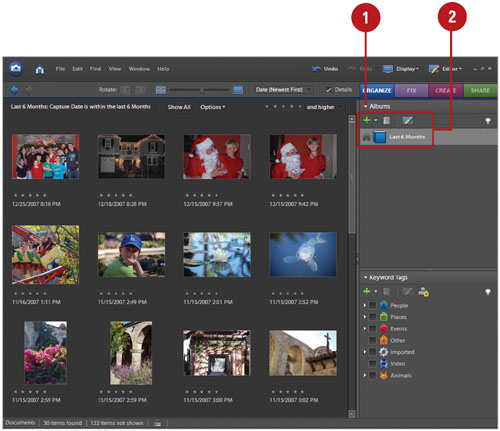
 Use the following methods to work with the Albums palette:
Expand/Collapse. Click the triangle next to the category or subcategory to expand or collapse the albums within it.
Create, Delete, and Edit. Use the New,Delete, and Edit buttons in the Albums palette to create, delete, and edit albums, and album groups.
Show/Hide. Click an album; a show icon (binoculars) appears next to it.
Move/Reorder. Drag an album from one position to another. A horizontal line appears to indicate the new position.
Trouble?
If you cannot move a keyword tag, click the Manual option for Categories, Sub-Categories, and Keyword Tags in Keyword Tags and Album preferences.
See Also
See “Setting Keyword Tags and Albums Preferences” on page 36 for information on setting preference options.
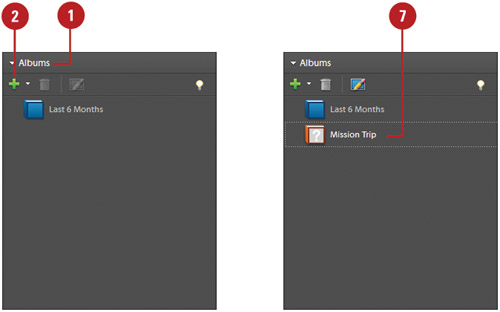
In the Albums palette, you can quickly and easily create, edit, and delete albums. When you create a new album, you can place it into any group, which you can always change and modify later. When you create a new album, the icon in the Albums palette appears with a questions mark icon until you add photos to the album. The first photo you add to the album is the one used as the icon.
- In the Organizer (in Photo Browser view), display the Albums palette in the Task pane.
- Click the New button in the Albums palette, and then click New Album.
 Click the Group list arrow, and then select a group into which you want to store the album.
 Type the name for the album.
 To include a note, type the information you want about the album.
 Click OK.
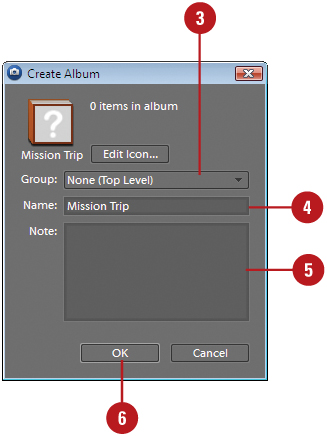
 To add a photo to an album, use either of the following methods:
Drag the photo from the Photo Browser into the album in the Albums palette.
Drag the album from the Albums palette onto the photo in the Photo Browser.
In addition to creating individual new albums, you can also create a group of new albums. Album groups are useful for organizing albums by subject or content. For example, you might create an album group for Kids Activities, and create individual albums within the group for each of the kids activities, such as Soccer, Dance, or Band.
- In the Organizer (in Photo Browser view), display the Albums palette in the Task pane.
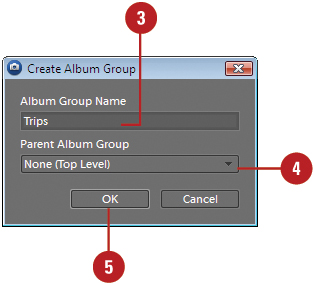
- Click the New button in the Albums palette, and then click New Album Group.
- Type the name for the album group.
- To nest the album group within a group, click the Parent Album Group list arrow, and then select a group you want.
- Click OK.
- To add a photo to an album, use either of the following methods:
Drag the photo from the Photo Browser into the album in the Albums palette.
Drag the album from the Albums palette onto the photo in the Photo Browser.

After you create an album or album group, you can add one or more photos to it. You can add one or more photos to an individual album or to multiple albums. You add photos to albums by either dragging one or more selected photos from the Photo Browser onto the selected album or albums in the Albums palette, or dragging selected albums in the Albums palette onto any of the selected photos in the Photo Browser.
- In the Organizer (in Photo Browser view), display the Albums palette in the Task pane.
- Select the photos you want to add to an album or album group.
- Select one or more album names in the Albums palette.
- Use either of the following methods:
Drag the selected photos from the Photo Browser into the album in the Albums palette.
Drag the selected albums from the Albums palette onto the photos in the Photo Browser.
Did You Know?
You can remove a photo from an album. Display the album in the Photo Browser, select the photos you want to delete, right-click a photo, point to Remove (Selected Items from Album), and then click <album name>. If the album icon associated with the photo appears, right-click the icon, and then click Remove from <album name>.
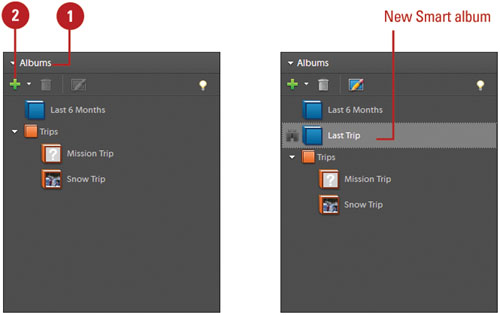
A smart album (New!) is an album set with search criteria. After you set the search criteria, any photo in the catalog that meets the criteria automatically appears in the smart album. As you add photos to the catalog, the smart album automatically checks the search criteria to determine whether it matches. You don’t have to do anything. A smart album automatically keeps itself up to date. The criteria you set for a smart album can include more than one criterion to make the smart album more customized. You create and edit smart albums using buttons in the Albums palette.
- In the Organizer (in Photo Browser view), display the Albums palette in the Task pane.
- Click the New button in the Albums palette, and then click New Smart Album.
- Type the name for the album group.
- Click the Search for files which matches options you want, either Any one of the following search criteria[OR] or All of the following search criteria[AND].
- Click the first pop-up menu, and then select a metadata type.
- Click the second pop-up menu, and then select a range for the search, such as Is, or Contains.
- Click the third pop-up menu, and then type or choose the metadata name or value you want to find.
 To include another set of metadata search criteria, click the plus sign (+) to the right of the third pop-up, and then specify new values for the two or three pop-up menus (repeat Steps 5 thru 7).
 To remove a set of metadata search criteria, click the minus sign (-) to the right of the third pop-up.
 Click OK.
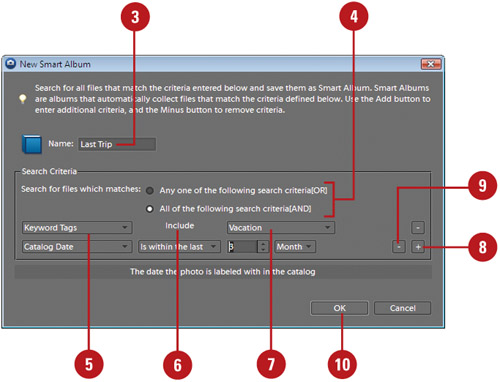
- In the Organizer (in Photo Browser view), display the Albums palette in the Task pane.
- Select the smart album you want to edit in the Albums palette.
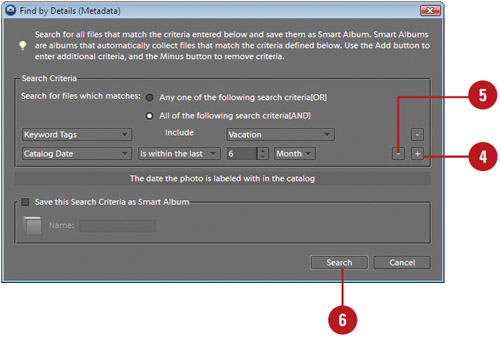
- Click the Options menu on the Find bar, and then click Modify Search Criteria.

- To add a set of metadata search criteria, click the plus sign (+) to the right of the third pop-up, and then specify new values for the two or three pop-up menus.
- To remove a set of metadata search criteria, click the minus sign (-) to the right of the third pop-up.
- Click Search.
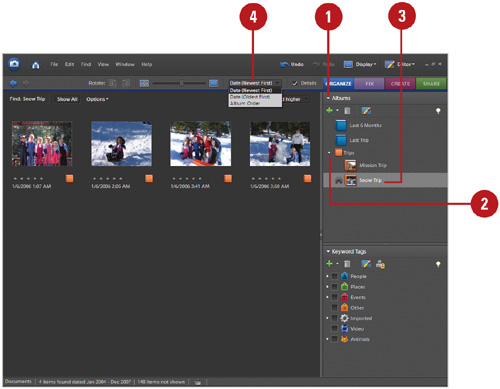
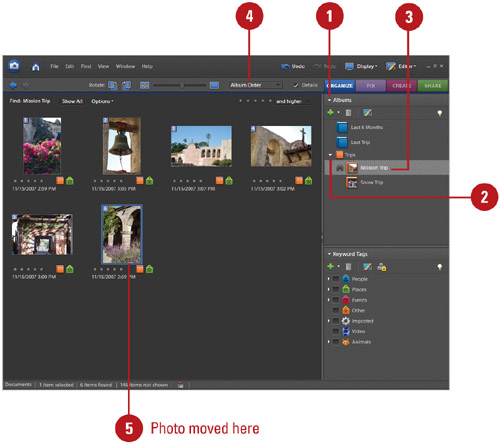
After you create an album or album group, you can display photos, sort photos, and change the order of photos. You can open an album or album group by selecting it in the Albums palette. The photos in the album appear in the Photo Browser, where you can sort them by date from newest to oldest or oldest to newest, or change the order of the photos by dragging photos to a new location.
- In the Organizer (in Photo Browser view), display the Albums palette in the Task pane.
- Click the triangle next to a group to expand or collapse it.
- Click an album in the Albums palette.
- Click the Photo Browser Arrangement menu, and then click Album Order.
- Select one or more photos, and then drag the selection to the left or right of a photo in the album.
Did You Know?
You can delete an album or album group. Select the album or album group you want to remove in the Albums palette, and then click the Delete button in the Albums palette.
You can merge albums. Select the albums you want to merge in the Albums palette, right-click the selected albums, click Merge Albums, select the album into which you want to merge the selected albums, and then click OK.
You can export and import an album structure. You can share the album structure used to store photos with others. Display the Albums palette, click the New button in the Albums palette, click Save Albums To File, click an export option, click OK, type a name, specify a folder location, and then click Save to export the file as an XML (Extensible Markup Language) file. You can use the From File command on the New button menu to import the keyword tags from an exported file.
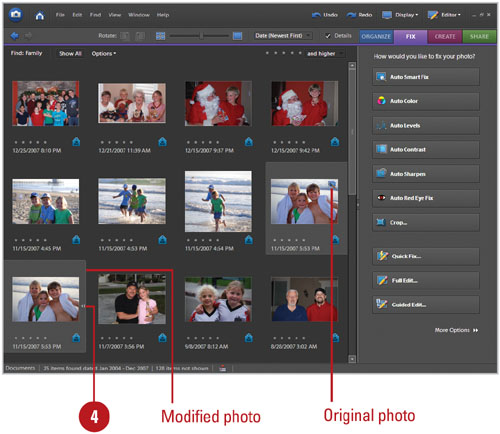
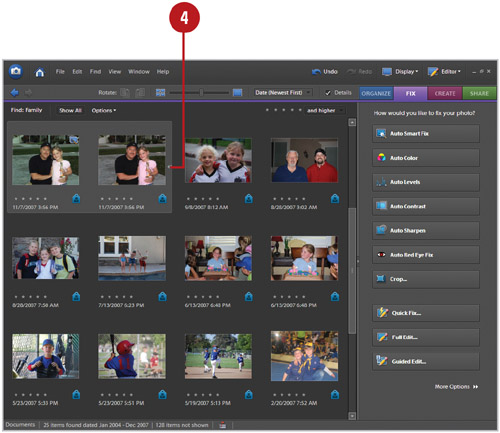
The tools on the Fix tab make it easy to correct common photo problems, such as poor exposure in contrast, color balance, and color saturation. Many of the tools correct specific photo problems, such as contrast or sharpness, except the Auto Smart Fix tool. The Auto Smart Fix tool analyzes photos and corrects the overall exposure of the image. Before Auto Smart Fix corrects a photo, it makes a copy of the original and makes the adjustment to the copy, and saves it in a version set, so you can keep the original in tact as well as make the changes you want.
- In the Organizer (in Photo Browser view), click the Fix tab.
- Select one or more photos in the Photo Browser you want to fix.
- Click Auto Smart Fix on the Fix tab.
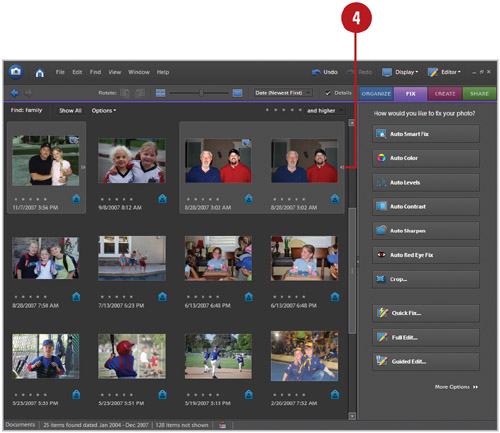
Auto Smart Fix creates copies of the selected photos, making adjustments to the copies, and saving the copies to a version set of the photos.

- Click the arrow to the right of the fixed photo to display/hide the original photo and the altered one.
Auto Color is one of the tools on the Fix tab in the Organizer. Auto Color analyzes photos and corrects common problems in color balance. For example, if you have a greenish or bluish-tint in one of your pictures due to incorrect lighting or camera settings, you can use the Auto Color button to fix it. Before Auto Color corrects a photo, it makes a copy of the original and makes the adjustment to the copy, and saves it in a version set, so you can keep the original in tact as well as make the changes you want.
- In the Organizer (in Photo Browser view), click the Fix tab.
- Select one or more photos in the Photo Browser you want to fix.
- Click Auto Color on the Fix tab.
Auto Color creates copies of the selected photos, making adjustments to the copies, and saving the copies to the version sets of the photos.

- Click the arrow to the right of the fixed photo to display/hide the original photo and the altered one.
Auto Levels is one of the tools on the Fix tab in the Organizer. Auto Levels analyzes photos and corrects common problems in lightness, known as luminance. For example, if you have a photo that lacks detail due to under- or over-exposure, you can use the Auto Levels button to fix it. Before Auto Levels corrects a photo, it makes a copy of the original and makes the adjustment to the copy, and saves it in a version set, so you can keep the original in tact as well as make the changes you want.
- In the Organizer (in Photo Browser view), click the Fix tab.
- Select one or more photos in the Photo Browser you want to fix.
- Click Auto Levels on the Fix tab.
Auto Levels creates copies of the selected photos, making adjustments to the copies, and saving the copies to the version sets of the photos.

- Click the arrow to the right of the fixed photo to display/hide the original photo and the altered one.
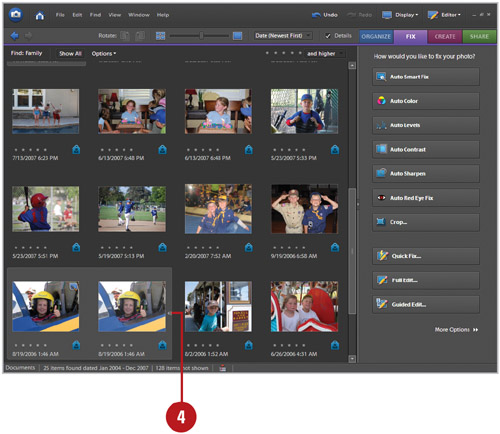
Auto Contrast is one of the tools on the Fix tab in the Organizer. Auto Contrast analyzes photos and corrects common problems in color contrast, which is the difference in brightness between light and dark areas of an image. For example, if you have a photo that lacks a distinction between bright and dark areas, you can use the Auto Contrast button to fix it. Before Auto Contrast corrects a photo, it makes a copy of the original and makes the adjustment to the copy, and saves it in a version set, so you can keep the original in tact as well as make the changes you want.
- In the Organizer (in Photo Browser view), click the Fix tab.
- Select one or more photos in the Photo Browser you want to fix.
- Click Auto Contrast on the Fix tab.
Auto Contrast creates copies of the selected photos, making adjustments to the copies, and saving the copies to the version sets of the photos.
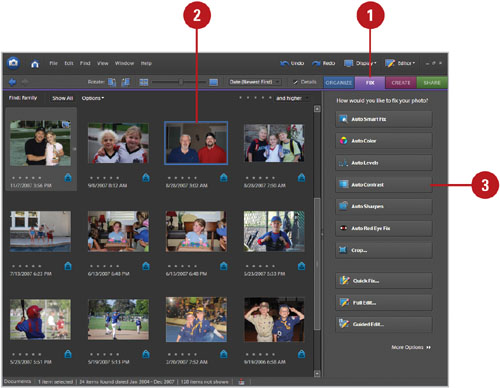
- Click the arrow to the right of the fixed photo to display/hide the original photo and the altered one.
Auto Sharpen is one of the tools on the Fix tab in the Organizer. Auto Sharpen analyzes photos and corrects common focus problems. For example, if you have a photo that is blurry and out of focus, you can use the Auto Sharpen button to fix it. Before Auto Sharpen corrects a photo, it makes a copy of the original and makes the adjustment to the copy, and saves it in a version set, so you can keep the original in tact as well as make the changes you want.
- In the Organizer (in Photo Browser view), click the Fix tab.
- Select one or more photos in the Photo Browser you want to fix.
- Click Auto Sharpen on the Fix tab.
Auto Sharpen creates copies of the selected photos, making adjustments to the copies, and saving the copies to the version sets of the photos.

- Click the arrow to the right of the fixed photo to display/hide the original photo and the altered one.

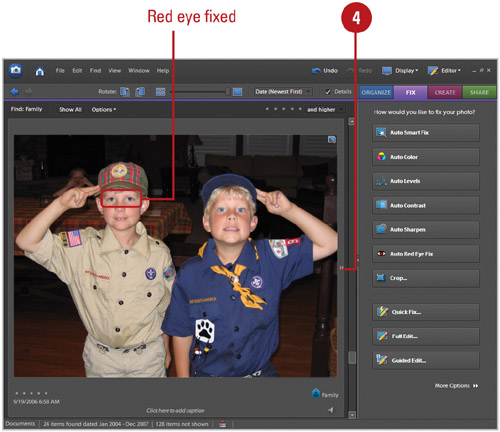
Have you ever taken the perfect photo and then notice one or more of the people in the photo have red eyes? Now you don’t have to retake the photo. You can use the Auto Red Eye Fix button on the Fix tab to quickly correct the problem. Auto Red Eye Fix finds red pupils in a photo, and changes them to a natural black. Before Auto Red Eye Fix corrects a photo, it makes a copy of the original and makes the adjustment to the copy, and saves it in a version set, so you can keep the original in tact as well as make the changes you want.
- In the Organizer (in Photo Browser view), click the Fix tab.
- Select one or more photos in the Photo Browser you want to fix.
- Click Auto Red Eye Fix on the Fix tab.
Auto Red Eye Fix creates copies of the selected photos, making adjustments to the copies, and saving the copies to the version sets of the photos.
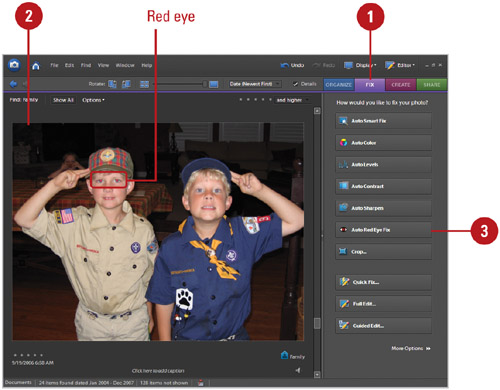
- Click the arrow to the right of the fixed photo to display/hide the original photo and the altered one.
Did You Know?
You can fix red eye several different ways. In addition to the Auto Red Eye Fix button on the Fix tab in the Organizer, you can also use the Red Eye tool on the toolbox, and the Auto Red Eye Fix on the Enhance menu and Full Edit tab in the Editor.
See Also
See “Working with the Red Eye Tool” on page 289 for information on using the Red Eye tool on the toolbox.
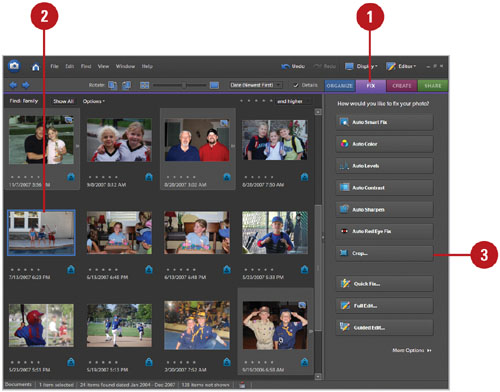
You can crop a photo to isolate just one portion of the picture. For example, if you have a photo of two people standing side-by-side, and you want a separate image of each person, you can crop each person to create each image. The Crop button on the Fix tab opens the Crop Photo dialog box, where you can resize the cropping box, select an aspect ratio (the ratio of an image’s width to its height), and view the photo before the change, after the change, or both. When you crop a photo, Photoshop Elements makes a copy of the original before it makes the adjustment to the copy, and saves it in a version set. This keeps the original in tact, yet still makes the changes you want.
- In the Organizer (in Photo Browser view), click the Fix tab.
- Select the photo in the Photo Browser you want to crop.
- Click Crop on the Fix tab.
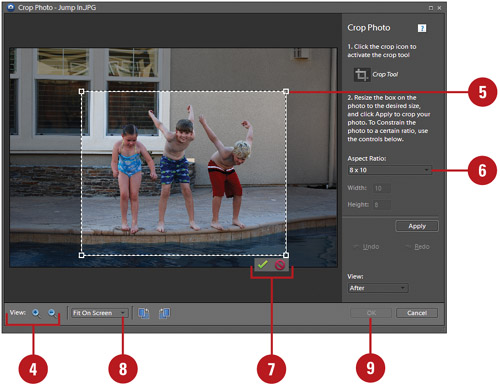
The Crop Photo dialog box appears.
- Use the View buttons at the bottom to display the photo the way you want.
- Resize the cropping box on the photo to the size you want.
- To constrain the photo to a certain ratio, click the Aspect Ratio list arrow, and then select the ratio size you want. For a custom ratio, set your own width and height.
- Click the Commit button (green check mark) under the cropping box or the Apply button to accept the cropping size.
To cancel the crop, click the Cancel button (red circle with a line through it) under the cropping box.
- To change the photo view before the change, after the change, or both, click the View list arrow, and then select the view you want.
- Click OK.
If you scanned a photo on the incorrect side, you can change its orientation by rotating it. Rotating turns an object 90 degrees to the right or left. You can rotate any photo in the Photo Browser by using the Rotate Left or Rotate Right button on the Navigation bar. When you rotate a photo, Photoshop Elements makes a copy of the original before it makes the adjustment to the copy, and saves it in a version set. This keeps the original in tact, yet still makes the changes you want.
- In the Organizer (in Photo Browser view), display the photos you want to rotate.
- Select one or more photos in the Photo Browser you want to rotate.
- Use either of the following methods:
Counter clockwise 90 Degrees. Click the Rotate Left button on the Navigation bar.
Clockwise 90 Degrees. Click the Rotate Right button on the Navigation bar.

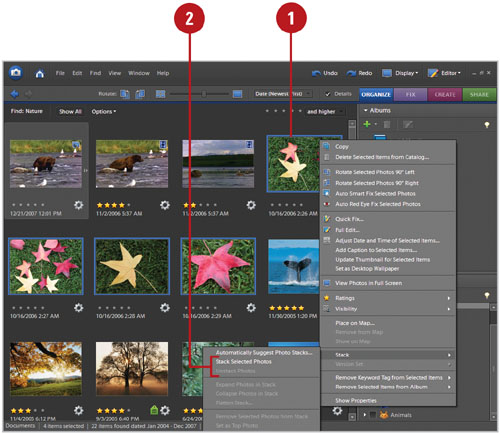
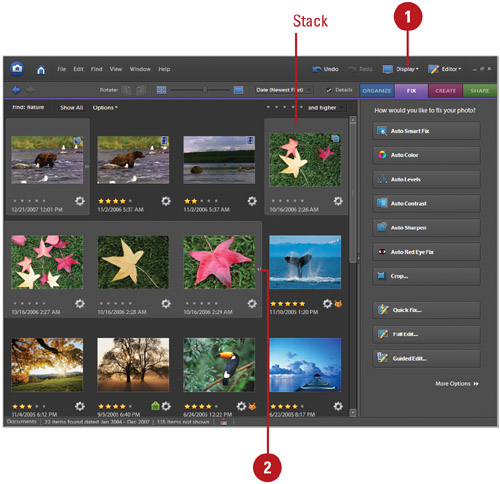
A stack is a group of photos with visually similar properties. A stack is useful for keeping similar variations of the same photo together in one place, which also reduces clutter in the Photo Browser. Instead of looking for each version of a photo, you can easily access all of them in one place. The newest photo you place in a stack appears at the top of the stack. If you have taken a series of photos of a scene, object, or person in rapid succession, you can have Photoshop Elements stack the visually similar photos automatically.
- In the Organizer (in Photo Browser view), select the photos you want to include in the stack or the stack you want to unstack.
- Use the following method to stack or unstack photos:
Stack. Right-click the photo you want on top of the stack, point to Stack, and then click Stacked Selected Photos.
Unstack. Right-click the stack you want to unstack, point to Stack, and then click Unstack Photos.
- Click the arrow to the right of the fixed photo to display/hide the original photo and the altered one.

- In the Organizer (in Photo Browser view), select a group of photos or an entire catalog.
- Click the Edit menu, point to Stack, and then click Automatically Suggest Photo Stacks.

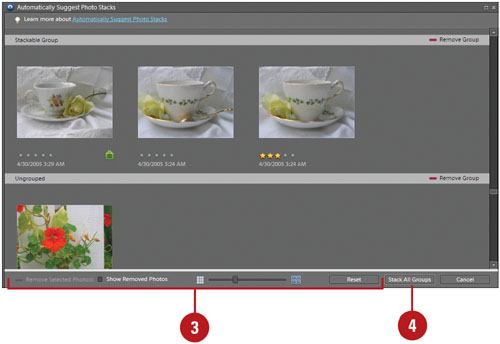
- Look at the suggested stacks to determine whether you want to create a stack. Use any of the following to change the arrangement:
Remove Selected. Select one or more photos, and then click Remove Selected Photos.
Show Removed. Select the Show Removed Photos check box to display removed photos.
Return Removed. Drag the photo from the Removed Photos panel back to the suggested stack.
Move Photo. Drag the photo from one stack to the other.
Revert Back. Click Reset.
- Click Stack All Groups.
If you have taken a series of photos of a scene, object, or person in rapid succession, you can have Photoshop Element stack the visually similar photos automatically or you can do it yourself. Stacking similar photos keeps them all together in one place for easy access. You can quickly expand a stack to view all the photos within it or collapse it to save viewing space in the Photo Browser. When you expand a stack, you can also remove photos from it. Removing photos from a stack removes them from the stack, but keeps them in your catalog, while deleting photos from a stack, deletes them from your catalog, but not from your computer.
- In the Organizer (in Photo Browser view), display the stacks you want to view.
- Use either of the following to expand or collapse the photos in a stack:
Expand Stack. Click the triangle next to the stack thumbnail or right-click a stack, point to Stack, and then click Expand Photos in Stack.
Collapse Stack. Click the triangle next to the stack thumbnail or right-click a stack, point to Stack, and then click Collapse Photos in Stack.
- In the Organizer (in Photo Browser view), display the stacks you want to change.
- Click the triangle next to the stack thumbnail or right-click a stack, point to Stack, and then click Expand Photos in Stack.
- Select the photos you want to remove from the stack.
- Right-click the photos, point to Stack, and then click Remove Selected Photos from Stack.

Did You Know?
You can delete photos from a stack. Expand the stack you want to change, select the photos you want to delete, and then press the Delete key. To delete all photos in a stack, select a collapsed stack, and then press the Delete key. To delete all photos in a stack except the top one, select the collapsed stack, click the Edit menu, point to Stack, and then click Flatten Stack.
You can edit photos in a stack. Expand the stack you want to change, select the photo you want to edit, click the Editor button, and then click Go To Quick Fix or Go To Full Edit. If you have Adobe Photoshop installed, you can also click Edit With Photoshop.
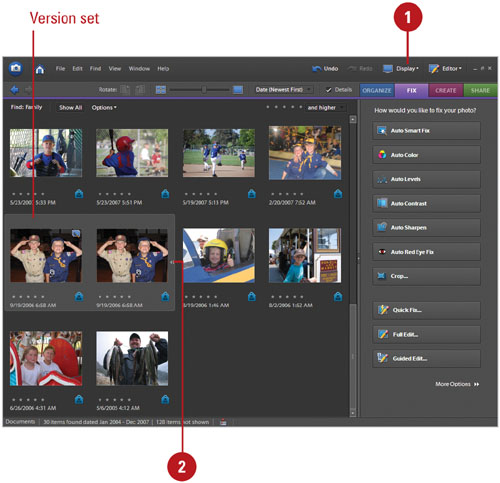
A version set is a type of stack that contains one original photo and its edited versions. When you edit a photo in the Organizer, Photoshop Elements automatically creates a copy of the edited photo and a version set. If you edit a photo in the Editor using Full Edit or Quick Fix, you need to manually save your changes to create a version set. If you edit a photo that’s already in a stack, the photo and edited copy are put in a version set that is nested in the original stack. Removing photos from a version set removes them from the stack, but keeps them in your catalog, while deleting photos from a version set, deletes them from your catalog, but not from your computer.
- In the Organizer (in Photo Browser view), display the version set you want to view.
- Use either of the following to expand or collapse the photos in a version set:
Expand Version Set. Click the Expand button next to the version set thumbnail or click the Edit menu, point to Version Set, and then click Expand Items in Version Set.
Collapse Version Set. Click the Collapse button next to the version set thumbnail or click the Edit menu, point to Version Set, and then click Collapse Items in Version Set.
- In the Organizer (in Photo Browser view), display the version set you want to change.
- Click the Expand button next to the version set thumbnail or click the Edit menu, point to Version Set, and then click Expand Items in Version Set.
- Select the photos you want to remove from the version set.
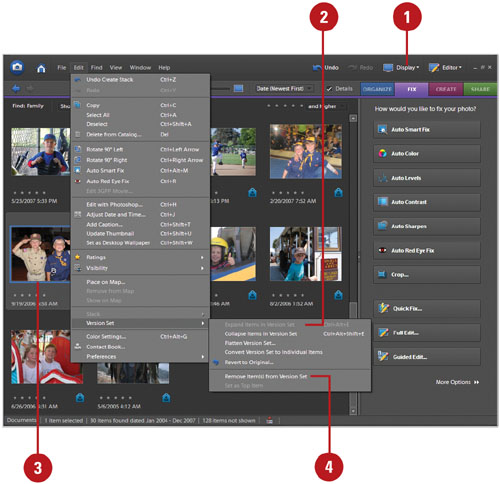
- Click the Edit menu, point to Version Set, and then click Remove Item(s) from Version Set.
Did You Know?
You can delete photos from a version set. Expand the version set you want to change, select the photos you want to delete, and then press the Delete key. To delete all photos in a version set, select the version set, click the Edit menu, click Delete From Catalog, and then select the Delete All Photos In Version Set option.
You can manually save a version set. Edit a file in the Editor, click the File menu, click Save As, select the Save In Version Set With Original check box, specify a name for the file, and then click Save.
You can edit photos in a version set. Expand the version set you want to change, select the photo you want to edit, click the Editor button, and then click Go To Quick Fix or Go To Full Edit. If you have Adobe Photoshop installed, you can also click Edit With Photoshop.
If the clock on your camera is incorrect and you don’t realize it until after you take a lot of pictures, don’t worry. You can change the date and time of the photos or other media files in the Photo Browser. The Organizer allows you to manually change the date and time to whatever you want, the Modified Date of a file, the oldest photo in the selection, or ahead or back by a specified number of hours.
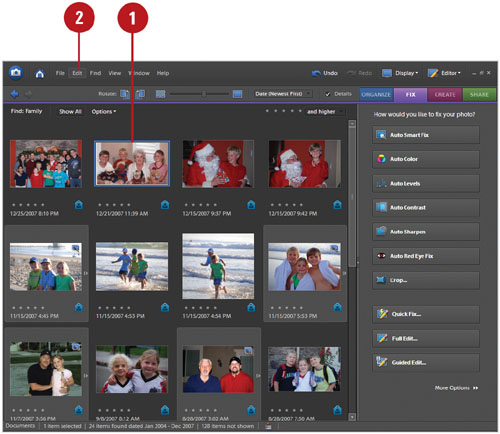
- In the Organizer (in Photo Browser view), select the files you want to change.
- Click the Edit menu, and then click Adjust Date and Time.
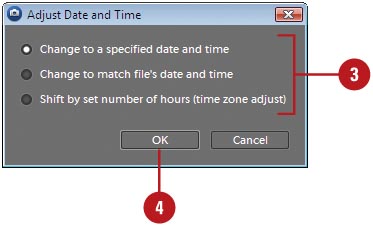
- Select the following option you want:
Change to a Specified Date and Time. Allows you to manually change the date and time.
Change to Match File’s Date and Time. Changes the time to the Modified Date of the file.
Shift to New Starting Date and Time. Allows you to adjust the date and time in relation to the oldest photo in the selection (not shown).
Shift by Set Number of Hours (Time Zone Adjust). Allows you to adjust the time ahead or back by a specified number of hours.
- Click OK.
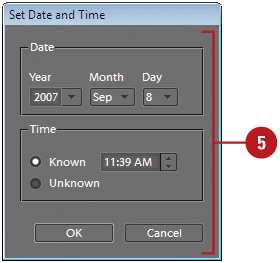
- As requested, specify the options and information you want, and then click OK.
If you move, rename, or delete a file outside of Photoshop Elements in an Explorer window, a missing file icon with a question mark appears in place of the photo in the Photo Browser. By default, the Organizer tries to reconnect missing files when your try to use them. If the Organizer cannot find and reconnect the missing files, the Reconnect Missing Files dialog box opens, where you can browse to manually find the missing files or click Cancel to stop the process.
- In the Organizer (in Photo Browser or Date view), select one or more of the missing file icons you want to reconnect.
- Click the File menu, point to Reconnect, and then click Missing File or All Missing Files.
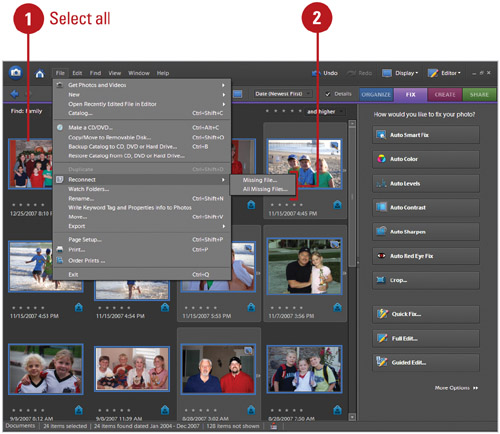
- If an exact match for a file isn’t found, click Browse to manually find files or click Cancel to stop.
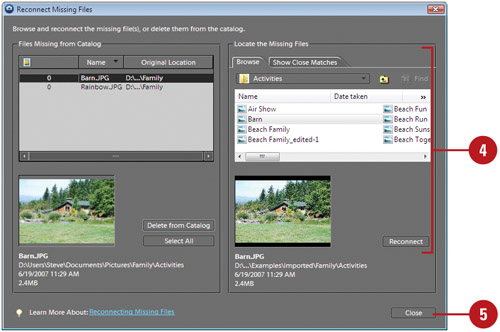
- Select one or more missing files, and then use the following to locate the files:
Browse tab. Click to see the last known folder location for the file. Click Find to locate it.
Show Close Matches tab. Click to view close matches. Select the file, and then click Reconnect.
Delete from Catalog. Select the file, and then click the Delete from Catalog button.
- Click Close, and then click Yes or No, if necessary, to close while some files remain disconnected.
See Also
See “Modifying Files Preferences” on page 28 for information on turning on/off automatic reconnect.