

NOW THAT YOUR Raspberry Pi is up and running, how do you tell it what you want it to do? Well, there are a number of ways to communicate with computers, depending on what operating system (OS) it uses. Many of today’s OSs—like Microsoft Windows and MAC OS X—use graphical user interfaces (GUIs). These have icons that you click with a mouse, making the computer very easy to use. Raspbian, the OS you are using on the Raspberry Pi, has a GUI (see Figure 2-1). You can access the GUI by typing startx straight after you log in, as you did in Adventure 1.
If you use the Raspbian GUI, you simply click the icons to access the software programs. As an alternative to the GUI, you can communicate with the Raspberry Pi using text-based instructions, known as commands, without the need for a GUI. This form of communication is called a command-line interface, and the window into which you type the commands is called a terminal. Although the GUI might be more user friendly and easier to understand than text commands, text commands can be faster when you become more experienced in using them. You can also do more things with text commands, such as writing scripts, which are small programs that combine a series of commands to carry out routine computing tasks. In later adventures you will write your own scripts to make something happen.

FIGURE 2-1 The Raspberry Pi GUI
When you first log in to your Raspberry Pi with your username and password, you will see the $ prompt on the screen, which tells you that the computer is waiting for you to type a command. In Adventure 1 you typed the command startx at the $ prompt to start the desktop environment (GUI) but you don’t have to use that command—you can type in any command that the computer knows about.
For example, suppose you have written a book report on Hamlet and you want your Raspberry Pi to delete it. You might try typing the following command at the prompt:
Delete the file hamlet.doc
If you do this, the file won’t be deleted, but you’ll get this error message:
-bash: Delete: command not found
This is because you can’t just type any command and expect the Raspberry Pi to understand it! It will only respond to a command when it is composed of a particular set of defined words that it already understands. These commands can be very specific and often need to be typed in a certain order to work. To delete your report, you must use a command that Raspberry Pi understands. In this case, you need to use the rm (remove) command:
rm hamlet.doc
If you learn these commands, you won’t be limited to using a GUI and you’ll be able to navigate file systems and program the computer by using simple text commands. This can sometimes be faster and more convenient than doing the same tasks in a GUI. Many of the projects and tutorials in this book use some text commands, so this chapter introduces you to some basic commands that will help you save some time.
Exploring the Terminal
In this section, you’ll become familiar with some common Linux text commands by using the graphical LXTerminal within the desktop environment, as shown in Figure 2-2. You can open this terminal in one of two ways:
- Open the LXTerminal from the taskbar by clicking on the icon with your mouse.
- Select LXTerminal from Accessories in the main menu.
When LXTerminal is loaded, you will see a black screen with the line pi@raspberrypi ~ $, as shown in Figure 2-2.
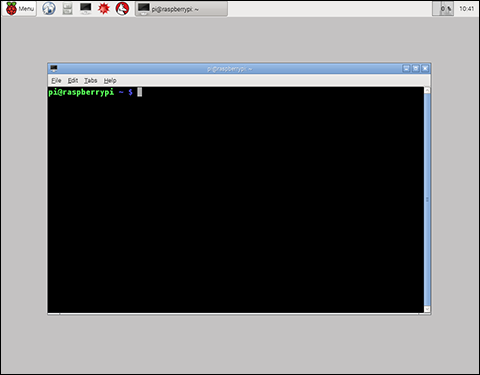
FIGURE 2-2 The LXTerminal open in the Raspbian Desktop Environment
You may recognise the line pi@raspberrypi ~ $ from when you logged in, before you launched the graphical user interface using the command startx. Let’s break down the parts of this line.
- pi refers to your username. You have logged in as the user pi.
- raspberrypi is the hostname of your device; this name identifies it on a network. So you are the user pi on the device raspberrypi.
- After the hostname comes the current directory, which is represented by the ~ symbol (this symbol is called a tilde). This is a short way of referring to your home directory, which is /home/pi when written in full.
- Finally, the Raspberry Pi asks you what you want it to do, by displaying the $ symbol as a prompt to enter a text command (see Figure 2-3).

FIGURE 2-3 Breakdown of pi@raspberrypi ~ $
Now try to interact with the computer by typing a command: type date into the terminal and press Enter.
The Raspberry Pi tells you the date and time without needing to display a graphical clock, and the command provides you with a response quickly.
Commands for Navigating Through Your File System
One of the most important tasks of an OS is to organise files and folders (called directories in Linux). These files and directories are organised into a tree-like structure, in which directories can contain other directories and files. The File Manager, shown in Figure 2-4, is a tool that lets you see what that structure looks like graphically. You can access File Manager by clicking the icon next to the main menu at the top of the desktop environment, followed by Accessories and then File Manager.
You can use simple commands to navigate through the file system using the command line. As with any navigation, you need to know where you are—your starting point—before you can find your way forward. Type pwd at the terminal prompt and press Enter:
pi@raspberrypi ~ $ pwd
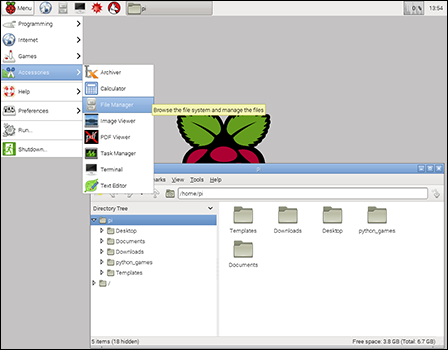
FIGURE 2-4 The File Manager view of my Raspberry Pi file system
The Raspberry Pi will respond by displaying this line on the screen:
/home/pi
The pwd command asks the Raspberry Pi to print the working directory, or show which directory you are currently working in. The /home/pi response that appears shows that you are currently located in the pi directory, which is inside the home directory.
As you can see in Figure 2-5, if you give the command ls, it tells your Raspberry Pi to output a list of the files and directories in the current directory. To see a list of files and directories that are in /home/pi (the pi directory in your Raspberry Pi’s home directory), type ls at the $ prompt and press Enter:
pi@raspberrypi ~ $ ls

FIGURE 2-5 Using the ls command to show a list of the files and directories on my Raspberry Pi
Figure 2-5 shows that inside /home/pi are six directories listed in blue (such as Desktop and Scratch), as well as one file in pink (ocr_pi.png) and one in red (minecraft-pi-0.1.1.tar.gz). This list does not really tell us much about those files or directories. To learn more about the contents of the directory you are in, type ls -l. You are still using the ls command, but this time adding the -l (which stands for long) parameter or option. This tells your Raspberry Pi to show the list in a longer, more detailed format:
pi@raspberrypi ~ $ ls –l
As you can see in Figure 2-6, the Raspberry Pi will now give you more information about the files and directories that were listed in Figure 2-5. This information includes the size of the file, the date it was created, the owner of the file and what kind of permission you have to access it.
To move between directories or folders in the tree-like structure, you can use the cd (change directory) command. Try moving into the Desktop directory by typing cd Desktop at the prompt:
pi@raspberrypi ~ $ cd Desktop
To move between directories or folders in the tree-like structure, you can use the cd (change directory) command. Try moving into the Desktop directory by typing cd Desktop at the prompt:
pi@raspberrypi ~ $ cd Desktop

FIGURE 2-6 Using the text command ls -l to list more information about files and directories
The next prompt from Raspberry Pi will read like this:
pi@raspberrypi ~/Desktop $
Notice how ~/Desktop has appeared as part of the prompt. This reminds you that you are now in the Desktop directory, which in turn is inside your home directory.
You are now inside /home/pi/Desktop.
To go back to /home/pi, type the command cd .. (that’s cd followed by a space and two full stops).
pi@raspberrypi ~ $ cd ..
The cd .. command will move you up the directory tree to the parent directory. For example, if you are in /home/pi/Desktop and type cd .. you are moved upwards through the file system to /home/pi. To check where you are in the file system at any time, type pwd to see your current directory, as shown in Figure 2-7.

FIGURE 2-7 Navigating the file system in Raspberry Pi’s LXTerminal
Understanding sudo
When you are logged into Raspberry Pi as the user pi, you have only limited access to the ability to perform tasks on the device. This restriction prevents you from accidentally deleting important files. Sometimes, however, you will need to do things that affect the whole system, such as installing a new program or adding a new user. The sudo command lets you temporarily act as the super user (or root user) and gives you permission to do whatever you want on the system. This includes deleting every file on your disk so you must be very careful when you are logged in as sudo!
You may need to use sudo for some applications. Can you think why?
Some applications require the ability to make changes to protected parts of the system or to interact with protected devices such as the GPIO pins, and so must run as an administrator. For instance, if you run the apt-get command to install or upgrade an application you must run it with sudo or else it will fail because it doesn’t have permissions to update the necessary files.
Launching Programs from the Command Line
You can use text commands to launch programs from the command line, too, which is often quicker than navigating the main menu and clicking an icon. It is also handy to be able to do this if you do not have a mouse plugged in.
Try this. In LXTerminal, type the following command at the $ prompt:
leafpad
The leafpad application on the Raspberry Pi opens. (The leafpad application is a text editor in which you can enter text. It is included with your Raspberry Pi installation.)
Managing Files and Directories
You may sometimes want to create files, or copy, move or delete them. The following Linux commands are useful for managing your files:
- cat—displays the contents of the text file
- cp—makes another copy of a file
- mv—moves a file to a new location
- rm—deletes (removes) a file
- mkdir—makes a directory
- rmdir—deletes (removes) a directory
- clear—allows you to clear the terminal
Installing and Updating Applications
The New Out Of Box Software, or NOOBS, that you learned about in Adventure 1 includes some applications that are installed along with the Raspbian operating system. You can see these application icons on the desktop and also in the main menu. In future adventures you will use Scratch and Python IDLE 3, which are already installed.
If you connected your Raspberry Pi to the Internet as described in Adventure 1, you can use text commands to download, install and update additional applications that you may wish to use.
Downloading and Installing Applications
It’s easy to find new applications and install them on your Raspberry Pi. The Pi Store (http://store.raspberrypi.com/projects), for example is full of both free and for-pay apps that you can download and use much like the Apple App Store. Try typing the following command in a terminal and then pressing Enter:
sudo apt-get install scrot
Scrot (which is short for screen shot) is an application that enables you to take pictures of the display on your Raspberry Pi screen. The sudo apt-get command tells Raspberry Pi to use the Internet connection to find and install the application on your Raspberry Pi. This command requires sudo because by installing a new application you are asking the Raspberry Pi to change system files.
You will see the terminal window fill with writing and, after a few seconds, the terminal will ask you to check that there is enough space on your SD card to install the application. At this point you can either press the Y key for yes, to continue with the installation, or the N key for no, which will cancel the installation. Figure 2-8 shows the screen display for the scrot installation process. About halfway down the screen, you see the question “Do you want to continue [Y/n]?” and see that I answered yes (y) to install the application.

FIGURE 2-8 Using the apt-get install command to download and install the scrot application
You will remember from earlier in this chapter that you can use a command to open an application. Once you have installed scrot, you can open it and see it work by typing scrot into a terminal window. Scrot will take a picture of your screen, called a screen capture, and store it in the home directory. Use the File Manager to find the image—it will be labelled with a filename that starts with the date and time the picture was taken and end in .png, which is a common image format. Once you have found the file, click it to view the image.
Learning More About an Application
Each Linux application or command has a “manual” file that gives a description of the application and lists the options or features that are available. To read the manual for any application, use the command man followed by the name of the application. For example, to see the manual for the nano text editor, simply type man nano. Figure 2-9 shows the manual for the scrot application.
The manual lists the options available with the application and shows you any extra functions that are available for you to use if you wish. For the scrot application, for example, you can choose to have a timer delay before it captures the screen. It is always a good idea to read an application’s manual, and it can be very helpful if you forget the order in which you need to write the commands.

FIGURE 2-9 Accessing an application’s manual to learn more
Upgrading Your Apps
It is good practice to upgrade the applications that you have installed approximately once every two weeks, or before you download and install a new application. Upgrades for an application may provide new features, correct “bugs” that have been causing problems in the application and resolve security issues that may threaten your system.
To upgrade your applications, you should first type the following command to download information about any new versions of applications that are available:
sudo apt-get update
Next, type the following command to actually install the upgrades:
sudo apt-get upgrade
Editing Files
The nano command opens a text editor, which is an application that allows you to edit text files. This program is useful if you wish to make changes to lines of code or individual settings inside a file. The following instructions walk you through the stages of using nano to create and edit a text file (see Figure 2-10).
- Create a text file on the desktop. To do this, first use the cd command to navigate to the Desktop directory, and then use the nano command, like this:
pi@raspberrypi ~ $ cd Desktop
pi@raspberrypi ~/Desktop $ nano hello
- The nano program will open a text file called hello. You can type anything you like into this text file—as you can see in Figure 2-10, I typed in “Hello Raspberry Pi Adventurers!” Try typing your favourite quote from a film or the lyrics of a song.
- To exit the text editor, press CTRL+X. The following message appears:
Save modified buffer (ANSWERING "No" WILL DESTROY CHANGES) ?
If you want to save the changes you have made to the file, press Y for yes. If you do not want to make any changes, press N for no.
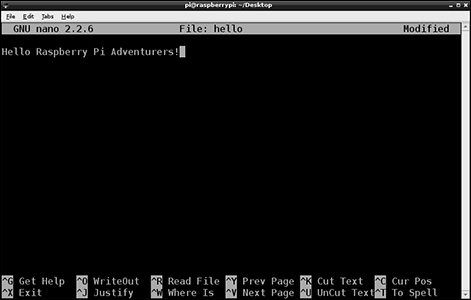
FIGURE 2-10 Using nano to edit a text file
To learn more about using nano to edit files, run the man nano command and read the manual.
Using Shutdown and Restart Commands
When you start a Raspberry Pi, the device follows a set of instructions to load the OS. Similarly, when you shut it down, it should follow a set of instructions to shut down the OS in such a way that the file system stored on the SD card stays complete and uncorrupted. It is therefore very important that you don’t simply remove the power supply but make sure you always instruct the OS to shut down safely. From the GUI, you can simply use the Shutdown icon from the main menu to shut down the Raspberry Pi, as described in Adventure 1. Alternatively, from the LXTerminal, you do this by using the shutdown command.
First, make sure that you close any open applications. After all applications are closed, type the following command to start the shutdown process from the command line:
sudo shutdown -h now
The -h option in this command stands for halt. When the system is “halted”, it is safe to remove the power.
Sometimes, you might simply want to restart the OS. The following command, with the -r (restart) option, will shut down and then restart the Raspberry Pi:
sudo shutdown -r now
Continuing Your Text Adventure
To learn more about commands and using terminals in Linux, click on the Debian Reference shortcut on the desktop of the Raspberry Pi and explore the information in that program. To recall or review the commands in this chapter, refer to the following Quick Reference Table.
|
Command Line Quick Reference Table |
|
|
Command |
Description |
|
cat |
Displays the contents (catalog) of the text file. |
|
cd |
Change directory. For example, the command cd Desktop moves you into the Desktop directory. |
|
cd .. |
Move you up the directory tree to the parent directory. |
|
cp |
Makes another copy of a file. |
|
clear |
Allows you to clear the terminal. |
|
date |
Displays the time and date. |
|
ls |
Displays a list of files and folders in the current directory. |
|
ls -l |
Provides a list that includes more detail about the files. The -l parameter is a lowercase L (for long), not the numeral 1. |
|
man |
Displays the manual or description file for the command. |
|
mv |
Moves a file to a new location. |
|
mkdir |
Makes a directory. |
|
nano |
Opens the nano text editor. To open a specific text file, add the file name; for example, nano hello opens the hello text file. |
|
pwd |
Prints the working directory (shows which directory you are currently working in). |
|
rm xxx |
Deletes (removes) the file named xxx. |
|
rmdir |
Deletes (removes) a directory. |
|
startx |
Launches the Raspbian desktop environment (GUI). |
|
sudo |
Gives the user root or super user permissions. |
|
sudo apt-get install xxx |
Tells the Raspberry Pi to use the Internet to find, download, and install the xxx application. |
|
sudo apt-get update |
Downloads information about any new versions available for applications on your Raspberry Pi. |
|
sudo apt-get upgrade |
Installs available upgrades for all applications on your Raspberry Pi. |
|
sudo shutdown -h now |
Shuts down (halts) the power to the Raspberry Pi. |
|
sudo shutdown -r now |
Shuts down the power to the Raspberry Pi and then restarts it. |

Achievement Unlocked: Your Raspberry Pi responds to your commands!