DVD MENUS, START TO FINISH: HOW TO BUILD A DVD MENU
RICHARD HARRINGTON, RHED PIXEL
I’ve been meaning to teach this lesson for a long time. The teacher in me is excited to share this technique. The business owner was a little hesitant to let you in on one of my company’s greatest secrets. Let me start off by saying a few things:
• These techniques are not difficult.
• The equipment needed is very modest.
• You have to learn to trust yourself.
• The render times are very short.
• This really does work.
• Your clients will be impressed.
“Okay,” you say… why so much justification? Well, I’ve got a very useful secret. Making your own looping backgrounds and DVD menus is not very hard. In fact, you can use random objects and “bad” videography to pull it off. We have a motion graphics shoot every other month in my office, and it has come to be known as “Shiny Stuff Day.”
WHAT’S ON THE DVD
Sample Footage Plates, After Effects Projects, and Sample Render Backgrounds
 WHAT YOU’LL NEED
:: A video camera
:: Colored lighting gels
:: Handheld shop lights
:: Black fabric or a non-reflective surface
:: Shiny Stuff
:: “Adequate” tape stock
HELPFUL STUFF
:: A television or field monitor
:: Some field lights
:: Camera filters
:: Lazy susan or turntable
:: An assistant
Getting Started
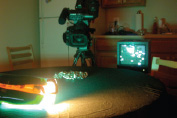
These techniques involve just a little bit of optical “squinting.” By playing with your camera and subject, you can easily achieve great looks within the camera. The goal is to not finish the job in the camera, but great footage goes along way towards great graphics. Trust yourself here. As long as you are willing to experiment, you can achieve great creative results. Creativity involves the ability to let go of your fear and take chances. (SEE FIGURE 01 &02.)
Technical Approach
In my experiences as a trainer and speaker, I have found that less than 20% of my audiences use blending (or transfer) modes. This is a crime that I intend to fix. By employing simple footage, blending modes, and some optical trickery, beautiful backgrounds can be made. (SEE FIGURE 03.)
Stages
1. Gathering objects to shoot 15 minutes to 4 hours (depending on your ambition)
2. Shooting and lighting objects: 1–4 hours
3. Creating the background: 10–30 minutes after practice (this includes render time)

01 »

02 » A LITTLE BIT OF CREATIVE LIGHTING AND SOFT FOCUS CAN GO A LONG WAY.
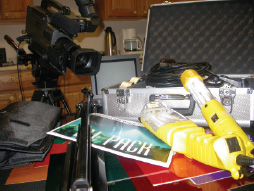
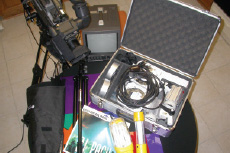
03 » THE GEAR NEEDED IS PRETTY SIMPLE. WHILE WE USED A MIDRANGE CAMERA, ANY DV CAMERA WILL DO. HOWEVER, A TRIPOD IS A MUST.
SHINY STUFF EXAMPLES
:: Wrapped mints
:: Metal candle holders
:: Plastic boxes
:: Light disc
:: Award statues
:: Kitchen utensils
:: Jewelry pieces
:: Crystal glass
:: Liquids of various densities
:: Holiday lights
:: Scientific flasks
:: Dinner plates
:: Porcelain fixtures
:: Metal air vents
:: Electric fans
:: Candles
Budget
If you already own production gear, you can pull this together with as little as $35 for a shoplight and some gels. We usually budget $100 per shoot.
Get It Together
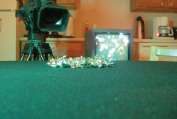
It’s important to find interesting objects to shoot. Anything that reflects light is an awesome candidate. Colorful objects produce nice results. Highly reflective surfaces like porcelain and metal can be very useful. Knick-knacks and drawer contents can work. Just tell your team to bring things in to shoot. You’ll be surprised by the diversity of objects they’ll bring and even more surprised by the results you’ll get. (SEE FIGURE 04.)
Make It Happen
Any video camera will work, but try to shoot in a digital format that will allow you to cleanly transfer the files to your system. Some flaws of video like flares and hotspots will actually come in handy. If you have access to camera filters, a soft FX filter or Pro Mist filter can help soften your image. Before shooting, ensure that your lens is clean. Extra dust or smudges on the lens won’t help you here. More useful than the camera will be your tripod. The movement in the textures will usually come from moving the lights or objects, not the camera. This is where the field monitor will come in handy. By being able to see your results, you can make variations in the speed and type of movement. Your best results will often come from macro shots, or extreme close-ups. Camera movement will be too jarring when tightly focused. (SEE FIGURE 05.)
04 »

05 »
Light the Way
You’re about to spend some time in the dark. Be sure your shooting environment is set up with what you need and that your props are handy. You will also want the ability to easily turn lights off and on in the room to make setups easier. While a few studio lights can be useful, you can also get away with cheaper shop-lights from a hardware store. The most useful item for lighting is handheld shoplights. These small fluorescent lights can put off enough light for your project. They are also cool to the touch and lightweight. This will allow you to create subtle motion as the light moves across the surface of the images. The use of gentle rhythmic movement will give you the needed sense of motion for your motion graphics. While you can always add color effects to your After Effects comp, don’t be afraid to try another type of filter. Lighting gels can be easily bought from professional lighting stores, at audio centers that cater to DJs, or from online vendors. We keep a “party pack” with our lights that contains several different colors. You can tape the gels around your handheld lights (or even in front of the camera lens) to add important color. (SEE FIGURE 06-09.)
And Action!
It’s now time to shoot. When you start your cameras rolling, be sure to get enough footage. I recommend that you roll for 1-3 minutes on each shot. This will give you plenty of variation to choose from and more than enough footage to make longer looping backgrounds. Remember to experiment with focus and iris. Don’t be afraid to try out an idea here. Just watch your confidence monitor to make sure things are working. Keep an eye on your white level to ensure the video is not getting too hot. These types of shots are prone to overexposure. While you’re shooting, also consider capturing some still photos for use in high-resolution print projects.

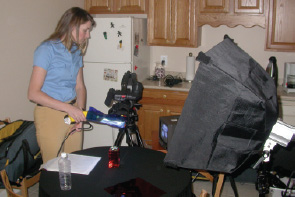
06 » THESE HANDHELD SHOPLIGHTS ARE INEXPENSIVE AND PRODUCE BRIGHT HIGHLIGHTS. PLUS, THEY REMAIN COOL TO THE TOUCH AND ARE A SAFER OPTION.
07 » A FIELD MONITOR AND LIGHTING GELS ARE IMPORTANT PIECES FOR THIS PRODUCTION. EXTRA LIGHTS CAN BE USED AS WELL TO PROVIDE SOFT LIGHTINNG.

08 » THE KEY IS TO MOVE THE LIGHTS, NOT THE CAMERA.

09 » SMALL MOVEMENT PRODUCES THE BEST RESULTS.
Once you trigger the camera, it is okay to step away (provided it’s on a secure tripod). The goal is to minimize any movement of the camera. Take advantage of your turntable or lazy susan. Even without rotating the object, the subtle motion of moving the handheld lights will give you great results.
The goal is to create as much magic within the camera as possible. But don’t worry—After Effects is only going to make things better in the end. (SEE FIGURE 10-12.)
Load It Up
At some point, you’ll stop shooting (it’s okay to be a little sad… but you can come back again). You’ll need to move back to the post-production side and get the footage into your computer. You don’t really need a full-blown editing application, just some way to load your footage in. Both Macs and PCs have free solutions available for capturing digital video over FireWire. Here’s some tips to ensure your success.
• Be sure to clearly label the clips with a descriptive name.
• Capture in the highest-quality mode you can.
• To get the most mileage from your footage, you should consider investing in an external drive to hold it. This way it can be easily shared with others in your office.
• If your editing system does not capture to a format that After Effects can read, you’ll likely want to create subclips and reexport the footage to your drive.
• Be sure your clips have proper file extensions. It is common for editing programs to not add the needed tags.
10 » WE HAD THE LIGHTS ON FOR THE PHOTO. IF YOU AREN’T AFRAID, SHOOT IN THE DARK.

11 » FASTEN THE LIGHTING GELS WITH SCOTCH TAPE FOR EASY REMOVAL.
12 » THE FIELD MONITOR IS THE BEST WAY TO SEE YOUR RESULTS. THIS WILL ENSURE THAT YOU WON’T TOUCH THE CAMERA AND GET JITTERY MOTION.

13 » BEAD STORES FOR JEWELRY MAKING ARE A GOOD PLACE TO START, AS ARE AUTOMOTIVE, HARDWARE, OR OFFICE SUPPLY STORES.
Start Your Engines
It’s now time to switch over to After Effects. If you don’t have access to After Effects, you can pull these same techniques off using Discreet Combustion or Apple Motion. The key here is you need a Timeline-based motion graphics application that can support blending (transfer) modes. The ability to nest or precompose will also come in handy.
Blending modes are an incredibly powerful feature of compositing applications that determine how one layer interacts with another. Elements can interact in new and exciting ways thanks to blending modes. The easiest way to learn blending modes is to just try them. To cycle through them in Adobe applications, hold down the Shift key and press either the minus key or the plus key.
Filters take on new life when you blend a filtered copy of a layer over the original. Blending modes can also solve the problem of knocking out a white or black background. My favorite use of blending modes is creating moving backgrounds for use in a video project. Let’s take some of the great footage made earlier in this tutorial and put it to work.
Import and Build
1. Create a new project. Save and name the file.
2. It’s time to bring your captured clips into After Effects. You can choose File>Import or drag them into the project window.
3. Select three to five clips that you’d like to use and drag them on the new composition icon. This will create a new comp with all your footage layers.
4. Check your composition settings by pressing Cmd+K (Ctrl+K). From the preset menu, choose NTSC DV, 720X480, and gave the comp a better name. Also, set the duration to 30:00
5. If your footage is not long enough, you can stretch it by choosing Layer>Time Stretch. Go with even increments like 200% when stretching a layer. Enable frame blending as well for all stretched layers. (SEE FIGURE 14-16.)

14 » HOLD DOWN THE OPTION/ALT KEY TO DRAG AN ENTIRE LENGTH OF FOOTAGE INTO YOUR PROJECT.

15 » TIME STRETCH YOUR FOOTAGE TO PRODUCE SLOWER MOVEMENT IN THE BACKGROUND, IF NEEDED. BE SURE TO TRY FRAME BLENDING WITH MOTION EFFECTS APPLIED.

16 » RANDOMLY TRY THREE TO FOUR FOOTAGE CLIPS IN YOUR TIMELINE. TO GET YOU STARTED, I’VE INCLUDED SOME SAMPLE FOOTAGE.
Mix and Blend
1. Turn off all layers except the bottommost two. Adjust the blending modes on the top layer until you find a look that you like. Experiment with blur filters on the top layer and adjust opacity to personal taste.
2. Click RAM Preview to see your results.
3. Repeat the blending technique on the remaining layers.
4. Try changing the stacking order and opacity to achieve additional options.
5. Click RAM Preview or press 0 on the numeric keypad to see your results.
6. To create the soft bloom, add an Adjustment Layer. Apply the Gaussian Blur effect and adjust the layer’s blending mode and opacity settings.
7. Solo your bottommost layer for easy viewing. For greater visual impact, I recommend boosting the intensity of your bottom layer. You can do this through a Levels adjustment. (SEE FIGURE 17.)
Make the Loop
1. Now it’s time to create the loop. Highlight all of your footage layers. Create a precomposition by choosing Layer>Precompose or pressing Shift+Cmd+C (Shift+Ctrl+C). Name the precomp footage BG.
2. Access your composition settings by pressing Shift+Cmd+K (Shift+Ctrl+K) and shorten the comp to be 25:00.
3. Go to the 12:00 mark by pressing Cmd+G (Ctrl+G) and entering 12:00.
4. Split the layer which will create the loop point. Select the layer and press Shift+Cmd+D (Shift+Ctrl+D).
5. We now must overlap the layers. With Layer 1 active, jump to the end of the composition by pressing the End key on your keyboard. Press the right bracket key (]) to move the layer’s outpoint.

17 » DIFFERENT MODES EQUAL DIFFERENT RESULTS. BE SURE TO EXPERIMENT.

18 » IT IS NECESSARY TO PRECOMPOSE YOUR TIMELINE IN ORDER TO CREATE THE LOOP.

19 » TO MOVE AROUND QUICKLY, PRESS CMD+G/CTRL+G TO CALL UP THE GO TO TIME DIALOG BOX.

6. Select Layer 2 then press the Home key. Press the left bracket key ([) to move the layer’s in-point.
7. Activate Layer 1 and press I to jump to the layer’s in-point.
8. Press Option+T (Alt+T) for opacity and activate the stopwatch.
9. Set a keyframe to 0% opacity.
10. Jump forward four-and-a-half seconds by pressing Cmd+G, then typing +4:15.
11. Set a keyframe to 100% opacity.
12. Flip the quality switches to Best Quality. (SEE FIGURE 18-22.)

21 » A FEW SECONDS OVERLAP IS IMPORTANT FOR THE LOOP.

22 » THE PASCUZZI RULE: IF YOU CAN’T SOLVE IT… DISSOLVE IT. SAGE ADVICE.
Color Your Background
1. By placing an Adjustment Layer on top, you can apply global effects or adjustments to all layers below. Use this to tweak your saturation or intensity. Add an Adjustment Layer at the top of your stack (Layer> New> Adjustment Layer).
2. Apply a colorization effect such as Colorama (Effect>Image Control> Colorama), Tint (Effect> Image Control>Tint) or Hue/Saturation with the colorize option selected (Effect>Adjust>Hue/Saturation).
3. You may want to apply the Effect>Video>Broadcast Colors filter. Other filters can be applied for a global effect as well. It is significantly faster to apply an Adjustment Layer, then to render individual effects on each layer.
4. You may also experiment with other effects on the Adjustment Layer such as Glow, Blur, Light Burst or Trapcode’s Shine.
5. Make sure frame blending is enabled and check your layer blending modes. Flip all your quality switches to Best, and render at Lossless Settings. (SEE FIGURE 23.)

23 » GRAY BACKGROUNDS ARE BORING… A LITTLE BIT OF COLORAMA CAN GO A LONG WAY.
Sample Recipes to Try
To make this concept come to life, I’ve included some source footage on the DVD-ROM. You can use the following recipes to practice and get the technique down.
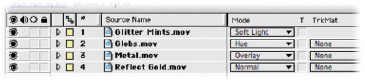
Blue Bomber Background
1. Import the following movies into your project:
:: Glitter Mints.mov
:: Globs.mov
:: Metal.mov
:: Reflect Gold.mov
2. Create a new composition with the NTSC DV 720X480 preset and set the duration to 20 seconds.
3. Arrange the clips as follows and set their blending mode as follows:
Track 1: Glitter Mints.mov, Mode Soft Light
Track 2: Globs.mov, Mode Hue
Track 3: Metal.mov, Mode Overlay Track
Track 4: Reflect Gold.mov, Mode Normal
4. Precompose the four tracks and perform the previously mentioned looping technique.
:: Select all four layers and press Shift+Cmd+C (Shift+Ctrl+C). Name the precomp Blue Nest.
:: Shorten your working comp to 15 seconds by pressing Cmd+K (Ctrl+K) and modifying the duration.
:: Go to the 10-second mark by pressing Cmd+G (Ctrl+G) and entering 10:00.
:: Press Shift+Cmd+D (Shift+Ctrl+D) to split the layer.
:: Relocate the two layers in the Timeline. Set Layer 1’s in-point to 00:00. Set Layer 2’s out-point to 14:29.
:: Keyframe an Opacity Transition from 100% to 0% on Layer 1 where the two layers overlap.
:: You now have a loop! Launch a RAM Preview to check.
5. Add an Adjustment Layer by choosing Layer>New Adjustment Layer.

24 »
25 » WHILE THIS RECIPE PRODUCES THE BACKGROUND ABOVE, YOU SHOULD FEEL FREE TO TRY NEW COMBINATIONS.
6. Apply a Gaussian Blur effect and set the radius to 20 pixels.
7. Set the Adjustment Layer’s blending mode to Overlay.
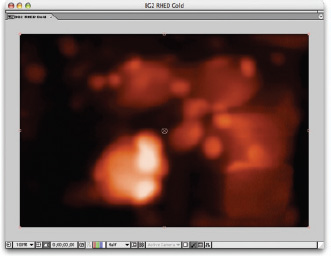
8. Render or further modify. (SEE FIGURE 24 & 25.)
RHED Gold Background
1. Import the following movies into your project:
:: Glitter Mints.mov
:: Gold to Blue.mov
:: Paper Clips.mov
:: Soda 1.mov
2. Create a new composition with the NTSC DV 720X480 preset and set the duration to 20 seconds.
3. Arrange the clips as follows and set their blending modes as follows:
Track 1: Gold to Blue.mov, Mode Hard Light
Track 2: Soda 1.mov, Mode Lighten
Track 3: Paper Clips.mov, Mode Overlay
Track 4: Glitter Mints.mov, Mode Normal
4. Add an Adjustment Layer as Layer 3. Apply a Gaussian Blur effect with a radius of 15 pixels.
5. Precompose the four tracks and perform the previously mentioned looping technique.
6. Create a new comp-sized solid layer by pressing Cmd+Y (Ctrl+Y). Set the color to R:200 G:50 B:20. Change the solid’s blending mode to Color.
7. Add an Adjustment Layer by choosing Layer>New Adjustment Layer.
8. Apply a Gaussian Blur effect and set the radius to 10 pixels.
9. Set the adjustment layer’s blending mode to Screen.
10. Render or further modify. (SEE FIGURE 26-27.)
26 »
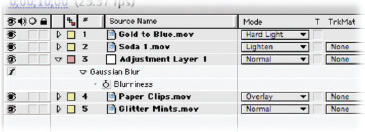
27 » AN ADJUSTMENT LAYER WAS USED TO FURTHER SOFTEN THE FOOTAGE. YOU CAN ALSO TRY CHANGING AN ADJUSTMENT LAYER’S MODE FOR NEW LOOKS.
Mike’s Moxie Background
1. Import the following movies into your project:
:: Blue Hexes.mov
:: Green Soda.mov
:: Organic.mov
:: Metal.mov
2. Create a new composition with the NTSC DV 720X480 preset and set the duration to 20 seconds.
3. Arrange the clips as follows and set their Blending Mode
Track 1: Green Soda.mov, Mode Overlay
Track 2: Blue Hexes.mov, Mode Soft Light
Track 3: Metal.mov, Mode Add Track
Track 4: Organic.mov, Mode Normal
4. Precompose the four tracks and perform the previously mentioned looping technique.
5. Add an Adjustment Layer by choosing Layer>New Adjustment Layer. Apply a Gaussian Blur effect set to a radius of 20 pixels.
6. Add an Adjustment Layer by choosing Layer>New Adjustment Layer. Apply the Colorama effect. Set the Output Cycle to Solarize Green.
7. Set the Colorama Adjustment Layer’s blending mode to Hue.
8. Render or further modify. (SEE FIGURE 28–31.)

28 »

29 »

30 » COLORAMA HAS THE WORST DEFAULT PRESET OF ANY FILTER. DON’T BE TURNED OFF… INSTEAD OPEN UP THE OUTPUT CYCLE AREA AND EXPERIMENT.

31 » BY SETTING THE COLORAMA ADJUSTMENT LAYER’S MODE TO HUE, A MORE SUBTLE COLOR EFFECT WAS ACHIEVED.
Do It Your Way
At this point, you need to finish the menu. You may choose to utilize your full toolbox here. Perhaps you’ll just take your looping background into a DVD authoring application such Adobe Encore or Apple DVD Studio Pro. You can also take advantage of the powerful compositing and masking abilities of After Effects.
The point is to build your menu until you (or your client) is happy. If you finish in After Effects, you’ll need to create a highlight layer for your rollover effects. (SEE FIGURE 32.)
Export Highlight Layer
Your DVD authoring app is going to need a map image to determine what lights up. This grayscale image identifies where the glows appear. It is an overlay for the moving video file.
1. Complete your DVD menu and render out the final version using a lossless codec.
2. Save your After Effects file to capture any changes.
3. Set your Comp window to 100% and Full Quality.
4. Go to a representative frame and choose Composition>Save Frame As>Photoshop Layers.
5. Open the file in Photoshop to further modify it. If you open it in Photoshop CS, check that the Pixel Aspect Ratio settings are flagged as non-square.
6. Turn off the visibility icon (eyeball) for all layers that are not part of the highlight layer.
7. Select one of the visible layers and choose Merge Visible from the Layers palette submenu.
8. Lock the transparency for this new merged layer by checking the Lock Transparent Pixels box.
9. Choose Edit>Fill and fill with black (or white, depending on your DVD application). (SEE FIGURE 33.)

32 »
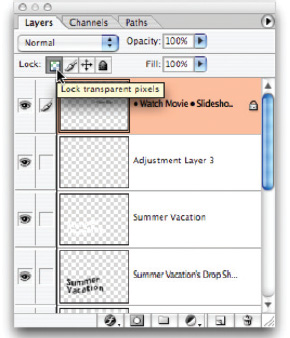
33 » BY USING LOCK TRANSPORT PIXELS, IT IS MUCH EASIER TO GET A CLEAN FILL ON THE HIGHLIGHT LAYER.
DVD DESIGN GUIDELINES
:: Square vs. Non-Square Pixel Aspect Ratio
DVDs use non-square pixels. If you are building in Photoshop CS or After Effects, this is no problem.
:: The Screen Is Smaller Than You Think
All words must fall within the title-safe area, which is 80% of the screen. All logos or elements meant to be seen in their entirety must fall inside of the action-safe area, which is 90% of the screen.
:: Final File Ends Up 720X480 Pixels for NTSC
Whether its widescreen or standard, you still have an area that’s only 720 pixels across and 480 pixels tall to design for.
:: Start High … Finish Low
Design your DVD elements at the highest-quality codec available to you. It’s better to give your compression program a high-quality file. Even if you are using footage acquired from a DVD, render out to the Animation (or another lossless) codec before going to MPEG-2.
10. Create a new empty layer and place it in the background.
11. Select All, then fill this layer with white (or black, again depending on your DVD application). The goal is to create a high-contrast matte.
12. Delete any unused layers from your Photoshop document.
13. Choose File>Save As to and save a flattened PICT or TARGA file.
14. Save the layered Photoshop file so you can make future modifications.
15. Duplicate the flattened file, open it, and choose Select All. Pressing Cmd+I (Ctrl+I) to Invert the image. This way you’ll have both for your DVD authoring application if needed. (SEE FIGURE 34-35.)
Real World Setup
Where does the motion graphic artist fit into the DVD process? As the menu designer of course! While many people settle for built-in templates or stock backgrounds, that often won’t cut it. Making your own custom backgrounds is essential as you build your reputation and client base.
While you may be turned off by the time involved in shooting, don’t be. In a very short amount of time you can build an immense library of footage. This raw material can be used not only for DVD backgrounds but also for animated backgrounds, bumpers, lower-third bars, and more. Take the leap and grab your camera (but in the meantime I’ve included 10 clips to get you started).
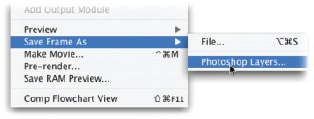
34 » AN AE COMP CAN BE SAVED OUT AS A LAYERED PSD FILE. THIS IS AN IMPORTANT STEP IF YOU NEED TO MAKE A HIGHLIGHT LAYER FOR YOUR MOTION BACKGROUND.

35 » DIFFERENT DVD APPS REQUIRE DIFFERENT HIGHLIGHT LAYERS. YOURS MAY WANT A WHITE ON BLACK IMAGE OR THE INVERSE. BE SURE TO READ UP.
ABOUT THE AUTHOR

Richard Harrington is a certified Project Management Professional, Apple Certified Trainer in Final Cut Pro, and Adobe Certified Expert in Photoshop and After Effects. Additionally, he has completed Avid’s Master Editor Workshop and the Avid Certified Instructor Program. His visual communications consultancy, RHED Pixel, creates motion graphics and produces video and multimedia projects, specializing in producing content or non-profit associations and live events. More information is available at www.RHEDPixel.com. He is a faculty member at The Art Institute of Washington, a popular speaker at conferences, and an instructor for Future Media Concepts.
Richard is the author of Photoshop CS for Nonlinear Editors and co-author of Final Cut Pro On the Spot and After Effects On the Spot. If you have more Photoshop questions, Richard can be reached as moderator of Creative Cow’s Photoshop Forum.
Special thanks to the RHED Pixel Crew: Mark Weiser, Sara Evans, Dennis Byrne, Dave Phillips, Mark Hofmann, and Meghan Ryan-Harrington.

RECOMMENDED RESOURCES
Okay, I believe in my own work. These are good books (in my opinion, of course).
Photoshop CS for Nonlinear Editors
Final Cut Pro On the Spot
After Effects On the Spot
Photoshop Dream Team Volume One
Photoshop CS: Essentials for Digital Video (DVD) from www.vasst.com
Photoshop CS2 Killer Tips
DVD Demystified
Designing Menus with Encore DVD
Broadcast Graphics On the Spot
