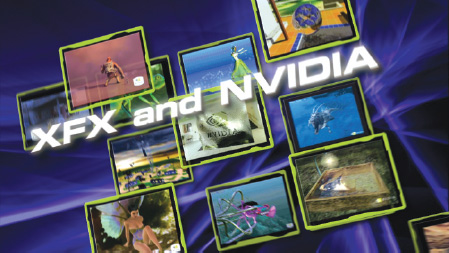
FAST, WIDE AND 3D: XFX TRADE SHOW VIDEO
CHRIS AND TRISH MEYER, CYBERMOTION
When you’re creating a web site or a brochure, you’re assuming a person has come to you to read your information. When you create a commercial, you’re assuming that the viewer will watch for all 30 seconds. But when someone is walking down an aisle at a trade show, you might have less than three seconds to grab their attention and lure them in. This was our challenge: creating a series of 30-second videos that conveyed a message, but just as important, encourage a person to stop, watch, and enter the booth to learn more.
For this project, our studio, CyberMotion was hired by CRISP (www.crispbranding.com), a boutique branding agency in Costa Mesa, California who can name the likes of Nestlé Foods and Coors Brewing among their clients. In this case, the client was XFX Technology, a leading maker of gaming video cards from China with a strong global presence, due in part to CRISP’s rebranding. In this chapter, we will walk through some of the work we created for CRISP and XFX, discuss some of the considerations that went into it, and give you a detailed tutorial on how we created one of its main elements, framing devices for a number of low-res gaming videos.
WHAT’S ON THE DVD
The DVD contains the final video described in this chapter, as well as an After Effects project and sources to explore and recreate several elements of the video. Note that the sources have been copyrighted by CyberMotion, NVIDIA, VideoHelper, and XFX, and are not to be reused in any form.
Parameters
CRISP and XFX had four main themes to convey: Who We Are, How We Do It, What We Do, and a new product introduction. The catch was that the new product would not be ready in time for the first trade show, which was coming up in two weeks. Rather than create one continuous video, we decided to create four 30-second modules, linked together using logos of XFX and their main technology partner, chip company NVIDIA. Two modules would be created for the first trade show and are featured here.
The total budget was $10,000 plus expenses. CRISP and XFX had a number of print assets but no animated ones. Pure 3D animation can be costly and time-consuming to create, so we chose to use “real” 3D just for the XFX and NVIDIA. Logos we chose to build the rest in a psuedo-3D environment inside After Effects. We drew on our extensive stock footage library for the backgrounds, and downloaded videos from NVIDIA. Beyond that, the main hero was the text, and the messages it conveyed.

01 » ELEMENTS FROM XFX’S PACKAGING, INCLUDING THE CHARACTERS THAT REPRESENTED EACH CARD FAMILY, WERE TRANSLATED INTO THE LOOK AND FEEL OF THE TRADE SHOW VIDEO.
Music Spotting
When audio and the visuals are closely tied together, they feed off of each other, heightening the impact of the work. Therefore, we strongly encourage our clients to choose the music before we get started with animation.
One of our favorite stock music houses is VideoHelper. Their music has a strong attitude, with numerous clear “hit points” and sections for us to key off of. We pointed CRISP to VideoHelper’s web site (www.videohelper.com) to audition and select music, CRISP passed along URLs of candidates to XFX in China, which is much faster than overnighting CDs around the world.
Much stock music is composed around the “three movement” framework common in symphonies: a fast introduction, a slow middle section, and a fast conclusion that recapitulates themes from the first movement. CRISP found a couple of pieces that had 30 second first and third movements (each matching the length of one of our modules), with quiet bridges (great for the logo section, helping to tie the modules together). After selection, we then “spotted” the music to get an idea of how many major sections there were, and where the hit points and individual beats were falling. This is the skeleton or grid around which we start to build our animations.
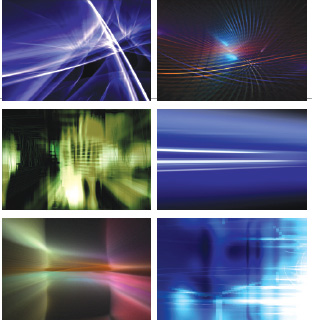
» WE COMBINED ELEMENTS FROM ARTBEATS’ DREAMLIGHT AND LIGHT ALCHEMY COLLECTIONS, DIGITAL VISION’S ATMOSPHERICS, ELECTRO, AND LIGHTFORMS, AND GETTY IMAGES’ SYNERGY: HYPERVISION LIBRARIES TO CREATE OUR BACKGROUNDS.
There are a large number of excellent stock footage libraries of abstract backgrounds available. Using these can save a lot of time and money. The challenge with stock footage is making sure it is appropriate to the client’s job and making it look different than someone else who has the same library.
After discussing the desired “vibe” with CRISP, we selected a number of images we thought might work, and narrowed them down with their input. We then layered and crossfaded between different combinations of these clips, using a variety of blending modes. The resulting composites were colorized to match XFX’s logo and packaging colors using the Boris BCC Tritone plug-in.
All of our libraries were of the NTSC D1 size of 720x486 pixels with a 4:3 aspect ratio, while for this job we needed a PAL 16:9 aspect size of 1024x576 pixels. This required scaling up the footage by as much as 160 percent. Fortunately, we could live with the resulting softness, as we wanted our backgrounds to “sit back” from the text and other foreground elements; pursuing a hot, glowing look made their softness seem appropriate. We also conformed the frame rate of all the footage to match PAL’s speed of 25 fps.
Open this chapter’s example project, CyberMotion_XFX.aep, and then in the Project window double-click the comp 01a-music spotting to see our result. Use the - or = keys to zoom in the Timeline window until you see about 10 seconds of time. If the audio waveform is not visible, select the layer VH023_52 (our shorthand for VideoHelper disc 23, track 52) and type LL to reveal it. Open Preferences>Previews and set the Audio Preview Duration to 10:00. (SEE FIGURE 02.)
Press Home, and then press. (period key) on the numeric keypad to audition the first 10 seconds of the music. While listening, watch the cursor move through time, relating what you hear to the spikes you see in the audio waveform. In the Timeline window, observe how we’ve noted the beats with unnamed layer markers, and the starts of new measures of music with the markers that have the letter “m.” We added a second silent, invisible layer to help us mark different sections of the music, such as F for Fast and S for Sting. Press any key to stop the preview; then move the time marker down the timeline to audition other sections of the music. (SEE FIGURE 03.)
After spotting the music, we did a timing test to make sure all of the desired words and phrases would fit, with enough time to digest each thought. This allowed us to fine-tune the messaging with CRISP and XFX. To see one of these tests, open comp 01b-timed text and press 0 on the numeric keypad to RAM Preview it.
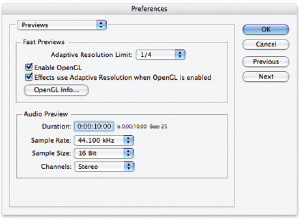
02 » TO AUDITION 10 SECONDS OF THE SOUNDTRACK AT A TIME, SET THE AUDIO PREVIEW DURATION TO 10:00 IN REFERENCES>PREVIEWS.
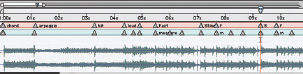
03 » WE USE LAYER MARKERS TO SPOT IMPORTANT EVENTS IN A SOUNDTRACK. TO CREATE A LAYER MARKER, SELECT THE LAYER AND PRESS * (ASTERISK KEY) ON THE NUMERIC KEYPAD. TO ADD A NAME WHEN YOU CREATE IT, HOLD DOWN OPTION (ALT) BEFORE PRESSING *.
 PREVIEW A SEGMENT
To preview a segment of the final movie, press a number such as 1 (on the standard keyboard, not the numeric keypad) to jump to that marker, press B to set the start of the work area to that point, press a later number such as 2 to jump to that marker, press E to end the work area, and then press 0 on the numeric keypad to RAM Preview that segment. You can also use Page Up and Page Down to step through the piece frame by frame.
The Final Work: Dissected
Selecting music and finalizing the wording took one of the two weeks we had in the schedule. All of the remaining animation was completed in five days. Let’s examine the finished piece, and discuss some of their major sections.
In the Project window double-click the composition 02_final piece to open it. If you have not already viewed the finished piece on the book’s DVD, hold down Option (Alt) and double-click the layer XFX.mov to open it in a QuickTime player window, press the spacebar to preview it.
Close the QuickTime window when done and turn your attention to the Timeline window. We’ve added layer markers describing some of the sections, as well as comp markers for easy location of specific examples.
Following is what to look for at each comp marker.
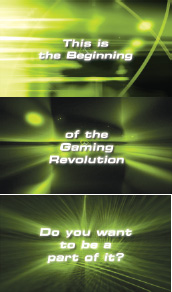
0: On the first hit in the music, we introduce the XFX logo, and zoom it back in space to anchor the background. To create the logo, we took Illustrator artwork provided by CRISP, extruded it with the Zaxwerks 3D Invigorator for After Effects Pro plug-in, and exported a 3D model. We surfaced, lit, and animated the model in Electric Image Animation System. (SEE FIGURE 04.)
1: We bring on the first text element, tumble it, and switch out the text to the second message in the middle of the tumble. GenArts’S_GlowEdges effect is used on the text here and extensively throughout the piece to add a bright haze around elements.

04 » THE 3D XFX LOGO OPENS THE PIECE, ZOOMING BACK TO ANCHOR THE BACKGROUND.

05 » THE CARD DANCE EFFECT IS USED TO DYNAMICALLY ASSEMBLE AND BLOW UP THE SIGNATURE CHARACTERS PLUS VIDEO
2: For “hero” shots, we had still images of the characters from the packaging, plus demo videos from NVIDIA. To give them a sense of 3D space and add some mystery, they are assembled and disassembled using the Simulation>Card Dance effect. Study the comp 03_Card Wipe for an example of this animation. (SEE FIGURE 05.)
3: Note that as we swap in different messaging phrases, we keep changing the mix of background elements, while keeping them unified by tinting them all with XFX and NVIDIA’s signature radiation-green (using Boris BCC Tritone). (SEE FIGURE 06.)
4: The “quiet” middle section is dedicated to displaying the XFX and NVIDIA logos. Rather than use a single continuous shot, to maintain interest we animated multiple camera passes on the logos in Electric Image, and then edited between them in time with the music. The light rays are created using Trapcode’s Shine plug-in. (SEE FIGURE 07.)
5: Use the Page Up and Page Down keys to move before and after this point in time. We covered some of our hard cuts by compositing film flashes from Artbeats’ Film Clutter library on top of our footage, using Add mode. The colorful randomness of exposed film creates more excitement than using a simple white solid. Similar flashes are used at 52:24 and 57:04. (SEE FIGURE 08.)
06 » THE MIXTURE OF BACKGROUND LAYERS EVOLVES AS EACH NEW PHRASE APPEARS.
07 » MULTIPLE MOVES ON THE 3D LOGOS ARE EDITED TO CHANGE IN TIME WITH THE MUSIC.

FROM .WMV TO .MOV
Some of NVIDIA’s demo movies were posted online using the Windows Media Viewer format (.wmv) files. After Effects cannot import this type of file. We opened them on a Windows XP computer using Microsoft’s free Windows Media Encoder and saved them as .avi files. We then converted them to QuickTime .mov files to make them easier to handle on the Mac.
The section after this marker includes a number of NVIDIA demos framed and being flown about in 3D space. Later, we will break down how we built this.
6: To emphasize the high-pitched guitar stings in the music, we tumbled the logos extremely fast, with Motion Blur enabled. Trapcode’s Shine was used to brighten and glow these tumbles. We used the distraction to swap out the text in the middle of each sting. (SEE FIGURE 09.)
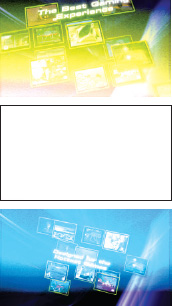
7: We borrowed the arrangement of the NVIDIA demo videos and applied it to third-party partner logos. When you have too many logos or words to get on screen in a limited period of time, one of our answers is to put them all on all the time, arrayed in 3D space. As there was not time nor budget to rebuild all of these logos as 3D models, we applied Perspective>Bevel Alpha to give some illusion of thickness. (SEE FIGURE 10.)
08 » FLASHES FROM THE ARTBEATS FILM CLUTTER LIBRARIES ADD EXCITEMENT WHILE CONCEALING HARD CUTS IN THE VIDEO.
09 » AN ARRAY OF VIDEO SCREENS TUMBLED EXTREMELY FAST–WITH MOTION BLUR–ACTS AS ANOTHER EYE GRABBER.

8: The desire is to keep building energy towards the end. For the final pieces of messaging, we added a nervous quality by having them bounce randomly by applying a “wiggle” expression to their Position parameter: wiggle(1.8181, 5). The first number, the number of wiggles per second, was carefully chosen so they would bounce in time with the music. The second number is how many pixels they wiggle. An additional trick is that we used two copies of the text: one that “stuck” in position, and another that continues to fly off screen. This is demonstrated in the comp 04_energy text. (SEE FIGURE 11.)
9: The final gaming logo was also created using Zaxwerks’ 3D Invigorator Pro and blown up in Electric Image using their plug-in Mr. Nitro. The pieces you see whizzing about are actual facets of the model. This reveals the XFX logo, which was the first element we saw at the start. (SEE FIGURE 12.)

10 » THIRD-PARTY PARTNER LOGOS WERE ALSO ARRAYED IN SPACE AS AN ECHO OF THE VIDEO SCREENS IN THE PREVIOUS SECTION.

11 » TWO COPIES OF THE TEXT STREAK ON.
ONE STICKS IN POSITION, WHILE THE OTHER STREAKS OFF.

12 » THE FINAL LOGO WAS BLOWN UP IN ELECTRIC IMAGE USING THE MR. NITRO PLUG-IN.
Exercise: Framing Video
We were fortunate that XFX’s technology partner NVIDIA posts online lots of demonstration videos showing what their chips can do, and posts them online. Using these proved much easier than clearing videos from individual games. Unfortunately, most of these videos were small and heavily compressed, ruling out playing them full-screen. As an alternative, we decided to have several videos on screen at once, so we could make each one small and sharp.
Raw videos floating in space aren’t very sexy so we decided to suspend the videos in interesting frames. The budget didn’t allow for creating elaborate frames in a 3D program so we decided to create simple frames inside After Effects. Here’s how you can do the same:
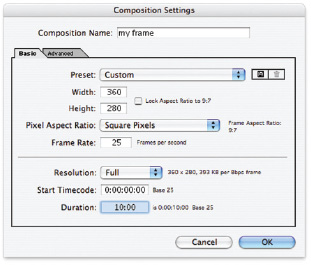
1: Choose a Composition> New Composition. In the Composition Settings dialog, set the size to 360x280 (slightly larger than the 320x240 video provided), using square pixels, and set the Resolution to Full. Pick a sensible name such as “my frame,” enter a Duration of 10:00, and click OK. (SEE FIGURE 13.)
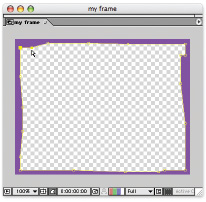
2: Along the bottom edge of the Comp window, enable the Toggle View Masks switch, as well as Toggle Transparency Grid. (SEE FIGURE 14.)
13 » CREATE A NEW COMPOSITION SLIGHTLY LARGER THAN THE VIDEO YOU NEED TO FRAME.

14 » ENABLE THE COMP WINDOW’S TOGGLE VIEW MASKS AND TOGGLE TRANSPARENCY GRID. THESE BUTTONS APPEAR DARKER WHEN ENABLED.
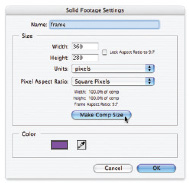
3: In this comp, add a Layer>New>Solid. Name it “frame,” click on the Make Comp Size button, and give it a strong color. Then click New. (SEE FIGURE 15.)
4: With your FRAME layer highlighted, select Layer>Mask>New Mask. This creates a mask the shape of your solid. Type MM to reveal your mask’s parameters in the Timeline window. Click on the word Shape on the same line as the parameter Mask Shape in the Timeline window. Edit the values to inset the Bounding Box 10 to 20 pixels on all sides by adding to the Left and Top values and subtracting from the Right and Bottom values. You should see the checkerboard grid in the Comp window wherethe solid is transparent. (SEE FIGURE 16.)
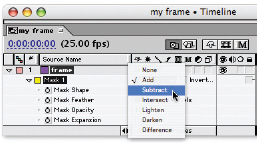
5: Change the popup in the Switches/Modes column from Add to Subtract; this will cut the center out of your solid. (SEE FIGURE 17.)
15 » CREATE A NEW SOLID THE SAME SIZE AS YOUR COMPOSITION.

16 » CREATE A NEW MASK, AND EDIT THE MASK SHAPE’S BOUNDING BOX, IN SETTING IT 10 TO 20 PIXELS ON ALL SIDES.
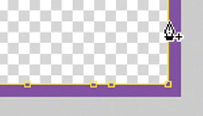
17 » SET MASK 1 TO SUBTRACT ITS SHAPE FROM THE SOLID, MAKING THE CENTER TRANSPARENT. USE THE PEN TOOL TO ADD MORE POINTS TO YOUR MASK.
6: Now edit the mask shape to make your frame more interesting. Press G to select the Pen tool. Click along your mask shape to add more vertices to your mask. For starters, try adding four points to each side. Make sure a “+” symbol is visible next to the pen cursor before you click; otherwise, After Effects will think you want to start drawing a new mask. If needed, choose Undo to remove accidental mask points. (SEE FIGURE 18.)
7: Press V to return to the Selection tool. In your sets of four extra mask points, Shift+click or drag a marquee to select the inner two. Then use the cursor keys to nudge them to a new position, creating a more detailed shape for the frame. Nudge the other points as needed. Do this for each side of the frame. (SEE FIGURE 19.)
8: Now inset the video in the middle of your frame. In the Project window, twirl open the Sources>Video folder. Select one of the NVIDIA clips, and type Command+/ (Control+/) to add it to the middle of your comp.
At this point, you can edit, add, or delete mask points to create a more interesting relationship between the frame and video. You can either make “spars” that connect the frame to the video, or leave the video floating in the middle of the frame. (SEE FIGURE 20.)
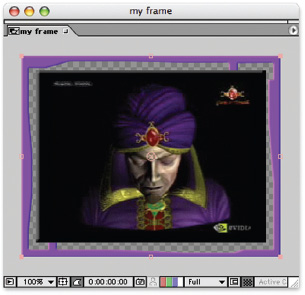
9: To add apparent thickness to your frame, select it and add Effect>Perspective>Bevel Alpha. If you like, do the same to the video. In the Effect Controls window, optionally increase the Edge Thickness to make the bevel more obvious.
18 » USE THE PEN TOOL TO ADD MORE POINTS TO YOUR MASK.
19 » NUDGE YOUR NEW MASK POINTS TO CREATE INTERESTING CUT-OUTS AND EXTENSIONS TO YOUR FRAME.
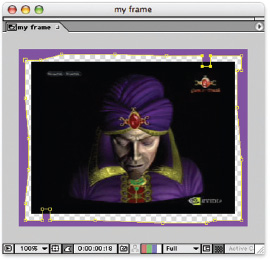
20 » ADD A VIDEO TO THE MIDDLE OF THE COMP AND FURTHER TWEAK THE FRAME’S SHAPE.
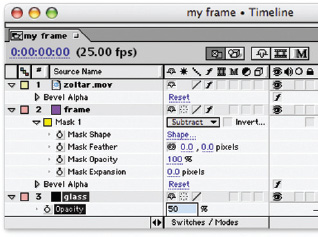
10. We like to add a “backing glass” to fill in the gaps between the frame and video while still being able to see bits of objects behind. Type Command+Y (Control+Y) to create another new solid. Make sure it is the same size as the comp, but this time change its color to black, and change its name to “glass.” Click OK. Then type Command+Shift+[(Control+Shift+[) to send it to the bottom of the layer stack.
11. With the glass layer still selected, type T to reveal its Opacity setting. Scrub its value in the Timeline window while watching the Comp window, looking for the checkerboard pattern to appear in the “glass” areas, somewhere around 50 percent to 65 percent works well. (SEE FIGURE 21.)
21 » TO GIVE THE ILLUSION OF SEMITRANSPARENT GLASS, PLACE A BLACK SOLID IN THE BACKGROUND AND REDUCE ITS OPACITY.

23 » WE ARRAYED A NUMBER OF THESE FRAMED VIDEOS IN 3D SPACE, CONNECTED THEM TO A CENTRAL NULL OBJECT, AND ANIMATED THE NULL.
In the project window, double-click the comp 05_our frame to see a slightly fancier frame we created for the XFX project. We used two mask shapes: the inner frame pattern was subtracted from an outer rounded-corner mask (created with Profound Effects Useful Assistants). (SEE FIGURE 22.)
After creating one frame, we followed the old artistic adage of “repeat, but with variations,” creating new compositions with frames for the other videos. In some cases the variations were simple rotations or flips of the original mask shape.
We then added these frame precomps to a master comp, and arranged them in a grid in 3D space, leaving semi-random holes to create interest through unpredictability. However, if you look closely, you will notice that we arranged the front row of video frames in an “X” to reinforce the company name. These precomps were attached to a central Null Object, which was then animated in space to move towards and away from a camera, changing direction as if being bounced around by the music. (SEE FIGURE 23.)
Open the comp 02_final piece again, and preview the section between comp markers 5 and 7. You will notice that we performed some other subtle tricks, such as making the videos semi-transparent, changing the arrangement of the frames halfway through, subduing the color of the frames in the back plane to make them recede into space, and editing the videos here and there to better match the music.
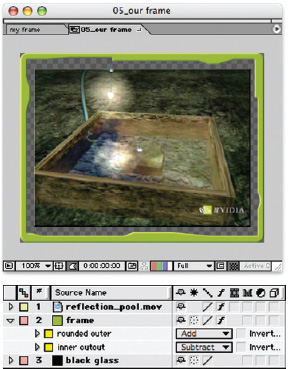
22 » FOR THE XFX VIDEO, WE CREATED SLIGHTLY FANCIER FRAMES WITH ROUNDED EDGES BY USING TWO MASK SHAPES.
DVD Considerations
The delivery requirements for this job were a bit unusual: a widescreen PAL DVD that would auto-start upon insertion and continuously loop. On most jobs, we hand off DVD authoring to those who specialize in it, but to keep the costs down we agreed to do the authoring ourselves.
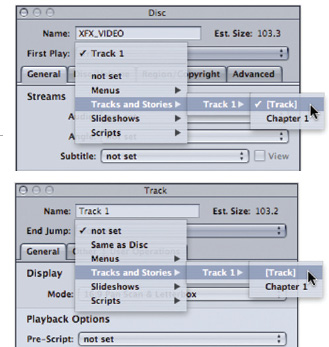
We normally use Apple’s iDVD when creating simple DVD proofs for clients. However, iDVD does not support autoplay or looping, so we stepped up to Apple’s DVD Studio Pro. The trick to having a disc play on insertion is to set the disc’s First Play to be your video track; to get it to loop, also set the track’s End Jump to this same track. (SEE FIGURE 24.)
As the discs had to be delivered overseas for a trade show on a tight deadline, and we didn’t have a PAL format DVD player or monitor of our own to test the final disc with (and again, the budget would not accommodate these purchases), we wanted to make our production process as bulletproof as possible by taking decisions out of DVD Studio Pro’s hands. For example, if you render a normal 720x576 PAL frame in After Effects, there is ambiguity over whether this is a normal 4x3 aspect ratio movie, or a 16x9 aspect ratio movie that has an “anamorphic squeeze” to cram the widescreen image into a normal PAL frame. Therefore, we rendered at the full square-pixel 1024x768 widescreen size and handed that off to DVD Studio Pro to compress. To ensure that the movie will be treated as PAL video, remember to set the Encoding preferences before you import your movie. (SEE FIGURE 25.)
Field order was also another area of concern. PAL can be upper field first (professional D1-spec video) or lower field first (DV), even for the same frame size. Different software packages also define upper, lower, first, second, even, and odd fields in different ways. We also knew that the DVD may be played back on computers, which do not correctly represent fields. Therefore, we decided to frame-render the movie. This was as much an aesthetic decision as a technical one, as frame rendering results in more motion blur than field rendering for the same Shutter Angle in After Effects. The final 25fps progressive-scan video has more dreamlike motion akin to 24fps film.
24 » IN DVD STUDIO PRO, USE THE INSPECTOR TO SET THE DISC’S FIRST PLAY AND THE TRACK’S END JUMP BOTH TO BE YOUR VIDEO.

25 » REMEMBER TO SET THE ENCODING PREFERENCES TO THE CORRECT VIDEO STANDARD AND ASPECT RATIO, WITH THE DESIRED DATA RATE TO MAXIMIZE QUALITY.
After we burned a test disc, we were not satisfied with the quality; there was visible banding or posterization around the “light ray” effects and with some of the layered background images. One partial cure was increasing the bit rate settings in DVD Studio Pro’s Encoding dialog. As we were trying to fit only a few minutes onto an entire DVD, file size was not an issue, so we set both the Bit Rate and Max Bit Rate as high as we could. Although a DVD’s maximum bit rate is 9Mbps, you need to leave room for audio, control tracks, and to recover from inevitable drop-outs. The suggested maximum in the real world is 7.5Mps.
However, even this did not cure all of our problems; nor did setting After Effects to 16bpc (bit per channel) color depth. The next corrective action was adding some noise to break up the banding patterns. For the problematic backgrounds, we placed an Adjustment Layer on top of the composite and applied Effect>Noise & Grain>Noise HLS Auto, with noise in the Hue channel set to 1 percent. (SEE FIGURE 26.)
For the light rays, we duplicated our source layer, and applied Trapcode’s Shine to the duplicate. On top of this we placed stock footage of blowing and drifting smoke (from the Artbeats ReelFire and ReelExplosions libraries), applied Effect>Adjust Levels to maximize its brightness and contrast, and used this as a luminance matte for the light rays to help break them up. Again, this choice was driven by aesthetics as much as technical requirements: Matting light rays with noise, smoke, and similar textures gives them a much more mysterious air. A split-screen of a similar effect is set up for you to study in comp 06_mysterious rays. This composition uses the Professional edition’s Fractal Noise effect, as well Cycore’s CC Radial Blur. (SEE FIGURE 27.)

26 » A SLIGHT AMOUNT OF NOISE IN THE HUE CHANNEL BROKE UP BANDING PROBLEMS THAT APPEARED DURING ENCODING.
The final DVD authoring consideration is simple, but significant: Some older DVD players can take up to a second to get playback running properly. It is suggested that for maximum compatibility you should insert a second of black and silence at the head of your files. The movie also ends in black, so the loop point–where the video would otherwise be frozen–will appear seamless.
Mission: Accomplished
We feel the final result was fast, loose, and fun. This video’s first use was at the huge CeBIT convention in Germany, and XFX’s English distributor reported it was a resounding success. And from our own point of view, it was fun to create a video where you loosen the tie and display a lot of attitude, rather than worry about painting well inside the lines.

27 » THIS SPLIT SCREEN LIGHT RAY SHOWS THE VISUAL BENEFITS OF USING A SMOKY OR CLOUDY TEXTURE AS A LUMINANCE MATTE FOR LIGHT-RAY EFFECTS.
» MIRETH’S IVCD PROVIDES AN EASY WAY TO CREATE VIDEO CDS, WHICH ARE POPULAR IN SOME ASIAN COUNTRIES.
A popular format in some Asian countries is Video CD (VCD). This places a few minutes of MPEG-encoded video on a CD instead of a DVD. As part of our deliverables, we were asked to create both VCD and SVCD (Super VCD) discs.
We used the inexpensive VCD and SVCD creator iVCD from Mireth Technology (www.mireth.com). Although VCDs don’t have nearly the interactive programming potential of DVDs (and are of much lower visual quality, by the way), they do have autoplay and looping functions, which are exactly what we needed for this job. iVCD refers to this as “kiosk” mode. iVCD also automatically letterboxed our widescreen video for playback in VCD’s 4:3 aspect ratio format.
ABOUT THE AUTHORS
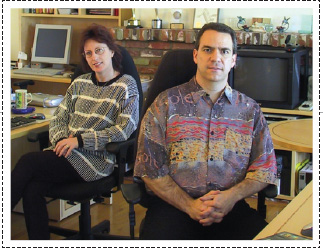
Chris and Trish Meyer are the creative forces behind CyberMotion, and award-winning motion graphics studio in Los Angeles. They have animated television and film opening tiles (including The Talented Mr. Ripley and Cold Mountain) for NBC, ABC, HBO, Fox, TLC, New Line, Paramount, and others. They also mix in a good amount of corporate work, creating trade show videos plus graphics for training, sales, and publicity materials for companies ranging from Apple to Xerox. CyberMotion has also contributed imagery for such unusual venues as a nine-screen CircleVi-sion exhibit at the Korean Expo and the four-block-long Fremont Street Experience in Las Vegas.
CyberMotion’s studio contains eight computers for the two artists-seven Macs and one Windows XP box-connected by a peer-to-peer gigabit Ethernet network. Their main workstations are dual-processor Apple G5s driving 22” Cinema displays; for video previewing, both also have ‘Blackmagic Design DeckLink cards connected to 20” Sony monitors. Their main application is Adobe After Effects (for which they were one of the original development sites) with a wide variety of plug-ins. They also use Adobe Photoshop and Illustrator, Apple Final Cut Pro and Motion, Maxon Cinema 4D, Electric Image Universe, Digidesign Pro Tools, Ableton Live, and a number of small utilities.
Trish and Chris Meyer are respected authors, writing the Motion Graphics column for DV magazine and several highly regarded books on After Effects: the Creating Motion Graphics series, and After Effects in Production. Chris also currently sits of the Broadcast Designers Association’s Board of Governors.
FURTHER READING
Creating Motion Graphics with After Effects, Volumes 1 and 2
by Trish & Chris Meyer
(CMP Books 2004, 2005)
After Effects in Production
by Trish & Chris Meyer (CMP Books 2005)
DVD Authoring and Production
by Ralph LaBarge (CMP Books 2001)
DVD Studio Pro 2 Solutions
by Erica Sadun (Sybex 2004)
DVD Studio Pro Visual QuickPro Guide
by Marin Sitter (Peachpit Press 2004)