13 Achieving high availability: Availability zones, autoscaling, and CloudWatch
- Recovering a failed virtual machine with a CloudWatch alarm
- Using autoscaling to guarantee your virtual machines keep running
- Understanding availability zones in an AWS region
- Analyzing disaster-recovery requirements
Imagine you run an online shop. During the night, the hardware running your virtual machine fails. Your users can no longer access your web shop until the next morning when you go into work. During the eight-hour downtime, your users search for an alternative and stop buying from you. That’s a disaster for any business. Now imagine a highly available web shop. Just a few minutes after the hardware failed, the system recovers, restarts itself on new hardware, and your e-commerce website is back online again—without any human intervention. Your users can now continue to shop on your site. In this chapter, we’ll teach you how to build a highly available system based on EC2 instances like this one.
Virtual machines are not highly available by default, so the potential for system failure is always present. The following scenarios could cause an outage of your virtual machine:
-
A software problem occurs on the host machine, causing the virtual machine to fail (either the OS of the host machine fails or the virtualization layer does).
-
The compute, storage, or networking hardware of the physical host fails.
-
Parts of the data center that the virtual machine depends on fail: network connectivity, the power, or the cooling system.
For example, if the computing hardware of a physical host fails, all EC2 instances running on this host will fail. If you’re running an application on an affected virtual machine, this application will fail and experience downtime until somebody intervenes by starting a new virtual machine on another physical host. In the case of a small outage—for example, when a single physical host fails—AWS will reboot the affected virtual machines and launch them on a new host. However, in the case of a larger outage—for example, when a whole rack is affected—you are in charge of recovering the failed instances. Therefore, to avoid downtime and to build a highly available system, we recommend enabling autorecovery based on a CloudWatch alarm or distributing the workload among multiple virtual machines.
High availability describes a system that is operating with almost no downtime. Even if a failure occurs, the system can provide its services most of the time. The Harvard Research Group (HRG) defines high availability with the classification AEC-2, which requires an uptime of 99.99% over a year, or not more than 52 minutes and 35.7 seconds of downtime per year. You can achieve 99.99% uptime with EC2 instances if you follow the instructions in the rest of this chapter. Although a short interruption might be necessary to recover from a failure, no human intervention is needed to instigate the recovery.
AWS provides building blocks for highly available systems based on EC2 instances. Depending on whether you can distribute a workload across multiple machines, different tools come into play, as described here:
-
Building a highly available infrastructure by using groups of isolated data centers, called availability zones, within a region.
-
Monitoring the health of virtual machines with CloudWatch and triggering recovery automatically, if needed. This option fits best for workloads that need to run on a single virtual machine.
-
Using autoscaling to guarantee a certain number of virtual machines are up and running and replace failed instances automatically. Use this approach when distributing your workload among multiple virtual machines is an option.
You will learn how to automatically replace a failed virtual machine in the first section of this chapter. But what happens if you have a data center outage? You will learn how to recover from that in the second section of this chapter. At the end of the chapter, we will discuss how to analyze disaster recovery requirements and translate them into an AWS architecture. In the following section, you’ll learn how to protect a workload that can run on only a single virtual machine at a time from failures.
13.1 Recovering from EC2 instance failure with CloudWatch
AWS does recover failed virtual machines under only some circumstances. For example, AWS will not recover an EC2 instance if a whole rack failed. An easy countermeasure is to automate the recovery of an EC2 instance by creating a CloudWatch alarm. You will learn how to do so in this section.
Suppose that your team is using an agile development process. To accelerate the process, your team decides to automate the testing, building, and deployment of the software. You’ve been asked to set up a continuous integration (CI) server, which allows you to automate the development process. You’ve chosen to use Jenkins, an open source application written in Java that runs in a servlet container such as Apache Tomcat. Because you’re using infrastructure as code, you’re planning to deploy changes to your infrastructure with Jenkins as well. (Learn more about Jenkins by reading its documentation at http://mng.bz/BZJg.)
A Jenkins server is a typical use case for a high-availability setup. It’s an important part of your infrastructure, because your colleagues won’t be able to test and deploy new software if Jenkins suffers from downtime. But a short downtime due to a failure with automatic recovery won’t hurt your business too much, so you don’t need a fault-tolerant system. Jenkins is only an example. You can apply the same principles to any other applications where you can tolerate a short amount of downtime but still want to recover from hardware failures automatically. For example, we used the same approach for hosting FTP servers and VPN servers.
In this example, you’ll do the following:
-
Launch a virtual machine in the VPC, and automatically install Jenkins during bootstrap.
-
Create a CloudWatch alarm to monitor the health of the virtual machine and replace the virtual machine when needed.
We’ll guide you through these steps with the help of a CloudFormation template. You can find the CloudFormation template for this example on GitHub and on S3. Download a snapshot of the repository at http://github.com/AWSinAction/code3/archive/master.zip. The file we’re talking about is located at chapter13/recovery.yaml. On S3, the same file is located at https://s3.amazonaws.com/awsinaction-code3/chapter13/recovery.yaml.
The following command creates a CloudFormation template that launches an EC2 instance with a CloudWatch alarm that triggers a recovery if the virtual machine fails. Replace $Password with a password consisting of 8–40 characters. The template automatically installs a Jenkins server while starting the virtual machine:
$ aws cloudformation create-stack --stack-name jenkins-recovery
➥ --template-url https:/ /s3.amazonaws.com/
➥ awsinaction-code3/chapter13/recovery.yaml
➥ --parameters "ParameterKey=JenkinsAdminPassword,
➥ ParameterValue=$Password"
➥ --capabilities CAPABILITY_IAM
While you are waiting for CloudFormation to launch the EC2 instance, we will have a look into the CloudFormation template. The CloudFormation template contains the definition of a private network. The most important parts of the template follow:
-
A virtual machine with user data containing a bash script, which installs a Jenkins server during bootstrapping
-
A public IP address assigned to the EC2 instance, so you can access the new instance after a recovery using the same public IP address as before
-
A CloudWatch alarm based on the system status metric published by the EC2 service
The next listing shows how to create an EC2 instance that runs a script to install Jenkins during bootstrapping. The Elastic IP address ensures a static public IP address for the virtual machine.
Listing 13.1 Starting an EC2 instance using a Jenkins CI server with recovery alarm
#[...]
ElasticIP:
  Type: 'AWS::EC2::EIP'                            ①
  Properties:
    InstanceId: !Ref Instance
    Domain: vpc
  DependsOn: VPCGatewayAttachment
Instance:                                          ②
  Type: 'AWS::EC2::Instance'
  Properties:
    ImageId: !FindInMap [RegionMap, !Ref
➥ 'AWS::Region', AMI]                             ③
    InstanceType: 't2.micro'                       ④
    IamInstanceProfile: !Ref IamInstanceProfile
    NetworkInterfaces:
    - AssociatePublicIpAddress: true
      DeleteOnTermination: true
      DeviceIndex: 0
      GroupSet:
      - !Ref SecurityGroup
      SubnetId: !Ref Subnet
    UserData:                                      ⑤
      'Fn::Base64': !Sub |
        #!/bin/bash -ex
        trap '/opt/aws/bin/cfn-signal -e 1 --stack ${AWS::StackName}
        ➥ --resource Instance --region ${AWS::Region}' ERR

        # Installing Jenkins                       ⑥
        amazon-linux-extras enable epel=7.11 && yum -y clean metadata
        yum install -y epel-release && yum -y clean metadata
        yum install -y java-11-amazon-corretto-headless daemonize
        wget -q -T 60 http://.../jenkins-2.319.1-1.1.noarch.rpm
        rpm --install jenkins-2.319.1-1.1.noarch.rpm

        # Configuring Jenkins
        # ...

        # Starting Jenkins                         ⑦
        systemctl enable jenkins.service
        systemctl start jenkins.service
        /opt/aws/bin/cfn-signal -e $? --stack ${AWS::StackName}
        ➥ --resource Instance --region ${AWS::Region}
    Tags:
    - Key: Name
      Value: 'jenkins-recovery'
  CreationPolicy:
    ResourceSignal:
      Timeout: PT10M
  DependsOn: VPCGatewayAttachment
① The public IP address stays the same after recovery when using Elastic IP address.
② Launches a virtual machine to run a Jenkins server
③ Selects the AMI (in this case, Amazon Linux)
④ Recovery is supported for t2 instance types.
⑤ User data containing a shell script that is executed during bootstrapping to install a Jenkins server
⑥ Downloads and installs Jenkins
In case the EC2 instance fails, AWS will not replace the instance automatically under all circumstances. Therefore, you need to create a CloudWatch alarm to trigger the recovery of the virtual machine automatically. A CloudWatch alarm consists of the following:
-
A metric that monitors data (health check, CPU usage, and so on)
-
A rule defining a threshold based on a statistical function over a period of time
-
Actions to trigger if the state of the alarm changes (such as triggering a recovery of an EC2 instance if the state changes to
ALARM)
An alarm can be in one of the following states:
Listing 13.2 creates a CloudWatch alarm based on a metric called StatusCheckFailed_System (referenced by attribute MetricName) to monitor a virtual machine’s health and recover it if the underlying host system fails. This metric contains the results of the system status checks performed by the EC2 service every minute. If the check fails, a measurement point with value 1 is added to the metric StatusCheckFailed_System. Because the EC2 service publishes this metric, the Namespace is called AWS/EC2 and the Dimension of the metric is the ID of a virtual machine.
The CloudWatch alarm checks the metric every 60 seconds, as defined by the Period attribute. As defined in EvaluationPeriods, the alarm will check the last five periods—the last five minutes in this example. The check runs a statistical function specified in Statistic on the time periods. The result of the statistical function, a maximum function in this case, is compared against Threshold using the chosen ComparisonOperator. If the result is negative, the alarm actions defined in AlarmActions are executed: in this case, the recovery of the virtual machine—a built-in action for EC2 instances.
In summary, AWS checks the status of the virtual machine every minute. The result of these checks is written to the StatusCheckFailed_System metric. The alarm checks this metric, and if there are five consecutive failed checks, the alarm trips.
Listing 13.2 Creating a CloudWatch alarm to recover a failed EC2 instance
RecoveryAlarm:                                              ①
  Type: 'AWS::CloudWatch::Alarm'
  Properties:
    AlarmDescription: 'Recover EC2 instance when underlying hardware fails.'
    Namespace: 'AWS/EC2'                                    ②
    MetricName: 'StatusCheckFailed_System'                  ③
    Statistic: Maximum                                      ④
    Period: 60                                              ⑤
    EvaluationPeriods: 5                                    ⑥
    ComparisonOperator: GreaterThanThreshold                ⑦
    Threshold: 0                                            ⑧
    AlarmActions:                                           ⑨
    - !Sub 'arn:aws:automate:${AWS::Region}:ec2:recover'
    Dimensions:
    - Name: InstanceId                                      ⑩
      Value: !Ref Instance
① Creates a CloudWatch alarm to monitor the health of the virtual machine
② The metric to monitor is provided by the EC2 service with the namespace AWS/EC2.
④ Statistical function to apply to the metric. The minimum is to notify you if a single status check failed.
⑤ Duration for which the statistical function is applied, in seconds. Must be a multiple of 60.
⑥ Number of time periods over which data is compared to the threshold
⑦ Operator for comparing the output of the statistical function with the threshold
⑧ Threshold triggering an alarm
⑨ Action to perform in case of an alarm. Uses the predefined recovery action for EC2 instances.
⑩ The virtual machine is a dimension of the metric.
While you have been reading through the details, the CloudFormation stack should have reached the status COMPLETE. Run the following command to get the output of the stack. If the output is null, retry after a few more minutes:
If the query returns output like the following, containing a URL, a user, and a password, the stack has been created and the Jenkins server is ready to use. If not, retry the command after a few minutes. Next, open the URL in your browser, and log in to the Jenkins server with user admin and the password you’ve chosen:
[
  {
    "Description": "URL to access web interface of Jenkins server.",
    "OutputKey": "JenkinsURL",
    "OutputValue": "http://54.152.240.91:8080"     ①
  },
  {
    "Description": "Administrator user for Jenkins.",
    "OutputKey": "User",
    "OutputValue": "admin"                         ②
  },
  {
    "Description": "Password for Jenkins administrator user.",
    "OutputKey": "Password",
    "OutputValue": "********"                      ③
  }
]
① Open this URL in your browser to access the web interface of the Jenkins server.
② Use this user name to log in to the Jenkins server.
③ Use this password to log in to the Jenkins server.
Now you’ll want to try out whether the Jenkins server works by creating your first build job on the Jenkins server. To do so, you have to log in with the username and password from the previous output. Figure 13.1 shows the Jenkins server’s login form.

The following steps guide you through the process of creating a Jenkins project:
-
Open http://$PublicIP:8080 in your browser, and replace
$PublicIPwith the public IP address from the output of the previousdescribecommand. -
Log in with user
adminand the password you chose when starting the CloudFormation template.
The Jenkins server runs on a virtual machine with automated recovery. If the virtual machine fails because of problems with the host system, it will be recovered with all data and the same public IP address. The URL doesn’t change because you’re using an Elastic IP for the virtual machine. All data is restored because the new virtual machine uses the same EBS volume as the previous virtual machine, so you can find your AWS in Action job again.
Unfortunately, you can’t test the recovery process. The CloudWatch alarm monitors the health of the host system, which can be controlled only by AWS.
13.1.1 How does a CloudWatch alarm recover an EC2 instance?
Now that you’ve launched an EC2 instance with self-healing capabilities, it’s time to take a look at the details. The EC2 service checks the status of every virtual machine automatically. System status checks are performed every minute, and the results are available as CloudWatch metrics.
A system status check detects a loss of network connectivity or power, as well as software or hardware problems on the physical host. By default, AWS does not recover failed EC2 instances automatically. You can, however, configure a CloudWatch alarm based on the system status check to restart a failed virtual machine on another physical host.
Figure 13.2 shows the process if an outage affects a virtual machine, described here:
-
The physical hardware fails and causes the EC2 instance to fail as well.
-
The EC2 service detects the outage and reports the failure to a CloudWatch metric.
-
A CloudWatch alarm triggers the recovery of the virtual machine.
-
The EBS volume and Elastic IP stay the same and are linked to the new EC2 instance.
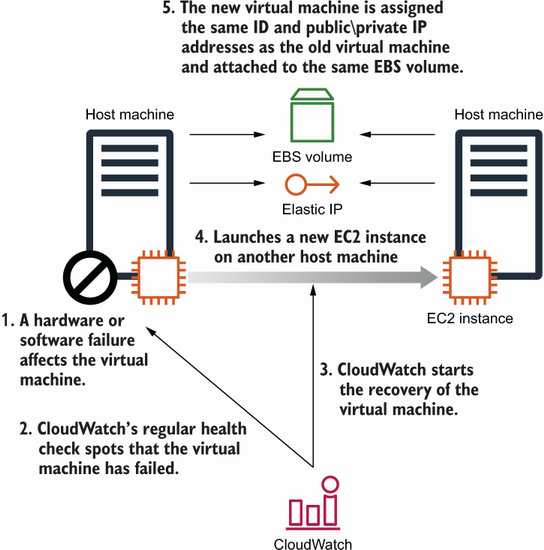
Figure 13.2 In the case of a hardware failure, CloudWatch triggers the recovery of the EC2 instance.
After the recovery, a new EC2 instance will run with the same ID and private IP address. Data on network-attached EBS volumes is available as well. No data is lost because the EBS volume stays the same. EC2 instances with local disks (instance storage) aren’t supported for this process. If the old EC2 instance was connected to an Elastic IP address, the new EC2 instance is connected to the same Elastic IP address.
|
|
The approach you learned about in this section has an important limitation: the CloudWatch alarm will recover a failed instance but can do so only in the same availability zone. If a whole data center fails, your Jenkins server will become unavailable and will not recover automatically.
13.2 Recovering from a data center outage with an Auto Scaling group
Recovering an EC2 instance after underlying software or hardware fails is possible using system status checks and CloudWatch, as described in the previous section. But what happens if the entire data center fails because of a power outage, a fire, or some other disaster? The process for recovering a virtual machine described in section 13.1 will fail because it tries to launch an EC2 instance in the same data center.
AWS is built for failure, even in the rare case that an entire data center fails. The AWS regions consist of multiple data centers grouped into availability zones. By distributing your workload among multiple availability zones, you are able to recover from an data center outage. Two pitfalls when building a highly available setup over multiple availability zones follow:
-
Data stored on network-attached storage (EBS) won’t be available after failing over to another availability zone by default. In this case, you can end up having no access to your data (stored on EBS volumes) until the availability zone is back online (but you won’t lose your data in this case).
-
You can’t start a new virtual machine in another availability zone with the same private IP address. That’s because subnets are bound to availability zones, and each subnet has a unique IP address range. By default, you can’t keep the same public IP address automatically after a recovery, as was the case in the previous section with a CloudWatch alarm triggering a recovery.
We will deal with those pitfalls at the end of this section. In this section, you’ll improve the Jenkins setup from the previous section, add the ability to recover from an outage of an entire availability zone, and work around the pitfalls afterward.
13.2.1 Availability zones: Groups of isolated data centers
As you’ve learned, AWS operates multiple locations worldwide, called regions. You’ve used the region US East (N. Virginia), also called us-east-1, if you’ve followed the examples so far. In total, there are 23 publicly available regions throughout North America, South America, Europe, Africa, and Asia Pacific.
Each region consists of multiple availability zones (AZs). You can think of an AZ as an isolated group of data centers and a region as an area where multiple availability zones are located at a sufficient distance. The region us-east-1 consists of six availability zones (us-east-1a to us-east-1f), for example. The availability zone us-east-1a could be one data center or many. We don’t know because AWS doesn’t make information about their data centers publicly available. So, from an AWS user’s perspective, you know only about regions and AZs.
The AZs are connected through low-latency links, so requests between different availability zones aren’t as expensive as requests across the internet in terms of latency. The latency within an availability zone (such as from an EC2 instance to another EC2 instance in the same subnet) is lower compared to latency across AZs. The number of availability zones depends on the region. All regions come with three or more availability zones. Keep in mind that AWS charges $0.01/GB for network traffic between availability zones. Figure 13.3 illustrates the concept of availability zones within a region.

13.2.2 Recovering a failed virtual machine to another availability zone with the help of autoscaling
In the first part of the chapter, you used a CloudWatch alarm to trigger the recovery of a virtual machine that was running a Jenkins CI server in case of a failure. This mechanism launches an identical copy of the original virtual machine, if necessary. This is possible only in the same availability zone, because the private IP address and the EBS volume of a virtual machine are bound to a single subnet and a single availability zone. But suppose your team isn’t happy about the fact that they won’t be able to use the Jenkins server to test, build, and deploy new software in the case of a unlikely availability zone outage. You need a tool that will let you recover in another availability zone.
Failing over into another availability zone is possible with the help of autoscaling. You can find the CloudFormation template for this example on GitHub and on S3. Download a snapshot of the repository at https://github.com/AWSinAction/code3/archive/main.zip. The file we’re talking about is located at chapter13/multiaz.yaml. On S3, the same file is located at https://s3.amazonaws.com/awsinaction-code3/chapter13/multiaz.yaml.
Autoscaling is part of the EC2 service and helps you to ensure that a specified number of EC2 instances is running, even when availability zones become unavailable. You can use autoscaling to launch a virtual machine and make sure a new instance is started if the original instance fails. You can use it to start virtual machines in multiple subnets. For example, if you have an outage of an entire availability zone, a new instance can be launched in another subnet in another availability zone.
Execute the following command to create a virtual machine that can recover in another availability zone if necessary. Replace $Password with a password consisting of 8–40 characters:
$ aws cloudformation create-stack --stack-name jenkins-multiaz
➥ --template-url https:/ /s3.amazonaws.com/
➥ awsinaction-code3/chapter13/multiaz.yaml
➥ --parameters "ParameterKey=JenkinsAdminPassword,
➥ ParameterValue=$Password"
➥ --capabilities CAPABILITY_IAM
While you wait for CloudFormation to create the stack, you will learn more about the details. To configure autoscaling, you need to create the following two parts of the configuration:
-
A launch template contains all information needed to launch an EC2 instance: instance type (size of virtual machine) and image (AMI) to start from.
-
An Auto Scaling group tells the EC2 service how many virtual machines should be started with a specific launch template, how to monitor the instances, and in which subnets EC2 instances should be started.
Figure 13.4 illustrates this process.

You’ll find both a launch template and an Auto Scaling group in the CloudFormation template for launching a Jenkins server, as shown in the next listing. The parameters are explained in table 13.1. You have already used the most important parameters for the launch template when starting a single virtual machine with a CloudWatch recovery alarm in the previous section.
Table 13.1 Required parameters for the launch template and Auto Scaling group
One important difference exists between the definition of a single EC2 instance and the launch template: the subnet for the virtual machine isn’t defined in the launch template but rather in the Auto Scaling group.
An Auto Scaling group is also used if you need to scale the number of virtual machines based on usage of your system. You’ll learn how to scale the number of EC2 instances based on current load in chapter 17. In this chapter, you only need to make sure a single virtual machine is always running. Because you need a single virtual machine, set the following parameters for autoscaling to 1:
Listing 13.3 Launching a Jenkins virtual machine with autoscaling in two AZs
# [...]
LaunchTemplate:
  Type: 'AWS::EC2::LaunchTemplate'                          ①
  Properties:
    LaunchTemplateData:
      IamInstanceProfile:                                   ②
        Name: !Ref IamInstanceProfile
      ImageId: !FindInMap [RegionMap,
➥ !Ref 'AWS::Region', AMI]                                 ③
      Monitoring:                                           ④
        Enabled: false
      InstanceType: 't2.micro'                              ⑤
      NetworkInterfaces:                                    ⑥
      - AssociatePublicIpAddress: true                      ⑦
        DeviceIndex: 0
        Groups:
        - !Ref SecurityGroup                                ⑧
      UserData:                                             ⑨
        'Fn::Base64': !Sub |
          #!/bin/bash -ex
          trap '/opt/aws/bin/cfn-signal -e 1 --stack ${AWS::StackName}
          ➥ --resource AutoScalingGroup --region ${AWS::Region}' ERR

          # Installing Jenkins
          amazon-linux-extras enable epel=7.11 && yum -y clean metadata
          yum install -y epel-release && yum -y clean metadata
          yum install -y java-11-amazon-corretto-headless daemonize
          wget -q -T 60 http://ftp-chi.osuosl.org/pub/jenkins/
          ➥ redhat-stable/jenkins-2.319.1-1.1.noarch.rpm
          rpm --install jenkins-2.319.1-1.1.noarch.rpm

          # Configuring Jenkins
          # [...]

          # Starting Jenkins
          systemctl enable jenkins.service
          systemctl start jenkins.service
          /opt/aws/bin/cfn-signal -e $? --stack ${AWS::StackName}
          ➥ --resource AutoScalingGroup --region ${AWS::Region}
AutoScalingGroup:
  Type: 'AWS::AutoScaling::AutoScalingGroup'                ⑩
  Properties:
    LaunchTemplate:                                         ⑪
      LaunchTemplateId: !Ref LaunchTemplate
      Version: !GetAtt 'LaunchTemplate.LatestVersionNumber'
    Tags:                                                   ⑫
    - Key: Name
      Value: 'jenkins-multiaz'
      PropagateAtLaunch: true
    MinSize: 1                                              ⑬
    MaxSize: 1                                              ⑭
    VPCZoneIdentifier:                                      ⑮
    - !Ref SubnetA
    - !Ref SubnetB
    HealthCheckGracePeriod: 600                             ⑯
    HealthCheckType: EC2                                    ⑰
  # [...]
① The blueprint used by the Auto Scaling group when launching an EC2 instance
② Attaches an IAM role to the EC2 instance to grant access for the Session Manager
③ Selects the AMI (in this case, Amazon Linux 2)
④ By default, EC2 sends metrics to CloudWatch every five minutes. You can enable detailed instance monitoring to get metrics every minute for an additional cost.
⑤ The instance type for the virtual machine
⑥ Configures the network interface (ENI) of the EC2 instance
⑦ Associates a public IP address when launching the instance
⑧ Attaches a security group allowing ingress on port 8080 to the instance
⑨ The EC2 instance will execute the script loaded from user data at the end of the boot process. The script installs and configures Jenkins.
⑩ Auto Scaling group responsible for launching the virtual machine
⑪ References the launch template
⑫ Adds those tags to the Auto Scaling group itself as well as to all EC2 instances launched by the Auto Scaling group
⑬ Minimum number of EC2 instances
⑭ Maximum number of EC2 instances
⑮ Launches the virtual machines in subnet A (created in availability zone A) and subnet B (created in availability zone B)
⑯ Waits 10 minutes before considering the health check of a newly launched instance
⑰ Uses the internal health check of the EC2 service to discover problems with the virtual machine
The CloudFormation stack might be already up and running. Execute the following command to grab the public IP address of the virtual machine. If no IP address appears, the virtual machine isn’t started yet. Wait another minute, and try again:
$ aws ec2 describe-instances --filters "Name=tag:Name,
➥ Values=jenkins-multiaz" "Name=instance-state-code,Values=16"
➥ --query "Reservations[0].Instances[0].
➥ [InstanceId, PublicIpAddress, PrivateIpAddress, SubnetId]"
[
  "i-0cff527cda42afbcc",    ①
  "34.235.131.229",         ②
  "172.31.38.173",          ③
  "subnet-28933375"         ④
]
① Instance ID of the virtual machine
② Public IP address of the virtual machine
③ Private IP address of the virtual machine
④ Subnet ID of the virtual machine
Open http://$PublicIP:8080 in your browser, and replace $PublicIP with the public IP address from the output of the previous describe-instances command. The web interface for the Jenkins server appears.
Execute the following command to terminate the virtual machine and test the recovery process with autoscaling. Replace $InstanceId with the instance ID from the output of the previous describe command:
After a few minutes, the Auto Scaling group detects that the virtual machine was terminated and starts a new virtual machine. Rerun the describe-instances command until the output contains a new running virtual machine, as shown here:
$ aws ec2 describe-instances --filters "Name=tag:Name,
➥ Values=jenkins-multiaz" "Name=instance-state-code,Values=16"
➥ --query "Reservations[0].Instances[0].
➥ [InstanceId, PublicIpAddress, PrivateIpAddress, SubnetId]"
[
  "i-0293522fad287bdd4",
  "52.3.222.162",
  "172.31.37.78",
  "subnet-45b8c921"
]
The instance ID, the public IP address, the private IP address, and probably even the subnet ID have changed for the new instance. Open http://$PublicIP:8080 in your browser, and replace $PublicIP with the public IP address from the output of the previous describe-instances command. The web interface from the Jenkins server appears.
You’ve now built a highly available architecture consisting of an EC2 instance with the help of autoscaling. Two problems with the current setup follow:
-
The Jenkins server stores data on disk. When a new virtual machine is started to recover from a failure, this data is lost because a new disk is created.
-
The public and private IP addresses of the Jenkins server change after a new virtual machine is started for recovery. The Jenkins server is no longer available under the same endpoint.
You’ll learn how to solve these problems in the next part of the chapter.
|
|
13.2.3 Pitfall: Recovering network-attached storage
The EBS service offers network-attached storage for virtual machines. Remember that EC2 instances are linked to a subnet, and the subnet is linked to an availability zone. EBS volumes are also located only in a single availability zone. If your virtual machine is started in another availability zone because of an outage, the EBS volume cannot be accessed from the other availability zones. Let’s say your Jenkins data is stored on an EBS volume in availability zone us-east-1a. As long as you have an EC2 instance running in the same availability zone, you can attach the EBS volume. If this availability zone becomes unavailable and you start a new EC2 instance in availability zone us-east-1b, however, you can’t access that EBS volume in us-east-1a, which means that you can’t recover Jenkins because you don’t have access to the data. See figure 13.5.

You have multiple solutions for this problem:
-
Outsource the state of your virtual machine to a managed service that uses multiple availability zones by default: RDS, DynamoDB (NoSQL database), EFS (NFSv4.1 share), or S3 (object store).
-
Create snapshots of your EBS volumes regularly, and use these snapshots if an EC2 instance needs to recover in another availability zone. EBS snapshots are stored on S3 and, thus, are available in multiple availability zones. If the EBS volume is the root volume of the ECS instance, create AMIs to back up the EBS volume instead of a snapshot.
-
Use a distributed third-party storage solution to store your data in multiple availability zones: GlusterFS, DRBD, MongoDB, and so on.
The Jenkins server stores data directly on disk. To outsource the state of the virtual machine, you can’t use RDS, DynamoDB, or S3; you need a file-level storage solution instead. As you’ve learned, an EBS volume is available only in a single availability zone, so this isn’t the best fit for the problem. But do you remember EFS from chapter 9? EFS provides network file storage (over NFSv4.1) and replicates your data automatically between availability zones in a region.
To embed EFS into the Jenkins setup, as shown in listing 13.4, you have to make the following three modifications to the Multi-AZ template from the previous section:
-
Adjust the user data to mount the EFS filesystem. Jenkins stores all its data under /var/lib/jenkins.
Listing 13.4 Storing Jenkins state on EFS
# [...]
FileSystem:                                                            ①
  Type: 'AWS::EFS::FileSystem'
  Properties: {}
MountTargetSecurityGroup:                                              ②
  Type: 'AWS::EC2::SecurityGroup'
  Properties:
    GroupDescription: 'EFS Mount target'
    SecurityGroupIngress:
    - FromPort: 2049                                                   ③
      IpProtocol: tcp
      SourceSecurityGroupId: !Ref SecurityGroup
      ToPort: 2049
    VpcId: !Ref VPC
MountTargetA:                                                          ④
  Type: 'AWS::EFS::MountTarget'
  Properties:
    FileSystemId: !Ref FileSystem
    SecurityGroups:
    - !Ref MountTargetSecurityGroup
    SubnetId: !Ref SubnetA                                             ⑤
MountTargetB:                                                          ⑥
  Type: 'AWS::EFS::MountTarget'
  Properties:
    FileSystemId: !Ref FileSystem
    SecurityGroups:
    - !Ref MountTargetSecurityGroup
    SubnetId: !Ref SubnetB
# [...]
LaunchTemplate:
  Type: 'AWS::EC2::LaunchTemplate'                                     ⑦
  Properties:
    LaunchTemplateData:
      # [...]
      UserData:
        'Fn::Base64': !Sub |
          #!/bin/bash -ex
          trap '/opt/aws/bin/cfn-signal -e 1 --stack ${AWS::StackName}
          ➥ --resource AutoScalingGroup --region ${AWS::Region}' ERR
          # Installing Jenkins
          # [...]

          # Mounting EFS volume
          mkdir -p /var/lib/jenkins                                    ⑧
          echo "${FileSystem}:/ /var/lib/jenkins efs tls,_netdev 0 0"
          ➥ >> /etc/fstab                                             ⑨
          while ! (echo > /dev/tcp/${FileSystem}.efs.${AWS::Region}.
          ➥ amazonaws.com/2049) >/dev/null 2>&1; do sleep 5; done     ⑩
          mount -a -t efs                                              ⑪
          chown -R jenkins:jenkins /var/lib/jenkins                    ⑫

          # Configuring Jenkins
          # [...]

          # Starting Jenkins
          systemctl enable jenkins.service
          systemctl start jenkins.service
          /opt/aws/bin/cfn-signal -e $? --stack ${AWS::StackName}
          ➥ --resource AutoScalingGroup --region ${AWS::Region}
  AutoScalingGroup:
    Type: 'AWS::AutoScaling::AutoScalingGroup'                         ⑬
    Properties:
      LaunchTemplate:                                                  ⑭
        LaunchTemplateId: !Ref LaunchTemplate
        Version: !GetAtt 'LaunchTemplate.LatestVersionNumber'
      Tags:
      - Key: Name
        Value: 'jenkins-multiaz-efs'
        PropagateAtLaunch: true
      MinSize: 1
      MaxSize: 1
      VPCZoneIdentifier:
      - !Ref SubnetA
      - !Ref SubnetB
      HealthCheckGracePeriod: 600
      HealthCheckType: EC2
    # [...]
① Creates an Elastic File System (EFS), which provides a NFS (network filesystem)
② Creates a security group used to grant network traffic from the EC2 instance to EFS
③ Allows incoming traffic on port 2049 used by NFS
④ The mount target provides a network interface for the filesystem.
⑤ The mount target is attached to a subnet.
⑥ Therefore, you need a mount target per subnet.
⑦ The blueprint used by the Auto Scaling group to launch virtual machines
⑧ Creates a folder used by Jenkins to store data if it does not exist yet
⑨ Adds an entry to the configuration file for volumes
⑩ Waits until the EFS filesystem becomes available
⑫ Changes the ownership of the mounted directory to make sure Jenkins is able to write and read files
⑬ Creates the Auto Scaling group
⑭ References the launch template defined above
You can find the CloudFormation template for this example on GitHub and on S3. Download a snapshot of the repository at https://github.com/AWSinAction/code3/archive/main.zip. The file we’re talking about is located at chapter13/multiaz-efs .yaml. On S3, the same file is located at https://s3.amazonaws.com/awsinaction-code3/chapter13/multiaz-efs.yaml.
Execute the following command to create the new Jenkins setup that stores state on EFS. Replace $Password with a password consisting of 8–40 characters:
$ aws cloudformation create-stack --stack-name jenkins-multiaz-efs
➥ --template-url https:/ /s3.amazonaws.com/
➥ awsinaction-code3/chapter13/multiaz-efs.yaml
➥ --parameters "ParameterKey=JenkinsAdminPassword,
➥ ParameterValue=$Password"
➥ --capabilities CAPABILITY_IAM
The creation of the CloudFormation stack will take a few minutes. Run the following command to get the public IP address of the virtual machine. If no IP address appears, the virtual machine isn’t started yet. In this case, wait another minute, and try again:
$ aws ec2 describe-instances --filters "Name=tag:Name,
➥ Values=jenkins-multiaz-efs" "Name=instance-state-code,Values=16"
➥ --query "Reservations[0].Instances[0].
➥ [InstanceId, PublicIpAddress, PrivateIpAddress, SubnetId]"
[
  "i-0efcd2f01a3e3af1d",    ①
  "34.236.255.218",         ②
  "172.31.37.225",          ③
  "subnet-0997e66d"         ④
]
① Instance ID of the virtual machine
② Public IP address of the virtual machine
③ Private IP address of the virtual machine
④ Subnet ID of the virtual machine
Next, create a new Jenkins job by following these steps:
-
Open http://$PublicIP:8080/newJob in your browser, and replace
$PublicIPwith the public IP address from the output of the previousdescribecommand. -
Log in with user
adminand the password you chose when starting the CloudFormation template.
You’ve made some changes to the state of Jenkins stored on EFS. Now terminate the EC2 instance with the following command, and you will see that Jenkins recovers from the failure without data loss. Replace $InstanceId with the instance ID from the output of the previous describe command:
After a few minutes, the Auto Scaling group detects that the virtual machine was terminated and starts a new virtual machine. Rerun the describe-instances command shown next until the output contains a new running virtual machine:
$ aws ec2 describe-instances --filters "Name=tag:Name,
➥ Values=jenkins-multiaz-efs" "Name=instance-state-code,Values=16"
➥ --query "Reservations[0].Instances[0].
➥ [InstanceId, PublicIpAddress, PrivateIpAddress, SubnetId]"
[
  "i-07ce0865adf50cccf",
  "34.200.225.247",
  "172.31.37.199",
  "subnet-0997e66d"
]
The instance ID, the public IP address, the private IP address, and probably even the subnet ID have changed for the new instance. Open http://$PublicIP:8080 in your browser, and replace $PublicIP with the public IP address from the output of the previous describe-instances command. The web interface from the Jenkins server appears, and it still contains the AWS in Action job you created recently.
You’ve now built a highly available architecture consisting of an EC2 instance with the help of autoscaling. State is now stored on EFS and is no longer lost when an EC2 instance is replaced. There is one problem left: the public and private IP addresses of the Jenkins server change after a new virtual machine is started for recovery. The Jenkins server is no longer available under the same endpoint.
|
|
You’ll learn how to solve the last problem next.
13.2.4 Pitfall: Network interface recovery
Recovering a virtual machine using a CloudWatch alarm in the same availability zone, as described at the beginning of this chapter, is easy because the private IP address and the public IP address stay the same automatically. You can use these IP addresses as an endpoint to access the EC2 instance, even after a failover.
When it comes to creating a virtual network in the cloud (VPC), you need to be aware of the following dependencies, as figure 13.6 illustrates:

You can’t keep the private IP address when using autoscaling to recover from a EC2 instance or availability zone outage. If a virtual machine has to be started in another availability zone, it must be started in another subnet. Therefore, it’s not possible to use the same private IP address for the new virtual machine, as figure 13.7 shows.

Figure 13.7 The virtual machine starts in another subnet in case of a failover and changes the private IP address.
By default, you also can’t use an Elastic IP as a public IP address for a virtual machine launched by autoscaling. The requirement for a static endpoint to receive requests is common, though. For the use case of a Jenkins server, developers want to bookmark an IP address or a hostname to reach the web interface. Different possibilities exist for providing a static endpoint when using autoscaling to build high availability for a single virtual machine, as described here:
-
Allocate an Elastic IP, and associate this public IP address during the bootstrap of the virtual machine.
-
Create or update a DNS entry linking to the current public or private IP address of the virtual machine.
-
Use an Elastic Load Balancer (ELB) as a static endpoint that forwards requests to the current virtual machine.
To use the second solution, you need to link a domain with the Route 53 (DNS) service; we’ve chosen to skip this solution because you need a registered domain to implement it. The ELB solution is covered in chapter 14, so we’ll skip it in this chapter as well. We’ll focus on the first solution: allocating an Elastic IP and associating this public IP address during the virtual machine’s bootstrap.
Execute the following command to create the Jenkins setup based on autoscaling again, using an Elastic IP address as static endpoint:
$ aws cloudformation create-stack --stack-name jenkins-multiaz-efs-eip
➥ --template-url https:/ /s3.amazonaws.com/
➥ awsinaction-code3/chapter13/multiaz-efs-eip.yaml
➥ --parameters "ParameterKey=JenkinsAdminPassword,
➥ ParameterValue=$Password"
➥ --capabilities CAPABILITY_IAM
You can find the CloudFormation template for this example on GitHub and on S3. Download a snapshot of the repository at https://github.com/AWSinAction/code3/archive/main.zip. The file we’re talking about is located at chapter13/multiaz-efs-eip .yaml. On S3, the same file is located at https://s3.amazonaws.com/awsinaction-code3/chapter13/multiaz-efs-eip.yaml.
The command creates a stack based on the template shown in listing 13.5. The differences from the original template spinning up a Jenkins server with autoscaling follow:
-
Adding the association of an Elastic IP to the script in the user data
-
Creating an IAM role and policy to allow the EC2 instance to associate an Elastic IP
Listing 13.5 Using an EIP as a static endpoint for a virtual machine
# [...]
ElasticIP:
  Type: 'AWS::EC2::EIP'                                                ①
  Properties:
    Domain: vpc
  DependsOn: VPCGatewayAttachment
IamRole:
  Type: 'AWS::IAM::Role'                                               ②
  Properties:
    AssumeRolePolicyDocument:
      Version: '2012-10-17'
      Statement:
      - Effect: Allow
        Principal:
          Service: 'ec2.amazonaws.com'                                 ③
        Action: 'sts:AssumeRole'
    Policies:
    - PolicyName: ec2
      PolicyDocument:
        Version: '2012-10-17'
        Statement:
        - Action: 'ec2:AssociateAddress'                               ④
          Resource: '*'
          Effect: Allow
    - PolicyName: ssm                                                  ⑤
      PolicyDocument:
        Version: '2012-10-17'
        Statement:
        - Effect: Allow
          Action:
          - 'ssmmessages:*'
          - 'ssm:UpdateInstanceInformation'
          - 'ec2messages:*'
          Resource: '*'
IamInstanceProfile:
  Type: 'AWS::IAM::InstanceProfile'                                    ⑥
  Properties:
    Roles:
    - !Ref IamRole
LaunchTemplate:
  Type: 'AWS::EC2::LaunchTemplate'                                     ⑦
  Properties:
    LaunchTemplateData:
      IamInstanceProfile:
        Name: !Ref IamInstanceProfile                                  ⑧
      ImageId: !FindInMap [RegionMap, !Ref 'AWS::Region', AMI]
      Monitoring:
        Enabled: false
      InstanceType: 't2.micro'
      NetworkInterfaces:
      - AssociatePublicIpAddress: true
        DeviceIndex: 0
        Groups:
        - !Ref SecurityGroup
      UserData:
        'Fn::Base64': !Sub |
          #!/bin/bash -ex
          trap '/opt/aws/bin/cfn-signal -e 1 --stack ${AWS::StackName}
          ➥ --resource AutoScalingGroup --region ${AWS::Region}' ERR

          # Attaching EIP
          INSTANCE_ID="$(curl
          ➥ -s http://169.254.169.254/latest/meta-data/instance-id)"  ⑨
          aws --region ${AWS::Region} ec2 associate-address
          ➥ --instance-id $INSTANCE_ID
          ➥ --allocation-id ${ElasticIP.AllocationId}
          ➥ --allow-reassociation                                     ⑩
          sleep 30

          # Installing Jenkins [...]
          # Mounting EFS volume [...]
          # Configuring Jenkins [...]

          # Starting Jenkins
          systemctl enable jenkins.service
          systemctl start jenkins.service
          /opt/aws/bin/cfn-signal -e $? --stack ${AWS::StackName}
          ➥ --resource AutoScalingGroup --region ${AWS::Region}
① Creates a static public IP address
② Creates an IAM role granting access to AWS services to the EC2 instance
③ The IAM role can be used only by EC2 instances.
④ The IAM policy allows access to the EC2 API action called AssociateAddress, which is used to associate an Elastic IP with an EC2 instance.
⑤ The other IAM policy enables access to the Session Manager, enabling you to open a terminal connection with the EC2 instance.
⑥ An IAM instance profile is needed to be able to attach an IAM role to an EC2 instance.
⑦ The launch template defines the blueprint for launching the EC2 instance.
⑧ Attaches the IAM instance profile defined when starting the virtual machine
⑨ Gets the ID of the running instance from the metadata service (see http://mng.bz/deAX for details)
⑩ The EC2 instance associates the Elastic IP address with itself by using the AWS CLI.
If the query returns output shown in the following listing, containing a URL, a user, and a password, the stack has been created and the Jenkins server is ready to use. Open the URL in your browser, and log in to the Jenkins server with user admin and the password you’ve chosen. If the output is null, try again in a few minutes:
$ aws cloudformation describe-stacks --stack-name jenkins-multiaz-efs-eip
➥ --query "Stacks[0].Outputs"
You can now test whether the recovery of the virtual machine works as expected. To do so, you’ll need to know the instance ID of the running virtual machine. Run the following command to get this information:
$ aws ec2 describe-instances --filters "Name=tag:Name,
➥ Values=jenkins-multiaz-efs-eip" "Name=instance-state-code,Values=16"
➥ --query "Reservations[0].Instances[0].InstanceId" --output text
Execute the following command to terminate the virtual machine and test the recovery process triggered by autoscaling. Replace $InstanceId with the instance from the output of the previous command:
Wait a few minutes for your virtual machine to recover. Because you’re using an Elastic IP assigned to the new virtual machine on bootstrap, you can open the same URL in your browser, as you did before the termination of the old instance.
|
|
Now the public IP address of your virtual machine running Jenkins won’t change, even if the running virtual machine needs to be replaced by another virtual machine in another availability zone.
Last but not least, we want to come back to the concept of an availability zone and dive into some of the details.
13.2.5 Insights into availability zones
A region consists of multiple availability zones. Each availability zone consists of at least one isolated data center. The identifier for an availability zone consists of the identifier for the region (such as us-east-1) and a character (a, b, c, ...). So us-east-1a is the identifier for an availability zone in region us-east-1. To distribute resources across the different availability zones, the AZ identifier is mapped to one or multiple data centers randomly when creating an AWS account. This means us-east-1a might point to a different availability zone in your AWS account than it does in our AWS account.
We recommend that you take some time to explore the worldwide infrastructure provided by AWS. You can use the following commands to discover all regions available for your AWS account:
$ aws ec2 describe-regions                          ①
{
  "Regions": [
    {
      "Endpoint": "ec2.eu-north-1.amazonaws.com",   ②
      "RegionName": "eu-north-1",                   ③
      "OptInStatus": "opt-in-not-required"          ④
    },
    {
      "Endpoint": "ec2.ap-south-1.amazonaws.com",
      "RegionName": "ap-south-1",
      "OptInStatus": "opt-in-not-required"
    },
    [...]
    {
      "Endpoint": "ec2.us-west-2.amazonaws.com",
      "RegionName": "us-west-2",
      "OptInStatus": "opt-in-not-required"
    }
  ]
}
① Lists all regions available for your AWS account
② The endpoint URL, used to access the EC2 service in the region
④ Newer regions require an opt-in.
Next, to list all availability zones for a region, execute the following command and replace $Region with RegionName of a region from the previous output:
$ aws ec2 describe-availability-zones --region $Region  ①
{
  "AvailabilityZones": [
    {
      "State": "available",
      "OptInStatus": "opt-in-not-required",
      "Messages": [],
      "RegionName": "us-east-1",                        ②
      "ZoneName": "us-east-1a",                         ③
      "ZoneId": "use1-az1",                             ④
      "GroupName": "us-east-1",
      "NetworkBorderGroup": "us-east-1",
      "ZoneType": "availability-zone"
    },
    {
      "State": "available",
      "OptInStatus": "opt-in-not-required",
      "Messages": [],
      "RegionName": "us-east-1",
      "ZoneName": "us-east-1b",
      "ZoneId": "use1-az2",
      "GroupName": "us-east-1",
      "NetworkBorderGroup": "us-east-1",
      "ZoneType": "availability-zone"
    },
    [...]
    {
      "State": "available",
      "OptInStatus": "opt-in-not-required",
      "Messages": [],
      "RegionName": "us-east-1",
      "ZoneName": "us-east-1f",
      "ZoneId": "use1-az5",
      "GroupName": "us-east-1",
      "NetworkBorderGroup": "us-east-1",
      "ZoneType": "availability-zone"
    }
  ]
}
① Lists the availability zones of a region
③ The name of the availability zone might point to different data centers in different AWS accounts.
④ The ID of the availability zone points to the same data centers in all AWS accounts.
At the end of the chapter, you will learn how to analyze resilience requirements and derive an AWS architecture from the results.
13.3 Architecting for high availability
Before you begin implementing highly available or even fault-tolerant architectures on AWS, you should start by analyzing your disaster-recovery requirements. Disaster recovery is easier and cheaper in the cloud than in a traditional data center, but building for high availability increases the complexity and, therefore, the initial costs as well as the operating costs of your system. The recovery time objective (RTO) and recovery point objective (RPO) are standards for defining the importance of disaster recovery from a business point of view.
Recovery time objective (RTO) is the time it takes for a system to recover from a failure; it’s the length of time until the system reaches a working state again, defined as the system service level, after an outage. In the example with a Jenkins server, the RTO would be the time until a new virtual machine is started and Jenkins is installed and running after a virtual machine or an entire availability zone goes down.
Recovery point objective (RPO) is the acceptable data-loss time caused by a failure. The amount of data loss is measured in time. If an outage happens at 10:00 a.m. and the system recovers with a data snapshot from 09:00 a.m., the time span of the data loss is one hour. In the example of a Jenkins server using autoscaling, the RPO would be zero, because data is stored on EFS and is not lost during an AZ outage. Figure 13.8 illustrates the definitions of RTO and RPO.

13.3.1 RTO and RPO comparison for a single EC2 instance
You’ve learned about two possible solutions for making a single EC2 instance highly available. When choosing the solution, you have to know the application’s business requirements. Can you tolerate the risk of being unavailable if an availability zone goes down? If so, EC2 instance recovery is the simplest solution, where you don’t lose any data. If your application needs to survive an unlikely availability zone outage, your safest bet is autoscaling with data stored on EFS, but this method also has performance effects compared to storing data on EBS volumes. As you can see, there is no one-size-fits-all solution. You have to pick the solution that fits your business problem best. Table 13.2 compares the solutions.
Table 13.2 Comparison of high availability for a single EC2 instance
If you want to be able to recover from an outage of an availability zone and need to decrease the RPO, you should try to achieve a stateless server. Using storage services like RDS, EFS, S3, and DynamoDB can help you to do so. See part 3 if you need help with using these services.
13.3.2 AWS services come with different high availability guarantees
It is important to note that some AWS services are highly available or even fault-tolerant by default. Other services provide building blocks to achieve a highly available architecture. As described next, you can use multiple availability zones or even multiple regions to build a highly available architecture, as figure 13.9 shows:
-
Route 53 (DNS) and CloudFront (CDN) operate globally over multiple regions and are highly available by default.
-
S3 (object store), EFS (network filesystem) and DynamoDB (NoSQL database) use multiple availability zones within a region so they can withstand a data center outage.
-
The Relational Database Service (RDS) offers the ability to deploy a primary-standby setup, called Multi-AZ deployment, so you can fail over into another availability zone with a short downtime, if necessary.
-
A virtual machine runs in a single availability zone. AWS offers a tool to build an architecture based on EC2 instances that can fail over into another availability zone: autoscaling.
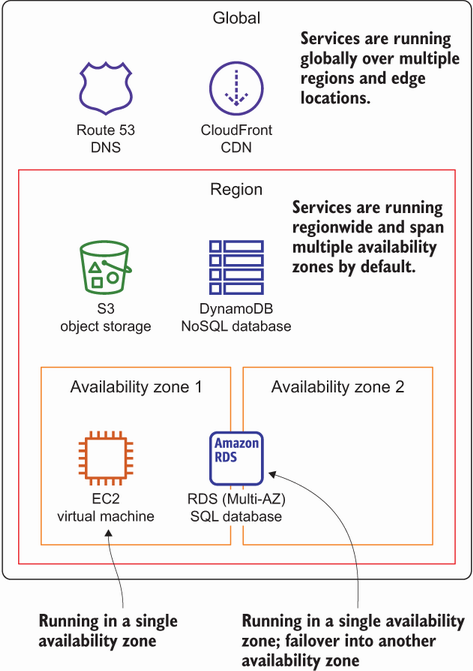
Figure 13.9 AWS services can operate in a single availability zone, over multiple availability zones within a region, or even globally.
When planning for failure, it is also important to consider the service-level objective (SLO) and service-level agreement (SLA) committed to by AWS. Most services define an SLA, which helps you as a customer when estimating the availability of an architecture. You can read them here: http://mng.bz/rn7Z.
When designing a system for AWS, you need to look into the SLA and resilience specifications of each building block. To do so, check the AWS documentation, which includes a section on resilience for most services.
Summary
-
A virtual machine fails if the underlying hardware or virtualization layer fails.
-
You can recover a failed virtual machine with the help of a CloudWatch alarm: by default, data stored on EBS, as well as the private and public IP addresses, stays the same.
-
An AWS region consists of multiple isolated groups of data centers called availability zones.
-
Recovering from a data center outage is possible when using multiple availability zones.
-
Use autoscaling to replace a failed virtual machine, even in the event of a data center outage. The pitfalls are that you can no longer blindly rely on EBS volumes and, by default, IP addresses will change.
-
Recovering data in another availability zone is tricky when stored on EBS volumes instead of managed storage services like RDS, EFS, S3, and DynamoDB.
-
Some AWS services use multiple availability zones by default, but virtual machines run in a single availability zone.