In this Chapter:
What Is Signal Flow and Why Is It So Important to Understand?
Setting Levels and Gain Structure
A/D Converters and Audio Interfaces
SIGNAL FLOW
What Is Signal Flow and Why Is It So Important to Understand?
A key component of audio engineering is to fully understand the analog model of signal flow, that is, how sound travels from the beginning to the end of its audio path. Much of audio engineering is troubleshooting different issues that occur during music production. Understanding signal flow can help you quickly pinpoint and solve a problem in order to keep a session running smoothly. When recording, the signal flow path starts where you plug in the microphone and ends at the speakers, or two-track recorder. Once this concept is understood, you will be able to hook up most gear, understand a patchbay, and troubleshoot yourself out of just about any mess! Knowing the analog model of signal flow will translate to almost any audio situation. Don't get frustrated if you don't fully understand the concept at first. It usually takes some experience and practical application to totally grasp signal flow.
To understand signal flow you will need to review and become familiar with the following terms:
Pre-amp
Mic
Line
Input ready
Tape send
Tape return
Stereo bus
I/O
A/D
Speakers/monitors
Audio Engineering 101. DOI: 10.1016/B978-0-240-81915-0.00008-4
© 2012 Timothy A. Dittmar. Published by Elsevier Inc. All rights reserved.
There are many ways to record music. Music can be recorded with a separate mixer and multi-track recorder, or on a laptop with an audio interface. You can even purchase an all-in-one mixer and recorder like an old school cassette, or digital four-track. Some engineers use a MIDI controller and software to create songs. It is even possible to record the band live from the soundboard. The following chapter will help you understand how to hook up your gear and figure out exactly what is going on along an audio path. The analog model is also valuable in understanding many aspects of digital recording and can be applied when running or recording live sound.
Recording involves three specific stages. The first stage is capturing the sounds with a mic. The next stage is storing the sounds in a recorder/line. The third stage is hearing the stored sounds on speakers or headphones. Always keep these specific stages in mind when you are recording.
Setting Levels and Gain Structure
The preamp is the first link in a recording chain when a microphone is used. Preamps sound best when run (turned up) between 10% and 90% of their potential. The sound quality is not all that good at maximum or minimum settings. If the preamp volume is set all the way down when recording a loud instrument, it will be necessary to pad the mic or preamp. This padding will allow the preamp to be turned up. Conversely, if the preamp is turned up all the way when recording a quiet instrument, a more sensitive mic will be needed in order to turn down the level.
Be aware of the input level sent to a digital recorder. If the level is too hot, the signal will clip in a displeasing way. Keep the levels below 0 dBFS. It is not imperative that the level be near zero if recording at 24-bit. Strive for setting recording levels somewhere between −20 and −6 dBFS. This will allow headroom for volume spikes, insuring that you won't damage the integrity of the audio signal. If using an analog recorder, store signals much hotter to increase the signal-to-noise ratio. Levels in the analog world can exceed zero and are typically set from −3 to +9.
Some audio devices or console settings are said to have “unity gain.” A device that has unity gain neither amplifies nor attenuates a signal. Most signal processors have unity gain; therefore, when a compressor or other device is inserted into an audio system, the overall gain of the system is not changed.
Analog-to-Digital Converters (A/D) and Audio Interfaces
A recording studio's collection of gear often includes both analog and digital components (learn more about analog and digital audio in Chapter 11). An analog-to-digital converter, abbreviated as A/D or D/A converter, allows these different devices to interact. These are usually rack-mounted units, but can also come in the form of a sound card or audio interface.
An A/D converter is an electronic device that converts an analog signal into its digital equivalent. The D/A converters do the opposite by converting digital information back into analog form. However, all converters perform both A/D and D/A functions. A/D converters come in varying price ranges and configurations. Many professionals would agree that the quality of the converter makes a huge difference in the quality of the sound. Speed and accuracy are two of the most important characteristics to consider when you are looking to purchase a good converter. Also, the better the converter, the less likely you will encounter problems such as quantization and jitter. Some A/D converters perform only A/D functions and do not include other options.
Audio Interfaces include A/D converters, pre-amps, and other record/mix controls. Audio interfaces are often paired with dedicated software, but many interfaces are not proprietary and can work with any software type. Pictured below are the two-channel Focusrite Interface and the TC Electronic Konnekt 6 Audio Interface
These particular units have mic preamps, phantom power, headphone outputs, monitor controls, USB 2.0, Optical ins/outs, MIDI ins/outs, S/PDIF ins and outs, and additional I/Os. Both of the aforementioned units are affordable options. Other brand name audio interfaces include: Apogee, Lynx, M-Audio, Behringer, Mackie, Digidesign, Presonus, and MOTU. The price ranges are anywhere from $50 a channel up to thousands per channel.
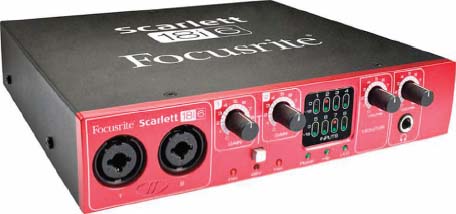
FIGURE 8.1

FIGURE 8.2
Analog Model of Signal Flow
 Signal Flow
When using a separate console and multi-track recorder signal flow can be represented by the following stages: Capturing sound, storing sound, and monitoring sound.
- CAPTURE. First, plug in the microphone.
- Turn up mic (preamp) and make sure that track(s) are armed and in input mode on the recorder.
- Send signal to an assigned track on the recorder. It doesn't matter if the recorder is real (multi-track tape machine) or virtual (digital representation such as Pro Tools). The fader often controls the amount of signal being sent to the recorder when a physical console is used. If a fader is not involved, the pre-amp output will dictate the amount of signal being sent to the recorder.
- STORE. Now that the signal has arrived at the recorder, the signal can be stored.
- The signal will return from the recorder to the console, often to a fader or monitor section.
- At this point, the signal usually has to be assigned to a bus to be heard. Most often the signal is sent to the L/R or stereo bus.
- MONITOR. Once the signal arrives at the stereo bus fader sound should be heard if the speakers are on and turned up.
- The signal from the stereo fader may also be sent to a two-track recorder during mix down.
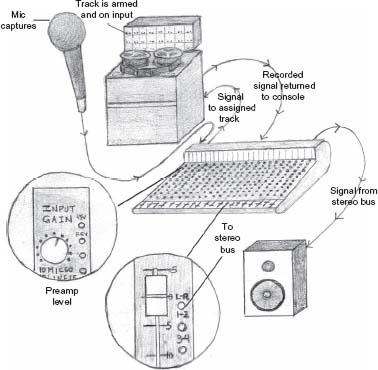
FIGURE 8.3
This path will never change when recording. The only thing that changes is what is being used for the tape machine/recorder. When mixing, steps 1–4 are eliminated and the audio path would start at step 5. When running live sound, you need to only feed the signal to the speakers to monitor.
Additionally, each one of these steps may be represented on a patchbay. If they are, here are a few ways they may be labeled:
■ (CAPTURE) Mic tie line, mic input
■ Mic output
■ Preamp in/out or direct out or tape send
■ Preamp out or direct out or tape send
■ (STORE) Multi-track in, tape in, Pro Tools in (or any other software-in)
■ Multi-track out, tape out, Pro Tools out (or any other software-out)
■ Fader in, console or line in, tape return
■ Bus out
■ Master fader in, stereo bus in
■ (MONITOR) Speaker out
Three levels of power correspond to the three stages of signal flow:
Mic level (CAPTURE)
Line level (STORE)
Speaker level (MONITOR)
Between each stage, an amplifier is required to boost the signal to the next power level.
Just like a microphone, a pre-amp can color the sound. For instance, tube pre-amps are popular with digital recording because they can make a thin, clean sound darker and thicker.
When you plug in a mic, you will likely be presented with the choice of “mic” level or “line” level. For a microphone, choose “mic,” and for an instrument or tape return, choose “line.”
Eventually, the signal works its way down the channel strip and is sent to be stored as a recorded track. This recorded track is stored at line level.
The stored signal is then returned to the console, or fader, to be monitored.
Monitoring is the final stage in the signal's path, and can be achieved by listening to speakers. Speakers are either self-powered or need an amplifier to boost the audio signal. Once the signal is boosted, it is at speaker level. This is the end of the signal path where we can relax and listen back to all of our hard work.
When recording, always picture the three main stages: capture, store, and monitor. Mic, line, and speaker are the hardware equivalents of these stages, respectively. This helps determine where the signal is and where it can be interrupted, if necessary, for manipulation and processing. Knowing these stages and corresponding levels will also make troubleshooting much easier.
APPLYING SIGNAL FLOW
Recording with a Laptop and Audio Interface
The analog model of signal flow directly relates to using a stand-alone recorder with a separate console or mixer. Understanding the analog model of signal flow is useful when working strictly in the box or with other recording setup configurations.
When recording instruments or vocals, signal flow always starts with plugging in the mic and adjusting the mic preamp.
Here is an overview of signal flow when recording with a laptop/computer audio interface:
(CAPTURE) Plug the mic into a preamp or audio interface such as an MBox.
Make sure that a cable is connected between the audio interface and the laptop.
Most interfaces use a USB 2.0 connection (see connectors Chapter 15).
Turn up the mic at the preamp.
(STORE) Send the signal to a recorder/computer. Make sure that the correct input and output is selected (often this is IN 1 and 2 and OUT 1 and 2/stereo bus selected in the software).
Return signal from the recorder/computer. This means selecting the correct bus or output.
(MONITOR) Turn up the monitor or main output knob on the interface.
If speakers or headphones are plugged in and turned up, the signal will be heard.
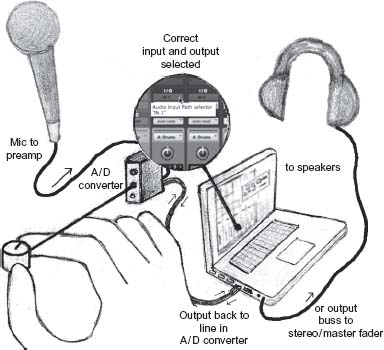
FIGURE 8.4
The two main differences between using a laptop/audio interface to record and using the traditional console/recorder setup are
- The audio interface's preamp captures the sound instead of the console's preamp.
- The computer stores the sound instead of a separate, stand alone analog or digital recorder.
Here are step-by-step details that can be followed when recording with most software types:
- Turn on the computer and audio interface.
- Open the software application.
- Set the session parameters, bit depth, sample rate, and audio file type.
- Determine the file name and destination where you will save the file. Very important! Pick an easy-to-remember location and be consistent with file naming so that you can retrieve files quickly.
- Create a new track and name it.
- Put the track into record pause (input ready) by pushing the red button.
- Make sure that the correct input is selected.
- Plug your mic into the interface and adjust the preamp. If no mic is required, import the audio track to a desired location.
- Make sure that the level isn't set too high or too low. Most interfaces will have a meter to check the mic level.
- Record the track.
- Unarm the track (take it out of input/record ready).
- If you can't hear the recorded sounds, select the correct output. Most default settings direct the output to the stereo bus or OUT 1 and 2.
- Turn up the monitor/volume and listen back. Monitor/volume adjustment is typically found on the audio interface.
 TIP
TIP
Make sure that you properly label and save tracks so they are easy to locate and identify. Don't leave audio tracks labeled Audio 1.0, Audio 1.1, etc. Many engineers label tracks by the mic or specific instrument that was recorded. Also, don't forget to back up your audio files to an external drive or other additional storage device.
How to Record Using an Analog or Digital Four- or Eight-Track All-In-One Recorder

FIGURE 8.5
Most analog and digital four-tracks pack a complete studio, minus the mic and speakers, into a powerful little recording unit. These all-in-one units provide multiple mic inputs with preamps. They also provide controls that allow you to adjust EQ, FX, and the volume of each track.
With an analog four- or eight-track you will likely record to a cassette. It certainly is not cutting edge, but it is an affordable way to learn about recording. Fostex and Tascam make classic units that provide a unique quality of sound. These units are completely portable and, if properly maintained, can last a long time. Use high-bias cassette tape and clean the tape heads regularly with 99% alcohol. Cassettes are still available for purchase online.
With a digital four- or eight-track, you are likely to record to a hard disc or flash drive. Some of the routing may be done digitally, but the concept is the same. Digital units are also likely to have some type of two-track built in to bounce down your mixes to stereo, like a CD recorder.
Here are step-by-step details that can be followed when recording with most all-in-one units:
- (CAPTURE) Plug in the mic. Make sure that mic, not line, is selected.
- Assign the track to a bus. You may have to use the pan knob. If you were to select the 1/2 bus, panning all the way left would select track 1, while panning all the way right would select track 2. With busses, if you pan all the way left, it will assign the signal to the odd numbered tracks. If you pan all the way right, it will assign the signal to the even-numbered tracks.
- Turn up the mic at the preamp (likely on the top of the channel).
- If the correct bus is assigned, the fader is up, and the track is armed, you should see the level at the stereo fader or meter. Make sure that the stereo fader and monitor volume are up at this point in order to hear the signal.
- (STORE) Record the signal when you are ready.
- (MONITOR) To listen back to the recorded sound, you will likely flip the channel back to “line” and unarm the track.
With most analog recorders, you will need a two-track recorder for mix down, such as an Alesis Masterlink, or stand alone CD recorder. This will allow you to combine the four- or eight-tracks down to two-tracks (stereo left and right), and store them.
Recording a Live Performance
Recording a live performance can be tricky. In a live recording situation, there is typically very little control over acoustics and a host of other issues may arise. You also may have to piggyback off another system or engineer's EQ settings, which may or may not be sufficient.
One of the easiest ways to get a live recording is to take a pair of stereo outputs from the main mixing console, known by engineers as “getting a split off the board.”
Stereo outputs can be recorded to a variety of two-track recorders or straight to your laptop. One potential issue is that your mix will end up being whatever the house sound person has mic'd. A smaller club or venue may not mic the instruments because they are loud enough for the room. As a result, your mix will most likely end up vocal heavy (vocals will be mic'd), and be lacking louder instruments (electric guitar, bass) that were not mic'd by the sound person. Another potential issue is that you are at the mercy of the venue's sound person to set the levels properly.

FIGURE 8.6
Another way to record a performance is to place a pair of stereo mics in a good spot and record to your laptop or stereo recorder. The problem with this method is in finding an optimal spot in the room for mic placement. If the mics are placed too far away, you will pick up more of the unclear ambient wash and less of the direct, clear audio. If the mics are placed too close, you may not pick up all the instruments equally. Show up early and scout out the venue or club prior to recording.
TIP
Try using the XY stereo miking technique when recording a live performance. This technique was discussed in Chapter 5 and demonstrated in Video 3.
Many engineers bring their own mobile recording rigs to record live performances. A few engineers have mobile trucks or vans set up as complete studios. There are even a few folks out there recording live music out of the back of their cars with minimal recording equipment.
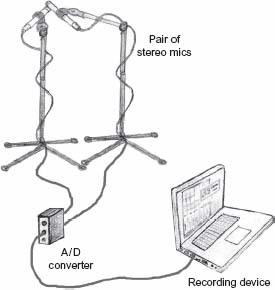
FIGURE 8.7
Frequently, people record live bands straight to laptop computers. Keep in mind that this is a live situation. A computer may crash or lockup, which can be a very stressful situation without a backup recorder.
Here are step-by-step details that can be followed when recording a live performance to your laptop or other recorder:
- (CAPTURE) Place stereo mics in a good spot to capture the overall sound.
- Plug mics into a preamp or audio interface.
- Assign mics to inputs and ready tracks by placing them into input or record pause mode on your recorder or laptop.
- Turn up the mics and monitor the signal.
- (STORE) Record the signal when ready.
- (MONITOR) Unarm tracks and listen back.
- Headphones, not speakers, are used to monitor in live situations.
Venue management, the house sound person, or various setup limitations will determine the location where you will monitor and record sound. Common areas to setup are next to front of house (FOH) sound or to the side of the stage.
When recording a live performance, make sure that you stay out of the way of the other professionals working on the production. Try to be as transparent as possible. Do not take over the house engineer's space or adjust the house engineer's controls. Most of the engineers are willing to work with you if you are courteous and don't overstep your boundaries in their venue.
If you do not completely grasp signal flow at this stage, do not be discouraged! You may initially have to mimic what you have been taught to get a session going. Eventually, you will get the picture. Until then, memorize the steps and any patching needed to record, overdub, and mix. Listen to and observe others that have more audio experience. When you do get to the point where you understand exactly how audio is traveling between any two points, you will have learned an important concept that will help propel you to the next level.