
7. Tiles and Toasts
Windows 8 applications can remain alive and connected even when they are not running in the foreground. This is obvious when you look at your Windows 8 Start screen. Unlike the boring collection of static icons you are probably used to, the Windows 8 Start screen is alive and animated. The weather tile provides the current temperature and an image that indicates weather conditions at a glance. Social networking tiles show the latest tweets directed your way. Email tiles display the number of unread emails and scroll the subjects. If you own a Windows Phone, you are likely already familiar with the concept of active tiles and use them on a daily basis.
All of these features are delivered through tiles. Tiles are baked into the Windows Runtime. The APIs exist to easily deliver information in a variety of formats and templates. More importantly, you can update tiles and send notifications even when your application is not in the foreground or actively running. This enables you to keep the application alive and relevant at all times.
Basic Tiles
You are already familiar with basic tiles. The package manifest for your application on the Application UI tab allows you to specify a 150 x 150 pixel square logo and a 310 x 150 large logo. This is the static or default tile.
The wide logo is optional and when provided enables choosing between a smaller or wider icon. The wider icon is useful because it gives you more surface area for providing information when you update the tiles. You can see an example of defining these tiles in Figure 7.1.

Figure 7.1. Defining the logos for tiles
Both types of tiles support live updates. Live tiles are updated either from your application or from the cloud and overwrite the basic template. They can overlay the basic template with simple information like badges and badge counts or completely replace the basic template. There are a variety of templates to choose from with image, text, and combination formats.
Live Tiles
Live tiles provide you with the ability to create a dynamic experience for your application, even when it is not running. The Windows Runtime makes it easy for you to define a tile format and publish information to that tile. It’s as easy as providing some simple XML and calling a helper class. The most difficult part of the process is choosing which tile format to use.
You can download a sample application that provides a list of the available tile formats online at http://code.msdn.microsoft.com/windowsapps/App-tiles-and-badges-sample-5fc49148.
Download the source, compile the application, and run it. You will be presented with several different scenarios. Select the fifth scenario, and you can cycle through the available templates and specify images and text to update the tile. Figure 7.2 shows a snapshot of the images provided with the sample to give you an idea of the variety of formats that are available. The sample also comes with a set of tile extensions that you can reuse to make it easier to set up tiles and badges.

Figure 7.2. Various tile templates
The predefined templates include images, text, and combinations of images and text. The “peek” templates provide animations and swap between one format and the other. With each template, you specify the text and the path to the image (if the template supports images) in an XML document and pass that document to the Windows Runtime.
A detailed listing of each tile template, a sample image, and the associated XML is available online at http://msdn.microsoft.com/en-us/library/windows/apps/hh761491.aspx.
Download the updated Wintellog2 application from the book website at http://windows8applications.codeplex.com/.
For this chapter, the application has been updated to provide a few new key features, including the following:
• Introduction of the ImageUriManager class for better resolution of images for each blog post
• Inclusion of application bars to browse images, jump back to home, and open posts in a browser
• Addition of Semantic Zoom to the main page to quickly access various blogs
The application is still missing some key features such as integration with Search and Share charms. These will be implemented for Chapter 8, Giving Your Application Charm. In this chapter, the application has also been enhanced to provide badges and tiles. It provides a new feature to pin either a blog or a specific post to the Start menu. The tiles are updated from the SplashPage class.
After loading the list of posts from cache and the Internet, the application queries the five most recent posts and sorts them in ascending order by post date:
var query = from i in
(from g in list
from i in g.Items
orderby i.PostDate descending
select i).Take(5)
orderby i.PostDate
select i;
There are two ways you can update tiles. The default mode will always replace the current tile with the most recent tile you specify. Another approach is to provide tiles to a notification queue. When the queue is enabled, up to five of the most recent updates will be cycled for the tile. This allows you to provide multiple pieces of content, such as the titles of unread emails or in the case of the sample application, the titles of the five most recent posts.
The TileUpdateManager class is provided by the Windows Runtime and used to configure tiles. The following code enables the notification queue:
TileUpdateManager.CreateTileUpdaterForApplication()
.EnableNotificationQueue(true);
The query is iterated for each post, and two tiles are created using the extension methods provided by the Windows 8 Code Samples. A square tile allows the image to “peek” in and wraps the title text:
var squareTile = new TileSquarePeekImageAndText04();
squareTile.TextBodyWrap.Text = item.Title;
squareTile.Image.Alt = item.Title;
squareTile.Image.Src = item.DefaultImageUri.ToString();
Wide tiles should always specify a square tile as a fallback in case the user opts to use the smaller tile size (to change the size of a tile, simply select it on the start screen and the option will appear to make it wider or smaller depending on the current size and the sizes the applications supports). The application bar for this action is shown in Figure 7.3.
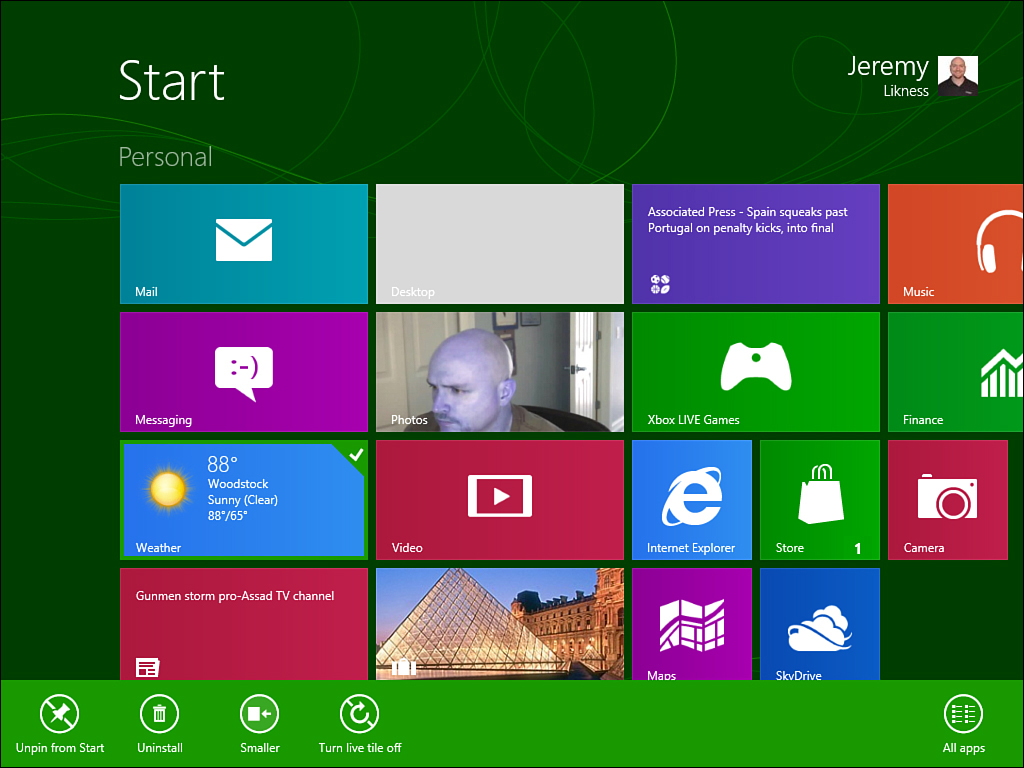
Figure 7.3. Specifying tile options on the Start screen
Here is the code for the wide tile that references the square tile in SplashScreen.xaml.cs:
var wideTile = new TileWideSmallImageAndText03();
wideTile.SquareContent = squareTile;
wideTile.Image.Alt = item.Title;
wideTile.Image.Src = item.DefaultImageUri.ToString();
wideTile.TextBodyWrap.Text = item.Title;
To see how the extension classes help generate the XML for the tiles, place a breakpoint after the wide tile is created on the line that generates the notification:
var notification = wideTile.CreateNotification();
Run the application and allow it to hit the breakpoint. Open the Immediate Window by navigating to Debug![]() Windows
Windows![]() Immediate Window or holding down Ctrl+Alt+I. This is a window that allows you to enter statements and variables to evaluate as the application is running. In the Immediate Window type wideTile (case sensitive) and press Enter. You will see the contents of the class dumped, as shown in Figure 7.4. You can use
Immediate Window or holding down Ctrl+Alt+I. This is a window that allows you to enter statements and variables to evaluate as the application is running. In the Immediate Window type wideTile (case sensitive) and press Enter. You will see the contents of the class dumped, as shown in Figure 7.4. You can use wideTile.GetContent() to show only the XML.
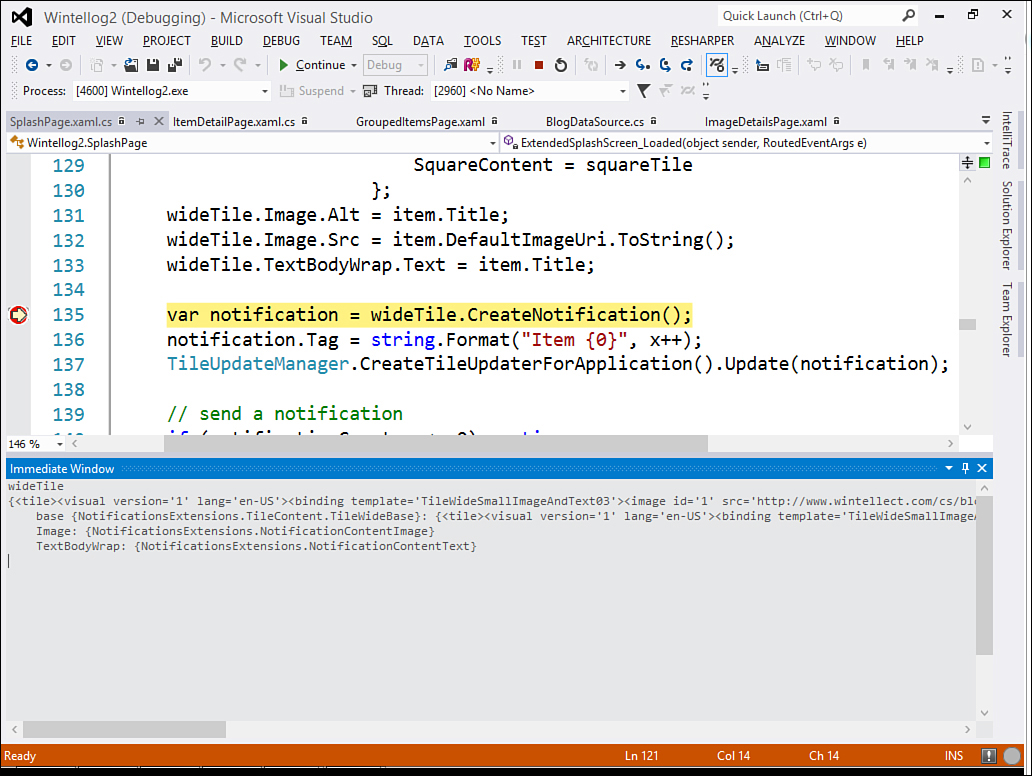
Figure 7.4. Using the Immediate Window in debug mode
The contents of the tile include the XML snippet shown in Listing 7.1.
Listing 7.1. The XML for a Wide Tile with a Square Tile
<tile>
<visual version='1' lang='en-US'>
<binding template='TileWideSmallImageAndText03'>
<image id='1' src='http://lh6.ggpht.com/-V8-lch3ip3U/T33GescOOHI/AAAAAAAAAps/vuQXH0JYqz0/slbookcover%25255B3%25255D.png?imgmax=800'
alt='Designing Silverlight Business Applications Officially Released'/>
<text id='1'>Designing Silverlight Business Applications Officially Released</text>
</binding>
<binding template='TileSquarePeekImageAndText04'>
<image id='1' src='http://lh6.ggpht.com/-V8-lch3ip3U/T33GescOOHI/AAAAAAAAAps/vuQXH0JYqz0/slbookcover%25255B3%25255D.png?imgmax=800'
alt='Designing Silverlight Business Applications Officially Released'/>
<text id='1'>Designing Silverlight Business Applications Officially Released</text>
</binding>
</visual>
</tile>
As you can see, the XML is straightforward. It contains bindings that relate to the various tile sizes. The binding specifies the template and then the contents for the template. Images and text tags have identifiers to support tiles that allow for multiple entries. There are three possible ways to provide images.
Images on the Web are referenced with the http:// prefix. You can easily reference images embedded in the package for your Windows 8 application by using the ms-appx:/// prefix (for example, the logo for the Wintellog application can be referenced as ms-appx:///Assets/Logo.png). Finally, images you store in local storage can be referenced using the ms-appdata:///local/ prefix. You can download images for offline access and reference them in this fashion. The maximum size for images used in tiles is 150 kilobytes.
Choosing the correct tile size is based on a few parameters. The square tile is intended for short summary messages and infrequently updated notifications. The wide tile size is recommended when your application has interesting notifications that are updated frequently. This wider size is intended to convey the “connected and alive” Windows 8 theme.
Other guidelines for using tiles from Microsoft include
• Don’t use multiple tiles to link to subareas in your application—it is more appropriate to use a secondary tile (these are discussed later).
• Don’t use tiles to provide extras or accessories for your application.
• Don’t create a special tile for troubleshooting or configuring settings—use the Settings charm for this (you’ll learn more about this in Chapter 8).
• Don’t design your tile with a call to action to launch the application—this is implied by the tile’s availability on the Start screen.
• Don’t advertise using tiles.
• Don’t embed information that is relative to the current time in a tile update, like “10 minutes ago,” because the content will become stale; instead use absolute dates and times.
To read Microsoft’s complete set of Windows 8 design guidelines for tiles, visit http://msdn.microsoft.com/en-us/library/windows/apps/hh465403.aspx.
When you turn on notification queuing, there is an extra property to set on the tile. This is the tag property. Tags are used to uniquely identify “slots” in the notification queue. Using tags, you can update the tile that appears in a given slot by submitting a new tile with the same tag. The sample application defines five unique slots that are always updated with the five most recent posts.
Badges
In addition to live tiles, the Windows Runtime supports the concept of badge notifications. Badges are small icons that appear on the surface of the tile. They are typically used to convey summary or status information. There are two types of badge notifications: a number (for example, showing the count of new items) and a glyph (for example, showing a status like active or new or warning). Badges can overlay both square and wide tiles and will appear in the lower–right corner of the tile except when right-to-left languages are used.
The reference application provides badges to indicate new posts. The first time you run the application, you should see the badge count for all of the posts that were downloaded. After that, you may want to test the badge functionality even when new posts aren’t available. To do this, simply find the local storage for the application (you learned how to do this in previous chapters) and navigate into the folder for any of the groups. Delete a few of the items in the folder to force the application to reload the posts. When you launch the application the next time, it will pull down those items again and update the badge to indicate the new items.
The numeric badge can display any number from 1 through 99. In the reference application, the badge is used to display a count of new posts that were downloaded since the last time the application was launched. First, a count of new items is calculated. The range is capped at 99:
var totalNew = list.Sum(g => g.NewItemCount);
if (totalNew > 99)
{
totalNew = 99;
}
The badge is then updated using the extension methods from the Windows 8 Code Samples under the NotificationExtensions folder. If new items exist, the numeric-style badge is sent:
if (totalNew > 0)
{
var badgeContent = new BadgeNumericNotificationContent(
(uint)totalNew);
BadgeUpdateManager.CreateBadgeUpdaterForApplication()
.Update(badgeContent.CreateNotification());
}
The XML for this is simple and straightforward. This is the XML for a badge showing a 3 count:
<badge version="1" value="3"/>
If no new items exist, the badge is simply cleared:
BadgeUpdateManager.CreateBadgeUpdaterForApplication().Clear();
You can also provide badges that are glyphs. You can use the BadgeGlyphNotificationContent class for this. You can only pick one of the pre-existing status glyphs provided by the Windows Runtime:
• None
• Activity
• Alert
• Available
• Away
• Busy
• New Message
• Paused
• Playing
• Unavailable
• Error
You can see sample images for each glyph online at http://msdn.microsoft.com/en-us/library/windows/apps/hh761458.aspx.
Microsoft also provides the following guidelines for badges:
• Numeric badges should only be used when the item count is meaningful; if you are likely to have a high number count, consider using a glyph instead.
• The numbers on badges should be relative to the last time the user launched the application rather than when the application was first installed.
• If your application supports different types of notifications, it makes sense to use the glyph for new messages rather than providing an ambiguous count.
• Only use glyphs when the status the glyph represents is likely to change.
Badges work in conjunction with live tile updates. The reference application will scroll through the most recent posts while also showing a badge that indicates the number of new posts. The combination of new content and a badge to indicate it exists is a common scenario. One change you could make is to show only the new posts instead of the five most recent to align the tile content with the badge count.
Secondary Tiles
Launch the reference application and navigate to a group or item. Open the application bar, and you will see an option to Pin to Start, as shown in Figure 7.5.
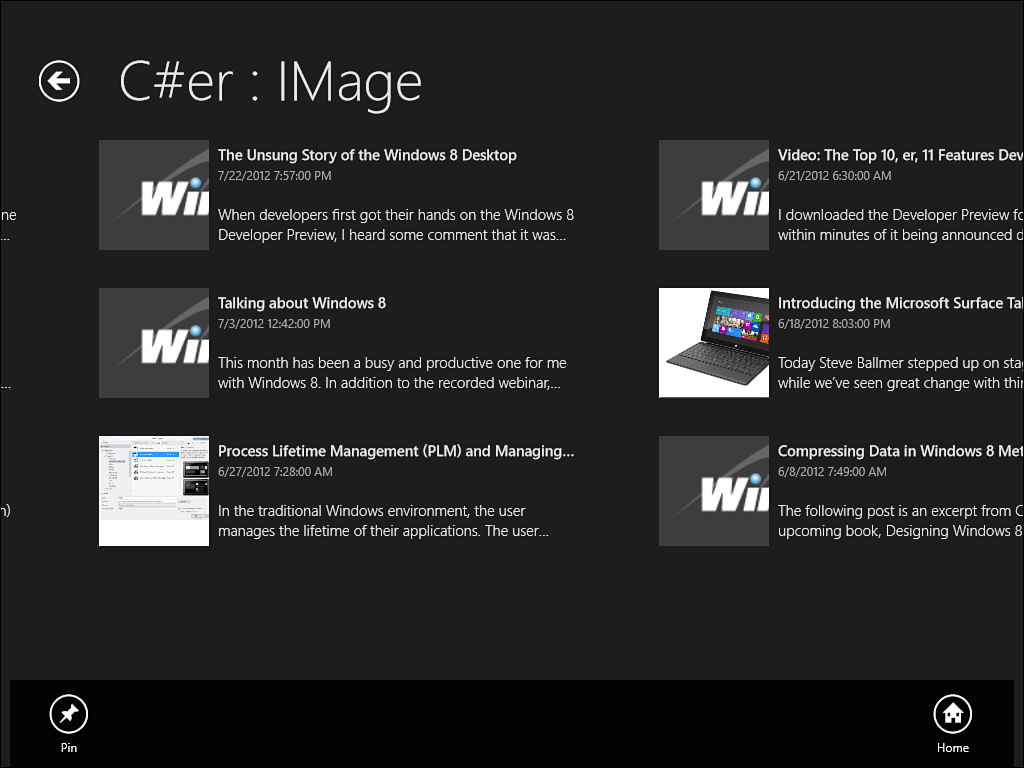
Figure 7.5. The option to pin a blog to the Start menu
When you select that option, a new tile will appear on the Start menu. It shows the application logo with the title of the blog. When you click the tile, the application will load and then navigate directly to that blog. The same behavior will occur when you pin an item: Launching the tile will take you directly to that item.
The additional tiles are referred to as secondary tiles because they provide new ways to launch the application outside of the main tile. They are used to promote interesting content or deep links into a location within the application. You are not able to create secondary tiles programmatically. Only the user can create tiles, so the command to pin the item will initiate a dialog that allows the user to create the tile. Users are also able to easily remove the tile from the start screen by selecting the tile and choosing the Unpin from Start command in the application bar.
Secondary tiles must use the standard square logo but can optionally choose the wide logo format. They are capable of showing notifications and badges (these should be filtered specifically to the content; for example only new items for that specific blog). Secondary tiles are automatically removed when the application is uninstalled.
When you click the command to pin a group, the following code is executed:
var group = DefaultViewModel["Group"] as BlogGroup;
var title = string.Format("Blog: {0}", group.Title);
App.Instance.PinToStart(sender,
string.Format("Wintellog.{0}", group.Id.GetHashCode()),
title,
title,
string.Format("Group={0}", group.Id));
The first line finds the current group, and the second line creates a title. The PinToStart method is a helper method that makes it easy to prompt the user to create the secondary tile. It takes in the UI element (the button on the application bar) that the tile was requested from, a unique identifier for the tile (in this case, we use the hash code for the group’s identifier), a short name, a display name, and a set of arguments. The arguments are stored with the tile and passed to the application when it is launched. This allows the application to determine where to navigate or deep link when it is launched.
The helper method creates a few links to embedded assets for the various logo sizes:
var logo = new Uri("ms-appx:///Assets/Logo.png");
var smallLogo = new Uri("ms-appx:///Assets/SmallLogo.png");
var wideLogo = new Uri("ms-appx:///Assets/WideLogo.png");
Next, the secondary tile object is created, and some properties are set. The Windows Runtime provides a class in the Windows.UI.StartScreen namespace for this:
var tile = new SecondaryTile(id, shortName, displayName, args,
TileOptions.ShowNameOnLogo | TileOptions.ShowNameOnWideLogo,
logo);
tile.ForegroundText = ForegroundText.Dark;
tile.SmallLogo = smallLogo;
tile.WideLogo = wideLogo;
The last bit of code takes the parent element that the tile was requested from and computes the area on the screen. This is passed to the special dialog, referred to as a flyout, as information to help arrange where it will appear. A flyout is simply a lightweight dialog that appears in context and dismisses easily, similar to using the Charm Bar. A method on the tile is called to request the user to confirm placing it on the Start screen.
var element = sender as FrameworkElement;
var buttonTransform = element.TransformToVisual(null);
var point = buttonTransform.TransformPoint(new Point());
var rect = new Rect(point,
new Size(element.ActualWidth, element.ActualHeight));
await tile.RequestCreateForSelectionAsync(rect,
Windows.UI.Popups.Placement.Left);
You can see the result of tapping the Pin to Start button in Figure 7.6. Note the flyout appears on the left side above where the user tapped. The user is also able to edit the text that will appear on the tile before pinning it. Flyouts are an important element of the Windows 8 UI. Although there are no built-in controls for flyouts, Tim Heuer has released a toolkit named Callisto that includes an implementation of the control that you can reuse in your own projects, which can be found at https://github.com/timheuer/callisto.
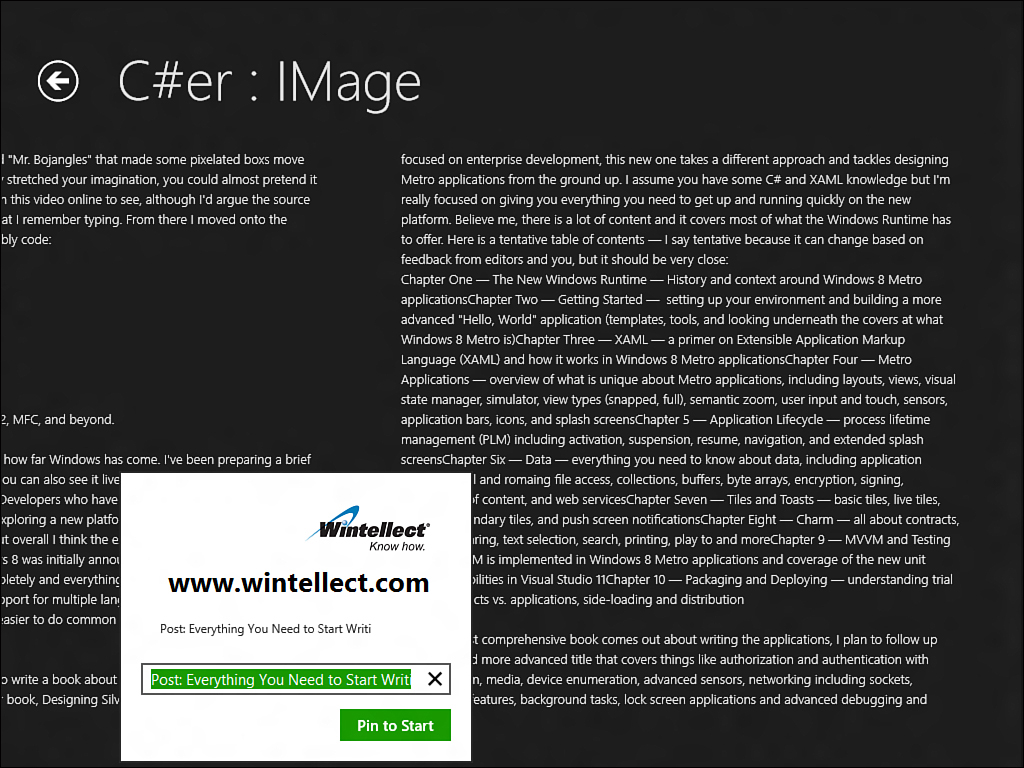
Figure 7.6. The flyout dialog for pinning a secondary tile
In this case, the arguments passed to the tile include the group and the identifier for the group, like this:
Group=http://feeds2.feedburner.com/CSharperImage
When the extended splash page is done loading all of the content, it checks the arguments passed into the application. If the arguments start with the text Group, the code parses out the identifier for the group and then calls the group detail page with the ID:
if (_activationArgs.Arguments.StartsWith("Group"))
{
var group = _activationArgs.Arguments.Split('='),
rootFrame.Navigate(typeof (GroupDetailPage), group[1]);
}
The application responds to secondary tiles by parsing the launch arguments. If you try to set a breakpoint and modify those arguments, you will find they are read-only. So how can you debug a secondary tile? It is easy to debug an application that you launch, whether from the primary tile or a secondary tile. First, right-click the Windows 8 application in the solution explorer and choose Properties or press Alt+Enter. This will open the properties dialog for the project. Navigate to the Debug tab and check the box next to Do not launch, but debug my code when it starts. This is shown in Figure 7.7.
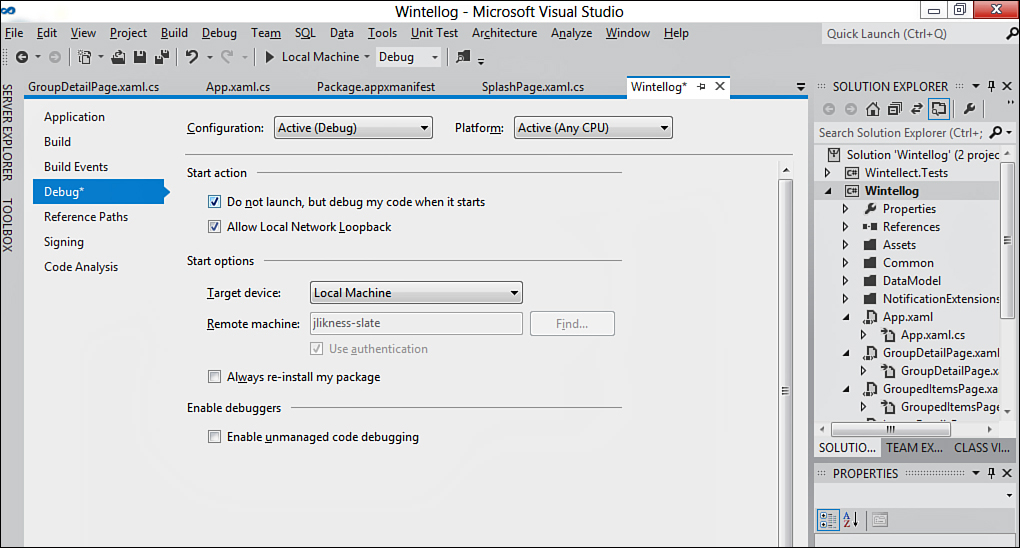
Figure 7.7. Setting the application to debug without automatically launching
Now you can press F5 to start debugging; the debugger will start, but the application will not launch. Press the Windows Key to open the Start screen and navigate to the secondary tile. Tap the tile, and the application will launch. The debugger will attach to the process automatically and stop at any breakpoints you have set. You will now be able to view the arguments passed in from the secondary tile and troubleshoot the application as needed in that context.
Toast Notifications
Toast notifications enable you to send transient messages outside of the application. Although they can be initiated from within the application, a far more common use is from an external source. In the next section, you learn more about push notifications and how to update your application even when it is not running.
The user has complete control over toast notifications. When the user activates the Settings charm, he is always presented with a Permissions command. Selecting this command results in options similar to the ones you see in Figure 7.8.
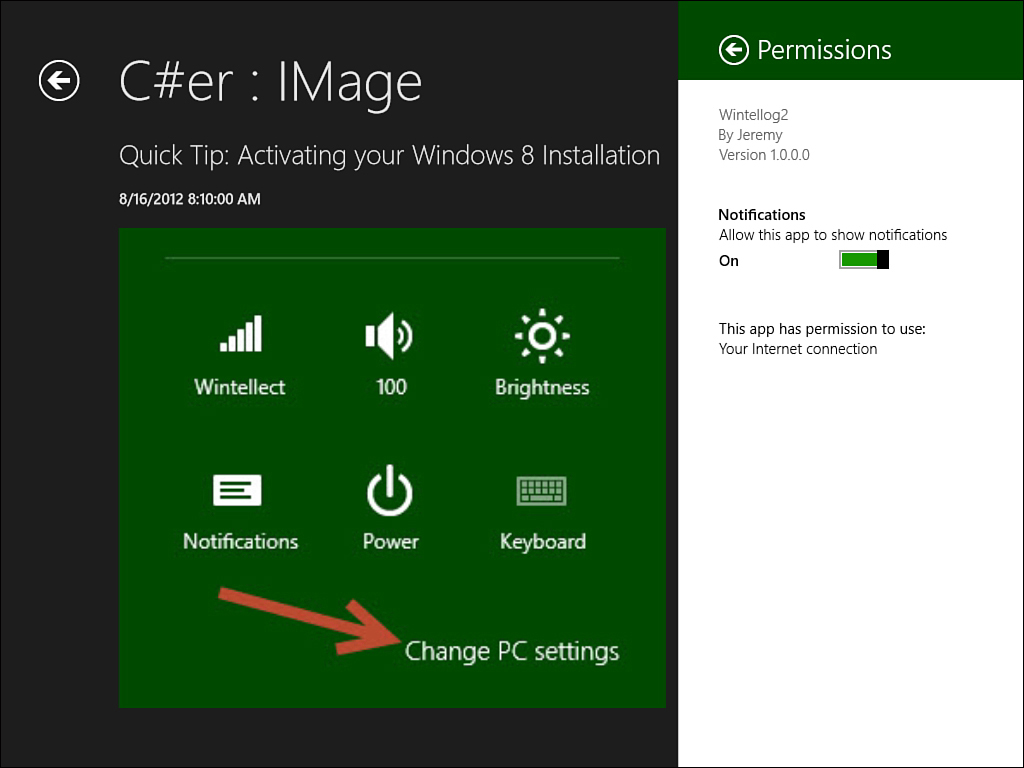
Figure 7.8. The user-controlled setting for notifications
Notifications can be sent immediately or scheduled for later use. For example, a calendar application might set a reminder for an event. The notification can be scheduled from within the application but will still appear even if the application is no longer running. The reference application takes advantage of this to schedule toast notifications for new items. This is not how the application would typically be designed but is included as a way to illustrate how toast notifications work.
The first step to creating a toast notification is to enable toast capabilities in the application. To do this, open the Package.appmanifest and navigate to the Application UI tab. Make sure the setting for Toast Capable is set to Yes. This setting is shown in Figure 7.9.
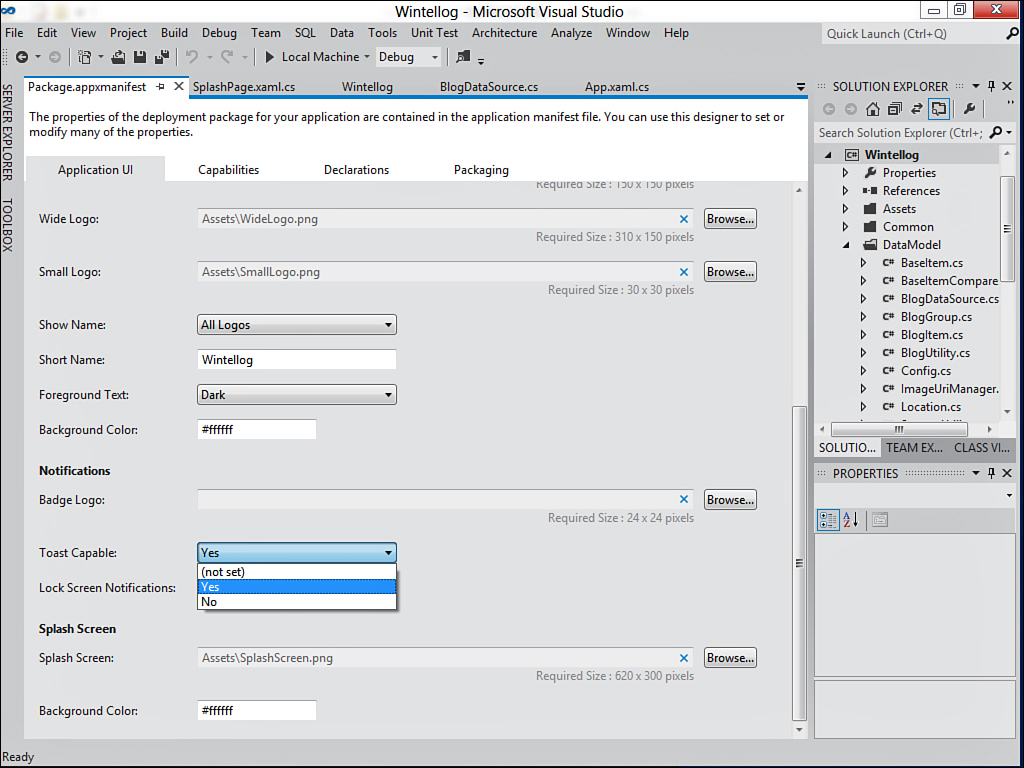
Figure 7.9. Enabling notification for an application
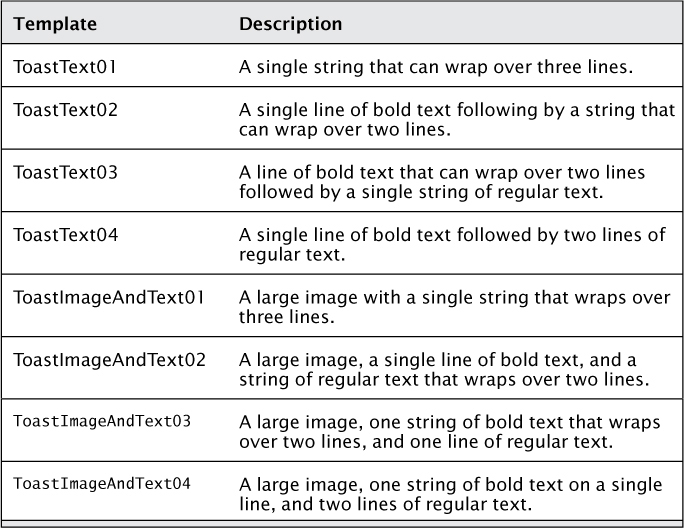
When you have enabled notifications, you can build your toasts. The reference application uses the extensions provided by the Windows 8 Code Samples mentioned earlier in this chapter. There are eight templates provided for notifications. Table 7.1 lists the templates and describes how they appear.
In the SplashPage code-behind, you can see the code to create a toast notification. Although this code would most likely live on a server used to push notifications to the client, it is contained here within the application for illustration purposes. The code creates a template and sets the values used by the template:
var notificationTemplate =
ToastContentFactory.CreateToastImageAndText02();
notificationTemplate.TextHeading.Text = item.Group.Title;
notificationTemplate.TextBodyWrap.Text = item.Title;
notificationTemplate.Image.Src = item.DefaultImageUri.ToString();
notificationTemplate.Image.Alt = item.Title;
Notifications are similar to secondary tiles because they can also pass arguments to the application for context. The Launch property is used to set the arguments. The reference application uses the same format for notifications as it did for secondary tiles:
notificationTemplate.Launch = string.Format("Item={0}", item.Id);
This takes advantage of the fact that the code to process the parameters already exists. If you want to distinguish between a notification and a secondary tile launch, you can add additional information to the arguments to parse when they are received. The ToastNotificationManager provides the functionality you need to schedule toasts. It will create an instance of the notification object that you can query to see if toasts are enabled:
var notifier = ToastNotificationManager.CreateToastNotifier();
if (notifier.Setting == NotificationSetting.Enabled) { ... }
If you want to know why notifications are not enabled, you can query the Setting enumeration that provides the following values:
• Enabled—Toasts are enabled, and notifications will be sent/received.
• DisabledByGroupPolicy—An administrator has disabled all notifications through a group policy.
• DisabledByManifest—The application did not declare toasts by setting Toast Capable to Yes.
• DisabledForApplication—The user has explicitly disabled notifications for this application.
• DisabledForUser—The user or administrator has disabled all notifications for the user on the device.
When you have established that toasts are allowed and created the template, you can simply generate the notification from the template and show the toast:
var toast = notificationTemplate.CreateNotification();
notifier.Show(toast);
If you want to schedule the notification instead (as the reference application does), you simply specify a time for the toast to display and create a ScheduledToastNotification. Instead of calling Show, you pass the instance to the AddToSchedule method:
var toast = notificationTemplate.CreateNotification();
var date = DateTimeOffset.Now.AddSeconds(30);
var scheduledToast = new ScheduledToastNotification(toast.Content,
date);
notifier.AddToSchedule(scheduledToast);
To test the toast notification, you can navigate to the local storage for the application and delete one or two posts. Run the application. When the application is done initializing and displays the first page, close it (drag it from top to bottom or press Alt+F4). Wait about 30 seconds, and you should see the toast display. You can either dismiss the toast or click it. Because the toast was configured with parameters for the item it shows, clicking the toast will launch the application and take you to the specific item shown by the notification. Figure 7.10 shows several notifications appearing over the weather application.

Figure 7.10. Toast notifications overlaying the weather application
To dismiss the toast, you can swipe the toast from the screen, hover the mouse pointer over the top right to see a close button, or wait and it will eventually go away. Tapping or clicking on the toast will bring you into the application.
When the application is not running, the toast notification will launch the application and pass the specified arguments. If the application is running when the notification appears, it is possible to respond to user interactions. You can perform logic when the user taps the notification by hooking into the Activated event on the notification instance you receive when you call CreateNotification. When the toast is dismissed, whether by the user or due to timing out, you can respond by hooking into the Dismissed event. The event arguments provide a reason for the toast being dismissed.
You can also change the duration and content of the audio that is played by the toast. This is done by setting the Audio.Content property on the template. Sources include the tone for instant messages, alarms, calls, mail, reminders, SMS, and silent. Setting the Duration property to ToastDuration.Long will cause the toast to display for 25 seconds rather than the default period of 7 seconds.
All of the examples for tiles and toasts so far have been demonstrated from within the application itself. This is not always practical because there are many times you will want to update the application when it is not running. Weather applications may update the tiles as the weather changes and send toasts when there are weather alerts. How can you keep the application connected and alive when it is not running? The answer is with push notifications.
Windows Notification Service
The Windows Notification Service (WNS) enables the delivery of tile and toast notifications over the Internet. This is how you can keep your application current and fresh, even when it is not running. The service handles all of the communication with your application and even takes care of tricky situations such as when the device is behind a firewall. It is designed to scale to millions of users and, best of all, is a free service for your application.
There are five steps involved in using the WNS service. These steps are the same whether you wish to send tiles, toasts, or simple badge updates. The steps are illustrated in Figure 7.11.
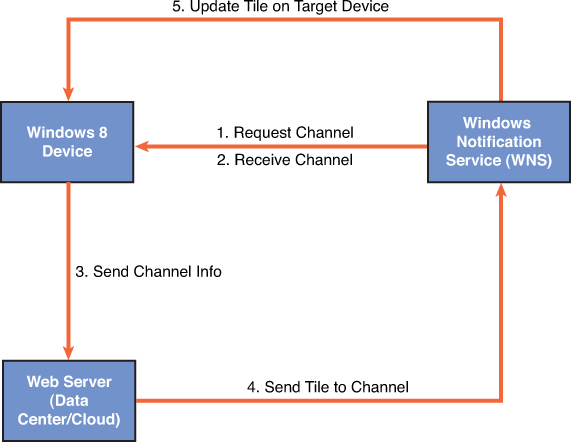
Figure 7.11. The steps involved with using the Windows Notification Service
The steps can be broken down as follows:
1. The application requests a channel. This is a unique URI used to communicate with the specific application on a specific Windows 8 device.
2. The WNS assigns a channel and sends this information back to the application.
3. The application must now communicate this channel to the host that will manage updates—most often this is a web server you or your company creates to track channels and send updates. Often you will send the channel URI with a unique identifier for the device so you can tie updates back to the original device.
4. When your host service wishes to send an update, it posts the content for the update to WNS using the channel URI that was provided.
5. The Windows 8 device maintains an ongoing communication link with WNS that will work even from behind a firewall. When an update is present, it will acquire the update and use it to update the badge or tile or to generate a notification.
The ongoing link is maintained by the application, but it can expire after a time. It is a good practice to consistently establish and store the link each time the application is launched or resumed. This will ensure the service has the most up-to-date value.
In addition to providing the scale necessary to communicate with a large number of devices, WNS also addresses security. Although any Windows 8 application can request and establish a channel with WNS, sending a message requires an authorization that includes a special code. This code is unique and based on the combination of a unique security identifier for the application and a shared secret you generate.
There are two ways to obtain the credentials you need to interact with WNS. The preferred method is through the Windows Store, using a developer account. You can learn more about the developer center online at http://msdn.microsoft.com/en-us/windows/apps/.
To access your developer account or create a new one, select the Dashboard tab and follow the prompts. As of this writing, the store is closed to general registration, and the steps involved may change when Windows 8 is finally released. After you create your account, you can follow the steps outlined at http://msdn.microsoft.com/en-us/library/windows/apps/hh465407.aspx to obtain your security credentials.
If you do not have a developer account or simply want temporary access for testing, you can navigate to the Windows Live Application Management site at http://go.microsoft.com/fwlink/?linkid=227235.
This site requires a Windows Live Account. After you sign in, you will be prompted to obtain information from the application manifest. Specifically, you will be prompted to enter the Package Display Name and Publisher from the Packaging tab in the manifest. Figure 7.12 shows this information for the Wintellog application.
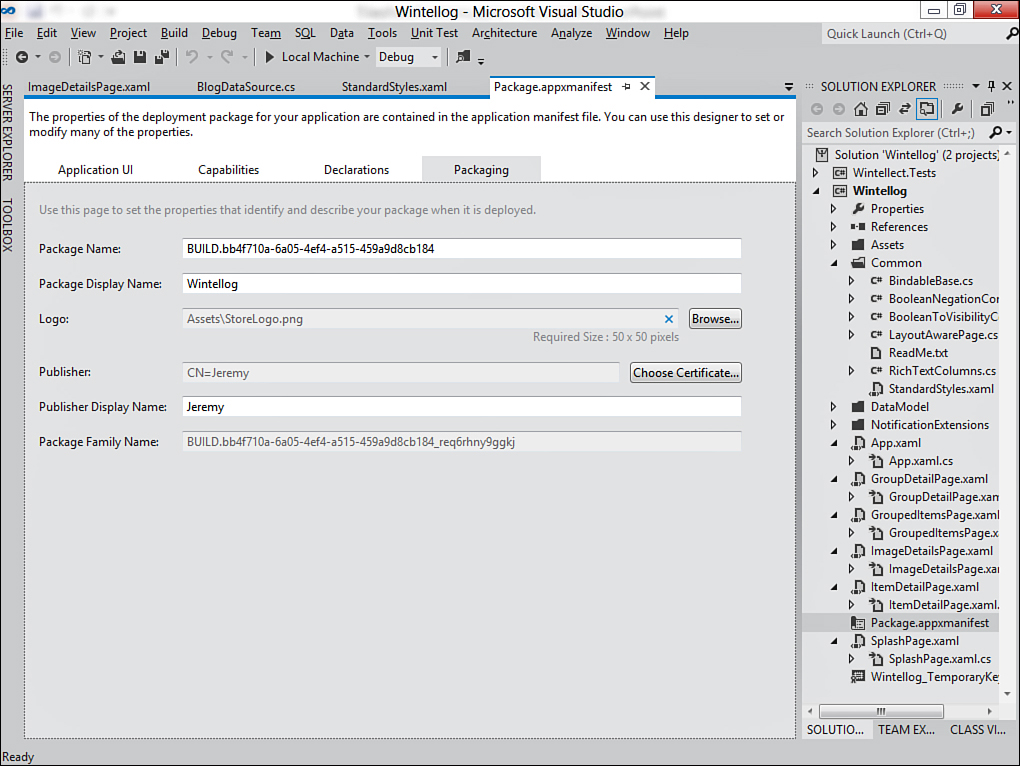
Figure 7.12. Package information
The Package Display Name is Wintellog, and the Publisher (not the Publisher Display Name) is CN=Jeremy. Enter these values in the fields to proceed. When you accept the terms and submit the form, you will see a page similar to what’s shown in Figure 7.13.

Figure 7.13. The credentials provided for WNS
Three key pieces of information are provided:
• The Package Name must be updated in your manifest. If you already have a value there, overwrite it with the one that is supplied.
• The Client Secret is a special code you will use to authorize your push notifications and should be stored on the host server.
• The Package Security Identifier is unique to the particular package and also used for authentication. The secret and identifier will be used to match the package itself when a request to push information is made.
When you have the necessary information, you can begin sending push notifications. The first step is to request a channel. The reference application does this when the application starts and saves it for later use (this code is in the App.xaml.cs file):
Channel = await PushNotificationChannelManager
.CreatePushNotificationChannelForApplicationAsync();
That call is fairly simple and straightforward. If an exception is thrown, the application will store the exception. When the channel is generated, it is typically sent to the host server to store and reference for later communication with the client. I’m not going to ask you to stand up a web service and provide a host, so this example will simply save the channel so you can copy and paste into a helper application. You learn about a trivial way to stand up a site to manage notification registration later in this chapter.
From the main Wintellog page (the GroupedItemsPage), you can open the application bar and you will see a command labeled Show Channel. When you tap this command, it will copy the channel to the clipboard. This is done using a DataPackage. This is the same class used to communicate information through the Share Contract, only here it is used to populate the clipboard instead:
var dataPackage = new DataPackage();
dataPackage.SetText(App.Instance.Channel.Uri);
Clipboard.SetContent(dataPackage);
You will see a dialog appear that indicates it was successfully copied or that displays an error if the channel was not acquired. Now that you have the channel, you can compile and run the PushNotificationTest application. This is a special application that simulates what a host web service would do when sending push notifications to the Wintellog2 application. The main page is shown in Figure 7.14.

Figure 7.14. The push notification test application
Your first step is to position the cursor inside the Paste Channel Here input and paste the channel you copied to the clipboard from the Wintellog2 application. Now you should be able to send updates. For example, move the slider to any value and tap the Badge Notification button. If you receive a success dialog, go back to the Start screen and look at the tile for the Wintellog2 application. It should reflect the number you selected. You can also enter your own text and use it to either update the tile or generate a notification.
The source for the PushNotificationTest application demonstrates what your host service would do in order to send notifications. The diagram in Figure 7.11 was somewhat simplified because there is an authentication step required before the push notification can be send. The authentication uses the OAuth protocol to obtain a special code that is used for the notification. OAuth is a popular open protocol for secure authorization that you can learn more about online at http://oauth.net/.
The application defines a contract that is used to communicate with the service:
[DataContract]
public class OAuthToken
{
[DataMember(Name = "access_token")]
public string AccessToken { get; set; }
[DataMember(Name = "token_type")]
public string TokenType { get; set; }
}
This is where the secret and security identifier you obtained earlier come into play (the ones that I used are hard-coded in the reference application). The first step is to create the content the service needs to provide the access code:
var body =
String.Format("grant_type=client_credentials&client_id={0} &client_secret={1} &scope=notify.windows.com", urlEncodedSid, urlEncodedSecret);
The request is always the same with the exception of the client identifier and secret. These are taken from their raw format and encoded for transport over the web. For example, the secret is encoded like this:
const string SECRET = "4n3ZeAodQpNmAQiBIpl2Pb6gcyKetITN";
var urlEncodedSecret = WebUtility.UrlEncode(SECRET);
Your host application would likely contain this somewhere in a secured configuration file or database record and then access it as needed. The message is formatted using a special class that helps encapsulate messages that are sent over HTTP. In this case, the content is string-based, so the StringContent helper class is used:
var httpBody = new StringContent(body,
Encoding.UTF8, "application/x-www-form-urlencoded");
An instance of the HttpClient is then used to post the request. The result should be a token that contains the access code necessary for sending push notifications:
var client = new HttpClient();
var response = await client.PostAsync(
new Uri("https://login.live.com/accesstoken.srf", UriKind.Absolute),
httpBody);
var oAuthToken = GetOAuthTokenFromJson(
await response.Content.ReadAsStringAsync());
return oAuthToken.AccessToken;
The token is always requested from https://login.live.com/accesstoken.srf by sending the secret and the client identifier. When the token is received, you can extract the access code and use it for push notification calls. The nice thing about notification calls is that they use the exact same XML you generated locally to update your tiles, badges, and to send notifications. The only difference is that the XML is pushed to a special channel obtained by the application.
For example, the code to send the badge notification uses the same extensions provided by the SDK to post the badge to the cloud:
var badge = new BadgeNumericNotificationContent(
(uint)BadgeValue.Value);
await PostToCloud(badge.CreateNotification().Content, "wns/badge");
The only difference between this and a call to generate a notification is the content and the type:
var tile = TileContentFactory.CreateTileSquareText02();
tile.TextHeading.Text = title;
tile.TextBodyWrap.Text = text;
await PostToCloud(bigTile.CreateNotification().Content);
The call to PostToCloud extracts the XML from the notification and prepares a message to post to WNS:
var content = xml.GetXml();
var requestMsg = new HttpRequestMessage(HttpMethod.Post, uri);
requestMsg.Content =
new ByteArrayContent(Encoding.UTF8.GetBytes(content));
Next, the headers are set. The overall package is XML, but the specific package type will map to wns/badge,wns/tile, or wns/notification depending on what you intend to push. The access code that was retrieved is placed in the authentication header:
requestMsg.Content.Headers.ContentType =
new MediaTypeHeaderValue("text/xml");
requestMsg.Headers.Add("X-WNS-Type", type);
requestMsg.Headers.Authorization =
new AuthenticationHeaderValue("Bearer", _accessCode);
Finally, there is nothing left to do but send the message. The response is queried to display the status in case the call was not successful:
var responseMsg = await new HttpClient().SendAsync(requestMsg);
message = string.Format("{0}: {1}", responseMsg.StatusCode,
await responseMsg.Content.ReadAsStringAsync());
That’s all there is to it! The same code can easily be implemented on a web server. You can use the source code for the toast and tile extensions to create similar classes on your web server. When the client registers the channel, instead of copying it to the clipboard, you would prepare a message to post the information to the host server. This is the perfect example of a scenario that makes a lot of sense to implement with Azure, which provides a fairly trivial way to stand up the necessary components to handle the notification registration and tracking. You can learn more about Azure and how well it works with Windows 8 through a special project called the Windows Azure Toolkit for Windows 8, available online at http://watwindows8.codeplex.com/.
Feel free to use the authentication helper or any other code from this sample in your own applications to simplify the process of generating toast notifications.
Summary
In this chapter, you learned how to keep your applications alive, fresh, and connected, even when they are not running. You can inform the user the new information is waiting for them through the use of badges. Tiles can be dynamically updated to provide previews of images and content in the application, and notifications provide timely “toasts” that overlay the user’s current application and give him or her the ability to respond by launching your application. All of these services are available from within your application or from an external server using the Windows Notification Services (WNS).
In the next chapter, you learn how to give your application charm through the use of contracts. Each time you launch or debug an application, you are already using the Launch contract. You’ve been exposed to some other contracts including Settings and Share already. You will learn more about these contracts as well as how to integrate Search and even stream content using the PlayTo contract.