
8. Giving Your Application Charm
Imagine trying to build an application that is so flexible it can predict how to interface with all other applications that will be written for the target platform. You would have the unprecedented ability to integrate seamlessly with those future applications. Whether sharing settings and preferences, sending over contact information, or embedding an image, the user would only have to perform a few simple actions to get the job done. As a developer, of course, you would have to analyze all of the potential future applications to write the appropriate interfaces and adapters to share information in a way those applications expect.
Windows 8 addresses this challenge at the operating system level and removes any guesswork out of developing applications that integrate well with each other. Instead of having to understand the interfaces that other applications use, as a developer you can learn a common set of agreements known as contracts that Windows 8 applications might function with. Contracts provide a way for your application to integrate data without knowing the details of how that data will be used by other applications. It is an incredibly powerful feature introduced with Windows 8.
In Windows 8, a contract is simply an agreement between one or more applications. It defines the set of requirements an application should meet in order to participate in a pre-defined set of interactions. Windows 8 also supports extensions that represent a unique agreement between your application and the operating system. For example, when Windows 8 requests the user to select a photo for his or her account profile, your application can appear in the list of available options if you decide to provide an extension in your application for that feature.
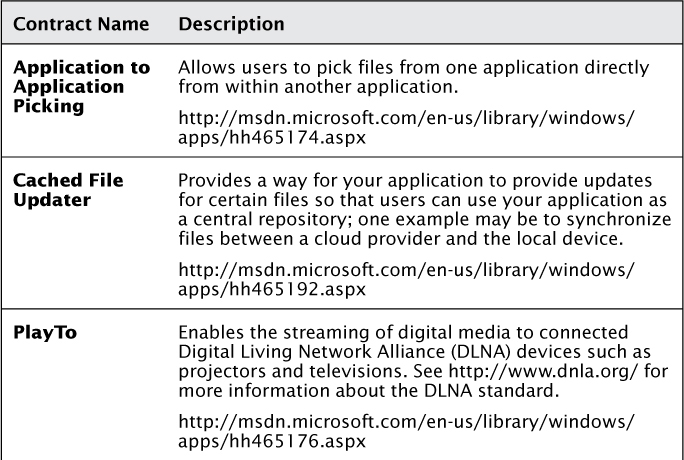
Windows 8 supports six contracts. The contract names and their brief explanations are provided in Table 8.1. You learn how to implement many of these contracts later in this chapter.
Table 8.1. Windows 8 Contracts

There are ten extensions your Windows 8 application can implement. These extensions are listed in Table 8.2. Extensions are like agreements between your application and Windows 8.
Table 8.2. Windows 8 Extensions


By now you are familiar with the Windows 8 Charms Bar that is invoked by swiping from the right edge of the screen or pressing Windows Key+C. These charms are each associated with a specific contract. The Start charm is a unique charm that opens the Start screen and allows you to activate applications by launching them when you tap or click a tile. The Device charm activates the PlayTo contract and displays any DLNA devices that are available as targets. The Search, Share, and Settings charms correspond to contracts with the same name and are the focus of this chapter.
Searching
The Start button for Windows was featured front and center when Bill Gates took the stage almost 20 years ago to announce Windows 95. This button has become almost synonymous with Windows, so it came as a surprise to many when they learned the Start button had been eliminated from Windows 8. There are numerous articles and blog entries that attempt to tackle the reasons why this button was eliminated and replaced with the combination of a new Start screen coupled with a powerful search mechanism. The primary reason, according to Microsoft, is that almost 70% of all searches in Windows 7 were used to find and launch programs.1
In Windows 8, search is featured front and center. I’ve been using Windows 8 as a primary operating system since it was first released as the Developer Preview in September of 2011. Although it took some retraining of my “muscle memory” to stop going for the Start button anytime I want to launch a new application, I’ve become used to the new way of getting around Windows, and I like it. I can open any program out of hundreds or thousands with a few simple taps on my keyboard.
To understand how this works, click the Desktop icon on your Start screen and imagine a scenario in which you want to launch Notepad. Now tap the Windows key followed by an N and an O and press Enter. That’s a simple sequence of four presses in succession. Chances are, unless you have some other program installed with a similar name, you will be staring at a new instance of Notepad. This is because the default behavior for the Start screen (which is toggled by pressing the Windows key) is to begin searching applications. For partial matches, the most frequently and recently used applications will appear at the top of the list. Figure 8.1 shows the result of tapping the key and typing the two characters. Notice that all applications with “no” in the name are listed, and Notepad is highlighted as the default (resulting in it being launched when I press the Enter key).

Figure 8.1. A quick search for Notepad
Notice that there are three special search types listed in the right margin. The default is for applications on the system. You can tap the Settings option to see the 47 available matches related to app settings (the total count on your machine may be different), or Files to search for the same text on the file system. You can also see a long list of applications beneath these three built-in options. Those are all applications that support the Search contract.
You can invoke the Search charm several ways. One is to swipe from the right side of the display to reveal the Charms Bar and then tap the Search charm icon. You also make the Charms Bar appear by holding down Windows key+C. Finally, you can launch Search directly by holding down the Windows key+Q (think “Q” for “Query”). When the bar appears, type the word chicken and tap the icon for Internet Explorer. The search is automatically passed to the web browser, as shown in Figure 8.2.

Figure 8.2. A search for chicken with Internet Explorer
Keeping the same search text, you can tap the Dictionary.com option if you have it installed on your system and read the definition of chicken. This is shown in Figure 8.3.
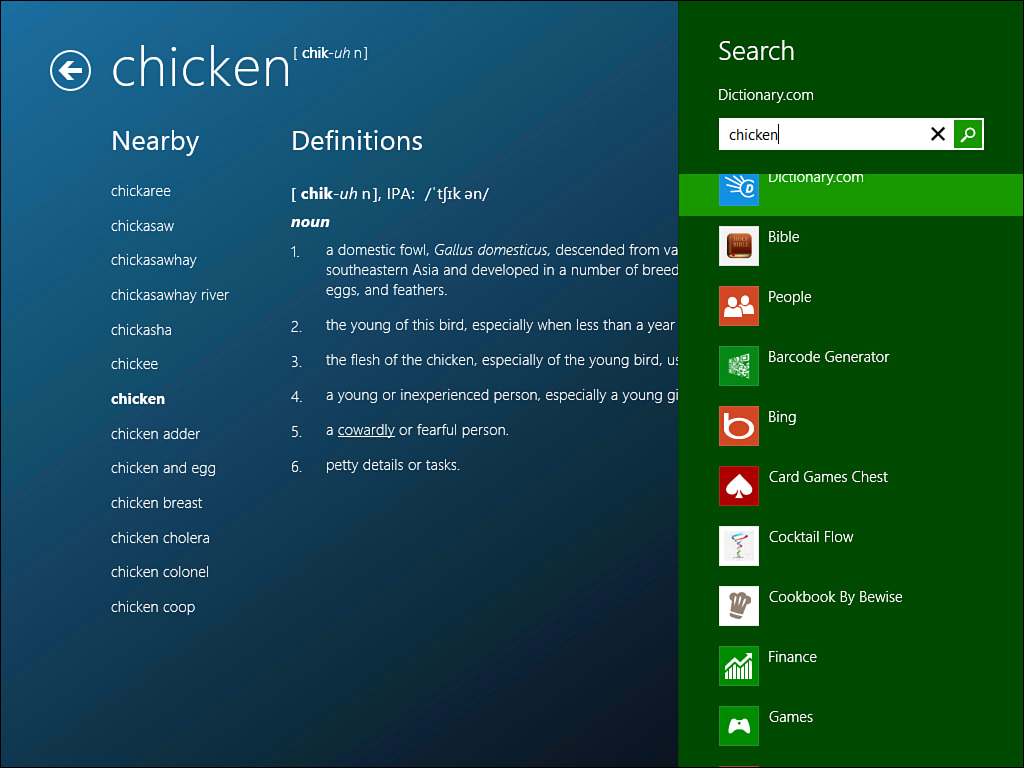
Figure 8.3. A search for chicken using Dictionary.com
The search integration makes it possible for you to conduct searches across applications. Applications that support the Search contract will allow you to search content while also providing the ability to search other sources. This makes it possible to start a search in one application and then refine it until you find the source that provides the information you need. Adding search capabilities to your application is supported by special Visual Studio 2012 templates.
The Wintellog3 application demonstrates integrated search capabilities. My first step to add search capabilities was to right-click the project in the Solution Explorer, choose Add![]() New Item from Visual Studio, and select the Search Contract option, as shown in Figure 8.4.
New Item from Visual Studio, and select the Search Contract option, as shown in Figure 8.4.

Figure 8.4. The Search contract item type
The template for the Search contract can perform several actions on your behalf. It will add search as a supported contract in the declarations section of your application’s manifest. It creates a basic XAML page to host the search results and builds some of the plumbing necessary to respond to search requests. It also adds code to the App class to handle incoming search requests. These default settings may work fine for most applications, but because the Wintellog3 application uses an extended splash screen, the code was modified to support loading the blogs before launching the search.
I added a property called Extended to the App class to track whether or not the extended splash page was launched. If not, the page must load first in order to retrieve the list of blogs and items. When the extended splash page is loaded, subsequent search requests are passed straight to the search page as the necessary data is loaded and present. The code to check this flag is placed within the override that is called when search is activated:
protected override void OnSearchActivated(SearchActivatedEventArgs args)
{
if (Extended) { SearchResultsPage.Activate(args); }
else { ExtendedSplash(args.SplashScreen, args); }
}
The splash page was modified to accept SearchActivatedEventArgs in addition to the existing LaunchedActivatedEventArgs. The logic to determine the first page to load was extended to activate the search page when search arguments are passed in. This allows the same extended splash page to handle a variety of scenarios ranging from search, initial activation, activation after termination, and launching from a secondary tile.
The search results page (SearchResultsPage.xaml.cs) contains all of the code necessarily to facilitate the search. The static Activate method checks for the existence of a Frame. If one does not exist, it creates one and then navigates to the search page. It passes in the search text and a reference to the previous content so the user can navigate back when they are done searching. This method is shown in Listing 8.1.
Listing 8.1. Method to Activate the Search Page
public static void Activate(SearchActivatedEventArgs args)
{
var previousContent = Window.Current.Content;
var frame = previousContent as Frame;
if (frame != null)
{
frame.Navigate(typeof (SearchResultsPage), args.QueryText);
}
else
{
var page = new SearchResultsPage
{
_previousContent = previousContent
};
page.LoadState(args.QueryText, null);
Window.Current.Content = page;
}
Window.Current.Activate();
}
When the state for the page is loaded, a set of filters is created. A filter provides a way to narrow down the search. It is up to you to determine what filters make the most sense for your application. In the Wintellog3 example, the user is given the option to narrow their search to a specific blog. First, the total number of matches is computed:
var total = (from g in App.Instance.DataSource.GroupList
from i in g.Items
where i.Title.ToLower().Contains(query) ||
i.Description.ToLower().Contains(query)
select i).Count();
Then a filter list is created with an entry for all matching items:
var filterList = new List<Filter>
{
new Filter(string.Empty, "All", total, true)
};
The Filter class contains the identifier for each specific blog, the title of the blog, and the count of matches within that blog:
filterList.AddRange(from blogGroup in
App.Instance.DataSource.GroupList
let count = blogGroup.Items.Count(
i => i.Title.ToLower().Contains(query) ||
i.Description.ToLower().Contains(query))
where count > 0
select new Filter(blogGroup.Id, blogGroup.Title, count));
The filters and query text are stored in the base page, and data-binding handles creating the page. By default, all search results are shown. The user can choose a filter to narrow the search results. Any time the filter is changed, including the first time it is set, the Filter_SelectionChanged method is fired. This method takes the current filter and uses it to apply the query and create a list of results. This logic is shown in Listing 8.2.
Listing 8.2. Filtering Individual Items Based on the Query Text
private void Filter_SelectionChanged(object sender,
SelectionChangedEventArgs e)
{
var query = _query.ToLower();
var selectedFilter = e.AddedItems.FirstOrDefault() as Filter;
if (selectedFilter != null)
{
selectedFilter.Active = true;
if (selectedFilter.Name.Equals("All"))
{
DefaultViewModel["Results"] =
(from g in App.Instance.DataSource.GroupList
from i in g.Items
where i.Title.ToLower().Contains(query)
|| i.Description.ToLower().Contains(query)
select
new SearchResult
{
Image = i.DefaultImageUri,
Title = i.Title,
Id = i.Id,
Description = i.Description
}).ToList();
}
else
{
var blogGroup = App.Instance.DataSource. GetGroup(selectedFilter.Id);
DefaultViewModel["Results"] =
(from i in blogGroup.Items
where i.Title.ToLower().Contains(query)
|| i.Description.ToLower().Contains(query)
select
new SearchResult
{
Id = i.Id,
Image = i.DefaultImageUri,
Title = i.Title,
Description = i.Description
}).ToList();
}
object results;
ICollection resultsCollection;
if (DefaultViewModel.TryGetValue("Results", out results) &&
(resultsCollection = results as ICollection) != null &&
resultsCollection.Count != 0)
{
VisualStateManager.GoToState(this, "ResultsFound", true);
return;
}
}
VisualStateManager.GoToState(this, "NoResultsFound", true);
}
Note the use of the Visual State Manager (VSM) to change the state when no results are found. The result of applying the search term entered by the user is shown in Figure 8.5.
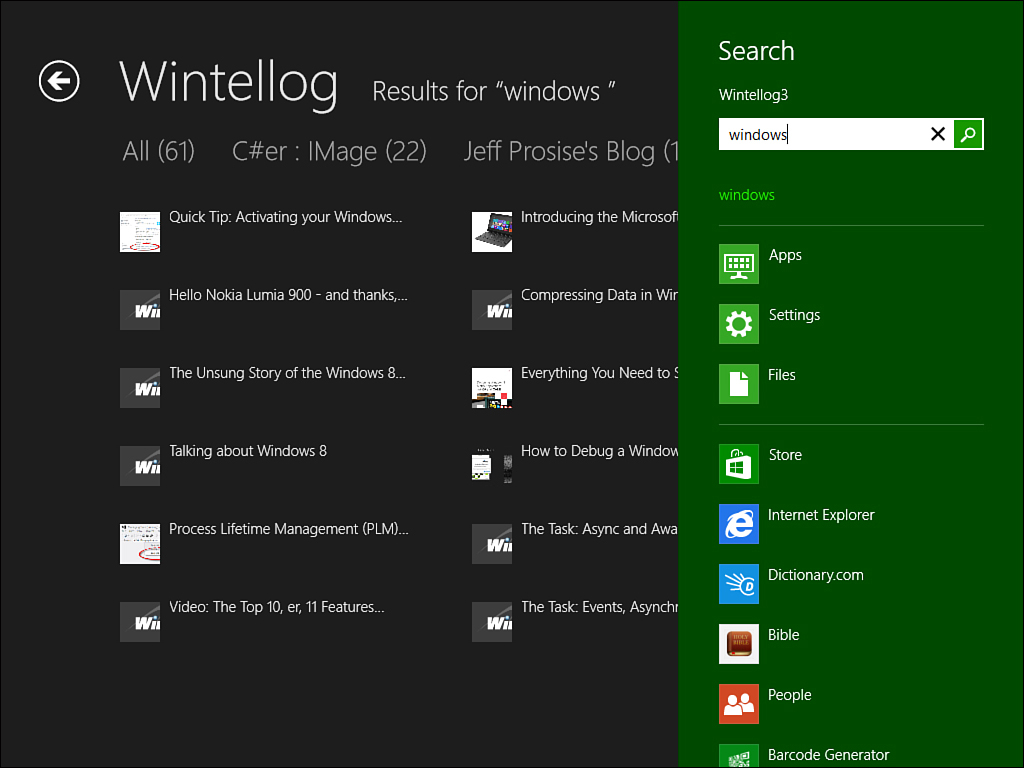
Figure 8.5. Search results
You can search from within the application at any time by pressing Windows key+Q. If the application is already loaded, you may notice that you receive search suggestions when you begin typing search text.
Suggestions are easy to implement; you simply register to an event that is fired when the user types in search text. For this application, the results are based on finding partial matches in the titles of blog post entries. First, the event is registered after the blog content is loaded:
Windows.ApplicationModel.Search.SearchPane.GetForCurrentView()
.SuggestionsRequested += SplashPage_SuggestionsRequested;
The built-in search mechanism remembers previous search queries and will show those in the list of suggestions. When the event is fired, you can add other suggestions to this collection. Suggestions can either be query suggestions (search terms that may generate results the user is looking for) or result suggestions (potential matches based on the search term). The UI is capable of displaying up to five items of either type. The implementation of this is shown in Listing 8.3. The search text is ignored if it is less than three characters. A LINQ query filters out text from the titles, matches anything that starts with the characters the user has entered, and then cleans up the result, stripping white space and special characters to provide a distinct list of unique words that appear in titles.
Listing 8.3. Providing Search Suggestions
void SplashPage_SuggestionsRequested(Windows.ApplicationModel.Search
.SearchPane sender,
Windows.ApplicationModel.Search
.SearchPaneSuggestionsRequestedEventArgs args)
{
var query = args.QueryText.ToLower();
if (query.Length < 3) return;
var suggestions = (from g in App.Instance.DataSource.GroupList
from i in g.Items
from keywords in i.Title.Split(' ')
let keyword = Regex.Replace(
keywords.ToLower(), @"[^w.@-]", "")
where i.Title.ToLower().Contains(query)
&& keyword.StartsWith(query)
orderby keyword
select keyword).Distinct();
args.Request.SearchSuggestionCollection
.AppendQuerySuggestions(suggestions);
}
The last piece of functionality to implement is handling the selection of search items. You’ll notice in the XAML for the search page that the grids support item selection through the following attribute:
IsItemClickEnabled="True"
This will allow an item to be selected by a click or tap. To handle the selection event, add a handler for the ItemClick event:
ItemClick="ResultsGridView_ItemClick_1"
The result simply navigates to the items detail page for the selected item:
private void ResultsGridView_ItemClick_1(object sender,
ItemClickEventArgs e)
{
Navigate(typeof (ItemDetailPage),
((SearchResult) e.ClickedItem).Id);
}
To recap, handling the Search contract involves a few steps. Although you must handle the search request and determine whether you will navigate to the search page directly or use an extended splash page to load data first, the template provides all of the necessary plumbing needed to implement the search. After the search is loaded, you implement the search filters and provide search results when a filter is selected. Finally, you handle search selection by navigating to the appropriate page within your application.
Sharing
Sharing content is now more popular than ever in today’s Internet-connected social media landscape. In previous versions of Windows, the primary way to share data between applications was by using the Windows Clipboard. If you wanted to build an application that could post content to the Internet, you had to build the process yourself by creating a user interface for sharing content and building the right code to interact with the various APIs exposed by different social media providers. Windows 8 changed the game by providing a standard API for sharing different types of data that may range from lightweight text to bitmap images and even file system objects.
The Share contract enables applications to share data in a standard way without having to know the details of what other applications are installed on the system or how they might handle shared data. Your application can act as a Share Source by providing content the user may want to share. It may also act as a Share Target that consumes content. Share interactions are facilitated through the DataTransferManager WinRT component that exists in the Windows.ApplicationModel.DataTransfer namespace. Full documentation for this namespace is available online at http://msdn.microsoft.com/en-us/library/windows/apps/windows.applicationmodel.datatransfer.aspx.
Sourcing Content for Sharing
The Wintellog3 application acts as a Share Source and can share details about blogs, posts, and images. Before you can successfully share, you will need appropriate applications installed that can receive the content. The ImageHelper2 application from Chapter 3, Extensible Application Markup Language (XAML), can receive images; the Mail client can receive links and text. I recommend you download, build, and deploy the Windows 8 Sample SDK application called “Sharing content target app sample” available online at http://code.msdn.microsoft.com/windowsapps/Sharing-Content-Target-App-e2689782/.
This application is specifically designed to receive all shared content types and is a great way to see how the process works. When the user chooses the Share charm, the DataRequested event is fired on the Data TransferManager component. The App class provides a method to register for this event:
public void RegisterForShare()
{
var dataManager = DataTransferManager.GetForCurrentView();
dataManager.DataRequested += DataManager_DataRequested;
}
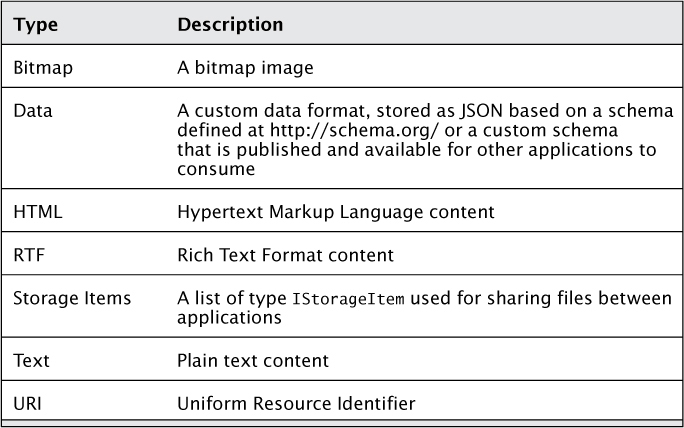
The event is fired with a reference to the DataTransferManager and a parameter of type DataRequestedEventArgs. The parameter exposes a Request property of type DataRequest that in turn exposes a DataPackage object. This object is used to wrap any data you wish to share with other applications. Table 8.3 lists the types of data you can associate with the package.
Table 8.3. Data Types Supported by the DataPackage Class
The data package also provides support for asynchronous requests by setting a data provider. The provider indicates the type of information to provide along with a callback that is invoked when the target application is ready for the data. This approach is used when the data you have to share requires significant processing time to package and deliver.
Along with the actual data content, you may also provide a thumbnail image that represents the data, a title, and a description. To actually implement the sharing, a property is exposed on the main App class to allow each individual page to supply a handler for sharing so that the proper context can be provided:
public Action<DataTransferManager, DataRequestedEventArgs>
Share { get; set; }
Pages that don’t provide any sharing functionally will set this to null when they are navigated to like the main GroupedItemsPage:
protected override void LoadState(Object navigationParameter,
Dictionary<String, Object> pageState)
{
App.Instance.Share = null;
DefaultViewModel["Groups"] = App.Instance.DataSource.GroupList;
groupGridView.ItemsSource =
groupedItemsViewSource.View.CollectionGroups;
}
The handler itself checks to see if a callback is registered, like this:
void DataManager_DataRequested(DataTransferManager sender,
DataRequestedEventArgs args)
{
if (Share != null)
{
Share(sender, args);
}
}
If no data is supplied, a message will be provided to the user indicating there is nothing to share. You can provide additional information if necessary to indicate why the share operation failed. The following code is added after the check to see if a callback exists:
else
{
args.Request
.FailWithDisplayText(
"Please choose a blog or item to enable sharing.");
}
The result of a share attempt is shown in Figure 8.6.

Figure 8.6. A failed share attempt with a custom message.
The pages that allow sharing register a method to handle the callback:
App.Instance.Share = Share;
If the user navigates to a blog entry, the share operation will provide the URL for the blog. First, a “reality check” ensures a current blog exists:
var group = DefaultViewModel["Group"] as BlogGroup;
if (group == null)
{
return;
}
Next, a title and description are supplied along with the URL:
dataRequestedEventArgs.Request.Data.Properties.Title = group.Title;
dataRequestedEventArgs.Request.Data.SetUri(group.RssUri);
dataRequestedEventArgs.Request.Data.Properties.Description =
"Wintellog RSS feed.";
The ItemDetailPage contains more complex logic for sharing. If the user simply invokes the Share charm without selecting any text, the application will provide a link to the blog post along with the entire contents:
dataRequestedEventArgs.Request.Data.SetText(item.Description);
If an image exists for the blog post, the image itself is packaged as a bitmap:
if (item.DefaultImageUri != null)
{
dataRequestedEventArgs.Request.Data.SetBitmap(
RandomAccessStreamReference
.CreateFromUri(item.DefaultImageUri));
}
The information for the blog post is also packaged using the custom data format.
Custom Data
Custom data enables you to package data based on a well-known schema like one provided at http://schema.org/ or your own. A schema is provided for blog posts at http://schema.org/BlogPosting, so any application that recognizes that schema can parse the information that is shared.
Custom data is typically stored in a JSON format. Due to limitations in the built-in DataContractJsonSerializer class (it does not provide a standardized format and requires attributes to successfully serialize an instance), I chose to use the popular open source Json.NET serializer by James Newton-King. You can read about it at http://james.newtonking.com/projects/json-net.aspx.
The library is packaged using NuGet (http://nuget.org), so installing it is as simple as opening the package manager (Tools![]() Library Package Manager
Library Package Manager![]() Package Manager Console) and typing the following (note the package name is case sensitive):
Package Manager Console) and typing the following (note the package name is case sensitive):
install-package Newtonsoft.Json
This automatically pulls down all necessary files and inserts a reference into the current project. This has already been done for you in the sample application. With the Json.NET library, I can create an anonymous type to hold the blog information and serialize it to JSON with a single line of code, as shown in Listing 8.4.
Listing 8.4. Serializing a Dynamic Type with Json.NET
private static async Task<string> CustomData(BlogItem item)
{
var schema = new
{
type = "http://shema.org/BlogPosting",
properties = new
{
description = string.Format(
"Blog post from {0}.",
item.Group.Title),
image = item.DefaultImageUri,
name = item.Title,
url = item.PageUri,
audience = "Windows 8 Developers",
datePublished = item.PostDate,
headline = item.Title,
articleBody = item.Description
}
};
return await JsonConvert.SerializeObjectAsync(schema);
}
To package the custom data, the SetData method is called and passed the schema and the JSON content:
var data = await CustomData(item);
dataRequestedEventArgs.Request.Data.SetData(
"http://schema.org/BlogPosting", data);
There are hundreds of existing schemas available for sharing rich data and content between applications. If you want to provide your own schema, you simply need to provide a unique URL that describes the schema format and then package the data using that schema. Any application that is aware of your schema can process the data by checking the schema type and handling the resulting data. You will learn how to receive and process shared data later in this chapter.
Text Selection
What if the user only desires to share a small excerpt from the blog post? Text selection is built into the existing text-based XAML controls. The content of the blog posts are hosted in a RichTextBlock control. The control exposes a SelectionChanged event:
<RichTextBlock x:Name="richTextBlock" Width="560"
Style="{StaticResource ItemRichTextStyle}"
SelectionChanged="RichTextBlock_SelectionChanged_1">
Whenever this event fires, the selected text is saved to a local variable:
private void RichTextBlock_SelectionChanged_1(object sender,
RoutedEventArgs e)
{
var richTextControl = sender as RichTextBlock;
_selection = richTextControl != null ?
richTextControl.SelectedText : string.Empty;
}
When the Share charm is invoked and a selection exists, it is provided like this:
dataRequestedEventArgs.Request.Data.Properties.Title =
string.Format("Excerpt from {0}", item.Title);
dataRequestedEventArgs.Request.Data.Properties.Description =
string.Format("An excerpt from the {0} blog at {1}.",
item.Group.Title, item.PageUri);
dataRequestedEventArgs.Request.Data.SetText(
string.Format("{0}
{1}", _selection, item.Group.RssUri));
Figure 8.7 shows the result of selecting a single sentence from a blog post and then sharing it to the sample application referred to earlier in this chapter.

Figure 8.7. Sharing a simple excerpt
The decision to include the URL of the original post in the text instead of the package itself is an example of targeting the share for a specific purpose. It is the excerpt that is the focus when text is selected, not the source page. Sharing the source URL in the main package may cause other applications to pull the full page and lose the intent of simply sharing an excerpt. Therefore, the only content provided is in the text portion of the data package.
Receiving Content as a Share Target
The flipside to sharing is receiving content. The sample application referred to earlier in this chapter provides several examples of consuming shared content. To add support as a Share Target, simply right-click the project in the Solution Explorer, choose Add![]() New Item, and then select the Share Target Contract option. An example of this is shown in Figure 8.8.
New Item, and then select the Share Target Contract option. An example of this is shown in Figure 8.8.

Figure 8.8. Adding the Share Target contract to your application
The template will perform several tasks. It will add a page that acts as the target for the share. You use this page to prompt the user for any necessary information needed to complete the sharing operation. For example, if you have the Puzzle Touch application installed (you can obtain this free application from the Windows Store) and you share an image, you will be prompted to pick the size and difficulty of the puzzle. This is shown in Figure 8.9.
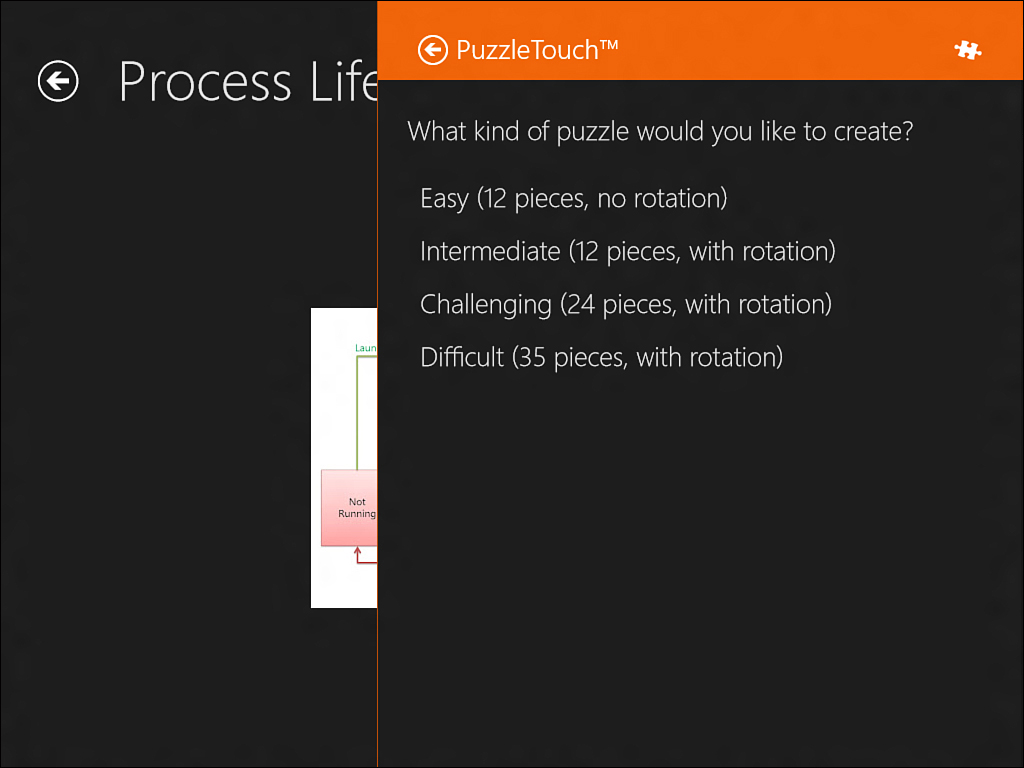
Figure 8.9. Share prompt for Puzzle Touch
The template will also update the manifest for your application. It adds a Share Target declaration and by default will support the text and uri data formats. It will display the title and description, prompt the user for a comment, and provide a button to complete the Share operation. You can see the result of this in Figure 8.10.
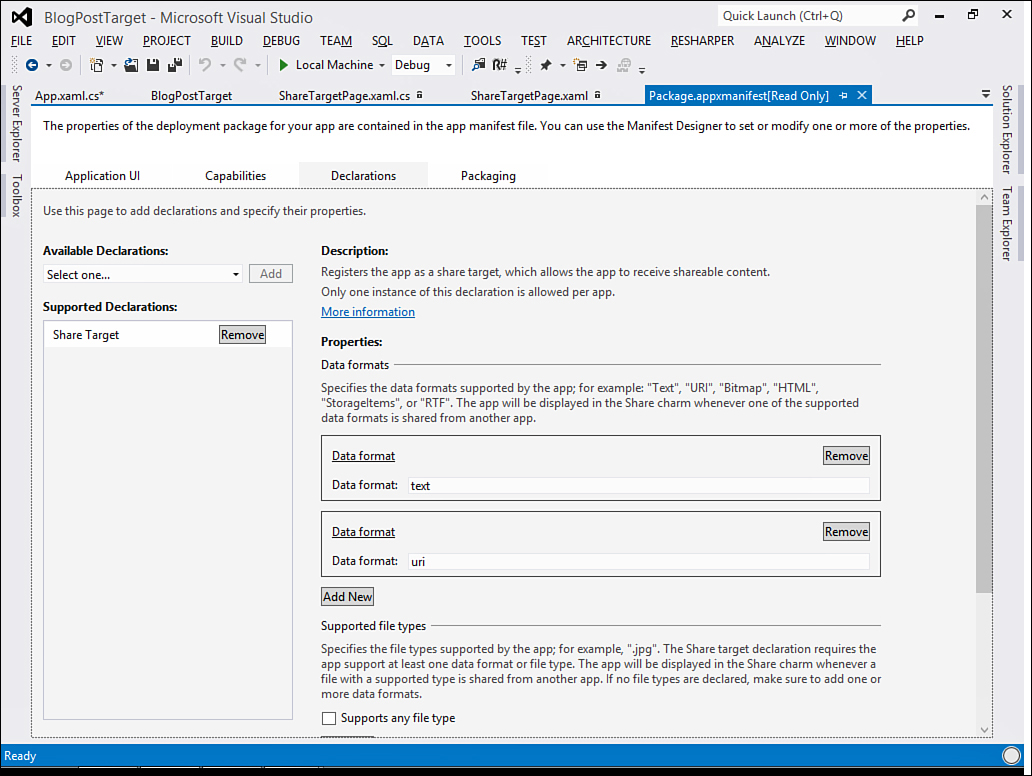
Figure 8.10. The Share Target declarations
The BlogPostTarget application for Chapter 8 demonstrates how to handle the receipt of custom data. When the Share operation begins, the application is activated from the Share Target contract. The code to handle this is automatically added to the App class by the template:
protected override void OnShareTargetActivated(
ShareTargetActivatedEventArgs args)
{
var shareTargetPage = new ShareTargetPage();
shareTargetPage.Activate(args);
}
The Activate method on the ShareTargetPage control loads information from the data package. Listing 8.5 shows the default code to obtain various properties and set them for data-binding.
Listing 8.5. Boilerplate Code to Load the Contents of a Share Operation
_shareOperation = args.ShareOperation;
DataPackagePropertySetView shareProperties =
_shareOperation.Data.Properties;
var thumbnailImage = new BitmapImage();
DefaultViewModel["Title"] = shareProperties.Title;
DefaultViewModel["Description"] = shareProperties.Description;
DefaultViewModel["Image"] = thumbnailImage;
DefaultViewModel["Sharing"] = false;
DefaultViewModel["ShowImage"] = false;
DefaultViewModel["Comment"] = String.Empty;
DefaultViewModel["SupportsComment"] = true;
Window.Current.Content = this;
Window.Current.Activate();
if (shareProperties.Thumbnail != null)
{
var stream = await shareProperties.Thumbnail.OpenReadAsync();
thumbnailImage.SetSource(stream);
DefaultViewModel["ShowImage"] = true;
}
To receive the custom data format that is shared by the Wintellog3 application, the code in BlogPostTarget checks to see if the data format exists in the package, using the same schema identifier that was used to save the data:
const string BLOG_POST = "http://schema.org/BlogPosting";
if (!_shareOperation.Data.Contains(BLOG_POST)) return;
If the format exists, the data is extracted and checked to ensure it is not empty:
var data = await _shareOperation.Data.GetDataAsync(BLOG_POST);
if (data == null) return;
Finally, the data is deserialized to the original format and saved. The same tool that was used to serialize the data (Json.NET) is used to perform the reverse operation. The example uses an anonymous type, so a template is passed to Json.NET for it to use. The template mirrors the data that is saved in the Wintellog3 application. Listing 8.6 shows the steps involved.
Listing 8.6. Loading Custom Data from the Share Operation
DefaultViewModel["ShowBlog"] = true;
DefaultViewModel["BlogPost"] = Newtonsoft.Json.JsonConvert
.DeserializeAnonymousType((string) data,
new
{
type = "http://shema.org/BlogPosting",
properties = new
{
description = string.Empty,
image = new Uri("http://schema.org/"),
name = string.Empty,
url = new Uri("http://schema.org/"),
audience = "Windows 8 Developers",
datePublished = DateTime.Now,
headline = string.Empty,
articleBody = string.Empty
}
});
When the custom blog post information has been extracted, data-binding is used to display it to the end user. Listing 8.7 shows the XAML used to provide a clickable title (tapping the title will open the blog post in the default browser, typically Internet Explorer) and a scrollable section with the article content.
Listing 8.7. XAML to Show the Blog Post
<StackPanel Visibility="{Binding ShowBlog, Converter={StaticResource BooleanToVisibilityConverter}}"
Orientation="Vertical">
<HyperlinkButton NavigateUri="{Binding BlogPost.properties.url}"
Content="{Binding BlogPost.properties.headline}"/>
<ScrollViewer Height="200">
<RichTextBlock Margin="20">
<Paragraph>
<Run FontWeight="SemiLight"
FontSize="13"
Text="{Binding BlogPost.properties.articleBody}"/>
</Paragraph>
</RichTextBlock>
</ScrollViewer>
</StackPanel>
You can see the result of a Share operation in Figure 8.11. Notice the title and description are displayed, followed by the title as a hyperlink and the content of the article. The application will successfully display this content from any other application that uses the same schema.
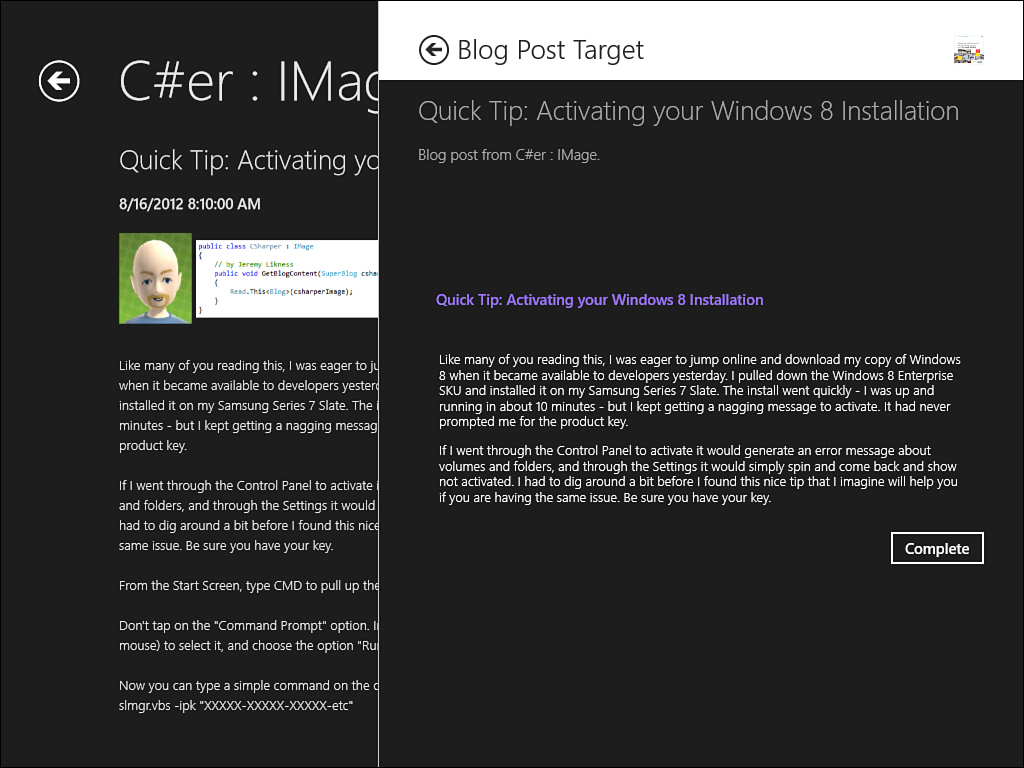
Figure 8.11. Sharing a blog post
The Share contract is a powerful feature that allows sharing of content between applications. Your application can expose information without knowing what other applications are installed. This enables you to support advanced scenarios such as posting content to Twitter or Facebook without having to implement the code yourself. When the user installs an application that supports social media as a Share Target, your application is only a few taps away from posting the content online.
Settings
The settings contract provides a consistent way to expose application information and settings. You learned how to wire settings in Chapter 4, Windows 8 Applications. That example used a custom control to handle the animation of the panel. In this chapter, you learn how to use an open source toolkit to make creating a settings panel even easier. The toolkit I’m referring to is by Microsoft employee Tim Heuer and is called Callisto:
http://timheuer.com/blog/archive/2012/05/31/introducing-callisto-a-xaml-toolkit-for-metro-apps.aspx
The first step is to install Callisto using NuGet. You learned how to use the Package Manager Console earlier in this chapter. There is also a graphical interface. You can navigate to Tools![]() Manage NuGet Packages for Solution to open the visual dialog. Select Online in the left pane and type Callisto in the search box. The package will display, and you can simply click the Install button to download and reference the package, as shown in Figure 8.12. An alternative location to download the package is from the online source repository at https://github.com/timheuer/callisto.
Manage NuGet Packages for Solution to open the visual dialog. Select Online in the left pane and type Callisto in the search box. The package will display, and you can simply click the Install button to download and reference the package, as shown in Figure 8.12. An alternative location to download the package is from the online source repository at https://github.com/timheuer/callisto.

Figure 8.12. Using the visual NuGet Package Manager to install Callisto
After Callisto is installed, you can quickly and easily add a settings panel. First, a new item is added of type User Control called WintellogSettings. The XAML contains a simple list showing the name of the application, a hyperlink to access the source code website, and a button to get the URI for the channel (this will now be accessible in settings instead of through an application bar command as it was previously). The XAML for the settings panel is shown in Listing 8.8.
Listing 8.8. Simple XAML for the Settings Panel
<Grid Style="{StaticResource LayoutRootStyle}">
<StackPanel Orientation="Vertical">
<TextBlock Style="{StaticResource BodyTextStyle}"
Text="Wintellog by Jeremy Likness"
TextWrapping="Wrap"/>
<HyperlinkButton
NavigateUri="http://windows8applications.codeplex.com/"
Content="Click to Access Source Code"/>
<Button Content="Tap to Copy Channel URI"
Click="Button_Click_1"/>
</StackPanel>
</Grid>
The code-behind will handle the button click to obtain the channel URI and display it as shown in Listing 8.9.
Listing 8.9. Code to Display the Channel URI
private async void Button_Click_1(object sender, RoutedEventArgs e)
{
var message = App.Instance.Channel != null
? "The channel has been copied to the clipboard."
: string.Format("Error: {0}", App.Instance.ChannelError);
var dataPackage = new DataPackage();
if (App.Instance.Channel != null)
{
dataPackage.SetText(App.Instance.Channel.Uri);
}
Clipboard.SetContent(dataPackage);
var dialog = new MessageDialog(message);
await dialog.ShowAsync();
}
An event handler for CommandsRequested is registered in the App class when the application is first launched:
private void RegisterSettings()
{
var pane = SettingsPane.GetForCurrentView();
pane.CommandsRequested += Pane_CommandsRequested;
}
The event handler registers a menu item called “About”:
void Pane_CommandsRequested(SettingsPane sender,
SettingsPaneCommandsRequestedEventArgs args)
{
var aboutCommand = new SettingsCommand("About", "About",
SettingsHandler);
args.Request.ApplicationCommands.Add(aboutCommand);
}
Finally, the handler itself uses the Callisto SettingsFlyout class to show the panel. The code is shown in Listing 8.10.
Listing 8.10. Using the SettingsFlyout Class from Callisto
private SettingsFlyout _flyout;
private void SettingsHandler(IUICommand command)
{
_flyout = new SettingsFlyout
{
HeaderText = "About",
Content = new WintellogSettings(),
IsOpen = true
};
_flyout.Closed += (o, e) => _flyout = null;
}
Notice how using the special control is as simple as specifying a header, assigning the content (in this case, a user control), and setting it to open. The code also clears any references to the control once the settings panel is dismissed. The result of accessing the new about page from the Settings charm is shown in Figure 8.13.

Figure 8.13. The “About” settings panel
This simple example introduced a hyperlink and button, but you can use the same approach to capture multiple settings for your application. Simply build the user interface for the settings that are available and then persist them using the methods you learned in Chapter 6, Data.
Summary
In this chapter, you learned how to give your application some charm by using the built-in Windows 8 contracts. Contracts provide a consistent, standardized way for applications to interact with each other and the Windows 8 platform. You can provide integrated search, share rich text, images, and other data and provide a consistent experience to the end user for managing applications settings.
In the next chapter, MVVM and Testing, you will learn how to better organize your code using the MVVM pattern. One of the many benefits of this pattern is improved testing capabilities. I will explain why testing is important and show you how to build automated unit tests for Windows 8 applications. You will learn how MVVM can help you build applications using other technologies like WPF and Silverlight that can share code with your Windows 8 applications.