
Chapter 11. Security
11.0 Introduction
The security of running code in .NET revolves around the concept of Code Access Security (CAS). CAS determines the trustworthiness of an assembly based upon its origin and the characteristics of the assembly itself, such as its hash value. For example, code installed locally on the machine is more trusted than code downloaded from the Internet. The runtime will also validate an assembly’s metadata and type safety before that code is allowed to run.
There are many mechanisms that we can use to write secure code and protect data using the .NET Framework. In this chapter, we explore such topics as controlling access to types, encryption/decryption, randomizing numbers for use with encryption, securely storing data, and using programmatic and declarative security.
11.1 Encrypting and Decrypting a String
Solution
Encrypting the string will help to prevent users from being able to read and decipher the information. The CryptoString class shown in Example 11-1 contains two static methods to encrypt and decrypt a string and two static properties to retrieve the generated key and initialization vector (IV—a random number used as a starting point to encrypt data) after encryption has occurred.
Example 11-1. CryptoString class
using System;
using System.Security.Cryptography;

public sealed class CryptoString
{
    private CryptoString() {}

    private static byte[] savedKey = null;
    private static byte[] savedIV = null;

    public static byte[] Key { get; set; }

    public static byte[] IV { get; set; }

    private static void RdGenerateSecretKey(RijndaelManaged rdProvider)
    {
        if (savedKey == null)
        {
            rdProvider.KeySize = 256;
            rdProvider.GenerateKey();
            savedKey = rdProvider.Key;
        }
    }

    private static void RdGenerateSecretInitVector(RijndaelManaged rdProvider)
    {
        if (savedIV == null)
        {
            rdProvider.GenerateIV();
            savedIV = rdProvider.IV;
        }
    }

    public static string Encrypt(string originalStr)
    {
        // Encode data string to be stored in memory.
        byte[] originalStrAsBytes = Encoding.ASCII.GetBytes(originalStr);
        byte[] originalBytes = {};

        // Create MemoryStream to contain output.
        using (MemoryStream memStream = new
                 MemoryStream(originalStrAsBytes.Length))
        {
            using (RijndaelManaged rijndael = new RijndaelManaged())
            {
                // Generate and save secret key and init vector.
                RdGenerateSecretKey(rijndael);
                RdGenerateSecretInitVector(rijndael);

                if (savedKey == null || savedIV == null)
                {
                    throw (new NullReferenceException(
                            "savedKey and savedIV must be non-null."));
                }

                // Create encryptor and stream objects.
                using (ICryptoTransform rdTransform =
                       rijndael.CreateEncryptor((byte[])savedKey.
                       Clone(),(byte[])savedIV.Clone()))
                {
                    using (CryptoStream cryptoStream = new CryptoStream(memStream,
                          rdTransform, CryptoStreamMode.Write))
                    {
                        // Write encrypted data to the MemoryStream.
                        cryptoStream.Write(originalStrAsBytes, 0,
                                   originalStrAsBytes.Length);
                        cryptoStream.FlushFinalBlock();
                        originalBytes = memStream.ToArray();
                    }
                }
            }

        }
        // Convert encrypted string.
        string encryptedStr = Convert.ToBase64String(originalBytes);
        return (encryptedStr);
    }

    public static string Decrypt(string encryptedStr)
    {
        // Unconvert encrypted string.
        byte[] encryptedStrAsBytes = Convert.FromBase64String(encryptedStr);
        byte[] initialText = new Byte[encryptedStrAsBytes.Length];

        using (RijndaelManaged rijndael = new RijndaelManaged())
        {
            using (MemoryStream memStream = new MemoryStream(encryptedStrAsBytes))
            {
                if (savedKey == null || savedIV == null)
                {
                    throw (new NullReferenceException(
                            "savedKey and savedIV must be non-null."));
                }

                // Create decryptor and stream objects.
                using (ICryptoTransform rdTransform =
                     rijndael.CreateDecryptor((byte[])savedKey.Clone(),
                     (byte[])savedIV.Clone()))
                {
                    using (CryptoStream cryptoStream = new CryptoStream(memStream,
                     rdTransform, CryptoStreamMode.Read))
                     {
                         // Read in decrypted string as a byte[].
                         cryptoStream.Read(initialText, 0, initialText.Length);
                     }
                }
            }
        }

        // Convert byte[] to string.
        string decryptedStr = Encoding.ASCII.GetString(initialText);
        return (decryptedStr);
    }
}
Discussion
The CryptoString class contains only static members, except for the private instance constructor, which prevents anyone from directly creating an object from this class.
This class uses the Rijndael algorithm to encrypt and decrypt a string. This algorithm is found in the System.Security.Cryptography.RijndaelManaged class. This algorithm requires a secret key and an initialization vector; both are byte arrays. You can generate a random secret key by calling the GenerateKey method on the RijndaelManaged class. This method accepts no parameters and returns void. The generated key is placed in the Key property of the RijndaelManaged class. The GenerateIV method generates a random initialization vector and places this vector in the IV property of the RijndaelManaged class.
The byte array values in the Key and IV properties must be stored for later use and not modified. This is due to the nature of private-key encryption classes, such as RijndaelManaged. The Key and IV values must be used by both the encryption and decryption routines to successfully encrypt and decrypt data.
The SavedKey and SavedIV private static fields contain the secret key and initialization vector, respectively. The secret key is used by both the encryption and decryption methods to encrypt and decrypt data. This is why there are public properties for these values, so they can be stored somewhere secure for later use. This means that any strings encrypted by this object must be decrypted by this object. The initialization vector is there to make it much more difficult to deduce the secret key from the encrypted string. The initialization vector does this by making two identical encrypted strings (encrypted with the same key) look very different in their encrypted forms.
Two methods in the CryptoString class, RdGenerateSecretKey and RdGenerateSecretInitVector, are used to generate a secret key and initialization vector when none exists. The RdGenerateSecretKey method generates the secret key, which is placed in the SavedKey field. Likewise, the RdGenerateSecretInitVector generates the initialization vector, which is placed in the SavedIV field. There is only one key and one IV generated for this class. This enables the encryption and decryption routines to have access to the same key and IV information at all times.
The Encrypt and Decrypt methods of the CryptoString class do the actual work of encrypting and decrypting a string. The Encrypt method accepts a string that you want to encrypt and returns an encrypted string. The following code calls this method and passes in a string to be encrypted:
string encryptedString = CryptoString.Encrypt("MyPassword");
Console.WriteLine($"encryptedString: {encryptedString}");

// Get the key and IV used so you can decrypt it later.
byte [] key = CryptoString.Key;
byte [] IV = CryptoString.IV;
Once the string is encrypted, the key and IV are stored for later decryption. This method displays:
encryptedString: NmmKqBO4iPT+BDxgLVwzgQ==
Note that your output may differ since you will be using a different key and IV value. The following code sets the key and IV used to encrypt the string and then calls the Decrypt method to decrypt the previously encrypted string:
CryptoString.Key = key;
CryptoString.IV = IV;
string decryptedString = CryptoString.Decrypt(encryptedString);
Console.WriteLine($"decryptedString: {decryptedString}");
This method displays:
decryptedString: MyPassword
There does not seem to be any problem with using escape sequences such as
,
,
, or in the string to be encrypted. In addition, using a quoted string literal, with or without escaped characters, works without a problem:
@"MyPassword"
See Also
Recipe 11.2; the “System.Cryptography Namespace,” “MemoryStream Class,” “ICryptoTransform Interface,” and “RijndaelManaged Class” topics in the MSDN documentation.
11.2 Encrypting and Decrypting a File
Solution
Use multiple cryptography providers and write the data to a file in encrypted format. This is accomplished in the following class, which has a constructor that expects an instance of the System.Security.Cryptography.SymmetricAlgorithm class and a path for the file. The SymmetricAlgorithm class is an abstract base class for all cryptographic providers in .NET, so you can be reasonably assured that this class could be extended to cover all of them. This example implements support for TripleDES and Rijndael.
The following namespaces are needed for this solution:
using System;
using System.Text;
using System.IO;
using System.Security.Cryptography;
The class SecretFile (see Example 11-2) can be used for TripleDES as shown:
// Use TripleDES.
using (TripleDESCryptoServiceProvider tdes = new
       TripleDESCryptoServiceProvider())
{
    SecretFile secretTDESFile = new SecretFile(tdes,"tdestext.secret");

    string encrypt = "My TDES Secret Data!";
    Console.WriteLine($"Writing secret data: {encrypt}");
    secretTDESFile.SaveSensitiveData(encrypt);

    // Save for storage to read file.
    byte [] key = secretTDESFile.Key;
    byte [] IV = secretTDESFile.IV;

    string decrypt = secretTDESFile.ReadSensitiveData();
    Console.WriteLine($"Read secret data: {decrypt}");
}
To use SecretFile with Rijndael, just substitute the provider in the constructor like this:
// Use Rijndael.
using (RijndaelManaged rdProvider = new RijndaelManaged())
{
    SecretFile secretRDFile = new SecretFile(rdProvider,"rdtext.secret");

    string encrypt = "My Rijndael Secret Data!";

    Console.WriteLine($"Writing secret data: {encrypt}");
    secretRDFile.SaveSensitiveData(encrypt);
    // Save for storage to read file.
    byte [] key = secretRDFile.Key;
    byte [] IV = secretRDFile.IV;

    string decrypt = secretRDFile.ReadSensitiveData();
    Console.WriteLine($"Read secret data: {decrypt}");
}
Example 11-2 shows the implementation of SecretFile.
Example 11-2. SecretFile class
public class SecretFile
{
    private byte[] savedKey = null;
    private byte[] savedIV = null;
    private SymmetricAlgorithm symmetricAlgorithm;
    string path;

    public byte[] Key { get; set; }

    public byte[] IV { get; set; }

    public SecretFile(SymmetricAlgorithm algorithm, string fileName)
    {
        symmetricalgorithm;
        path = fileName;
    }

    public void SaveSensitiveData(string sensitiveData)
    {
        // Encode data string to be stored in encrypted file.
        byte[] encodedData = Encoding.Unicode.GetBytes(sensitiveData);

        // Create FileStream and crypto service provider objects.
        using (FileStream fileStream = new FileStream(path,
                                               FileMode.Create,
                                               FileAccess.Write))
        {
            // Generate and save secret key and init vector.
            GenerateSecretKey();
            GenerateSecretInitVector();

            // Create crypto transform and stream objects.
            using (ICryptoTransform transform =
                        symmetricAlgorithm.CreateEncryptor(savedKey,
                                savedIV))
            {
                using (CryptoStream cryptoStream =
                       new CryptoStream(fileStream, transform,
                                        CryptoStreamMode.Write))
                {
                    // Write encrypted data to the file.
                    cryptoStream.Write(encodedData, 0, encodedData.Length);
                }
            }
        }
    }

    public string ReadSensitiveData()
    {
        string decrypted = "";

        // Create file stream to read encrypted file back.
        using (FileStream fileStream = new FileStream(path,
                                               FileMode.Open,
                                               FileAccess.Read))
        {
            // Print out the contents of the encrypted file.
            using (BinaryReader binReader = new BinaryReader(fileStream))
            {
                Console.WriteLine("---------- Encrypted Data ---------");
                int count = (Convert.ToInt32(binReader.BaseStream.Length));
                byte [] bytes = binReader.ReadBytes(count);
                char [] array = Encoding.Unicode.GetChars(bytes);
                string encdata = new string(array);
                Console.WriteLine(encdata);
                Console.WriteLine($"---------- Encrypted Data ---------
                                   {Environment.NewLine}");

                // Reset the file stream.
                fileStream.Seek(0,SeekOrigin.Begin);

                // Create decryptor.
                using (ICryptoTransform transform =
                    symmetricAlgorithm.CreateDecryptor(savedKey, savedIV))
                {
                    using (CryptoStream cryptoStream = new CryptoStream(fileStream,
                                                     transform,
                                                     CryptoStreamMode.Read))
                    {
                        // Print out the contents of the decrypted file.
                        using (StreamReader srDecrypted =
                               new StreamReader(cryptoStream, new UnicodeEncoding()))
                        {
                            Console.WriteLine("---------- Decrypted Data ---------");
                            decrypted = srDecrypted.ReadToEnd();
                            Console.WriteLine(decrypted);
                            Console.WriteLine($"---------- Decrypted Data ---------
                                               {Environment.NewLine}");
                        }
                    }
                }
            }
        }

        return decrypted;
    }

    private void GenerateSecretKey()
    {
        if (null != (symmetricAlgorithm as TripleDESCryptoServiceProvider))
        {
            TripleDESCryptoServiceProvider tdes;
            tdes = symmetricAlgorithm as TripleDESCryptoServiceProvider;
            tdes.KeySize = 192; // Maximum key size
            tdes.GenerateKey();
            savedKey = tdes.Key;
        }
        else if (null != (symmetricAlgorithm as RijndaelManaged))
        {
            RijndaelManaged rdProvider;
            rdProvider = symmetricAlgorithm as RijndaelManaged;
            rdProvider.KeySize = 256; // Maximum key size
            rdProvider.GenerateKey();
            savedKey = rdProvider.Key;
        }
    }

    private void GenerateSecretInitVector()
    {
        if (null != (symmetricAlgorithm as TripleDESCryptoServiceProvider))
        {
            TripleDESCryptoServiceProvider tdes;
            tdes = symmetricAlgorithm as TripleDESCryptoServiceProvider;
            tdes.GenerateIV();
            savedIV = tdes.IV;
        }
        else if (null != (symmetricAlgorithm as RijndaelManaged))
        {
            RijndaelManaged rdProvider;
            rdProvider = symmetricAlgorithm as RijndaelManaged;
            rdProvider.GenerateIV();
            savedIV = rdProvider.IV;
        }
    }
If the SaveSensitiveData method is used to save the following text to a file:
This is a test
This is sensitive data!
the ReadSensitiveData method will display the following information from this same file:
---------- Encrypted Data --------
????????????????????????????????????????
---------- Encrypted Data --------

---------- Decrypted Data ---------
This is a test
This is sensitive data!
---------- Decrypted Data ---------
Discussion
Encrypting data is essential to many applications, especially those that store information in easily accessible locations. Once data is encrypted, a decryption scheme is required to restore the data back to an unencrypted form without losing any information.
The encryption schemes used in this recipe are TripleDES and Rijndael. The reasons for using Triple DES are:
-
TripleDES employs symmetric encryption, meaning that a single private key is used to encrypt and decrypt data. This process allows much faster encryption and decryption, especially as the streams of data become larger.
-
TripleDES encryption is much harder to crack than the older DES encryption and is widely considered to be of high strength.
-
If you wish to use another type of encryption, you can easily convert this recipe using any provider derived from the
SymmetricAlgorithmclass. -
TripleDES is widely deployed in the industry today.
The main drawback to TripleDES is that both the sender and receiver must use the same key and initialization vector (IV) in order to encrypt and decrypt the data successfully. If you wish to have an even more secure encryption scheme, use the Rijndael scheme. This type of encryption scheme is highly regarded as a solid encryption scheme, since it is fast and can use larger key sizes than TripleDES. However, it is still a symmetric cryptosystem, which means that it relies on shared secrets. For a cryptosystem that uses shared public keys with private keys that are never shared between parties, use an asymmetric cryptosystem, such as RSA or DSA.
See Also
The “SymmetricAlgorithm Class,” “TripleDESCryptoServiceProvider Class,” and “RijndaelManaged Class” topics in the MSDN documentation.
11.3 Cleaning Up Cryptography Information
Problem
You will be using the cryptography classes in the FCL to encrypt and/or decrypt data. In doing so, you want to make sure that no data (e.g., seed values or keys) is left in memory for longer than you are using the cryptography classes. An attacker can sometimes find this information in memory and use it to break your encryption or, worse, to break your encryption, modify the data, and then re-encrypt the data, forcing your application to use tainted data rather than valid data.
Solution
To clear out the key and initialization vector (or seed), you need to call the Clear method on whichever SymmetricAlgorithm- or AsymmetricAlgorithm-derived class you are using. Clear reinitializes the Key and IV properties, preventing them from being found in memory. You call it after saving the key and IV so that you can decrypt later. Example 11-3 shows how to encrypt a string and then clean up immediately afterward to provide the smallest window possible for potential attackers.
Example 11-3. Cleaning up cryptography information
using System;
using System.Text;
using System.IO;
using System.Security.Cryptography;

public static void CleanUpCrypto()
{
    string originalStr = "SuperSecret information";
    // Encode data string to be stored in memory.
    byte[] originalStrAsBytes = Encoding.ASCII.GetBytes(originalStr);

    // Create MemoryStream to contain output.
    MemoryStream memStream = new MemoryStream(originalStrAsBytes.Length);
    RijndaelManaged rijndael = new RijndaelManaged();

    // Generate secret key and init vector.
    rijndael.KeySize = 256;
    rijndael.GenerateKey();
    rijndael.GenerateIV();

    // Save the key and IV for later decryption.
    byte [] key = rijndael.Key;
    byte [] IV = rijndael.IV;

    // Create encryptor and stream objects.
    ICryptoTransform transform = rijndael.CreateEncryptor(rijndael.Key,
        rijndael.IV);
    CryptoStream cryptoStream = new CryptoStream(memStream, transform,
        CryptoStreamMode.Write);

    // Write encrypted data to the MemoryStream.
    cryptoStream.Write(originalStrAsBytes, 0, originalStrAsBytes.Length);
    cryptoStream.FlushFinalBlock();

    // Release all resources as soon as we are done with them
    // to prevent retaining any information in memory.
    memStream.Close();
    cryptoStream.Close();
    transform.Dispose();
    // This clear statement regens both the key and the init vector so that
    // what is left in memory is no longer the values you used to encrypt with.
    rijndael.Clear();
}
You can also make your life a little easier by taking advantage of the using statement, instead of having to remember to manually call each of the Close methods individually. This code block shows how to use the using statement:
public static void CleanUpCryptoWithUsing()
{
    string originalStr = "SuperSecret information";
    // Encode data string to be stored in memory.
    byte[] originalStrAsBytes = Encoding.ASCII.GetBytes(originalStr);
    byte[] originalBytes = { };

    // Create MemoryStream to contain output.
    using (MemoryStream memStream = new MemoryStream(originalStrAsBytes.Length))
    {
        using (RijndaelManaged rijndael = new RijndaelManaged())
        {
            // Generate secret key and init vector.
            rijndael.KeySize = 256;
            rijndael.GenerateKey();
            rijndael.GenerateIV();

            // Save off the key and IV for later decryption.
            byte[] key = rijndael.Key;
            byte[] IV = rijndael.IV;

            // Create encryptor and stream objects.
            using (ICryptoTransform transform =
                    rijndael.CreateEncryptor(rijndael.Key, rijndael.IV))
            {
                using (CryptoStream cryptoStream = new
                       CryptoStream(memStream, transform,
                        CryptoStreamMode.Write))
                {
                    // Write encrypted data to the MemoryStream.
                    cryptoStream.Write(originalStrAsBytes, 0,
                                originalStrAsBytes.Length);
                    cryptoStream.FlushFinalBlock();
                }
            }
        }
    }
}
Discussion
To make sure your data is safe, you need to close the MemoryStream and CryptoStream objects as soon as possible, as well as calling Dispose on the ICryptoTransform implementation to clear out any resources used in this encryption. The using statement makes this process much easier, makes your code easier to read, and leads to fewer programming mistakes.
See Also
The “SymmetricAlgorithm.Clear Method” and “AsymmetricAlgorithm.Clear Method” topics in the MSDN documentation.
11.4 Preventing String Tampering in Transit or at Rest
Solution
Calculate a hash value from the string, digitally sign the hash value, and send both the string and its digital signature to the recipient (a public key will also be provided to the recipient). Once the destination receives this information, it can determine whether the string is the same one that was initially sent by verifying its digital signature, which cannot be forged or manipulated.
Before getting into the details of how this works, first we’ll look at the code used to digitally sign some string data and, in turn, verify that this string has not changed using this same digital signature. In Example 11-4, the AntiTamper class contains two methods, SignString and VerifySignedString, which perform each of these duties. The SignString method takes a clear text string and generates a digital signature from it. The VerifySignedString method is used by the code that receives the string to determine if the string has been modified in any way prior to reception.
Example 11-4. The AntiTamper class
public class AntiTamper
{
    static private readonly int RSA_KEY_SIZE = 2048;


    public static byte[] SignString(string clearText, out string rsaPublicKey)
    {
        byte[] signature = null;
        rsaPublicKey = null;

        byte[] encodedClearText = Encoding.Unicode.GetBytes(clearText);

        using (SHA512CryptoServiceProvider sha512 =
                             new SHA512CryptoServiceProvider())
        {
            using (RSACryptoServiceProvider rsa =
                   new RSACryptoServiceProvider(RSA_KEY_SIZE))
            {
                signature = rsa.SignData(encodedClearText, sha512);

                rsaPublicKey = rsa.ToXmlString(false);
            }
        }

        return signature;
    }

    public static bool VerifySignedString(string clearText, byte[] signature,
                                          string rsaPublicKey)
    {
        bool verified = false;
        byte[] encodedClearText = Encoding.Unicode.GetBytes(clearText);

        using (SHA512CryptoServiceProvider sha512 =
                             new SHA512CryptoServiceProvider())
        {
            using (RSACryptoServiceProvider rsa =
                   new RSACryptoServiceProvider(RSA_KEY_SIZE))
            {
                rsa.FromXmlString(rsaPublicKey);

                verified = rsa.VerifyData(encodedClearText, sha512, signature);
            }
        }

        return verified;
    }
}
The VerifyStringIntegrity method shows how to use the AntiTamper class to sign and verify a string. The VerifyStringIntegrity method first calls the SendData method. This method encapsulates the code that would exist on the sender’s side, but you will need to add code to actually send the complete message to the receiver. Before the message is sent, this method generates a digital signature from the string data that we want to protect from tampering. You generate the digital signature by calling the static AntiTamper.SignString method. This method returns a digital signature as a byte[] and the RSA public key information through an out parameter. The RSA public key information is required by the verification method, ReceiveData.
Note
It is important to understand that the receiver needs three things: the original string data, its digital signature, and the public key. The string data and signature can be sent together in the same message; however, the public key could be sent either along with the message or distributed through a separate channel. This separate channel could be one of several mechanisms: a signed and encrypted email message, a secure FTP server, an X.509 certificate signed by a trusted third-party authority, Simple Public Key Infrastructure (SPKI), or Pretty Good Privacy (PGP) used to sign and encrypt the public key to prove that it originated from the expected party.
Whatever mechanism you use to distribute the public key, it is critical that the recipient trusts that this key is indeed originating from the correct party.
The second method, ReceiveData, receives the string data, the generated digital signature, and the RSA public key information, which is used to verify the digital signature against the string data received. This method encapsulates the code that would exist on the receiver’s side, but you will need to add code to actually receive the complete message from the sender. If the digital signature indeed proves that the string data has not been tampered with, a Boolean value of true is returned; otherwise, false is returned, indicating that the string data has been modified or tampered with:
public static void VerifyStringIntegrity()
{
    string originalString = "This is the string that we'll be testing.";

    // Create a hash value from the original string value we need to protect
    //   and sign the hash value
    string rsaPublicKey;
    byte[] signature = SendData(originalString, out rsaPublicKey);

    //  Uncomment the code below to quickly test handling a tampered string:
    //      originalString += "a";
    //  Uncomment the code below to quickly test handling a tampered signature:
    //      signature[1] = 100;

    // Now, verify that the string has not been corrupted, nor tampered with
    if (ReceiveData(originalString, signature, rsaPublicKey))
    {
        Console.WriteLine(
            "The original string was NOT corrupted or tampered with.");
    }
    else
    {
        Console.WriteLine(
            "ALERT:  The original string was corrupted and/or tampered with.");
    }
}


private static byte[] SendData(string originalString, out string rsaPublicKey)
{
    // Digitally sign the string data
    byte[] signature = AntiTamper.SignString(originalString, out rsaPublicKey);

    // Send the data to its destination...

    return signature;
}

private static bool ReceiveData(string originalString, byte[] signature,
                                string rsaPublicKey)
{
    // Receive the data from the sender...

    // Verify the digital signature
    return (AntiTamper.VerifySignedString(originalString, signature,
        rsaPublicKey));
}
The output of this method is shown here when the string is uncorrupted:
The original string was NOT corrupted or tampered with.
The output of this method is shown here when the string has been corrupted:
ALERT: The original string was corrupted and/or tampered with.
To see this in action, simply uncomment one of the following two commented lines in the VerifyStringIntegrity method:
//  Uncomment the code below to quickly test handling a tampered string:
      originalString += "a";
or:
//  Uncomment the code below to quickly test handling a tampered signature:
      signature[1] = 100;
Discussion
Hash values are useful in determining if data has been modified or corrupted at rest or in transit. A hash value—or even a checksum, or cyclic redundancy check (CRC) value—is first calculated from the data you are trying to protect. This hash value along with the data is then sent to the receiver. The receiver recalculates the hash value based on the data received. If the new hash value matches the hash value received, the data has not changed; otherwise, the data has been modified or corrupted at some point.
Note
It is critical that both sides agree on a hash algorithm that will be used. Either the SHA-256 or SHA-512 algorithm is a good secure choice as well as an industry standard.
While this hashing technique works well in flagging data that has become corrupted or has been modified accidentally, it cannot protect against an attacker surreptitiously modifying the data in an attempt to gain access to a system or plant false information in an attempt to blackmail or extort. If only a hash value is used to protect the data, an attacker can intercept the data (using a Man-in-the-Middle attack), modify the data, and then regenerate a new hash from the modified data. The old hash value is then replaced with the new one before the data is resent to the intended receiver. The intended receiver is none the wiser that the data has been tampered with; since, from the receiver’s point of view, the hash the receiver generates is exactly the same as the one received. To prevent against these types of attacks, a more robust system is needed. This is where digital signatures come into play.
A digital signature is generated through an asymmetric public key cryptography algorithm. This means that there are two keys. The first key is a public key that can be distributed to all parties that will receive the signed data. This public key will be used to verify the digital signature of the received data. The second key is a private key that must remain securely in the hands of the party sending the data. The private key is used only to initially sign the data before it is sent to the receiver. The public and private keys work together, one to sign the data and the other to prove not only that the signature is from the intended sender, but also that the data signed with this signature has not been tampered with, modified, or corrupted.
Warning
If the private key is stolen, an attacker will be able to digitally sign data as if he were the legitimate sender of the data. Never send the private key to parties other than those required to have it, and never transmit or store it in plain text.
Here is how data is digitally signed by the sender. The AntiTamper.SignString method is called, and the data to be signed is passed into the first argument (clearText) and a string variable (rsaPublicKey) is passed in as the second argument. The rsaPublicKey variable will eventually hold the public key information, which must be used to verify the signature later in the AntiTamper.VerifySignedString method:
public static byte[] SignString(string clearText, out string rsaPublicKey)
{
    byte[] signature = null;
    rsaPublicKey = null;

    byte[] encodedClearText = Encoding.Unicode.GetBytes(clearText);

    using (SHA512CryptoServiceProvider sha512 =
                         new SHA512CryptoServiceProvider())
    {
        using (RSACryptoServiceProvider rsa =
               new RSACryptoServiceProvider(RSA_KEY_SIZE))
        {
            signature = rsa.SignData(encodedClearText, sha512);

            rsaPublicKey = rsa.ToXmlString(false);
        }
    }

    return signature;
}
First the SignString method creates a SHA512CryptoServiceProvider object that will be used to create a hash that will be digitally signed. Note here that we are creating a SHA-512 hash value for the data that we need to protect. However, we are not actually signing the data we are protecting; rather, we are signing the SHA-512 hash value. This is important because asymmetric cryptography algorithms are inherently slow. If we signed the data we were protecting—and that data could be extremely large (e.g., megabytes or gigbaytes in size)—our signing process would slow down the system. By signing the much smaller hash value (in our case, 512 bytes), we don’t have to worry about performance bottlenecks.
Next, an RSACryptoServiceProvider object is created that will be used to sign the data. The RSACryptoServiceProvider.SignData instance method accepts the clear text data to be signed in the form of a byte[] as well as our hashing algorithm (SHA-512). These are used to generate a hash value, which in turn generates a digital signature. Only the digital signature is returned by this method.
There is one final very important step, which is to capture the public key information generated by this RSACryptoServiceProvider object. We do this by calling the RSACryptoServiceProvider.ToXmlString instance method. This method returns the public key information necessary to verify the signature.
Warning
When calling ToXMLString, pass in the Boolean value of false to return only the public key. If you pass in true, both the public and private key will be returned. As mentioned before, it is imperative that the private key is protected and not accidentally distributed.
Now all the sender has to do is send the data, the digital signature, and the public key information returned by the AntiTamper.SignString method to the intended recipient:
private static byte[] SendData(string originalString, out string rsaPublicKey)
{
    // Digitally sign the string data
    byte[] signature = AntiTamper.SignString(originalString, out rsaPublicKey);

    // Send the data and the signature to its destination...

    return signature;
}
The recipient then calls the AntiTamper.VerifySignedString method, passing in the received data, the digital signature, and the public key information. Note that the AntiTamper class will need to be referenced in both the sender’s and receiver’s code:
private static bool ReceiveData(string originalString, byte[] signature,
                                string rsaPublicKey)
{
    // Receive the data and signature from the sender...

    // Verify the digital signature
    return (AntiTamper.VerifySignedString(originalString, signature,
        rsaPublicKey));
}
The VerifySignedString method must use the same SHA512CryptoServiceProvider object that the sender used in the previous SignString method; otherwise, the signature will not be verified. An RSACryptoServiceProvider object is also created, but before this object is used to verify the signature, the RSACryptoServiceProvider.FromXmlString method is called to import the public key information needed to properly verify the signature. Finally, the RSACryptoServiceProvider.VerifyData method is called to verify the data along with its signature. This method returns a Boolean true if the string data was not tampered with or corrupted, and false otherwise:
public static bool VerifySignedString(string clearText, byte[] signature,
                                   string rsaPublicKey)
{
    bool verified = false;
    byte[] encodedClearText = Encoding.Unicode.GetBytes(clearText);

    using (SHA512CryptoServiceProvider sha512 =
                         new SHA512CryptoServiceProvider())
    {
        using (RSACryptoServiceProvider rsa =
               new RSACryptoServiceProvider(RSA_KEY_SIZE))
        {
            rsa.FromXmlString(rsaPublicKey);

            verified = rsa.VerifyData(encodedClearText, sha512, signature);
        }
    }

    return verified;
}
See Also
The “RSACryptoServiceProvider Class,” “SHA512CryptoServiceProvider Class,” and “Encoding.Unicode.GetBytes Method” topics in the MSDN documentation. For more on public keys, see the Wikipedia article “Public-key cryptography”.
11.5 Making a Security Assert Safe
Problem
You want to assert that at a particular point in the call stack, a given permission is available for all subsequent calls. However, doing this can easily open a security hole to allow other malicious code to spoof your code or to create a back door into your component. You want to assert a given security permission, but you want to do so in a secure and efficient manner.
Solution
To make this approach secure, you need to call Demand on the permissions that the subsequent calls need. This makes sure that code that doesn’t have these permissions can’t slip by due to the Assert. The Demand ensures that you have indeed been granted this permission before using the Assert to short-circuit the stackwalk. This is demonstrated by the function CallSecureFunctionSafelyAndEfficiently, which performs a Demand and an Assert before calling SecureFunction, which in turn does a Demand for a ReflectionPermission.
The code listing for CallSecureFunctionSafelyAndEfficiently is shown in Example 11-5.
Example 11-5. CallSecureFunctionSafelyAndEfficiently function
public static void CallSecureFunctionSafelyAndEfficiently()
{

    // Set up a permission to be able to access nonpublic members
    // via reflection.
    ReflectionPermission perm =
        new ReflectionPermission(ReflectionPermissionFlag.MemberAccess);

    // Demand the permission set we have compiled before using Assert
    // to make sure we have the right before we Assert it. We do
    // the Demand to ensure that we have checked for this permission
    // before using Assert to short-circuit stackwalking for it, which
    // helps us stay secure, while performing better.
    perm.Demand();

    // Assert this right before calling into the function that
    // would also perform the Demand to short-circuit the stack walk
    // each call would generate. The Assert helps us to optimize
    // our use of SecureFunction.
    perm.Assert();

    // We call the secure function 100 times but only generate
    // the stackwalk from the function to this calling function
    // instead of walking the whole stack 100 times.
    for(int i=0;i<100;i++)
    {
        SecureFunction();
    }
}
The code listing for SecureFunction is shown here:
public static void SecureFunction()
{
    // Set up a permission to be able to access nonpublic members
    // via reflection.
    ReflectionPermission perm =
        new ReflectionPermission(ReflectionPermissionFlag.MemberAccess);

    // Demand the right to do this and cause a stackwalk.
    perm.Demand();

    // Perform the action here...
}
Discussion
In the demonstration function CallSecureFunctionSafelyAndEfficiently, the function you are calling (SecureFunction) performs a Demand on a ReflectionPermission to ensure that the code can access nonpublic members of classes via reflection. Normally, this would result in a stackwalk for every call to SecureFunction. The Demand in CallSecureFunctionSafelyAndEfficiently is there only to protect against the usage of the Assert in the first place. To make this more efficient, you can use Assert to state that all functions issuing Demands that are called from this one do not have to stackwalk any further. The Assert says stop checking for this permission in the call stack. In order to do this, you need the permission to call Assert.
The problem comes in with this Assert, as it opens up a potential luring attack where SecureFunction is called via CallSecureFunctionSafelyAndEfficiently, which calls Assert to stop the Demand stackwalks from SecureFunction. If unauthorized code without ReflectionPermission were able to call CallSecureFunctionSafelyAndEfficiently, the Assert would prevent the SecureFunction Demand call from determining that there is some code in the call stack without the proper rights. This is the power of the call stack checking in the CLR when a Demand occurs.
To protect against this, you issue a Demand for the ReflectionPermission needed by SecureFunction in CallSecureFunctionSafelyAndEfficiently to close this hole before issuing the Assert. The combination of this Demand and the Assert causes you to do one stackwalk instead of the original 100 that would have been caused by the Demand in SecureFunction.
Security optimization techniques, such as using Assert in this case (even though it isn’t the primary reason to use Assert), can help class library and control developers who are trusted to perform Asserts in order to speed the interaction of their code with the CLR; but if used improperly, these techniques can also open up holes in the security picture. This example shows that you can have both performance and security where secure access is concerned.
If you are using Assert, be mindful that stackwalk overrides should never be made in a class constructor. Constructors are not guaranteed to have any particular security context, nor are they guaranteed to execute at a specific point in time. Thus, the call stack is not well defined, and Assert used in this context can produce unexpected results.
One other thing to remember with Assert is that you can have only one active Assert in a function at a given time. If you Assert the same permission twice, a SecurityException is thrown by the CLR. You must revert the original Assert by first using RevertAssert. Then, you can declare the second Assert.
See Also
The “CodeAccessSecurity.Assert Method,” “CodeAccessSecurity.Demand Method,” “CodeAccessSecurity.RevertAssert Method,” and “Overriding Security Checks” topics in the MSDN documentation.
11.6 Verifying That an Assembly Has Been Granted Specific Permissions
Problem
When your assembly requests optional permissions (such as asking for disk access to enable users to export data to disk as a product feature) using the SecurityAction.RequestOptional flag, it might or might not actually obtain those permissions. Regardless, your assembly will still load and execute. You need a way to verify whether your assembly actually obtained those permissions. This can help prevent many security exceptions from being thrown. For example, if you optionally requested read/write permissions on the registry but did not receive them, you could disable the user interface controls that are used to read and store application settings in the registry.
Solution
Check to see if your assembly received the optional permissions using the PermissionSet.IsSubsetOf method like this:
using System;
using System.Text.RegularExpressions;
using System.Web;
using System.Net;
using System.Security;

Regex regex = new Regex(@"http://www.oreilly.com/.*");
WebPermission webConnectPerm = new WebPermission(NetworkAccess. Connect,regex);

PermissionSet pSet = new PermissionSet(PermissionState.None);
pSet.AddPermission(webConnectPerm);
if (pSet.IsSubsetOf(Assembly.GetExecutingAssembly().PermissionSet))
{
   // Connect to the O'Reilly site.
}
This code sets up a Regex for the O’Reilly website and then uses it to create a WebPermission for connecting to that site and all sites containing the string. You then check the WebPermission by creating a new PermissionSet object with no access to the protected resource (i.e., PermissionState.None), adding the webConnectPerm permission to this newly created PermissionSet object, and finally checking if this new PermissionSet object is a subset of the executing assembly’s permission set.
Discussion
The IsSubsetOf method is a lightweight way of determining whether permission is granted for an assembly without first incurring the full stackwalk that a Demand gives you. Note, however, that once you exercise any code that performs a Demand, the full stackwalk will then take place.
One reason you might design an assembly to have optional permissions is for deployment in different customer scenarios. In some scenarios (such as desktop applications), it might be acceptable to have an assembly that can perform more robust actions (talk to a database, create network traffic, etc.). In other scenarios, you can defer these actions if the customer does not wish to grant enough permissions for these extra services to function.
See Also
The “WebPermission Class,” “SecurityManager Class,” and “IsGranted Method” topics in the MSDN documentation.
11.7 Minimizing the Attack Surface of an Assembly
Problem
Someone attacking your assembly will first attempt to find out as many things as possible about your assembly and then use this information in constructing the attack(s). The more surface area you give to attackers, the more they have to work with. You need to minimize what your assembly is allowed to do so that if an attacker is successful in taking it over, the attacker will not have the necessary privileges to do any damage to the system.
Solution
Use the SecurityAction.RequestRefuse enumeration member to indicate, at an assembly level, the permissions that you do not wish this assembly to have. This will force the CLR to refuse these permissions to your code and will ensure that, even if another part of the system is compromised, your code cannot be used to perform functions that it does not need the rights to do.
The following example allows the assembly to perform file I/O as part of its minimal permission set but explicitly refuses to allow this assembly to have permissions to skip verification:
[assembly: FileIOPermission(SecurityAction.RequestMinimum,Unrestricted=true)]
[assembly: SecurityPermission(SecurityAction.RequestRefuse,
             SkipVerification=false)]
Discussion
Once you have determined what permissions your assembly needs as part of your normal security testing, you can use RequestRefuse to lock down your code. If this seems extreme, think of scenarios in which your code could be accessing a data store containing sensitive information, such as Social Security numbers or salary information. This proactive step can help you show your customers that you take security seriously and can help defend your interests in case a break-in occurs on a system containing your code.
One serious consideration with this approach is that the use of RequestRefuse marks your assembly as partially trusted. This in turn prevents it from calling any strong-named assembly that hasn’t been marked with the AllowPartiallyTrustedCallers attribute.
See Also
The “Using Libraries from Partially Trusted Code,” “SecurityAction Enumeration,” and “Global Attributes” topics in the MSDN documentation.
11.8 Obtaining Security and/or Audit Information
Solution
When obtaining security and/or audit information for a file, use the static GetAccessControl method of the File class to obtain a System.Security.AccessControl.FileSecurity object. Use the FileSecurity object to access the security and audit information for the file. These steps are demonstrated in Example 11-6.
Example 11-6. Obtaining security audit information
public static void ViewFileRights()
{
    // Get security information from a file.
    string file = @"C:Windowswin.ini";
    FileSecurity fileSec = File.GetAccessControl(file);
    DisplayFileSecurityInfo(fileSec);
}

public static void DisplayFileSecurityInfo(FileSecurity fileSec)
{
    Console.WriteLine($"GetSecurityDescriptorSddlForm:
                {fileSec.GetSecurityDescriptorSddlForm(AccessControlSections.All)}");

    foreach (FileSystemAccessRule ace in
            fileSec.GetAccessRules(true, true, typeof(NTAccount)))
    {
        Console.WriteLine("	IdentityReference.Value:
                             {ace.IdentityReference.Value}");
        Console.WriteLine($"	AccessControlType: {ace.AccessControlType}");
        Console.WriteLine($"	FileSystemRights: {ace.FileSystemRights}");
        Console.WriteLine($"	InheritanceFlags: {ace.InheritanceFlags}");
        Console.WriteLine($"	IsInherited: {ace.IsInherited}");
        Console.WriteLine($"	PropagationFlags: {ace.PropagationFlags}");

        Console.WriteLine("-----------------

");
    }

    foreach (FileSystemAuditRule ace in
            fileSec.GetAuditRules(true, true, typeof(NTAccount)))
    {
        Console.WriteLine("	IdentityReference.Value:
                           {ace.IdentityReference.Value}");
        Console.WriteLine($"	AuditFlags: {ace.AuditFlags}");
        Console.WriteLine($"	FileSystemRights: {ace.FileSystemRights}");
        Console.WriteLine($"	InheritanceFlags: {ace.InheritanceFlags}");
        Console.WriteLine($"	IsInherited: {ace.IsInherited}");
        Console.WriteLine($"	PropagationFlags: {ace.PropagationFlags}");

        Console.WriteLine("-----------------

");
    }

    Console.WriteLine($"GetGroup(typeof(NTAccount)).Value:
                        {fileSec.GetGroup(typeof(NTAccount)).Value}");
    Console.WriteLine($"GetOwner(typeof(NTAccount)).Value:
                        {fileSec.GetOwner(typeof(NTAccount)).Value}");

    Console.WriteLine("---------------------------------------


");
}
These methods produce the following output:
GetSecurityDescriptorSddlForm:  O:SYG:SYD:AI(A;ID;FA;;;SY)(A;ID;FA;;;BA)
                     (A;ID;0x1200a9;;;BU)(A;ID;0x1200a9;;;AC)
        IdentityReference.Value: NT AUTHORITYSYSTEM
        AccessControlType: Allow
        FileSystemRights: FullControl
        InheritanceFlags: None
        IsInherited: True
        PropagationFlags: None
-----------------


        IdentityReference.Value: BUILTINAdministrators
        AccessControlType: Allow
        FileSystemRights: FullControl
        InheritanceFlags: None
        IsInherited: True
        PropagationFlags: None
-----------------


        IdentityReference.Value: BUILTINUsers
        AccessControlType: Allow
        FileSystemRights: ReadAndExecute, Synchronize
        InheritanceFlags: None
        IsInherited: True
        PropagationFlags: None
-----------------


        IdentityReference.Value:
                         APPLICATION PACKAGE AUTHORITYALL APPLICATION PACKAGES
        AccessControlType: Allow
        FileSystemRights: ReadAndExecute, Synchronize
        InheritanceFlags: None
        IsInherited: True
        PropagationFlags: None
-----------------


GetGroup(typeof(NTAccount)).Value: NT AUTHORITYSYSTEM
GetOwner(typeof(NTAccount)).Value: NT AUTHORITYSYSTEM
When obtaining security and/or audit information for a registry key, use the GetAccessControl instance method of the Microsoft.Win32.RegistryKey class to obtain a System.Security.AccessControl.RegistrySecurity object. Use the RegistrySecurity object to access the security and audit information for the registry key. These steps are demonstrated in Example 11-7.
Example 11-7. Getting security or audit information for a registry key
public static void ViewRegKeyRights()
{
    // Get security information from a registry key.
    using (RegistryKey regKey =
        Registry.CurrentUser.OpenSubKey(@"SoftwareMicrosoftVisualStudio14.0"))
    {
        RegistrySecurity regSecurity = regKey.GetAccessControl();
        DisplayRegKeySecurityInfo(regSecurity);
    }
}

public static void DisplayRegKeySecurityInfo(RegistrySecurity regSec)
{
    Console.WriteLine($"GetSecurityDescriptorSddlForm:
            {fileSec.GetSecurityDescriptorSddlForm(AccessControlSections.All)}");

    foreach (RegistryAccessRule ace in
            regSec.GetAccessRules(true, true, typeof(NTAccount)))
    {
        Console.WriteLine("	IdentityReference.Value:
                           {ace.IdentityReference.Value}");
        Console.WriteLine($"	AccessControlType: {ace.AccessControlType}");
        Console.WriteLine($"	FileSystemRights: {ace.FileSystemRights}");
        Console.WriteLine($"	InheritanceFlags: {ace.InheritanceFlags}");
        Console.WriteLine($"	IsInherited: {ace.IsInherited}");
        Console.WriteLine($"	PropagationFlags: {ace.PropagationFlags}");

        Console.WriteLine("-----------------

");
    }

    foreach (RegistryAuditRule ace in
            regSec.GetAuditRules(true, true, typeof(NTAccount)))
    {
        Console.WriteLine("	IdentityReference.Value:
                           {ace.IdentityReference.Value}");
        Console.WriteLine($"	AuditFlags: {ace.AuditFlags}");
        Console.WriteLine($"	FileSystemRights: {ace.FileSystemRights}");
        Console.WriteLine($"	InheritanceFlags: {ace.InheritanceFlags}");
        Console.WriteLine($"	IsInherited: {ace.IsInherited}");
        Console.WriteLine($"	PropagationFlags: {ace.PropagationFlags}");

        Console.WriteLine("-----------------

");
    }
    Console.WriteLine($"GetGroup(typeof(NTAccount)).Value:
                        {fileSec.GetGroup(typeof(NTAccount)).Value}");
    Console.WriteLine($"GetOwner(typeof(NTAccount)).Value:
                        {fileSec.GetOwner(typeof(NTAccount)).Value}");

    Console.WriteLine("---------------------------------------


");
}
These methods produce the following output:
GetSecurityDescriptorSddlForm:  O:S-1-5-21-3613598369-3284219489-1294304910-1001G:
             S-1-5-21-3613598369-3284219489-1294304910-1001D:
            (A;OICIID;KA;;;S-1-5-21-3613598369-3284219489-1294304910-1001)
            (A;OICIID;KA;;;SY)(A;OICIID;KA;;;BA)(A;OICIID;KR;;;RC)
        IdentityReference.Value: VM_Win81_VS14Teilhet
        AccessControlType: Allow
        RegistryRights: FullControl
        InheritanceFlags: ContainerInherit, ObjectInherit
        IsInherited: True
        PropagationFlags: None
-----------------


        IdentityReference.Value: NT AUTHORITYSYSTEM
        AccessControlType: Allow
        RegistryRights: FullControl
        InheritanceFlags: ContainerInherit, ObjectInherit
        IsInherited: True
        PropagationFlags: None
-----------------


        IdentityReference.Value: BUILTINAdministrators
        AccessControlType: Allow
        RegistryRights: FullControl
        InheritanceFlags: ContainerInherit, ObjectInherit
        IsInherited: True
        PropagationFlags: None
-----------------


        IdentityReference.Value: NT AUTHORITYRESTRICTED
        AccessControlType: Allow
        RegistryRights: ReadKey
        InheritanceFlags: ContainerInherit, ObjectInherit
        IsInherited: True
        PropagationFlags: None
-----------------


GetGroup(typeof(NTAccount)).Value: VM_WIN81_VS14Teilhet
GetOwner(typeof(NTAccount)).Value: VM_WIN81_VS14Teilhet
Discussion
The essential method that is used to obtain the security information for a file or registry key is GetAccessControl. When this method is called on the RegistryKey object, a RegistrySecurity object is returned. However, when this method is called on a File class, a FileSecurity object is returned. The RegistrySecurity and FileSecurity objects essentially represent a Discretionary Access Control List (DACL), which is what developers writing code in unmanaged languages such as C++ are used to working with.
The RegistrySecurity and FileSecurity objects each contain a list of security rules that has been applied to the system object that it represents. The RegistrySecurity object contains a list of RegistryAccessRule objects, and the FileSecurity object contains a list of FileSystemAccessRule objects. These rule objects are the equivalent of the Access Control Entries (ACE) that make up the list of security rules within a DACL.
System objects other than just the File class and RegistryKey object allow security privileges to be queried. Table 11-1 lists all the .NET Framework classes that return a security object type and what that type is. In addition, the rule-object type that is contained in the security object is also listed.
| Class | Object returned by the GetAccessControl method | Rule-object type contained within the security object |
|---|---|---|
Directory |
DirectorySecurity |
FileSystemAccessRule |
DirectoryInfo |
DirectorySecurity |
FileSystemAccessRule |
EventWaitHandle |
EventWaitHandleSecurity |
EventWaitHandleAccessRule |
File |
FileSecurity |
FileSystemAccessRule |
FileInfo |
FileSecurity |
FileSystemAccessRule |
FileStream |
FileSecurity |
FileSystemAccessRule |
Mutex |
MutexSecurity |
MutexAccessRule |
RegistryKey |
RegistrySecurity |
RegistryAccessRule |
Semaphore |
SemaphoreSecurity |
SemaphoreAccessRule |
The abstraction of a system object’s DACL through the *Security objects and the abstraction of a DACL’s ACE through the *AccessRule objects allows easy access to the security privileges of that system object. In previous versions of the .NET Framework, these DACLs and their ACEs would have been accessible only in unmanaged code. With the .NET 2.0 Framework and later, you now have access to view and program these objects.
See Also
Recipe 11.9; the “System.IO.File.GetAccessControl Method,” “System.Security. AccessControl.FileSecurity Class,” “Microsoft.Win32.RegistryKey.GetAccessControl Method,” and “System.Security.AccessControl.RegistrySecurity Class” topics in the MSDN documentation.
11.9 Granting or Revoking Access to a File or Registry Key
Solution
The code shown in Example 11-8 grants and then revokes the ability to perform write actions on a registry key.
Example 11-8. Granting and revoking the right to perform write actions on a registry key
public static void GrantRevokeRegKeyRights()
{
    NTAccount user = new NTAccount(@"WRKSTNST");


    using (RegistryKey regKey = Registry.LocalMachine.OpenSubKey(
                            @"SOFTWAREMyCompanyMyApp"))
    {
        GrantRegKeyRights(regKey, user, RegistryRights.WriteKey,
                       InheritanceFlags.None, PropagationFlags.None,
                       AccessControlType.Allow);

        RevokeRegKeyRights(regKey, user, RegistryRights.WriteKey,
                       InheritanceFlags.None, PropagationFlags.None,
                       AccessControlType.Allow)
    }
}

public static void GrantRegKeyRights(RegistryKey regKey,
                                     NTAccount user,
                                     RegistryRights rightsFlags,
                                     InheritanceFlags inherFlags,
                                     PropagationFlags propFlags,
                                     AccessControlType actFlags)
{
    Registry Security regSecurity = regKey.GetAccessControl();

    RegistryAccessRule rule = new RegistryAccessRule(user, rightsFlags, inherFlags,
                                                     propFlags, actFlags);
    regSecurity.AddAccessRule(rule);
    regKey.SetAccessControl(regSecurity);
}


public static void RevokeRegKeyRights(RegistryKey regKey,
                                      NTAccount user,
                                      RegistryRights rightsFlags,
                                      InheritanceFlags inherFlags,
                                      PropagationFlags propFlags,
                                      AccessControlType actFlags)
{
    RegistrySecurity regSecurity = regKey.GetAccessControl();

    RegistryAccessRule rule = new RegistryAccessRule(user, rightsFlags, inherFlags,
                                                     propFlags, actFlags);
    regSecurity.RemoveAccessRuleSpecific(rule);

    regKey.SetAccessControl(regSecurity);
}
The code shown in Example 11-9 grants and then revokes the ability to delete a file.
Example 11-9. Granting and revoking the right to delete a file
public static void GrantRevokeFileRights()
{
    NTAccount user = new NTAccount(@"WRKSTNST");

    string file = @"c:FOO.TXT";
    GrantFileRights(file, user, FileSystemRights.Delete, InheritanceFlags.None,
                    PropagationFlags.None, AccessControlType.Allow);

    RevokeFileRights(file, user, FileSystemRights.Delete, InheritanceFlags.None,
                     PropagationFlags.None, AccessControlType.Allow);
}

public static void GrantFileRights(string file,
                                   NTAccount user,
                                   FileSystemRights rightsFlags,
                                   InheritanceFlags inherFlags,
                                   PropagationFlags propFlags,
                                   AccessControlType actFlags)
{
    FileSecurity fileSecurity = File.GetAccessControl(file);
    FileSystemAccessRule rule = new FileSystem AccessRule(user, rightsFlags,
                                                          inherFlags, propFlags,
                                                          actFlags);
    fileSecurity.AddAccessRule(rule);
    File.SetAccessControl(file, fileSecurity);
}

public static void RevokeFileRights(string file,
                                    NTAccount user,
                                    FileSystemRights rightsFlags,
                                    InheritanceFlags inherFlags,
                                    PropagationFlags propFlags,
                                    AccessControlType actFlags)
{
    FileSecurity fileSecurity = File.GetAccessControl(file);

    FileSystemAccessRule rule = new FileSystemAccessRule(user, rightsFlags,
                                                         inherFlags, propFlags,
                                                         actFlags);
    fileSecurity.RemoveAccessRuleSpecific(rule);
    File.SetAccessControl(file, fileSecurity);
}
Discussion
When granting or revoking access rights on a file or registry key, you need two things. The first is a valid NTAccount object. This object essentially encapsulates a user or group account, and is required to create either a new RegistryAccessRule or a new FileSystemAccessRule. The NTAccount identifies the user or group this access rule will apply to. Note that the string passed in to the NTAccount constructor must be changed to a valid user or group name that exists on your machine. If you pass in the name of an existing user or group account that has been disabled, an IdentityNotMappedException will be thrown with the message “Some or all identity references could not be translated.”
The second item you need is either a valid RegistryKey object, if you are modifying security access to a registry key, or a string containing a valid path and filename to an existing file. These objects will have security permissions either granted to them or revoked from them.
Once these two items have been obtained, you can use the second item to obtain a security object, which contains the list of access-rule objects. For example, the following code obtains the security object for the registry key HKEY-LOCAL_MACHINESOFTWAREMyCompanyMyApp:
RegistryKey regKey = Registry.LocalMachine.OpenSubKey(
                            @"SOFTWAREMyCompanyMyApp");
RegistrySecurity regSecurity = regKey.GetAccessControl();
The following code obtains the security object for the FOO.TXT file:
string file = @"c:FOO.TXT";
FileSecurity fileSecurity = File.Get AccessControl(file);
Now that you have your particular security object, you can create an access-rule object that will be added to it. To do this, you need to create a new access rule. For a registry key, you have to create a new RegistryAccessRule object, and for a file, you have to create a new FileSystemAccessRule object. To add this access rule to the correct security object, you call the SetAccessControl method on the security object. Note that RegistryAccessRule objects can be added only to RegistrySecurity objects, and FileSystemAccessRule objects can be added only to FileSecurity objects.
To remove an access-rule object from a system object, you follow the same set of steps, except that you call the RemoveAccessRuleSpecific method instead of AddAccessRule. RemoveAccessRuleSpecific accepts an access-rule object and attempts to remove the rule that exactly matches this rule object from the security object. As always, you must remember to call the SetAccessControl method to apply any changes to the actual system object.
For a list of other classes that allow security permissions to be modified programmatically, see Recipe 11.8.
See Also
Recipe 11.8; the “System.IO.File.GetAccessControl Method,” “System.Security. AccessControl.FileSecurity Class,” “System.Security.AccessControl.FileSystemAc-cessRule Class,” “Microsoft.Win32.RegistryKey.GetAccessControl Method,” “System.Security.AccessControl.RegistrySecurity Class,” and “System.Security.AccessControl.RegistryAccessRule Class” topics in the MSDN documentation.
11.10 Protecting String Data with Secure Strings
Solution
Use the SecureString object.
To copy text from a stream object to a SecureString object, use the following method:
public static SecureString CreateSecureString(StreamReader secretStream)
{
    SecureString secretStr = new SecureString();
    char buf;
    while (secretStream.Peek() >= 0)
    {
        buf = (char)secretStream.Read();
        secretStr.AppendChar(buf);
    }

    // Make the secretStr object read-only.
    secretStr.MakeReadOnly();

    return (secretStr);
}
To copy text from a string containing sensitive data, use the following method:
public static SecureString CreateSecureString(string secret)
{
    SecureString secretStr = new SecureString();
    char[] buf = new char[1];
    foreach (char c in secret)
    {
        secretStr.AppendChar(c);
    }

    // Make the secretStr object read-only
    secretStr.MakeReadOnly();

    return (secretStr);
}
To pull the plain text out of a SecureString object, use the following method:
public static void ReadSecureString(SecureString secretStr)
{
    // In order to read back the string, you need to use some special methods.
    IntPtr secretStrPtr = Marshal.SecureStringToBSTR(secretStr);
    string nonSecureStr = Marshal.PtrToStringBSTR(secretStrPtr);

    // Use the unprotected string.
    Console.WriteLine($"nonSecureStr = {nonSecureStr}");

    Marshal.ZeroFreeBSTR(secretStrPtr);

    if (!secretStr.IsReadOnly())
    {
        secretStr.Clear();
    }
}
Discussion
A SecureString object is designed specifically to contain string data that you want to keep secret. Some of the data you may want to store in a SecureString object would be a Social Security number, a credit card number, a PIN, a password, an employee ID, or any other type of sensitive information.
This string data is automatically encrypted immediately upon being added to the SecureString object, and it is automatically decrypted when the string data is extracted from the SecureString object. The encryption is one of the highlights of using this object.
Another feature of a SecureString object is that when the MakeReadOnly method is called, the SecureString becomes immutable. Any attempt to modify the string data within the read-only SecureString object causes an InvalidOperationException to be thrown. Once a SecureString object is made read-only, it cannot go back to a read/write state. However, you need to be careful when calling the Copy method on an existing SecureString object. This method will create a new instance of the SecureString object on which it was called, with a copy of its data. However, this new SecureString object is now readable and writable. You should review your code to determine if this new SecureString object should be made read-only similarly to its original SecureString object.
Note
The SecureString object can be used only on Windows 2000 (with Service Pack 3 or greater) or later operating system.
In this recipe, you create a SecureString object from data read in from a stream or a simple string. This data could also come from a char* using unsafe code. The SecureString object contains a constructor that accepts a parameter of this type in addition to an integer parameter that takes a length value, which determines the number of characters to pull from the char*.
Getting data out of a SecureString object is not obvious at first glance. There are no methods to return the data contained within a SecureString object. To accomplish this, you must use two static methods on the Marshal class. The first is the SecureStringToBSTR, which accepts your SecureString object and returns an IntPtr. This IntPtr is then passed into the PtrToStringBSTR method, also on the Marshal class. The PtrToStringBSTR method then returns an unsecure String object containing your decrypted string data.
Once you are done using the SecureString object, you should call the static ZeroFreeBSTR method on the Marshal class to zero out any memory allocated when extracting the data from the SecureString. As an added safeguard, you should call the Clear method of the SecureString object to zero out the encrypted string from memory. If you have made your SecureString object read-only, you will not be able to call the Clear method to wipe out its data. In this situation, you must either call the Dispose method on the SecureString object (the use of a using block would be preferable here) or rely on the garbage collector to remove the SecureString object and its data from memory.
Notice that when you pull a SecureString object into an unsecure String, its data becomes viewable by an attacker. So it may seem pointless to go through the trouble of using a SecureString when you are just going to convert it into an insecure String. However, by using a SecureString, you narrow the window of opportunity for an attacker to view this data in memory. In addition, some APIs only accept a SecureString as a parameter so that you don’t have to convert it to an unsecure String. The ProcessStartInfo, for example, accepts a password in its Password property as a SecureString object.
Note
The SecureString object is not a silver bullet for securing your data. It is, however, another layer of defense you can add to your application.
See Also
The “Secure String Class” topic in the MSDN documentation.
11.11 Securing Stream Data
Problem
You want to use the TCP server in Recipe 9.9 to communicate with the TCP client in Recipe 9.10. However, you need to encrypt the communication and verify that it has not been tampered with in transit.
Solution
Replace the NetworkStream class with the more secure SslStream class on both the client and the server. The code for the more secure TCP client, TCPClient_SSL, is shown in Example 11-10 (changes are in boldface).
Example 11-10. TCPClient_SSL class
class TCPClient_SSL
{
    private TcpClient _client = null;
    private IPAddress _address = IPAddress.Parse("127.0.0.1");
    private int _port = 5;
    private IPEndPoint _endPoint = null;

    public TCPClient_SSL(string address, string port)
    {
        _address = IPAddress.Parse(address);
        _port = Convert.ToInt32(port);
        _endPoint = new IPEndPoint(_address, _port);
    }

    public void ConnectToServer(string msg)
    {
        try
        {
            using (client = new TcpClient())
            {
                client.Connect(_endPoint);

                using(SslStreamsslStream = newSslStream(_client.GetStream(), false,
                    new RemoteCertificateValidationCallback
                             (CertificateValidationCallback)))
                 {
                    sslStream.AuthenticateAsClient("MyTestCert2");

                    // Get the bytes to send for the message.
                    byte[] bytes = Encoding.ASCII.GetBytes(msg);
                    // Send message.
                    Console.WriteLine($"Sending message to server: { msg}");
                    sslStream.Write(bytes, 0, bytes.Length);

                    // Get the response.
                    // Buffer to store the response bytes.
                    bytes = new byte[1024];

                    // Display the response.
                    int bytesRead = sslStream.Read(bytes, 0, bytes.Length);
                    string serverResponse = Encoding.ASCII.GetString(bytes, 0,
                          bytesRead);
                    Console.WriteLine($"Server said: { serverResponse}");
                }
            }
        }
        catch (SocketException e)
        {
            Console.WriteLine
                     ($"There was an error talking to the server: {e.ToString()}");
        }
    }

    private bool CertificateValidationCallback(objectsender,
                 X509Certificate certificate, X509Chain chain,
                 SslPolicyErrors sslPolicyErrors)
     {
          if (sslPolicyErrors == SslPolicyErrors.None)
          {
              return true;
          }
          else
          {
              if (sslPolicyErrors == SslPolicyErrors.RemoteCertificateChainErrors)
              {
                  Console.WriteLine("The X509Chain.ChainStatus returned an array " +
                        "of X509ChainStatus objects containing error information.");
              }
              else if (sslPolicyErrors ==
                       SslPolicyErrors.RemoteCertificateNameMismatch)
              {
                   Console.WriteLine(
                             "There was a mismatch of the name on a certificate.");
              }
              else if (sslPolicyErrors ==
                       SslPolicyErrors.RemoteCertificateNotAvailable)
              {
                   Console.WriteLine("No certificate was available.");
              }
              else
              {
                  Console.WriteLine("SSL Certificate Validation Error!");
              }
          }
          Console.WriteLine(Environment.NewLine +
                            "SSL Certificate Validation Error!");
          Console.WriteLine(sslPolicyErrors.ToString());

          return false;
     }
}
The new code for the more secure TCP server, TCPServer_SSL, is shown in Example 11-11 (changes are in boldface).
Example 11-11. TCPServer_SSL class
class TCPServer_SSL
{
    private TcpListener _listener = null;
    private IPAddress _address = IPAddress.Parse("127.0.0.1");
    private int _port = 55555;

    #region CTORs
    public TCPServer_SSL()
    {
    }

    public TCPServer_SSL (string address, string port)
    {
        _port = Convert.ToInt32(port);
        _address = IPAddress.Parse(address);
    }
    #endregion // CTORs

    #region Properties
    public IPAddress Address
    {
        get { return _address; }
        set { _address = value; }
    }

    public int Port
    {
        get { return _port; }
        set { _port = value; }
    }
    #endregion

    public void Listen()
    {
        try
        {
           _using_(listener = new TcpListener(_address, _port))
            {
                // Fire up the server.
                listener.Start();

                // Enter the listening loop.
                while (true)
                {
                    Console.Write("Looking for someone to talk to... ");

                    // Wait for connection.
                    TcpClient newClient = _listener.AcceptTcpClient();
                    Console.WriteLine("Connected to new client");

                    // Spin a thread to take care of the client.
                    ThreadPool.QueueUserWorkItem(new WaitCallback(ProcessClient),
                                             newClient);
                }
            }
        }
        catch (SocketException e)
        {
            Console.WriteLine($"SocketException: {e}");
        }
        finally
        {
            // Shut it down.
            _listener.Stop();
        }

        Console.WriteLine("Hit any key (where is ANYKEY?) to continue...");
        Console.Read();
    }

    private void ProcessClient(object client)
    {
        using (TcpClient newClient = (TcpClient)client)
        {
            // Buffer for reading data.
            byte[] bytes = new byte[1024];
            string clientData = null;

            using (Ssl Stream sslStream = new SslStream(newClient.GetStream()))
            {
                 sslStream.AuthenticateAsServer(GetServerCert("MyTestCert2"), false,
                                                SslProtocols.Default, true);

               // Loop to receive all the data sent by the client.
               int bytesRead = 0;
               while ((bytesRead = sslStream.Read(bytes, 0, bytes.Length)) != 0)
               {
                   // Translate data bytes to an ASCII string.
                   clientData = Encoding.ASCII.GetString(bytes, 0, bytesRead);
                   Console.WriteLine($"Client says: {clientData}");
                   // Thank them for their input.
                   bytes = Encoding.ASCII.GetBytes("Thanks call again!");

                   // Send back a response.
                   ssl Stream.Write(bytes, 0, bytes.Length);
               }
            }
        }
    }

    private static X509Certificate GetServerCert(string subjectName)
    {
        X509Store store = new X509Store(StoreName.My, StoreLocation.LocalMachine);
        store.Open(OpenFlags.ReadOnly);
        X509CertificateCollection certificate =
                store.Certificates.Find(X509FindType.FindBySubjectName,
                                        subjectName, true);
        if (certificate.Count > 0)
            return (certificate[0]);
        else
            return (null);
    }
}
Discussion
For more information about the inner workings of the TCP server and client and how to run these applications, see Recipes 9.9 and 9.10. In this recipe, we will cover only the changes needed to convert the TCP server and client to use the SslStream object for secure communication.
The SslStream object uses the SSL protocol to provide a secure encrypted channel on which to send data. However, encryption is just one of the security features built into the SslStream object. Another feature of SslStream is that it detects malicious or even accidental modification to the data. Even though the data is encrypted, it may become modified during transit. To determine if this has occurred, the data is signed with a hash before it is sent; when it is received, the data is rehashed and the two hashes are compared. If both hashes are equivalent, the message arrived intact; if the hashes are not equivalent, then somehow the data was modified during transit.
The SslStream object also has the ability to use client and/or server certificates to authenticate the client and/or the server as well as allowing the client to pass a certificate to the server if the client also needs to prove identity to the server. These certificates are used to prove the identity of the issuer. For example, if a client attaches to a server using SSL, the server must provide a certificate to the client to prove that the server is who it says it is. This certificate must be issued by a trusted authority. All trusted certificates are stored on the client in its root certificate store.
To ensure that the TCP server and client can communicate successfully, you need to set up an X.509 certificate that will be used to authenticate the TCP server. To do this, you set up a test certificate using the makecert.exe utility. This utility is installed with Visual Studio and must be run from the Admin Visual Studio Command Prompt. The syntax for creating a simple certificate is as follows:
makecert -r -pe -n "CN=CSharpCookBook.net" -a sha512 -len 4096
         -cy authority -sv CSCBNet.pvk CSCBNet.cer
The options are defined as follows:
-r- The certificate will be self-signed. Self-signed certificates are often created and signed by the developer of a website to facilitate testing of that site before it is moved into production. Self-signed certificates offer no evidence that the site is legitimate.
-pe- The certificate’s private key will be exportable so that it can be included in the certificate.
-n "CN=CSharpCookBook.net"- The publisher’s certificate name. The name follows the
"CN="text. -a sha512- The algorithm used to create the digital signature.
sha512is the strongest available. -len 4096- The number of bits in the length of the key.
-cy authority- The type of this certificate. The type can either be
end(end entity) orauthority(cert authority). -sv CSCBNet.pvk- The name of the private key file that will be generated for the subject.
The final argument to the makecert.exe utility is the output filename, in this case CSCBNet.cer. This will generate the certificate in this file in the current working directory on the hard drive. Additionally, a second file is generated called CSCBNet.pvk. This is the private key file. Both the private key file and the certificate file need to be converted to a personal information exchange (.pfx) file. You accomplish this by running the Pvk2Pfx.exe tool from the Admin Visual Studio Command Prompt as follows:
pvk2pfx.exe -pvk CSCBNet.pvk -spc CSCBNet.cer -pfx CSCBNet.pfx -po CSCB
The options are defined as follows:
-pvk- The name of the private key file.
-spc- The name of the certificate file.
-pfx- The name of the generated personal information exchange file.
-po- The new password for the generated personal information exchange file.
The next step is opening Windows Explorer and right-clicking the CSCBNet.cer file. This will display a pop-up menu. Click the Install Certificate menu item, and a wizard will start up, allowing you to import this .cer file into the certificate store. The first dialog box of the wizard is shown in Figure 11-1. Click Next.
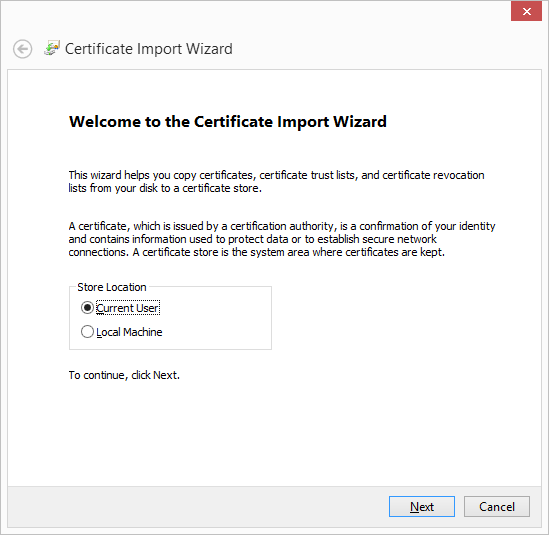
Figure 11-1. The first step of the Certificate Import wizard
The next step in the wizard allows you to choose the certificate store in which you want to install your certificate. This dialog is shown in Figure 11-2. Keep the defaults and click Next.
The final step in the wizard is shown in Figure 11-3. On this dialog, click Finish.
After you click Finish, you’ll see the message box in Figure 11-4, indicating that the import was successful.
Once the certificate file is successfully imported, you need to import the .pfx file using the Certificate Import wizard. Right-click the CSCBNet.pfx file. A pop-up menu is displayed. Click the Install PFX menu item and the wizard will start. The first dialog box of the wizard is shown in Figure 11-5. Keep the default settings and click Next.

Figure 11-2. Specifying a certificate store in the Certificate Import wizard
The next step in this wizard, shown in Figure 11-6, asks you to choose a .pfx file to import. Browse to the file using the Browse button and then click Next.
The next step, shown in Figure 11-7, asks for the password used to create this .pfx file. Note that this password was the one we used in the Pvk2Pfx.exe command-line tool. The actual password was passed in to this tool through the –po switch. For our example, we use the text CSCB as the password. Type this into the text box on this page of the wizard and click Next.
This next step, shown in Figure 11-8, asks you to choose the certificate store in which to store this .pfx information. Keep the defaults and click Next.
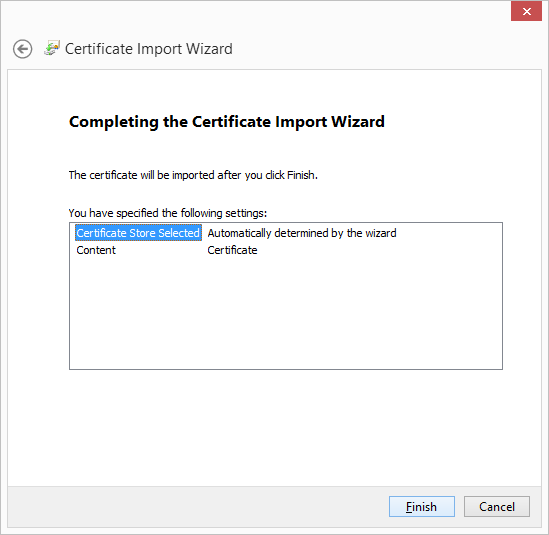
Figure 11-3. The last step of the Certificate Import wizard
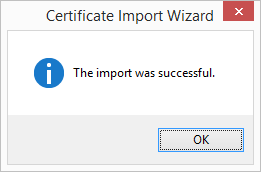
Figure 11-4. The Certificate Import Successful message

Figure 11-5. Specifying a private key store in the Certificate Import wizard
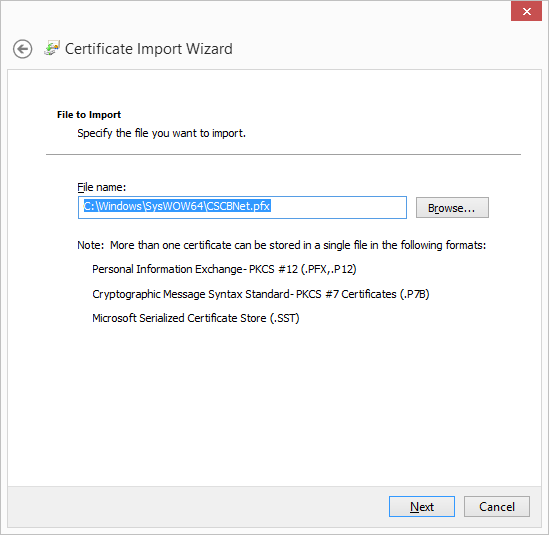
Figure 11-6. Specifying the personal information exchange file to be imported into the certificate store
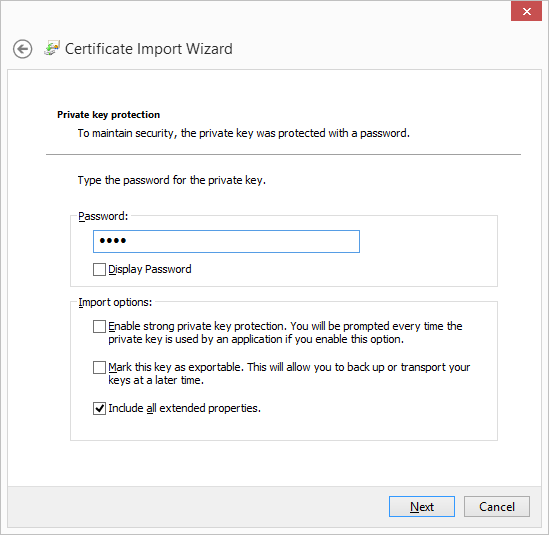
Figure 11-7. Entering in the password of the personal information exchange file
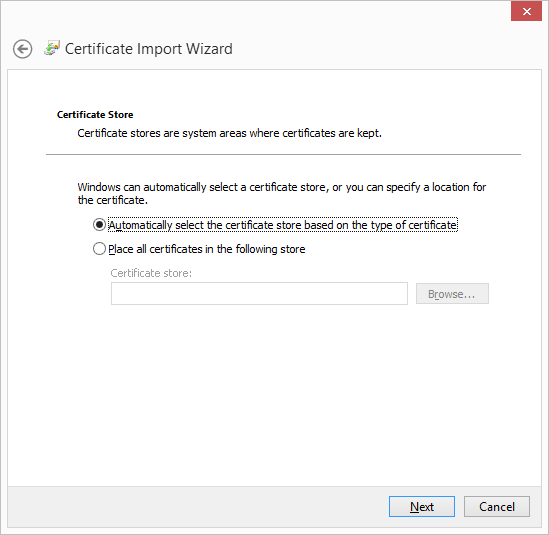
Figure 11-8. Specifying a certificate store for the personal information exchange file in the Certificate Import wizard
The final step in the wizard, shown in Figure 11-9, simply shows the information you specified on the previous pages of the wizard. Click Finish to complete the import. After you click the Finish button, you’ll see the message box in Figure 11-4, indicating that the import was successful.
At this point, you can run the TCP server and client, and they should communicate successfully.
To use the SslStream in the TCP server project, you need to create a new SslStream object to wrap the TcpClient object:
SslStream SslStream = new SslStream(newClient.GetStream());
Before you can use this new stream object, you must authenticate the server using the following line of code:
SslStream.AuthenticateAsServer(GetServerCert("MyTestCert2"),
                           false, SslProtocols.Default, true);
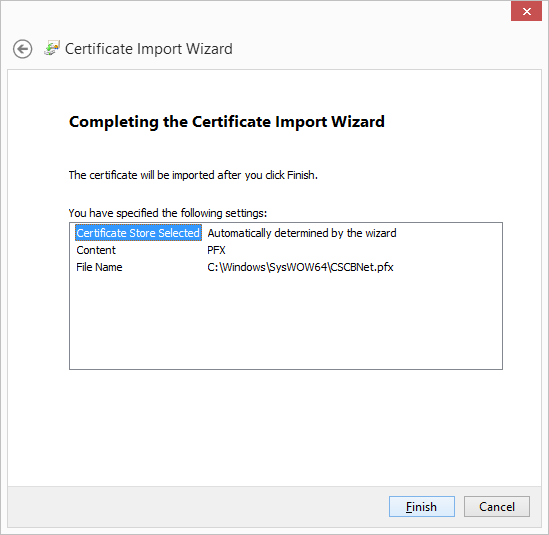
Figure 11-9. The personal information exchange File Import Successful message
The GetServerCert method finds the server certificate used to authenticate the server. Notice the name passed in to this method; it is the same as the publisher’s certificate name switch used with the makecert.exe utility (see the –n switch). This certificate is returned from the GetServerCert method as an X509Certificate object. The next argument to the AuthenticateAsServer method is false, indicating that a client certificate is not required. The SslProtocols.Default argument indicates that the authentication mechanism (SSL 2.0, SSL 3.0, TLS 1.0, or PCT 1.0) is chosen based on what is available to the client and server. The final argument indicates that the certificate will be checked to see whether it has been revoked.
To use the SslStream in the TCP client project, you create a new SslStream object, a bit differently from how it was created in the TCP server project:
SslStream SslStream = new SslStream(_client.GetStream(), false,
        new RemoteCertificateValidationCallback(CertificateValidationCallback));
This constructor accepts a stream from the _client field, a false indicating that the stream associated with the _client field will be closed when the Close method of the SslStream object is called, and a delegate that validates the server certificate. The CertificateValidationCallback method is called whenever a server certificate needs to be validated. The server certificate is checked, and any errors are passed into this delegate method to allow you to handle them as you wish.
The AuthenticateAsClient method is called next to authenticate the server:
SslStream.AuthenticateAsClient("MyTestCert2");
As you can see, with a little extra work, you can replace the current stream type you are using with the SslStream to gain the benefits of the SSL protocol.
See Also
The “SslStream Class” topic in the MSDN documentation.
11.12 Encrypting web.config Information
Solution
To encrypt data within a web.config file section, use the following method:
public static void EncryptWebConfigData(string appPath,
                                        string protectedSection,
                                        string dataProtectionProvider)
{
    System.Configuration.Configuration webConfig =
                WebConfigurationManager.OpenWebConfiguration(appPath);
    ConfigurationSection webConfigSection =
                webConfig.GetSection(protectedSection);

    if (!webConfigSection.SectionInformation.IsProtected)
    {
        webConfigSection.SectionInformation.ProtectSection(
                                               dataProtectionProvider);
        webConfig.Save();
    }
}
To decrypt data within a web.config file section, use the following method:
public static void DecryptWebConfigData(string appPath, string protectedSection)
{
    System.Configuration.Configuration webConfig =
                WebConfigurationManager.OpenWebConfiguration(appPath);
    ConfigurationSection webConfigSection =
                 webConfig.GetSection(protectedSection);

    if (webConfigSection.Section Information.IsProtected)
    {
        webConfigSection.SectionInformation.UnprotectSection();
        webConfig.Save();
    }
}
You will need to add the System.Web and System.Configuration DLLs to your project before this code will compile.
Discussion
To encrypt data, you can call the EncryptWebConfigData method with the following arguments:
EncryptWebConfigData("/WebApplication1", "appSettings",
                     "DataProtectionConfigurationProvider");
The first argument is the virtual path to the web application, the second argument is the section that you want to encrypt, and the last argument is the data protection provider that you want to use to decrypt the data.
The EncryptWebConfigData method uses the virtual path passed into it to open the web.config file. You do this using the OpenWebConfiguration static method of the WebConfigurationManager class:
System.Configuration.Configuration webConfig =
    WebConfigurationManager.OpenWebConfiguration(appPath);
This method returns a System.Configuration.Configuration object, which you use to get the section of the web.config file that you wish to encrypt. You accomplish this through the GetSection method:
ConfigurationSection webConfigSection = webConfig.GetSection(protectedSection);
This method returns a ConfigurationSection object that you can use to encrypt the section. This is done through a call to the ProtectSection method:
webConfigSection.SectionInformation.ProtectSection(dataProtectionProvider);
The dataProtectionProvider argument is a string identifying which data protection provider you want to use to encrypt the section information. The two available providers are DpapiProtectedConfigurationProvider and RsaProtectedConfigurationProvider. The DpapiProtectedConfigurationProvider class makes use of the Data Protection API (DPAPI) to encrypt and decrypt data. The RsaProtectedConfigurationProvider class makes use of the RsaCryptoServiceProvider class in the .NET Framework to encrypt and decrypt data.
The final step to encrypting the section information is to call the Save method of the System.Configuration.Configuration object. This saves the changes to the web.config file. If this method is not called, the encrypted data will not be saved.
To decrypt data within a web.config file, you can call the DecryptWebConfigData method with the following parameters:
DecryptWebConfigData("/WebApplication1", "appSettings");
The first argument is the virtual path to the web application; the second argument is the section that you want to encrypt.
The DecryptWebConfigData method operates very similarly to the EncryptWebConfigData method, except that it calls the UnprotectSection method to decrypt the encrypted data in the web.config file:
webConfigSection.SectionInformation.UnprotectSection();
If you encrypt data in the web.config file using this technique, the data will automatically be decrypted when the web application accesses the encrypted data in the web.config file.
See Also
The “System.Configuration.Configuration Class” topic in the MSDN documentation.
11.13 Obtaining a Safer File Handle
Solution
Use the Microsoft.Win32.SafeHandles.SafeFileHandle object to wrap an existing unmanaged file handle:
public static void WriteToFileHandle(IntPtr hFile)
{
    // Wrap our file handle in a safe handle wrapper object.
    using (Microsoft.Win32.SafeHandles.SafeFileHandle safeHFile =
        new Microsoft.Win32.SafeHandles.SafeFileHandle(hFile, true))
    {
        // Open a FileStream object using the passed-in safe file handle.
        using (FileStream fileStream = new FileStream(safeHFile,
               FileAccess.ReadWrite))
        {
           // Flush before we start to clear any pending unmanaged actions.
           fileStream.Flush();

           // Operate on file here.
           string line = "Using a safe file handle object";

           // Write to the file.
           byte[] bytes = Encoding.ASCII.GetBytes(line);
           fileStream.Write(bytes,0,bytes.Length);
        }
    }
    // Note that the hFile handle is invalid at this point.
}
The SafeFileHandle constructor takes two arguments. The first is an IntPtr that contains a handle to an unmanaged resource. The second argument is a Boolean value, where true indicates that the handle will always be released during finalization, and false indicates that the safeguards that force the handle to be released during finalization are turned off. Unless you have an extremely good reason to turn off these safeguards, it is recommended that you always set this Boolean value to true.
Discussion
A SafeFileHandle object contains a single handle to an unmanaged file resource. This class has two major benefits over using an IntPtr to store a handle—critical finalization and prevention of handle recycling attacks. The SafeFileHandle is seen by the garbage collector as a critical finalizer, due to the fact that one of the SafeFileHandle’s base classes is CriticalFinalizerObject. The garbage collector separates finalizers into two categories: critical and noncritical. The noncritical finalizers are run first, followed by the critical finalizers. If a FileStream’s finalizer flushes any data, it can assume that the SafeFileHandle object is still valid, because the SafeFileHandle finalizer is guaranteed to run after the FileStream’s.
Note
The Close method on the FileStream object will also close its underlying SafeFileHandle object.
Since the SafeFileHandle falls under critical finalization, it means that the underlying unmanaged handle is always released (i.e., the SafeFileHandle.ReleaseHandle method is always called), even in situations in which the AppDomain is corrupted and/or shutting down or the thread is being aborted. This will prevent resource handle leaks.
The SafeFileHandle object also helps to prevent handle recycling attacks. The operating system aggressively tries to recycle handles, so it is possible to close one handle and open another soon afterward and get the same value for the new handle. One way an attacker will take advantage of this is by forcing an accessible handle to close on one thread while it’s possibly still being used on another, in the hope that the handle will be recycled quickly and used as a handle to a new resource, perhaps one that the attacker does not have permission to access. If the application still has this original handle and is actively using it, data corruption could be an issue.
Since this class inherits from the SafeHandleZeroOrMinusOneIsInvalid class, a handle value of 0 or –1 is considered an invalid handle.
See Also
The “Microsoft.Win32.SafeHandles.SafeFileHandle Class” topic in the MSDN documentation.
11.14 Storing Passwords
Problem
You need to store passwords for users of your application in a safe and secure manner. However, you do not want to allow anyone with elevated privileges, such as an administrator of the system, to have any way to decrypt the stored passwords. Additionally, if this information is stolen by an attacker, you want to make it as difficult as possible for her to uncover the original passwords.
Solution
Rather than using a two-way encryption algorithm to encrypt the passwords, which can also be used to decrypt the passwords with the right key, we will use a one-way hashing algorithm with a salt value to store the passwords in a more secure manner. Rather than comparing clear-text passwords we will compare hash values, thereby hiding the real password from prying eyes.
Note
This recipe uses methods from Recipe 11.10—most notably the CreateSecureString and ReadSecureString methods.
We’ll start out by creating the method that accepts a clear-text password and returns both a unique salt value (as an out parameter) and the hashed and salted password (as the return value):
const int HASH_ITERATIONS = 43;
const string HASH_ALGORITHM = "SHA-512";
const int SALT_LENGTH = 64;

public static SecureString GeneratePasswordHashAndSalt(SecureString passwd,
                                                       out SecureString salt)
{
    // First generate the unique salt we will use to hash with
    salt = GenerateSalt();

    // Create salted hash
    string hashedPwd = GenerateHash(passwd, salt);

    return CreateSecureString(hashedPwd);
}
Next we’ll write the method that generates a cryptographically strong random number, which we will use as the salt value:
private static SecureString GenerateSalt()
{
    RNGCryptoServiceProvider rng = new RNGCryptoServiceProvider();

    byte[] salt = new byte[SALT_LENGTH];
    rng.GetBytes(salt);

    return CreateSecureString(Convert.ToBase64String(salt));
}
And, of course, we’ll need a method that accepts both the unhashed password as well as our salt value, created in the previous method GenerateSalt, and then returns the final hashed password/salt combination:
private static string GenerateHash(SecureString clearTextData, SecureString salt)
{
    if (salt?.Length > 0)
    {
        // Combine password and salt before hashing
        byte[] clearTextDataArray =
                  Encoding.UTF8.GetBytes(ReadSecureString(clearTextData));
        byte[] clearTextSaltArray =
            Convert.FromBase64String(ReadSecureString(salt));

        byte[] clearTextDataSaltArray = new byte[clearTextDataArray.Length +
                                                 clearTextSaltArray.Length];
        Array.Copy(clearTextDataArray, 0, clearTextDataSaltArray,
                   0, clearTextDataArray.Length);
        Array.Copy(clearTextSaltArray, 0, clearTextDataSaltArray,
                   clearTextDataArray.Length, clearTextSaltArray.Length);

        // Use a secure hashing algorithm
        HashAlgorithm alg = HashAlgorithm.Create(HASH_ALGORITHM);

        byte[] hashedPwd = null;

        for (int index = 0; index < HASH_ITERATIONS; index++)
        {
            if (hashedPwd == null)
            {
                // Initial hash of the cleartext password
                hashedPwd = alg.ComputeHash(clearTextDataSaltArray);
            }
            else
            {
                // Re-hash the hash for added entropy
                hashedPwd = alg.ComputeHash(hashedPwd);
            }
        }

        return Convert.ToBase64String(hashedPwd);
    }
    else
    {
        throw new ArgumentException(
         $"Salt parameter {nameof(salt)} cannot be empty or null. " +
          "This is a security violation.");
    }
}
This GenerateHash method simply combines both the password and salt values into a single byte[] and then computes the hash for this combined value. For additional security, the resulting hash value is rehashed many times over. The number of hashing iterations is controlled by the HASH_ITERATIONS constant.
Once this final hashed/salted password value is created, we need to store both this value as well as the unique salt value for this user in a data store. This pseudocode gives you the general idea. You can modify this to work with whatever data store you are using:
public static void SaveHashedPassword(string userName, SecureString pwdHash,
                                      SecureString salt)
{
    string base64PwdHash = ReadSecureString(pwdHash);
    string base64Salt = ReadSecureString(salt);

    // Store in DB
    // INSERT users ('user', 'pwd', 'salt', ...)
    //                (userName, base64PwdHash, base64Salt, ...)}
The pwdHash and salt parameters should be fed from the return value and out parameter of the GeneratePasswordHashAndSalt method, respectively.
Now that we can create our hashed/salted password, we need a way to compare what the user enters into the password text box on the login form of his application to the hash that is stored in the data store. The following method will salt and hash the password entered by the user and then compare that value to what is stored in the data store for that same user (i.e., the original hashed/salted password the user created):
public static bool ComparePasswords(SecureString storedHashedPwd,
                                    SecureString storedSalt,
                                    SecureString clearTextPwd)
{
    try
    {
        // First hash the clear text pwd using the same technique
        byte[] userEnteredHashedPwd =
                 Convert.FromBase64String(GenerateHash(clearTextPwd,
                     storedSalt));

        // Get the stored hashed pwd/salt
        byte[]originalHashedPwd =
                 Convert.FromBase64String(ReadSecureString(storedHashedPwd));

        // Now compare the two hashes
        // If true, the user entered password is correct
        if (userEnteredHashedPwd.SequenceEqual(originalHashedPwd))
            return true;
    }
    catch(ArgumentException ae)
    {
        // You should log this error and return false here
        Console.WriteLine(ae.Message);
        return false;
    }

    return false;
}
When calling this method, you must retrieve the storedHashedPwd and salt arguments from the data store where they were initially stored. Originally, we had saved these values using the pseudocode in the SaveHashedPassword method. Here is another pseudocode method to retrieve those values:
public static void RetrieveHashedPasswordAndSalt(string userName,
                                                 out SecureString
                                                     storedHashedPwd,
                                                 out SecureString storedSalt)
{
    // Get from DB
    // SELECT pwd, salt FROM users WHERE user = ?
    // SetString(userName);

    storedHashedPwd = CreateSecureString(getFromResultSet("pwd"));
    storedSalt = CreateSecureString(getFromResultSet ("salt"));
}
Again, you should modify this pseudocode to handle your particular data store.
Discussion
Before getting into the details of how to use this code, let’s discuss the constant values used in this code:
const int HASH_ITERATIONS = 43;
const string HASH_ALGORITHM = "SHA-512";
const int SALT_LENGTH = 64;
First, the HASH_ITERATIONS value simply defines how many times the clear-text password/salt combination will be hashed. In this case the password/salt value is hashed, the resulting hash is again hashed, and so on, for a total of 43 times. If you require more entropy in the hash, you should increase this value; it could easily be increased to 100, 200, 500, or even 1,000. However, keep in mind that it requires processing power to create these hashes, and an attacker (presumably with a bot net) could forcibly cause many hashes to be generated, resulting in a denial of service to your application.
Note
Displaying a CAPTCHA when prompting a user to register and log in and locking a user out after several unsuccessful login attempts are measures you can use to prevent or deter denial-of-service attacks that are focused on keeping your servers busy generating hash values.
The HASH_ALGORITHM value defines the hashing algorithm to use. It is safe to use either SHA-256 or SHA-512, although SHA-512 is safer to use. Do not use easily broken hashing algorithms, such as MD5 or SHA-1, as they will significantly reduce the amount of time it takes an attacker to crack your hashes. In fact, do not use anything weaker than the SHA-256 algorithm.
Finally, the SALT_LENGTH value is the number of bytes that will make up the salt value. These bytes are generated from a cryptographically strong random-number generator. A salt length of 64 bytes was chosen here, but a smaller or larger size could also be used. We chose 64 because it’s the same size as the hashed password/salt, which forces an attacker to determine which one is the salt value and which one is the hashed value before he can use rainbow tables or reverse lookups on the hashes. If you decide to use SHA-256, then you can reduce the SALT_LENGTH to 32 bytes to be equivalent in size to the hash value.
Moving on to implementing this code in your application, there are two places where this code should be used—in the user registration and login forms on your site. First, we’ll step through the registration process:
-
The user chooses to register a username and password for this site.
-
The site asks the user to enter in a username and password, which is then passed into the
GeneratePasswordHashAndSaltmethod, producing both a unique salt value and a hashed/salted password for this user. -
The username entered by the user is verified against the data store to determine if an existing user exists.
-
If no previously entered username exists, the username, hashed/salted password, and unique salt value are stored in the data store.
Note
For this recipe, we assume the use of the System.Windows.Controls.PasswordBox control on both the registration and login forms. This control can be found in the PresentationFramework.dll. This control has a built-in property, SecurePassword, that allows us to retrieve a password already stored in a SecureString object as opposed to a normal String object.
The code will look something like this:
public bool Register()
{
    try
    {
        ...

        SecureString salt;
        SecureString pwdHash =
          GeneratePasswordHashAndSalt(myRegPasswordTextBox.SecurePassword,
              out salt);

        // Test to make sure this user is available to be registered
        if (UserDoesNotExist(myRegUserNameTextBox.Text))
        {
            SaveHashedPassword(userName, pwdHash, salt);
            return true;
        }
        else
        {
            return false;
        }
    }
    catch(Exception e)
    {
        // An error occurred, login failure!
        return false;
    }
}
The first method that we call is GeneratePasswordHashAndSalt, in order to generate a new unique salt value for this user and to salt and hash the password the user registered with.
Warning
It is important that a unique salt value is generated for each user. Using the same salt for each user is insecure, since it makes it easier for the attacker to uncover all hashed passwords. All the attacker has to do is determine the one salt value and apply it to each hash value that she generates.
The last thing we do in this method is test to make sure that this username does not already exist in the data store. If it does not exist, we continue on to store this username, the hashed/salted password, and the unique salt in the data store using the SaveHashedPassword method. Otherwise, the registration process is halted and the user must enter a different username.
This is the process when the user returns to the site and attempts to log in with her credentials:
-
The user enters her username and password.
-
The unique salt value and the originally hashed/salted password for this user is obtained from the data store.
-
The password the user entered into the site (obtained in step #1) and the unique salt value for this user (obtained in step #2) as well as the hashed/salted password (also obtained in step #2) are passed into the
ComparePasswordsmethod. -
The
ComparePasswordsmethod simply salts and hashes the user’s password using the original salt value stored for this particular user and then compares that resulting hash to the original hash stored for the user. -
If the hashes are exactly the same, the user can continue authenticating; otherwise, the user is prevented from authenticating.
The code will look something like this:
public bool Login()
{
    try
    {
        ...

        string userName = myLoginUserNameTextBox.Text;

        SecureString storedHashedPwd;
        SecureString storedSalt;
        RetrieveHashedPasswordAndSalt(userName, out storedHashedPwd,
            out storedSalt);


        if (ComparePasswords(storedHashedPwd, storedSalt,
                             myLoginPwdTextBox.SecurePassword))
        {
            // Password hashes match
            return true;
        }
        else
        {
            // Password hashes do not match, login failure!
            return false;
        }
    }
    catch(Exception e)
    {
        // An error occurred, login failure!
        return false;
    }
}
First, this code uses the username entered by the user to retrieve both the hashed/salted password and the user’s unique salt value from the data store using the RetrieveHashedPasswordAndSalt method. These two values, along with the password entered by the user in the login form, are passed into the ComparePasswords method. This method hashes and salts the password that the user entered in the login form using the same salt value returned by the RetrieveHashedPasswordAndSalt method. If the hashed/salted password that the user entered in the login form is the same as the hashed/salted password stored in the data store, then the passwords match and the authentication process is allowed to continue. Otherwise, the authentication fails.
See Also
The “System.Windows.Controls.PasswordBox Class,” “System.Security.Cryptography.RNGCryptoServiceProvider Class,” and “System.Security.SecureString Class” topics in the MSDN documentation.